Wednesday, October 16, 2019

How to Update a WordPress Theme without Losing Customization

One of the best things about WordPress is the easy customization options that you get with WordPress themes and plugins.

You can also take these customizations to the next level by adding your own code snippets and CSS styles to your WordPress theme.

The problem arises when an update becomes available for your theme. If you are not careful, then there is a high chance that you’ll lose some of those changes you made to your theme.

In this article, we will show you how to easily update a WordPress theme without losing customization. We will also cover how to properly customize your themes, so you are not affected when a new theme update is released.

Properly updating WordPress theme without losing customizations

How Theme Updates Work in WordPress?

WordPress comes with a powerful system to install updates for not just WordPress itself but for plugins and themes as well.

Your WordPress website regularly checks for updates and display them under Dashboard » Updates page.
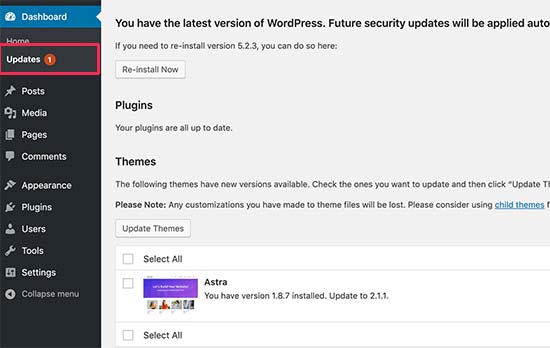
WordPress updates

When a theme update becomes available, you’ll also see a notification on the Appearance » Themes page.
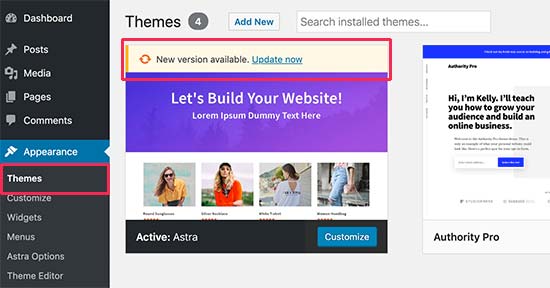
Theme updates

Updates are really important for the security and performance of your WordPress website. Aside from security and bug fixes, theme developers can also introduce new features with these updates.

You can simply click on the update button to install the new version.

WordPress will then download the theme package, unzip it, and replace the old files with the newer version.

This will overwrite all old theme files installed on your website. If you manually added custom code to your WordPress theme files, then you’ll lose those changes.

That being said, let’s take a look at which theme changes are safe and which customizations will be erased.

What Type of Theme Customizations Can You Lose During an Update?

There are multiple ways you can customize a WordPress theme. Some of these theme customizations are safe because your changes are stored in the WordPress database itself.

This includes all changes made through the built-in WordPress theme customizer which you can access by visiting Appearance » Customize page.

WordPress theme customizer

The theme customizer allows you to modify your WordPress theme and store all changes in the WordPress database. You can change the header image, colors, layout, custom CSS, and more.

Your WordPress widgets and navigation menus are also not affected by the theme updates.

Popular WordPress themes like Astra and Ocean WP now come with companion plugins. These plugins are used to add extra features to your theme. Any theme changes made using these companion plugins are also not affected by the theme update.

If you customize your WordPress layout using a WordPress page builder like Divi, Beaver Builder, Elementor, etc, then those changes will also not be impacted.

Any other features that you have added to your website using a plugin are also safe. For example, your WordPress contact forms, Google Analytics, email newsletter popups, and more.

Customizations that you’ll lose during the update

If you have added any code to your theme’s functions.php file, then it will disappear. Any CSS changes that you have added directly to your theme’s stylesheet (style.css) file will also be wiped off.

Now that we know which changes will be erased, let’s talk about how to preserve and restore them after the theme update.

Step 1. Preparing for The Theme Update

First thing you need to do is connect to your WordPress hosting account using an FTP client.

Once connected, go to the /wp-content/themes/ folder and download your theme folder to your computer.
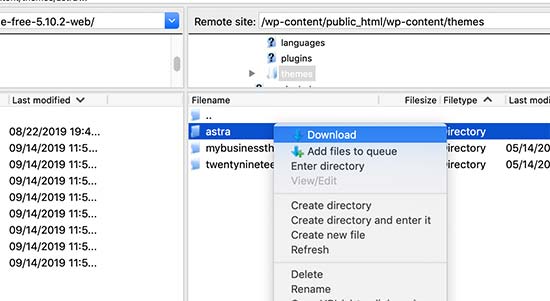
Download your WordPress theme

This folder will be the backup of your theme, and we will use it later to copy and paste customizations after updating the theme.

Step 2. Download The Updated Theme and Move Customizations

Now we want to transfer customizations we have made to the old theme files to the updated version.

Simply visit your theme’s website and download the latest version to your computer. Locate the theme’s zip file and extract it.

You should now have both, the new version and your old customized theme on your computer.

If you remember the changes you made to your theme, then simply copy and paste the code snippets from the old theme to the new version.

On the other hand, if you do not remember the changes you made, then you will have to find them first. The easiest way to do this is by comparing your theme files.

You’ll need to use a file comparison software like WinMerge (kaleidoscope for Mac, Meld for Linux).

Open both theme folders in file comparison software. It will show files side by side allowing you to quickly compares files to locate the customizations you have added to the old theme.
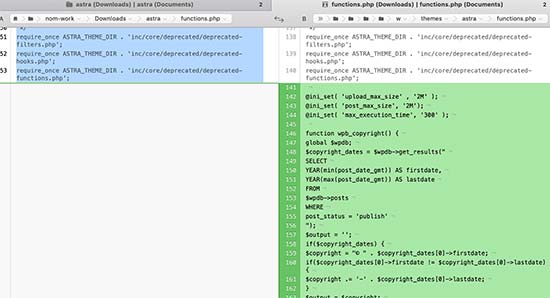
Compare theme changes

You can then copy and paste the code from the old theme file to the same file in the new theme.

Step 3. Upload the New Theme Folder

After copying your changes to the new theme, you are now ready to upload the updated version to your website.

Simply connect to your website using the FTP client and go to the /wp-content/themes/ folder. Select the new theme folder and update it to your website.
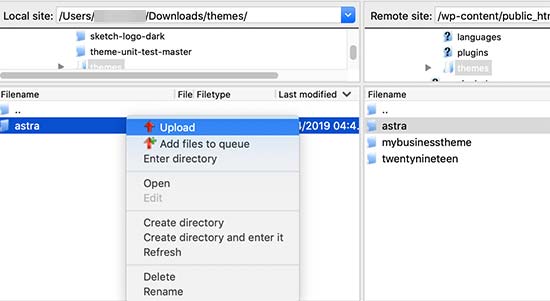
Upload updated theme

Your FTP client will warn you that the files with the same name already exist. You need to choose <strongOverwrite to make sure that your old theme files are replaced by new files.
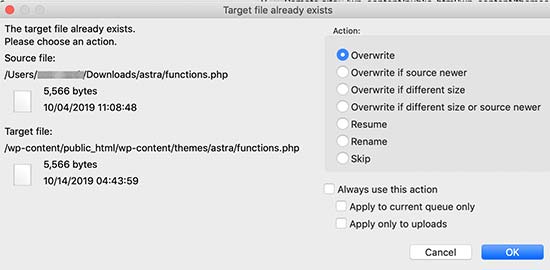
Overwrite

That’s all. You have successfully updated your WordPress theme. Visit your website to make sure that everything is working as expected.

How to Avoid Losing Changes During Theme Update

If you want to add code snippets or custom styles to your WordPress theme, then there are some best practices that you should follow.

The best solution is to create a child theme and add your custom code to child theme’s files.

However, many WordPress beginners may not feel comfortable creating a child theme. Luckily, there are easier solutions available.

For all your custom code changes, you can use the code snippets plugin.

It allows you to safely add custom code snippets without breaking your website, and your changes will not be affected by theme updates. You can even change your WordPress theme without losing those changes.

For CSS code, you can save it all under the theme customizer’s ‘Additional CSS’ tab.

Additional CSS

For more information, see our guide on how to add custom CSS in WordPress.

Alternatively, you can also use the powerful CSS Hero plugin to easily customize the styles without even writing any CSS code.

We hope this article helped you update your WordPress theme without losing customization. If you come across any issues, then check out our guide on most common WordPress errors and how to fix them.

If you liked this article, then please subscribe to our YouTube Channel for WordPress video tutorials. You can also find us on Twitter and Facebook.

The post How to Update a WordPress Theme without Losing Customization appeared first on WPBeginner.


October 16, 2019 at 05:00PM

Tuesday, October 15, 2019

21 Plugins to Efficiently Manage WordPress Multi-Author Blogs

Running a multi-author WordPress website comes with a different set of challenges compared to a a single author WordPress blog.

You’ll need to plan content, create an editorial workflow, monitor user activity, and make sure that your website is running at peak performance.

This sounds like a lot of work, but luckily there are some really helpful plugins that can make it all go smoothly.

In this article, we will show you the best plugins to efficiently manage multi-author WordPress blogs. These plugins will make your job easier and help authors on your website to be more productive.

The best plugins to manage multi-author WordPress blogs more efficiently

1. PublishPress

PublishPress

PublishPress is the best publishing tool kit for any type of content-rich websites and a must-have plugin for multi-author WordPress blogs

It allows you to create and manage an editorial calendar inside WordPress, followup progress on drafts and article ideas, manage authors, set up custom notifications, and more.

The plugin comes with companion addons which give you powerful set of tools. These addons include Capability Manager Enhanced (to customize user permissions), Revisions (to manage revisions in WordPress), and Press Permit which lets you control viewing permissions on WordPress.

This incredibly powerful plugin helps you every step of the way, from content planning to publishing, while ensuring that nothing slips through the cracks. For more details, see our guide on how to improve your editorial workflow in WordPress.

Bonus: See our guide on how to do keyword research to find blog post ideas.

2. WPForms

WPForms
WPForms is the best WordPress contact form plugin on the market. It allows you to easily build forms using a simple drag and drop form builder.

Their Pro plan also comes with user registration, custom login form, and post-submission addons. This allows you to accept posts on your website without allowing anyone accesses to your WordPress admin area,

For details, see our step by step guide on how to allow users to submit posts to your WordPress website.

3. MemberPress

MemberPress

If you want to build a website where only paid members can submit posts, then you’ll love MemberPress. It is the best WordPress membership plugin and allows you to easily sell subscriptions and memberships plans.

It allows you to easily restrict access to any content based on the user’s membership level. You can also use it with WPForms to create front-end post submission pages.

For detailed instructions, see our guide on how to easily create a membership website in WordPress.

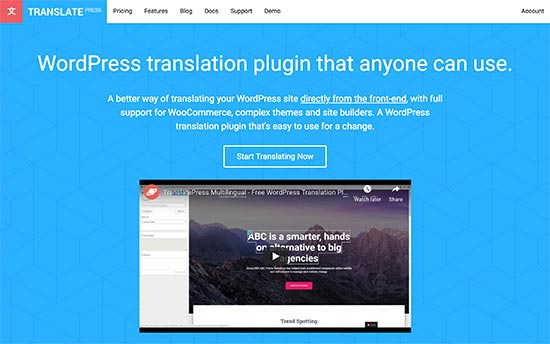
4. TranslatePress

TranslatePress

If you run a multilingual WordPress website, then TranslatePress helps you easily manage translations on your website.

It allows you and other authors on your website to easily translate content on your website with a live preview. You can also use it to translate WordPress themes and plugins as well.

For step by step details, see our tutorial on how to easily translate your WordPress website

Alternatives: WPML, Polylang

5. Sucuri

Sucuri

Sucuri is the best WordPress security plugin to protect your website against unauthorized access, brute force attacks, and hacking.

As a multi-author WordPress site, more people have access to the admin area of your WordPress website. While making sure that your authors can write posts, you would also want to make sure that your admin area is safe and secure.

Sucuri performs regular security checkups and acts as a website firewall. This allows malicious attacks to be blocked even before they reach your website.

6. Pre-Publish Checklist

Pre-Publish Checklist

As the administrator of a multi-author WordPress website, you would want to ensure that all authors follow the editorial process you have set up for your website.

Pre-Publish Checklist helps you add a checklist to the post editor, which allows authors to check everything on the list before publishing or submitting it for review.

7. Simple Local Avatars

Simple Local Avatars

WordPress uses Gravatar to display user avatars in comments and in user profiles. However, some of your users may not have gravatar setup for their email address, or they may simply want to use some other picture on their author profile.

Simple Local Avatars plugin allows users on your WordPress site to upload their own author photo by editing their profile.

8. MonsterInsights

MonsterInsights

MonsterInsights is the best Google Analytics plugin for WordPress. It allows you to easily install Google Analytics in WordPress.

It also shows where your users are coming from, what content is doing well, what users do when viewing your website, and more. This data provides you insights to make an effective content strategy for your website.

Bonus: See the top marketing metrics you must track on all WordPress sites.

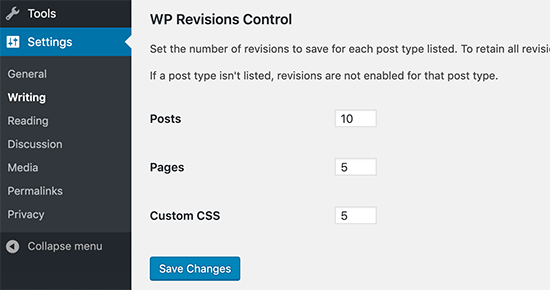
9. WP Revisions Control

WP Revisions Control

WordPress automatically saves drafts as revisions. This helps you easily undo changes and revert back to an earlier draft of your article. However, if you run a large multi-author WordPress site then these revisions add up to your WordPress database size.

WP Revisions Control helps you set a number of revisions that WordPress should keep. After that number, WordPress will automatically delete the oldest revision. You can also delete all revisions for a specific post if you want.

To learn more, see our beginner’s guide to WordPress post revisions with step by step instructions on how to use revisions on your blog.

10. Author Avatars List

Author Avatars List

An easy way to attract more authors to write for your website is by showcasing authors prominently on your website. One way to do this is by displaying a list of blog authors.

Author Avatars List plugin allows you to easily add a blog authors list anywhere on your site. It comes with a sidebar widget and you can also use the shortcode to easily add it to a post or page.

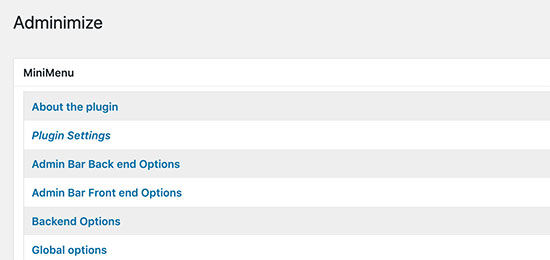
11. Adminimize

Adminimize

Adminimize gives admins full control over what users can or cannot see inside the WordPress admin area. Admins of a multi-author blog can use it to disable user access to unnecessary sections.

This enables them to provide a lean and distraction-free writing space for the authors. For more details, see our tutorial on how to hide unnecessary items from WordPress admin.

12. User Notes

User Notes

User notes allow you to leave notes on user profiles. These notes can only be seen by admins and can be very helpful and may serve as a reminder tool.

For example, if an author is not following the deadlines you can add a note to remind yourself that this particular author is a bit careless with the deadlines.

13. Simple Author Box

Simple Author Box

By default, most modern WordPress themes can display an author’s profile pic along with their bio below the article. However, some are not very good at it or you way want to get a bit more control over author bio box.

Simple Author Box helps you easily add an author bio box below articles. You can customize it to match your theme colors, configure what you want to show, and add social sharing buttons with it.

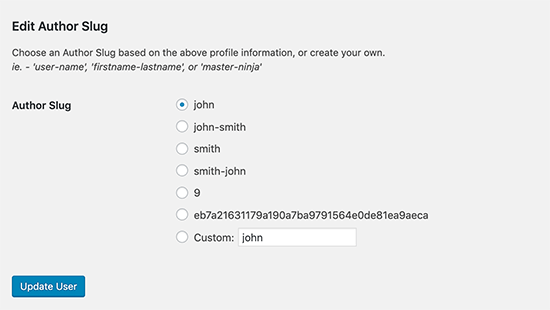
14. Edit Author Slug

Edit Author Slug

WordPress comes with SEO friendly URL structure which allows you to choose URL slugs for your posts and pages. However, there is no option to do so for an author page.

Edit Author Slug plugin allows you to do that. You can simply edit a user profile and change the author URL slug. It also allows you to change the author base.

For more information, see our detailed tutorial on how to change author URL slug and base in WordPress.

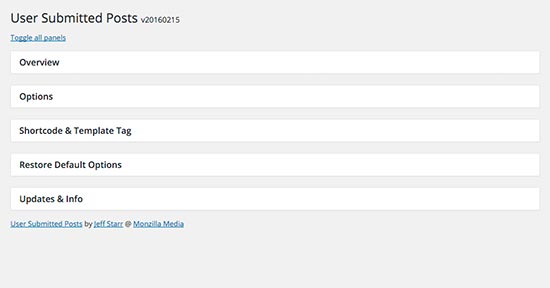
15. User Submitted Posts

User Submitted Posts

User Submitted Posts plugin does just what it says, it allows users to submit posts to your website without login or creating an account. This allows you to manage user-submitted content without managing user accounts or giving users access to admin area.

For details, see our guide on how to allow users to submit posts to your WordPress site.

16. Theme My Login

Theme My Login

Theme My Login allows you to create custom WordPress login page for your website. You can also create a front-end registration and profile editing page.

Basically, users will be able to login without having access to the admin area of your website. Theme My Login can be used with other plugins to create a front-end editing experience for your authors.

17. Two Factor

Two-Factor

Two Factor plugin allows you to easily add Two Factor authentication to your website. This adds an extra step to your WordPress login screen and making it difficult for hackers to gain access to your website.

You can generate a one-time password using an app like LastPass Authenticator to finish the login process. For details, see our guide on how to add two-factor authentication in WordPress.

18. WP Security Audit Log

WP Security Audit Log

WP Security Audit Log helps you keep a log of all things happening on your website. This allows you to see when each user logged in, what they did, and all other website activties.

This helps you find an imposter, catch mistakes, block hacking attempts, and more. For details, see our guide on how to how to monitor user activity on your WordPress site.

19. WP Email Users

WP Email Users

WP Email Users plugin allows you to quickly send an email to all authors and registered users on your website. This comes in handy if you want to communicate important announcements, notifications, and site related updates.

You’ll need WP Mail SMTP plugin and a proper SMTP service provider to ensure that your emails reach user’s inbox.

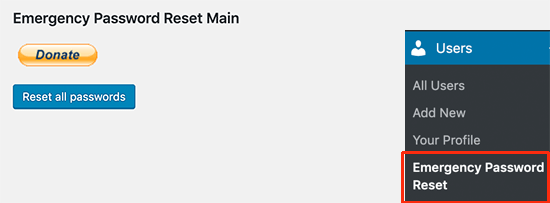
20. Emergency Password Reset

Emergency Password Reset

If you are worried that the security of your WordPress site is compromised, then you need to immediately change all WordPress passwords. Now if you run a multi-author WordPress website, then you need to make sure that all user passwords are changed as well.

Emergency Password Reset plugin allows you to reset all user passwords in WordPress with a single click. It also sends an email to all your users with a link to set new passwords.

For details, see our guide on how to reset passwords for all users in WordPress.

21. User Blocker

User Blocker

User Blocker plugin allows you to easily block an author on your WordPress website without changing their author information or deleting their account.

This helps you make sure that content on your website is not affected while making sure that unwanted users can no longer access the WordPress admin area.

For more information, see our step by step guide on how to block a WordPress user without deleting their account.

That’s all for now.

We hope this article helped you find useful plugins to manage your multi-author WordPress blogs. You may also want to see our proven tips to quickly increase your blog traffic and our ultimate guide on how to speed up your WordPress site.

If you liked this article, then please subscribe to our YouTube Channel for WordPress video tutorials. You can also find us on Twitter and Facebook.

The post 21 Plugins to Efficiently Manage WordPress Multi-Author Blogs appeared first on WPBeginner.


October 15, 2019 at 04:00PM
Monday, October 14, 2019

How to “Easily” Add Anchor Links in WordPress (Step by Step)

We occasionally use anchor links in our longer WordPress posts to help users quickly jump to the section they want to read.

Anchor links are often used in the table of content sections because they help users move up and down a lengthier article without reloading the page. It can also help with SEO as Google may show them below your search listings for easy navigation (more on this later).

In this step by step guide, we will explain what are anchor links and show you how to easily add anchor links in WordPress.

Adding anchor links in WordPress

Ready? Let’s start with a live example of anchor links.

Below is a list of all the topics we will cover in this guide. Go ahead and click on any of these links, and you’ll be taken to that specific section.

An anchor link is a type of link on the page that brings you to a specific place on that same page. It allows users to jump to the section they’re most interested in.

Take a look at the animated screenshot below:

Anchor link preview

As you can see, clicking on the anchor link takes the user to the specific section on the same page.

Anchor links are commonly used in lengthier articles as the table of content which allows users to quickly jump to the sections they want to read.

Why and when you should use anchor links?

An average user spends less than a few seconds before deciding if they want to stay or leave your website. You have just those few seconds to convince users to stay.

The best way to do that is to help them quickly see the information they’re looking for.

Anchor links make this easier by allowing users to skip the rest of the content and jump directly to the part that interests them. This improves user experience and helps you win new customers / readers.

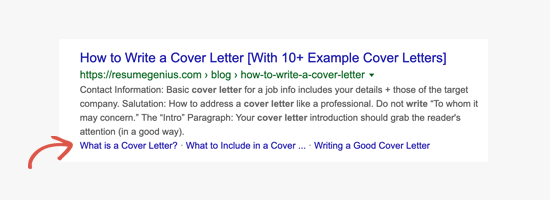
Anchor links are also great for WordPress SEO. Google can display an anchor link in the search results as a “jump to link”.

Jump to link in search results

Sometimes Google can also display several links from that page as jump to links, and this is proven to increase the click-through rate in search results. In other words, you get more traffic to your website.

Multiple jump to links below a search result

Having said that, let’s take a look at how to easily add anchor links in WordPress.

If you just want to add a few anchor links in your article, then you can easily do so manually.

Basically you need to add two things for an anchor text to work as intended.

  1. Create an anchor link with a # sign before the anchor text.
  2. Add the id attribute to the text where you want the user to be taken.

Let’s start with the anchor link part.

Step 1. Creating an anchor link

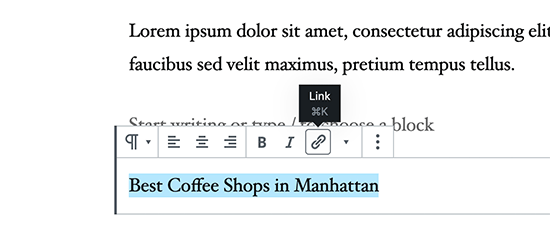
First you need to select the text that you want to link and then click on the insert link button in the WordPress Gutenberg editor.

Add a link in WordPress

This will bring up the insert link popup where you usually add the URL or look for a post or page to link.

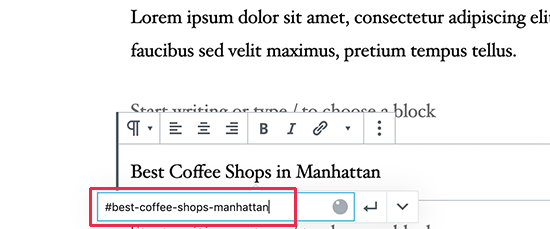
However, for an anchor link, you’ll simply use # as prefix and enter the keywords for the section you want the user to jump to.

Creating anchor link

After that click on the enter button to create the link.

Some helpful tips on choosing what text to use as your anchor # link:

  • Use the keywords related to the section you are linking to.
  • Don’t make your anchor link unnecessarily long or complex.
  • Use hyphens to separate words and make them more readable.
  • You can use capitalization in anchor text to make it more readable. For example: #Best-Coffee-Shops-Manhattan.

Once you add the link, you will be able to see the link you have created in the editor. However, clicking on the link doesn’t do anything.

That’s because the browsers cannot find the anchor link as an ID.

Let’s fix that by pointing browsers to the area, section, or text that you want to show when users click on the anchor link.

Step 2. Add the ID attribute to the linked section

In the content editor, scroll down to the section that you want the user to navigate to when they click on the anchor link. Usually, it is a heading for a new section.

Next, click to select the block and then in the block settings click on the Advanced tab to expand it. You can simply click on the ‘Advanced’ tab under the heading block settings.

HTML Anchor

After that, you need to add the same text that you added as the anchor link under the ‘HTML Anchor’ field. Make sure that you add the text without the # prefix.

You can now save your post and see your anchor link in action by clicking on the preview tab.

What if the section you want to show is not a heading but just a regular paragraph or any other block?

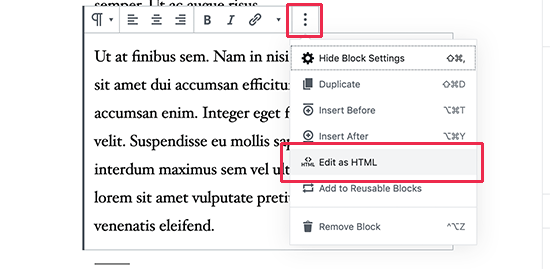
In that case, you need to click on the three-dot menu on the block settings and select ‘Edit as HTML’.

Edit as HTML

This will allow you to edit the HTML code for that particular block. You need to select find the HTML tag for the element you want to point to. For example, <p> if it is a pagraph, or <table> if it is a table block, and so on.

Now, you need to add your anchor as the ID attribute to that tag, like the following code:

<p id="best-coffee-shops-manhattan">

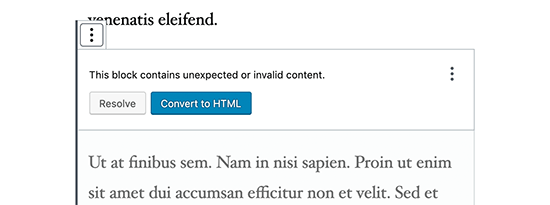
You will now see a notice that this block contains unexpected or invalid content. You need to click on the convert to HTML to preserve the changes you made.

Convert to HTML

How to Manually Add Anchor Link in Classic Editor

If you are still using the older classic editor for WordPress, then here is how you can add the anchor link.

Step 1. Create the anchor link

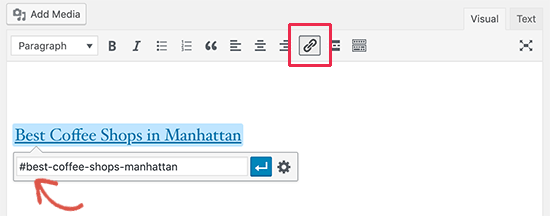
First, select the text that you want to change into the anchor link and then click on the ‘Insert Link’ button.

Adding an anchor link in Classic Editor

After that, you need to add your anchor link with a # sign prefix followed by the slug you want to use for the link.

Step 2. Add the ID attribute to the linked section

The next step is to point the browsers to the section you want to show when users click on your anchor link.

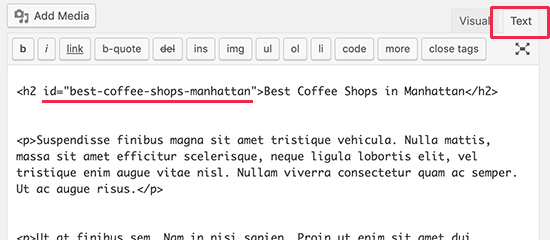
For that, you’ll need to switch to the ‘Text’ mode in the classic editor. After that scroll down to the section that you want to show.

Adding anchor ID in Classic Editor

Now locate the HTML tag you want to target. For example, <h2>, <h3>, <p>, and so on.

You need to add the ID attribute to it with your anchor link’s slug without the # prefix, like this:

<h2 id="best-coffee-shops-manhattan">

You can now save your changes and click on the preview button to see your anchor link in action.

How to Manually Add Anchor Links in HTML

If you are used to writing in the Text mode of the old Classic Editor in WordPress, then here is how you would manually create an anchor link in HTML.

First, you need to create the anchor link with a # prefix using the usual <a href=""> tag, like this:

<a href="#best-coffee-shops-manhattan">Best Coffee Shops in Manhattan</a>

Next, you need to scroll down to the section that you want to show when users click on the link.

Usually, this section is a heading (h2, h3, h4, etc.), but it could be any other HTML element or even a simple paragraph <p> tag.

You need to add the ID attribute to the HTML tag, and then add the anchor link slug without the # prefix.

<h2 id="best-coffee-shops-manhattan">Best Coffee Shops in Manhattan</h4>

You can now save your changes and preview your website to test the anchor link.

This method is suitable for users who regularly publish long-form articles and need to create table of contents with anchor links.

The first thing you need to do is install and activate the Easy Table of Contents plugin. For more details, see our step by step guide on how to install a WordPress plugin.

This plugin allows you to automatically generate a table of contents with anchor links. It uses headings to guess the content sections, and you can customize it fully to meet your needs.

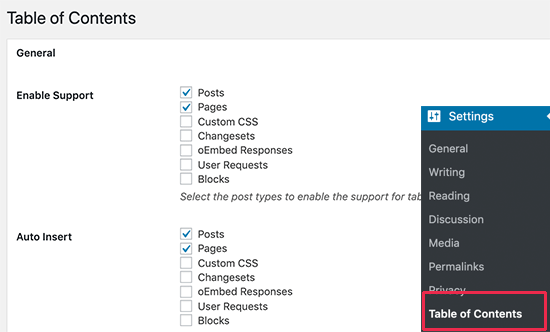
Upon activation, simply go to Settings » Table of Contents page to configure plugin settings.

Easy Table of Contents plugin settings

First, you need to enable it for the post types where you want to add table of contents. By default, the plugin is enabled for pages, but you can also enable it for your posts as well.

You can also enable the auto-insert option. This allows the plugin to automatically generate the table of contents for all articles, including the older articles that match the criteria.

If you only want to automatically generate table of contents for specific articles, then you can leave this option unchecked.

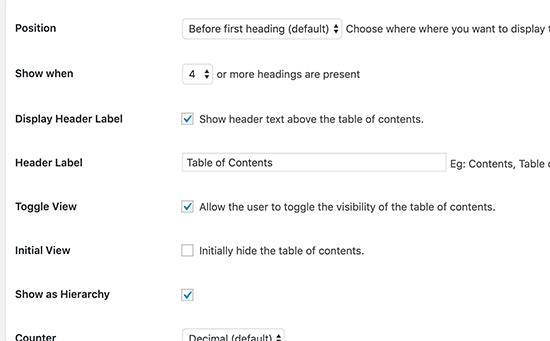
Next, scroll down a little to select where you want to display the table of contents and when you want it to be triggered.

Select where and when to display table of contents

You can review other advanced settings on the page and change them as needed.

Don’t forget to click on the ‘Save Changes’ button to store your settings.

If you enabled the auto-insert option, then you can now view an existing article with the specified number of headings.

You’ll notice that the plugin will automatically display a table of contents before the first heading in the article.

If you wanted to manually generate table of contents for specific articles, then you need to edit the article where you want to display a table of contents with anchor links.

On the post edit screen, scroll down to the ‘Table of Contents’ tab below the editor.

Manually add table of contents with anchor links

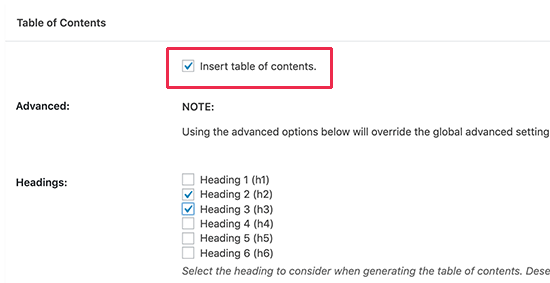
From here, you can check the ‘Insert table of contents’ option and select the headings you want to include as anchor links.

You can now save your changes and preview your article. The plugin will automatically display a list of anchor links as your table of contents.

Table of contents preview

For more detailed instructions, see our article on how to add table of contents in WordPress.

We hope this article helped you learn how to easily add anchor links in WordPress. You may also want to see our tips on how to properly optimize your blog posts for SEO and our pick of the best WordPress page builder plugins.

If you liked this article, then please subscribe to our YouTube Channel for WordPress video tutorials. You can also find us on Twitter and Facebook.

The post How to “Easily” Add Anchor Links in WordPress (Step by Step) appeared first on WPBeginner.


October 14, 2019 at 05:34PM

Friday, October 11, 2019

7 Best Places to Find Premium Domain Name for Sale (+ Expert Tips)

We have been often asked by many readers about the best places to find premium domain names for sale.

There are many domain name registrars on the market, each one of them try to sell you the best domain names.

However not all of them offer you the best tools to find the perfect domain name. Some even try their best to sell you lesser-known domain extensions at cheaper rates.

This makes it difficult for beginners to do their domain name research and find a brandable name for their business or blog.

In this article, we will share the best places to find domain name for sale including new, expired, and premium domain names. We’ll also share expert tips on how to do due diligence when buying a premium domain name.

What are the best places to find domain name for sale

Domain Name Registrars

The first place to start your domain search is through a domain name registrar. These are the companies allowed by ICANN to sell domain names to the general public.

However, not all domain registrars are the same.

Some try to aggressively upsell other services that you may not need. Others try to lock you in by making it difficult to transfer your domain name.

Below our providers that we use and recommend.

1. Domain.com

Domain.com

Domain.com is the best domain name registrar on the market. It has a fast and simple domain search tool which helps you easily find a domain name available for sale.

They offer all top-level domain names, at very competitive pricing for newer domain names.

If you are looking for domain names on sale, then simply click on the premium domains tab to find unique, brandable, and shorter domain names.

Premium domain search

Premium domain names are typically more expensive, but you get a better selection to choose from.

Domain.com makes it easier to manage your domains using a simpler domain management area. From there, you can point your domain name to any hosting company and start making a website.

Finding Premium Domain Names on Domain Marketplaces

Domain names are a lucrative business. You can think of it as real estate for the internet.

Thousands of people trade domain names every day which means that at any given time there are premium domain names on sale from domain investors.

You can find these domain names on domain marketplaces. This is where users can list their domain names for sale, allowing others to search, make an offer, or directly purchase the name at a premium price.

2. Sedo

Sedo

Sedo is one of the biggest domain marketplaces in the world. They provide a reliable and secure platform for domain owners to list their domain names for sale.

You will find a lot of premium domain names for sale there. Some of them have been used in the past, but most of them are never used to build a website.

Sedo is also an excellent platform to do your domain name research. You can find interesting ideas matching your keywords, which you can then use to find similar domain names at a regular price.

3. Flippa

Flippa

Flippa is the world’s leading platform to sell online businesses, websites, and domain names. It is a marketplace where sellers list their domain names for sale. Most of them are premium domain names listed for auction or direct purchase.

You can watch domain names, follow auctions, or enter the auction by bidding on domain names.

If your bid is accepted, then you can follow the payment guidelines. Usually, sellers use Flippa’s escrow service for secure payments and transfer of registration to the buyer.

4. GoDaddy

GoDaddy

GoDaddy is the largest domain name registrar in the world. They manage millions of domain names for a very large number of customers around the world.

They offer domain research tools, domain name generator, domain broker service, and more. They also have their own premium domain marketplace with auctions.

However being a large business, they offer tons of other services and upsells which can be a bit overwhelming for beginners.

Many GoDaddy alternatives offer more focused, cheaper, and better services to compete which ultimately benefits the customers.

Finding Domain Names for Sale on Forums

There are thousands of online communities and forums where website owners can discuss online business ideas, marketing techniques, and building websites.

Some of these online communities focus solely on trading domain names, while others have dedicated sub-forums for the topic. Here are some of the online forums you can use to find domain names available for sale including expired domain names or soon to be expiring domain names.

5. NamePros

NamePros

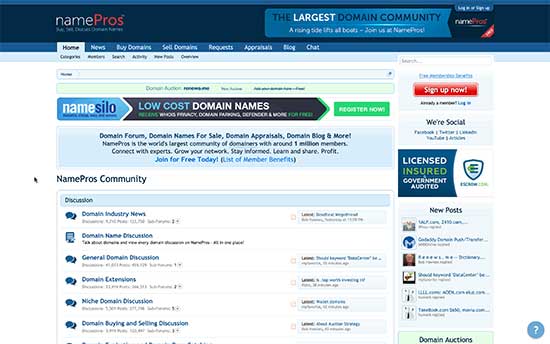
NamePros is one of the leading online communities to buy and sell domain names. It is also a great place to learn about building online businesses, investing in domain names, and finding unique domain name ideas.

They have a dedicated domain marketplace section, where sellers can list their domain names on sale. Domains are listed as auctions, buy now, bargains, and make an offer.

6. DNForum

DNForum

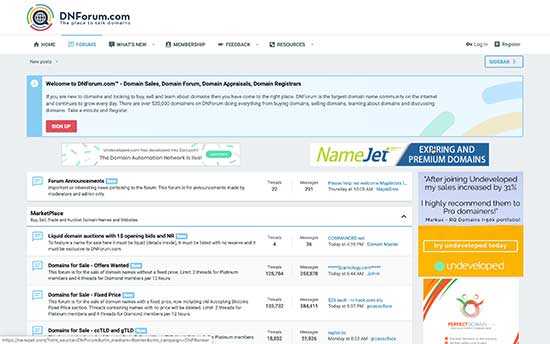
DNForum is another popular online community to find unique domain names. The forum is used by both sellers and buyers to trade domains, run auctions, make offers, or request help from domain name brokers to find you a unique idea.

Get a Free Domain Name via Hosting

If you just want to register a new domain name for your business, then the easiest way to get a free domain name is by signing up for a website hosting account. This way you can save money on domain name registration and quickly make a website right away.

7. Bluehost

Bluehost

Bluehost is one of the largest hosting companies in the world and officially recommended hosting provider by WordPress and WooCommerce.

They have agreed to offer WPBeginner users a free domain name + SSL certificate and a generous discount on hosting. You can get started for just $2.75 per month.

→ Click Here to Claim This Exclusive Bluehost Deal ←

How to Find a Great Domain Name for Sale

There are so many places where you can find domain names available for sale. However, it is a highly competitive business and if you are not careful, then you could end up paying a lot more for a domain name.

First, we recommend you to find a unique domain name idea by yourself. Use the domain availability checker tool on Domain.com to see if your desired name is available for registration.

This way, you would be able to find a domain name on a regular price which could be between $10-14.99 per year.

See our guide on how to find a domain name for some tips on coming up with catchy ideas for your domain.

Finding a Premium Domain Name for Sale

Finding a domain name can be hard. You may feel that all good domain name ideas are already taken.

However, if you are willing to invest in buying a shorter, more brandable, and clever domain name, then domain marketplaces can be a good resource.

This helps you narrow down your search and get a domain name that is not available for registration.

We recommend using platforms like Sedo and Flippa to find unique premium domain names on sale. These platforms offer better tools for secure transfer of domain ownership, better tools to asses seller’s reputation, and are trusted by legit businesses all over the world.

How to do Due Diligence When Buying a Premium Domain on Sale

After you have found a unique domain name that you want to buy, it is time to do some due diligence before moving forward.

Domain names that have already been used could be blacklisted, marked for spam, or have a bad reputation. Buying such a domain name could affect your business.

Luckily there are tools that you can use to do your homework before making the purchase.

First, you would want to make sure that the domain name is not a registered trademark of an existing business.

According to ICANN rules, if a domain name violates a company’s registered trademark, then that company can claim the domain name or ask you to take it down.

You can check the United States Patent and Trademark Office’s database to do a quick trademark search for your domain name to see it is already registered by a business.

Next, you would want to see if a domain name has been previously used to make a website. An easy way to do this is by using the Wayback Machine. This massive archive crawls the internet and takes snapshots of websites.

Wayback Machine

You would also want to search a domain name’s historical records using the Whois tools. This allows you to see when a domain name was created, last renewed, DNS changes, and historical data.

Who.is

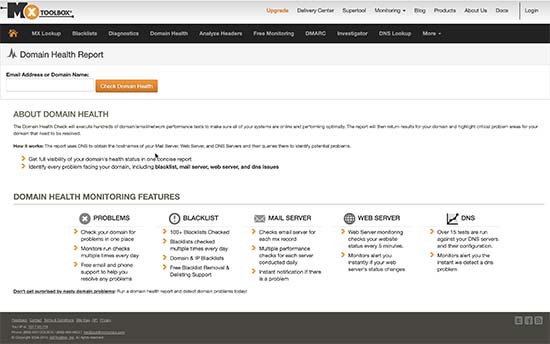
Lastly, you would want to check if a domain name has been misused to send spam email, spread malware, or other malicious activities. You can perform a quick domain health check test to see if it raises any red flags.

Domain health check

We hope this article helped you find the best places to find domain name for sale. You may also want to see our pick of the best business phone services and the best email marketing services that you can use to grow your business.

If you liked this article, then please subscribe to our YouTube Channel for WordPress video tutorials. You can also find us on Twitter and Facebook.

The post 7 Best Places to Find Premium Domain Name for Sale (+ Expert Tips) appeared first on WPBeginner.


October 11, 2019 at 05:43PM