Tuesday, November 12, 2019

What’s New in WordPress 5.3 (Features and Screenshots)

WordPress 5.3 was released just a few hours ago. It will be the last major WordPress release of 2019.

This release is packed with some new features and lots of improvements including a brand new default theme.

In this article, we will show you what’s new in WordPress 5.3 and which features you should try after updating your websites.

What's new in WordPress 5.3

WordPress 5.3 is a major release, and unless you are on a managed WordPress hosting service, you’ll have to manually initiate the update.

Important: Don’t forget to create a complete WordPress backup before starting the update.

A Design and User Interface Upgrade

WordPress 5.3 comes with several changes in the overall appearance of the WordPress user interface. These changes are not highly noticeable, but they bring coherency to the overall appearance of the admin area.
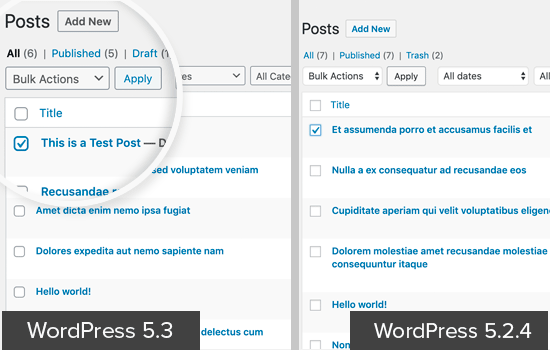
Form fields in WordPress 5.3 UI

The new user interface adds borders around form fields to make them more noticeable. It also improves the accessibility of the WordPress admin area to make it a good experience for all users.

Twenty Twenty The New Default WordPress Theme

WordPress traditionally releases a new default theme each year which is usually named after the year. WordPress 5.3 now ships with Twenty Twenty as the new default WordPress theme.
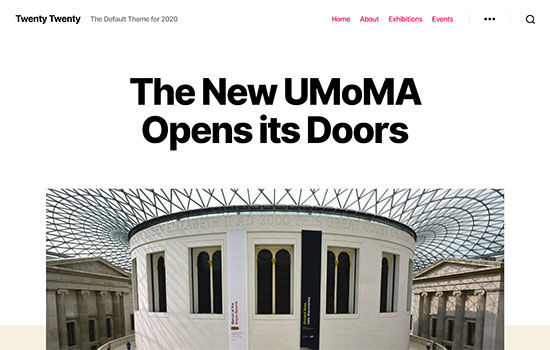
Twenty Twenty the new default theme in WordPress 5.3

This new theme is designed to take full advantage of the WordPress block editor. It allows you to easily create beautiful content layouts for your articles and pages.

Twenty Twenty uses the Inter typeface (font), which looks great for headlines. It also looks great on smaller screens and provides a better reading experience across devices.

It is a single column WordPress theme which means there is no sidebar for your blog posts or pages. It does have a widget ready area at the bottom.

You can also use the cover or the fullwidth template with your posts and pages. The full-width template works really well not just with block editor but also with other page builder plugins.

Overall, this is a beautiful theme suitable for both business websites as well as personal blogs.

New Features in The WordPress Block Editor

In 2018, WordPress released a new editor interface code-named ‘Gutenberg’. This new WordPress content editor, completely changed the writing interface in WordPress.

Subsequent WordPress releases has continued to improve upon it, and WordPress 5.3 will come with tons of enhancements to the block editor.

Here are a few block editor changes in WordPress 5.3 that you’d find useful.

The Group Block

The group block allows you to group blocks together. This handy block helps you organize your layout by dividing it into different groups.
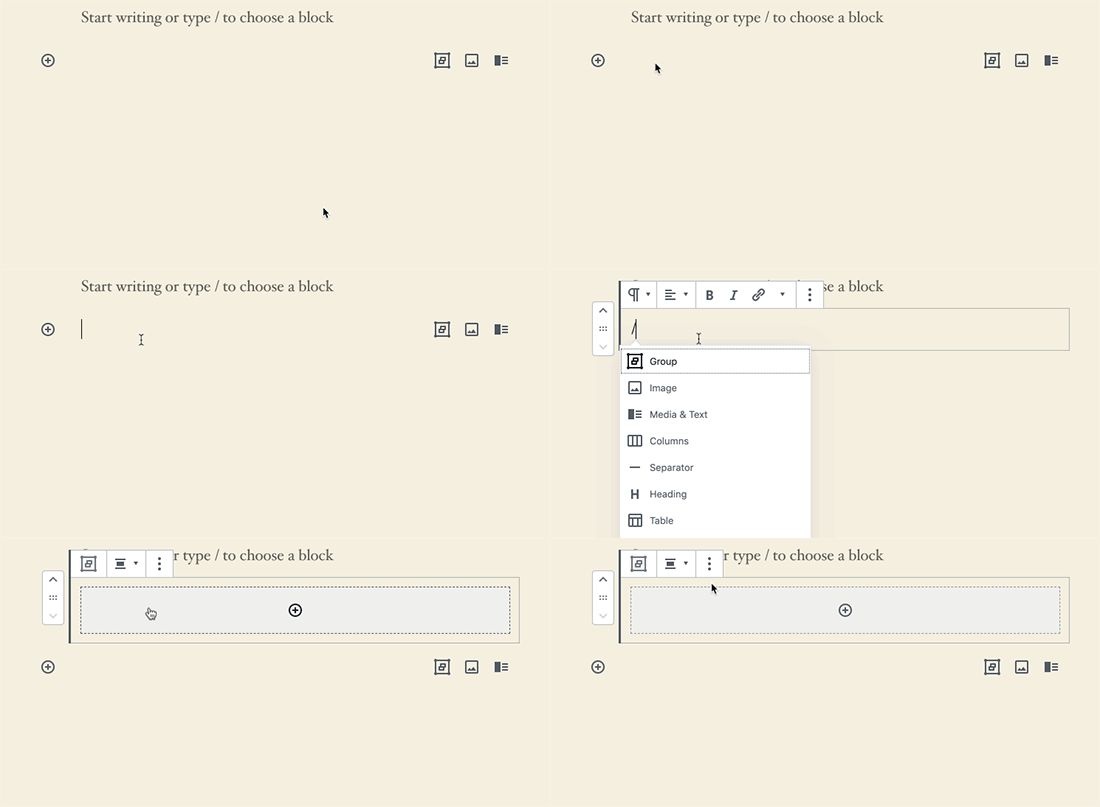
Adding group block in WordPress 5.3

You can set the group width to be wide or full-width, and choose a background color for the group container.

You can add new blocks into a blank group or select multiple blocks, and add them to the group. This allows you to interact with these blocks together. For example, you can put different blocks into one group, and then save it as a reusable block.

The Columns Block

Columns provide another way to create interesting layouts in the WordPress editor. WordPress 5.3 comes with some major changes to the columns block.

First, you can set a layout for columns and adjust their width.
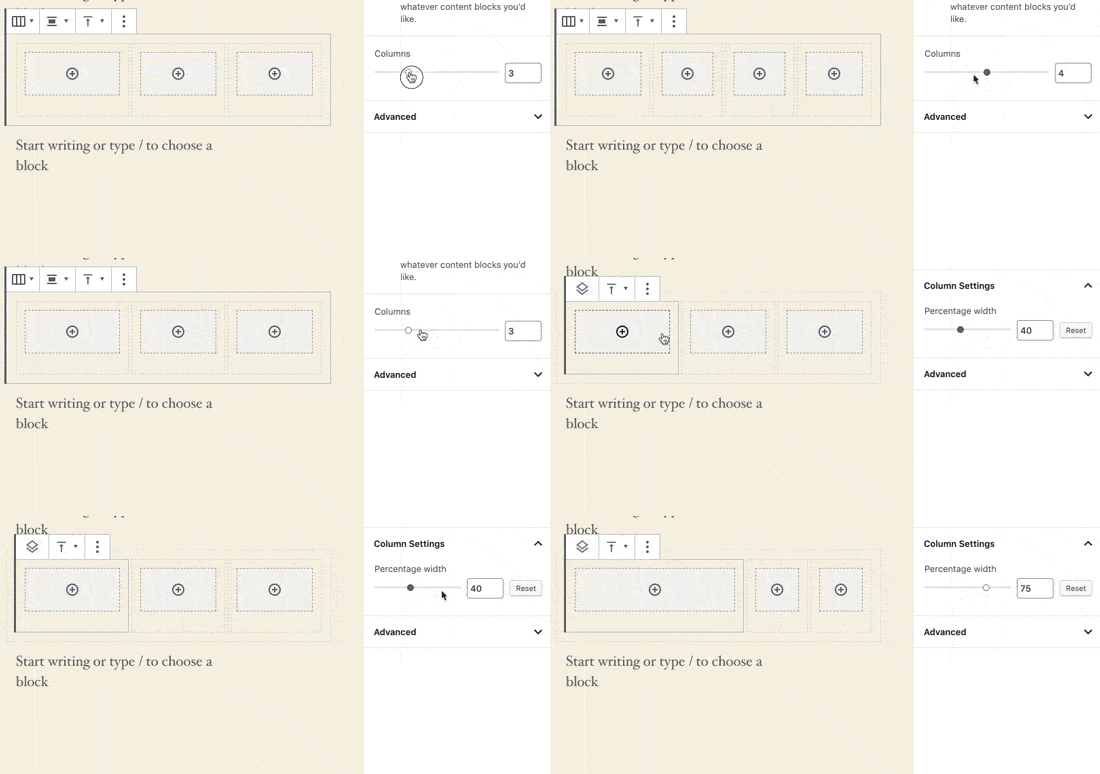
Adjusting columns width

Secondly, you can set an individual column to be wider, and the rest of the columns will automatically adjust.

The placeholder to add blocks inside a column is now clearly visible making it easier to use.

You can also set vertical alignment for columns. This means you no longer need to add spaces for proper alignment of content in each column.
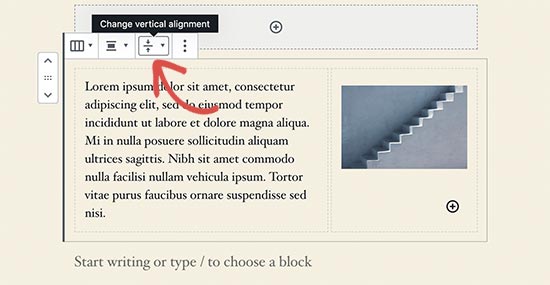
Vertical alignment

Improved Button Block

WordPress 5.3 makes it easier to add button in posts or pages with an improved button block which will allow you to select border-radius yourself.
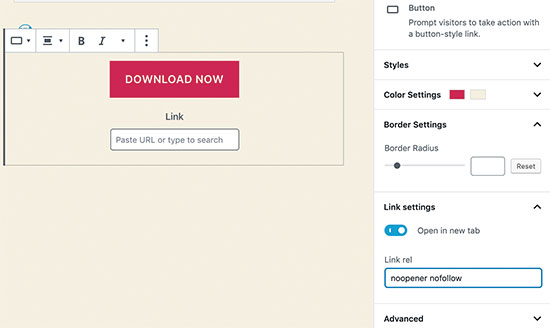
New button block

You can also open button links in a new window and make it nofollow if needed.

Block Previews

The block editor in WordPress 5.3 shows a block preview. However, the preview is only available when you are using the Add new block icon on the top.
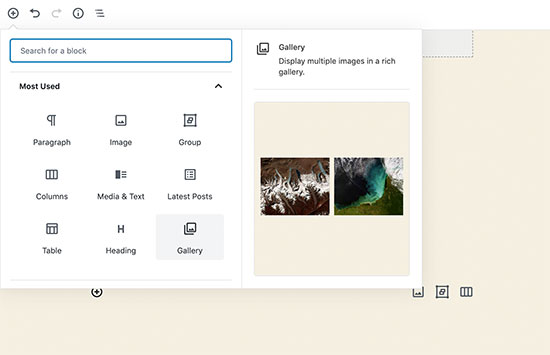
Block preview in WordPress 5.3

Heading Colors

WordPress 5.3, now lets you choose a color for sub-headings inside your articles.
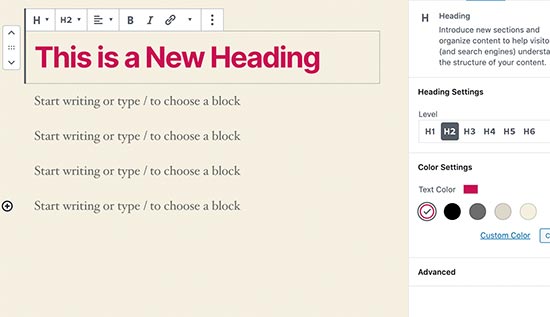
Change heading colors

Reorder Gallery Images

The new and improved gallery block in WordPress 5.3 allows you to reorder images inside the gallery.

Reorder gallery images

Image Block Styles

Image block now lets you choose a style for your images. Currently, it ships with two styles: Default and Circle mask.
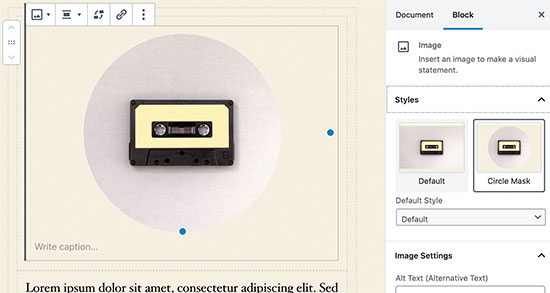
Image block settings in WordPress 5.3

Improved Table Block

Table block in WordPress 5.3 has some much-needed improvements. You can now select styles and add stripes to table rows. You can also add header and footer rows.
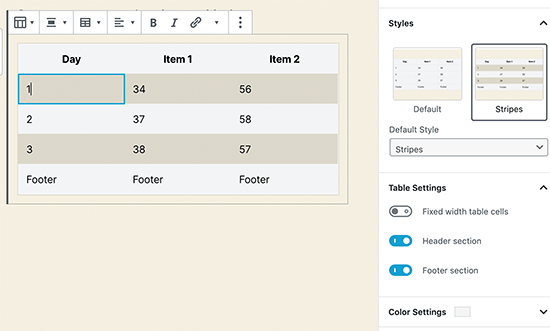
Table block

Improved Latest Posts

Previously, the latest posts block only added a list of links to recent posts. WordPress 5.3 allows to add the latest posts with excerpts and display them in a grid layout.
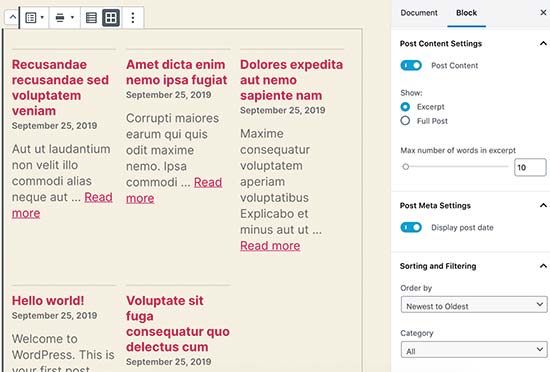
Latest Posts in WordPress 5.3

It does not show featured images for the latest posts. For an alternative method, see our guide on how to show recent posts with thumbnails.

The Block Editor is Now Even Faster

The WordPress editor relies heavily on PHP and JavaScript. While PHP only runs on your WordPress hosting server, JavaScript runs on your user’s browser.

A big task for the WordPress core team is to keep the editor interface smooth and responsive no matter how many blocks and content you add.

In WordPress 5.3, the block editor team has shaved off 1.5 seconds of loading time while testing with 1000 blocks and 36,000 words long post.

Improved Image Uploads in WordPress 5.3

Previously when you uploaded large images from your phone or camera, there was always a chance that your server would time out before the upload could finish.

WordPress 5.3 has addressed this issue. It will now automatically save the image creation process and allow you to resume uploads without breaking anything.

WordPress also fixed the image rotation issue using the EXIF metadata which is something added by your camera or phone to the original image.

You can now use very large image sizes in WordPress posts and pages.

Improved Site Health Reports in WordPress 5.3

WordPress introduced a site health score feature with WordPress 5.1. This helped website owners improve WordPress speed and performance and address common WordPress security issues.

It showed a site health score in percentages, which was a bit arbitrary and confusing to beginners. WordPress 5.3 has replaced it with a status message like ‘Should be improved’ and ‘Good’.
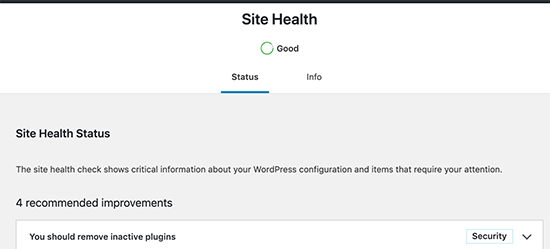
Site Health score in WordPress 5.3

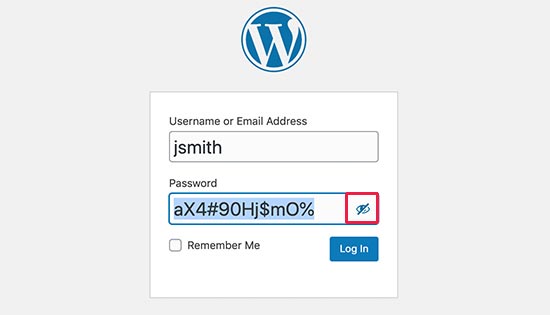
Show Password Button on Login Screen

WordPress 5.3 adds a show password button on the WordPress login screen. This is a really handy tool and makes it easier to type complex passwords, or see that you have entered a password correctly.
WordPress Admin Email Address Verification

Previously, WordPress allowed you to simply change the admin email address from Settings » General page.

This address is very important as WordPress sends password reset and other notification emails to the address.

WordPress 5.3, now makes it mandatory to verify the new email address to ensure that you don’t miss those future emails.
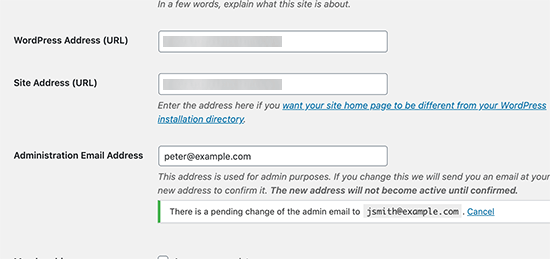
Verify site admin email address

Note: Please make sure that you’re using a WordPress SMTP plugin, so your WordPress site emails actually make it to your inbox. See our guide on how to fix WordPress not sending email issue.

Under The Hood Changes

WordPress 5.3 brings ton of features and improvements targeted towards developers. The following are some of the most significant under the hood changes.

WordPress 5.3 offers a better way to discourage search engines from indexing a website when you check the option ‘Discourage search engines from indexing this website’ option. (#43590)

Improved compatability with PHP 7.4. (#47441, #47704, #47746, #47783)

Better handling of date and timezone functionality, which will allow developers to use them more efficiently in their projects. (See details)

On a WordPress multisite network, developers can filter sites by status. (#37392, #37684)

Multisite will now store database version as meta (#41685)

We hope this guide helped you explore what’s new in WordPress 5.3. We are particularly excited about the block editor improvements in this release.

If you liked this article, then please subscribe to our YouTube Channel for WordPress video tutorials. You can also find us on Twitter and Facebook.

The post What’s New in WordPress 5.3 (Features and Screenshots) appeared first on WPBeginner.


November 13, 2019 at 03:51AM
7 Ways to Get a 800 Toll-Free Number for Your Business in 2019

Do you want to get a 800 toll-free number for your business?

Toll-free numbers help new and existing customers reach out to your business directly. Many customers also prefer to call a business phone number instead of writing an email.

A toll-free number encourages them to do so because they’re free for the caller. It also helps you win new customers and build lasting relationships with your existing customers.

In the past, toll-free numbers were used by large businesses only. But now they’re extremely affordable, so even small business owners can get a 800 toll-free number for their business.

In this guide, we’ll share 7 ways to easily get an 800 toll-free number for your business. You wouldn’t need to install expensive phone sets, purchase new hardware, or even hire new staff.

Sounds good? Let’s get started.

Ways to easily get a toll-free number for your business

Why Get a Toll-Free Number for Your Business?

Toll-free numbers are the phone numbers that can be dialed without any charge to the person placing the call.

They start with a unique 3 digit code as a prefix. 800 is the most commonly used prefix for toll-free numbers, but you can also get one with the following toll free prefixes 888, 877, 866, 855, 844 or 833.

These toll-free codes are well recognized and customers know that they will not be charged for the call by their phone company.

Apart from the free call, talking to a human feels more natural and offers better customer satisfaction.

Toll-free numbers are not restricted to a particular geographic location. Your customers across the world can use the same number to reach you.

It looks more professional and gives credibility to your business. It is also easier to promote because you can select a memorable phone number and use it in all your marketing campaigns. Some companies even buy vanity phone numbers which are available on a first-come-first-serve basis.

They are not too expensive and using a VoIP service provider also allows you to make cheaper calls. You don’t need any special hardware, in fact, you can use a computer or even your phone to receive calls.

That being said, let’s take a look at the best ways to get a 800 toll-free number for your business.

1. Nextiva

Nextiva

Nextiva is the best business phone service provider on the market. They offer the easiest way to get a toll free number for your small business.

You get a free toll-free number with each Nextiva plan. You can also get a local number from anywhere in the United States.

Nextiva offers a simple dashboard to monitor your calls, set up voicemail greeting, set caller ID for outbound calls, call routing, caller ID, logs, and more. This enables you to efficiently manage your business calls and make the most out of them.

You can get calls on your toll-free number via laptop, a desk phone set, or even on cell phone using their app. This reduces the dependency on specific hardware and gives you the flexibility to take your business phone with you.

Pricing: Starting from $20 / month per user.

2. RingCentral

RingCentral

RingCentral is another excellent way to get a toll-free number for your business. They offer all popular toll-free codes including 800, 888, 877, 866, 855, and 844.

You can forward the calls to an existing number or use an existing toll-free number with RingCentral. They offer an extensive set of features like call routing, voicemail, call analytics, message alerts, answering rules, and more.

They have an easy to use dashboard that you can manage from your browser, desktop app, or use mobile apps to receive calls on the go.

Pricing Starting from $15.99 / month

3. Grasshopper

Grasshopper

Grasshopper is a leading provider of virtual phone number for small business with toll-free, local, and vanity numbers.

You get all the usual features of a VoIP service like call management, extensions, call forwarding, voicemail transcript, and more. You can use your business number to send and receive texts.

Call management tools like call waiting, custom greetings, simultaneous call handling, allow small businesses to easily manage more calls with limited staff.

Pricing: Starting from $26 per month with 1 number and 3 extensions.

4. Ooma Office Phone

Ooma Office Phone

Ooma is a popular business VOIP phone provider that offers 1-800 toll free phone numbers at affordable prices. You can add a toll free number to any Ooma office plan. By default they will pre-select a toll-free phone number for you, but you also have the option to choose a new one.

Ooma office platform comes with all powerful features that you would expect such as virtual receptionist, extension dialing, music-on-hold, smart mobile phone apps, and more. Best of all the setup is very easy, and you can do it within minutes.

Pricing: Their plan starts at $19.95 per month which comes with a free toll-free number and 500 minutes included for free. They also allow you to purchase additional minutes at discounted rates.

5. Phone.com

Phone.com

Phone.com is another easy way to get a toll free number. It allows you to easily manage your businness calls using your computers and mobile apps.

They offer vanity and toll-free numbers that you can use with your existing number. It comes with all the usual features you may expect from a cloud phone service.

Pricing: Pay per minute plans start from $12.99 per month and Unlimited plans start from $29.99 per month.

6. 8×8

8x8

8×8 is another easy option to get a toll-free number for your small business. They offer toll-free and local numbers for several countries which makes them a good choice if your target customers are in multiple regions.

You also get all the usual call management features plus integrations with G Suite and Office 365.

Pricing: Starting from $12 per month per user.

7. Vonage

Vonage

Vonage is another business phone service offering toll-free and local numbers. You can choose from the popular 888, 877 or 866 codes and it will ring on your existing business phone number.

They have an easy to use web-based control panel to manage your calls. It includes all the additional features you may expect from a VoIP service provider including voicemail, auto-attendant, forwarding and routing, simultaneous call ring on multiple devices, and more.

Pricing: Their mobile plan starts from $19.99 / month per user with limited features. The premium plan starts at $29.99 / month per user and unlocks advanced features.

FAQs about 800 Toll Free Numbers

Many beginners who are just starting their first business are quite unfamiliar with how toll-free number works. Here are some frequently asked questions about toll-free numbers and how they work.

1. What are toll-free numbers?

Toll-free numbers are telephone numbers where a person or business receiving the call is charged for it instead of the caller. Mostly, these numbers are used for customer services by businesses and organizations.

To distinguish them from regular landline numbers, toll-free numbers start with specific codes like 800, 888, 877, 866, 855, 844 and 833.

The rules for toll-free numbers are controlled by the FCC, but they don’t assign the specific phone numbers.

The toll-free numbers registry database is maintained by a company called Somos, Inc. This company then gives permission to other companies called RespOrgs (Responsible Organizations) to assign toll-free numbers.

This allows any small business owner to get a toll-free number for their WordPress website or online store.

2. Is there a difference between a toll-free number and vanity number?

A vanity phone number is the industry term used to describe numbers that spell a business name or a more memorable phrase, for example, 800-FLOWERS.

If a vanity number starts with a toll-free code, then it is not different than any other toll-free number in terms of functionality and purpose.

3. Can I get a vanity number that spells a business name and then sell it?

No, FCC rules prohibit hoarding or purchasing toll-free numbers for the purpose of reselling them.

4. Can I transfer my toll-free number to another company?

Yes, toll-free numbers are portable ,and you can use the same number with any business phone service provider of your choice.

5. Can I receive international calls on a US toll-free number?

Yes, you can. However, those calls will not be free for the caller, and they will be charged by their phone company for an international call.

Most toll-free numbers are considered local calls in the US and Canada. Customers calling from Canada will not be charged for an international call.

If your customers are located in different countries, then many of the toll-free number providers mentioned above offer toll-free numbers for other countries as well.

6. Can I forward toll-free calls to my existing number?

Yes, you can forward toll-free calls to your existing phone numbers. Many of the phone companies above also allow you to set forwarding rules for inbound calls based on business hours, availability, and other factors.

7. How do I add the toll-free phone number on my website?

You can easily add your toll-free number to any of the popular website builders or blogging platforms.

If you’re using WordPress for your website, then you can follow our step by step guide on how to add a click to call button in WordPress.

Which is The Best Toll-Free Number Service?

The basic service which assigns you the toll-free number is offered by almost all virtual phone service providers.

However, call management tools, costs, and integrations are equally crucial for growing your business by using a toll-free number.

Keeping these factors in mind, we believe Nextiva to be the best toll-free number for small businesses. They offer competitive rates, an extensive set of features, and integrations to take full advantage of a business phone system.

We use Nextiva for our own business.

RingCentral comes as the close second in terms of features, ease of use, and simplicity of adding toll-free number to your plan.

We hope this article helped you get a 800 toll-free number for your business. You may also want to see our guide on how to get a free business email address and our comparison of the best email marketing services for small business.

If you liked this article, then please subscribe to our YouTube Channel for WordPress video tutorials. You can also find us on Twitter and Facebook.

The post 7 Ways to Get a 800 Toll-Free Number for Your Business in 2019 appeared first on WPBeginner.


November 12, 2019 at 08:41PM
Monday, November 11, 2019

How to Create a Dropdown Menu in WordPress (Beginners Guide)

Do you want to make a dropdown menu and add it to your WordPress website?

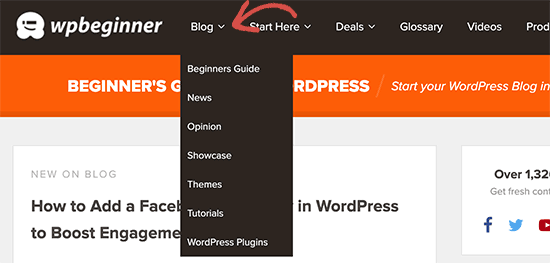
A dropdown menu shows a list of links as you take your mouse over an item on the menu.

We use a dropdown menu on WPBeginner, go ahead and take your mouse over the navigation menu on top.

In this beginner’s guide, we will show you how to easily create a dropdown menu in WordPress with step by step instructions.

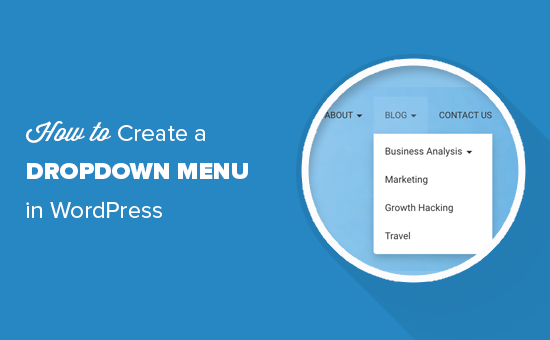
Creating a dropdown menu in WordPress

Why Use Dropdown Menus in WordPress?

WordPress comes with a built-in menu management system that allows you to easily add navigation menus to your WordPress site.

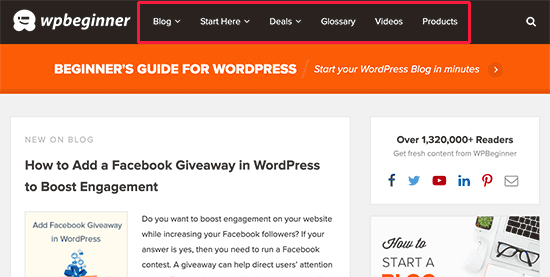
Navigation menus are links to the main pages of your website that usually appear on the top as a horizontal row right next to the website’s logo.

Typical navigation menu with a horizontal row of links

If you are starting a blog or creating a website with only a few pages, then you can add them in the single row.

However, if you run an online store or a large website, then you may want to add more links to the navigation menu.

Dropdown menus help you solve the limited space issue by showing menu links only when users bring their mouse over to a parent item. They also allow you to organize the menu structure by topics or hierarchy.

Dropdown menu example

Lastly, they look pretty nice too.

That being said, now let’s take a look at how you can easily create WordPress dropdown menus add them to your website.

Step 1. Choosing a Theme with Dropdown Menu Support

WordPress comes with a built-in menu management system but displaying those menus is entirely dependent on your WordPress theme.

Almost all WordPress themes support dropdown menus by default. However, some themes may not have proper menu support.

You need to make sure that you are using a WordPress theme that supports dropdown menus.

How do you know if the theme you are using supports the dropdown menu?

You can simply visit the theme’s website where you’ll find a link to the theme’s demo. From there you can see if the demo is showing a dropdown menu in the navigation menu.

If it is not, then you’ll need to find a WordPress theme that does.

See our guide on how to choose the perfect WordPress theme for your website.

Here are a few excellent themes that support the dropdown menu out of the box.

  • Astra – It is a multipurpose WordPress theme that comes with several starter sites and tons of features.
  • StudioPress themes – Built on top of genesis theme framework, these professional themes are highly optimized for performance.
  • OceanWP – A popular WordPress theme that is suitable for all kind of websites.
  • Ultra – Powered by Themify builder this drag and drop WordPress theme comes with beautiful templates and flexible theme options.
  • Divi – popular theme by Elegant Themes that uses the Divi page builder and comes with tons of drag & drop features including dropdown menus.

That being said, now let’s take a look at how to create a dropdown WordPress menu.

Step 1. Creating a Navigation Menu in WordPress

If you have already set up a navigation menu on your website, then you can skip to the next step.

Let’s create a simple menu first.

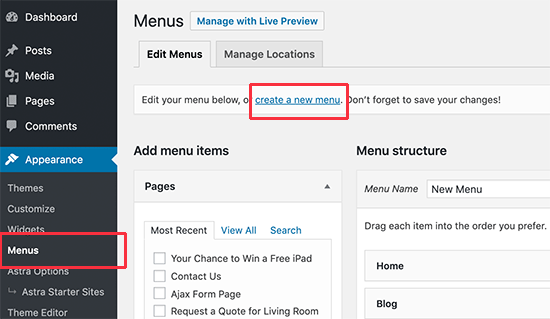
Go to Appearance » Menus page and click on the ‘Create a new menu’ link at the top.

Create a menu

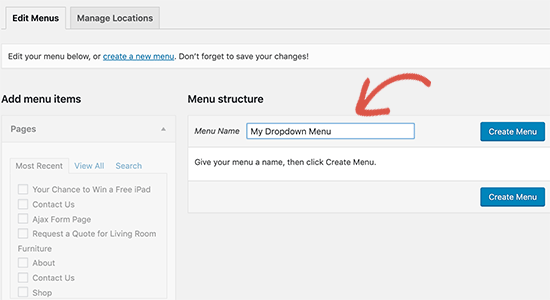
Next, you need to provide a name for your navigation menu. This name will not be publicly visible on your website. The purpose of menu name is to help you identify the menu inside the WordPress admin area.

Menu name

Enter a name for your menu and then click on the ‘Create Menu’ button.

WordPress will now create a new empty menu for you.

Let’s add the top links to the navigation menu. These items will appear in the top row of your menu.

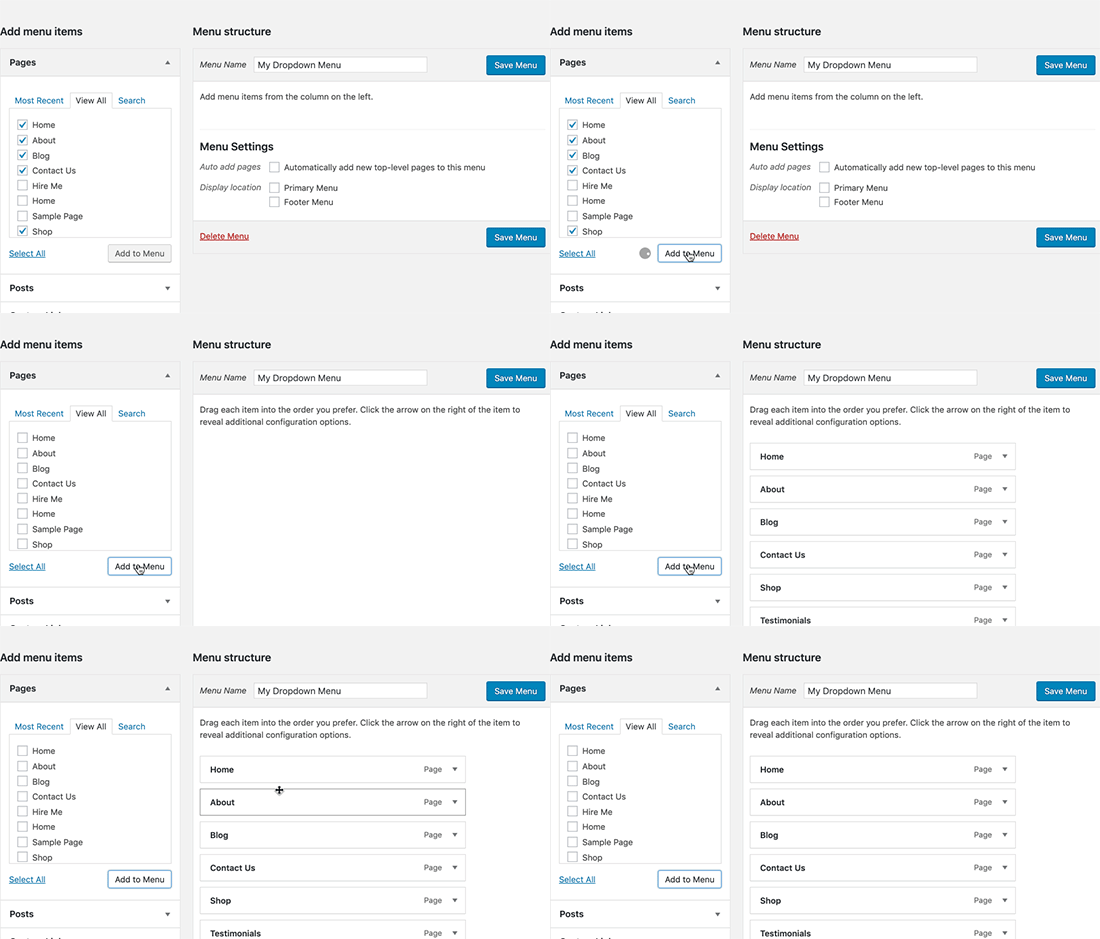
Simply select the pages you want to add from the left column and click on the ‘Add to menu’ button. You can also select blog posts, categories, or add custom links.

Add pages to menu

You will now see those pages appear in the right column under your new menu.

Step 2. Adding Sub-Items to a Menu

Sub-items are the items that will appear inside the dropdown menu. Depending on how you want to organize your menus, you can add them under any of the existing items.

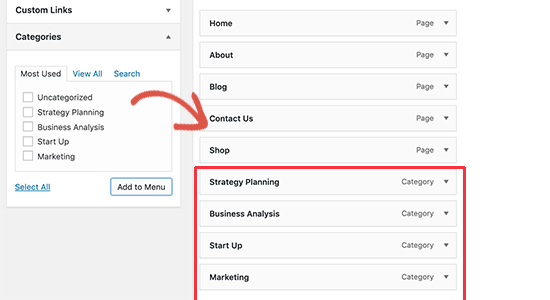
For the sake of this tutorial, we will be adding categories under the blog link.

Simply select the items you want to add from the left column and then click on the ‘Add to menu’ button. Your items will now appear in the right column.

New menu items added to the menu

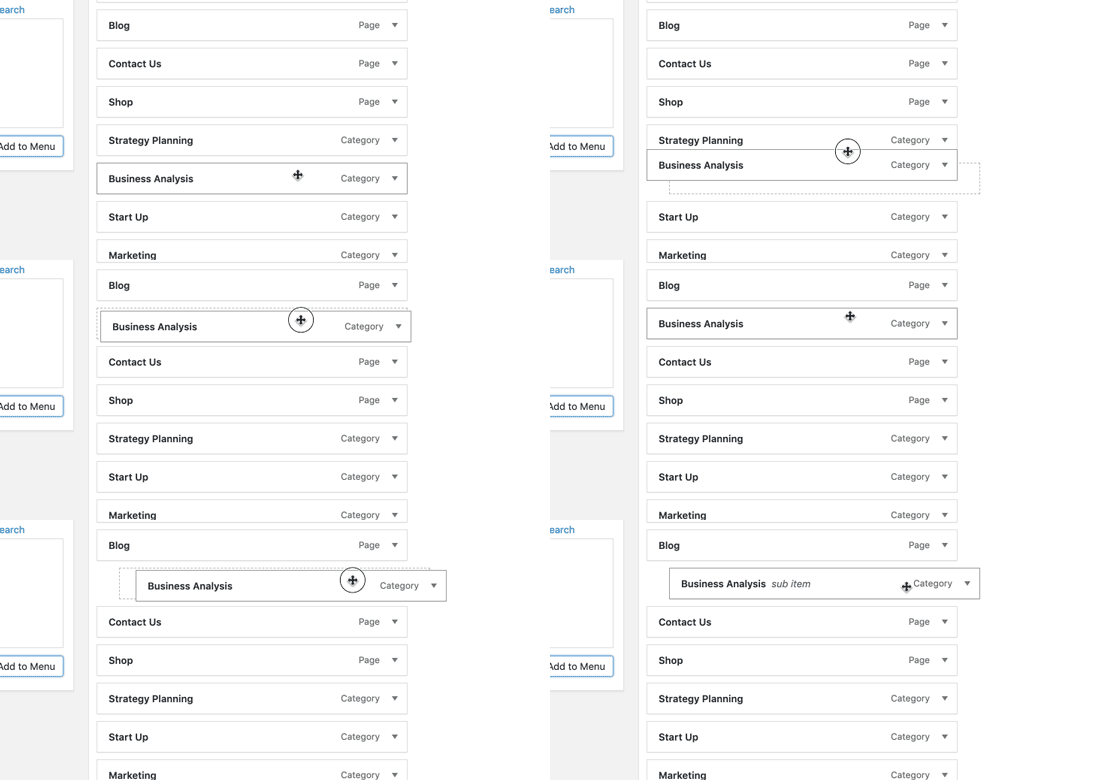
However, these links will appear as regular items. We need to make them a sub-item of a parent menu.

You can simply drag and drop a menu item and place it under the parent item. Move it slightly to the right, and it will become a sub-item.

Adding sub menu items to create a dropdown menu

Repeat the process for all links you want to show under the dropdown menu.

Once you are done, don’t forget to click on the ‘Save menu’ button to store your changes.

Step 3. Publish Your Dropdown Menu

If you are editing a menu that’s already live on your website, then it will start appearing on your website right away.

However, if it is a new menu item, then you now need to choose a theme location to display this menu.

WordPress themes can show menus at different locations. Each theme defines their own menu locations, and you can select which menu you want to display there.

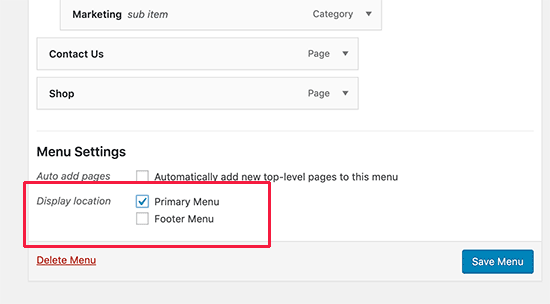
You’ll find this option in the right column under ‘Menu settings’. Select an option next to the ‘Display location’ setting and click on the ‘Save menu’ button.

Choose theme location

You can now visit your website to see your dropdown menu in action.

Dropdown menu preview

Tips on Creating Interactive Dropdown Menus

Navigation menus are important because this is the first place your users will look if they want to see specific information.

Using them correctly will help your users find their way around your website. It will also help you get more pageviews, conversions, and sales on your website.

Here are a few tips on making your navigation menus more interactive with dropdown menus.

1. You can create multi-level dropdown menus

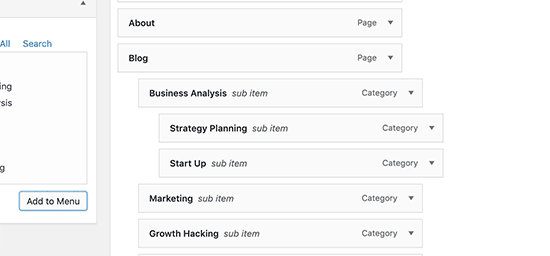
Making a link a sub-item of another link makes it appear in the dropdown menu. You can also add a sub-item below another sub-item to create multi-level dropdown menus.

Multi level menus

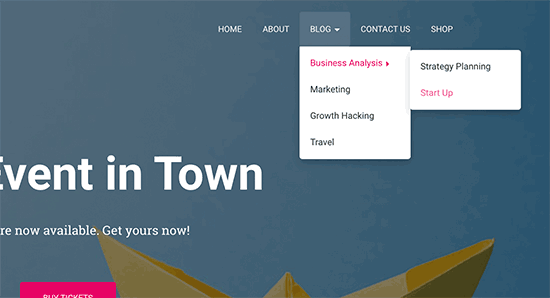
Your theme would automatically show them as a sub-menu inside the dropdown.

Multi-level dropdown menu

2. You can also create multiple dropdown menus

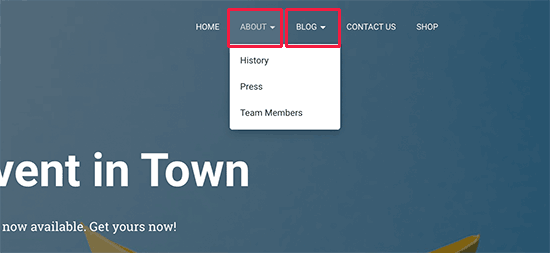
You can create a dropdown under any top link in your menu. You can even add multiple dropdown menus in your main navigation menu.

Multiple dropdown menus in the primary menu

3. Create menus with a live preview

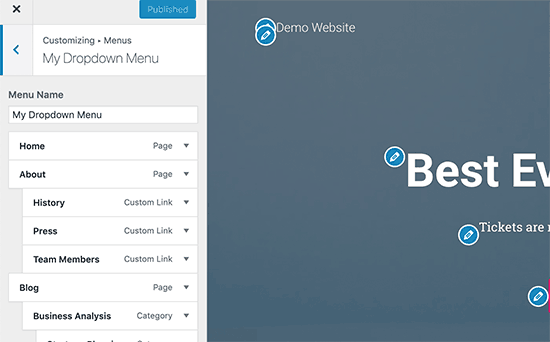
If your menu gets too complicated, then you can switch to the visual preview. Go to Appearance » Customize to launch the live theme customizer.

From there, click on the ‘Menus’ tab and then select your navigation menu. You’ll now see a drag and drop menu editor in the left column with a live preview of your site in the right panel.

Customize WordPress menus with a live preview

4. Creating a large mega menu as dropdown in WordPress

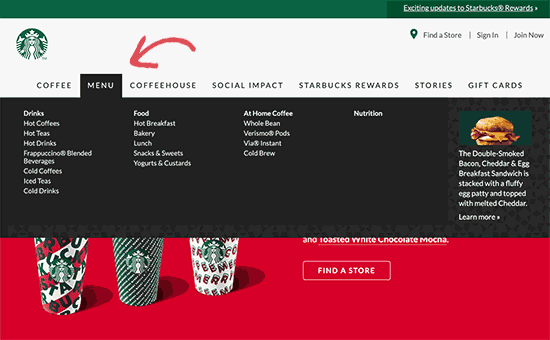
The dropdown menus only show one dropdown at a time. What if you wanted to show the full structure of your website as a mega menu that only appears when users hover on the main menu?

Mega menu example

Mega menus do appear as a dropdown menu, but they can show a lot more links, sub-menus, and more. For detailed instructions, see our step by step tutorial on how to create a mega menu in WordPress.

We hope this article helped you learn how to easily create a dropdown menu in WordPress. You may also want to see our guide how to create a sticky floating navigation menu in WordPress and how to add image icons to navigation menus in WordPress.

If you liked this article, then please subscribe to our YouTube Channel for WordPress video tutorials. You can also find us on Twitter and Facebook.

The post How to Create a Dropdown Menu in WordPress (Beginners Guide) appeared first on WPBeginner.


November 11, 2019 at 06:44PM

Friday, November 8, 2019

How to Add a Facebook Giveaway in WordPress to Boost Engagement

Do you want to boost engagement on your website while increasing your Facebook followers?

If your answer is yes, then you need to run a Facebook contest. A giveaway can help direct users’ attention to your Facebook page and help you get more likes / followers on Facebook.

In this guide, we’ll show you how to properly add a Facebook giveaway in WordPress to boost engagement and get more likes / views.

Creating a Facebook giveaway on your WordPress website

Why Run a Facebook Giveaway in WordPress?

Facebook’s policies do not allow you to giveaway prizes for getting likes.

However, these policies do not restrict you from sending visitors to your Facebook page or group from your website.

Running a giveaway on your WordPress website enables you to point users to your Facebook page, which ultimately results in more followers and engagement on your Facebook page.

Giveaways also allow you to add other engagement metrics simultaneously such as asking users to join your email newsletter, viewing your Instagram profile, watching your YouTube video, and more.

Giveaways and contests can go viral due to the social sharing actions, which increase your reach and help you find new users.

That being said, let’s take a look at how to easily run a Facebook giveaway in WordPress to get more likes and engagements.

Running a Facebook Giveaway in WordPress

For this tutorial, we’ll be using RafflePress. It is the best WordPress giveaway plugin on the market.

RafflePress makes it easy to design your giveaway using a drag and drop builder. You can add prize photo, choose dates, select winners randomly, and use templates to quickly launch new giveaway campaigns.

It comes with social actions to direct your users to your social media channels including Facebook. You can make an action mandatory to join a giveaway. It also comes with social logins and integrates with all popular email marketing platforms.

RafflePress was co-founded by WPBeginner’s founder, Syed Balkhi, to help us boost engagement on our own site, and it works really well.

With that said, let’s start your first Facebook giveaway campaign.

Step 1. Creating Your First Facebook Giveaway Campaign

The first thing you need to do is install and activate the RafflePress plugin. For more details, see our step by step guide on how to install a WordPress plugin.

You can also use the RafflePress lite plugin for free, but for the sake of this tutorial, we will be showing the Pro version.

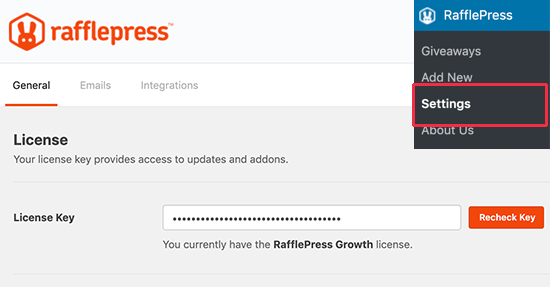
Upon activation, the plugin will add a new menu item labeled RafflePress to your WordPress admin sidebar.

Clicking on it will take you to the plugin’s settings, and you’ll be asked to enter your license key. You can find this information under your account on the RafflePress website.

RafflePress license key

After that, you need to visit RafflePress » Add New to launch the giveaway builder.

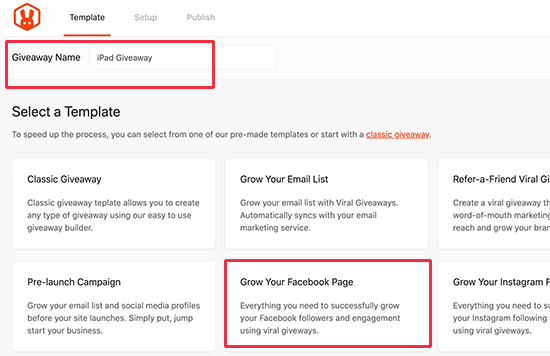
First, you need to provide a title for your giveaway and then choose a template. RafflePress comes with several pre-made templates for specific campaigns including one for growing your Facebook page.

Giveaway template

This will launch the giveaway builder with select actions users need to perform to join the contest. You can still add / remove actions to your giveaway (more on this later).

Facebook template

By default, the template will add login with the Facebook button, visit us on Facebook, and View a Facebook post or video actions.

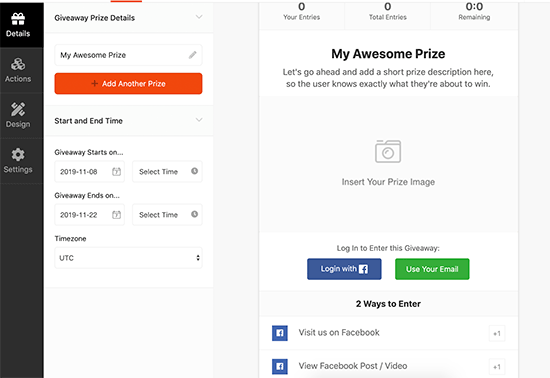
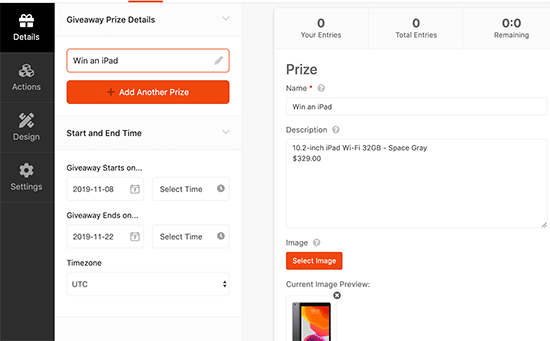
Let’s start customizing this giveaway by adding our Prize details. Simply click on the edit icon next to the Prize title from the left column.

First, you need to provide a title for the prize. After that, you can provide a brief description and add a picture of the prize.

Note: Need help finding prize ideas? Here are 105 proven contest prize ideas for viral giveaways.

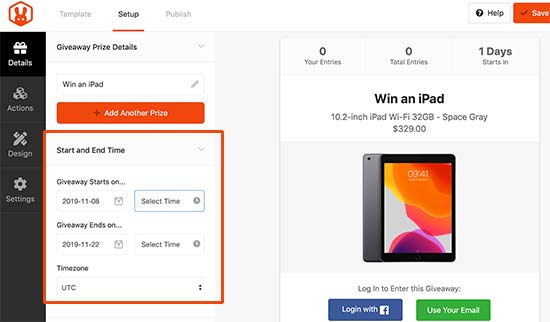
Just below the title, you’ll be able to select the start and end dates for the giveaway.

Campaign start and end date

Step 2. Adding More Actions to Your Facebook Giveaway

Now that you have done the basic set up for the giveaway, let’s add some more ways for users to join the giveaway.

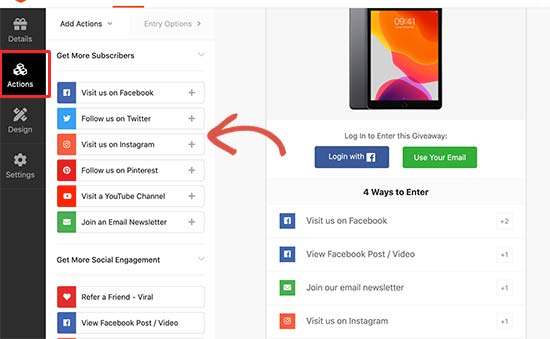
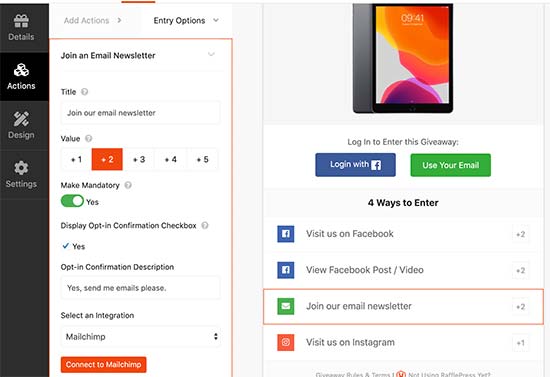
You need to switch to the ‘Actions’ tab in the giveaway builder and start adding actions to your giveaway.

Adding actions to your Facebook giveaway

For example, you can ask users to join your email list, view your Instagram, Pinterest, or Twitter profile, send a Tweet, visit a page or a WooCommerce product on your store, and so on.

Simply click on an action and add it to your giveaway. The builder will then show you specific settings for that particular action.

Action settings

From here you need to provide a title for the action which users will see on the action button in your giveaway.

After that, you need to assign a value to the action. The value is the number of entries users will earn for performing an action. For example, if you are trying to get more likes on Facebook, then you would want to give more weight to your Facebook actions.

Below that, you have a choice to make an action mandatory. Users will not be able to participate in your Facebook contest if they don’t perform the mandatory action.

Finally, you’ll have action-specific settings such as providing your Facebook page URL, Facebook group link, or connecting to your email service.

Step 3: Design your Facebook Giveaway to Stand out

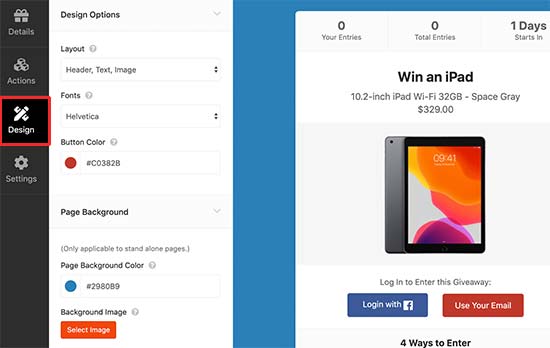
RafflePress gives you easy to use design tools to customize the appearance of your giveaway campaigns.

Simply switch to the Design tab, and you will see options to choose a layout, button color, and fonts for your giveaway.

Design your Facebook giveaway campaign

If you plan to use the giveaway as a standalone landing page vs embedding it in a blog post, page, or a sidebar widget, then you can also choose the page background color.

RafflePress allows you to add your giveaway to any WordPress post or page. You can also create a custom landing page for your Facebook giveaway contest by using your favorite WordPress page builder and simply add your giveaway widget there (more on this later).

Step 4. Fine Tuning Your Giveaway Settings

Now that your giveaway looks great, let’s review its settings for the last time. Switch to the ‘Settings’ tab under the builder to see various options.

They are all very self-explanatory, but we’ll go through them one by one.

General settings

First, you need to click on the ‘General’ tab and review the options.

If you wanted to create a standalone Facebook giveaway contest page, then you can do that here. Provide a name for your campaign page under the Page Permalink option without any spaces.

You can also show and hide the number of entries, contest winners, and the powered by link.

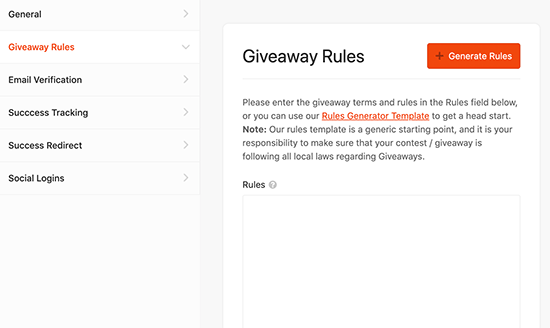
Next, switch to the ‘Giveaway Rules’ tab. This is where you’ll list the rules for joining the giveaway. You can start by clicking on the ‘Generate Rules’ button to automatically generate rules using a sample template.

Generate contest rules

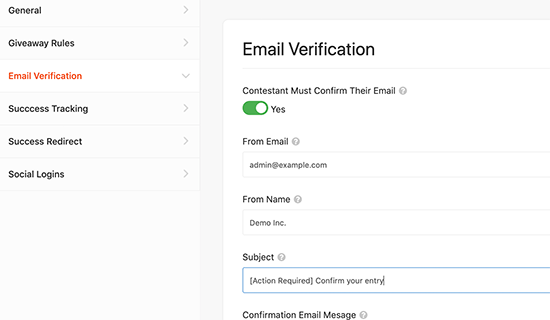
If you want participants to confirm their email address, then switch to the email verification tab. From here, turn on the email verification feature and configure the confirmation email options.

Enable email verification

RafflePress allows you to track users who have successfully completed giveaway actions. You can do so by adding tracking scripts under the ‘Success tracking’ tab. For example, you can add your Google Analytics script here or a Facebook retargeting pixel code here.

Success tracking

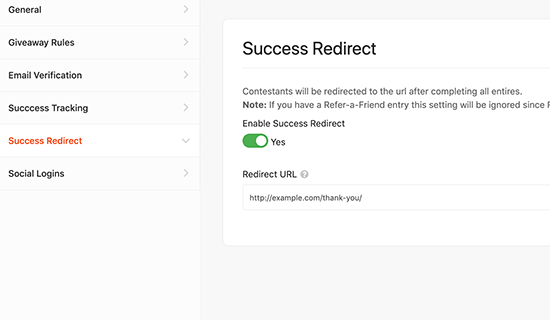
If you want to redirect users to a specific page, then switch to the Success redirect tab and enter the URL of the page where you want to send users.

Success redirect

Lastly, you can turn the social login feature On/Off from the social logins tab. Turning it off will disable the login with Facebook button on your giveaway campaign.

Your giveaway is now ready to be launched. Don’t forget to click on the ‘Save’ button at the top right corner to save all your settings.

Step 5. Add Your Facebook Giveaway to a WordPress Post or Page

RafflePress makes it very easy to display your giveaway anywhere on your WordPress website.

You can simply edit a post or page or create a new one and then add the RafflePress block to the block editor.

Add RafflePress block

After that, you need to select the giveaway you created earlier. RafflePress block will now load a preview of your giveaway right inside the editor.

Giveaway preview

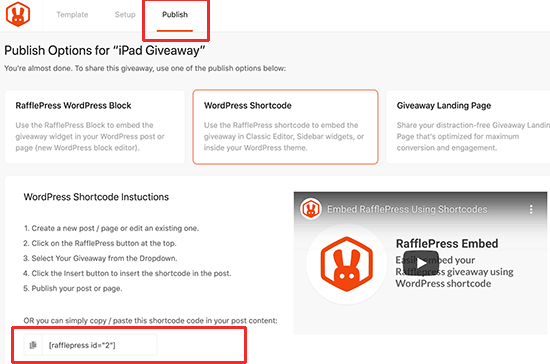
You can also add your giveaway to a sidebar or any other place using the shortcode.

Simply edit your giveaway and switch to the ‘Publish’ tab in the builder interface. From here, click on the shortcode option and RafflePress will show the shortcode you can use.

Copy the shortcode

Copy the shortcode and edit the post or page where you want to display the giveaway. Simply paste the shortcode inside the post editor and you are done.

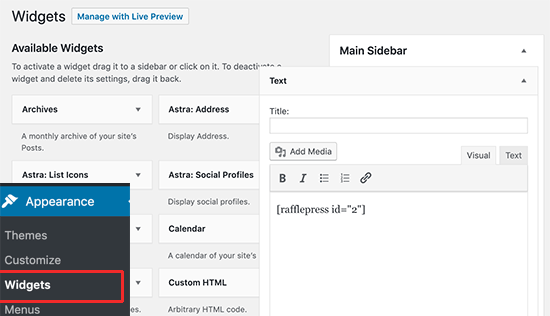
You can also add the shortcode to a sidebar widget. Go to Appearance » Widgets page and then add the ‘Text’ widget to your sidebar.

Adding the shortcode to a sidebar widget

You can now paste your shortcode inside the widget settings and click on the save button to store it. After that, you can preview your website to see it in action.

Giveaway widget in sidebar

Step 6. Promoting Your Facebook Giveaway

You’ll need to start promoting your giveaway to build anticipation before the contest begins. We recommend planning ahead to give yourself enough time to publicize the campaign.

Here are a few things you can do to build anticipation for a successful giveaway campaign.

  • Send an email to the subscribers of your email newsletter.
  • Announce the event on social channels: Facebook, Twitter, Instagram, and more.
  • Run a paid advertising campaign (not required but it does help).
  • Reach out to influencers, bloggers, forums, and communities to get the word out.

By putting in all the hard work before the event increases the chances of your campaign to get viral. It will also increase the return on investment in terms of Facebook likes, followers, and new subscribers you’ll get for your website.

Step 7. Announcing The Giveaway Winners

The best part about RafflePress is that it automates the whole process. Your giveaway will automatically end once it reaches the end time and date you have set.

After that, you can automatically choose the lucky winners through a random draw.

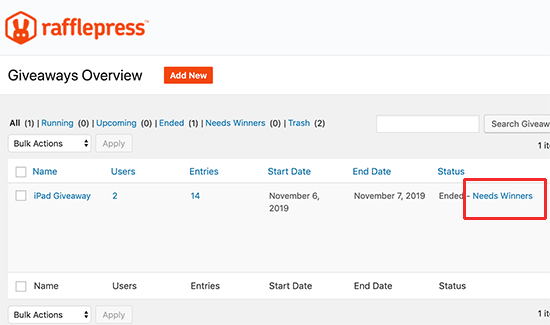
Simply go to RafflePress » Giveaways page and click on the ‘Need Winners’ link next to your giveaway.

Need winners

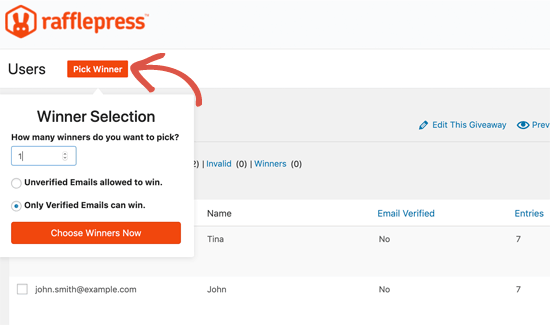
Next, you’ll see a list of users who participated in the contest. You need to click on the Pick winner button at the top and select the number of users who can win and whether you want to allow unverified emails to win.

Choose a random winner for your Facebook giveaway

Click on the ‘Choose winner now’ button to continue.

RafflePress will now randomly select a winner for your giveaway.

Email giveaway winner

You can now click on the Email Winner link to send the winner an email about how they can claim their prize.

We hope this article helped you learn how to easily add a Facebook giveaway in WordPress to boost engagement. You may also want to see these actionable tips that you can use to get more traffic to your WordPress website.

If you liked this article, then please subscribe to our YouTube Channel for WordPress video tutorials. You can also find us on Twitter and Facebook.

The post How to Add a Facebook Giveaway in WordPress to Boost Engagement appeared first on WPBeginner.


November 08, 2019 at 06:00PM