Wednesday, December 4, 2019

How to Add Your WordPress Site to Google Search Console

One of the most important step in optimizing your WordPress site for SEO is adding it to Google Search Console (formerly Google Webmaster Tools).

Google Search Console offers specific webmaster tools to help website owners monitor and maintain their search presence and rankings.

In this guide, we will show you how to easily add and verify your WordPress site in Google Search Console also known as Webmaster Tools.
How to easily add your WordPress site to Google Search Console

What is Google Search Console?

Google Search Console is a free tool offered by Google to help website owners monitor their website’s presence in Google search results.

It helps you track search rankings along with keeping you updated about site errors, security issues, and indexing issues that may affect your website’s search performance.

If you are serious about growing your website, then you need to add it to Google webmaster tools from day one.

That being, let’s take a look at how to easily add your site to Google Search Console.

Adding Your WordPress Site to Google Search Console

First, you need to visit the Google Search Console website and click on the ‘Start Now’ button.
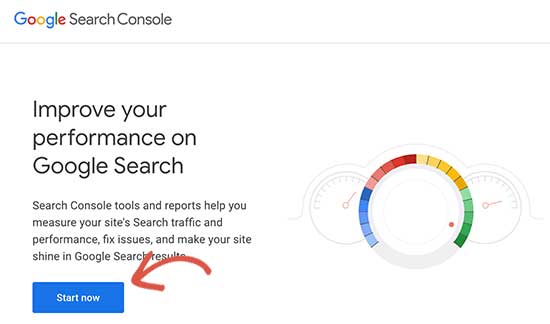
Start Google Search Console

Next, you’ll need to sign in with your Google / Gmail account.

Once logged in, you’ll be asked to enter your website URL.

There are two methods for site verification: domain name or URL prefix. We recommend the URL prefix method because it is more flexible.
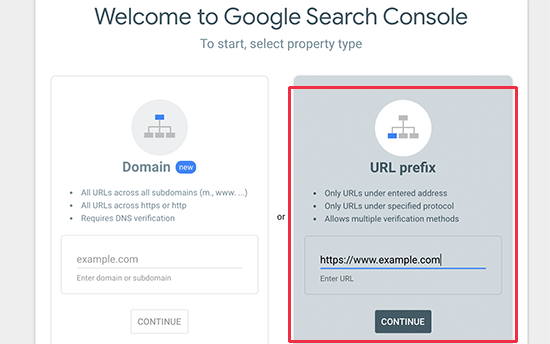
Add website URL

Keep in mind that Google considers an HTTP and HTTPS as two different protocols. It also considers https://www.example.com and https://example.com as two different websites.

You need to enter the correct website URL used by WordPress.

If you are unsure, then there is an easy way to find out the exact URL you need to enter. Simply login to your WordPress admin area and go to Settings » General page.

There you will see your website’s URL in the site address field.
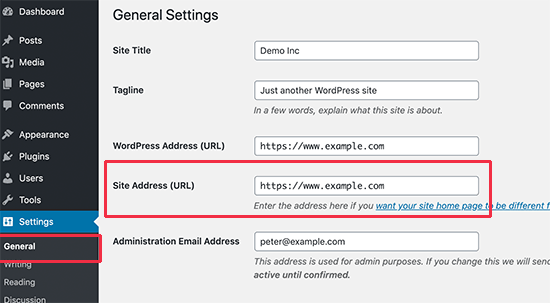
Copy your site address from WordPress settings page

After entering your correct website address in Google webmaster tools setup wizard, click on the ‘Continue’ button to go to the next step.

Now, you’ll be asked to verify ownership of your website. There are several ways to do that, but we will show the HTML tag method because it is the easiest one.
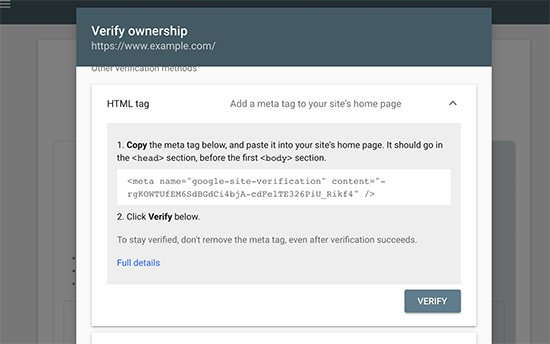
Copy the HTML tag

Click on the HTML tag to expand it and then copy the code inside it.

Now, you need to add this Google site verification meta tag in WordPress, so Google can verify that you are the owner of the website.

Most WordPress tutorials will guide you to just edit the header.php file in your WordPress theme and add the code just above the <body> tag.

However, we don’t recommend this method because if you update or change your theme, then the HTML tag will disappear.

Google periodically checks for the HTML tag and will disable your access to the site data in the search console if it cannot find the verification tag.

Here is how to make sure that Google can always verify your ownership of the website.

First, you need to install and activate the Insert Headers and Footers plugin. For more details, see our step by step guide on how to install a WordPress plugin.

Upon activation, go to Settings » Insert Headers and Footers page and paste the Google HTML tag code you copied earlier inside the ‘Scripts in Header’ box.
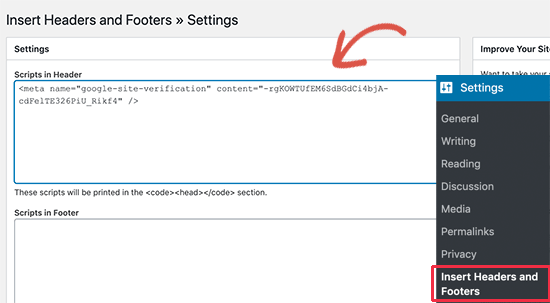
Add HTML verification tag to site header

Don’t forget to click on the ‘Save’ button to store your changes.

You can now go back to Google Search Console settings and click on the ‘Verify’ button.
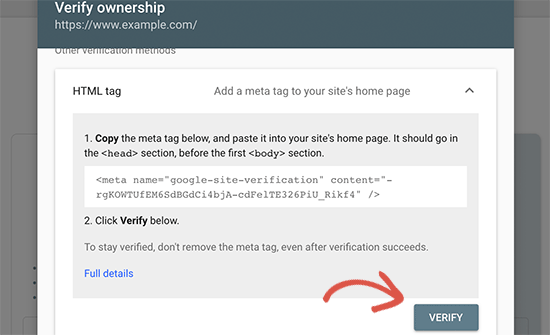
Verify ownership

Google Search Console will now look for the HTML tag in your website code and will show you a success message.
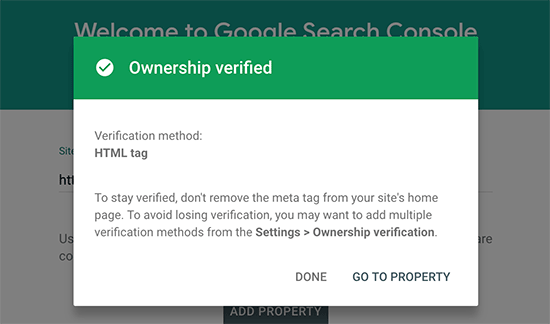
Your website successfully added to Search Console

Note: If you don’t see a success message, then you need to clear your WordPress cache. This will ensure that Google can fetch the latest version of your website.

That’s all. You have successfully added your site to the Google Search Console (Webmaster tools). You can now click on the ‘Go to Property’ link to visit your Google Search Console dashboard.

Google Search Console dashboard

From here you can see your website’s performance reports and index coverage.

Before you do that, let’s tell Google a little bit more about your website. This will help Google crawl your website a bit more efficiently.

Add XML Sitemap to Google Search Console

An XML sitemap is a file that lists all your website content in XML format, so search engines like Google can easily discover and index your content.

The easiest way to add an XML sitemap to your WordPress website is by installing and activating the Yoast SEO plugin.

Upon activation, go to SEO » General and switch to the ‘Features’ tab. From here, you need to scroll down to the ‘XML Sitemap’ option and make sure that it is turned on.
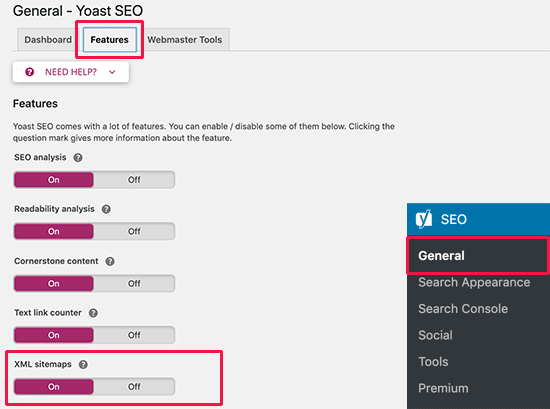
XML Sitemap option in Yoast SEO

Next, you need to get the XML sitemap link. Simply click on the question mark icon next to the XML sitemap option, and you will see a link to your XML sitemap.
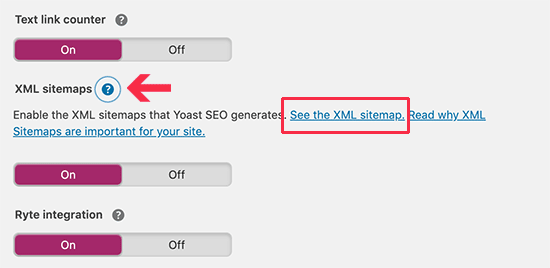
View your XML sitemap

Clicking on the link will take you to your XML sitemap. From there, you can just copy the URL from your browser’s address bar.
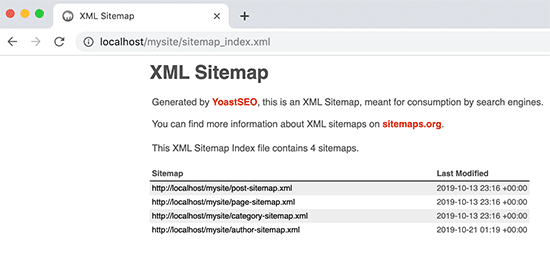
Copy your XML Sitemap URL

Alternatively, you can directly access your XML sitemap by adding sitemap_index.xml at the end of your website address. For example:

https://ift.tt/2HrV0S0

Now that you have XML sitemap ready, let’s help Google find it quickly.

Simply switch to the Google Search Console dashboard and click on the Sitemaps menu from the left column.
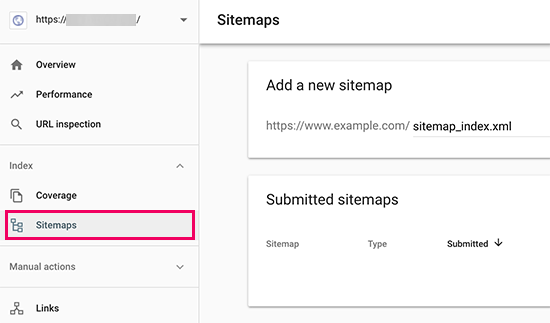
Add your sitemap URL to Google Search Console

After that, you need to add the last part of your sitemap URL under the ‘Add new sitemap’ section and click the Submit button.

Google will now add your sitemap URL to your Google Search Console.

That’s all, you have successfully added your website to Google Search Console.

The next step is to learn how to use the treasure trove of information in Google search console to grow your business. We have a complete Google Search Console guide for beginners which shows you how to make the most out of Google Search Console data.

Google Search Console and WordPress FAQs

Having helped thousands of readers add and verify their website in Google search console, we have seen just about every question you can think of. Here are the answers to some of the most frequently asked questions.

1. How can I upload a Google HTML verification file to my WordPress blog?

Google Search Console allows few different ways to verify website ownership. In this article, we covered the easiest method which is to use the Google site verification meta tag. However some website owners prefer to upload the HTML file to verify site ownership.

To upload the Google search console HTML verification file to WordPress, you will need to login to your WordPress hosting cPanel or connect to your hosting account using FTP.

Next, you need to upload the HTML verification file inside the /public_html/ folder of your website. This is the root directory where you’ll see other WordPress folders like /wp-admin/, /wp-content/, etc.

2. Should I use a Google Site verification plugin for WordPress?

There are many WordPress plugins that are designed specifically to help you with Google site verification. However you don’t need to use them because you’ll likely need to verify ownership on other webmaster tools and platforms like Bing, Yandex, Pinterest, etc.

It’s much better to use the Insert Headers and Footers plugin because it lets you add site verification for all platforms (in a single plugin).

3. How can I become a power user of Google Search Console?

Google search console has a lot of useful information that you can use to grow your business. We have created the ultimate Google Search Console guide that you can use to become a power user.

4. I’m running into problems, is there a Google Search console phone number that I can contact?

No, there’s no Google search console phone number that you can contact. If you’re running into problems with Google search console, then you can use their online support center. For specific questions about WordPress, you can always join our free WordPress help group to ask your questions.

We hope this article helped you learn how to easily add your WordPress site to Google Search Console. You may also want to see our guide on how to get more traffic to your website, and our comparison of the best email marketing services for small business.

If you liked this article, then please subscribe to our YouTube Channel for WordPress video tutorials. You can also find us on Twitter and Facebook.

The post How to Add Your WordPress Site to Google Search Console appeared first on WPBeginner.


December 04, 2019 at 05:00PM

Tuesday, December 3, 2019

How Much Does a Domain Name Really Cost? (Expert Answer)

If you have ever tried to register a domain name before, then you have likely seen a wide-variety of prices ranging from $9 to several thousand dollars.

The cost of a domain name varies based on the domain extension (such as .com, .org, .net), domain registrar, availability, and few other factors.

Apart from new domain names, you can also buy premium domain names from someone else who has registered it before you. Domain name investors often register premium domain names that are shorter, brandable, and easy to remember for the sole purpose of reselling.

In this article, we’ll explain how much does a domain name really costs. We’ll also show you different ways to buy a domain name including a way to get one for free.

How much does a domain name really cost

Since this is a comprehensive guide on domain name costs, we have broken it down into few sections:

How Much Does a New Domain Name Cost?

Buying a new domain name would typically cost you anywhere between $9 and $14.99 per year. However, these prices may differ based on the domain extension or the domain registrar you choose.

If you are starting a new website, then we recommend using Bluehost. They are one of the top web hosting companies in the world.

They are offering WPBeginner users a free domain name + free SSL certificate on top of the 60% discount on their web hosting plans.

→ Claim Your Free Domain Name with Bluehost ←

Since you need both a domain name and web hosting to make a website, this is the most affordable option to get started.

If you just want to purchase a domain name, then we recommend using Domain.com as your registrar. You can use our Domain.com coupon code to get 25% off your purchase.

Here is how much a new domain registration costs with different registrars.

  • Bluehost – Free domain with hosting $2.75 / month
  • Domain.com – $7.45 for .com domain names with our coupon code
  • HostGator – Free domain with hosting $2.64 / month
  • GoDaddy – $11.99
  • DreamHost – Free domain with hosting $2.59 / month

These prices are for new .com domain names only. The pricing of other extensions such as .net, .org, .info, .blog, etc. will vary based on the domain registrar you use.

When it comes to domain extensions, we always recommend users to use .com because it’s the most popular one.

Hidden Costs of a Domain Name

Aside from the domain registration cost, there are few hidden domain costs and upsells that you should be aware of, so you can make the most educated decision.

Yearly Renewals

Domain name registration is done on a yearly basis. You can maintain control over your domain name as long as you continue to renew your registration each year.

Some domain registrars offer domain name discounts on first year purchase, but their renewal costs are much higher. If you see a promotion where you can pay $0.99 for a domain name, then please know that it’s usually for first year only. Your annual renewals will be at a much higher price.

WHOIS and Domain Privacy

ICANN is the not-for-profit public-benefit corporation that is responsible for coordinating the assignment and maintenance of domain names. They require each domain registrar to collect contact information for the website owner.

This information can be publicly accessed using WHOIS data. Other businesses and companies can use this information to contact you about a potential business partnership.

Having the WHOIS data publicly available can result in unwanted emails and phone calls. This is why many domain registrars sell an add-on called Domain Privacy.

This addon typically costs an additional $9.99, and it’s completely optional. The problem is that often registrars automatically add it to the cart, and you have to manually remove it if you don’t want to pay for it.

Some registrars like DreamHost offer free domain privacy with their domains.

Business Email Accounts (Email Domains)

When buying a domain name, you will likely see an addon for email domains for setting up a professional business email address.

You do not need to buy this because you can get a free business email address with most web hosting companies.

If you want a more professional option, then we recommend buying this directly from G Suite or Microsoft Office365, so you’re not locked into a registrar.

Pro Tip: Secure Domain Discounts for Multiple Years

Some registrars like Domain.com allows you to pre-pay for multiple years upfront. This is a great way to get the introductory discount offer for multiple years.

Since you have to pay for domain renewals every year, pre-paying for multiple years can be a significant saving. Not to mention, it saves you from future price increases.

But these hidden fees and domain cost explanation is primarily for new domains that are available to register.

What about premium domains or domains that you buy from other people? Let’s take a look at the premium domain costs in details.

How Much Does a Premium Domain Name Cost?

Premium domain names are pre-registered domain names that are often shorter, brandable, and more memorable. Often domain investors register these premium domain names to sell later at a higher price for profit.

Cost of premium domain names can range anywhere from a few hundred dollars to thousands of dollars. It all depends on the uniqueness of the name, domain length, and its overall brand potential.

Some premium domains may even cost hundreds of thousands to millions of dollars. Here are some of the most expensive domains sold in history:

  • Insurance.com – $35.6 million
  • PrivateJet.com – $30.18 million
  • Hotels.com – $11 million
  • Fb.com – $8.5 million
  • Business.com – $7.5 million

You can find premium domain names listed for sale by private sellers on various websites.

We recommend buying domain names from reputable websites to ensure a safe transfer of the domain name. See our guide on the best places to buy a premium domain name.

How to Estimate The Value of a Premium Domain Name?

Many beginners ask us about how to find the right offer to make for a premium domain or a pre-registered domain name?

Domain names that are already taken are often sold at a higher price. However, most of the time the asking price is outrageously high which discourages many inexperienced domain buyers from making an offer.

We recommend users to do some research and make a reasonable counter offer. Remember, the domain investor only makes money when they sell the domain.

Like most trades, the value of a premium domain largely depends on the maximum you’re willing to pay and the lowest the seller is willing to accept.

However, you can look at domain marketplaces like BuyDomains, Sedo, or Flippa to better understand the market rates, so you can make a respectable offer for a particular niche.

Flippa domains

If the domain you are looking for already has a listed price, then you can start by offering 50-75% of the listed price.

Note: Most domain value estimation tools are completely useless, so it’s best to avoid using them as a reference.

We recommend caution when buying a registered domain name. If you are unsure about the domain’s potential worth to your business, then simply walk away.

How Much Does an Expired Domain Names Cost?

Each day thousands of domain names expire. These are the domain names where the owner decided not to renew their registration, or they simply forgot about these domain names.

Expired domains provide an excellent opportunity to find great brandable domain name. The following are a few places where you can look for recently expired domain names.

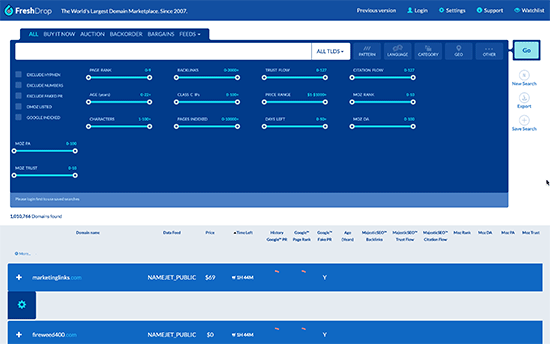
1. FreshDrop

FreshDrop

FreshDrop is a domain marketplace that allows you to follow expired and soon to be expired domain names. It comes with an advanced search tool that you can use to narrow down your search.

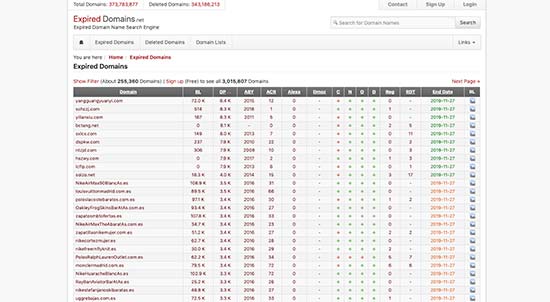
2. ExpiredDomains

ExpiredDomains

ExpiredDomains is a search engine dedicated to expired domain names. It may not look as easy to use as other domain search tools but it has a large and constantly updated index of domain names.

Note: You need to check for domain abuse and other problems before buying a used, pre-registered, or expired domain names (more on this later).

Cost of Expired Domain Names

Normally, you can register an expired domain name at the usual yearly rates of your domain registrar company.

However if a domain name is soon to be expired, then you can use a domain backorder service. This allows you to place an advance order for the domain name.

If there is no other advance order for that domain name, then your order will become successful. Most domain name companies charge a small one-time fee ($25 – $99) to provide this service.

How to Buy a Domain Name Not Listed for Sale?

So far we have talked about the cost of domain names that are available for registration or sold by third-parties. What if you have your eye on a domain name that is already taken but not listed for sale?

There is a good chance that you can still get your hands on that particular domain name.

You see, many users register domain names to start a new online business idea. A lot of them end up never using that domain name or abandon the idea.

Since they’re not using the domain name, you can directly contact the domain owner to make an offer.

If the domain name has a website, then you can use the contact form on their website to reach out.

Alternatively, you can use the Whois search to find contact information of the domain owner and send them a message to show your interest.

Sometimes people register domain names for future ideas, so even if they’re not using it, they still wouldn’t want to sell it. Some folks get greedy and will ask for a premium to part ways with their domain.

Remember, you’re buying someone’s “dream idea”, so you need to be respectful but also realistic about the value.

Pro tip: If you have a business idea, then it’s better to register a domain name even if you’re not 100% sure. You don’t want to risk someone else registering it before you get around to it. We think of it as an insurance policy because a domain costs only $9.99.

Doing Your Homework Before Buying a Domain Name

If you are buying a domain name that has never been used before, then you are good to go.

However, if you are buying a domain name that was previously owned by someone else, then you need to do some basic due diligence.

These domain names could be violating copyright or trademark, used to distribute malware or spam, or misused in other malicious activities.

Don’t worry, there are plenty of tools that you can use to do your homework.

1. Check For Trademark

First, you would want to make sure that the domain name is not a registered trademark of an existing business.

According to ICANN rules, if a domain name violates a company’s registered trademark, then that company can claim the domain name or ask you to take it down.

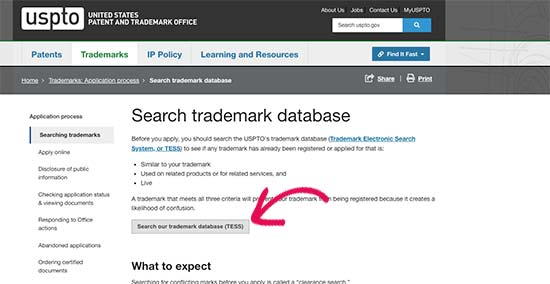
You can check the United States Patent and Trademark Office’s database to do a quick trademark search. Simply enter your domain name in the search box to see if it returns any matches.

Trademark search

2. Check Past Domain Name Usage

Next, you would want to see how the domain name has been used in the past. What kind of websites were made using that particular domain name?

The easiest way to do this is by using the Wayback Machine. It is a massive historical archive of the internet with snapshots of websites archived on a regular basis.

Wayback Machine

3. Check Historical Whois Records

Whois tools provides you historical whois records for a domain name. This helps you see when a domain name was created, last renewed, DNS changes, and other historical data.

Whois

4. Run a Domain Health Check Test

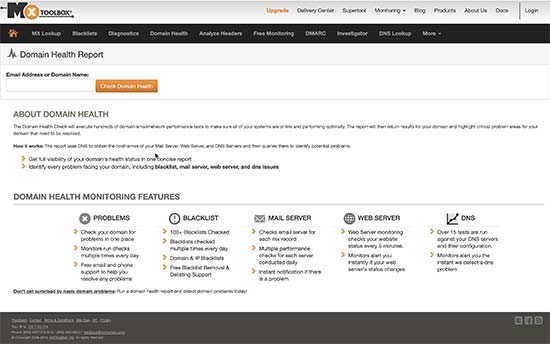
Finally, you need to make sure that the domain is not used to send spam, launch DDoS attacks, or spread malware. You can use MxToolBox’s domain health tool to see if raises any red flags.

Check domain health check

Frequently Asked Questions About Domain Name Costs

Having helped thousands of users start a blog and website, we have answered a lot of questions related to domain names. Below are some of the most common ones:

Can I get a domain name for free?

While domain name typically costs $14.99 / year, you can get a domain name for free as a bundled offer with various web hosting companies.

Hosting companies like Bluehost, HostGator, Dreamhost, GreenGeeks, and others offer free domains with their web hosting packages.

Which is the best domain name registrar?

We believe that Domain.com is the best registrar right now because they have the features you need, and they’re offering a 25% off discount.

However it’s a smarter money decision to get a free domain with web hosting like Bluehost because it saves you time and money.

You can always transfer your domain name to another popular domain name registrar if you’re not happy with your existing provider.

Do I need both domain name and web hosting to build a website?

Yes, you need both the domain name and web hosting to build a website. Domain name is your website’s address on the internet whereas web hosting is where your website files are stored. For more details, see our guide on difference between domain name vs web hosting (explained).

Can I buy a domain name forever (permanently)?

No, you cannot buy a domain name permanently. Domain name registration is done on a yearly basis. However, you can pre-pay for up to 10 years which guarantees that you will have a domain name for 10 years.

How much does a domain name cost on Wix vs WordPress?

When using a hosted website builder platform, the cost of your domain name will vary. It’s important to remember that website builder platforms offer a combination of hosting + domain.

For example, Wix domains cost $14.95 / year, but they are free if you choose the annual plan which costs $13 / month.

WordPress.com domains cost $18 / year, but they are included for free with the annual Personal plan which costs $8 / month.

But if you use a self-hosted WordPress platform, then you can start a website with Bluehost for $2.75 per month, and it comes with a free domain name. For more details, see the difference between WordPress.com vs self-hosted WordPress.org.

We hope this article helped you learn how much does a domain name really cost. You may also want to see our guide on how much does it really cost to build a WordPress website.

If you liked this article, then please subscribe to our YouTube Channel for WordPress video tutorials. You can also find us on Twitter and Facebook.

The post How Much Does a Domain Name Really Cost? (Expert Answer) appeared first on WPBeginner.


December 03, 2019 at 04:52PM

Monday, December 2, 2019

How to Add an Author Info Box in WordPress Posts

Do you want to add an author bio box in your WordPress posts? The author bio box is a small section where you can display information about the blog’s author, show their social media profiles, and more.

Many WordPress themes allow you to easily display author bio using the default WordPress functionality. However, some themes may not have this feature built-in, or you may want to change how they display the author bio section.

In this article, we will show you multiple ways to easily show an author info box in WordPress posts. We will also show you how to customize author bio and make it more useful.

Easily add an author info section to WordPress posts

Why and When You Need an Author Info Box in WordPress

Seeing an actual person behind the content helps build credibility and strengthens your site’s authority among users.

For a single-author WordPress blog, you can just add an about me page, but for a multi-author WordPress sites, you’ll need to add an author info box below each post.

This helps your users learn more about individual authors on your website. It also provides authors an additional incentive to contribute more often and interact with readers.

If you want more users to submit content to your website, then the author info box is a great way to attracts writers who are looking for exposure and new audiences.

Having said that, let’s take a look at how to easily add an author info box in WordPress posts.

Adding Author Info Box in WordPress Posts

WordPress is the best website builder in the world because of the flexibility and customization options it offers.

There are many different author bio plugins that you can use to add an author info section. We will show you the default WordPress method, two different plugins as well as the code method. This way you can choose a method that works best for your site.

Method 1: Adding Author Bio Using Your WordPress Theme

If your WordPress theme comes with an author information box below each article, then you can simply use that to display your author bio.

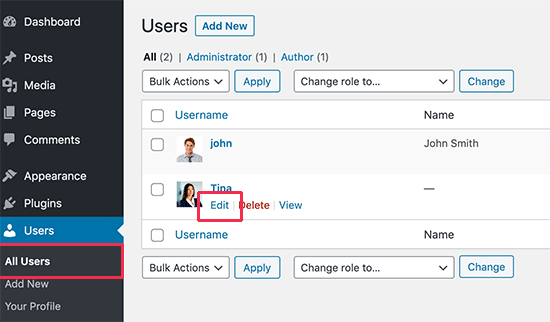
In order to make use of it, you will simply need to visit Users » All Users page. From here you need to edit the user you want to change.

Editing a user profile

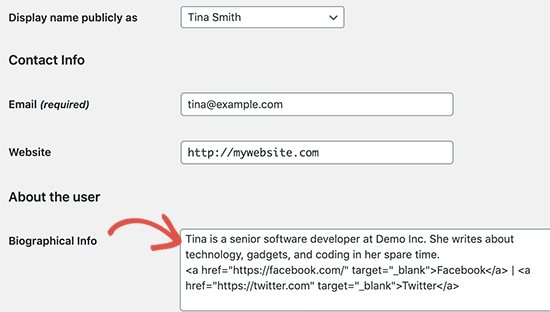
On the profile edit screen, scroll down to the ‘Biographical info’ section to add the author’s bio. You can also use HTML in this field to manually add links to the author’s social media profiles.

Add author bio in user profile

The author profile image is fetched using Gravatar. If the author has not set up a gravatar photo, then you can ask them to follow our guide for setting up a gravatar photo in WordPress.

Alternatively, you can also allow users on your website to upload a custom author profile photo by editing their profile.

Don’t forget to click on the ‘Update user’ button to save your changes.

You can now visit any article on your website to see your WordPress theme display author bio box below the content.

Preview default author info box

Method 2. Adding Author Info Box in WordPress Using a Plugin

If your theme does not show an author info box, or you want to customize it, then this method is for you.

For this method, we’ll be using a WordPress plugin to add author info box to your WordPress posts.

First, thing you need to do is install and activate the Author Bio Box plugin. For more details, see our step by step guide on how to install a WordPress plugin.

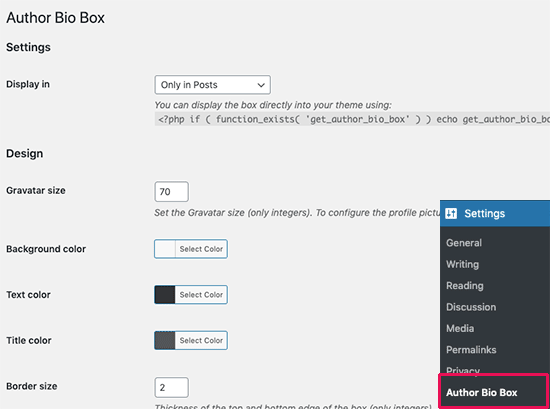
Upon activation, you need to visit Settings » Author Bio Box page to configure plugin settings.

Author Bio Box settings

From here, you can choose colors, gravatar size for the author photo, and location to display author bio box.

Once you are done, don’t forget to click on the ‘Save changes’ button to store your changes.

Next, you need to visit Users » All Users page and click on the ‘Edit’ link below the user you want to change.

Editing a user profile

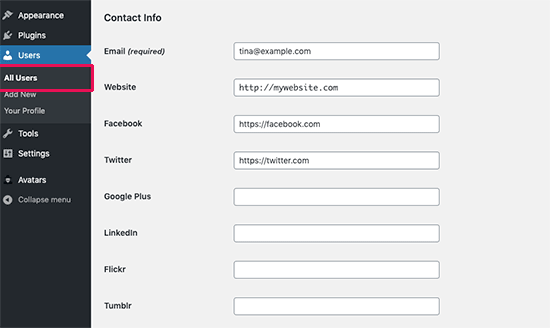
On the profile edit screen, you need to scroll down to ‘Contact Info’ section. From here you can add links to the author’s social media profiles.

Add social media links to user profile

The plugin will only show icons for social networks where you enter a URL.

After that, you can scroll down to the ‘Biographical Info’ section to add the author’s bio. You can also use HTML in this field to manually add links or use basic HTML formatting options.

Add author biographical information

Once you are finished, click on the Update user button to save your changes.

You can now visit any article written by that user to see the author info box in action.

Author info box plugin preview

Method 3: Display Author Info in a Sidebar Widget

Do you want to show the author info in the sidebar instead of below the article? If yes, then this method is for you because it allows you to show author info box in a sidebar widget.

For this method, you’ll need to install and activate the Meks Smart Author Widget plugin. For more details, see our step by step guide on how to install a WordPress plugin.

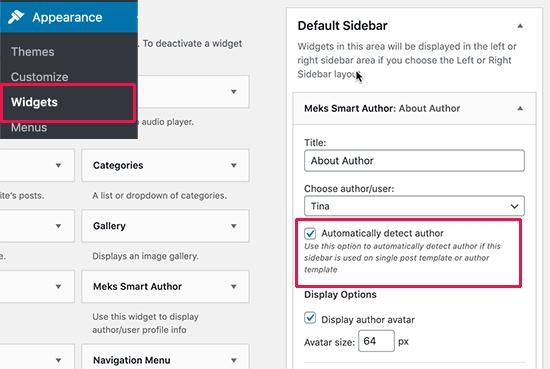
Upon activation, you need to visit Appearance » Widgets page. There you will find Meks Smart Author under the list of available widgets. You need to add this widget to the sidebar where you want to display the author information.

Adding author info widget

The widget comes with a number of options. The most important option that you need to check is the checkbox next to ‘Automatically detect author’ option.

Click on the Save button to store your widget settings. You can now visit your website to see the author’s information widget in action.

Author bio box widget

This plugin fetches user information from their WordPress profile. You or your authors will need to fill their biographical information by editing their profiles.

Method 4. Add Author Info Box Manually (Coding Required)

This method requires you to add code to your WordPress website. If you have not done this before, then please take a look at our guide on how to add code snippets in WordPress.

First, you need to add the following code to your theme’s functions.php file or a site-specific plugin.

function wpb_author_info_box( $content ) {
 
global $post;
 
// Detect if it is a single post with a post author
if ( is_single() && isset( $post->post_author ) ) {
 
// Get author's display name 
$display_name = get_the_author_meta( 'display_name', $post->post_author );
 
// If display name is not available then use nickname as display name
if ( empty( $display_name ) )
$display_name = get_the_author_meta( 'nickname', $post->post_author );
 
// Get author's biographical information or description
$user_description = get_the_author_meta( 'user_description', $post->post_author );
 
// Get author's website URL 
$user_website = get_the_author_meta('url', $post->post_author);
 
// Get link to the author archive page
$user_posts = get_author_posts_url( get_the_author_meta( 'ID' , $post->post_author));
  
if ( ! empty( $display_name ) )
 
$author_details = '<p class="author_name">About ' . $display_name . '</p>';
 
if ( ! empty( $user_description ) )
// Author avatar and bio
 
$author_details .= '<p class="author_details">' . get_avatar( get_the_author_meta('user_email') , 90 ) . nl2br( $user_description ). '</p>';
 
$author_details .= '<p class="author_links"><a href="'. $user_posts .'">View all posts by ' . $display_name . '</a>';  
 
// Check if author has a website in their profile
if ( ! empty( $user_website ) ) {
 
// Display author website link
$author_details .= ' | <a href="' . $user_website .'" target="_blank" rel="nofollow">Website</a></p>';
 
} else { 
// if there is no author website then just close the paragraph
$author_details .= '</p>';
}
 
// Pass all this info to post content  
$content = $content . '<footer class="author_bio_section" >' . $author_details . '</footer>';
}
return $content;
}
 
// Add our function to the post content filter 
add_action( 'the_content', 'wpb_author_info_box' );
 
// Allow HTML in author bio section 
remove_filter('pre_user_description', 'wp_filter_kses');

This code simply fetches the author information and displays it below WordPress posts. You need to style this author info box so that it looks nice and matches your WordPress theme.

You can add the following custom CSS to style your author box. Feel free to modify it to meet your needs

.author_bio_section{
background-color: #F5F5F5;
padding: 15px;
border: 1px solid #ccc;
}
 
.author_name{
font-size:16px;
font-weight: bold;
}
 
.author_details img {
border: 1px solid #D8D8D8;
border-radius: 50%;
float: left;
margin: 0 10px 10px 0;
}

This is how the author info box looked on our demo site.

Custom author info box

We hope this article helped you learn how to add an author info box to WordPress posts. You may also want to see our tips on how to increase your blog traffic, or our step by step guide on how to create an email newsletter.

If you liked this article, then please subscribe to our YouTube Channel for WordPress video tutorials. You can also find us on Twitter and Facebook.

The post How to Add an Author Info Box in WordPress Posts appeared first on WPBeginner.


December 02, 2019 at 04:00PM

Thursday, November 28, 2019

How to Get Google Sitelinks for Your WordPress Site

One of the questions we often get asked from readers is: how do I get additional links to appear under my site’s search results in Google?

Sometimes when you search for a company name in Google (like “wpbeginner”), you may notice that the search listing is larger than others because it contains sitelinks to other important pages from the website.

These sitelinks in Google helps your brand stand out and get more exposure. In this article, we will share how you can get Google sitelinks for your WordPress site.

How to Get Google Sitelinks in WordPress

Since this is a comprehensive guide on adding Google sitelinks, we have created a table of content for easy browsing:

Google sitelinks are additional sub-pages that appear under the first site in search engine ranking results (SERPs). These are often internal links to the most popular pages of that website. Google sitelinks are often shown when you search for a specific brand keyword because they help the user easily navigate around the website.

The exact number of Google sitelinks may vary for each website. A typical brand name search in Google can contain two, four, or six sitelinks displayed underneath the website name.

Here’s an example of what a Google sitelink looks like:

What are Google Sitelinks?

Google sitelinks are chosen by their algorithm to provide the best user experience because it allows users to head directly to the top pages without extra clicks.

If your website is brand new or does not get a lot of traffic, then Google may not display any sitelinks for your keyword.

Don’t worry, we’ll share some tips on how to influence Google sitelinks for your website. But before we do, let’s talk about why Google sitelinks are important.

Google sitelinks are coveted by business owners and SEO professionals because they help your brand stand out. Here are the top 5 reasons why Google sitelinks are important.

1. Google Sitelinks Improve Your Click-Through-Rate (CTR)

Studies show that the top 3 spots in Google get the most clicks. When sitelinks are shown for a specific brand, it takes up the same amount of space as three regular search listings.

This significantly increases your overall click-through rate. Simply put, more visitors will visit your website from the keyword.

Google Search Click-Through-Rate by Position

2. Google Sitelinks Help Build Trust and Credibility

As we mentioned earlier, Google Sitelinks are not shown for all websites. When Google display sitelinks for a brand, it means that a website is popular, well-optimized, and/or that Google believes the results are useful for the visitor.

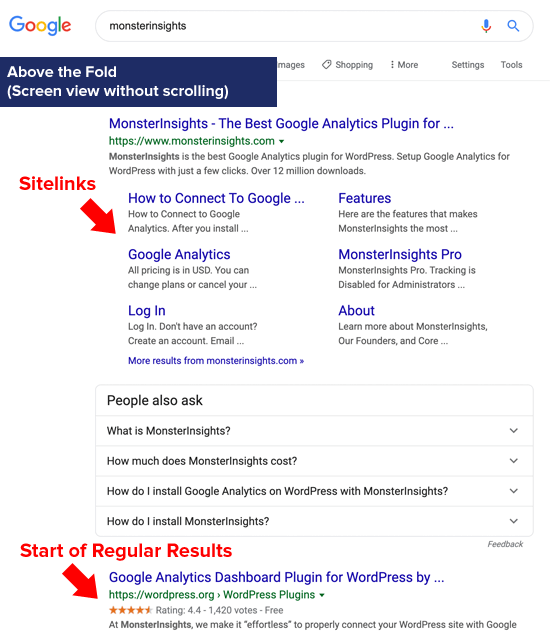
Google sitelinks take up a lot of screen space (a.k.a digital real-estate). This tells the user that Google believes the #1 result is a lot more relevant than others on the page.

Google Sitelinks Above the Fold (Digital Real Estate)

On mobile, the same sitelinks take even more screen space, further highlighting the brands credibility.

3. Google Sitelinks Can Increase Product Awareness

Google sitelinks highlight the most important pages on the website. This is based on what Google’s algorithm believes to be the most relevant to the user’s search intent.

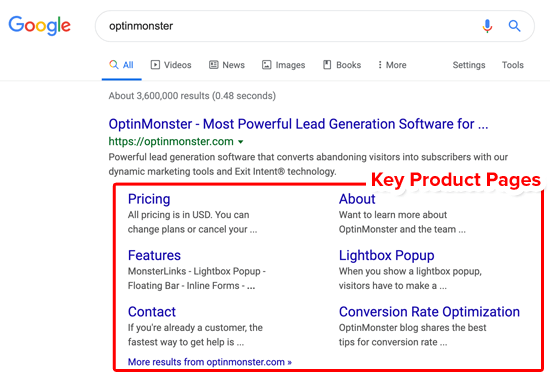
For a company like OptinMonster, this works out great because it lets new users quickly become aware of their product, features, pricing, and even blog content.

Google Sitelinks Key Product Pages

A new user may not know that the OptinMonster blog has the best conversion optimization tips, but because of Google sitelinks they’re more likely to check it out.

For an eCommerce website or online store, Google sitelinks may even show more personalized results to help users quickly discover and purchase available products.

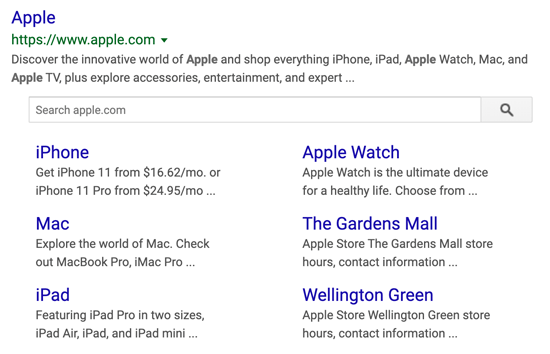
For example, when we search for Apple, Google sitelinks are personalized to not only show the top Apple products but also the closest physical Apple stores.

Google Sitelinks Personalized Results

This lets us easily discover Apple’s top products, and even have one-click access to the stores, hours, and directions. This is extremely helpful and makes it much more likely for the user to make a purchase.

4. Google Sitelinks Allow Users to Discover Top Pages

Google sitelinks can also act as a great “Start Here” point for websites with a lot of content. This makes it easier for users to discover the top pages on your website.

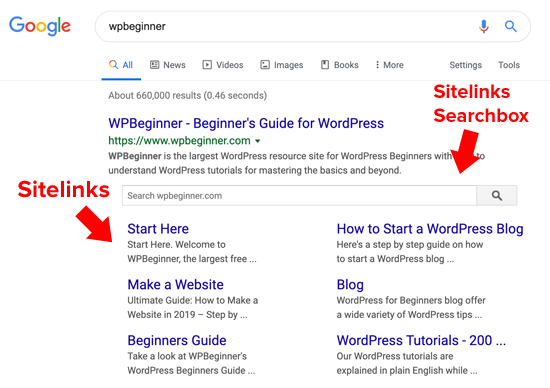
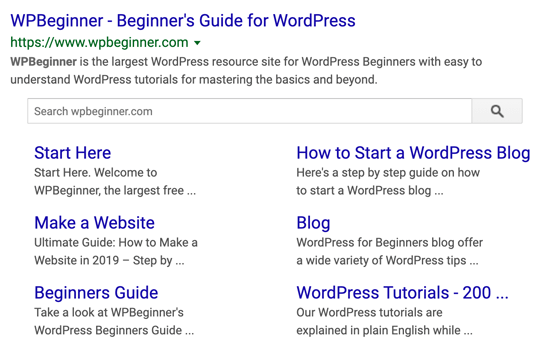
For example, if a new user searches for WPBeginner, they will see our most popular (and most helpful) content first such as our Start Here page, our guide on How to Start a Blog, How to Make a Website, our 200+ WordPress tutorials category, our WordPress Beginner’s Guide category, and of course our popular WordPress blog.

WPBeginner Google Sitelinks

5. Google Sitelinks Search Lets Users Browse Deeper Pages

For some websites, Google sitelinks may be accompanied by a dedicated site-specific search box. This Google sitelinks search box allow users to search within the specific website directly from Google.

This is an extremely powerful feature, so Google only adds it for websites with a lot of content because they believe that including a search box will be the most useful for the user.

Google Sitelink search box only appears with sites that contain a lot of content like WPBeginner, YouTube, Wikipedia, etc.

What are Google Sitelinks?

Now that you know the importance of Google sitelinks, let’s take a look at how you can add Google sitelinks to your website.

There’s no guaranteed way to get Google Sitelinks for your website. Unlike other SEO features, there’s no button that you can click in Google Search Console to enable sitelinks for your WordPress site.

Google sitelinks are automated, and they are displayed entirely based on Google’s algorithm. However you can follow certain SEO best practices to significantly improve your chances of getting Google sitelinks for your website.

Let’s take a look at the 8 best practices to get sitelinks for your website.

1. Your Website Name Must be Unique

Google sitelinks are primarily displayed on brand specific search queries, and they’re only added for the site that ranks #1 for that search results.

If you have a generic brand name like “Global HR Expert Consulting”, then you will likely struggle to rank at the top. Even if you get to position #1, Google still has a hard time deciding if the user is really searching for your company or the general topic.

This is why generic brand names don’t have sitelinks:

No Google Sitelinks for Generic Brands

Unless of course your brand becomes a household name like Apple, in which case Google knows the search intent is for people interested in the tech company, Apple, and not the fruit.

Since most companies will not have the marketing budget like Apple to become a worldwide brand, its better to select a more unique name for your company like WPBeginner, OptinMonster, etc.

Now if you already have an established brand, we definitely don’t recommend changing it just to get sitelinks because this is a very complicated task, and it has its own risks. For more details, see our guide on: how to move your site to a new domain.

2. Rank at Position #1 for Your Brand Name

As we mentioned earlier, Google sitelinks are only assigned to the first search result, so you need to work on ranking #1 for your brand term.

This can take some time for a new company, but with enough promotion you can get there.

For example, our new website, WP Mail SMTP, doesn’t rank #1 for its keyword, so we don’t have Google sitelinks yet.

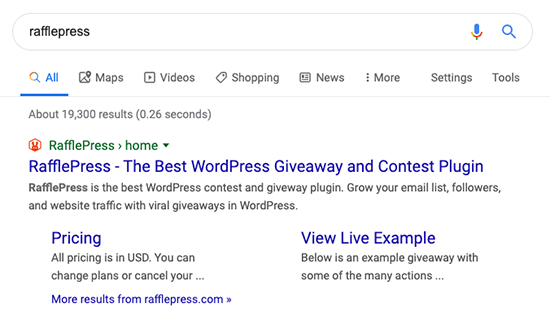
Whereas our other new website, RafflePress ranks #1, so it has Google sitelinks.

RafflePress Site Link Example

To improve your website’s ranking, you need to follow our WordPress SEO guide and implement the best practices. You also need to do keyword research and write quality blog posts that are optimized for SEO. After that, you need get backlinks to your site.

3. Use Proper Structured Data for SEO

Search engines use automated bots to crawl and index your website. These search engine bots look for structured data to better understand what is the website and the specific page is about.

Structured data can help improve your chances of getting a Google sitelink, featured snippet, and even appear in the answers box.

You can set this up by using a WordPress SEO plugin like Yoast SEO, All in One SEO, or another similar plugin that lets you add meta data and other schema elements.

Again like with anything else, Schema markups or Structured Data doesn’t guarantee that Google will add sitelinks, but it definitely improves your chances.

4. Have Clear Website Structure and Navigation

As a website owner, it is your job to make sure that Google and other search engines can easily find their way around your website.

You can do this by organizing your top pages in well-thought out hierarchical dropdown WordPress menus.

You can add breadcrumb navigation on your website to make it easy for users and search engines to see the site structure.

You also need to make sure that you have the important website pages like About, Pricing, Contact, etc created and linked from various areas of your website.

5. Create a Sitemap and Add Your Site to Google Search Console

Google and other search engines rely on XML sitemaps to properly discover and index all pages from your website.

You need to create an XML sitemap, and then submit it to Google search console.

This will make it easier for Google to discover all the pages on your site, and it can also help increase your chances of getting a Google sitelink.

6. Make Internal Linking a Habit

Internal linking is one of the most important part of on-page SEO. You need to make sure that you’re frequently linking to your top internal pages on your website.

Since Google uses backlinks as a ranking signal, internal linking helps Google see which pages are the most important on your site.

You can see how we have linked to various of our internal website content from this article.

7. Improve Page Titles and Make them Relevant

Page titles are probably the most important on-page SEO element. You need to make sure that your page title is relevant to the keyword you’re trying to rank for.

Google uses page titles to generate the sitelinks, so you need to make sure that your page titles are relevant.

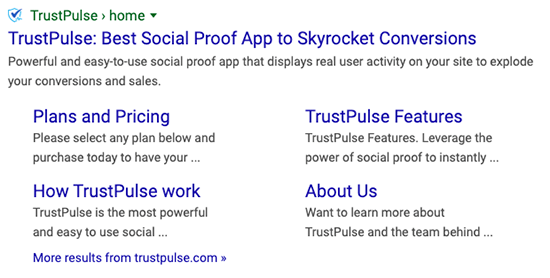
TrustPulse team has done a great job with their page titles:

Google Sitelinks Generated from Page Title

You can define the post or page title inside your WordPress SEO plugin settings for that respective page.

8. Increase Your Brand Awareness

As we mentioned earlier, that Google sitelinks are typically shown for established websites.

You don’t have to be a big brand like Apple or WPBeginner, but you need to raise enough awareness for Google to notice you.

Your website’s authority and presence online plays an important factor in Google’s ranking algorithm.

Here are few things you can do to boost your brand awareness:

  • Create social media profiles for your brand and make sure they link to you
  • Get positive business reviews about your brand on Facebook, Yelp, Google, and other review aggregators.
  • Guest blog on popular industry websites
  • Participate in community discussions and/or give interviews
  • Do press releases and reach out to news outlets to cover your brand

Brand awareness helps increase the number of brand search which is an indicator Google uses to determine if Sitelinks should be added for that particular term.

Just like Google sitelinks, the search box with sitelinks is also added based on Google’s discretion. The Google sitelinks search box is typically dedicated to websites with a large number of content such as WPBeginner, Wikipedia, YouTube etc.

What are Google Sitelinks?

With that said, you can add some code snippets on your website to encourage Google to display a site search box along with your Google sitelinks.

If you’re using the Yoast SEO plugin, then it adds the JSON+LD markup for site search automatically.

If you’re not, then you can use the Sitelinks Search Box plugin to add the relevant JSON LD schema markup.

Frequently Asked Questions about Google Sitelinks

In our Facebook Group and support channels, we have received many questions related to Google sitelinks. Below are the top ones.

How do I remove sitelinks from Google?

In the past, Google allowed webmasters to “demote” sitelinks from the Google search console. However that option was removed to simplify things. The only way to remove a specific page from Google sitelinks is to either delete the page or set it to noindex. There’s no way to disable Google sitelinks once they’re added unless you de-index your entire website which is not recommended.

How do I change Sitelinks in Google?

There is no way to change Sitelinks in Google. The Google algorithm automatically selects the relevant pages on your site and add it to the sitelink. You can customize the page titles, but it’s entirely up to Google as to what text they display. There’s no way to edit the text on Google sitelinks since it’s automated.

Can I pay to get Google sitelinks?

Sometimes beginners can confuse Google sitelinks with the Google Adwords Sitelink extension. When you’re paying for ads, Google lets you use the sitelink extension to add additional sublinks as part of your ad. This does not influence the Google sitelinks on your organic listing.

We hope this article helped you learn how to get Google sitelinks for your WordPress site. You may also want to see our guide on how to increase your blog traffic and how to monetize your blog.

If you liked this article, then please subscribe to our YouTube Channel for WordPress video tutorials. You can also find us on Twitter and Facebook.

The post How to Get Google Sitelinks for Your WordPress Site appeared first on WPBeginner.


November 27, 2019 at 09:10PM

Tuesday, November 26, 2019

How to Prevent Clients from Deactivating WordPress Plugins

Do you want to prevent clients from accidentally deactivating WordPress plugins on the website?

If you make websites for clients, then you probably already have a favorite toolkit of must-have WordPress plugins to install on each site. You may also add custom code snippets inside site-specific plugins for that client.

However, clients can accidentally deactivate one of those plugins, which may affect their site’s functionality or even break it completely.

In this article, we’ll show you how to safely prevent clients from deactivating WordPress plugins without restricting their control on the website.

How to stop clients from deactivating crucial plugins in WordPress

We will cover two methods, and you can choose the one that works best for you. We’ll also discuss some alternative approaches along the way.

Let’s start with the easiest option.

Method 1. Prevent Plugin Deactivation in WordPress by Using a Plugin

This method is easier and less intrusive. It also gives all users with administrator role full control, and they can turn it off whenever they want.

Basically, we will be using a plugin that will remove the ‘Deactivate’ link from all plugins. Users would still be able to install new plugins and can disable this prevention anytime at their own risk.

The first thing you need to do is install and activate the Disable Plugin Deactivation plugin. For more details, see our step by step guide on how to install a WordPress plugin.

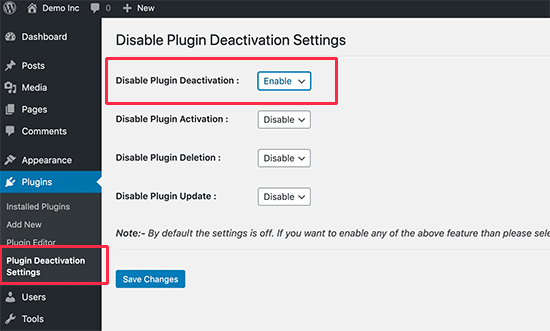
Upon activation, you need to visit Plugins » Plugin Deactivation Settings page to configure plugin options.

Disable Plugin Deactivation settings

Simply select ‘Enable’ next to ‘Disable Plugin Deactivation’ option to turn off the ‘Deactivate’ link for all plugins.

Optionally, you can also disable plugin activation which will stop users from activating any other plugin. You can also turn off plugin deletion and prevent users from installing plugin updates.

Note: You should never disable plugin updates on client sites. This would compromise WordPress security and make your client vulnerable to security threats.

Don’t forget to click on the ‘Save changes’ button to store your settings.

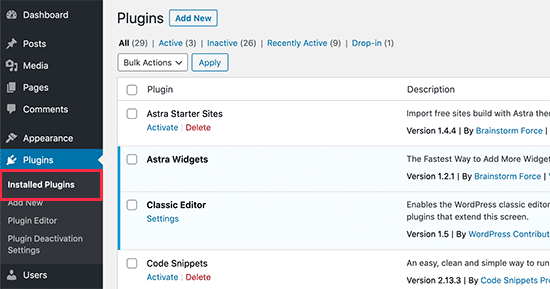
You can now visit the plugins page to see the plugin in action. You’ll not see the ‘Deactivate’ link below any of the active plugins on the website.

No deactivation

The plugin provides an easier and non-obtrusive way to disable the plugin deactivation option. However, your clients can simply go to Plugins » Plugin Deactivation Settings page and disable this feature.

Method 2. Prevent Specific Plugins from Deactivation

This method allows you to prevent deactivation of a single plugin or a group of specific plugins installed on a website.

You’ll need to add code to your WordPress website. If you have not done this before, then take a look at our guide on how to easily add code snippets in WordPress.

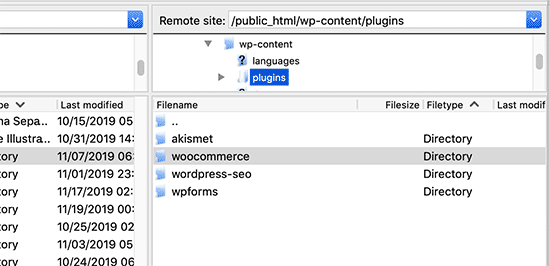
First, you need to find the plugin locations that you want to disable. WordPress plugins are stored in the wp-content folder on your website.

You can view this folder by connecting to your WordPress hosting account using an FTP client. Inside the plugins folder, you’ll see different folders for each plugin installed on that website.

Plugins folder

Inside each folder, you’ll also find a plugin file, which is usually named after the plugin and ends with .php extension.

Next, you need to add the following code to your theme’s functions.php file or a site-specific plugin.

add_filter( 'plugin_action_links', 'disable_plugin_deactivation', 10, 4 );
function disable_plugin_deactivation( $actions, $plugin_file, $plugin_data, $context ) {

        if ( array_key_exists( 'deactivate', $actions ) && in_array( $plugin_file, array(
                'wpforms/wpforms.php',
                'woocommerce/woocommerce.php'
        )))
                unset( $actions['deactivate'] );
        return $actions;
}

As you can see in the above code, we have disabled deactivation for two plugins, WPForms and WooCommerce.

We have added the plugins by mentioning their location inside the plugins folder. For example, wpforms/wpforms.php

Don’ forget to replace plugin locations with the plugins that you want to protect.

You can now visit the plugins page, and you will notice the deactivate link disappear below those plugins.

Specific plugins protected

This method is better as it only affects crucial plugins. Your clients will still be able to deactivate other plugins, install new plugins, delete plugins, and update all plugins.

Limiting Plugin Access by User Roles and Permissions

WordPress comes with a built-in user role management system. A default WordPress installation comes with the following user roles:

To learn more, see our complete beginner’s guide to WordPress user roles and permissions.

Only the Administrator user role has permission to manage plugins. If you are making a website for a client, then you can create two user accounts for them.

One with the Administrator privileges, which will allow them to manage the website on their own. After that, you can add a second user account with the Editor user role. Your clients can use it to create content.

This would reduce the chances that they will accidentally deactivate crucial plugins. You’ll need to educate them to use the Administrator account carefully for installing updates or adding new users.

Alternately, you can create a custom user role with a specific set of permissions. This way you can create a user role that can modify themes but cannot manage plugins.

We hope this article helped you learn how to prevent clients from deactivating WordPress plugins. You may also want to see our guide on how to create a custom WordPress login page for your clients.

If you liked this article, then please subscribe to our YouTube Channel for WordPress video tutorials. You can also find us on Twitter and Facebook.

The post How to Prevent Clients from Deactivating WordPress Plugins appeared first on WPBeginner.


November 26, 2019 at 07:00PM

Monday, November 25, 2019

120+ Black Friday / Cyber Monday 2019 WordPress Deals – Big Savings

Looking for the best Black Friday and Cyber Monday deals on your favorite WordPress products?

The next few days are the perfect time to buy premium WordPress plugins, themes, web hosting, and tools to grow your business. As always, to help you find the best deals, we have created the ultimate listed of best WordPress Black Friday and Cyber Monday deals for 2019. Some of these are exclusive just for WPBeginner readers.

View our Complete Black Friday and Cyber Monday List for 2019

Bonus Giveaways

Some WordPress companies are doing exclusive Black Friday giveaways. Here are the top ones:

Once again, to see all the WordPress Black Friday deals, click here!

View our Complete Black Friday and Cyber Monday List for 2019

The post 120+ Black Friday / Cyber Monday 2019 WordPress Deals – Big Savings appeared first on WPBeginner.


November 25, 2019 at 02:37PM