Saturday, December 21, 2019

How to Enable Automatic Updates in WordPress for Major Versions

Did you know that WordPress comes with automatic updates enabled for minor releases? This means that the WordPress.org team can automatically install security updates without requiring user input.

However, it does not automatically update your website when there is a new major release. Unless you are on a managed WordPress hosting service, you’ll have to manually initiate the update yourself.

In this article, we’ll show you how to easily enable automatic updates in WordPress for major releases as well.
Turning on automatic updates for major WordPress releases

How WordPress Automatic Updates Work

WordPress introduced automatic updates feature in WordPress 3.7 (October 24, 2013). This allowed WordPress to automatically install a new minor release to improve your website security.

There is an option to disable automatic updates in WordPress. However, we recommend that you keep automatic updates enabled because they usually address crucial security issues and vulnerabilities.

Managed WordPress hosting providers like WP Engine and Liquid Web automatically update WordPress for all new releases not just minor ones.

Now if you just run one or two WordPress websites, then you can simply follow our guide to safely update your WordPress site.

On the other hand, if you manage multiple WordPress sites, then updating all of them can be very time consuming.

Luckily, you can also enable auto-updates on a shared hosting provider like Bluehost, SiteGround, etc. You’ll just need to make sure that you have a proper backup system in place, so you can revert updates in case something goes wrong.

That being said, let’s take a look at how to easily setup automatic updates for major WordPress releases.

Preparing for Automatic Updates in WordPress

The most important layer of security you can add to any website is to set up a backup system. Whether you turn on automatic updates or not, you should always have an automatic backup system in place for every WordPress website.

There are several helpful WordPress backup plugins that you can use set up automatic back ups on your WordPress site.

We recommend using the UpdraftPlus plugin because it is the most popular WordPress backup plugin on the market, and it is free. UpdraftPlus allows you to easily set up automatic backups of your complete WordPress website.

It also allows you to automatically store your backup files to a remote location like Google Drive, Dropbox, etc.

Once you have set up automatic WordPress backups, you can go ahead and turn on automated WordPress update for major releases.

Method 1. Enable Automatic WordPress Updates for Major Releases Using a Plugin

This method is easier and recommended for all users.

First, you need to install and activate the Easy Updates Manager plugin. For more details, see our step by step guide on how to install a WordPress plugin.

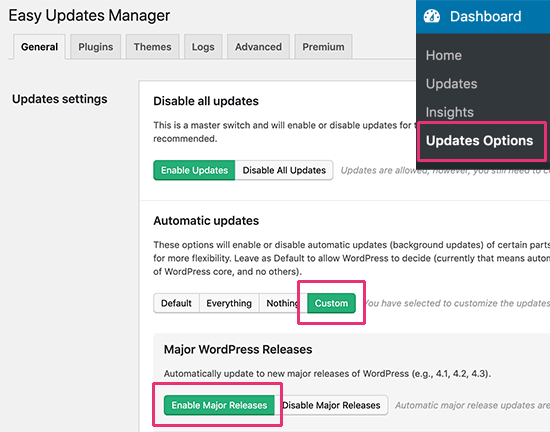
Upon activation, you need to visit Dashboard » Updates Options page to setup the plugin.
Enable automatic updates

Under the ‘Automatic updates’ section, click on the ‘Custom’ option. After that, click on the ‘Enable Major Releases’ button under the ‘Major WordPress Releases’ section.

The plugin will automatically store your settings and enable the major WordPress releases to be automatically updated.

This plugin also allows you to set up other automatic updates or disable them. See our detailed guide on how to better manage automatic WordPress updates for more details.

Method 2. Manually Enable Automatic Update for Major Releases in WordPress

This method requires you to add code to your WordPress files.

First, you need to add the following line of code to your site’s wp-config.php file.

define( 'WP_AUTO_UPDATE_CORE', true );

There is one little problem with this code. It also enables development or nightly updates.

To disable nightly builds and development updates, you need to add the following code in a site-specific plugin or Code Snippets plugin.

add_filter( 'allow_dev_auto_core_updates', '__return_false' );

This filter will disable automatic updates for nightly builds or development updates.

Your WordPress site is now ready to automatically update itself, without your input, whenever there is a new WordPress version available.

Frequently Asked Questions about WordPress Automatic Updates

1. Why do I need to install WordPress updates?

WordPress is a regularly maintained software. Thousands of developers contribute to make WordPress better and secure.

You need to install WordPress updates as soon as they are available. This ensures that your website has the latest security patches, new features, and best speed and performance.

2. Are updates safe for my website?

As the world’s most popular website builder, WordPress updates immediately become available to millions of websites. The core team works very hard to ensure that they are absolutely safe for all websites to install.

However, we recommend everyone to always back your WordPress website before updates. This allows you to quickly revert back in case anything goes wrong after an update.

3. Can I also automatically update WordPress plugins?

By default, WordPress requires you to manually install plugin updates. However, you can enable automatic updates for plugins as well. See our guide on how to enable automatic updates for WordPress plugins.

4. Can I install updates on all my websites from a single dashboard?

By default, you’ll need to login to each WordPress website to install updates. Luckily, you can use tools to manage multiple WordPress sites. These tools make it easier to install updates on all your WordPress sites without having to login to each site.

We hope this article helped you learn how to enable automatic updates in WordPress for major releases. You may also want to see our ultimate list of most wanted WordPress tips, tricks, and hacks.

If you liked this article, then please subscribe to our YouTube Channel for WordPress video tutorials. You can also find us on Twitter and Facebook.

The post How to Enable Automatic Updates in WordPress for Major Versions appeared first on WPBeginner.


December 20, 2019 at 05:00PM

Thursday, December 19, 2019

How to See the Keywords People Use to Find Your WordPress Site

Do you want to see the keywords people use to find your WordPress website?

Keywords are the phrases users type in search engines to find the content they are looking for. You would want your website to rank for the right keywords that describe what you are offering.

In this guide, we will show you how to easily see the keywords people use to find your WordPress site.

View the keywords your website ranks for

What is Keyword Tracking and Why is it Important?

Keyword tracking is basically the activity of monitoring the position of your website for specific keywords in search engines like Google, Bing, etc.

Keyword tracking helps you see important metrics such as which specific keywords people use to find your website, so you can focus on what’s working and stop spending time on what’s not.

When it comes to WordPress SEO optimization, we often recommend users to do keyword research and add proper meta description / keywords to their website. This helps your website rank higher in search engines.

But what many beginners don’t know is that search rankings change quite often. If a new competitor enters the market or your previous competitor further improves their SEO, then you can lose the rankings that you previously had and thus the traffic along with it.

Sometimes Google algorithm updates can also cause your website to increase or decrease in rankings for your top keywords.

At WPBeginner, we believe that its easier to double your website traffic and sales when you know exactly how people find and use your website.

With that said, let’s take a look at how to see the keywords people use to find your website.

Tracking Keywords People Use to Find Your Site

The best way to track keywords people use and the keywords where your website ranks is by using Google Search Console.

Google Search Console is a free tool offered by Google to help website owners monitor and maintain their site’s presence in Google search results.

We’ll show you how to connect search console to your Google Analytics along with how to bring those reports right inside your WordPress dashboard.

Finally, we’ll cover how to track not just your own keywords, but also the keywords your competitors are ranking for.

Sounds good? Let’s get started.

Tracking Your Website Keywords in Google Search Console

If you have not already done so, then you need to add your website to Google Search Console. We have a detailed tutorial on how to add your WordPress site to Google Search Console.

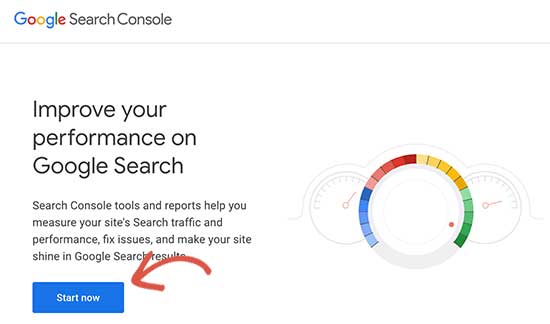
You can simply visit the Google Search Console website and follow the instructions in our tutorial.

Start Google Search Console

Once you have added your website to Google Search Console, you’ll be able to use it to monitor your search rankings.

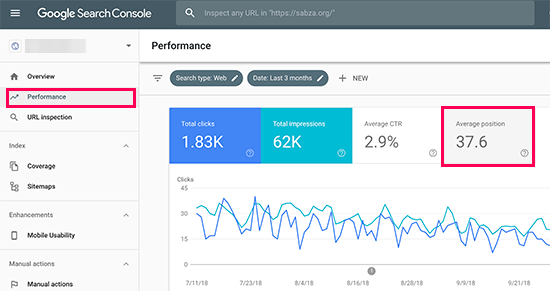
To view your keyword positions, click on the Performance report and then click on the average position score.

Track your keyword positions

Search Console will now load your reports with the average position column included.

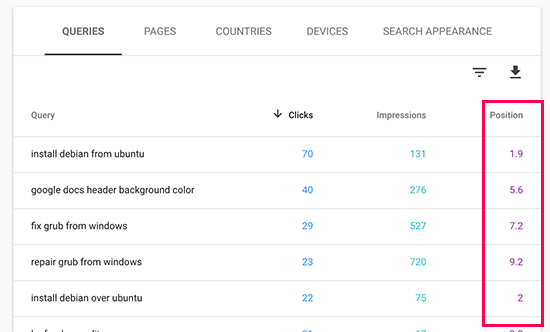
Next, you need to scroll down a bit to see the full list of keywords your website ranks for.

View your keyword rankings

You will see a list of keywords with number of clicks, impressions, and position of that keyword in search results.

You can sort the data by clicks, impressions, and position columns. You can see your top ranking keywords by sorting the data by position.

As you scroll down, you will be able to see keywords where your site appears deeper in search results. You can optimize your content to rank higher for those keywords as well.

Method 2. Track Your Keywords Inside WordPress with MonsterInsights

For this method, we’ll be using MonsterInsights to fetch our Google Search Console data inside the WordPress dashboard.

This method has two advantages.

  • You get to see your keywords right inside WordPress admin area
  • You’ll see it along with your other MonsterInsights reports which will help you plan more effeciently

MonsterInsights is the #1 Google Analytics plugin for WordPress. It allows you to easily install Google Analytics in WordPress and shows you human-readable reports right inside your WordPress dashboard.

First, you need to do is install and activate the MonsterInsights plugin on your website. For more details, see our step by step guide on how to install a WordPress plugin.

For step by step instructions, see our complete guide on how to install Google Analytics in WordPress.

Once you have installed and set up MonsterInsights, the next step is to connect your Google Analytics account to your Goole Search Console account.

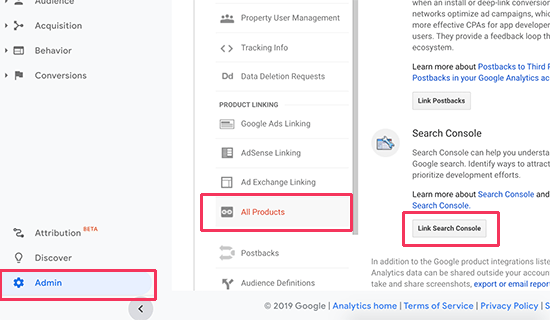
Simply, login to your Google Analytics account and then click on the Admin button from the bottom left corner of the screen.

Link search console

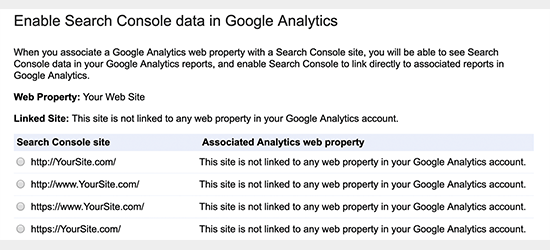
Next, you need to click on ‘All products’ under the property column and then click on the ‘Link Search Console’ button.

This will take you to the Search Console settings page where you need to click on the Add button. After that, you’ll see a list of websites added to your Google Search Console account.

Select Google Search Console property

Click on the OK button to continue and your Analytics and Search Console accounts will now be linked.

You can now view the keywords your website ranks for inside the WordPress admin area.

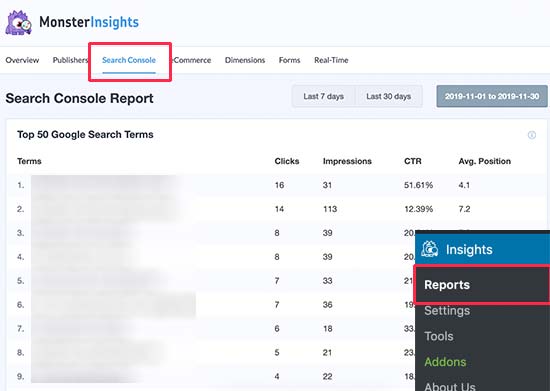
Simply go to Insights » Reports and then switch to the Search Console tab.

Search console report

You’ll see a list of keywords where your website appears in the search result. Next, to each keyword you’ll also see the following parameters:

  • Clicks – How often your site is clicked when it appears for this keyword
  • Impressions – How often it appears in search results for that keyword
  • CTR – Click through rate for this keyword
  • Average position – Your site’s average position in search results for that particular keyword

Method 3. Tracking Your Keyword Rankings in Google Analytics

In the previous method, we showed you how to connect Google Search Console to your Google Analytics account and view the reports inside your WordPress dashboard.

However, you can also view your keyword rankings inside Google Analytics.

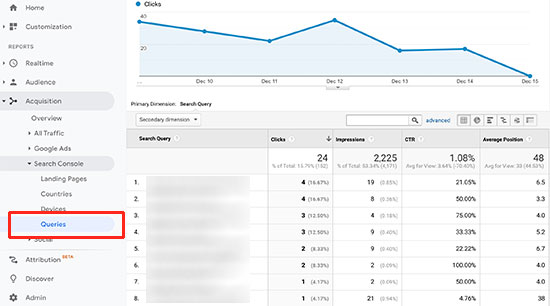
Simply, login to your Google Analytics dashboard and go to Acquisitions » Search Console » Queries report.

Search keywords in Google Analytics

Your search keywords will be listed under the Search Query column. For each keyword, you’ll also see its CTR, impressions, and average position.

Method 4. Tracking Competitor Keywords using SEMRush

Do you want to track not just yours but also the keywords your competitors are ranking for? This method allows you to do that with actual tips on how to outrank your competition.

We’ll be using SEMRush for this method. It is one of the top SEO tools on the market because it helps you get more search traffic to your website.

We use it on our many websites to gather competitive intelligence.

First, you need to sign up for an SEMRush account. Note: You can use our SEMRush coupon to get a better deal.

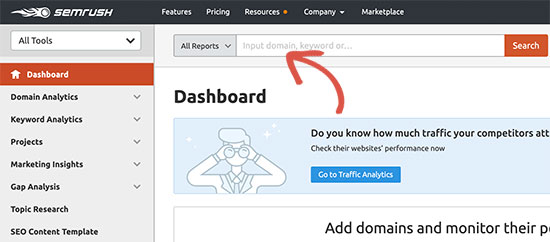
After you have created an account, you can enter your domain name at the top search bar under SEMRush dashboard.

Track a domain name in SEMRush

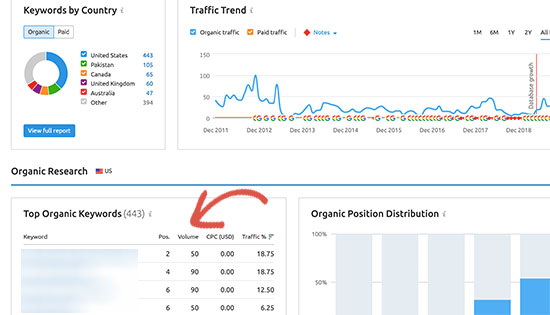
Next, SEMRush will show you full keyword report with a list of your top ranking keywords.

Keywords list in SEMRush

Click on the View Full Report button to get the full list of keywords.

Next to each keyword, you’ll see its position, volume of search, cost (for paid advertisement), and the percentage of traffic it sends to your website.

You can also enter your competitor’s domain name to download a full list of all the keywords where they rank.

Tips on Improving The Keywords Where Your Website Ranks

As you go through the list of keywords, you’ll notice some of your results rank quite well (under top 10) with significant impressions but very low CTR.

This means that users didn’t find your article interesting enough to click on. You can change that by improving your article’s title and meta descriptions. See our guide on how to improve blog post SEO to rank higher.

You’ll also see keywords where your website can easily rank higher. You can then edit those articles and improve them by adding more helpful content, adding a video, and making it easier to read.

If you are using SEMRush, then you can use their Writing Assistant Tool which helps you improve your content by making it more SEO friendly for that particular keyword. See our guide on using the SEO writing assistant for more details.

We hope this article helped you learn how to see the keywords people use to find your WordPress site. You may also want to see our guide on how to easily increase website traffic with practical tips for beginners.

If you liked this article, then please subscribe to our YouTube Channel for WordPress video tutorials. You can also find us on Twitter and Facebook.

The post How to See the Keywords People Use to Find Your WordPress Site appeared first on WPBeginner.


December 19, 2019 at 05:38PM

Wednesday, December 18, 2019

How to Redirect Users after Successful Login in WordPress

Have you ever wanted to redirect users to a specific page after they login to your WordPress site?

Depending on the user’s role, WordPress would either take them to the dashboard or their profile section in the WordPress admin area.

In this guide, we’ll show you how to easily redirect users after a successful login in WordPress. We’ll also show you how to redirect after login based on user roles and permissions.

Easily redirect users after WordPress login

Why Redirect Users After Login in WordPress?

A lot of website owners run multi-user WordPress websites. For example, a multi-author blog, a membership community, or an online store.

All these websites require users to login to perform certain actions and access their account details.

Many WordPress membership plugins and eCommerce software automatically handle redirects by showing user custom login pages and redirect them to a custom account management page.

However, some websites may not be using such a plugin. In that case, users will be redirected to the default WordPress admin area.

The default WordPress method doesn’t offer users clear guidance on what to do next. While this may work for bloggers and writers, this is not an ideal user experience for your users and customers.

That being said, let’s take a look at how to easily redirect users after successful login in WordPress. We’ll show you two methods, and you can pick the one that best meets your requirements.

Method 1. Setting up Login Redirects in WordPress using Peter’s Login Redirect

This method is easier and allows you to set up login redirects based on user roles and permissions.

The first thing you need to do is install and activate the Peter’s Login Redirect plugin. For more details, see our step by step guide on how to install a WordPress plugin.

Upon activation, you need to visit Settings » Login/logout Redirects to setup the plugin.

It allows you to set up post login redirects for various situations. Let’s take a look at each one of them.

Setup Login Redirect for Specific Users

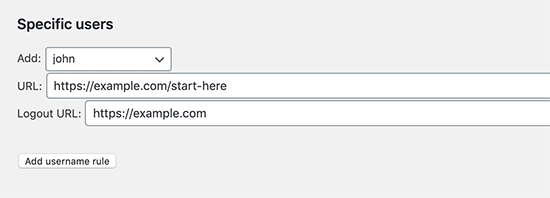
The first option on the settings page allows you to redirect only specific users. You can select a username from the drop-down menu. After that, you can enter the URLs to redirect a user on login and logout.

Redirect specific user

Once done, click on the Add username rule button to store this setting. Repeat the process if you need to set up redirects for more individual users.

Setting up Login Redirect by User Role in WordPress

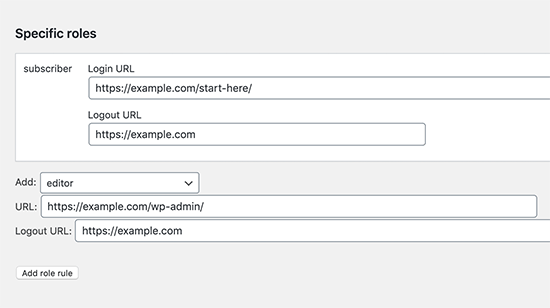
You can also set up a login redirect based on user role in WordPress. You simply need to select a user role from the drop down list and then enter the redirect URL. For example, you can redirect editors to the admin-area and subscribers to a custom page.

Redirect by user role

Setting up Login Redirect by Capabilities in WordPress

The plugin also allows you to set up login redirects based on user levels and capabilities. This option is particularly useful if you are using user roles with custom capabilities in WordPress.

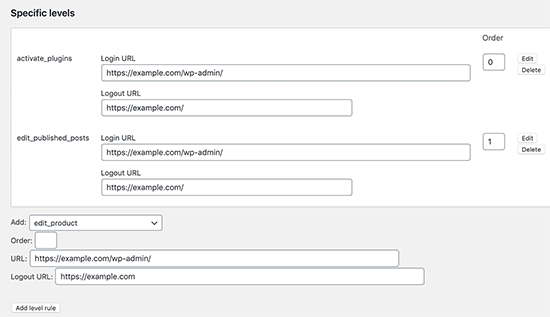
Simply select a user level from the drop-down menu and enter login and logout URLs. You can set order to any number, and this will determine how this rule is stored and displayed in plugin settings.

Redirect by user level

Setting up Login Redirect for All Users in WordPress

On the plugin’s settings page, there is an option to set a redirect for all other users. If a user does not match any rules you set above, then you can redirect them by entering a URL here.

You can also use this setting to create a site-wide redirect for all users.

Redirect all other users

Setting up a User Registration Redirect in WordPress

When a new user signs up on your site, WordPress redirects them to the login page. You can set up a redirect URL to send them to any other page on your site under the Post Registration section.

Post registration redirect

For example, you can redirect them to a welcome page with links to different things they can do on your website.

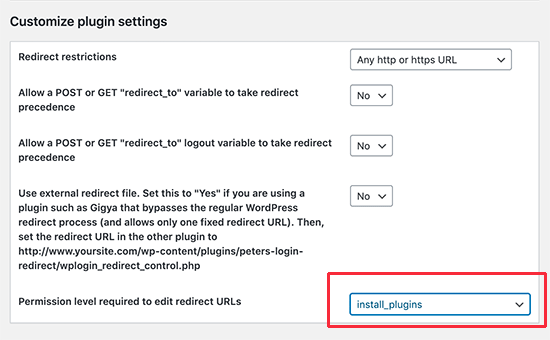
Important: Do not forget to change permission level under ‘Customize plugin settings’ section. The plugin allows anyone who can edit categories to edit redirect URLs. This means a user with the Editor user role can set up redirects. We recommend changing this to install_plugins, so only users with administrator role can setup redirects.

Plugin access

Method 2. Set up Login Redirects in WordPress Using WPForms

If you want to create a custom login form in WordPress, then you can use WPForms to set it up with a post-login redirect.

WPForms is the best WordPress contact form plugin on the market. It allows you to easily create beautiful forms and add them to your WordPress site.

It is a premium plugin, and you’ll need at least their “Pro” plan to access login form feature.

First, you need to do is install and activate the WPForms plugin. For more details, see our step by step guide on how to install a WordPress plugin.

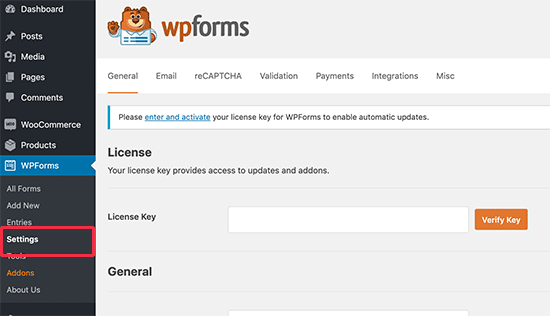
Upon activation, you need to visit WPForms » Settings page to enter your license key. You can find this information under your account on WPForms website.

WPForms License key

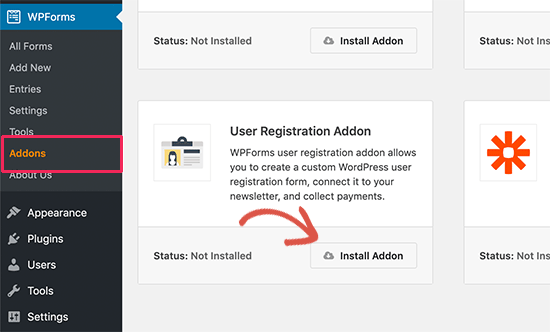
After entering the license key, you would be able to install add-ons. Go ahead and visit WPForms » Addons page and locate the User Registration Addon.

Install user registration and login forms addon

Next, click on the Install Addon button to download and activate the addon. You are now ready to create your own custom login forms.

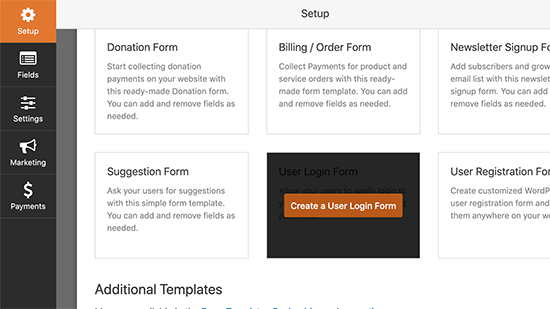
Next, you need to visit WPForms » Add New page and scroll down to the ‘User Login Form’ template. You need to click on the ‘Create a User Login Form’ button to continue.

Load login form template

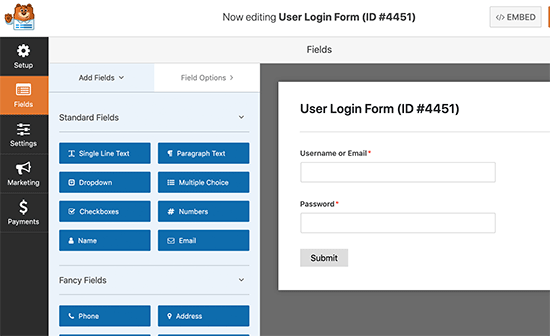
WPForms will load the User Login Form with required fields. You can click on the fields to add your own description or text around them. You can also click on the Submit button and change its label to ‘Login’.

Build your login form

Finally, you can set up login redirect for this login form.

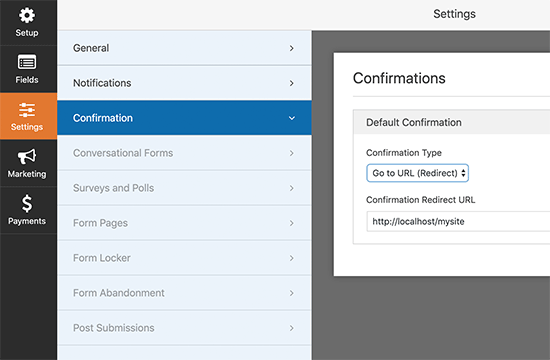
Go to Settings » Confirmation tab from left columnns and select ‘Go to URL’ redirect as your confirmation type.

Redirect logged in users

Below that you can enter the URL where you want users to be redirected.

Your login form is now ready. You can save your settings and exit the WPForm builder interface.

Now let’s add your login form to your website.

Simply edit the page where you want to display the login form or create a new one. On the page edit screen, add the WPForms block to your content area.

Adding WPForms block in WordPress

Next, select the login form you created earlier, and WPForms block will automatically load it inside the content area.

The advantage of this method is that you can set up a redirect for your custom login form, and you can also use page builders like Beaver Builder or Divi to create stunningly beautiful login pages.

Creating a landing page for your login form

Troubleshooting Login Issues in WordPress

Setting up redirects using the methods described above works like a charm. On rare occasions, you may see issues, depending on how your WordPress website is set up, and the plugins you are using.

Here are some tips to help you resolve you resolve those issues.

1. Update Your Permalink Structure

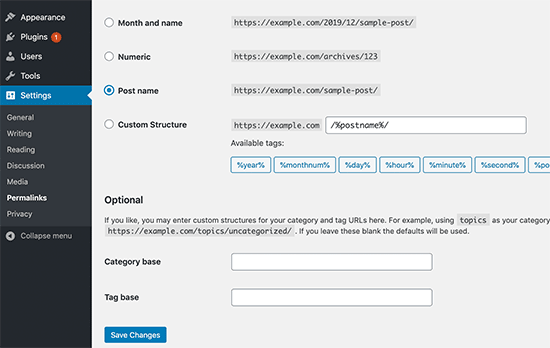
Simply go to Settings » Permalinks page and click on the ‘Save settings’ button without making any changes.

Update permalink structure

This refreshes the WordPress permalink settings. Keep this tip handy as it can also help fix other redirect issues in WordPress.

2. Fix Login Page Redirect Issue

If you the WordPress login page keeps refreshing and redirecting you back to the login form, then this is a sign of a conflicting setting.

For troubleshooting this problem, see our guide on how to fix WordPress login page refreshing and redirecting issue.

3. Follow General Troubleshooting Tips

The most likely problem behind login issues is a plugin or theme conflict. To figure out which one is causing the problem, follow the step in our ultimate WordPress troubleshooting guide.

We hope this article helped you learn how to easily redirect users after successful login in WordPress. You may also want to see our complete WordPress security guide to keep your user data safe and secure.

If you liked this article, then please subscribe to our YouTube Channel for WordPress video tutorials. You can also find us on Twitter and Facebook.

The post How to Redirect Users after Successful Login in WordPress appeared first on WPBeginner.


December 18, 2019 at 05:00PM

Tuesday, December 17, 2019

How to Rename Images and Media Files in WordPress

Ever wanted to change an image file name after uploading it to WordPress? Image file names are important for image SEO and can help more users find your website.

While WordPress allows you to change an image alt tag and caption, there is no built-in option to change an image file name from the admin area.

In this article, we will show you how to easily rename images and media files in WordPress. We’ll also show you a method to replace media files after renaming them on your computer.

Rename image files and media in WordPress

Why Rename Images and Media File Names in WordPress?

Images can help you get more traffic to your website. Particularly, if you upload original images and other media files to your website.

However, unlike text, search engines and users both need your help to describe those images. This is a major part of optimizing image SEO.

One of the best ways to help search engines and your users find these images is by giving them a meaningful filename. For example, a file name like newyork-skyline.jpg is a lot more helpful than DSC00789.jpg.

Now the problem is that a lot of users upload images directly from their phones or cameras. Some users download images from other sources and forget to rename them before the upload.

Once you have uploaded those images to WordPress, there is no default option to rename those images or any media files.

Having said that, let’s take a look at how to easily rename images and media files in WordPress.

Renaming Images and Media Files in WordPress

This method does not automatically change the image file name in WordPress. However, it does allow you to manually change an image filename inside the WordPress admin area.

The first thing you need to do is install and activate the Phoenix Media Rename plugin. For more details, see our step by step guide on how to install a WordPress plugin.

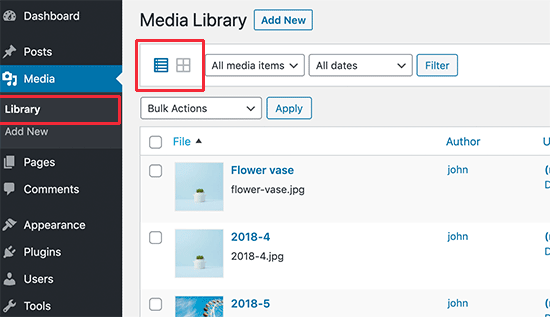
Upon activation, simply go to Media » Library. If your media library is displayed in the grid view, then you will need to switch to the list view.

Switching from grid to list view in WordPress media library

This will allow you to view more details for each media file including the file name.

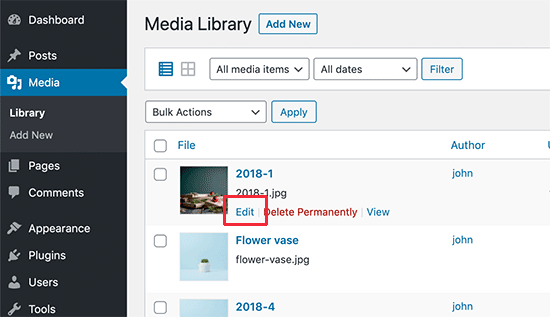
Next, you need to click on the ‘Edit’ link below the image or media file that you want to rename.

Edit media file

This will open your image in the WordPress media edit screen. From here, you can edit details of an image like Alt tag, caption, and more.

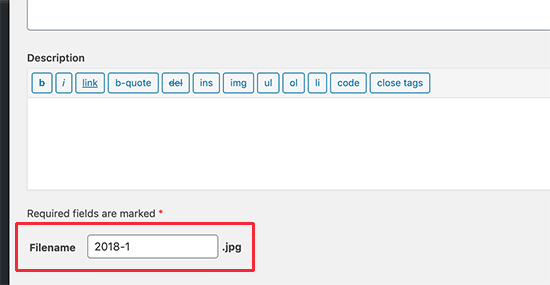
Scroll down to the bottom and you’ll see the filename field.

Change image file name

From here, you can change the file name. We recommend giving it a keyword-focused and meaningful name that actually describes the image. We recommend only using all lowercase letters and dashes between two words.

After that, click on the ‘Update’ button to save your changes.

That’s all. You have successfully renamed the media files without leaving the WordPress admin area. The plugin will also update the file name if you have used the image in a post or page.

Replace Image and Media Files in WordPress

If the above method does not work you, then you can try this method. Basically, you’ll download the file to your computer and rename it there.

After that, you’ll replace the original file on your website with the renamed version by using a plugin.

The first thing you need to do is install and activate the Enable Media Replace plugin. For more details, see our step by step guide on how to install a WordPress plugin.

After that, visit Media » Library page. If you are using the grid-view, then you would need to switch to the list view.

Switching from grid to list view in WordPress media library

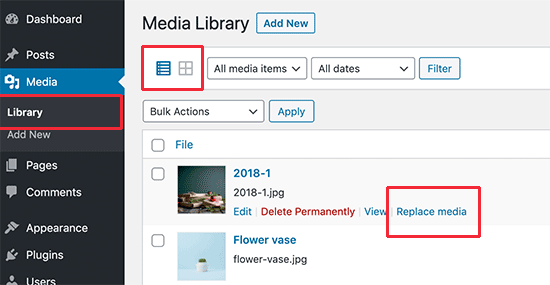
You will now see a new link to replace the media below each item in your media library.

Replace media link

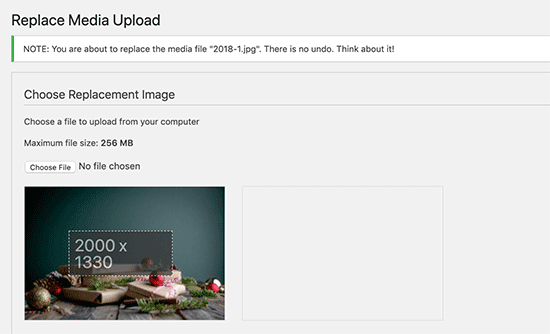
This will bring you to the replace media page.

First, you need to choose the file from your computer that you want to upload and replace the old file with. Make sure that you have already changed the file name on your computer.

After that, you need to scroll down a little for more options.

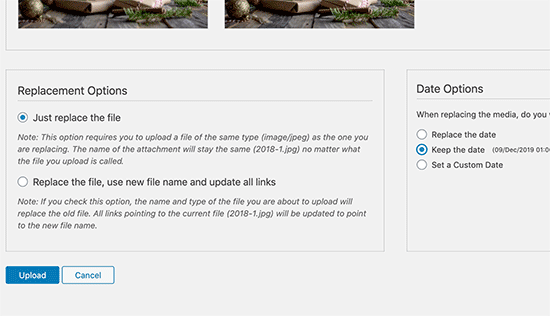
Under replacement options, you can choose whether you just want to replace the file or also want to replace all the links. We recommend using the second option if you have already added that file to your WordPress posts and pages.

Replace options

You can also choose to keep the old date or use a new date.

Finally, click on the ‘Upload’ button to replace the old media file with the new and renamed file.

We hope this article helped you learn how to easily rename images and media files in WordPress. You may also want to see our article on best WordPress image compression plugins compared.

If you liked this article, then please subscribe to our YouTube Channel for WordPress video tutorials. You can also find us on Twitter and Facebook.

The post How to Rename Images and Media Files in WordPress appeared first on WPBeginner.


December 17, 2019 at 05:00PM
Monday, December 16, 2019

How to Track and Reduce Form Abandonment in WordPress

Do you want to track and reduce form abandonment in WordPress?

Abandoned forms result in lower conversions, and less revenue. Wouldn’t it be great if you can track form abandonment and recover abandoned form leads.

In this article, we’ll show you how to easily track and reduce form abandonment in WordPress.

 How to track abandoned forms in WordPress

What is Form Abandonment?

Form abandonment is a term used to describe situations when a user leaves a form without submitting it. This could be due to a faulty form, bad user experience, or unknown reasons like users changing their minds.

It applies to any form on your website. It could be your email newsletter form, a WooCommerce checkout form, contact form, and more.

If users reach the form and decide not to fill it or leave it halfway, then that’s form abandonment.

Why You Need to Reduce Form Abandonment

Forms are really important for the success of any website. You need them to grow your email list, increase eCommerce conversions, and grow your business.

However, more than 77% of online shoppers abandon their checkout forms. That’s a lot of money in terms of unfinished sales.

Tracking form abandonment helps you stay on top of your game.

First, you’ll be able to figure out which forms are abandoned frequently. After that, you can figure out what you can do to make them better.

That being said, let’s start with the form tracking part first.

Tracking Form Abandonment in WordPress

The best way to track form abandonment on your WordPress website is by using MonsterInsights.

It is the #1 Google Analytics plugin for WordPress and allows you to easily track website traffic using Google Analytics.

You’ll need at least their Pro plan to access the Form addon.

First, you need to install and activate the MonsterInsights plugin. For more details, see our step by step guide on how to install a WordPress plugin.

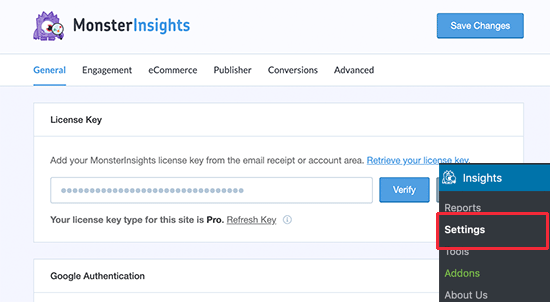
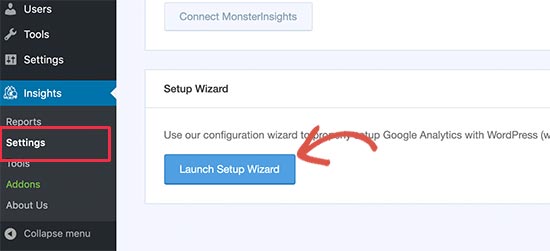
Upon activation, go to the Insights » Settings page to enter your license key. You can find this information under your account on the MonsterInsights website.

Enter MonsterInsights license key

If you already have a Google Analytics account, then you can simply connect to it using MonsterInsights set up wizard.

Launch set up wizard

If you don’t have a Google Analytics account or need more detailed instructions, then see our beginner’s guide on how to install Google Analytics in WordPress.

Once you have set up MonsterInsights, it is time to set up form tracking.

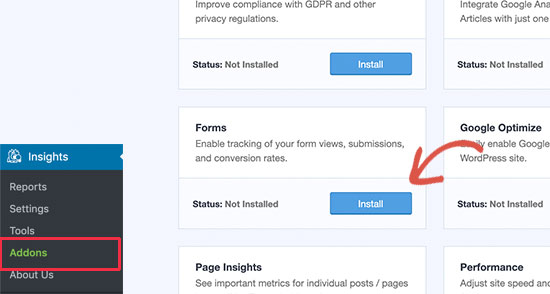
Simply go to the Insights » Addons page, scroll down to the Forms addon and then click on the Install button.

Install Forms Addon

Once you have installed and activated the forms addon, MonsterInsights will automatically detect your WordPress form plugin and enable form tracking.

You can verify it by visiting the Insights » Settings page and switching to the ‘Conversions’ tab. From here, you can see your form builder listed under the ‘Enable Form Conversion Tracking’ option.

MonsterInsights form conversion tracking

Now that everything is setup, you just have to wait a few hours for MonsterInsights to collect data as your users fill forms on your website.

Viewing Form Reports in MonsterInsights

MonsterInsights makes Google Analytics reports easy to understand. The form addon shows you how users on your website interact with forms in terms of conversions and form abandonment.

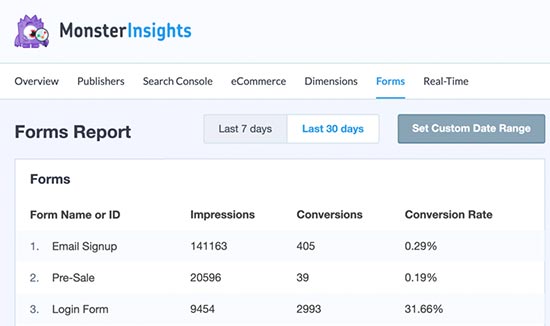
Simply go to Insights » Reports page and switch to the forms tab.

MonsterInsights forms report

You’ll see a list of forms on your website with their impressions, conversion, and conversion rates.

You can see forms with higher impressions and low conversion rates. These are the forms that your users are viewing but not filling out.

Let’s find out what’s stopping users from filling those forms.

Recovering Abandoned Form Entries with WPForms

WPForms is the best WordPress contact form plugin on the market.

It comes with a form abandonment addon which helps you track abandoned forms and even allows you to save partial entries. You can then reach out to those users as prospective customers.

You’ll need at least their Pro plan to access the Form Abandonment addon.

First you need to install and activate the WPForms plugin. For more details, see our step by step guide on how to install a WordPress plugin.

Upon activation, you need to visit WPForms » Settings page to enter your license key. You can find this information under your account on WPForms website.

WPForms License key

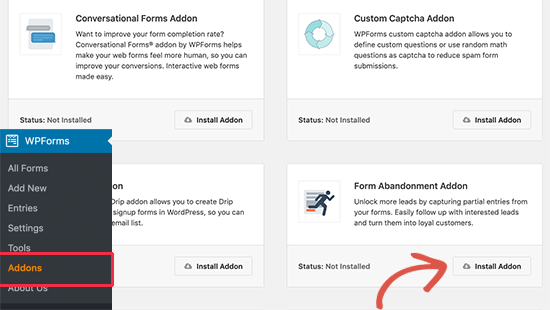
Next, go to the WPForms » Addons and install Form Abandonment Addon.

Install form abandonment addon

After that, you are now ready to create forms that can automatically save abandoned forms.

Simply go to WPForms » Add New page to create your first form.

Creating a new form

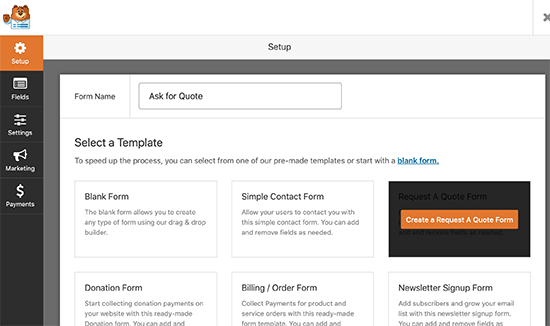
You’ll be asked to provide a title for your form and then choose a template. WPForms comes with some pre-made templates for different scenarios. You can also use a blank template to create a form from scratch.

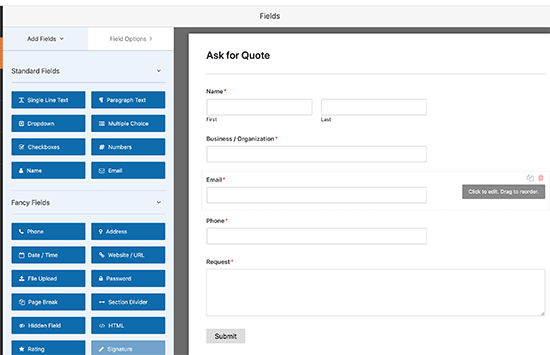
Next, WPForms will load the form entries. You can edit the existing entries by clicking on them. You can also move them up and down, or add new fields from the left column.

Edit your form

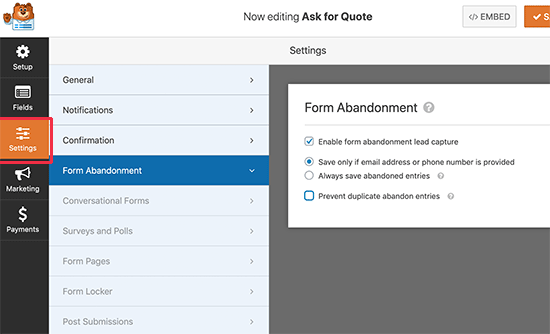
Once you are satisfied with the form entries, switch to the ‘Settings’ tab from the left column and then select ‘Form Abandonment’ option.

Form abandonment settings

From here, you can turn on the form abandonment feature for this particular form. Once done, you can save your form and exit the builder interface.

Next, let’s add this form to your WordPress site. Simply edit the post or page where you want to add the form and then add the WPForms block to the content editor.

Adding WPForms block in WordPress

After that simply select the form you created earlier from the drop down menu. You can now save or publish your post or page.

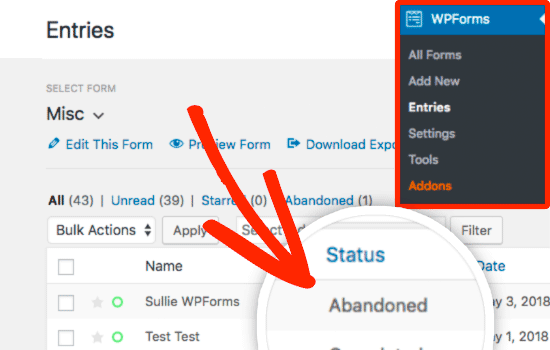
Now give your form a few days to collect entries. After that, you can go to WPForms » Entries page to see all your form entries.

Abandoned WPForms

You’ll see abandoned as the status for the entries where a user decided to leave the form without submitting.

You can click on Entries to view the captured data of your abandoned form.

Tips to Reduce Form Abandonment in WordPress

So far we have learned how to track and recover abandoned forms in WordPress.

Let’s talk about how to reduce form abandonment.

First, you need to figure out why a form is not converting so well. You don’t need to make an educated guess when there are actual tests you can run first.

1. Improve Form Pages Speed

Speed is one of the top reasons for users abandoning shopping carts and online forms.

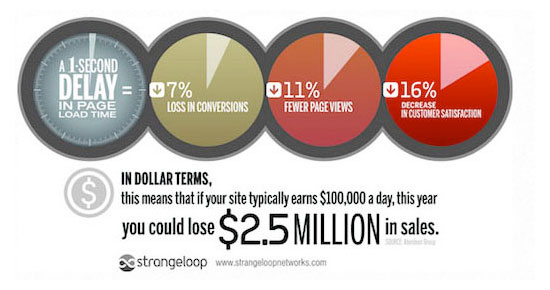
According to a StrangeLoop case study, a 1 second delay in page load time can lead to 7% loss in conversions, 11% fewer page views, and 16% decrease in customer satisfaction.

Strangeloop case study

Test the pages containing your forms for speed and performance using an online speed test tool.

If your form pages are loading slowly, then you need to follow our WordPress speed optimization guide to improve performance.

2. Create Better Forms

As a website owner, you want to collect as much user information as possible, so you can serve them better.

However, this could make your forms lengthier, and users don’t like long forms.

Here are a few things you can do to improve your forms.

  • Remove unnecessary form fields. These are the form fields that you don’t really need and can do without.
  • Use multi-page forms. If you have to create lengthier forms, then try multi-page forms. They are easier to fill and provide much better user experience.
  • Use form landing pages whenever possible. Using form landing pages allows you to remove clutter from the screen which may be distracting users.
  • Use conversational form styles to make your forms interactive and joyful.

3. Use Conversion Optimization Software

If you are serious about boosting form conversions, then you need to start using OptinMonster.

It is the best conversion optimization software on the market and helps you convert website visitors into subscribers and customers.

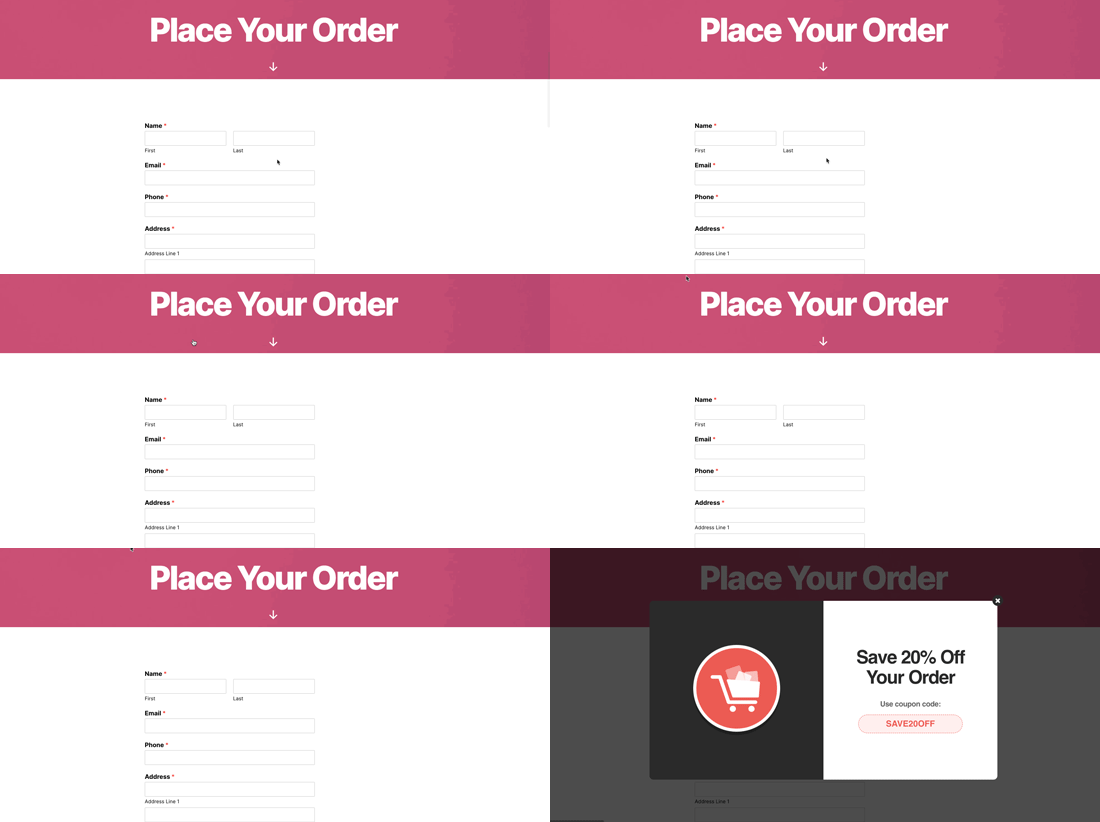
OptinMonster comes with exit-intent popups. This allows you to show targeted popups to users when they are about to leave a page. Using this on your form pages will help you drastically reduce form abandonment on your website.

Exit intent popup

For detailed instructions, see this tutorial on how to create a coupon popup using OptinMonster.

We hope this guide helped you learn how to track and reduce form abandonment in WordPress. You may also want to see our pick for the best email marketing services and best business phone services for small business.

If you liked this article, then please subscribe to our YouTube Channel for WordPress video tutorials. You can also find us on Twitter and Facebook.

The post How to Track and Reduce Form Abandonment in WordPress appeared first on WPBeginner.


December 16, 2019 at 07:08PM