Thursday, September 17, 2020

How to Create a Local WordPress Site Using XAMPP

Do you want to create a local WordPress site on your computer using XAMPP?

Installing WordPress on your computer helps you try out WordPress, test themes and plugins, and learn WordPress development.

In this article, we will show you how to easily create a local WordPress site Using XAMPP.
Creating local WordPress install using XAMPP

Why Create a Local WordPress Site?

Creating local WordPress sites is a common practice among developers and site owners. It allows you to test WordPress without creating an actual website on the internet.

Local websites are only visible to you on your computer. You can try different WordPress themes and plugins, test their features, and learn the WordPress basics.

If you already have a WordPress website, then you can create a local copy of your website on your computer to try out new plugin updates before implementing them on your live website.

Important: Local website will only be visible to you on your computer. If you want to make a live website, then you’ll need a domain name and WordPress hosting.

Follow the step by step instructions in our how to start a WordPress blog guide when you are ready to create a live website.

Having said that, let’s check out how to install WordPress locally on Windows, Mac, or Linux using XAMPP.

What is XAMPP?

XAMPP is a software package that includes all things you need to set up a local server environment on your computer.

In order to create a local WordPress site, you need to set up a web server software (Apache), PHP, and MySQL on your computer.

PHP is a programming language and MySQL is a database management software. Both of them are required to run WordPress.

Installing each of them separately is quite difficult for beginners. This is where XAMPP comes in.

XAMPP makes it easy for you to build WordPress websites locally. It is available for Windows, Mac, and Linux based computers.

Let’s get started by installing XAMPP and setting it up to run your local WordPress site.

Installing XAMPP on Your Computer

First, you need to visit the XAMPP website and click on the download button for your operating system.
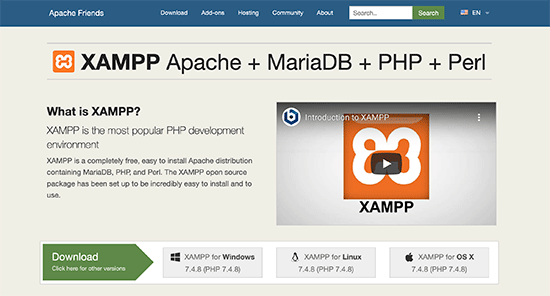
Download XAMPP to your computer

Depending on your operating system, your installation wizard and the application interface may differ from the screenshots here. For the sake of this article, we’ll show you the Windows version of the software.

After downloading XAMPP, you will need to click and run the installer.
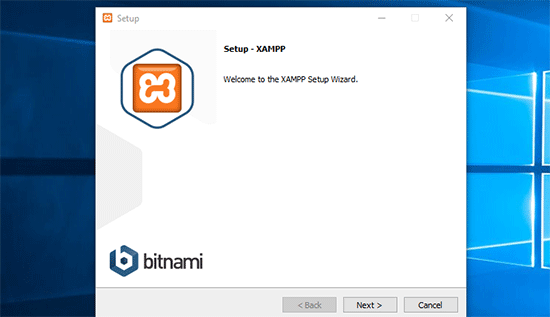
XAMPP set up wizard

XAMPP will ask where to install the software and which packages you’d like to install. The default settings will work for most users. Keep clicking on the ‘Next’ button to finish the setup wizard.

After finishing the wizard, check the ‘start the control panel now’ option and then click on the finish button.
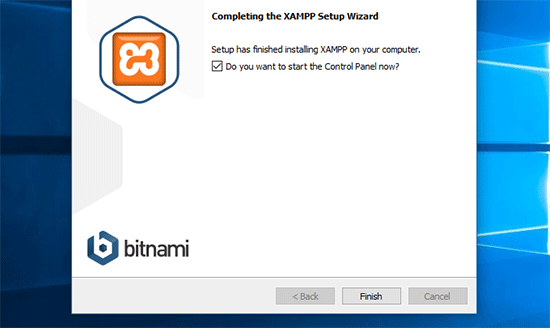
Finish set up and launch XAMPP control panel

This will launch the XAMPP control panel app.

Using the XAMPP app, you can run Apache web server as your local server and MySQL as your database server. Go ahead and click on the start button next to both Apache and MySQL.
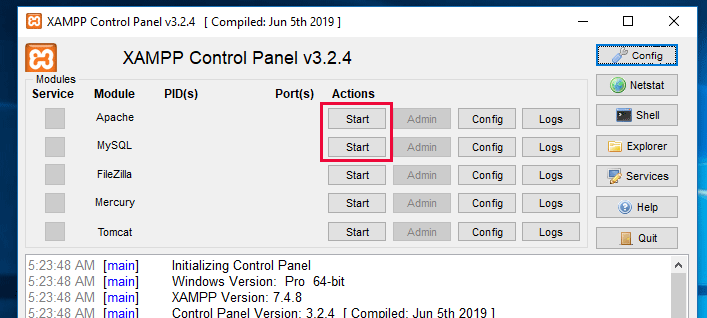
Start Apache and MySQL to launch your local server

XAMPP will now start Apache and MySQL. You may see a Windows firewall notification, it is important that you click on the ‘Allow Access’ button for both applications to run on your computer.
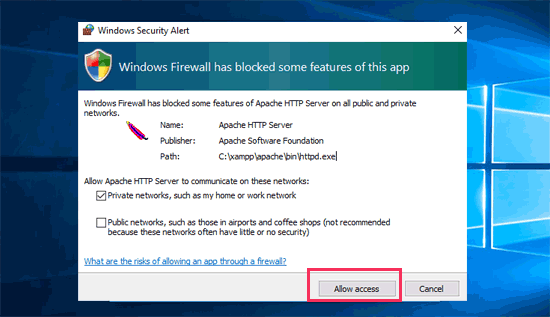
Allow firewall access to Apache and MySQL

Once both applications are started their names will be highlighted in Green.

Now you are ready to create a local website and install WordPress using XAMPP.

Creating a Local WordPress Site with XAMPP

First, you will need to download WordPress. Visit the WordPress.org website and click on the ‘Download WordPress’ button.
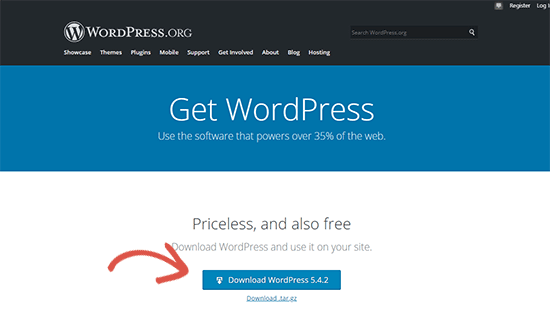
Download WordPress

After downloading WordPress, you need to extract the zip file, and you will see a wordpress folder. You need to copy this folder.
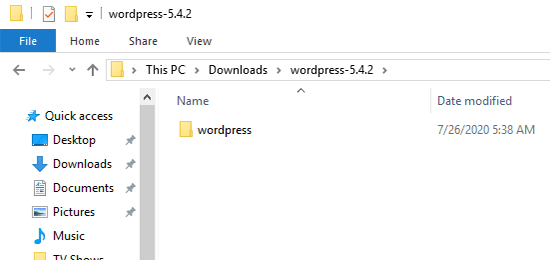
WordPress folder

Next, head over to your XAMPP installation folder.

On Windows it would be C:/Program Files/XAMPP/htdocs or C:/Xampp/htdocs folder.

On Mac, it will be /Applications/XAMPP/htdocs folder.

Paste the wordpress folder you copied earlier inside htdocs.

We recommend renaming the wordpress folder to websites or anything else. This will help you easily identify your local site.
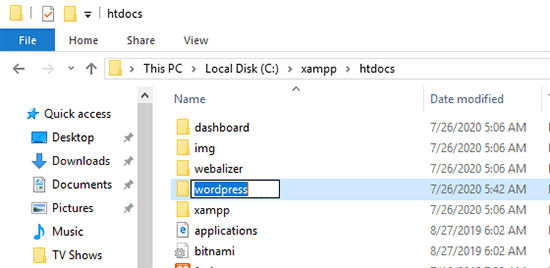
Rename WordPress folder

Next, you need to open your favorite web browser and enter the following URL in your browser’s address bar.

https://localhost/website1/

If you renamed the WordPress folder something else, then replace website1 with your own folder name.

This will load the WordPress installation wizard and you’ll be asked to select a language. After selecting a language, click on the ‘Continue’ button.
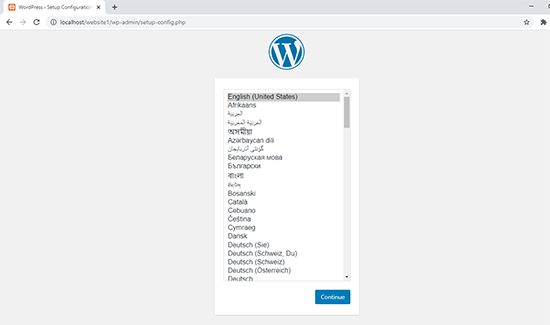
Select language

On the next screen, you will see a notice that WordPress needs a database name, database username, password, and host information.
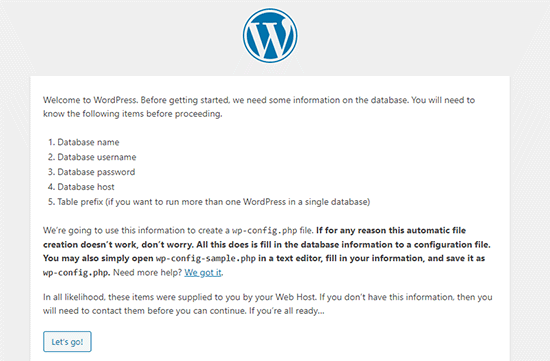
WordPress installation requirements

Let’s create a database for your WordPress site.

You’ll need to open a new browser tab and visit https://localhost/phpmyadmin/.

This will launch the phpMyAdmin app that comes pre-installed with XAMPP. It allows you to easily manage your databases using a simpler interface.

You would need to click on Databases, and provide a name for your new database. After that, click on the ‘Create’ button to continue.
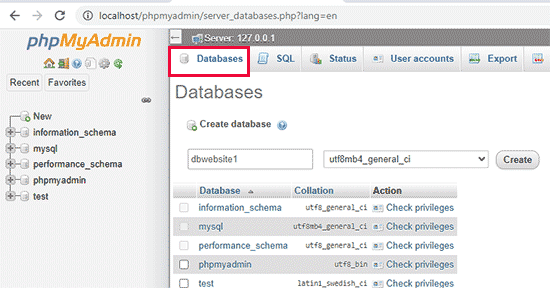
Creating a database for your local WordPress site

Now that you have created a database, you can use it for your WordPress site.

Switch back to /localhost/website1/ browser tab and click on the ‘Let’s Go’ button.

On the next screen, you will be asked to provide your WordPress database information.

Enter the database name you created earlier. Your username is ‘root’ and you should leave the password field blank. For the database host field, you need to use localhost.
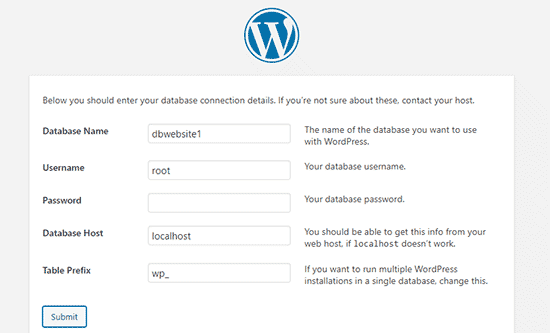
Enter your WordPress database information

Once you are done, click on the ‘Submit’ button to continue.

If you are on Windows or Linux, WordPress will now store these settings in your WordPress configuration file called wp-config.php file.

However, if you are on Mac, then it will show you the contents of the file and will ask you to create it.

You will need to create this file in your website’s root folder.

After creating the file, paste the text you copied earlier inside it. Next, you need to save the file and return back to WordPress installer to continue.

In the next step, WordPress will ask you to provide information about your website. First, enter the title you want to use for this site.

After that, you need to enter a username, password, and email address for your admin account.
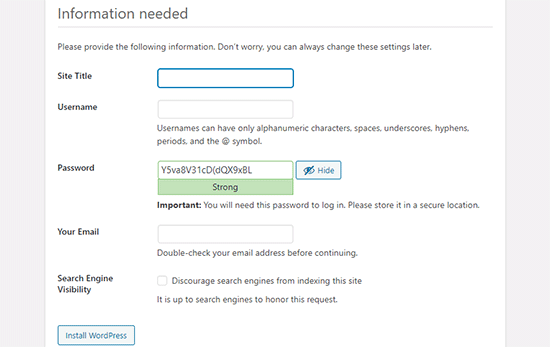
Enter your local site information

Once you have filled all the information, click on the ‘Install WordPress’ button to continue.

WordPress will now run the installation and prompt you to log in once it’s done.

You can login to your website by going to /localhost/website1/wp-admin page and use the username / password that you entered during installation to login.
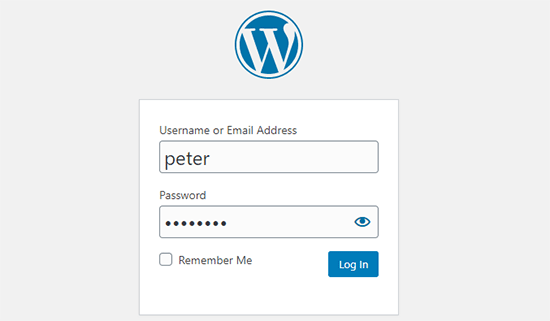
WordPress login page

Things to Try After Creating a Local WordPress Site

Now that you have created your local WordPress site using XAMPP, you can work on it like you would do on a live WordPress site.

Head over to Appearance menu in WordPress admin sidebar, to customize your site’s appearance or install a new theme.

Here are some great free themes that you can try.

The next thing you would want to try is WordPress plugins.

Plugins are like apps for your WordPress site and allow you to add cool features like contact form, social media buttons, eCommerce store, etc.

Need help installing plugins? See our step by step guide on how to install a WordPress plugin.

Bonus: Moving Local WordPress Site to Live Server

After working on your local WordPress site you may want to move it to a live server to make your first WordPress blog or website.

To do that you’ll need a domain name and web hosting account. Normally, a domain name costs $14.99 and website hosting start from $7.99 per month.

That’s too much if you are just starting out.

Luckily, Bluehost is offering WPBeginner users a free domain name with generous discount on hosting. Basically, you can get started for $2.75 per month.

→ Click Here to Claim This Exclusive Bluehost Offer ←

For more hosting recommendations, take a look at our complete WordPress hosting guide.

Once you have signed up for hosting, you can follow our step by step guide on how to move WordPress from local server to live site.

We hope this article helped you learn how to create a local WordPress site using XAMPP. You may also want to look at alternate ways to create local WordPress sites on Windows using Wampserver, and on Mac using MAMP.

If you liked this article, then please subscribe to our YouTube Channel for WordPress video tutorials. You can also find us on Twitter and Facebook.

The post How to Create a Local WordPress Site Using XAMPP appeared first on WPBeginner.


September 17, 2020 at 02:13PM
Wednesday, September 16, 2020

How to Edit the Footer in WordPress (Step by Step)

Do you need to edit the footer area of your WordPress website? The footer area appears at the bottom of each page on your WordPress site.,

There are several different ways website owners can utilize this area and make it more useful for their website visitors.

In this article, we will show you how to edit the footer in WordPress.

Editing your footer in WordPress

What is the Footer in WordPress?

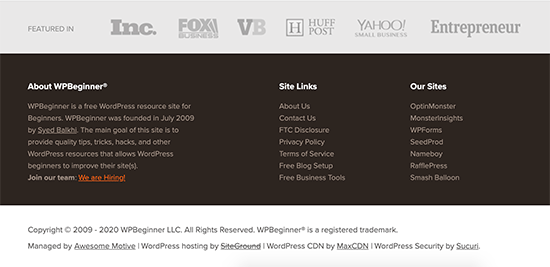
The ‘footer’ in WordPress is the bottom part of your website that appears after the content area. It normally appears on all pages on your website.

Example of the footer area on a WordPress powered website

This part of the website is located far down below and is often ignored by most beginners for a long time. However, there are several ways you can utilize this area by making it more helpful for your users, WordPress SEO, and your business.

All top WordPress themes come with footer widget area that’s easy to edit. You can also carefully edit the footer.php template file in your theme to remove unwanted links from this area.

That being said, let’s take a look at how to easily edit the footer in WordPress. You can use the following links to jump to the section you want to read.

Editing Widgets in Your Footer in WordPress

Many popular WordPress themes have widget areas in the footer.

You can use these widget areas to add text, images, or links to your privacy policy and legal disclaimers in the footer area.

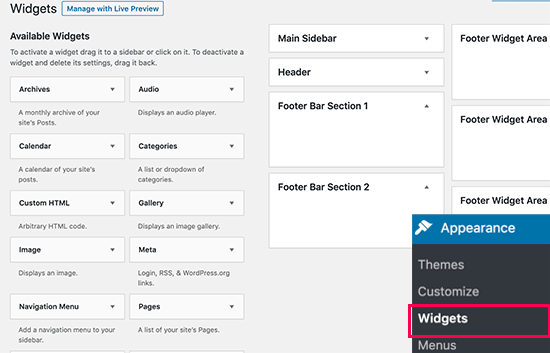
Adding text and images is quite straight forward. You can simply go to the Appearance » Widgets page and add a Text, Image, or Gallery widget to your footer widget area.

Add widgets to footer in WordPress

To add a widget, simply drag and drop it into a footer area. If you need more help, then see our article on how to add and use widgets in WordPress.

Note that many themes will have multiple footer areas, and they may use them differently. You can preview your website after adding widgets to make sure that they appear where you want them to be.

Adding Links in Footer Widget Area

You may also want to add links to different pages, categories, or to the legal pages of your website in the footer area.

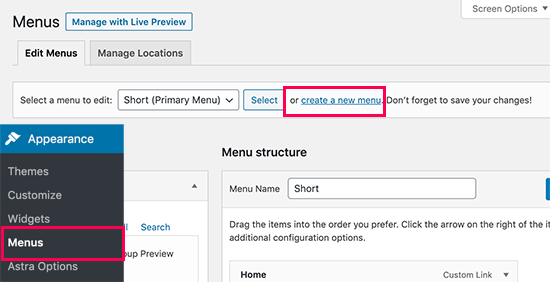
WordPress comes with an easy to to manage those links using the navigation menus. Simply head over to the Appearance » Menus page and click on the ‘create new menu’ link.

Create new menu in WordPress

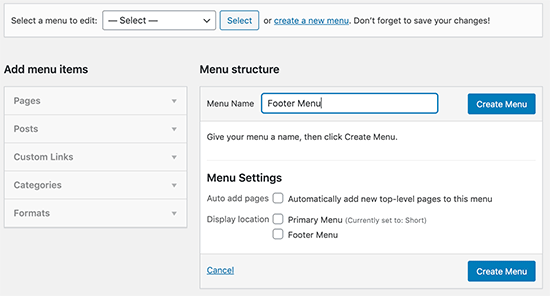
WordPress will ask you to provide a name for your new menu. Enter a name that helps you easily identify this menu and then click on the ‘Create Menu’ button.

Enter your navigation menu name

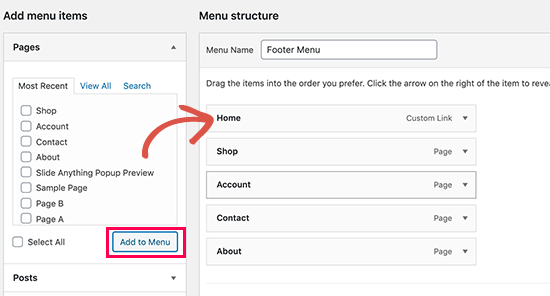
Your menu is now ready and you can start adding links to it. Simply select the pages, posts, categories from the left column to add them to your menu.

Add pages to your menu

Once you are finished, click on the Save Menu button to store your changes. For more help, see our article on how to create navigation menus in WordPress.

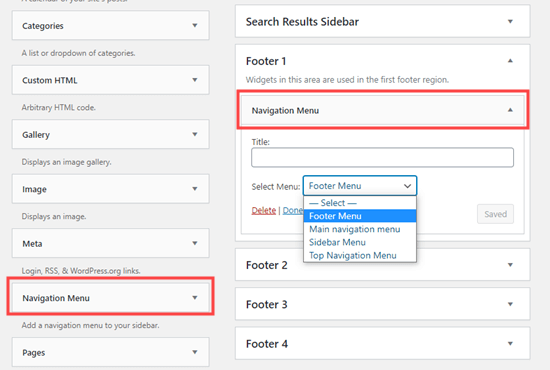
Your menu is now ready to be added to the WordPress footer widget area. Simply visit the Appearance » Widgets page in your WordPress admin and then add the Navigation Menu widget to your footer area.

Adding a navigation menu widget to your website's footer

In the widget settings, select the footer navigation menu you created earlier from the dropdown menu and click on the Save button.

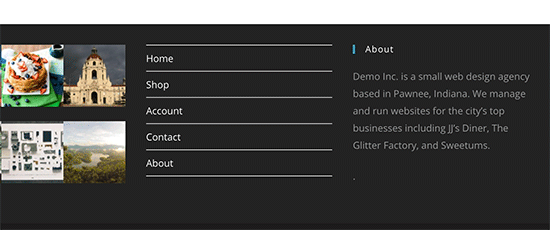
You can now visit your website to see your footer links in action.

A footer section with navigation menu links

You can create multiple navigation menus in WordPress and add as many navigation menu widgets to your sidebar as you need. If you need another set of links simply repeat the same steps again.

Removing the ‘Powered by WordPress’ Text from Your Footer

When you first install WordPress, your site may have a ‘Powered by WordPress’ link in a footer bar at the bottom. This isn’t a widget, so it’s often not clear how to change it.

The 'Powered by WordPress' text and link in the Twenty Twenty theme

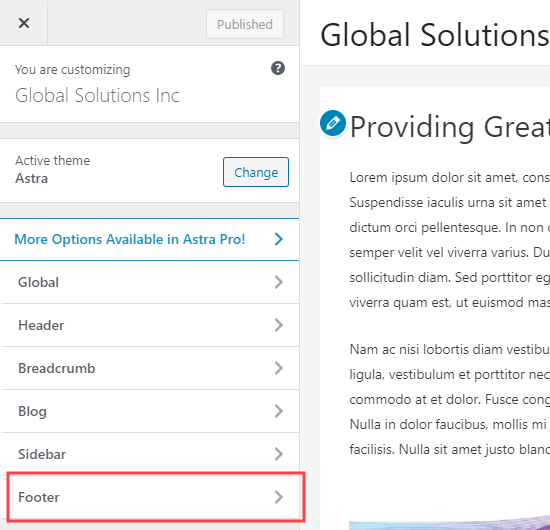
Some themes will alter this to their own text and link. If so, you can normally change this text using the live theme customizer. Simply go to Themes » Customizer in your WordPress admin. Look for an option to edit your site footer:

The Footer tab in the WordPress theme customizer

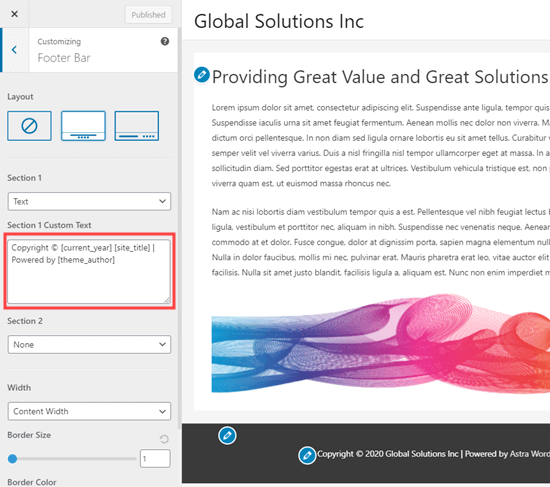
We’re using the Astra theme for this example. With Astra, you need to go to Footer » Footer Bar in the customizer. You will then have the option to change the text of your footer bar:

Editing the footer text in the theme customizer for the Astra theme

Once you’ve finished editing the text, don’t forget to click the Publish button at the top of the screen to put your changes live.

Go ahead and view your site to see your new footer:

Viewing the new footer text live on your website

For more help, take a look at our in-depth guide to the WordPress theme customizer.

Editing the Footer Text Manually

What if your theme doesn’t have the option to edit the footer text using the customizer?

In this case, you need to edit the footer.php file. It is a template file stored in your WordPress theme folder and is responsible for displaying the footer area for that particular theme.

The easiest way to edit this is by using an FTP client to connect with your WordPress hosting.

First, download the /wp-content/themes/yourtheme/footer.php file and then edit it in a text editor.

You will need to find the line in the file with the ‘Powered by WordPress’ text. This is how it looks in the Twenty Twenty theme:

<div class="footer-credits">

        <p class="footer-copyright">&copy;
                <?php
                echo date_i18n(
                        /* translators: Copyright date format, see https://www.php.net/date */
                        _x( 'Y', 'copyright date format', 'twentytwenty' )
                );
                ?>
                <a href="<?php echo esc_url( home_url( '/' ) ); ?>"><?php bloginfo( 'name' ); ?></a>
        </p><!-- .footer-copyright -->

        <p class="powered-by-wordpress">
                <a href="<?php echo esc_url( __( 'https://wordpress.org/', 'twentytwenty' ) ); ?>">
                        <?php _e( 'Powered by WordPress', 'twentytwenty' ); ?>
                </a>
        </p><!-- .powered-by-wordpress -->

</div><!-- .footer-credits -->

Then, simply delete or change that text, and reupload your footer.php file.

Tip: Make a copy of your footer.php file before making changes. That way, if you accidentally break anything, you can easily upload the original file again.

For more help, check out our guide on removing the ‘Powered by WordPress’ footer link.

Adding Code to Your WordPress Footer

Sometimes, you may need to add code snippets to your WordPress footer. This is often done in order to connect your site with an external app.

For instance, to add a Pinterest button to your site, you need to add Pinterest’s script to your footer. You may also see a tutorial that asks you to insert your Google Analytics code there.

The easiest way to do this is to install and activate the Insert Headers and Footers plugin. For more details, see our step by step guide on how to install a WordPress plugin.

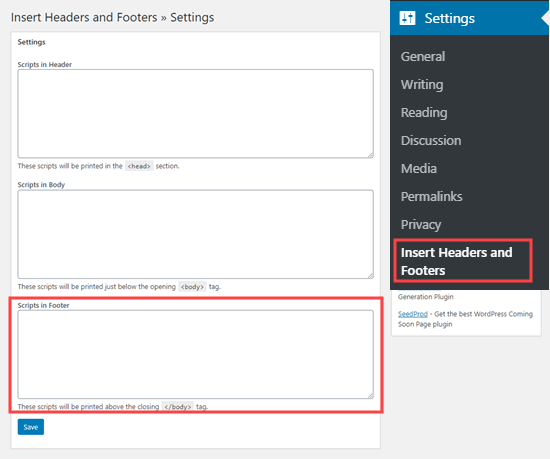
Upon activation, simply go to Settings » Insert Headers and Footers in your WordPress admin. Go ahead and copy and paste your footer code into the ‘Scripts in Footer’ box:

Using the Insert Headers and Footers plugin to add code to your website's footer

Don’t forget to click the Save button before moving on.

For more help, take a look at our guide to adding header and footer code in WordPress.

If you’re looking to add Google Analytics, then we recommend you use another method instead which helps with better tracking.

We hope this article helped you learn how to edit the footer in WordPress. You may also want to see our comparison of the best drag & drop WordPress page builder plugins, and our guide on how to create a custom WordPress theme without writing any code.

If you liked this article, then please subscribe to our YouTube Channel for WordPress video tutorials. You can also find us on Twitter and Facebook.

The post How to Edit the Footer in WordPress (Step by Step) appeared first on WPBeginner.


September 16, 2020 at 04:20PM
Tuesday, September 15, 2020

How to Prevent Newsletter Signup Spam in WordPress

Recently, one of our readers asked us how to prevent newsletter signup spam in WordPress?

Sometimes spam bots fill in your newsletter signup forms and add dummy email addresses to your email list. This costs you money and email service providers can mark your emails as spam.

In this article, we’ll explain how to prevent newsletter signup spam in WordPress and keep your email list healthy and spam free.

Preventing newsletter signup spam in WordPress

What is Newsletter Signup Spam and Why Prevent It?

Newsletter signup spam is when a bot fills in a form and joins your email list.

It happens because some spambots simply fill in all the forms they come across. They’re hoping to get a message to you.

While newsletter signup spam may be less noticeable than comment spam and contact form spam, it can still cause problems.

Almost all email marketing services charge you based on the number of subscribers you have in your list. This means, you can end up paying for subscribers who are just bots, which is a waste of your money.

Plus, if you’re sending out emails to bot email addresses that don’t exist, then this can potentially damage your sender reputation.

There are several ways to prevent newsletter signup spam, and in this article we will cover all the best methods:

Use Double Optin to Prevent Newsletter Signup Spam

Double optin, sometimes called confirmed optin, is useful in several ways. It means people have to confirm they want to receive your emails.

When a user first signs up, they get a special email with a button or link to click. If they don’t click this, then they will not receive any further emails. Here’s an example from Elegant Themes‘ email list:

Confirmation email (double optin) from Elegant Themes

This method stops many spambots from becoming full members of your list. They will not be counted in your total subscribers when your email marketing service bills you.

Double optin has a number of other benefits, too:

  • You will only email people who truly want to be on your list.
  • You will not be emailing addresses that don’t exist. This can happen if someone mistypes their email address when signing up.
  • Your emails will be more likely to get through. Some mail providers require double optin in order to deliver emails.

All reputable email marketing services offer double optin. It often comes enabled by default.

Setting Up Double Optin With Constant Contact

Constant Contact is top of our list of best email marketing services. It’s easy to set up double optin for your Constant Contact lists.

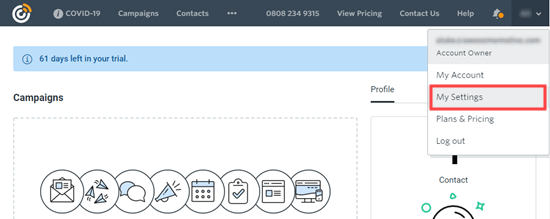
First, login to your Constant Contact email marketing account. Then, click on your name in the top right hand corner and click the ‘My Settings’ link:

Click the 'My Settings' link in the dropdown from your name

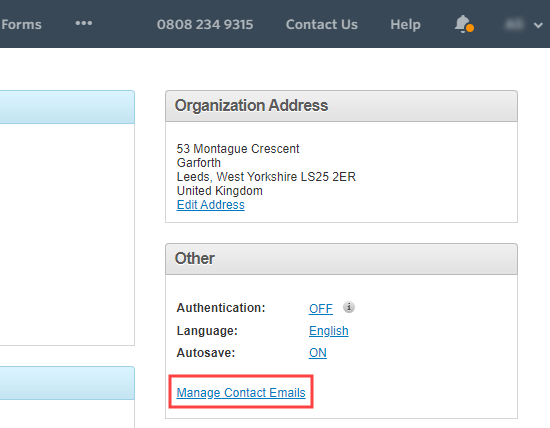
Next, click the ‘Manage Contact Emails’ link. This will take you to the Contact Emails page.

Click the 'Manage Contact Emails' link in your account settings

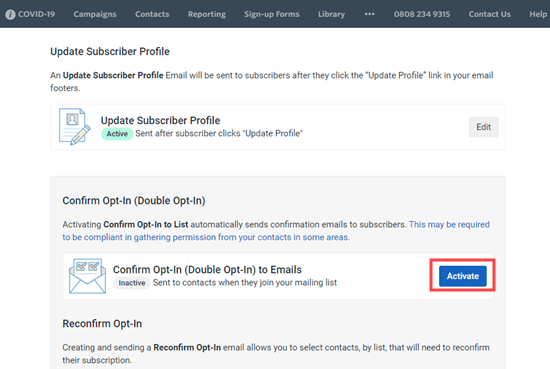
On the Contact Emails page, scroll down to the Confirm Optin section. Here, you just need to click the ‘Activate’ button to turn on double optin:

Activate the double optin option in Constant Contact by clicking the 'Activate' button

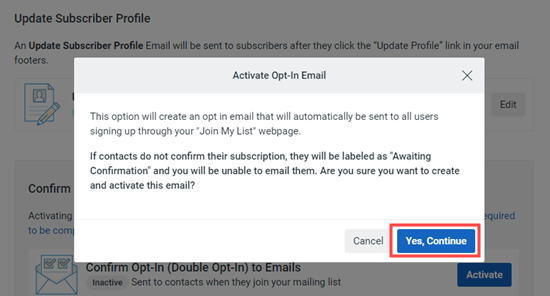
You will then see a popup asking you whether you want to continue. Simply click the ‘Yes, Continue’ button here:

Confirm that you want to go ahead and use double optin for your email list

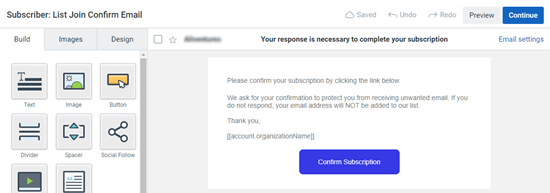
Constant Contact will now take you straight to the optin confirmation email. You can edit the text of this email if you want.

Edit the optin confirmation email that subscribers will receive immediately after joining your email newsletter list

New subscribers to your email list will now receive a confirmation email. They need to click the ‘Confirm Subscription’ button to become full members of your list.

The process is similar for other email marketing services like Drip, SendinBlue, ConvertKit, MailChimp, etc.

Unfortunately, some spambots are clever enough that they can click on email links and confirm their membership of your list. In this case, you can try some of these other methods to prevent them from signing up for your email list.

Using reCAPTCHA on Your Newsletter Signup Form

Using reCAPTCHA is a great way to block spambots from completing your form and getting on your list in the first place.

We’re going to show you how to use reCAPTCHA with 2 popular tools, OptinMonster and WPForms.

Using reCAPTCHA with OptinMonster to Prevent Email Signup Spam

OptinMonster is a popular lead generation tool that you can use on your WordPress site. It lets you create a wide range of email signup forms, including popups, slide-in forms, inline forms, sticky bars, and more.

You can easily add a reCAPTCHA to your OptinMonster forms (optins).

To do so, you’ll first need to sign up for Google’s reCAPTCHA and register your site there. Just follow our step by step instructions on using reCAPTCHA for help with this.

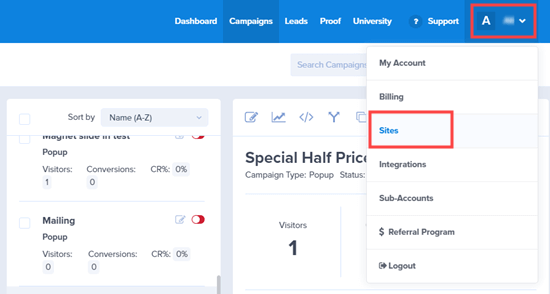
It’s easy to integrate OptinMonster with Google reCAPTCHA. Simply login to your OptinMonster account, click on your profile name and then click on the ‘Sites’ link in the dropdown menu:

Select the 'Sites' link from the OptinMonster dropdown

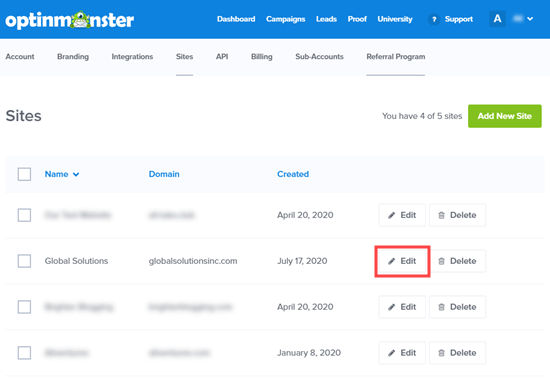
Here, you just need to find your website in the list and click on the ‘Edit’ link next to it.

Click the 'Edit' link next to the website that you want to use

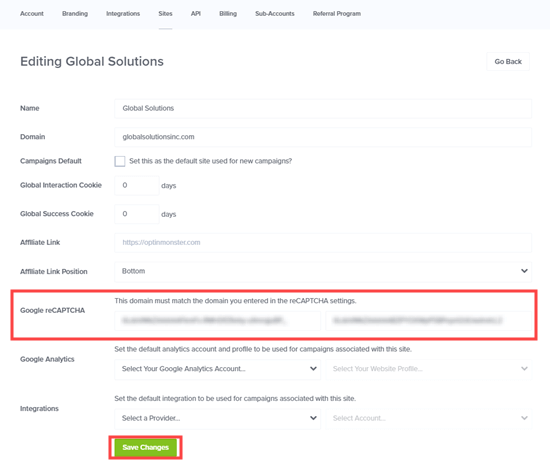
Now, go ahead and scroll down to the Google reCAPTCHA fields. Copy your Site Key and Secret Key from your Google reCAPTCHA account here:

Enter your Google reCAPTCHA details into OptinMonster

That’s all you need to do. All the email optin forms you create for that website will now be automatically protected against spam.

Using reCAPTCHA with WPForms to Prevent Email Signup Spam

If you’re using WPForms for your newsletter sign up form, it’s easy to use reCAPTCHA to prevent bots from joining your list.

First, you need to enable reCAPTCHA under WPForms » Settings. To do this, you need a Site Key and Secret Key from Google. Just follow our step by step instructions on using reCAPTCHA for help with this.

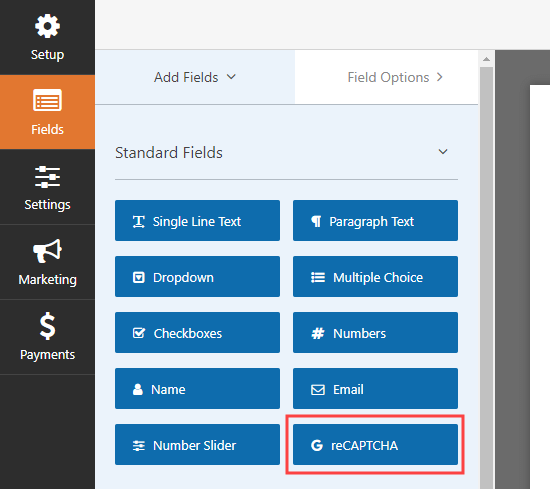
Once you’ve enabled reCAPTCHA, go ahead and edit your newsletter signup form. You just need to click on the reCAPTCHA field on the left hand side:

Adding the reCAPTCHA to your newsletter signup form

Then, you will see a message letting you know that reCAPTCHA has been enabled for your form. Don’t forget to save your changes to your form.

Your form will now have the reCAPTCHA logo on it, showing that reCAPTCHA is active.

Most users will not even notice the reCAPTCHA, if you use the invisible version like us. They will only be prompted to complete a reCAPTCHA test if Google thinks they might be a bot.

Using Smart Lead Verification from DataValidation

DataValidation offers an email verification service that checks email addresses on your list. You can use this to remove duplicates, filter out temporary and disposable email addresses, and verify whether email addresses are active.

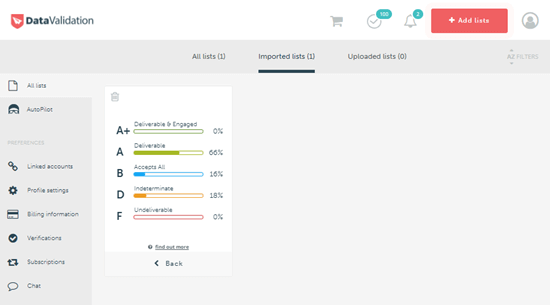
You will get a free quality report for all the lists you upload or import into the DataValidation app:

Viewing a data validation report for your email list

You can then pay to download or export just the email addresses that are high quality. This lets you easily and quickly remove any spambots from your list.

OptinMonster offers this service to their Enterprise customers. Just reach out to their support team if you’d like them to help with this.

Checking Your List for Suspicious Email Addresses or Activity

If you don’t want to pay to use a smart lead verification service, you can manually remove suspicious email addresses from your email newsletter list.

There’s no perfect way to identify spambots, but one of the following indicators can be good clues:

  • They have an unusual looking email address, perhaps with lots of numbers or multiple dots in it.
  • They open 100% of your emails and click on every link. While this could be a very engaged subscriber, it’s quite likely to be a bot.
  • They have never opened an email from you in a very long time.

Once you’ve found suspicious email addresses on your list, you can simply delete these subscribers.

What if you are unsure whether certain subscribers are real people or bots? You could tag them, then email them. Ask them to reply if they want to stay on your list. Then, go ahead and delete anyone who doesn’t reply.

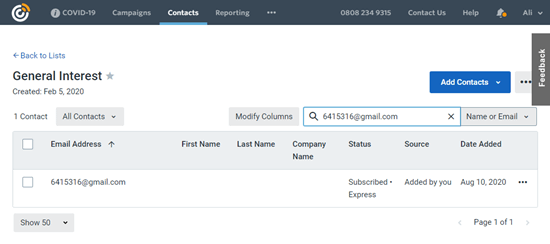
To add a tag to a subscriber in Constant Contact, click the ‘Contacts’ tab then click on your chosen list. Next, find your subscriber. The easiest way to do this is to search by their email address.

Finding a contact by email address in Constant Contact

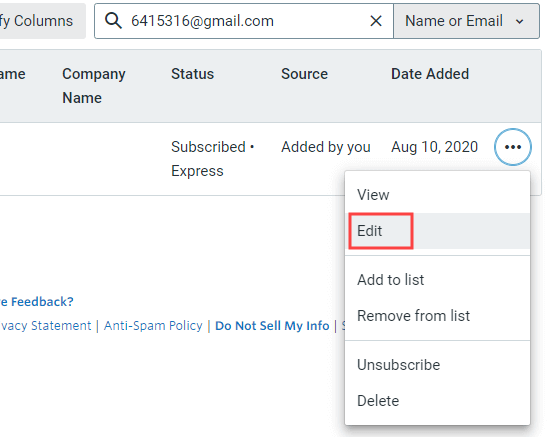
Next, click on the three dots to the right of the subscriber’s details and click the ‘Edit’ link:

Editing a subscriber in Constant Contact

Tip: If you want to delete a subscriber, you can do that here by clicking the ‘Delete’ link.

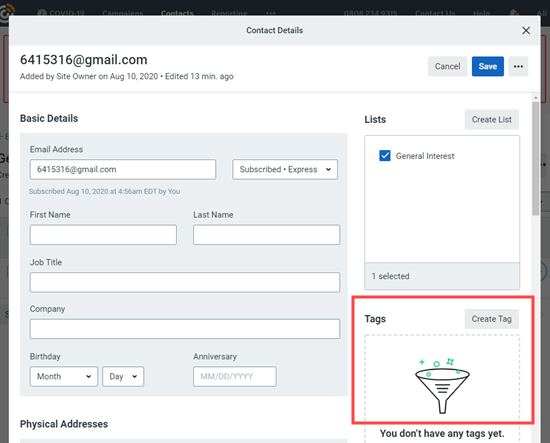
Now, it’s time to add tags in the ‘Tags’ section on the right-hand side.

Adding tags to a potential spambot newsletter subscriber in Constant Contact

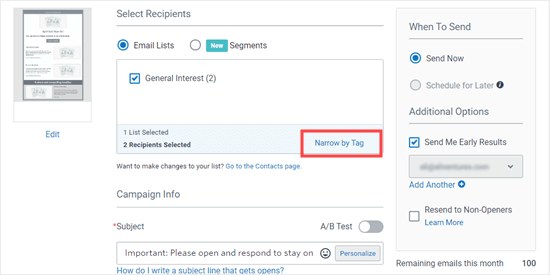
Once you’ve tagged all the subscribers who might be spambots, go ahead and create a new campaign. Before sending out the campaign, use the ‘Narrow by Tag’ option to send it only to people with the tag you set up:

Narrowing your Constant Contact list by tag before sending an email

Email newsletter spambot subscribers can be expensive and irritating. Make sure you use at least one of the above methods to keep your email list healthy and bots free.

We hope this article helped you learn how to prevent newsletter signup spam in WordPress. You might also want to see our tips on how to get more email newsletter subscribers, and our list of the best marketing automation tools.

If you liked this article, then please subscribe to our YouTube Channel for WordPress video tutorials. You can also find us on Twitter and Facebook.

The post How to Prevent Newsletter Signup Spam in WordPress appeared first on WPBeginner.


September 15, 2020 at 05:00PM
Monday, September 14, 2020

How to Make a Print on Demand Shop in WordPress

Do you want to create a print on demand shop in WordPress?

You can use print on demand shop as a new online business idea, or use it to sell t-shirts and other swags to support your existing brand.

In this article, we will show you how to make a print on demand shop in WordPress, so you can run an online store without dealing with any inventory or shipping.

Creating a print on demand shop in WordPress

What is Print on Demand and Why Use It?

Print on demand is a manufacturing method where a design is only printed on a product once a customer orders it. This is very similar to dropshipping except the products are custom made for you.

It can be used for clothing, bags, homeware, and more.

Print on demand isn’t as cost effective as mass production manufacturing methods, but it has some big advantages for small businesses, and it can still be very profitable.

With print on demand, you don’t pay anything until a customer pays you which makes it much easier for small businesses to get started.

There’s no need to buy inventory upfront, and you don’t need any storage space either. Plus, you can easily experiment with different designs to see which is most popular.

There are a few different print on demand companies out there. In this tutorial, we’ll be using Printful. It’s well established and integrates easily with your WordPress site through WooCommerce.

As well as printed designs, Printful also offers embroidery for some products, such as baseball caps and backpacks.

You can use it to easily sell your custom branded merchandise such as t-shirts, hoodies, shorts, hats, backpacks, bracelets, phone cases, keychains, coffee mugs, blankets, and over 249 products.

Creating an Account with Printful to Sell Your Products

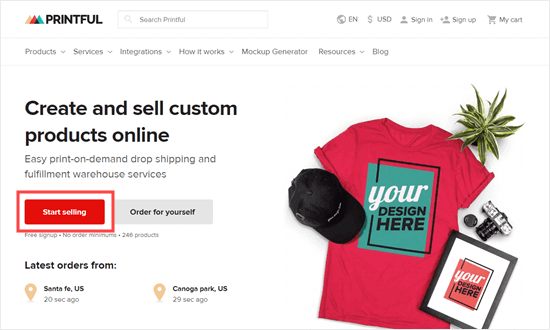
First, you need to sign up for a free account with Printful. Simply go to the Printful website and click the ‘Start selling’ button:

Click the 'Start Selling' button to begin selling with Printful

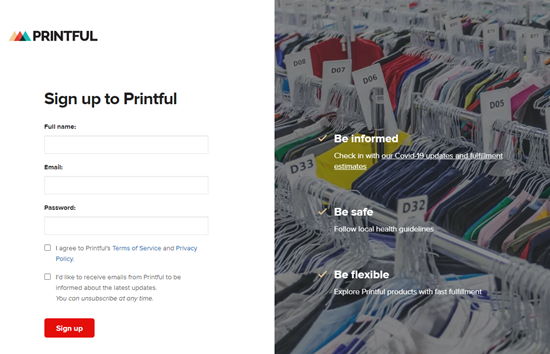
Next, enter your name, email address, and password. You also need to check the box to agree to Printful’s terms and conditions:

Enter your details to sign up for Printful

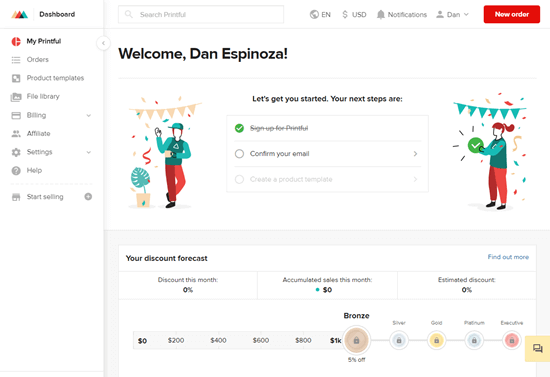
Printful will ask a few questions about how you plan to use their service. Once you’ve answered these, you will see the Printful dashboard.

The welcome page for the Printful dashboard

You will also get an email with a link that you need to click to confirm your email address.

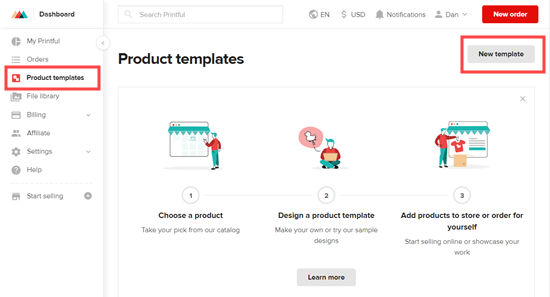
You can go ahead and set up your products straight away. Simply go to ‘Product templates’, and then click the ‘New template’ button.

Creating a new product template in Printful

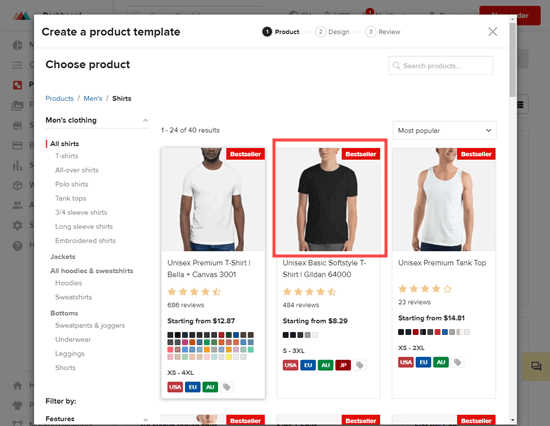
Here, you will see a wide range of different templates. Just click on the product you want to use. We’re going to create a basic T-Shirt:

Creating a basic print on demand t-shirt with Printful

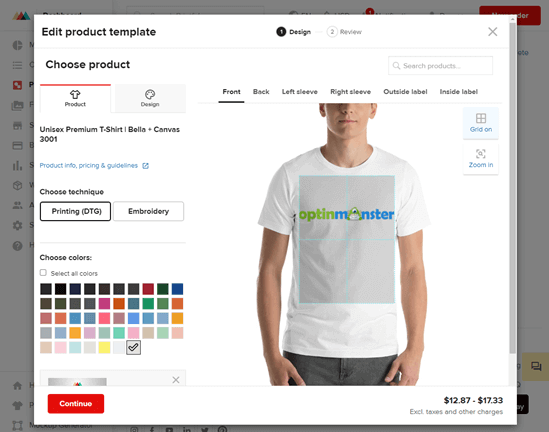
If you already have a design for your product, go ahead and drag it here to upload it. For example, you might use your business logo or company slogan. Here’s an example of a T-Shirt using the OptinMonster logo:

Creating an OptinMonster t-shirt with Printful

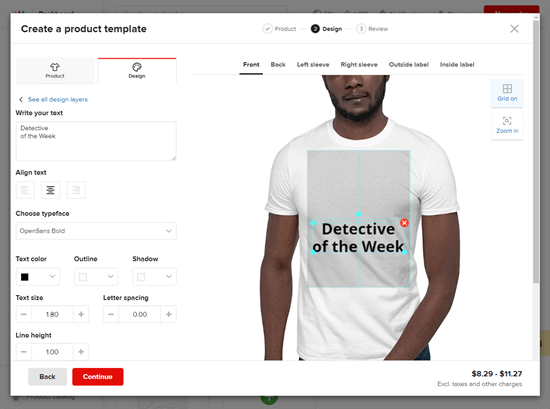
We’re going to add text and clipart from Printful to create our product. In the mockup generator, you can change the size and color of the text, and you can easily drag it to resize or reposition it.

Adding text and clipart to a print on demand t-shirt in Printful

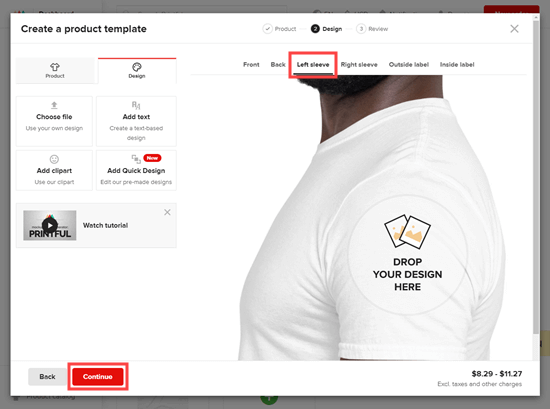
The tabs at the top of the screen let you add designs to other areas of the product, where applicable. Once you’re happy with your design, click the ‘Continue’ button:

Editing the left sleeve of the print on demand t-shirt in Printful

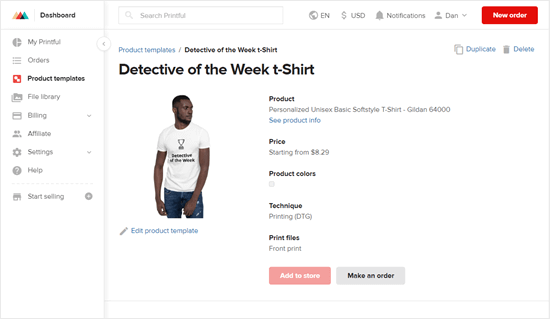
Now, it’s time to give your template a title and save it. It’s easy to go back and change it if you want to make changes in the future. You can find it by going to the ‘Product templates’ tab again:

Viewing your product in the list of product templates that you've created in Printful

Go ahead and create as many products as you want.

You also need to set up a billing method for Printful. Your customers will pay you through your online store for the product, and Printful will charge you the cost of shipping it. We will show you how to setup your online store in the next step.

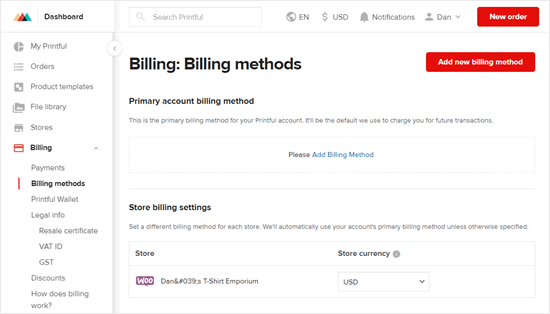
For now, let’s setup Printful billing. Simply go to Billing » Billing methods in Printful, then click the ‘Add new billing method’ button:

Setting up a billing method in Printful

Then, you need to enter the details for either your credit card or your PayPal account. Don’t worry, you will not be charged unless you order a shirt from your account.

Connecting Printful to Your WordPress Site

The next step is to connect your Printful account to your WordPress site. You need to have the WooCommerce plugin installed and activated on your site.

If you don’t have an online store yet, then don’t worry. We have a step by step guide on how to start your online store.

You’ll need a domain name and web hosting for your store. Domain is your website’s name, and web hosting is where your website files are stored.

We recommend using Bluehost. They’re one of the largest hosting providers in the world, and they’re officially recommended by WordPress.

They’re offering WPBeginner readers a 60% discount + free domain + free SSL + automatic WooCommerce setup. This means you can get started for $3.95 per month instead of $13.99 regular price.

→ Click here to Claim this Exclusive Bluehost offer ←

Once your online store is setup, you’re ready to connect it to your Printful account.

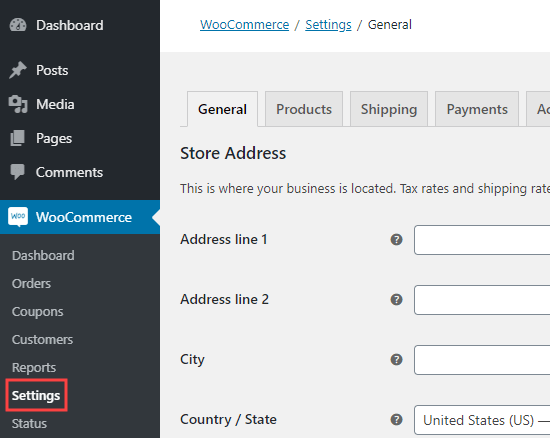
In order to connect Printful to your online store, you need to enable the Legacy REST API feature in WooCommerce. In your WordPress admin area, go to the WooCommerce » Settings page:

The WooCommerce settings page in your WordPress dashboard

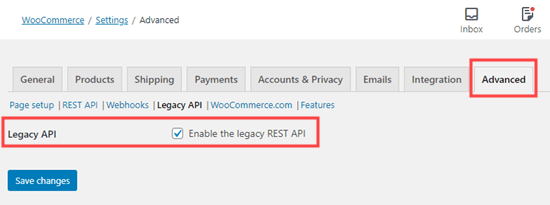
Next, click on Advanced » Legacy API. Here, you simply need to click the box for ‘Enable the legacy REST API’ then click the ‘Save changes’ button:

Enabling the Advanced Legacy REST API in WooCommerce so you can connect to Printful

The next step is to install and activate the Printful Integration for WooCommerce plugin. For more details, see our step by step guide on how to install a WordPress plugin.

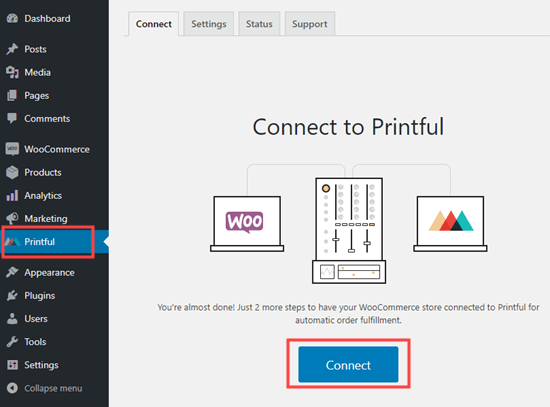
Upon activation, go to the Printful tab in your WordPress admin. Then, simply click the ‘Connect’ button:

Click the button to connect Printful to WooCommerce

You will be prompted by WooCommerce to approve the connection. Simply click the ‘Approve’ button to continue, then follow the on-screen prompts to connect and confirm your account.

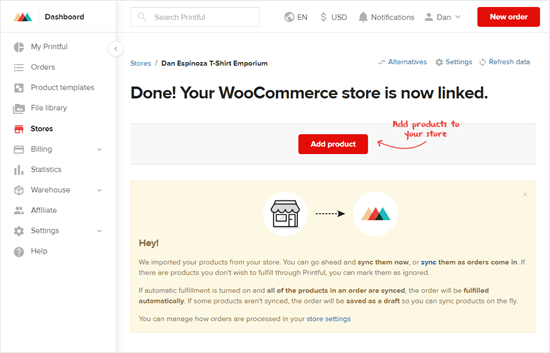
Once you’ve done that, you will see a message letting you know that your product data is being synchronized. After a minute or so, your WooCommerce store will be linked.

Your WooCommerce store is now linked to your Printful account

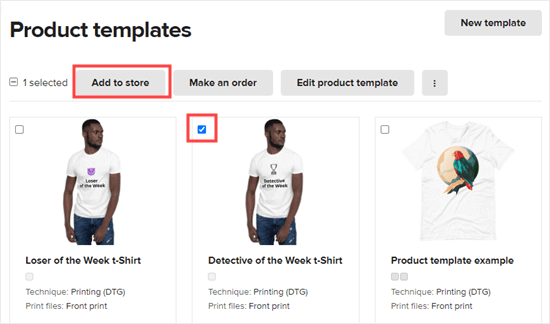
To put your products live in your store, you need to go back to your Printful account. Then, go to the Product Templates tab in your Printful dashboard.

Then, click the checkbox above the product you want to add to your store, and click the ‘Add to store’ button.

Select one of your print on demand products and click to add it to your WooCommerce store

Note: You cannot add two or more products to your store at the same time. You need to go through an approval process for each product.

Now, simply follow Printful’s prompts. You will get to select colors and sizes, view the mockup images, and give your product a name and description.

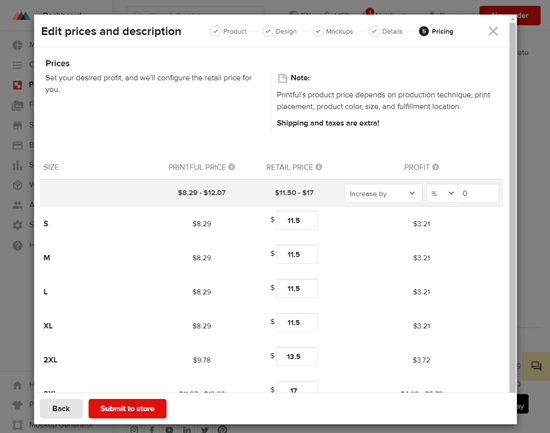
The final step is to set the pricing. Printful will automatically suggest prices for you. These are marked up from the price that Printful charges so that you can make a profit on each item:

Setting your product prices in Printful

Once you’ve set your prices, simply click the ‘Submit to store’ button to send the product to your WooCommerce store. It will now be live on your site:

Viewing your finished print on demand product live on your website

Go ahead and repeat this process for each product that you want to add to your store.

You will then be able to see and edit your Printful products in your WordPress admin by going to Products » All Products:

The list of print on demand products in WooCommerce, viewed in your WordPress dashboard

You can create as many products as you like in Printful. You don’t need to pay anything until you get orders. Printful will handle all the production and shipping for you.

Here’s our finished online store, with a range of Printful’s products:

The finished print on demand store, with a range of products ready to buy

We hope this article helped you learn how to make a print on demand shop in WordPress. You may also be interested in our articles on the best WooCommerce plugins and best email marketing services to help you get more subscribers and sales.

If you liked this article, then please subscribe to our YouTube Channel for WordPress video tutorials. You can also find us on Twitter and Facebook.

The post How to Make a Print on Demand Shop in WordPress appeared first on WPBeginner.


September 14, 2020 at 04:35PM