Monday, June 14, 2021

How to Create a Custom WooCommerce Cart Page (No Coding)

Do you want to create a custom WooCommerce cart page?

The default WooCommerce cart page is not optimized for conversions. By optimizing your cart page layout, you can significantly improve your conversions and get more sales.

In this article, we’ll show you how to customize your WooCommerce cart page without any technical knowledge.

How to create a custom WooCommerce cart page (no coding)

Why Create a Custom WooCommerce Cart Page in WordPress?

Creating a custom WooCommerce cart page gives you a chance to increase sales conversions in your online store.

Research shows that nearly 7 out 10 customers will abandon your shopping cart and never come back.

By optimizing the default WooCommerce cart page, you can make more sales without increasing your current traffic.

OptinMonster cart page example

When your visitors have items in their cart, they are very close to finishing the purchase. Your WooCommerce cart page should do everything possible to make the conversion happen.

With that said, let’s take a look at how you can customize your WooCommerce cart page with no code.

How to Create a Custom WooCommerce Cart Page in WordPress

SeedProd is the best drag and drop page builder used by over 1 million websites. It lets you easily create a custom WooCommerce cart page to make more sales.

First thing you need to do is install and activate the plugin. For more details, see our step by step guide on how to install a WordPress plugin.

Note: there is a free version of SeedProd that you can use, but for this tutorial, we’ll use the Pro version because it has the built-in WooCommerce blocks we need.

After the plugin is activated, you need to go to SeedProd » Settings and enter you product license key.
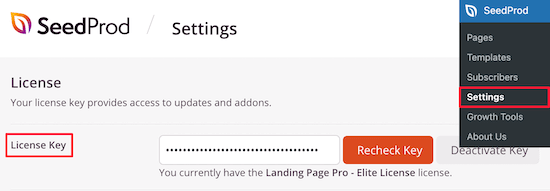
Enter SeedProd license key

You can find your license key under your account information on the SeedProd website.

Once you’ve done that, go to SeedProd » Pages and click the ‘Add New Landing Page’ button to create your cart page.
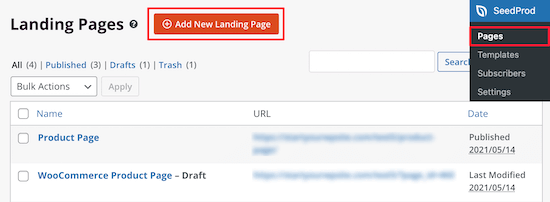
Add new SeedProd cart page

After that, you need to choose a cart page template. There are dozens of professionally designed templates you can use. Once you find a template you like, hover over it and click the ‘Checkmark’ icon.

We’re going to use the ‘Blank’ template since it lets us add only the sections we want.
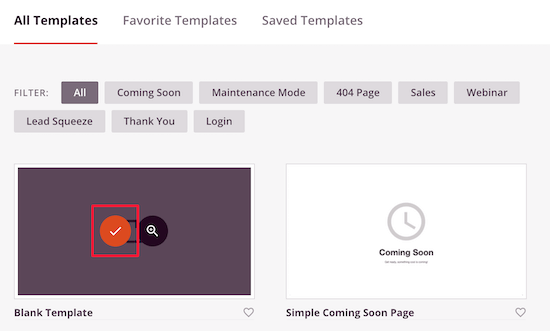
Select SeedProd template

Next, you’ll be asked to name your cart page, and then click ‘Save and Start Editing the Page’.

This will bring you to the drag and drop builder where you can starting building a custom cart page.

First, we’ll add an image block and upload a logo. You can adjust this to look like your header without it being clickable to reduce abandonment.

This keeps your branding in place but gives your visitors fewer exits, so they’re more likely to make a purchase.

Next, simply select the ‘Image’ block and drag it over to your page. Then, upload your logo from your image library.
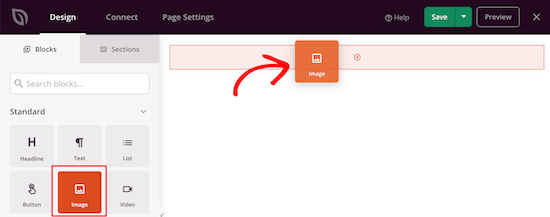
Add image block header

You can customize this entirely with the options panel on the left.

Next, click the content and sidebar block in the ‘Choose your layout:’ section.
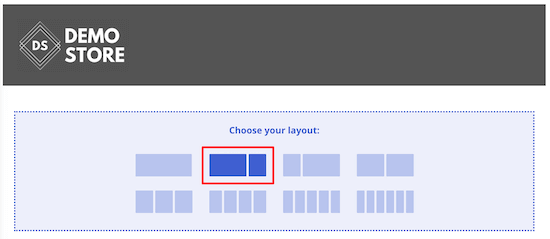
Select SeedProd layout

This lets you create a section for your cart, plus a testimonial section.

After that, locate the ‘Cart’ block in the WooCommerce section and drag it over.
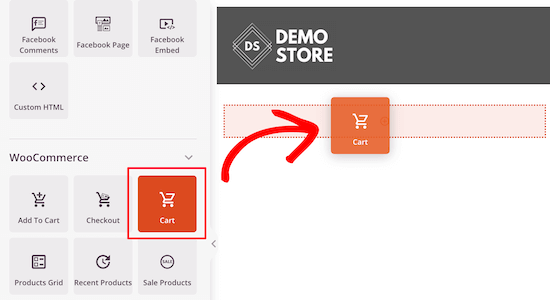
Add WooCommerce cart block

You can customize every part of the cart, including font choice, colors, buttons, and more.
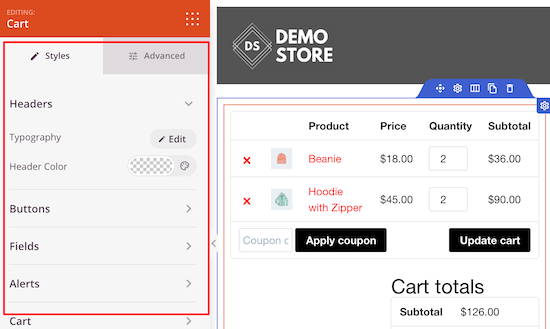
Customize WooCommerce cart block

Next, you can add a testimonials block. These act as social proof for your visitors and show them that they’re making the right decision.

Locate the ‘Testimonials’ block and drag it over to the open section.
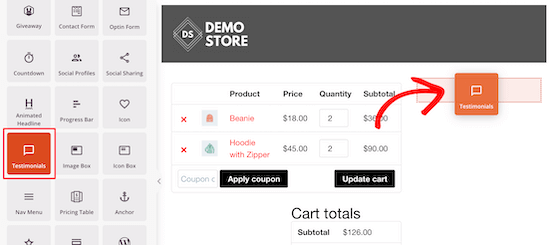
Add testimonials block

You have full control over the appearance of your testimonials.

There’s the option to add a customer photo, change the testimonial, add a position, and more.

Customize testimonials block

If you want to add multiple testimonials, then follow the same steps above.

Another great idea is to add a star rating underneath your testimonial.

Simply select the ’Star Rating’ block and drag it under your testimonial.
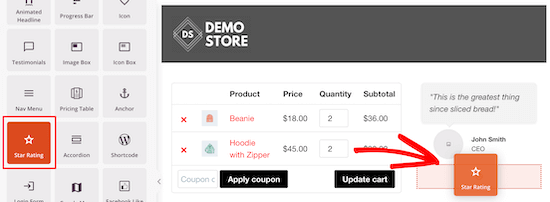
Add star rating block

If you want to create scarcity to encourage your customers to make a purchase now, then you can add a scarcity timer to your cart.

All you need to do is select the ‘Countdown Timer’ block and drag it to the top of your cart. Then, select the ‘Visitor Timer’ option so that the timer will refresh for all your visitors.
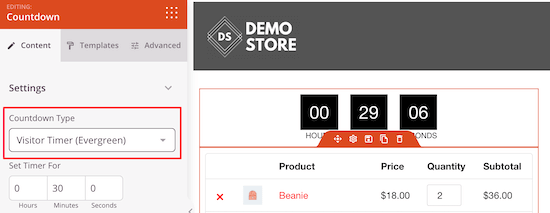
Countdown timer evergreen block

Next, add a headline notifying your shoppers they have a set period until their cart will expire.

Simply drag over the ‘Headline’ block and enter your text.

Countdown timer header

Another great feature to add is a popular products section. This lets you improve your sales by promoting other popular products your customers might be interested in.

To do this, just drag over the ‘Best Selling Products’ block from the ‘WooCommerce’ section.

You can also choose any of the other product blocks to add as well.
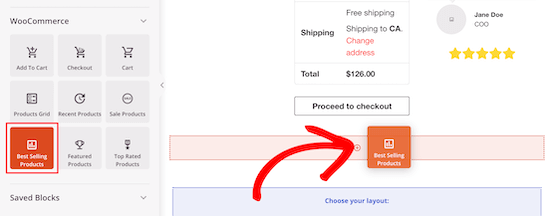
Add SeedProd products block

For more details on adding popular products to WooCommerce, see our guide on how to display popular products in WooCommerce.

After you’ve made your changes to the cart page, you can publish it live by clicking the arrow next to the ‘Save’ button and select ‘Publish’.
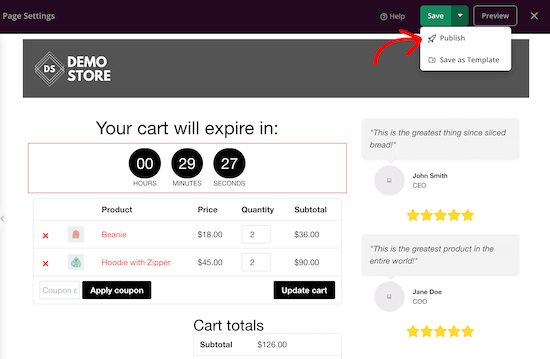
Publish cart live

Next, you’ll need to adjust your cart URL in the WooCommerce settings.

Go to WooCommerce » Settings and then click on the ‘Advanced’ tab.
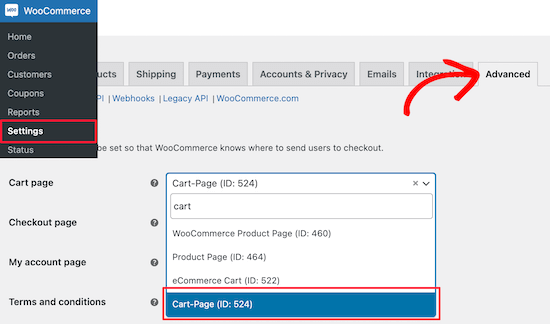
WooCommerce cart settings

After that, select the new cart page URL that you created with SeedProd. Make sure to click ‘Save changes’ at the bottom of the screen.

Depending on the WooCommerce theme you’re using, your visitors can now navigate to the cart page easier.
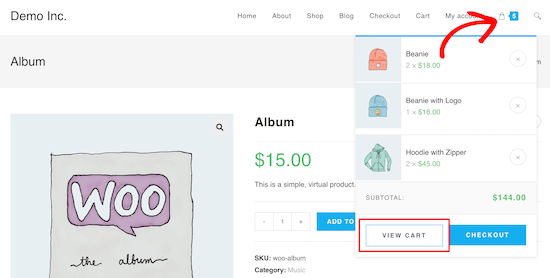
View WooCommerce cart dropdown

This will help your visitors view their carts on mobile devices too.

You can continue to customize your cart page with SeedProd, adding new blocks, and changing the design until it’s perfect.

Continue to test try different elements, to see what improves conversions the most.
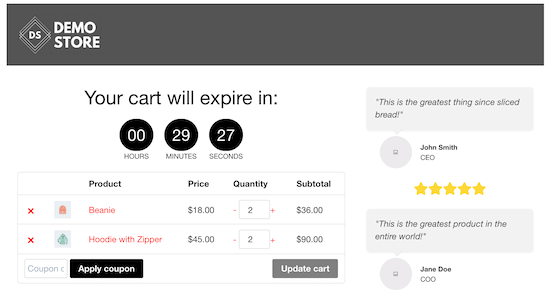
Cart page example

To track your WooCommerce cart conversions, see our step by step guide on how to setup WooCommerce conversion tracking.

Bonus: How to Further Improve WooCommerce Cart Page Conversions

Once you have created a custom WooCommerce cart page, you can further improve the conversions and reduce cart abandonment.

This helps you make even more revenue from your existing traffic.

Here are a few simple ways to do it.

1. Reduce Cart Abandonment with Timed Popups in WooCommerce

Nearly 70 percent of all shopping carts are abandoned. One of the best ways to reduce cart abandonment is with a timed popup.

OptinMonster is the best WordPress popup plugin used by over 1.2 million sites.
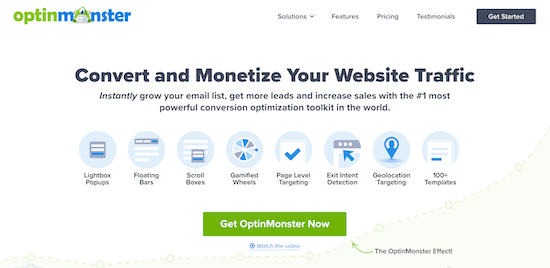
OptinMonster WooCommerce popup

It uses a unique Exit-Intent® technology to display popups exactly when a user is about to leave your site.

You can entice them back with a unique coupon code just for them.

OptinMonster popup WooCommerce

If you’ve already offered your visitor a coupon, then use an educational popup that helps with any questions and reassures them about their purchase, like this one from WPForms.
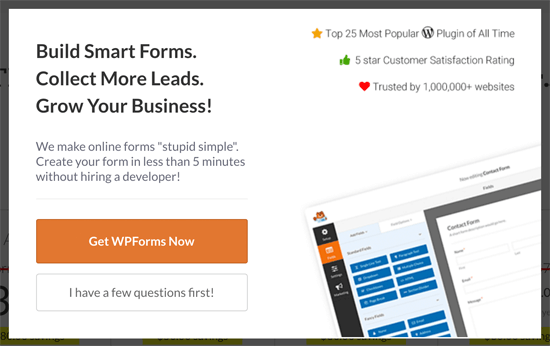
WPForms exit intent popup

There are even more unique popups and slide-ins you can add to your site too.

For example, if a customer adds an item to their cart and leaves but later returns, then you can add a slide-in that offers a coupon to complete their purchase.
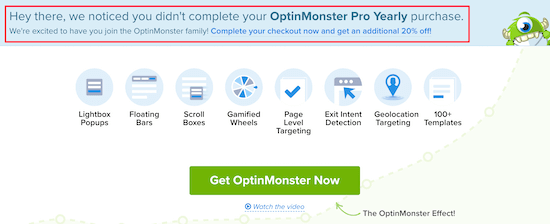
OptinMonster cart reminder

For more details, see our guide on how to create a WooCommerce popup to increase sales.

2. Boost Sales with Social Activity Notifications in WooCommerce

Social activity notifications alert your visitors to new purchases that have been made in real-time. This uses FOMO to improve your conversions and push them to buy.

The simplest way to add social proof notifications to your WooCommerce cart page is with TrustPulse.

TrustPulse WooCommerce notification

It’s the best social proof plugin for WordPress and WooCommerce in the market and has been proven to increase conversions by 15%.

It can be set up in a few minutes, and you can automatically display a notification bubble with recent purchases, free trial sign-ups, and more.

The notifications won’t get in the way of your cart or user experience. The only thing they do is improve your store conversions.

TrustPulse alert notification

For more details, see our guide on how to use FOMO on your WordPress site to increase conversions.

We hoped this article helped you create a custom WooCommerce cart page without writing any code. You may also want to see our step by step guide on how to improve WooCommerce SEO to grow your traffic, and our expert picks of the best WooCommerce plugins for your store.

If you liked this article, then please subscribe to our YouTube Channel for WordPress video tutorials. You can also find us on Twitter and Facebook.

The post How to Create a Custom WooCommerce Cart Page (No Coding) appeared first on WPBeginner.


June 14, 2021 at 03:20PM

Friday, June 11, 2021

6 Best SEO Checker and Website Analyzer Tools Compared (2021)

Are you looking for the best SEO checker and website analyzer tool?

An SEO checker tool can help you get a clear picture of your SEO, give you ideas to improve, and help you increase website traffic from SEO.

In this article, we’ll share our expert picks of the best SEO checker and website analyzer tools.

Best SEO checker and website analyzer tools compared (2021)

Why Use a SEO Checker and Website Analyzer Tool?

An SEO checker and website analyzer tool can help you see if your search engine optimization (SEO) strategy is working.

There are many moving pieces when it comes to SEO, and it can be hard to keep track of everything.

By using an SEO checker, you can see if your website is optimized for SEO and what changes you can make to help you get more traffic.

SEO checker and website analyzer tools can help your website in a lot of ways.

  • Help you fix any SEO errors holding your site back
  • Simply get more traffic by making improvements
  • Keep track of offsite SEO strategies like backlink building
  • Uncover areas where you can outrank your competition

That being said, let’s take a look at the best website SEO checker and rank tracking tools you can use to grow your business.

1. AIOSEO

AIOSEO

All in One SEO (AIOSEO) is the best SEO plugin for WordPress used by over 2 million websites. It is the most comprehensive SEO toolkit that will analyze your website and let you know how you can improve your SEO.

It’s very beginner-friendly and has a setup wizard that will walk you through the process of choosing the best SEO settings for your website.

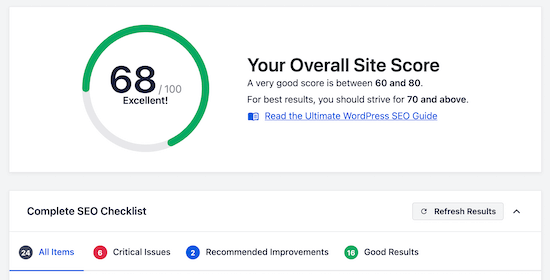
It will analyze your entire WordPress website and give you an SEO score, along with a detailed report of what you can change.

AIOSEO site score

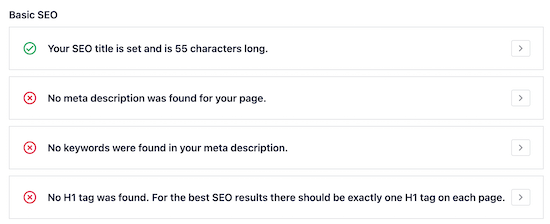
For example, it might tell you to add internal links, external links, fix broken links, change your headers, add a meta description and meta tags, and much more.

Even if you’ve never done any SEO before, this plugin will educate you and show you what to fix.

AIOSEO checklist

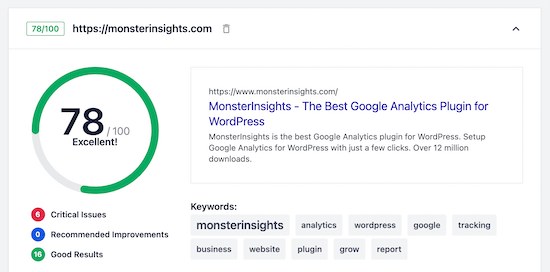
You can also fully optimize every post and page on your WordPress website by customizing the meta title, meta description, and more. Each page will be given a TruSEO score, as you make improvements the score will get higher.

By making all the changes this plugin suggests, you’ll have nearly perfect on-page SEO and will easily get more traffic to your website.

There’s also a competitor research feature that will show you how well your competitor’s are optimized for SEO.

AIOSEO competitor research

AIOSEO also comes with smart XML sitemaps, Rich snippet schema markup, robots.txt editor, built-in social media integration, and a ton of other useful features to grow your search engine visibility.

2. SEMRush

SEMRush

SEMRush is one of the best SEO tools in the market. It’s used by WordPress blogs, SEO experts, and business owners of all sizes.

We use SEMRush here at WPBeginner for a lot of SEO tasks like tracking keyword rankings and keyword research.

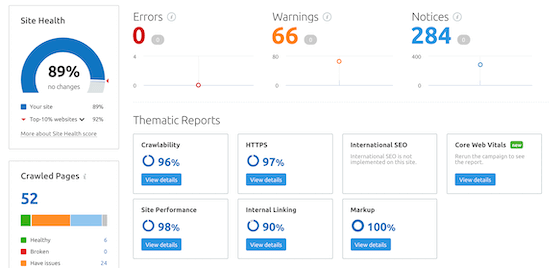
You can use this tool to analyze your website and conduct an SEO audit.

SEMRush SEO audit

There’s an in-depth backlink checker that will show you all the sites linking to yours, along with their authority and the anchor text.

This will show you if your link building efforts are working and even find potential partnerships. It can also help you spot spam links before they negatively impact your SEO.

SEMRush backlink analysis

As you work on your SEO strategy, you can use the keyword tracker to see if your rankings improve.

You can even track specific keywords that are the most valuable to your business.

SEMRush keyword tracking

You can take advantage of the 7-day free trial or the limited free plan that gives you access to basic SEO and website data.

If you want detailed SEO reports and SEO analysis features, then premium plans start at $119.95 per month and gives you full access to website, SEO, and traffic data.

3. MonsterInsights

MonsterInsights

MonsterInsights is the best Google Analytics plugin for WordPress used by over 3 million websites. It allows you to easily set up Google Analytics in WordPress and view your traffic metrics directly in your WordPress dashboard.

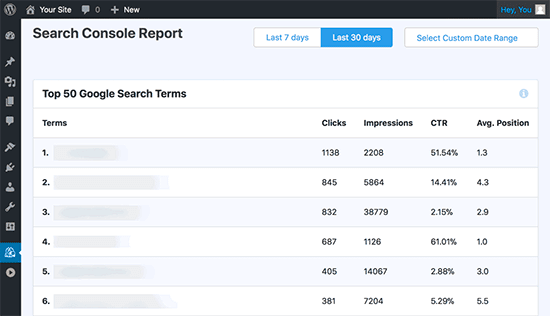
You can also monitor your keyword rankings directly in your WordPress dashboard. You can view your Google Search Console report and see the top 50 search terms your website ranks for.

To access this report you need to connect Google Search Console with Google Analytics first.

MonsterInsights search console data

It also shows you the number of impressions, clicks, click through rate, and the average position for each keyword.

You can use this data along with the optimization tips provided by AIOSEO to boost your rankings. For example, if you find an article that ranks in the 11 or 12th position, then you can optimize it to bring it to the first page.

There is a free version of MonsterInsights available, but the pro version gives you advanced tracking, additional data, eCommerce integrations, and much more.

4. Serpstat

Serpstat

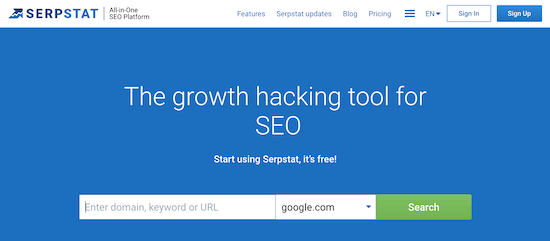
Serpstat was a wide range of different SEO tools that can provide in-depth website analysis. It’s very feature rich but still has a great user experience.

There are features that let you check your website traffic and SEO performance, conduct an SEO audit on your site, analyze your backlinks, and check the rank of specific keywords.

The site audit tool will show you any technical SEO issues affecting your website’s visibility and performance. The analysis report displays the most important issues first and gives you recommendations for fixing the problem.

There’s also a page audit tool that lets you compare a page on your website to a similar web page of a competitor’s website.

This lets you see if your optimizations can help you outrank your competitors in the search engine result pages (SERPS).

You’ll also find a backlink analysis tool for checking and monitoring your website backlinks.

Plus, there’s a keyword rank tracker, so you can watch your rankings improve over time.

The free seo tool gives you access to a portion of the website data available for your domain name. The premium version starts at $69 per month and gives you access to all the data provided by the tool.

5. Google Search Console

Google Search Console

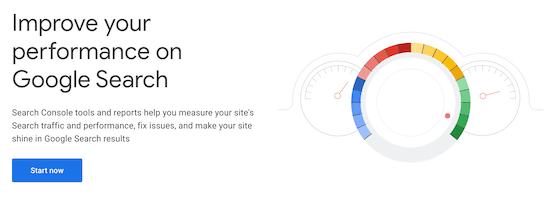
Google Search Console is a free SEO site checkup tool from Google that helps you monitor and maintain your website’s presence in the search engines.

Since Google is the world’s largest search engine, you’ll want to make sure your site displays correctly in Google search and has no search errors.

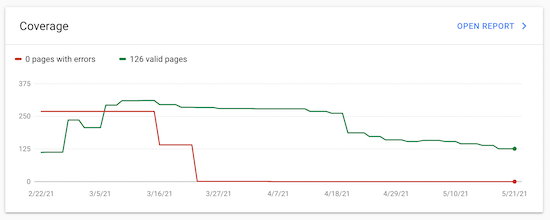
It will show you how your website appears in organic search, if it has any crawler, mobile usability, or indexing issues, and even problems with duplicate content.

Google Search Console errors

This tool will also displays the keywords that your website currently ranks for, along with the impressions, position, click through rate, and more. You can use this information to improve your click through rate and get more traffic.

You can also use this data to come up with new blog post ideas and get even more traffic.

For more details, see our beginner’s guide on how to use Google Search Console effectively.

Pro tip: you can use MonsterInsights to track your keyword rankings directly inside your WordPress admin area using data from Google Search Console.

Google Search Console also has a page speed report that shows you if any pages on your site are having speed and performance issues.

6. Ubersuggest

Ubersuggest

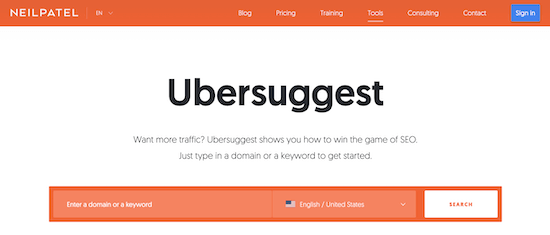
Ubersuggest is a free and premium SEO ranking tool from Neil Patel that can give you a ton of useful SEO and organic traffic data.

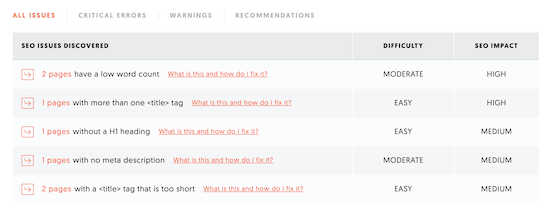
When you create an account, you can add a website to the tool and run an SEO check. This will check your website against common ranking factors to see if your site has any issues.

Ubersuggest SEO audit

It’s not as in-depth as other tools like AIOSEO and SEMRush, but it still gives you valuable data.

This tool also includes a traffic analyzer that provides you with a detailed breakdown of your competitor’s traffic levels, keywords, and backlinks.

You can use this information to improve your offsite SEO strategy and content marketing efforts.

The free version of the tool gives you full access to the SEO audit tool, along with three free searches per day. Premium plans start at $29 per month and gives you access to unlimited searches and traffic data.

Which is the Best SEO Checker and Website Analyzer Tool? (Expert Pick)

After using the most popular SEO checker and website analyzer tools we believe that AIOSEO and SEMRush are the two best tools in the market.

AIOSEO is the best WordPress SEO plugin and toolkit. It makes optimizing your website for SEO super simple.

SEMRush is a more advanced tool that can help you with more technical SEO errors and help you build your entire SEO strategy.

Our team uses both AIOSEO and SEMRush to improve our SEO rankings.

We also tried other SEO analyzer and website audit tools like Ahrefs, WooRank, and Moz, but we decided to keep the list short to make your decision easier.

We hope this article helped you find the best SEO checker and website analyzer tools for you. You may also want to see our list of the best email marketing services, and our expert picks of the must have WordPress plugins for business sites.

If you liked this article, then please subscribe to our YouTube Channel for WordPress video tutorials. You can also find us on Twitter and Facebook.

The post 6 Best SEO Checker and Website Analyzer Tools Compared (2021) appeared first on WPBeginner.


June 11, 2021 at 05:20PM

Thursday, June 10, 2021

How to Add Two-Factor Authentication in WordPress (Free Method)

Have you noticed how popular sites like Facebook and Google are now giving you the ability to add two-factor authentication to improve security?

Well, now you can add two-factor authentication to your WordPress site. This ensures maximum security for your WordPress site and all registered users.

In this article, we will show you how to add two-factor authentication for WordPress using both Google Authenticator as well as SMS text message.

Adding two-factor authentication in WordPress

Why Add Two-Factor Authentication for WordPress Login?

One of the most common tricks hackers use is called brute force attacks. By using automated scripts, hackers try to guess the right username and password to break into a WordPress site.

If they steal your password or accurately guess it, then they can infect your website with malware.

One of the easiest ways to protect your WordPress website against stolen passwords is to add two-factor authentication. This way even if someone stole your password, then they will need to enter a security code from your phone to gain access.

There are multiple ways to set up 2-step login in WordPress. However, the most secure and easier method is by using an authenticator app. Simply click the links below to jump to the method you prefer:

Let’s take a look at how to easily add two-factor verification to your WordPress login screen for free.

Method 1. Adding Two Factor Authentication in WordPress

This method is easier and recommended for all users. It is flexible and allows you to enforce two-factor authentication for all users.

First, you need to install and activate the WP 2FA – Two-factor Authentication plugin. For more details, see our step by step guide on how to install a WordPress plugin.

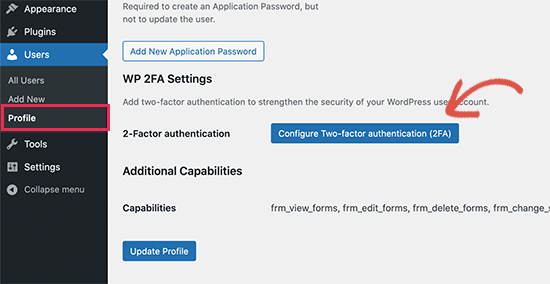
Upon activation, you need to visit the Users » Your Profile page and scroll down to the ‘WP 2FA Settings’ section.

Set up Two Factor Authentication

From here, you need to click on the ‘Configure Two-factor authentication (2FA)’ button to launch the setup wizard.

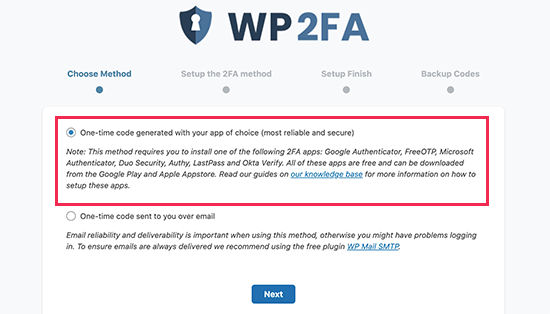
The plugin will now ask you to choose an authentication method. It comes with two options:

  • One-time code generated with your app of choice (Recommended)
  • One-time code sent to you over email

Choose 2FA method

We recommend that you choose the authentication via app method, as it is more secure and reliable. Then click on the Next button to continue.

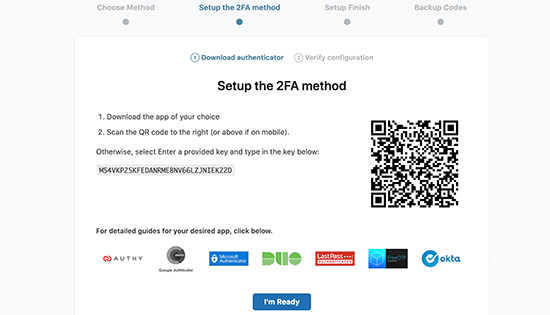
The plugin will now show you a QR code which you need to scan using an authenticator app.

Scan QR code

What is an Authenticator App?

An authenticator app is a smartphone app that generates a temporary one-time password for the accounts that you save in it.

Basically, the app and your server use a secret key to encrypt information and generate one-time codes that you can use as the second layer of protection.

There are many such apps available for free.

The most popular one is Google Authenticator, however, it is not the best one. While it works great, it does not provide a backup that you can use in case your phone is lost.

We recommend using Authy, since it is an easy-to-use and free app that also allows you to save your accounts on the cloud in an encrypted format. This way if you lose your phone, then you can simply enter your master password to restore all your accounts.

Other password managers like LastPass, 1password, etc all come with their own version of authenticator which are all better than the Google Authenticator since they allow you restore keys.

For the sake of this tutorial, we’ll be using Authy. You can follow our tutorial using a different app if you want, since they all work the same way.

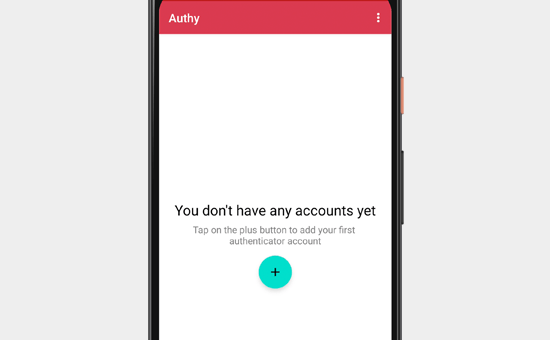
First, click on the Add account button in your authenticator app:

Add account in your authenticator app

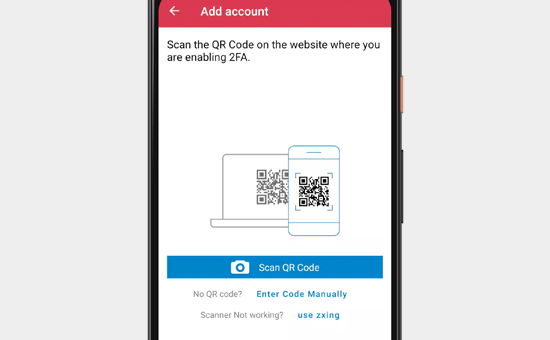
The app will then ask permission to access the camera on your phone. You need to allow this permission so that you can scan the QR code shown on the plugin’s settings page.

Scan QR code with your phone

The authenticator app will now save your website account, and it will start showing a one-time password that you can use to log in.

On the plugin’s setup wizard, click on the “I’m Ready” button to continue.

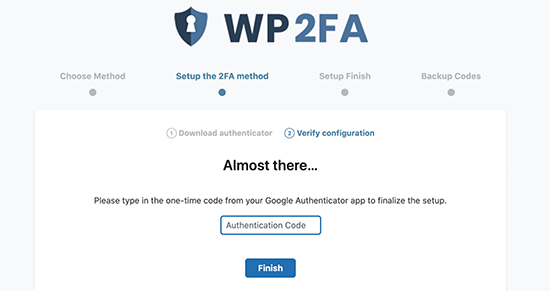
The plugin will now ask you to verify your one-time password. Simply click on your account in the authenticator app, and it will show you a six-digit one-time password that you can enter.

Verify code

After that, the plugin will give you an option to generate and save the backup codes. These codes can be used in case you don’t have access to your phone. You can print these backup codes and put them somewhere safe.

Generate backup codes

After that, you can exit the setup wizard.

Setting WP 2-FA Two Factor Login for All WordPress Users

If you run a multi-user WordPress website such as a membership site, then the plugin also allows you to enable or enforce two-factor authentication for all users on your site.

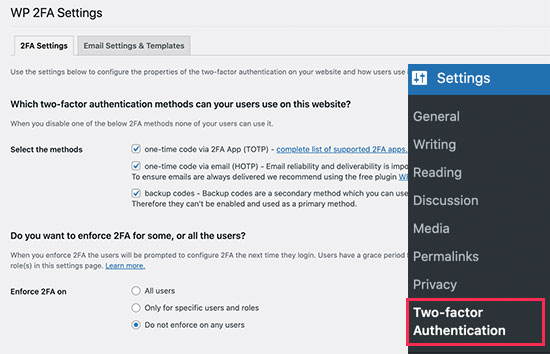
Simply head over to Settings » Two-factor Authentication page to configure the plugin settings.

Configure Two Factor Authentication

The plugin allows you to enable two-factor login for all users, make it compulsory for all users, and give users enough time to set it up.

If your WordPress website uses a custom login form page, then you can also create a custom page where users can manage their two-factor authenticator settings without accessing the WordPress admin area.

Don’t forget to click on the Save Changes button to store your new settings.

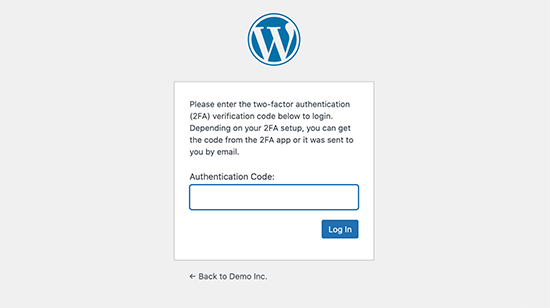
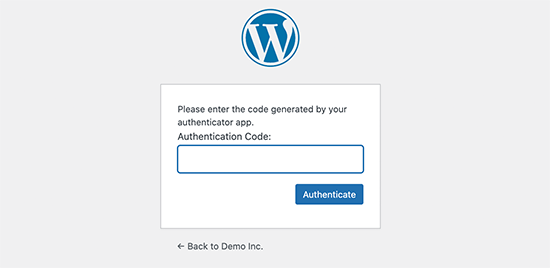
Here is how your default WordPress login screen will ask for the two-factor authentication code after users enter their regular WordPress password.

Authentication code

Method 2. Adding Two Factor Authentication using Two Factor

This method is a little less flexible as it does not allow you to enforce two factor login for all users. Each user will have to set it up on their own and can disable it from their profile.

First, you need to install and activate the Two Factor plugin. For more details, see our step by step guide on how to install a WordPress plugin.

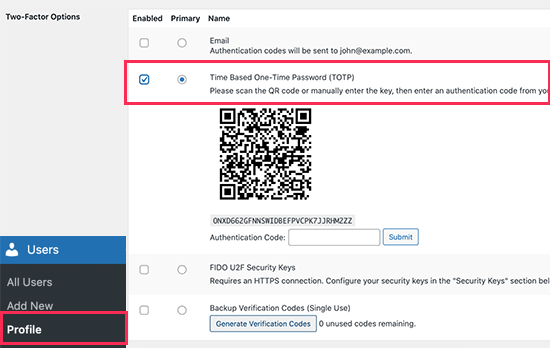
Upon activation, you need to visit the Users » Profile page and scroll down to the Two-Factor Options section.

Two Factor options

From here, you need to choose a two-factor login option. The plugin allows you to use email, authenticator app, and FIDO U2F Security Keys methods.

We recommend using the authenticator app method. Simply download an authenticator app like Google Authenticator, Authy, or LastPass Authenticator and scan the QR code shown on the screen.

Scan QR code with your phone

Once you have scanned the QR code, the app will show you a verification code that you need to enter into the plugin options and click on the Submit button.

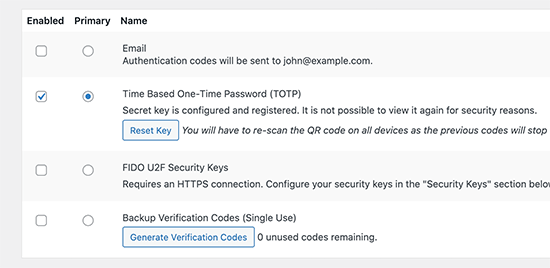
The plugin will now set the secret key. You can reset this key at any time from the settings page to rescan the QR code.

Secret keys configured

Don’t forget to click on the Update Profile button to save your settings.

Now each time you login to your WordPress website, you will be asked to enter the authentication code generated by the app on your phone.

Add two factor authebntication code to continue

Frequently Asked Questions about Two Factor Authentication (2FA) in WordPress

Following are answers to some of the commonly asked questions about using two-step login in WordPress.

1. How do I log in if I don’t have access to my phone?

If you are using an authenticator app with a cloud backup option like Authy, then you can install the app on your laptop as well.

This gives you access to the authentication codes even when you don’t have your phone with you. It also allows you to easily restore your secret keys when you buy a new phone.

Both methods mentioned above also allow you to generate backup codes. These codes can also be used as one-time passcodes when you don’t have access to your phone.

2. How to log in without any codes?

If you don’t have access to your phone, laptop, or backup codes, then you can only log in by disabling the plugin.

See our guide on how to deactivate all WordPress plugins when not able to access the admin area.

Once you deactivate all plugins, it will also disable the two-factor authentication plugin and you’ll be able to login to your WordPress website. Once logged in, you can reactivate plugins and reset the two-factor authentication setup.

3. Do I still need to password protect the WordPress admin folder?

Website security works best when you have multiple layers of security to protect your website, starting with the basics like using HTTPS and secure WordPress hosting. The 2-factor verification makes your WordPress login secure, but you can make it even more secure by password protecting the WordPress admin area.

This comes in handy if you have a WordPress membership website, an online store, or an online course website. Your users will be able to login securely, but they will not be able to access the WordPress admin area.

We hope this article helped you add 2-factor verification for WordPress login. You may also want to see our list of the best virtual business phone number apps, or our guide on how to get a free SSL certificate for your WordPress site.

If you liked this article, then please subscribe to our YouTube Channel for WordPress video tutorials. You can also find us on Twitter and Facebook.

The post How to Add Two-Factor Authentication in WordPress (Free Method) appeared first on WPBeginner.


June 10, 2021 at 05:50PM