Tuesday, July 6, 2021

How to Connect Google Sheets with WooCommerce (in 5 minutes)

Do you want to connect Google Sheets with WooCommerce?

Connecting Google Sheets with WooCommerce lets you easily manage order and customer data and share it with the rest of your team.

In this article, we’ll show you how to connect Google Sheets with WooCommerce, step by step.

How to connect Google Sheets with WooCommerce (in 5 minutes)

Why Connect Google Sheets with WooCommerce in WordPress?

Google Sheets is a very popular free spreadsheet software from Google. Connecting Google Sheets and WooCommerce lets you simply manage and analyze your store order and customer data.

You can also share this data with your team without having them login to your WordPress dashboard.

Integrating Google Sheets and WooCommerce can help your online store in a lot of ways.

  • Easily analyze and sort customer order data
  • Quickly present store data in charts and graphs
  • Sort and filter data by total, location, coupons used, and more
  • Give team access to data without creating a separate login

That being said, let’s take a look at how to connect Google Sheets with WooCommerce, in 5 minutes.

Setup Your WooCommerce Store and Google Sheets

First thing, you need to have a fully functioning WooCommerce store set up. If you’re still building your store, then see our step by step guide on how to start an online store.

Note: you’ll also want to make sure you’re using high quality WooCommerce hosting and a WooCommerce theme to ensure your store looks great and loads fast.

WooCommerce store example

Next, you’ll need to create a Google Sheets spreadsheet that you’ll send WooCommerce store data to.

Head over to the Google Sheets website and click ‘Blank’ to add a new spreadsheet.

Add new Google Sheet

Then, when adding columns to your spreadsheet, you want these to match the type of WooCommerce data you want to collect.

In this case, we have a spreadsheet with the customer’s name, email, phone, the products they ordered, and the total price.
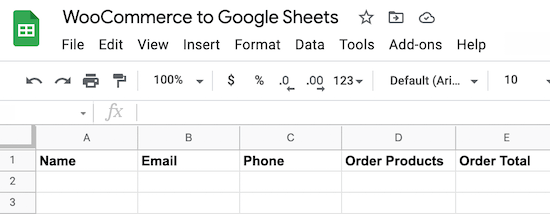
WooCommerce to Google Sheets spreadsheet

You can import all kinds of WooCommerce data, including location, coupons used, the status of the order, time of the order, and much more.

Install and Activate the Uncanny Automator Plugin for WordPress

To connect Google Sheets to WooCommerce, we’re going to be using an automation plugin.

The best WordPress automation plugin is Uncanny Automator. It acts as a connector between your WordPress website and other apps, so they can talk to each other without you writing any code.

Uncanny Automator Plugin

It’s like Zapier for WordPress websites without the high costs of Zapier.

Uncanny Automator is very easy to use and comes with all kinds of automated workflows that you can set up in a couple of clicks (no coding needed).

Note: there is a free version of the plugin available, but we’ll use the Pro version for this tutorial since it has the Google Sheets integration we need.

For more details, see our guide on how to create automated workflows in WordPress with Uncanny Automator.

Connect Your Google Account with Uncanny Automator

Upon activation, you need to connect Uncanny Automator to your Google account.

First, navigate to Automator » Settings and click on the ‘Google’ menu item.
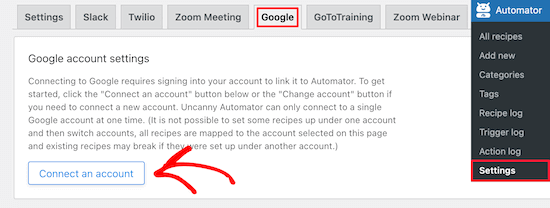
Connect Google Account

Next, click on the ‘Connect an account’ button. This takes you to a screen where you can authorize your Google account.

Then, select the Google account you want to connect and click the ‘Allow’ button.
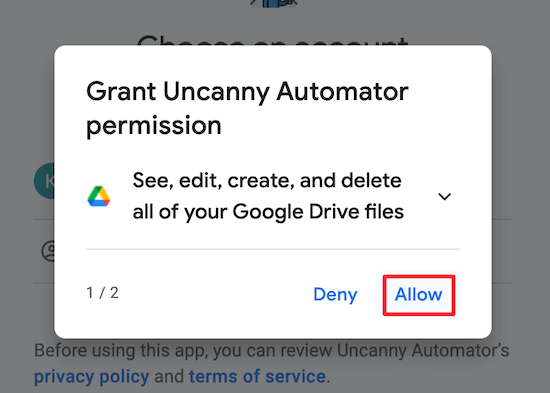
Give Uncanny Automator permission

After that, you need to click ‘Allow’ one more time to authorize your account and confirm your choices.

This will take you back to the Google settings page in your WordPress admin panel.
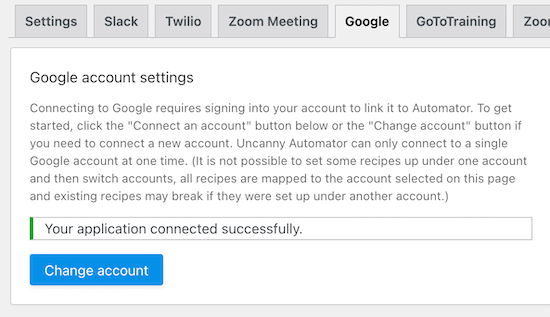
Google Account connection success

That’s all, you have successfully connected your WordPress site to Google Sheets using Uncanny Automator.

Connect WooCommerce to Google Sheets with Uncanny Automator

Now, you’re ready to connect your online store to the Google Sheets spreadsheet you created earlier.

Uncanny Automator uses “recipes” to create automations and link apps and plugins together.

The first thing you need to do is navigate to Automator » Add new, click the ‘Anonymous’ option, then click ‘Confirm’.
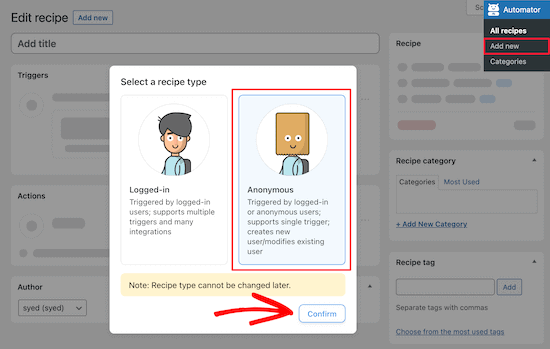
Select anonymous recipe

Anonymous recipes can be triggered by any user, while logged-in recipes can only be triggered by logged in users.

You need to choose the type of recipe based on your needs and then click the ‘Confirm’ button.

For the sake of this tutorial, we’ll be creating an anonymous recipe that automatically sends WooCommerce order data to Google Sheets the moment an order is completed.

After that, you need to give your recipe a name. This won’t be visible to your users, but it will help you identify the different recipes you create.

There are two different parts to each recipe, the trigger, and the action.
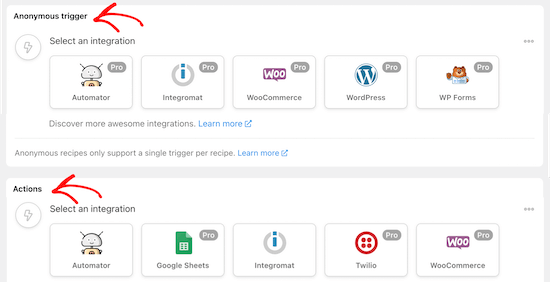
Anonymous triggers and actions

The trigger is the event that will start the recipe, and the action is the task that will run when the action is triggered.

First, you need to select ‘WooCommerce’ in the ‘Anonymous trigger’ meta box.
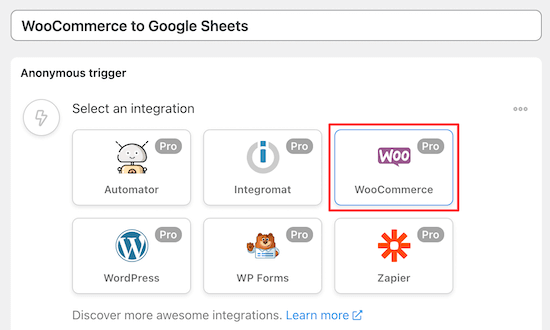
Select WooCommerce trigger

Then, you can choose the trigger.

We’ll select the first option from the drop-down menu since this lets you send WooCommerce data once an order is complete.
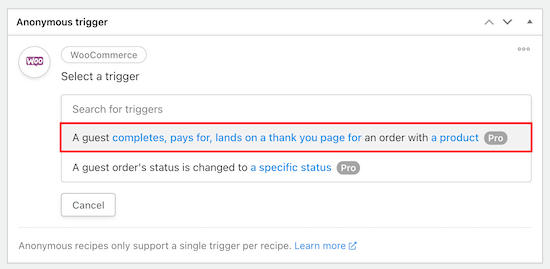
Select first WooCommerce trigger

After that, you need to choose the trigger condition.

Select the ‘completes’ option from the drop-down menu to trigger the automation when a customer completes a purchase and then click ‘Save’.
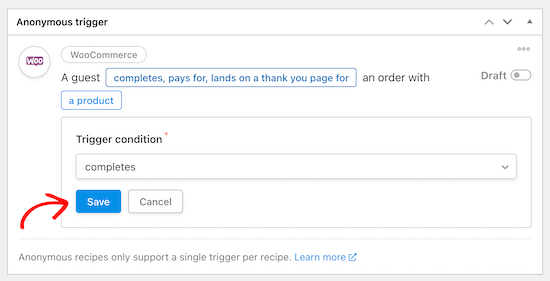
Completes order trigger condition

Now, you can choose a specific product or any product from your WooCommerce store to run the trigger on.

To choose any product in your store, select the ‘Any product’ option and then click ‘Save’.
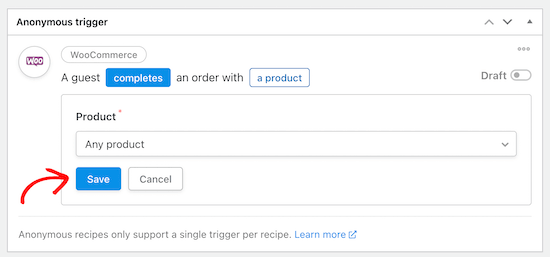
Trigger any product in store

Now, you can move onto the Actions section. You’ll see different options depending on if you chose an anonymous or logged-in recipe.

If you chose an Anonymous recipe above, then you need to create a new subscriber user in WordPress first. This new user will be used to send the form data through.

For more details, see our guide on how to add new users and authors to your WordPress blog.

Now, select the ‘Existing user’ option in the ‘Actions’ meta box.

Select existing user

This brings up a popup to choose the new subscriber user role you just created and enter the user ID.

If you don’t know the user ID, then you can find this by going to Users » All Users and editing the user profile.

Then, in the URL you can find the user ID.

Find user ID

After that, select ‘Subscriber’, enter the ID, and select ‘Do nothing’ for existing users.

Then, click the ‘Save’ button to continue.
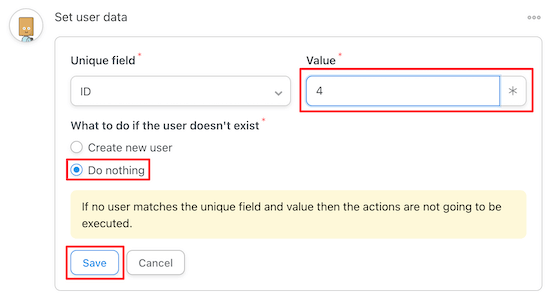
Select do nothing and save

Next, click the ‘Add action’ button.

Then, select ‘Google Sheets’ from the list of integrations.
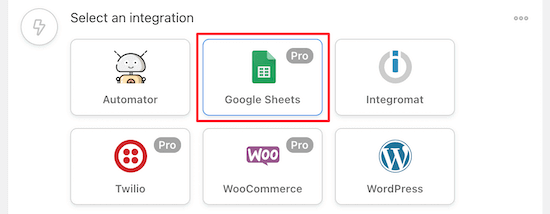
Select Google Sheets

Once you’ve done that, choose the ‘Create a row in a Google Sheet’ option located in the ‘Select an action’ box.

Create a row in Google Sheets

This will bring up a drop-down menu where you can select the spreadsheet you created earlier.

Then, select the ‘Spreadsheet’ and ‘Worksheet’.

Select spreadsheet and worksheet

Next, you need to click the ‘Get columns’ button.

This will import the rows from your spreadsheet.
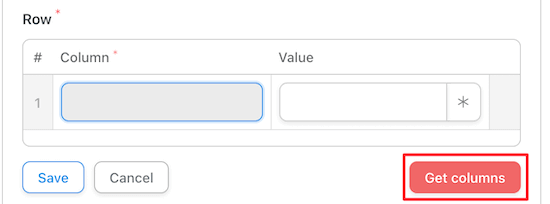
Select get columns

You need to map your spreadsheet columns to the WooCommerce order data by clicking the ‘Asterisk’ icon and selecting the WooCommerce field from the drop-down list.
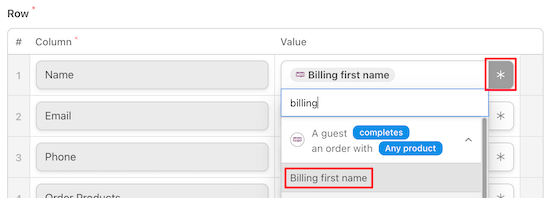
Match order and spreadsheet columns

After you’ve matched up all of your fields, it will look similar to the settings below.

You can choose WooCommerce shipping information, however we decided to use the WooCommerce billing information since the contact information can be more accurate.
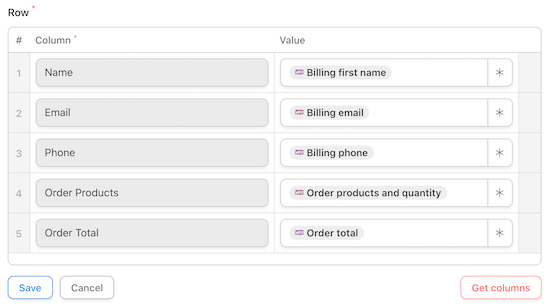
WooCommerce to Google Sheets columns

Make sure you click ‘Save’ once you’re done creating your recipe.

Now, you can view the full automation summary to make sure it looks right. After that, it’s time to make your recipe live.

At the top of the recipe editor, in the’ Recipe’ box, switch the Draft toggle to ‘Live’.
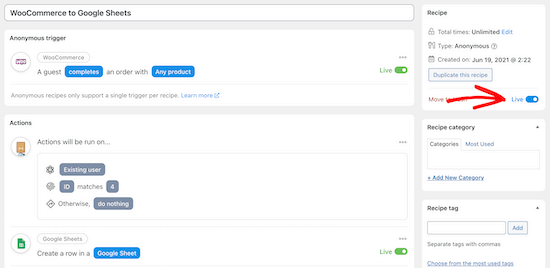
Review recipe and make live

Your new recipe will now be active, and you’ll automatically send new WooCommerce order data to Google Sheets once a purchase is complete.

Make sure to test your automation to see that the recipe is triggered and the correct action is performed.

If you want to add even more automations to your WooCommerce store, then see our guide on how to send Twilio SMS notifications from WooCommerce.

We hope this article helped you learn how to connect Google Sheets with WooCommerce. You may also want to see our expert picks of the best WooCommerce plugins for your store and our ultimate WooCommerce SEO guide to get more traffic.

If you liked this article, then please subscribe to our YouTube Channel for WordPress video tutorials. You can also find us on Twitter and Facebook.

The post How to Connect Google Sheets with WooCommerce (in 5 minutes) appeared first on WPBeginner.


July 06, 2021 at 02:30PM

Monday, July 5, 2021

How to Display Breadcrumb Navigation Links in WordPress

Do you want to display breadcrumb navigation links on your WordPress site?

Breadcrumb navigation tells users where they are on a website relative to the homepage. This breadcrumb trail is then also displayed in search results which makes your website stand out.

In this article, we’ll show you how to display breadcrumb navigation links in WordPress.

Easily display breadcrumb navigation links in WordPress

What is Breadcrumb Navigation and Why Do You Need it?

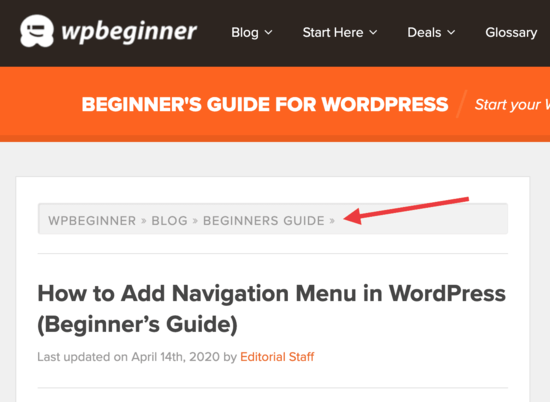
Breadcrumb navigation is a term used to describe a hierarchical navigation menu presented as a trail of links. It’s often used as a secondary navigation that allows users to go up in the website’s hierarchy of pages.

Breadcrumbs displayed on WPBeginner website

Breadcrumb navigation links are different than the default navigation menu system in WordPress.

The purpose of breadcrumb navigation is to help users navigate around your website. It also helps search engines understand the structure and hierarchy of links on a web page.

If your breadcrumbs are set up the right way, then search engines like Google will display them along with the page title in search results. This gives your website more visibility in the search results and increases your click-through rate.

Breadcrumb navigation in search results

The methods in this guide will help you to set up breadcrumbs properly by using schema markup. Schema is a smart markup code that helps Google to identify your breadcrumbs so they’ll be displayed in search results.

Having said that, let’s take a look at how to add breadcrumb navigation links in WordPress. We’ll show you two methods, and you can choose the one that works best for you.

Method 1. Adding Breadcrumb Navigation in WordPress using All in One SEO (Recommended)

This method is easier and recommended for all WordPress users.

For this method, we’ll be using All in One SEO for WordPress which is the best WordPress SEO plugin on the market. It helps you easily improve your WordPress SEO without any technical skills. It also comes with an easy-to-use breadcrumbs feature.

Note: There’s also a free version of All in One SEO available with limited features, which includes breadcrumbs.

Upon activation, you will be taken to the plugin’s setup wizard. You can follow the on-screen instructions to setup the plugin.

All in One SEO wizard

Need help with the set up? See our step by step tutorial on how to install and set up All in One SEO.

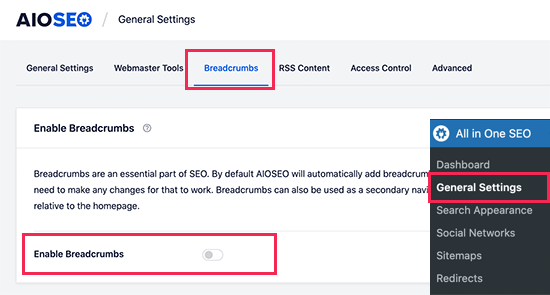
Next, you need to visit the All in One SEO » General Settings page and switch to the Breadcrumbs tab.

Enable breadcrumbs display in All in One SEO

Now the breadcrumbs schema markup is automatically added by All in One SEO to your website’s code so that search engines can find it.

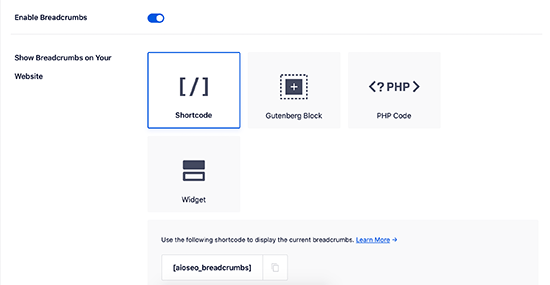
However, if you want to display breadcrumb navigation links on your website too, then you need to turn on the ‘Enable Breadcrumbs’ option. Switching the toggle allows you to see the different breadcrumb display settings that you can use on your website.

Breadcrumb display options

There are four ways you can use to display the breadcrumb navigation trail on your WordPress website.

1. Adding Breadcrumb Navigation using the Shortcode

The shortcode method is easy and allows you to display breadcrumb navigation links in your WordPress posts and pages, or in product pages on your online store.

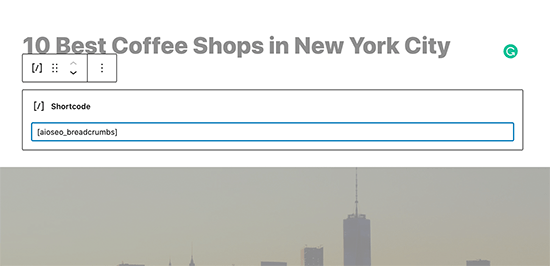
Simply edit the post, page, or product and add the following shortcode where you want to display the breadcrumb navigation trail.

[aioseo_breadcrumbs]

If you are using the default block editor, then the shortcode will automatically convert into the shortcode block.

AIOSEO breadcrumb navigation shortcode

You can now save your post or page and preview it to see the breadcrumb navigation menu in action. Here is how it looked on our test site.

AIOSEO breadcrumb navigation menu

2. Adding Breadcrumb Navigation using the Gutenberg Block

Now if you don’t want to use the shortcode option, or don’t remember the shortcode, then you can display breadcrumb navigation by using the ‘AIOSEO – Breadcrumbs’ block.

Simply edit the post or page where you want to display the breadcrumb navigation and add the AIOSEO – Breadcrumbs block.

Adding AIOSEO breadcrumbs block

The plugin will then load a live preview of your breadcrumb navigation links and display it in the content area.

Preview breadcrumb block

Don’t forget to update or publish your changes.

3. Adding Breadcrumb Navigation using Widget

The above two methods require you to add a shortcode or block in every post or page where you want to display breadcrumb navigation links.

What if you wanted to display breadcrumbs automatically for each post or page?

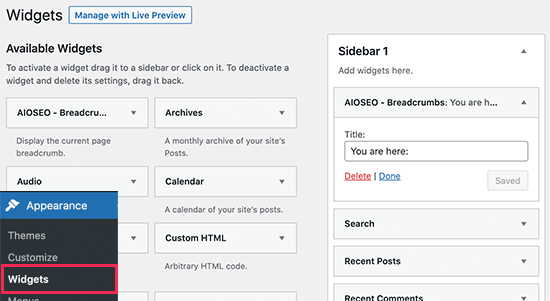
The AIOSEO Breadcrumbs widget allows you to easily do that. Simply go to the Appearance » Widgets page and add the ‘AIOSEO – Breadcrumbs’ widget to the sidebar.

AIOSEO breadcrumbs widget

You can provide a title for the widget, or leave it blank if you prefer. Don’t forget to click on the Save button to store your settings.

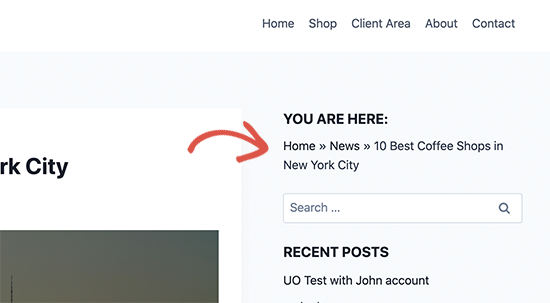
You can now visit your website and you’ll see the breadcrumb navigation menu on all posts and pages.

Breadcrumbs navigation in sidebar widget

4. Adding Breadcrumb Navigation using Code

This method allows you to display breadcrumbs navigation links exactly where you want them. However, it requires you to add code to your WordPress theme files.

If you haven’t done this before, then don’t forget to see our article on how to add code snippets in WordPress.

First, you need to decide where you want to display the breadcrumb links. The most common place to display breadcrumb links is below the individual post, page, or product title.

WordPress themes use template files to display different sections of your website. For instance, many themes would use a file called content-single.php located inside the template-parts folder of your theme.

See our cheat sheet to find which files to edit in a WordPress theme.

After that, you need to edit your theme file using an FTP client. See our guide on how to use FTP to upload files to WordPress for instructions. Then place the following code where you want to display the breadcrumb navigation links.

<?php if( function_exists( 'aioseo_breadcrumbs' ) ) aioseo_breadcrumbs(); ?>

Don’t forget to save your changes and upload the file back to your website.

You can now visit your website to see the breadcrumb links in action.

Breadcrumbs navigation links preview

Change How Breadcrumb Links are Displayed in AIOSEO

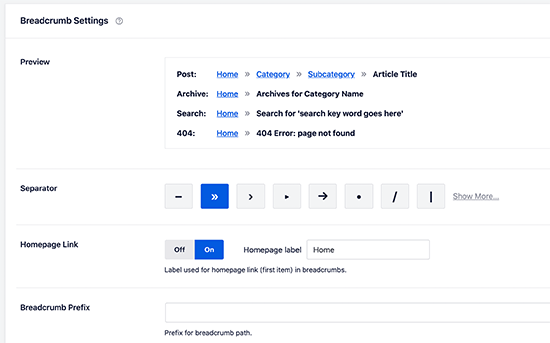
Now by default, All in One SEO uses a template to display your breadcrumb navigation links. It contains a link to your home, category or parent page, and post or page title separated by the ».

You can change that by visiting the All in One SEO » General Settings page and scroll down to the Breadcrumb Settings section.

Breadcrumb settings

From here, you can change the separator, show or hide the home link, add a prefix, and more.

Once finished, don’t forget to click on the Save Changes button to store your settings.

Method 2. Add Breadcrumb Navigation with Breadcrumb NavXT

This method can be used with any other WordPress SEO plugin. It’s easy to use if you have a compatible theme, but if you don’t, then you’ll need to edit your theme files to display your breadcrumb navigation links.

First thing you need to do is install and activate the Breadcrumb NavXT plugin. For more details, see our step by step guide on how to install a WordPress plugin.

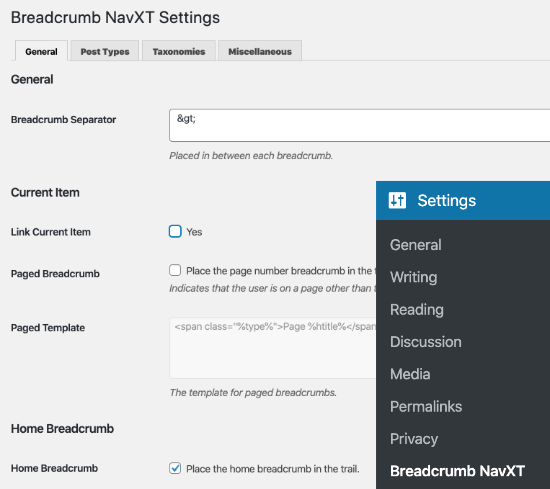
Upon activation, you need to visit the Settings » Breadcrumb NavXT page to configure the plugin settings.

Settings page for Breadcrumb NavXT plugin

The default settings should work for most websites. However, you can customize the settings as needed.

The settings page is divided into different sections. On the general settings tab, you can change the style and settings of your breadcrumbs.

You will also notice that these link templates use Schema.org markup in the link tag.

The post types tab under plugin settings allows you to set up breadcrumb links for posts, pages, and any custom post types.

You can choose how you want to display your post hierarchy. By default, the plugin will use Site Title > Category > Post Title. You can replace categories with tags, dates, or post parent, and change the separator.

The taxonomies and authors tabs have the similar templates for your breadcrumb navigation links.

Don’t forget to click on the save changes button to store your changes.

Showing Breadcrumb NavXT on Your Website

Breadcrumb NavXT offers multiple ways to display breadcrumb navigation links on your website.

1. Display Breadcrumb Navigation with Theme Support

Some of the most popular WordPress themes come with a built-in option to display breadcrumb navigation by choosing Breadcrumb NavXT or your WordPress SEO plugin as the source.

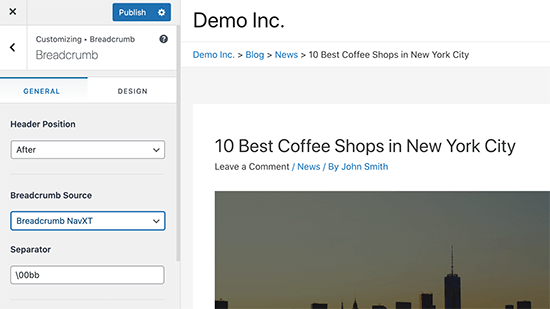
For instance, if you are using Astra, then you can go to Appearance » Customize page and click on the Breadcrumbs menu.

From there, you’ll choose where you want your breadcrumbs to be displayed in the Position dropdown.

In the Breadcrumb Source, you’ll need to choose ‘Breadcrumb NavXT’.

Adding breadcrumbs using theme customizer

If you are viewing a single post or page, then you’ll see a live preview of your breadcrumb navigation links.

Don’t forget to click on the Publish button to save your changes.

2. Adding Breadcrumbs Navigation using a Widget

The plugin also provides a widget that you can use to display breadcrumb navigation in the sidebar or any widget ready area.

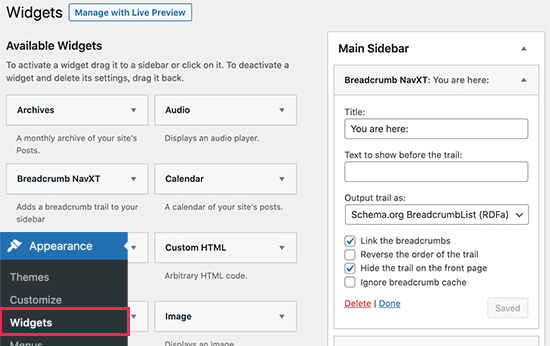
First, go to the Appearance » Widgets page and add the Breadcrumb NavXT widget to your sidebar.

Breadcrumb NavXT widget settings

The default widget settings would work for most websites, but you can change them if needed. For instance, you may want to hide the trail on the front page.

Don’t forget to click on the Save button to store your widget settings.

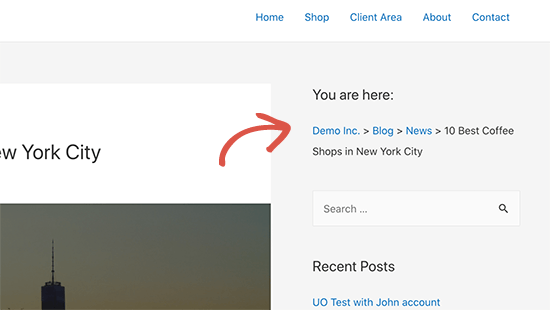
You can now visit your website to see the widget in action.

Breadcrumb links in sidebar

3. Adding Breadcrumb Navigation using Code

The plugin also offers a code method to display breadcrumb navigation links for advanced users.

First you need to connect to your WordPress site using an FTP client. After that, navigate to your current WordPress theme folder located inside /wp-content/themes/ directory.

WordPress themes use template files to display different sections of your website. For instance, many themes would use a file called content-single.php located inside the template-parts folder of your theme.

See our cheat sheet to find which files to edit in a WordPress theme.

Open the template file to edit it and then place the following code where you want to display the breadcrumbs trail:

<?php if( function_exists( 'bcn_display' ) ) bcn_display(); ?>

Don’t forget to save your changes and upload the file back to your website.

You can now visit your website to see the breadcrumb links trail in action.

Breadcrumb navigation preview

We hope this article helped you learn how to display breadcrumb navigation links in WordPress. You may also want to see our guide on how to get more traffic to your WordPress site, or our showcase of the best domain name registrars.

If you liked this article, then please subscribe to our YouTube Channel for WordPress video tutorials. You can also find us on Twitter and Facebook.

The post How to Display Breadcrumb Navigation Links in WordPress appeared first on WPBeginner.


July 05, 2021 at 02:00PM

Sunday, July 4, 2021

WPBeginner Turns 12 Years Old – Reflections and Updates

Today WPBeginner turns 12 years old — which means we pretty much have a teenager on our hand :)

Like every year, I want to take a few minutes and do a quick recap of all the major things happening in business as well as my personal life.

WPBeginner 12th Birthday

WPBeginner Story

I started using WordPress when I was 16 years old and started WPBeginner at age 19 with a single mission: make WordPress easy for beginners.

Since then WPBeginner has become the largest free WordPress resource site for beginners.

For those of you who’re new, you can read the full WPBeginner story on our about page and use the Start Here page to get the most out of WPBeginner.

Personal Updates

My son, Solomon, is now 4.5 years old. He’s growing up so fast. His storytelling and conversation skills always blow my mind.

Amanda and I got our vaccine doses, and we finally took our first international trip to Punta Mita, Mexico for Fathers Day. After 1.5 years of no commercial air-travel, this definitely felt weird, but overall the trip turned out great.

Balkhi Family 2021

As things are returning back to normal, I’m really looking forward to travel, seeing our team members, and hopefully attending a few networking events.

Earlier this year, we also moved into our new house. We’re still in Palm Beach Gardens, Florida, but we’re a lot closer to everything in the city.

If you didn’t get a chance to read my 2020 recap, I highly recommend checking it out on my personal blog where I share lessons learned from last year.

WPBeginner Updates

Thanks to our awesome community, WPBeginner has continued to grow year over year. Aside from tons of amazing WordPress tutorials on our blog, there have been several notable updates from last year, that I’d like to highlight.

1. WPBeginner YouTube Channel passed 246,000 subscribers

Our WPBeginner YouTube channel passed 246,000+ subscribers, and I believe we will likely get pretty close to 300k goal by end of this year.

We have hundreds of free WordPress video tutorials, and we have also been creating a lot of YouTube exclusive content.

If you haven’t subscribed yet, then please go ahead and subscribe to WPBeginner on YouTube (it’s free). My goal is to pass 300,000 subscribers by the time I write this post next year.

2. WPBeginner Engage Facebook Group (Over 77,000 Members)

Our WPBeginner Engage Facebook group has grown to over 77,000 members, and we’re the largest WordPress user group on Facebook.

For those of you who’re not members yet, the goal of this group is to share and learn WordPress tips while getting to know other website owners like yourself.

Aside from peer-to-peer support and knowledge sharing, we also do monthly giveaways, have exclusive video content, and our WPBeginner experts are also there answering questions (for free).

What are you waiting for? Go ahead and join the WPBeginner Facebook Group.

3. Contributing to WordPress and Open Source

We have always been huge supporters of open source. This past year, we really ramped up our commitment to both WordPress and free open source projects.

As part of our Five for the Future commitment, we hired Peter Wilson, one of the well-respected WordPress core contributors, so he can spend 100% of his time on making WordPress better. Recently, he co-led the WordPress 5.7.2 release.

Aside from the contributions that are visible on WordPress.org, we’re now offering over 1200 hours of free WordPress support each month through our various support channels including our contact form, Facebook group, etc.

We’ve also continued to maintain dozens of other free tools like Weebly to WordPress migration tool, Medium to WordPress migration tool, our popular free Insert Headers and Footers plugin, and more.

Want to join our team and make an impact on the larger open source ecosystem? We’re hiring.

4. New Acquisitions & Investments (PushEngage, Uncanny Automator, and more)

As you may know that in 2018, I created the WPBeginner Growth Fund to invest in WordPress focused companies.

We finished the 2020 strong with the acquisition of PushEngage, the leading web push notification software. See the background story.

I also invested in Uncanny Owl and Uncanny Automator plugin. I’m really excited about what we’re building at Automator. Our goal is to help website owners connect WordPress with other business tools without paying the high costs of Zapier. Read the full background story.

Earlier this year, we also acquired Plugin Rank. It’s a very useful tool for WordPress Plugin authors to keep track of their plugin ranking and grow their business.

I’m really proud of how far we’ve come with the Growth Fund in just three years. It’s really amazing to see the impact our companies are making in the WordPress ecosystem and the larger open web.

For example, one of our portfolio companies MemberPress announced earlier this year that they passed over $1 billion dollars in creator earnings on their platform. We project that MemberPress site owners and course creators will earn over $600 million in 2021 alone!

Our other portfolio companies continue to crush it as well.

Want me to invest in your business? Learn more about the WPBeginner growth fund.

Product / Company Updates

One of the questions that I often get asked via our contact form is what is WPBeginner’s income, and how does WPBeginner make money by giving away all WordPress tutorials for free.

Well, we make money indirectly through our suite of premium WordPress plugins that are now running on over 17 million websites. Aside from that, we also have investments in a suite of other WordPress companies through our growth fund that I mentioned above.

Our team at Awesome Motive continued to set new records this year, and all of our products saw tremendous growth.

Here’s a list of our plugins that you should check out:

  • OptinMonster – #1 conversion optimization software that helps you convert abandoning website visitors into subscribers and customers. There’s also a free version here.
  • WPForms – the most beginner friendly WordPress form builder used by over 4 million websites. There’s also a free version – WPForms Lite.
  • MonsterInsights – the most popular WordPress Analytics plugin that helps you grow your business with confidence. I use this on all of my websites. Free version available: MonsterInsights Lite.
  • AIOSEO – the original WordPress SEO plugin to help you get more traffic. Used by over 2 million websites. There’s also a free version of AIOSEO.
  • WP Mail SMTP – the #1 plugin that helps improve your WordPress email deliverability. The free version: WP Mail SMTP Lite is sufficient for most website owners.
  • SeedProd – the best drag & drop landing page builder for WordPress. Try the free version of SeedProd.
  • RafflePress – powerful WordPress giveaway and contest plugin to grow your website traffic.
  • Smash Balloon – most popular social media feeds plugin for WordPress. Free version available for Instagram, Facebook, Twitter, and YouTube feeds.
  • PushEngage – leading web push notification software for small businesses – helps send over 9 billion push notifications each month.

We’re a fully remote team of over 170+ people across 31 countries. Want to join our team and work alongside me in helping small businesses grow and compete with the big guys? We’re hiring.

Giving Back / Philanthropy

As you know that WPBeginner is a 100% free resource, and I don’t really ask for much in return. Your kindness and generosity in supporting our premium WordPress plugins make this business sustainable for us.

A big priority for Amanda and I is to help others, and we do a ton through our Balkhi Foundation. We also recently built another school in Cambodia through the Cambodian Village Fund.

Cambodian Village Fund School

Since Balkhi Foundation is our family foundation, we don’t ask for donations there. However if you’ve ever found WPBeginner to be helpful and want to give back, then I would appreciate you supporting some of my favorite charities below:

Thank You Everyone

I want to say thank you to everyone who has supported us in this journey. I really do appreciate all of your retweets, personal emails, content suggestions, and the interactions at the events.

I also want to say special thank you to everyone who’s using our plugins because that enables us to keep bringing more free tutorials on WPBeginner.

You all are AMAZING and without you, there is no WPBeginner.

I look forward to another solid year ahead of us.

Syed Balkhi
Founder of WPBeginner

The post WPBeginner Turns 12 Years Old – Reflections and Updates appeared first on WPBeginner.


July 04, 2021 at 06:26PM

Saturday, July 3, 2021

Com vs Net – What’s the Difference Between Domain Extensions

Have you ever wondered what the difference is between .com vs .net domain name extensions? Choosing the right domain name is crucial because it can have an impact on your branding and search rankings.

In this article, we will explain the difference between .com vs .net domain extensions and which one is better for your website.

Difference between Com vs Net domain name extensions

What Are .Com and .Net Domain Name Extensions?

A domain name is your website’s address on the internet. Ours is wpbeginner.com.

To learn more about domain names, see our beginner’s guide on what is a domain name and how do domains work.

Domain names always have an extension. This is sometimes also called a TLD, which stands for Top Level Domain. For instance:

example.com
example.net
example.org

You can choose from a wide range of domain extensions when making your website.

Most domain extensions don’t have any restrictions on usage and lots of new domain extensions have been created in recent years.

However, extensions were originally created for different types of websites. They have specific meanings.

You need to choose a domain name extension that fits your business while helping you build a recognizable brand in your industry.

Let’s take a look at the difference between the most popular .com vs .net domain extensions to see which is better for your business.

Difference Between .Com vs .Net Domain Names

The .com vs .net domain extension

Com and Net are two of the most popular domain name extensions. If your preferred .com domain name extension is not available, then you might be tempted to use a .net instead.

However, .net isn’t a good option for your business in most cases.

The “com” in the .com domain name indicates a “commercial” site. This can cover business websites, websites that want to make money online, personal websites, blogs, portfolios, and more.

On the other hand, the “net” in the .net domain name extension stands for “network”. It was designed for the internet, networking, and email service providers.

If you’re wondering about .org, that stands for “organization” and was originally intended for use by nonprofit organizations.

When Should You Choose a .Com Domain Name?

The extension .com on a bulletin board

The .com domain extension has been synonymous with the internet since the “dot-com bubble” in the late 1990s. Over 40% of all registered domain names are .com domains.

It’s much easier for people to remember a .com domain name than any other domain extension. It’s familiar and reassuring, plus it makes your site look professional.

Also, most mobile keyboards have a dedicated .com button. You won’t find that for .net (or any other extension).

There’s just one problem. You’ve probably noticed that .com domain names are so popular that it feels like all the good ones are already taken!

However, there are still plenty of clever ways to get the perfect .com domain name. Here are some things to try:

  • Check that your domain name represents your business and what you do. For example, stargardeningservices.com is better than starservices.com.
  • If your preferred domain name is taken, then you can add a word before or after it to make it unique. Your location could work well here. For example, stargardeninghouston.com.
  • Make sure your domain name can be easily pronounced and remembered. Don’t use hyphens or numbers in your domain name.
  • Take advantage of online domain name generators. These free tools will help you come up with clever domain name ideas that are unique and still available. WPBeginner now has an AI-powered free business name generator.

Need more help? We’ve got lots of practical tips and real-life examples in our article on how to choose the best domain name for your website.

When You Should Use the .Net Domain Extension?

The .net extension still makes sense in some cases. You could use it if you offer internet, networking, database hosting, email hosting, or similar services.

You might even want to use a .net domain name if it truly suits your brand.

For example, Behance.net is a popular online design community which uses a .net domain extension for their website. It suits them because they wanted to be a network of artists, designers, and companies looking for talent.

Under 4% of all domain names registered are using the .net domain extension.

Why You Might Be Tempted to Use the .Net Extension

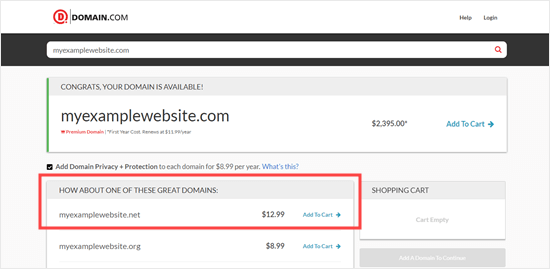
Have you ever tried to register a .com domain and seen something like this?

The .net domain is being promoted as an alternative to the .com one

Domain name registrars often present .net as the top alternative to .com. This might make you think it’s more commonly used than it actually is.

Even the most well-known internet and network service companies use a .com domain name for their business.

Of course, 4% is still a lot of domain names. Over 13 million, in fact. You might wonder who’s using all those .net domain names.

In many cases, the .net domains aren’t really being used.

Many businesses register a .net extension so no-one else can take it. They may not use the .net domain, or they may redirect it to their .com. site.

Also, some companies started with a .net because they couldn’t get the .com they wanted. Most later transferred to a .com domain extension, often keeping the .net domain name registered for technical and legal reasons.

Choosing .Com vs .Net – Which One is Better for SEO?

SEO - search engine optimization - in letters

A lot of our users ask us which domain extension will help them rank higher.

If you’re looking at either .com or .net, it doesn’t make any difference which you choose from an SEO perspective. Search engines will treat both domain extensions the same.

Just focus on SEO best practices and create useful targeted content to rank higher.

The important part is your domain name itself, not the extension.

For example, stargardeningservices.com will rank better than starservices.net because it contains a keyword (gardening services) that people are likely to search for.

How to Buy a Domain Name

There are two ways to get a domain name. You can choose the one that best suits you.

1. Get a FREE Domain Name with Bluehost

To make a website, you need website hosting as well as a domain name.

This may seem a bit confusing when you’re new to creating websites. Make sure you’re clear on the difference between domain name and website hosting.

Usually, you will pay around $14.99/year for a domain name and $7.99/month for hosting. If you are just starting out, then you may feel that’s quite expensive.

Luckily, the folks at Bluehost are offering WPBeginner users a free domain name and a 65% discount on hosting.

→ Click Here to Claim Your Free Domain Name ←

2. Register a Domain Name

If you don’t want to make a website straight away, you can still register a domain name and make a website later.

We recommend using Domain.com for this. They offer features like private registration, easy transfers, easy DNS management, and more. Their search tool shows you premium domains as well as regular ones, too.

Registering a domain name with Domain.com

To get an exclusive 25% discount on your domain, make sure you go through our link to Domain.com. This will automatically apply our Domain.com coupon code.

If you’re looking for Domain.com alternatives, then please see our list of the best domain registrars.

If this is your first time registering a domain name, then you may want to use our step by step guide on how to register a domain name.

We hope this article helped you learn the difference between .com vs .net domain name extensions. You may also want to see our step by step guides on how to start a blog and how to start an online store.

If you liked this article, then please subscribe to our YouTube Channel for WordPress video tutorials. You can also find us on Twitter and Facebook.

The post Com vs Net – What’s the Difference Between Domain Extensions appeared first on WPBeginner.


July 03, 2021 at 04:00PM