Monday, August 30, 2021

How to Fix WooCommerce Not Sending Order Emails (The Easy Way)

Are you frustrated by your WooCommerce store not sending order emails?

When running an eCommerce store, you need to know that your customers will receive their receipts and any order update emails quickly and reliably.

In this article, we’ll show you the easy way to fix WooCommerce not sending order emails.

How to fix WooCommerce not sending order emails

What Causes WooCommerce Emails to Not Send?

If you are running an online store, then you rely on email to keep your business running smoothly.

You use email to welcome new customers and build your relationship with them. Emails are sent to confirm orders and follow up on abandoned shopping carts. And email is needed to let customers reset their passwords.

But all too often, we hear that eCommerce sellers have trouble with WooCommerce not sending emails.

Sometimes this happens because of issues in your WooCommerce settings. We’ll show you how to check those settings first.

Other times it’s a deeper issue with the way WordPress sends email. By default, WordPress sends emails through PHP mail. Unfortunately, not all WordPress hosting servers are correctly configured to use PHP mail.

Even when your emails are sent successfully, they may be incorrectly identified as spam. This means they could be automatically deleted without ever being seen.

The best way to make sure your emails are reliably delivered is to send them through an SMTP service.

We’ll show you how to set up an SMTP server later in this guide, but first, let’s make sure there isn’t a problem with your WooCommerce settings.

Check WooCommerce Email and Order Settings

The first thing to check is your WooCommerce settings for emails and orders. If one of your settings is wrong, then your order emails won’t be sent.

Check WooCommerce Email Settings

We’ll start by checking that your emails haven’t been accidentally deactivated. To do that, navigate to WooCommerce » Settings on the WordPress dashboard and then click on the Emails tab.

List of WooCommerce Emails

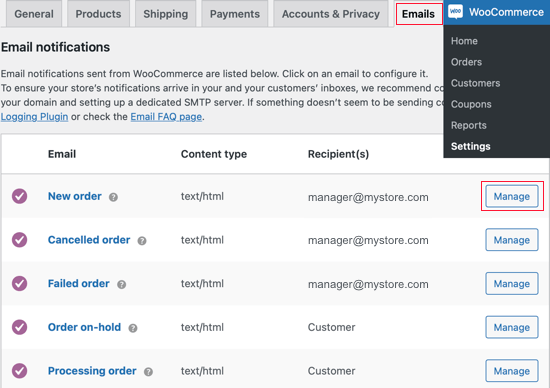
Here you’ll see a list of all the notification emails that WooCommerce will send. Some are sent to you and some to your customers. You’ll need to check the settings for each email.

Let’s start at the top and check the ‘New order’ email by clicking on the ‘Manage’ button on the right.

You’ll need to check two settings. First, make sure the email is enabled. Sometimes it is disabled accidentally, and the email won’t be sent if the box isn’t checked.

Make Sure the Email is Enabled

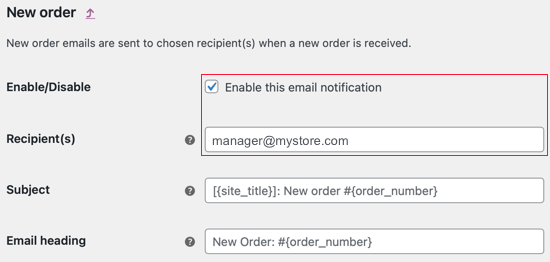
Second, you need to make sure that the recipient’s email address is correct. You’ll only find this setting for emails that will be sent to you. When an email is sent to the customer, the correct email address will be used automatically.

You can do the same for each type of email in the list. If everything looks good, then we need to check the status of each order where WooCommerce did not send an order email.

Check WooCommerce Payment Status

You’ll need to navigate to WooCommerce » Orders to check the status of recent orders. If you don’t yet have any orders, then you’ll want to create a test order and then come back.

Navigate to WooCommerce » Orders

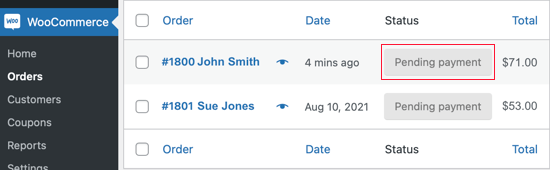
If the order status is ‘Pending payment’ as in this example, then that explains why an email was not sent. By default, WooCommerce doesn’t send an order email for pending sales.

Pending orders are waiting for further action. Maybe the customer added something to their cart and then abandoned it. Or maybe the customer needs to complete a manual payment, such as a bank transfer.

But if the status is ‘Processing’, then there’s a problem. An email should have been sent to both you and the customer. If it didn’t arrive in the inbox, then most likely it was treated as spam.

That’s a common problem with WooCommerce and WordPress emails. The best way to solve that problem is to send your email using an SMTP server.

Fix WordPress Email Reliability with an SMTP Server Plugin

SMTP is the standard protocol for sending emails over the internet, but it isn’t what WordPress uses by default. Unfortunately, that often results in emails from WordPress being treated as spam.

Sending email through an SMTP server is more reliable because it uses proper authentication. Your customer’s email software will be confident that your emails are genuine, and they’re less likely to be moved to the junk folder.

WP Mail SMTP is the best SMTP plugin for WordPress and WooCommerce. It’s the easiest way to make sure your order emails are actually delivered to your customer’s inbox.

To fix WooCommerce not sending order emails, you’ll need to install and activate the WP Mail SMTP plugin. You can check out our guide on how to install a WordPress plugin for more details.

Note: The free version of WP Mail SMTP is all that’s required for this tutorial. But the Elite plan includes White Glove Setup where an expert will set up the plugin for you.

On activation, the WP Mail SMTP setup wizard will start automatically. You’ll need to click on the Let’s Get Started button.

The WP Mail SMTP Setup Wizard Will Start Automatically

Next, you need to choose the SMTP service you wish to use. We recommend SMTP.com and Sendinblue because they are able to securely send large numbers of emails and without triggering spam filters.

Plus, Sendinblue lets you send up to 300 emails each day for free.

Choose Your SMTP Mailer Service

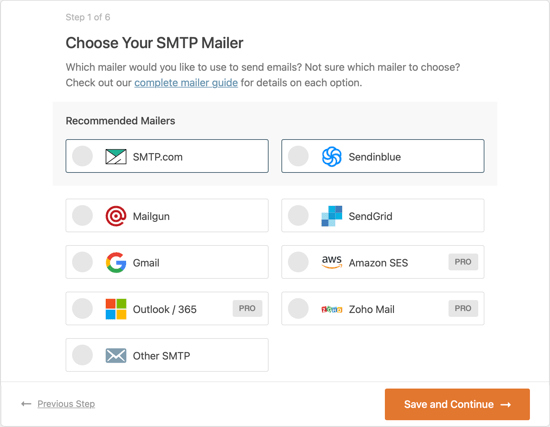
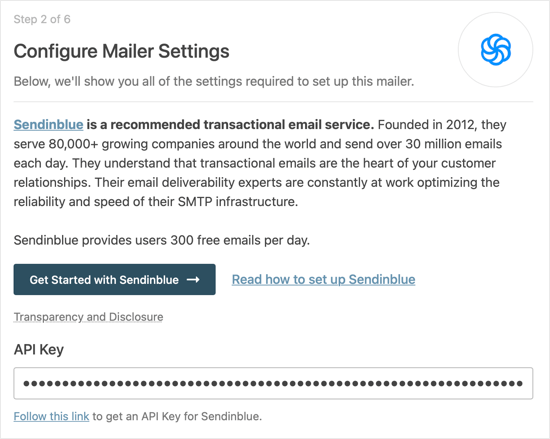
Once you’ve selected a service, you need to click on the ‘Save and Continue’ button. After that, you’ll be asked to configure your mailer settings.

Here you’ll be asked to copy some information from the mailer service you selected, and then paste it into the form. The exact steps you need to take will depend on the mailer service you have chosen.

Configure Your Mailer Settings

Note: If you’d prefer to bypass the wizard and set up WP Mail SMTP manually, then you’ll find manual step by step instructions in our ultimate guide on how to set up WP Mail SMTP with any SMTP service.

The setup wizard will also ask you to set up a From Email. Make sure you use the same business email address here as you entered when setting up your SMTP mailing service.

We Recommend You Force the Same Email Address

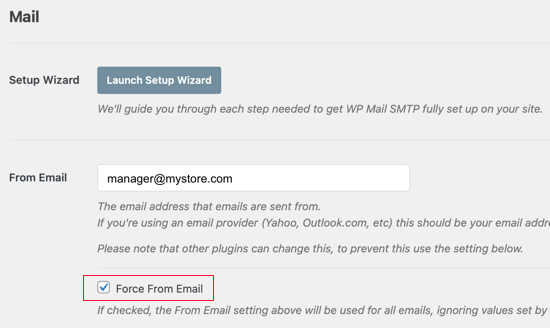
We also recommend that you check the ‘Force From Email’ box. This will make sure you use the same email address across your website. This can also help to make sure your WooCommerce emails don’t go to spam.

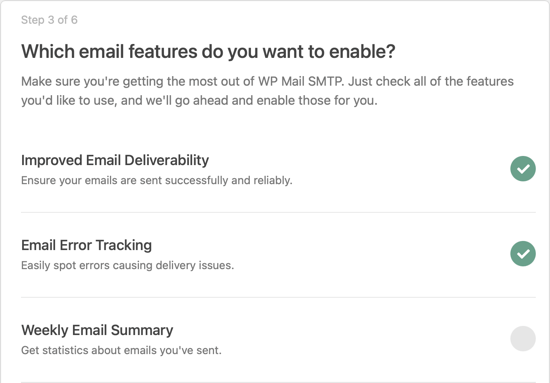
You’ll then be asked which email features you wish to enable. You need ‘Improved Email Deliverability’ and ‘Email Error Tracking’ to fix WooCommerce not sending email. They will be selected by default.

Enable WP Mail SMTP Email Features

If you’ve purchase WP Mail SMTP Pro, then you’ll have access to a few additional features. For example, the ‘Detailed Email Logs’ feature will let you check individual emails to make sure they being are sent.

WP Mail SMTP Pro Offers Additional Features

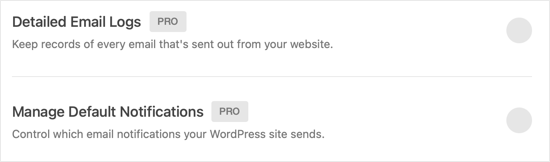
The Pro version will also let you resend a failed email. That can be really helpful when the customer typed in the wrong email address.

Send a Test Email

Congratulations, you’ve now set everything up! Let’s make sure it works by sending a test email.

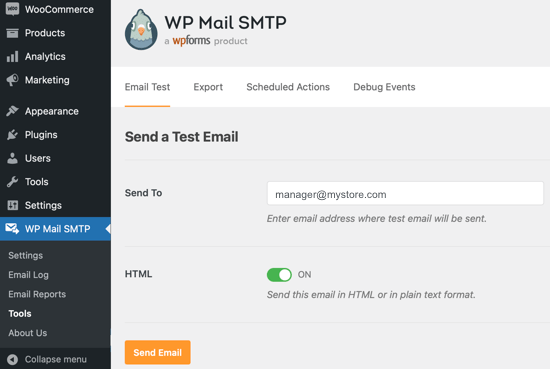
You’ll need to navigate to WP Mail SMTP » Tools and then click on the ‘Email Test’ tab. The site’s admin email will be entered by default, but you can send the test email to a different address if you like. Next, click ‘Send Email’.

Make Sure Everything Works by Sending a Test Email

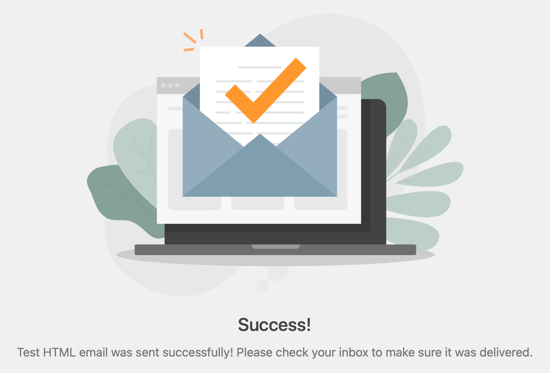
If everything has been set up correctly, then you should see a ‘Success!’ message. Make sure you also visit your email inbox to make sure the email actually arrived.

You Should See a Success! Message

We hope this tutorial helped you learn how to fix WooCommerce not sending order emails.

You may also want to learn the right way to create an email newsletter or check out list of must have WooCommerce plugins to grow your store.

If you liked this guide, then please consider subscribing to our YouTube Channel for WordPress video tutorials. You can also find us on Twitter and Facebook.

The post How to Fix WooCommerce Not Sending Order Emails (The Easy Way) appeared first on WPBeginner.


August 30, 2021 at 05:00PM

Saturday, August 28, 2021

How to Create Advanced Search Form in WordPress for Custom Post Types

Do you want to create an advanced search form in WordPress for custom posts types?

You can offer your visitors a better website experience by adding a search form that includes your custom post types in the results.

In this article, we’ll show you how to create an advanced search form for custom post types in WordPress, step by step.

How to create advanced search form in WordPress for custom post types

Why Create an Advanced Search Form for Custom Post Types in WordPress?

If you have many different content types, then a custom post type search form lets you help your visitors more easily find the most relevant content.

For example, we use custom post types here at WPBeginner to organize our deals and glossary sections. This keeps them separate from the rest of the content on our site.

If we were to add a custom post types search form to each of these pages, then the search results would only show posts from that category.

This kind of custom search helps your visitors view more pages and stay on your site longer, which gives off positive WordPress SEO signals like lower bounce rate and increased dwell time.

With that said, let’s show you how to create an advanced search form for custom post types in WordPress.

Create a New WordPress Search Algorithm with a WordPress Plugin

The easiest way to create an advanced search form for custom posts types is by using the SearchWP plugin. It’s the best search plugin for WordPress used by over 30,000 sites.

It’s easy to use and and gives you complete control over your WordPress search results.

First thing you need to do is install and activate the plugin. For more details, see our step by step guide on how to install a WordPress plugin.

Upon activation, you need to go to Settings » SearchWP and then click on the ‘License’ menu option.

Add SearchWP license key

Then, enter your license key in the ‘License’ box and click the ‘Activate’ button.

You can find this information in your account on the SearchWP website.

Once you’ve done that, you need to click on the ‘Engines’ menu option.

SearchWP engines settings

This brings you to a screen where you can set your search engine settings. Think of it like creating your own Google search algorithm for your website.

With SearchWP, you need to create a site-wide search engine before you can create a custom post types search engine, so we’ll do that first.

You can adjust the search engine settings by clicking on the ‘Posts’, ‘Pages’, ‘Library’, or other custom post type drop downs.

Each section has a ‘Weight Multiplier’ that will change how the search engines rank content.

If you want the search engine to value page titles higher than the content, then adjust the slider accordingly.

Adjust search engine attributes

Once you’re finished customizing your default search engine settings, make sure to click the ‘Save Engines’ button to create your first search engine.

Now that your initial search engine is set up, it’s time to create an advanced search form for your custom post types.

Add an Advanced Search Form Limited to a Single Custom Post Type

To create a custom search box, we’ll start by adding a separate search engine that only targets the custom post types you want.

First, navigate to Settings » SearchWP and then click the ‘Add New’ button.

Add new SearchWP search engine

This will automatically create a new separate search engine.

Next, click the ‘Sources & Settings’ button.

Click sources and settings

This will bring up a popup where you can select the sources for your custom search engine.

Simply uncheck the boxes of the sources you don’t want to include.

In this example, we’ll only leave the ‘Coupons’ box checked, since we want to create a search form that only lets users search through our coupon pages.

You also need to give your search engine a name. Take note of the name in the ‘Engine Name’ box, because you’ll need it at a later step.

Supplemental search engine settings

Then, click the ‘Done’ button.

Once you’ve done that, click the ‘Save Engines’ button to save your new custom post type search engine.

Now, you need to download the SearchWP shortcodes extension to easily add your new custom post search form to WordPress.

First, head over to the SearchWP Shortcodes Extension website and then click the ‘Download available with active license’ button.

Download SearchWP shortcodes extension

After that, you need to install and activate the extension the same way you installed the plugin above.

Now, you can create a new custom post search form page using shortcodes.

Simply navigate to Pages » Add New and then give your page a name.

After that, click the plus ‘Add Block’ icon to bring up the blocks menu.

Add block for shortcodes

Next, type ‘HTML’ into the search box.

Then, select the ‘Custom HTML’ block.

Select custom HTML shortcodes block

Once you’ve done that, you can add the following shortcodes and HTML to your page. If you need more help, then see our guide on how to add a shortcode in WordPress.

[searchwp_search_form engine="coupon" var="searchvar" button_text="Find Results"]
 
<div class="search-results-wrapper">
 [searchwp_search_results engine="coupon" var="searchvar" posts_per_page=4]
  <h2>[searchwp_search_result_link direct="true"]</h2>
  [searchwp_search_result_excerpt]
 [/searchwp_search_results]
</div>
 
<div class="no-search-results-found">
 [searchwp_search_results_none]
 No results found, please search again.
 [/searchwp_search_results_none]
</div>
 
<div class="search-results-pagination">
 [searchwp_search_results_pagination direction="prev" link_text="Previous" var="searchvar" engine="my_test_engine"]
 [searchwp_search_results_pagination direction="next" link_text="Next" var="searchvar" engine="my_test_engine"]
</div>

The code above will add your search engine, create a section to display the search results, show a no results message if necessary, and add pagination if the results go into multiple pages.

You need to change the engine name engine="coupon" to your own engine name. The rest of the code can stay the same.

Publish SearchWP shortcodes page

Make sure you click ‘Publish’ or ‘Update’ to save your page and make it live.

Your custom post type search engine is now live on your website.

Custom post types search form example

SearchWP is a very flexible and customizable search plugin. You can also use this plugin to add live Ajax search, create a search by category feature, and more.

We hope this article helped you learn how to create advanced search form in WordPress for custom post types. You may also want to see our guide on how to choose the best website builder and our picks of the best live chat software for small businesses.

If you liked this article, then please subscribe to our YouTube Channel for WordPress video tutorials. You can also find us on Twitter and Facebook.

The post How to Create Advanced Search Form in WordPress for Custom Post Types appeared first on WPBeginner.


August 28, 2021 at 03:00PM

Friday, August 27, 2021

23 Best WordPress Themes for Fashion Blogs

Are you looking for the best WordPress themes for fashion blogs?

Traditional WordPress themes are often designed for businesses and personal blogs. They will often lack the style you want to see from a fashion website.

In this article, we will share some of the best WordPress themes for fashion blogs, websites, and online magazines.

Best WordPress Themes for Fashion Blogs

Building a Fashion Blog with WordPress

WordPress is the most popular website builder on the market. Many top brands use WordPress for its ease of use and flexibility.

There are two types of WordPress. They are WordPress.com, which is a hosted solution, and WordPress.org, also known as self-hosted WordPress. Take a look at our guide on WordPress.com vs WordPress.org for more details.

For your fashion website or blog, you need to use self-hosted WordPress.org. This gives you access to all of WordPress’s features and functionality straight out of the box.

You will also need a domain name and web hosting account. A domain name is your site’s address on the web, like wpbeginner.com. Web hosting is the storage for all your website files.

We recommend using Bluehost as your web host. They are one of the largest hosting companies in the world and an officially recommended WordPress hosting provider.

For WPBeginner readers, Bluehost offers a free domain name, a free SSL certificate, and a HUGE discount on web hosting.

The Bluehost special offer for WPBeginner readers

After purchasing web hosting, you should follow our step by step guide on how to make a fashion blog from scratch.

Now, let’s take a look at some of the best WordPress themes for fashion blogs that you can use on your website.

1. Astra

Astra's Fashion Lifestyle template

Astra is a user-friendly multipurpose theme that has a gorgeous set of over 100 templates that you can use for your blog. The Fashion Lifestyle blog template is perfect for any fashion blogger. It will showcase your photos and content to great effect.

With Astra, you can easily customize exactly how your blog looks. You can change colors, fonts, layouts, and more so that your site is the perfect match for your brand and personality. Plus, Astra is designed for great WordPress SEO. This helps to make your site more visible in Google and other search engines, so you can get more visitors.

2. OceanWP

OceanWP Fashion Blog theme

OceanWP is a classic WordPress multipurpose theme suitable for creating any type of website. It comes with lots of free and paid demo content that you can import in 1-click to set up your fashion or lifestyle blog.

The theme offers lots of customization options, giving you control over colors, font, background, header, footer, sidebar, and more. It also offers custom widgets to extend the functionality of your fashion blog.

3. Divi

Divi Fashion Blog theme

Divi is a powerful WordPress theme designed to empower your fashion website or blog. It provides hundreds of ready-made blog layouts and page templates that you can use as you need.

The Divi fashion blog template is super attractive and offers unlimited color options. With the built-in page builder, it’s easy to customize and add content to your blog pages.

Like Astra, Divi is SEO friendly to help your site rank well in search engines. As well as all the built-in elements, you can add premium 3rd party features such as a carousel module.

4. Hestia Pro

Hestia Pro

Hestia Pro is a super flexible WordPress fashion blog theme. It comes with single-page and multi-page layouts, creating a great user experience.

The theme is compatible with all major drag and drop page builders, including Elementor Pro, Brizy, Visual Composer, and more. It’s easy to customize and set up even for absolute beginners.

Hestia Pro is retina ready and uses responsive design, so your site will look great on computers and on mobile devices.

5. Gallery Pro

Gallery Pro

Gallery Pro is an elegant WordPress theme for photography and fashion blogs. It features your logo on top followed by a navigation menu, header image, and then your most important content.

It includes custom page templates, multiple widget-ready areas, theme customizer support, and more. Gallery Pro is highly optimized for speed and performance.

StudioPress is now part of WP Engine, the most popular managed WordPress hosting company. You can get this theme and all 35+ other StudioPress themes when you sign up for WP Engine hosting to build your website.

Bonus: WPBeginner users also get an additional 20% OFF. Get started with WP Engine today!

6. Shoppe

Shoppe

Shoppe is a highly customizable WordPress theme for fashion websites and building an online store.

It ships with an integrated drag and drop page builder and multiple ready-made designs that you can use as a starting point. It includes beautiful photo galleries, sliders, multiple navigation menu styles, and more.

7. Løge

Løge

Løge is a beautiful eCommerce WordPress theme designed particularly for fashion and lifestyle websites. It features a gorgeous shop front, customizable blog, and archive pages, and flexible design options.

It supports all page builder plugins, which allows you to create your own landing pages as well. It has beautiful templates for photo galleries, a contact form, and full width pages.

8. Pepper+

Pepper+

Pepper+ is an all-purpose WordPress theme with a modular approach to design. You need to drag and drop modules to create stunning page layouts on your own. It also includes several ready-made website designs that you can import in 1-click.

Pepper+ includes features like contact form support, Google fonts, Google Maps, WooCommerce support, pricing tables, and more. It’s flexible enough to be used as a simple traditional blog, as a fully-fledged online store, or as a membership website.

9. Stack

Stack

Stack is a unique WordPress theme with a modern design. It features bold colors, a grid layout, and beautiful animations. It’s well suited for all kind of content blogs, and its design makes it highly suitable for fashion and lifestyle websites.

On top of that, Stack has a portfolio section, beautiful image galleries, and complete WooCommerce support. It has a custom theme options panel with a 1-click demo data importer for quicker setup.

10. The Styler

The Styler

The Styler is a fashion blog WordPress theme for fashion, beauty, health, and fitness websites. It features a unique homepage design with a sticky navigation menu and a fullscreen header image on top.

The Styler has templates to use for your blog page, full-width page, and landing pages. It includes support for multiple colors, custom widgets, social media icons, and WooCommerce.

11. Neve

Neve

Neve is a gorgeous WordPress all-purpose theme. It comes with a beautiful fashion blog template suitable for any fashionista. This template has a lot of white space that makes your content highly readable.

Neve comes with eye-catching color choices and attractive font styles that make your fashion blog look amazing. Neve supports WooCommerce straight out of the box.

12. Peak

Peak

Peak is an elegant WordPress theme for photographers, fashion designers, artists, and other creative professionals. Its homepage has a beautiful masonry tiles layout, which can automatically populate tiles from your posts.

This theme offers a built-in portfolio post type, mega menus, slide-out widgets, page title banner, custom 404 error page, and full WooCommerce support.

13. Salon

Salon

Salon is a beautifully designed WordPress theme suitable for fashion blogging, spas, and beauty salons. It has an elegant layout for the homepage with a fullscreen slider on top.

It comes in multiple color schemes and allows you to use a different color scheme for each page. Inside, you will also find custom widgets for social media, contact information, and content discovery. Salon is eCommerce ready and can be used with all the top WordPress page builders.

14. Envy

Envy

Envy is a stylish and free WordPress theme suitable for any fashion store or lifestyle blog, especially if you’re on a bootstrap budget. This beautifully designed WordPress theme features a 3 column grid layout to display your content.

Envy also includes social media buttons, fullscreen search overlay, page templates for your blog, archives, and full-width pages, multiple sidebars, and more. It’s easy to use and requires very little time to setup.

15. Ultra

Ultra

Ultra is a multi-purpose mega theme for WordPress. It has multiple ready-made website designs that you can install in 1-click, including demo data. You can use its intuitive drag and drop page editor to design your content.

It comes with Google Maps, contact forms, pricing tables, timelines, animated counters, progress bars, and more. It has multiple layout options that you can use with your own colors and custom widgets.

16. Balance

Balance

Balance is a well-crafted WordPress theme for any kind of business or professional website. This eCommerce ready theme features a full-width slider on top with your call to action on the homepage, followed by different sections of your website.

Balance is a great choice of theme for any site in the fashion industry. It can be styled in any way imaginable. It ships with multiple color schemes, and you can also create your own colors if needed. The theme setup is simple and beginner-friendly.

17. Elegant

Elegant

Elegant is a minimalist style WordPress theme suitable for fashion and lifestyle blogs. It uses elegant typography with beautiful photo galleries that make your content stand out.

It has a built-in portfolio section with a beautiful masonry grid layout to display portfolio items. It comes with multiple header styles, templates, layout choices, team members, and a 1-click demo installer for quicker setup.

18. Indigo

Indigo

Indigo is an excellent, well-crafted WordPress theme suitable for fashion blogs, boutiques, and fashion magazines. This super flexible WordPress theme comes with 15 ready-made website designs that can be installed with 1-click.

Indigo uses modules to build layouts so you can drag and drop a module to add it or remove any existing module that you don’t want. It’s easy to set up and use, and you will love its attention to detail.

19. Neto

Neto

Neto is a WooCommerce ready WordPress theme suitable for fashion blogs, boutiques, and fashion accessories. It features a clean design with a uniquely engaging homepage. It comes with built-in support for all popular page builder plugins.

Neto has a custom theme options panel for easier setup. You can also use the customization options in the live customizer, which gives you full control over colors, layouts, widgets, and more.

20. Velure

Velure

Velure is a beautiful magazine style WordPress theme for fashion blogs. It comes with a beautiful Instagram slideshow on the top, followed by your social media buttons to help you gain more followers. Below that, it has a featured slider, which is followed by a 3-column widget ready area.

Velure comes with custom widgets for an Instagram feed, latest Tweets, social icons, featured categories, newsletter subscription form, and more. It’s also WooCommerce ready and includes beautiful templates for product pages.

21. Paperbag

Paperbag

Paperbag features a clean minimalist layout for a fashion blog or magazine website. Behind this simplicity, there are tons of options (80+ options in the theme customizer alone) to fine-tune every aspect of your website.

Paperbag includes multiple layouts, several sidebars, custom widgets, and a flexible homepage layout. It’s tested with all the best WordPress plugins and works effortlessly with popular page builders.

22. Didi

Didi

Didi is an excellent WordPress theme for fashion blogs looking for an elegant and minimalist design. This beautiful theme comes with multiple homepage layouts, page templates, widget areas to add widgets and shortcodes, and more. All the theme options are available under the live customizer for easier setup.

It also includes full support for page builders and WooCommerce. You can use Didi with multilingual websites as it’s translation ready using WPML.

23. Cressida

Cressida

Cressida is a beautifully designed WordPress theme for online fashion brands, lifestyle, and personal websites. It features a clean and elegant design with a focus on readability and user experience.

It comes with a dedicated front page, with featured posts, highlight posts, posts strip, a promo category, and multiple header and footer widgets. It also supports a posts slider, banner, or slider with a sidebar on the front page.

We hope this article helped you find the best WordPress themes for fashion blogs. You may also want to check out our guide on the best ways to make money online blogging with WordPress.

If you liked this article, then please subscribe to our YouTube Channel for WordPress video tutorials. You can also find us on Twitter and Facebook.

The post 23 Best WordPress Themes for Fashion Blogs appeared first on WPBeginner.


August 27, 2021 at 05:05PM

Thursday, August 26, 2021

How Much Does it Cost to Start a Membership Site? (2021 Edition)

Are you trying to figure out how much does it cost to start a membership site?

There are many different factors that will affect the cost of your membership website. You’ll need to break them down into all the different essentials to keep your budget under control.

In this article, we’ll show you how much does it cost to start a membership site.

Calculating the cost of building a membership website

How to Calculate the Cost of a Membership Website?

To calculate the cost of a membership website, you’ll need to break down your spending into components.

This includes choosing the right platform, subscription addon, payment processor, and other tools / services that you’ll need. All of them depend on your business requirements, budget, and growth strategy.

To keep this article focused, we will break down our membership site cost analysis into the following major expenses:

There are several great membership platforms that you can use to build a membership website. Three major players in the industry are MemberPress (WordPress), Shopify, and Teachable.

Shopify and Teachable are SaaS (Software as a Service) platforms. They offer an easier setup initially, but they have limited flexibility and higher costs. More importantly, they charge you based on transactions which will take away a big chunk of your revenue over time.

This is why we recommend using MemberPress, which is the best membership site plugin on the market. They allow you sell unlimited memberships with no extra transaction fees.

MemberPress

It runs on top of WordPress, which is already the best website builder in the world used by over 42% of all websites on the internet.

Plus, you get full control over your membership site with the flexibility to choose your own payment service, integrations, and add any feature that you want.

This lets you control the cost of your membership website and adjust it as your business grows. In the long run, you would be able to make a sustainable business while saving a ton of money.

MemberPress has built-in features to sell online courses, digital subscriptions, and even physical memberships like associations.

Business owners using MemberPress are projected to earn over $600 million in 2021.

Membership Website Hosting and Setup Costs

Just like any other type of website, you’ll need a domain name and web hosting account to start a membership website.

Typically, a domain name costs around $16.99 per year and web hosting plans start at $7.99 per month (paid annually).

This is not cheap, considering that you’ll need to spend money on other components as well.

Luckily, the team at Bluehost have agreed to offer WPBeginner readers a generous 60% discount on hosting with a free domain name + SSL certificate which you’ll need in order to accept payments. Basically, you can get started for as low as $2.75 per month.

→ Click Here to Claim This Exclusive Bluehost Offer ←

Bluehost is one of the best web hosting companies in the world and an officially recommended WordPress hosting service.

Alternative options: If you are looking for an alternative, then SiteGround is another excellent option. For more options, see our expert pick of the best WordPress hosting companies.

Next, you’ll need to get a MemberPress license which starts at $179 / year for a single site license.

This gives you all the features you need such as unlimited members, no transaction fees, ability to accept payments online, subscription management, email automation, easy course builder, marketing integrations, and more.

MemberPress pricing

After you download MemberPress, you can go ahead and follow our step-by-step instructions on how to make a membership website in WordPress.

Estimated costs of hosting and setup:

Domain and web hosting: Starting from $2.75 per month – $25 per month
MemberPress: $179 – $479 (depending on your licensing plan)

Payment Processing Costs for Membership Website

The recurring revenue model is what makes membership websites a lucrative online business idea.

MemberPress supports both Stripe and PayPal payment gateways that you can use to accept credit cards. You can also use Authorize.Net as a payment method with their Pro plan.

While MemberPress doesn’t charge any additional transactional fee, these payment service providers (merchant banks) do have a payment processing fee, and this is controlled by Visa, MasterCard, Amex, and other credit card companies.

You will have to pay these fees no matter which membership platform you use.

For example, PayPal may charge 2.90% of the transaction amount and a fixed rate of $0.30 USD for domestic transactions. It may also charge an additional 1.50% for international transactions.

PayPal payment processing fees

Similarly, Stripe would charge $2.9%, a $0.30 USD fixed rate fee, and an additional 1% for international transactions.

The benefit of MemberPress is that you don’t pay them any transaction fees for using the platform. Also your payment processing costs only gets lower as your business grows because Stripe offers lower rates for higher processing volumes.

Whereas other providers like Teachable charge you an additional 5% transaction fee for using their platform on top of the fee you pay for payment processing services.

Estimated costs of payment processing:

PayPal: 2.90% + 0.30 fixed rate. Additional 1.50% on international transactions.
Stripe: 2.90% + 0.30 fixed rate. Additional 1% on international transactions.

Design Costs for a Membership Website

Design and templates for membership websites

Next, you need to choose a design for your membership website. Luckily, there are hundreds of free and paid website templates that work beautifully with MemberPress.

However, you’ll want to stand out from the crowd with a stunning design that looks professional and well polished.

Not only will it create a good impression of your brand, but it’ll also help your customers easily navigate your website. This results in higher engagement and sales.

There are three design options you can choose from based on your budget. We’ll discuss them in low to high pricing order:

  • Free WordPress themes
  • Premium WordPress themes
  • Custom WordPress themes

Free WordPress themes:

Free WordPress themes come with the obvious benefit of saving money, but they often include limited support and customization options compared to paid or premium WordPress themes.

Premium WordPress themes:

Premium or paid WordPress themes come with a price tag, but include more customization options and priority support from developers.

Pricing for premium WordPress themes usually starts at $30 USD per year. Here are some of the most popular membership website themes:

  • Divi – One of the most versatile WordPress themes suitable to make any kind of website including membership sites.
  • Astra – Astra is a popular multipurpose WordPress theme that works beautifully with membership sites. It comes with dozens of starter website templates and a 1-click setup.
  • Ocean WP – Another flexible WordPress theme that comes with powerful customization options.

For more design inspiration, see our pick of the best WordPress membership website themes.

A custom WordPress theme:

A custom WordPress theme is when you hire a WordPress designer/developer to code a unique membership website theme for your website.

This allows you to add custom features to your website and have a unique design that stands out from other membership sites.

However, custom WordPress themes can be very expensive. The cost would depend on the features you want to add and the expertise of the developer.

A custom theme could cost between $1500 to $6000 for a medium-sized business. An enterprise-level design may cost even more than that.

Estimated costs of membership website design:

Free to $30 for a WordPress theme.

$1500 – $6000 for a custom design.

Essential Addons and Extensions Costs

WordPress plugins

MemberPress runs on top of WordPress, which means you can add more features to your website by using plugins.

A WordPress plugin is a piece of software that adds new functions to your website. For instance, there are contact form plugins, landing page builders, social media plugins, and more.

There are also plugins made specifically for MemberPress as well.

The majority of WordPress plugins are available for free. Even many paid plugins also have a lite or free version that you can use.

You can try to keep your membership website costs down by using free plugins whenever possible.

Here is quick list of essential WordPress plugins that you may need right away. All of them are available for free.

Must-Have Features

WPForms – Allows you to easily add a contact form to your membership website.

MonsterInsights – Connect your membership site to Google Analytics and see how users find and use your website. This helps you learn how to bring more users and make more sales.

WP Mail SMTP – Emails are crucial for running a membership website. WP Mail SMTP fixes WordPress email deliverability by issue by properly sending emails using an SMTP server.

Marketing and SEO

All in One SEO – Easily optimize your membership website SEO to get more free traffic from search engines.

PushEngage – Easily send push notifications to your users on mobile as well as desktop. It helps increase website traffic, improve conversions, and grow your business.

OptinMonster – helps you improve conversion rates by converting website visitors into subscribers and paying customers.

Bonus Tools

SeedProd – An intuitive drag and drop page builder that allows you to quickly create custom landing pages and design layouts.

Uncanny Automator – Create automated workflows to manage your membership website. This helps you save time and create better user experience for your customers.

RafflePress – Easily run giveaways and contests for your members to boost engagement and grow your traffic.

Need even more features? Here are some of the must have WordPress plugins that you may want to check out. Many of them are free or have a free version.

Estimated costs of addons and extensions:

Free to Unlimited.

We recommend starting out with free versions of plugins whenever possible. This keeps your costs down and you can choose to buy premium plugins later as your business grows.

Premium Tools and Addons for a Growth Membership Site

We recommend all users to start with shared hosting and use free plugins and theme to keep the costs down. This saves you money and allows you to focus on growing your business.

Once your business starts growing, then you can choose to invest some money on extra features and premium tools. Following are a few additional features that you can later add to your website when you can justify the cost.

Email Marketing – We recommend using Constant Contact which is the best email marketing service for small businesses. For advanced marketing automation, you can use either Drip, ConvertKit, or HubSpot.

Live Chat SupportLive chat software helps you convert more users into paying members. We recommend using LiveChat which is the best customer service platform on the market. (Cost: Starting from $16 per agent per month)

Business Phone Service – A business phone number allows you to easily manage business calls using one number. We recommend using Nextiva, which is the best phone company for small businesses. (Cost: $18.95 per month)

Note: All of these additional services are not necessary to build a membership website. You can choose to add them to your site as your business grows.

Total Cost of Building a Membership Website

Now that we have covered the main areas of spending, let’s take a look at the total cost to build a membership website.

Keep in mind that your costs would increase as your business grows or you are able to invest more into it. We have broken down the cost range into three categories.

  • Starter Membership Website (Recommended): $212 per year or $17.66 per month (Shared hosting $2.75 / month, MemberPress $179 / year, free plugins and theme).
  • Growth Membership Website: $300 – $1000 (WordPress hosting upgrade $4.99/mo, MemberPress Pro $299/yr, paid plugins and marketing services).

For enterprise level membership websites the costs could go higher. They can choose dedicated hosting server, custom design, and hire developers to write custom WordPress plugins.

The best part about using MemberPress to build your membership website is that you are in charge of controlling the cost.

This means you don’t pay for anything that you don’t need right away, and you can still build a powerful membership website.

Tips on Keeping The Costs Down on Your Membership Site

Keeping costs down

Building a membership website with WordPress and MemberPress allows you to choose how you spend money on your membership website.

We recommend all users to start small and scale their website as their business grows.

Now many users compare their website with already established websites in their industry. This isn’t a fair comparison as those businesses have been around longer and already have a revenue stream to justify spending more money.

As a starter membership community you don’t need flashy premium features right off the gate.

You can start with a shared hosting plan on Bluehost which gives you a free domain + SSL. Then, you can purchase MemberPress Basic license plan and start building your membership website.

For essential features, you can rely on free WordPress plugins and theme. You would be surprised with what you can do using only the free plugins.

As your business takes off, you can start investing on premium features. Even then, you can find excellent WordPress deals and coupons to get discounts on all the top tools and services.

We hope this article helped you learn how much does it cost to build a membership website. You may also want to see our complete guide on how to create an email newsletter, or our comparison of the best webinar software platforms.

If you liked this article, then please subscribe to our YouTube Channel for WordPress video tutorials. You can also find us on Twitter and Facebook.

The post How Much Does it Cost to Start a Membership Site? (2021 Edition) appeared first on WPBeginner.


August 26, 2021 at 04:00PM