Sunday, September 19, 2021

How to Limit Authors to their Own Posts in WordPress Admin

Do you want to limit authors to editing their own posts in WordPress?

If you run a multi-author site or allow guest posts, then it’s a good idea to restrict contributors to only see their own blog posts in the dashboard, and keep them from viewing the posts of other authors before they’re published.

In this article, we will show you how to limit authors to viewing and managing only their own posts in the WordPress dashboard.
How to Limit Authors to Their Own Posts

Why Limit Authors to Their Own Posts?

By default, your WordPress website will show all posts and pages to all users, regardless of their user role in the admin area. Whether you’re an author, editor, contributor, or administrator, you can view all the articles.

This usually isn’t a problem if the authors are part of your company or team.

However, limiting people to view their own posts is useful in certain situations. For instance, if you run a multi-author website, then it can be useful to keep authors from seeing other writers’ articles in review.

That being said, let’s take a look at how you can limit authors to view their own posts in the WordPress admin.

Limit Authors to Their Own Posts Using a Plugin

Using a WordPress plugin, you can easily allow authors to see only their own posts without editing code.

For this tutorial, we will be using the PublishPress Permissions plugin. It’s a free plugin that lets you manage WordPress permissions, and works out of the box to limit writers to their own articles.

There is also a premium version available in PublishPress Pro bundle, which offers more permission settings like who can access the media library. However, you can start with the free version.

First, you’ll need to install and activate the PublishPress Permissions plugin. For more details, you can follow our guide on how to install a WordPress plugin.

Once the plugin is active, it will automatically show posts to only their authors.

For example, if you’re logged in as the administrator and head over to Posts » All Posts from your dashboard, then you’ll see all the posts.
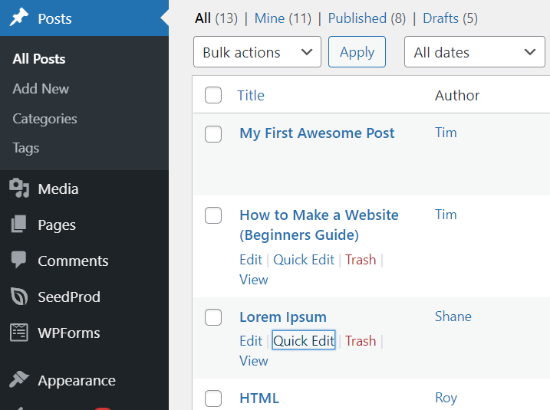
Posts before activating the plugin

However, if you log in to the WordPress admin area from an author’s account, then you’ll notice that only the posts created by the author will be visible.
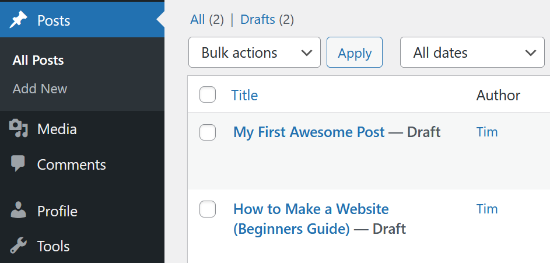
Posts by only the author

Now, what if you want your editors to be able to access all the posts so they can review them? Let’s see how you can do that.

How to Allow Editors to View All Posts

The problem with using the above method is that it only allows administrators to view all posts.

Many WordPress sites have editors responsible for proofreading articles submitted by other authors and guest contributors. Using this plugin will restrict editors to only their own posts.

However, you can allow editors to review different authors’ content by using a plugin like PublishPress Capabilities plugin or adding code to your site’s theme files. We’ll show you both the methods.

Using PublishPress Capabilities Plugin

PublishPress Capabilities is another plugin created by PublishPress. For the sake of this tutorial, we will be using the free version. There is also a pro version that you can get when you subscribe to a PublishPress Pro account.

First, you’ll need to install and activate the PublishPress Capabilities plugin on your WordPress website. You can follow our step-by-step guide on how to install a WordPress plugin.

After the plugin is active, go ahead and click on ‘Capabilities’ in your WordPress admin menu. This will open the ‘Role Capabilities’ page, where you can change permissions for different user roles.

Next, select the user role you want to edit from the dropdown menu in the top left corner.
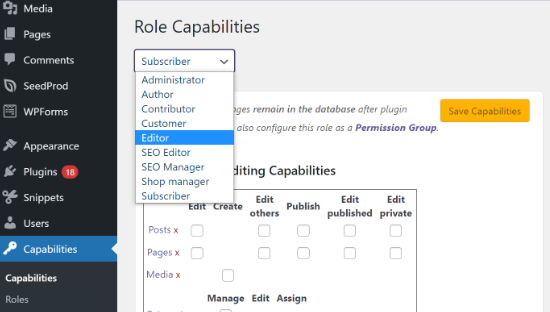
Select user role capabilities

Once you’ve selected the ‘Editor’ role, you’ll need to make sure that the checkbox for ‘Edit others’ is enabled under the Editing Capabilities settings.

This will allow editors to edit other posts.
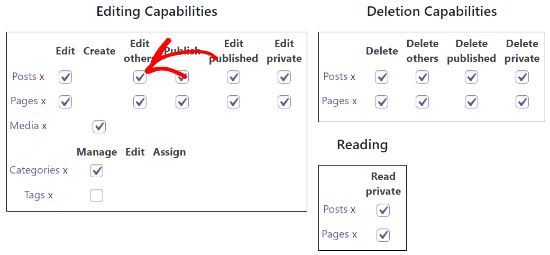
Enable Edit others Checkbox

After that, scroll down to the Additional Capabilities section and ensure that the ‘list others posts’ checkbox is enabled.

This way, anyone with the editor role will be able to see posts from other authors.
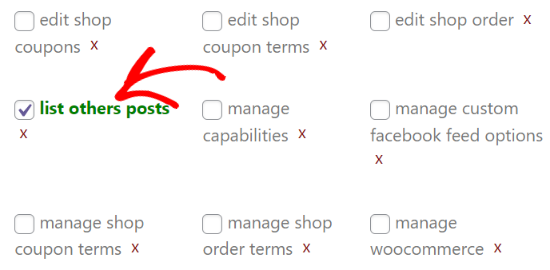
Enable list others posts checkbox

Now, save your settings and view the Posts section on your website by logging in as an editor. If you’re able to view and edit other authors’ posts, then it means you’ve correctly set up the settings.

Adding Custom Code to Your Theme

Another way to allow editors to view all posts is by adding custom code to your theme files. However, we don’t recommend this method for beginners as it involves editing code.

To start, you can add this code in your theme’s functions.php file or a site-specific plugin.

function posts_for_current_author($query) {
        global $pagenow;

        if( 'edit.php' != $pagenow || !$query->is_admin )
            return $query;

        if( !current_user_can( 'edit_others_posts' ) ) {
                global $user_ID;
                $query->set('author', $user_ID );
        }
        return $query;
}
add_filter('pre_get_posts', 'posts_for_current_author');

This code allows any users with the capability to edit other’s posts to view all posts. This means editors and administrators will be able to see all posts. Users with other roles like contributors or authors will only see their own posts.

If you are using custom user roles on your site, then you need to keep in mind that users who can edit posts added by other users will also be able to see them listed in the dashboard.

Bonus: Limit Authors to View Specific Posts or Pages

You can also limit authors, editors, contributors, and other user roles to view, edit, and delete certain blog posts and pages.

Using the PublishPress Permissions plugin, you can easily decide which specific posts and pages people can view on your website dashboard.

To start, install and activate the PublishPress Permissions plugin on your website. You can refer to our tutorial on how to install a WordPress plugin.

Now, let’s say you want specific article to only be edited by the website’s editor and no one else.

To do that, you can edit that post. Once you’re in the WordPress block editor, simply scroll down to the ‘Permissions: Edit this Post’ meta box.

Next, you’ll have to click on the dropdown menu for all other user roles and choose the ‘Blocked’ option. By default, the permission will be set to ‘default: Yes’, where everyone can edit the post.

After that, make sure that you leave the setting for the editor to the ‘Enabled’ or ‘default: Yes’ option. When you’ve set the permissions, make sure to update your blog post.
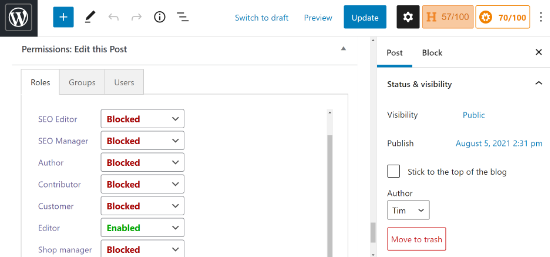
Change permission to view and edit specific posts

We hope this article helped you learn how to limit authors to their own posts in the WordPress admin area. You may also want to take a look at our tutorial on how to choose the best blogging platform, or our expert comparison of the best email marketing services.

If you liked this article, then please subscribe to our YouTube Channel for WordPress video tutorials. You can also find us on Twitter and Facebook.

The post How to Limit Authors to their Own Posts in WordPress Admin appeared first on WPBeginner.


September 19, 2021 at 09:00PM

Saturday, September 18, 2021

How to Show Latest Videos From YouTube Channel in WordPress

Do you want to show the latest videos from a YouTube channel on your WordPress website?

YouTube is the most popular video platform in the world. By adding videos from your YouTube channel to your website, you can get more views and increase engagement.

In this article, we’ll show you how to show the latest videos from your YouTube Channel in WordPress step by step.

How to show latest videos from YouTube channel in WordPress

Why Show Your YouTube Channel Videos in WordPress?

By adding your YouTube channel to WordPress, you get more eyes on your YouTube channel while making your website more engaging.

When your visitors watch YouTube videos on your website, they stay on your site longer, which positively impacts your WordPress SEO.

By default, WordPress lets you embed a single YouTube video into your posts and pages, but you can’t add an entire channel.

Luckily, you can easily add your YouTube channel to your WordPress site with the help of a WordPress plugin. This will save you a lot of time, since it will automatically show the latest videos from the channel.

That being said, let’s take a look at how to show the latest videos from your YouTube channel in WordPress easily.

How to Show Your Latest YouTube Channel Videos in WordPress

We recommend using the Feeds for YouTube by Smash Balloon plugin to add your YouTube channel to WordPress and show your latest videos. It’s the best YouTube video gallery plugin for WordPress used by over 1.6 million websites.

Note: There is a pro version of the plugin available that gives you more control over how your channel displays, but we will use the free version for this tutorial since it has the YouTube channel embed feature.

First thing you need to do is install the free Feeds for YouTube plugin. For more details, see our step by step guide on how to install a WordPress plugin.

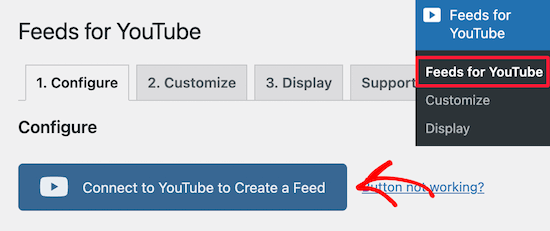
Upon activation, you need to go to Feeds for YouTube » Feeds for YouTube and then click the ‘Connect to YouTube to Create a Feed’ button.

Connect YouTube account

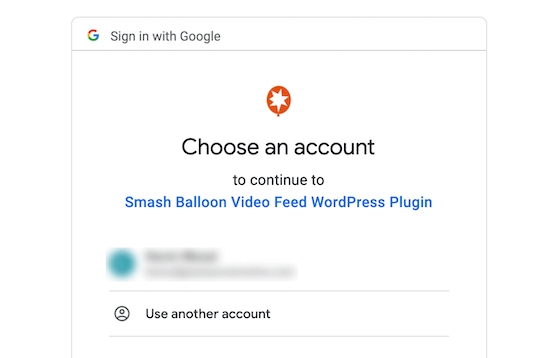
This will bring you to a screen where you’ll be asked to log into your Google account.

You need to choose the account that’s linked to your YouTube channel.

Select Google account

After that, enter your Google account password.

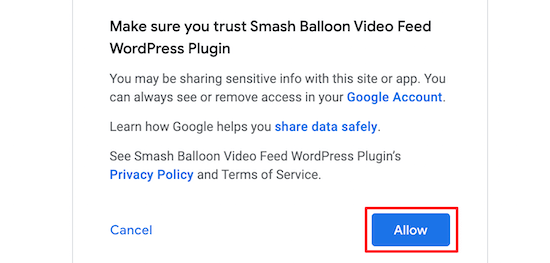
Then, click the ‘Allow’ button when asked.

Allow Smash Balloon

This will bring you back to your WordPress admin dashboard.

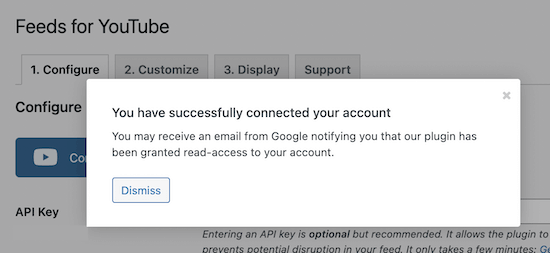
You should receive a notification that your account has been successfully connected.

Feeds for YouTube account connected

After that, click on the ‘Customize’ menu option at the top of the screen.

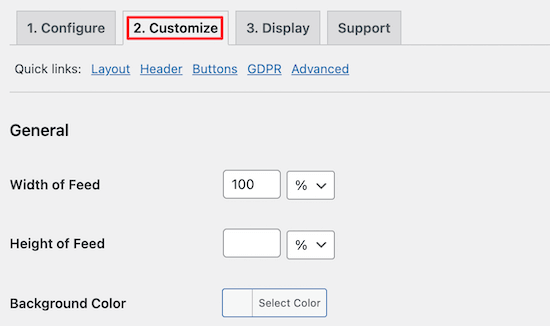
Here you can adjust how your YouTube channel feed will display. We will keep the default settings, but you can customize your feed however you like.

In the ‘General’ settings section, you can control the width and height of your feed and the background color.

Customize YouTube feed settings

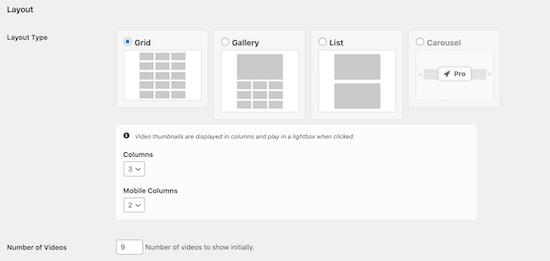
After that, you can select the type of visual layout for your channel in the ‘Layout’ section.

You can choose between, Grid, Gallery, and List. If you select Grid or Gallery, then you can set the number of columns too.

Next, you can choose the number of videos you want to load initially.

YouTube feed layout settings

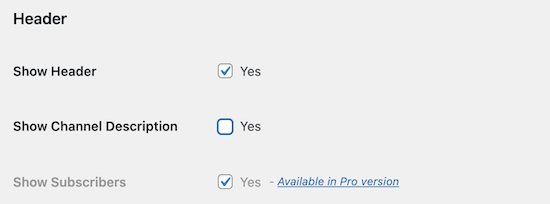
Once you’ve done that, you can control the appearance of your header in the ‘Header’ section.

Simply uncheck the boxes if you don’t want the channel header or description to display.

YouTube feed header settings

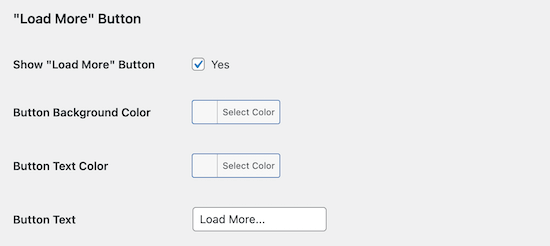
Next, in the ‘Load More Button’ section, you can change how this button displays on your site.

You can show or hide the button and change the color and text.

YouTube feed load more button

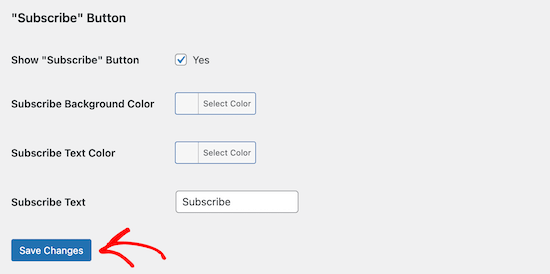
Below that, you can customize the subscribe button in the same way.

If you do make any changes, then make sure you click the ‘Save Changes’ button before exiting the screen.

YouTube feed subscribe button

Now it’s time to add your YouTube channel to your WordPress website.

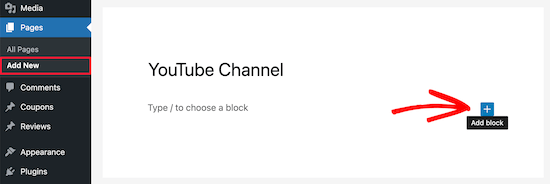
Simply navigate to Pages » Add New and then give your page a name.

After that, click the plus ‘Add Block’ icon.

Add new page for YouTube channel

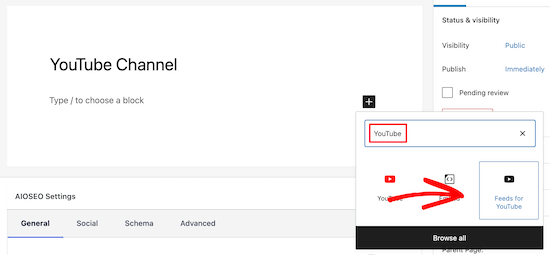
This brings up the WordPress block menu.

Simply type ‘YouTube’ into the search box and then select the ‘Feeds for YouTube’ block.

Select Feeds for YouTube block

This will automatically add your YouTube feed to your page. Finally, click the ‘Publish’ or ‘Update’ button to make your page live.

Now your visitors can view your YouTube channel on your WordPress site.

YouTube channel feed example

As you publish new videos to your YouTube channel, they will automatically appear on your page.

Show Latest YouTube Channel Videos in WordPress Sidebar

Beyond adding your latest YouTube channel videos to a WordPress page, you may also want to show your latest videos in your sidebar.

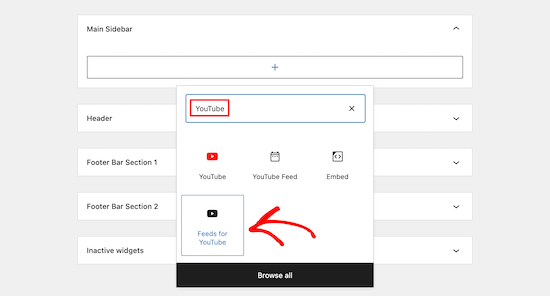
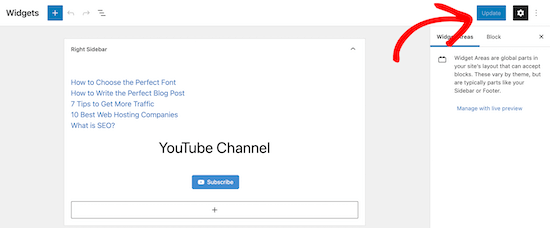
To do this navigate to Appearance » Widgets and then click the ‘Add Block’ icon to add a new block.

Add new widget for YouTube feed

After that, type ‘YouTube’ into the search bar.

Then, select the ‘Feeds for YouTube’ block, similar to above.

Select Feeds for YouTube block

This will automatically insert your YouTube channel feed into your sidebar.

Next, you need to click the ‘Update’ button to save your sidebar widget.

Update sidebar widget

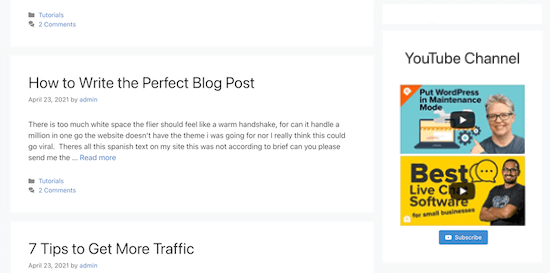
Your YouTube channel videos will now display in your WordPress sidebar.

Similar to above, your most recent videos will automatically show up at the top of the sidebar.

YouTube feed WordPress sidebar

We hope this article helped you learn how to show the latest videos from a YouTube channel in WordPress. You may also want to see our guide on how to start your own podcast, or our comparison of the best live chat software for small business.

If you liked this article, then please subscribe to our YouTube Channel for WordPress video tutorials. You can also find us on Twitter and Facebook.

The post How to Show Latest Videos From YouTube Channel in WordPress appeared first on WPBeginner.


September 18, 2021 at 03:00PM

Friday, September 17, 2021

6 Best Reseller Hosting Plans of 2021 (Best Value + Quality)

Are you looking for the best reseller hosting?

Reseller hosting lets you sell hosting services just like a web hosting company. Web designers, developers, and agencies can offer reseller hosting as an addon service for clients and customers.

In this article, we’ll share our favorite reseller hosting so that you can choose the right hosting company for your business.

Best reseller hosting of 2021 (compared)

What is Reseller Hosting and Who is it For?

With reseller hosting, you purchase web hosting services and then sell the server space and features to other customers.

Think of it like running your own web hosting business, but without all of the expensive costs like hardware, servers, maintenance, support, and more. Every technical task is managed behind the scenes by the web host.

It’s important to choose a high quality hosting provider, since their service will be the foundation for your business.

If you’re a developer, agency, or manage WordPress websites for clients in any way, then reselling hosting can be a great way to make money online.

With that said, let’s take a look at some of the best reseller hosting options available on the market today.

1. SiteGround

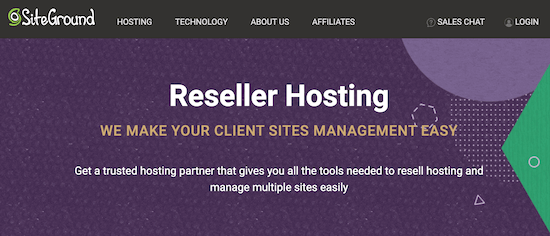
SiteGround Reseller

SiteGround is a popular hosting provider that’s known for its high quality support and fast loading speeds. It’s also one of the hosts officially recommended by WordPress.

The reseller hosting plans let you pass on all of SiteGround’s great hosting features to your clients.

All reseller packages support an unlimited number of hosting accounts, have free WordPress installation and updates, daily backups, and more.

Free SSL certificates, email accounts, and a CDN are included with your customers’ hosting accounts too.

You can also offer your clients access to the site staging features, datacenter selection, and free migration for those coming from other web hosts.

Pricing: SiteGround reseller plans start at $7.99 and include 20GB of storage and support for unlimited websites. If you want custom branding for your account, then you’ll need one of the higher priced plans.

For more details, see our SiteGround review to learn more about the features, performance, and more.

2. HostGator

HostGator Reseller

HostGator is one of the top WordPress hosting providers in the world. They’ve been around since 2002 and have grown to become one of the biggest and most beginner friendly hosts in the market.

The reseller hosting offers great features like unlimited domains, a free SSL certificate, dedicated IP addresses, FTP accounts, private name servers, automated backups, and more.

Every reseller plan comes with the WHM control panel for easier client management and server control. You can monitor and control the server bandwidth and disk space for every customer server.

It also includes WHMCS billing software to easily automate your billing.

Finally, HostGator includes 24/7 support via live chat and phone.

Pricing: HostGator reseller plans start at $19.95 per month and have 60GB of disk space and support for unlimited websites.

To learn more about HostGator, see our in depth HostGator review where we evaluate their speed, performance, and support.

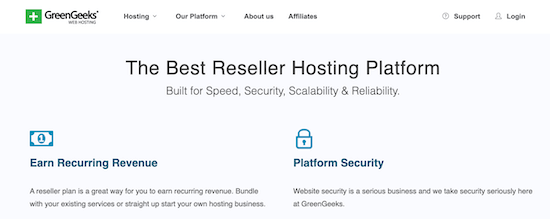
3. GreenGeeks

GreenGeeks Reseller

GreenGeeks is well known in the hosting industry for being an environmentally friendly host. They offer very fast loading speeds, 24/7 US-based support, and power over 600,000 websites.

Every reseller plan includes unlimited disk space and bandwidth, a free CDN, and automated daily backups. Plus, high level plans can support eCommerce stores across different platforms like WooCommerce.

If your clients are more advanced users, then you can offer support for multiple versions of PHP, FTP access, WP-CLI, Git, and more.

White label services are also available, so you can sell hosting under your branding instead of GreenGeeks.

Pricing: GreenGeeks reseller plans start at $19.95 per month with 60GB of disk space and support for 25 cPanel accounts.

To learn more about GreenGeeks, see our in depth GreenGeeks review where we cover the pros and cons in depth.

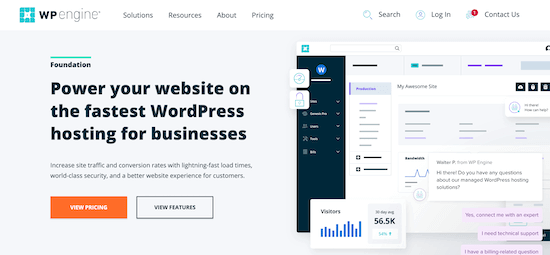
4. WP Engine

WP Engine Managed Hosting

WP Engine is known for its managed WordPress hosting plans, rock solid support team, and fast speeds.

It’s very popular with WordPress developers since it offers support for up to 30 websites on managed hosting when you choose the Managed Hosting Scale plan.

You get access to 24/7 support, automated migrations, daily backups, SSH access, and a free SSL certificate with managed hosting.

Plus, with WP Engine, you get access to 10 different StudioPress WordPress themes that you can use on client websites.

Pricing: WP Engine starts at $241.67 per month when billed yearly and supports up to 30 websites.

For more details, see our in depth WP Engine review where we highlight the pros, cons, performance, and more.

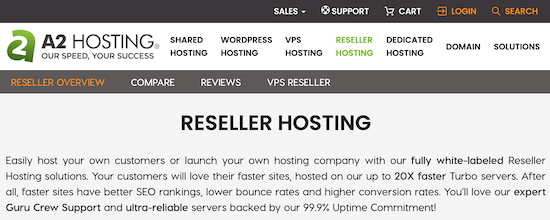
5. A2 Hosting

A2 Reseller Hosting

A2 Hosting is a web host known for its speed, performance, and reliability. There’s also 24/7 tech support to assist with any website issues.

All of the reseller hosting plans are managed with the Web Host Manager (WHM) tool, which makes it easy to keep track of your client websites.

Plus, you can white label the hosting to create a branded experience for your customers.

The reseller plans also include free account migration, SSL certificates, automated backups, and a CDN.

Pricing: A2 Hosting reseller plans start at $24.99 per month when paid yearly, and include 60 GB of disk space, a money-back guarantee, and more.

For more details, see our detailed A2 Hosting review for an in depth look at the hosting features, performance, and plans.

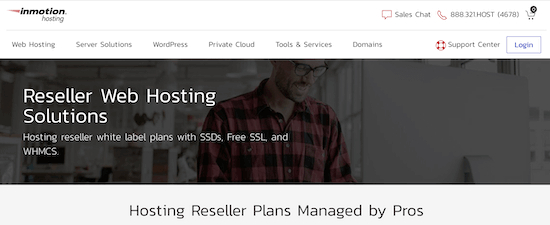
6. InMotion

InMotion Reseller

InMotion is a popular host that offers reliable performance for business websites. The technical support team is very helpful, plus there’s 99.99% guaranteed uptime.

Every plan has high bandwidth and disk space to support more websites and traffic at an affordable price.

All plans come with a free cPanel or WHM control panel, root server access, and built-in DDoS and malware protection. This offers your customers flexibility and improved website security.

White label services and billing software are included for free. So, you can easily manage payments while offering customers a hosting experience with your own branding.

If you want to sell domain names too, then you can use the domain reseller account also included in the reseller program.

Pricing: InMotion Hosting reseller plans start at $29.99 per month when paid yearly and offer 80GB storage and support for 25 websites, along with a 90-day money-back guarantee.

To learn more about InMotion, see our in depth InMotion Hosting review where we highlight the performance, speed, and pros and cons.

What is the Best Reseller Hosting? (Expert Pick)

All of the reseller hosting services above are great choices. The best reseller host for your business will depend on your goals and the kind of websites you’ll be hosting.

If website speed and high quality customer support are important, then SiteGround is the best option.

If you want a beginner-friendly host that your customers can grow and scale their websites with, then HostGator is perfect.

We also looked into other reseller web hosting providers like Liquid Web, GoDaddy, Bluehost, etc but we decided not to list them here to help you avoid choice paralysis.

We hope this article helped you find the best reseller hosting to help you start your own reseller business. You may also want to see our guide on choosing the best website builder and our expert picks on the best business phone services for small businesses.

If you liked this article, then please subscribe to our YouTube Channel for WordPress video tutorials. You can also find us on Twitter and Facebook.

The post 6 Best Reseller Hosting Plans of 2021 (Best Value + Quality) appeared first on WPBeginner.


September 17, 2021 at 03:20PM

Thursday, September 16, 2021

How to Unlock Your “Not Provided” Keywords in Google Analytics

Are you looking for a way to see ‘not provided’ keywords in Google Analytics?

Google Analytics is a powerful tool that shows how people discover and interact with your website. However, when you try to view which keywords they use to find your site, you often see ‘not provided’ in Google Analytics.

In this article, we’ll show you how to unlock your ‘not provided’ keywords in Google Analytics.

Unlock 'not provided' keywords in analytics

What is Keyword ‘Not Provided’ in Google Analytics?

Google Analytics collects information about your website visitors and display them in easy to understand reports. However, Google introduced a more secure search experience for users in 2011.

To protect users’ privacy, Google adopted Secure Socket Layers (SSL) to encrypt searches of visitors that are logged in to their Google account.

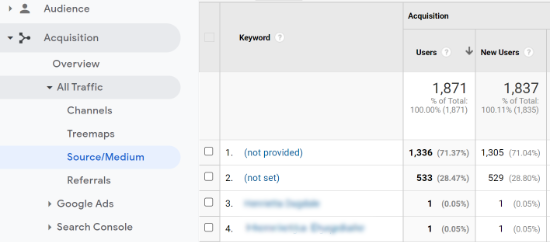
Because of this, if you try to find out which keywords your visitors use to find your website, then you’ll see ‘not provided’ in the Google Analytics report.

Keyword not provided

As a marketer and business owner, finding out the search terms people use to visit your site is extremely valuable. You can use this data to optimize your WordPress SEO and skyrocket your traffic by targeting the keywords that actually drive traffic to your site.

You can also use those keywords to generate new content ideas and answer questions that people may have about your brand.

That being said, let’s find out how you can unlock not provided keywords in Google Analytics.

Unlock Not Provided Keywords with Google Search Console

The easiest and most reliable way to see which keywords your visitors use in search engines is by using Google Search Console (previously called Google Webmaster Tools).

It is a free tool that helps you measure your site’s traffic from search engines, index web pages, find and fix issues, and improve your overall SEO.

You can start by simply visiting the Google Search Console website. After that, you’ll need to connect your WordPress website.

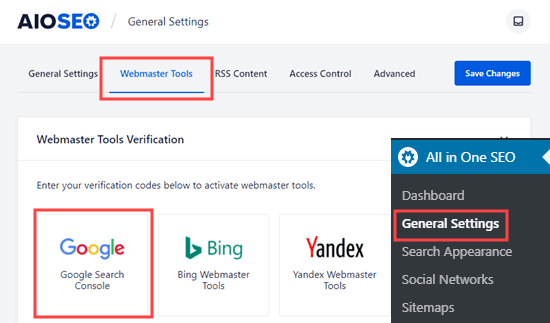
The free All in One SEO plugin makes it easy for you to do that.

The Webmaster Tools page in All in One SEO, to select Google Search Console

If you need help, then please refer to our detailed tutorial on how to add your WordPress site to Google Search Console.

Once you’ve added your website, the next thing to do is connect Google Search Console with Google Analytics.

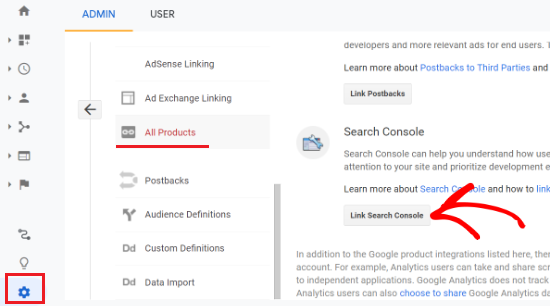
First, log in to your Google Analytics account and then click the ‘Admin’ option (gear icon) at the bottom left corner of the menu.

Link Search Console

After that, you’ll need to click the ‘All Products’ option under the Property column. Now navigate to the Search Console section and then click the ‘Link Search Console’ button.

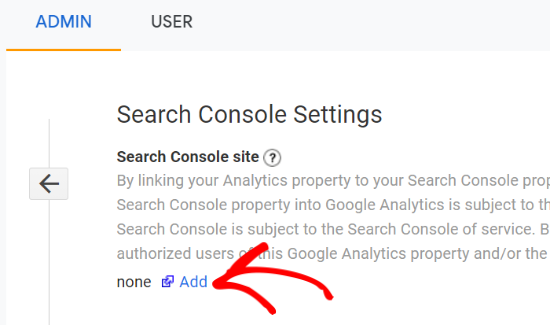
Next, you can click the ‘Add’ button to add Google Search Console.

Add search console

On the next screen, you’ll need to select a Search Console property from the dropdown menu that you’d like to link to Google Analytics.

Select a property

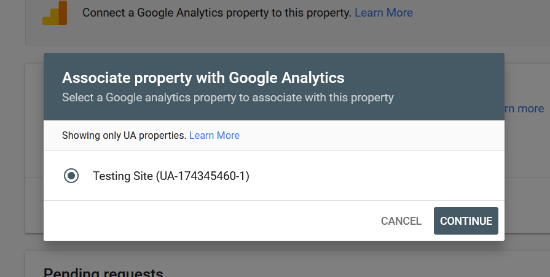
Next, you’ll need to select the Google Analytics property that you’d like to connect with Google Search Console and click the ‘Continue’ button.

Choose associated Analytics property

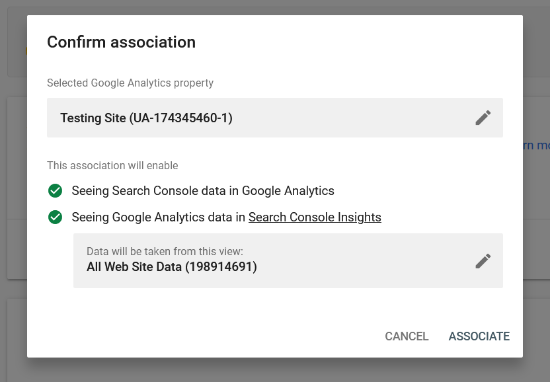
A popup will now appear which will confirm the connection between the Google Analytics and Google Search Console. You can go through the properties once more and make changes if you want.

Next, go ahead and click the ‘Associate’ button.

Confirm association between Analytics and Search Console

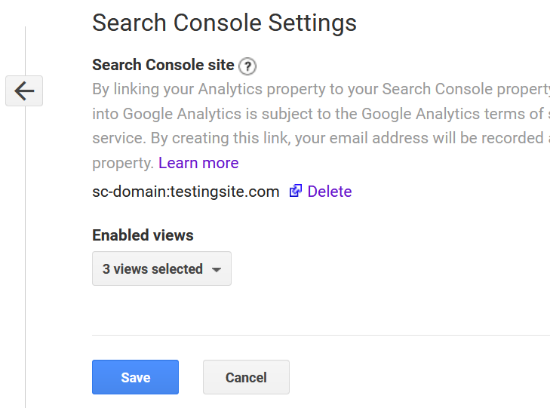
Once that’s done, you can head back to the Google Analytics Search Console settings page. Now refresh your page and your Google Search Console will be connected to Google Analytics.

See connected Search Console with Analytics

Go ahead and click the ‘Save’ button to store your settings.

Next, you can view your not provided keywords in Google Analytics by navigating to Acquisition » Search Console » Queries.

View Search Queries in Analytics

The report will show the number of clicks your website got in Google search results. Besides that, it will also show you the number of impressions for each of your keywords.

Impressions are the number of times any URL from your website appeared in the Google search results and was viewed by a user.

Other metrics you’ll see will include the click-through rate (CTR) and average position of your keywords. The average position metric shows where your search query is ranking on Google.

How to View ‘Not Provided’ Keywords in WordPress

Do you want to uncover your not provided keywords and see the Search Console report inside your WordPress dashboard?

Using MonsterInsights, you can view your Search Console report in the WordPress admin area and discover the top Google search terms without having to leave your website.

MonsterInsights is the best Google Analytics plugin for WordPress on the market. The plugin makes it super easy to set up and use Google Analytics. You can get insights to grow your business, track your site’s performance, and make data-driven decisions.

It also helps in setting up advanced tracking such as eCommerce conversions rate, link click and button click tracking, custom dimensions, and more without the need to edit code.

MonsterInsights

Note: We’ll be using the MonsterInsights Pro license for this tutorial as it includes the Search Console report and advanced tracking features. There is also a free version, but you won’t be able to view your top search terms.

First, you’ll need to install and activate the MonsterInsights Pro plugin on your website. For more details, you can check out our guide on how to install a WordPress plugin.

Once the plugin is active, you’ll need to connect it with your Google Analytics account. If you need help, then simply follow our guide on how to install Google Analytics in WordPress.

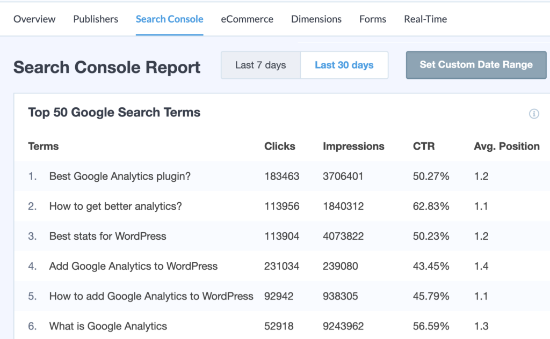
Next, you can navigate to Insights » Reports from your WordPress admin panel and then select the ‘Search Console’ tab.

MonsterInsights Search Console report

In the report, you can view the top 50 Google search terms that people use to find your website. Besides that, you’ll notice more metrics including clicks, impressions, click-through rate, and average position of each keyword.

Use Semrush to Unlock Keywords Not Provided

Another way you can find out which keywords people enter in search engines to find your site is by using Semrush.

It is a popular SEO tool that’s used by professionals, SEO experts, bloggers, marketers, and businesses of all sizes.

Semrush lets you do keyword research, see which keywords your competitors rank for, uncover backlink opportunities, perform site audits, and much more.

SEMRush

By connecting Google Search Console and Google Analytics with Semrush, you can easily unlock not provided keywords.

First, you’ll need to sign up for a Semrush account.

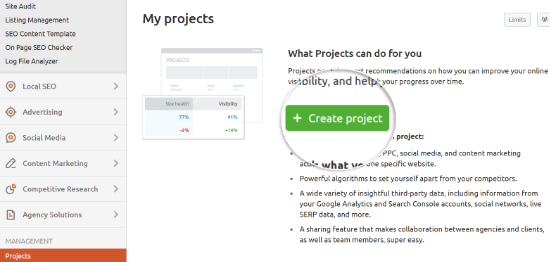
When you’re logged in, simply head over to the ‘Projects’ section from the menu on your left. You’ll now need to create a project by clicking the ‘+ Create Project’ button.

Create a new project

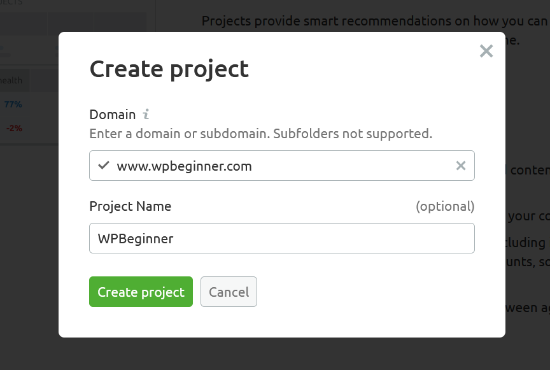
Next, a popup will appear where you’ll need to enter the URL of your website and add a project name. When you’ve done that, simply click the ‘Create Project’ button.

Enter your domain and add a project name

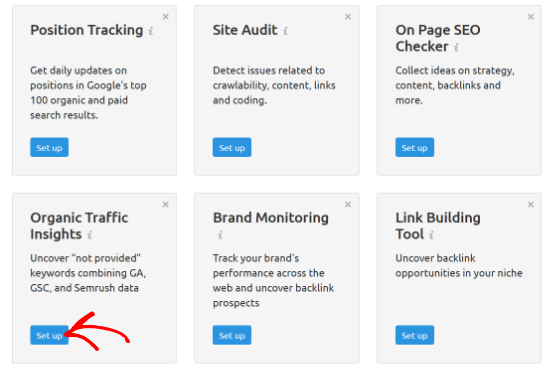
After that, Semrush will show you different tools you can set up in your project. Go ahead and select the Organic Traffic Insights option by clicking the ‘Set up’ button.

Set up Organic Traffic Insights

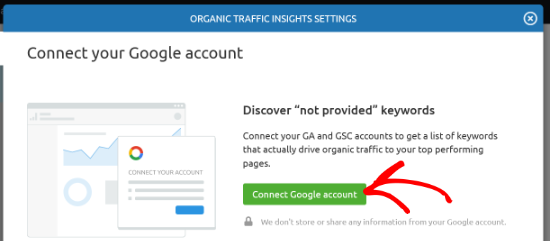
On the next screen, you can click the ‘Connect Google account’ button to integrate Google Analytics and Google Search Console.

Connect Google account

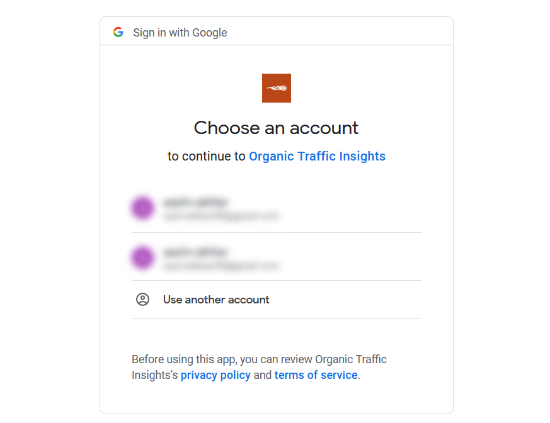
Next, go ahead and choose your Google account to connect with Semrush.

Choose your Google account

After that, click the ‘Allow’ button so Semrush Organic Traffic Insights can access your Google account.

Allow access to your Google account

Now select your Google Analytics account, property, and view. Then choose your Google Search Console property and click the ‘Select database’ option.

Enter Analytics and Search Console details

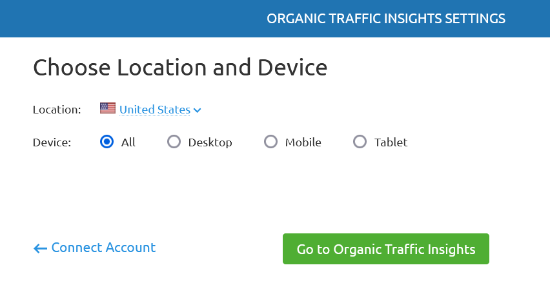
Next, you can choose your location and which devices you’d like Semrush to record organic traffic insights from. You can select all devices or choose a desktop, mobile, or tablet.

Once that’s done, simply click the ‘Go to Organic Traffic Insights’ button.

Choose location and device

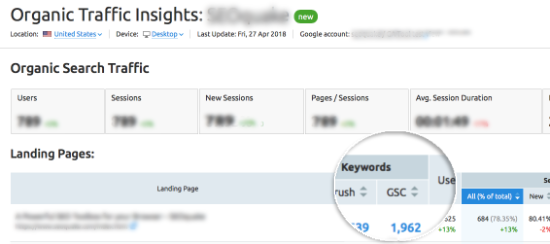
Semrush will now unlock your not provided keywords. All you have to do is click on the blue number under GSC in the Keywords column for any landing page and view the search queries people use on Google.

Semrush GSC report

We hope that this article helped you learn how to unlock your not provided keywords in Google Analytics. You may also want to check out our guide on how to choose the best hosting platform, or our expert comparison of the best email marketing services for small business.

If you liked this article, then please subscribe to our YouTube Channel for WordPress video tutorials. You can also find us on Twitter and Facebook.

The post How to Unlock Your “Not Provided” Keywords in Google Analytics appeared first on WPBeginner.


September 16, 2021 at 05:26PM