Monday, November 8, 2021

How to Create Additional Image Sizes in WordPress

Do you want to create additional image sizes in WordPress?

By default, WordPress automatically creates several copies of image uploads in different sizes. Additionally, WordPress themes and plugins can also create their own image sizes.

In this article, we’ll show you how to easily create additional image sizes in WordPress and use them on your website.

Creating additional image sizes in WordPress

Why Create Additional Image Sizes in WordPress?

Normally, all popular WordPress themes and plugins handle image sizes very well. For instance, your WordPress theme may create additional sizes to use as thumbnails on archive pages.

However, sometimes these image sizes may not fit your own requirements. You may want to use a different image size in a child theme or a post grid layout.

You can do this by creating additional image sizes in WordPress and then calling these sizes whenever you need them.

That being said, let’s take a look at how to create additional image sizes in WordPress.

Registering Additional Image Sizes for your Theme

Most WordPress themes including all the top WordPress themes support post thumbnails (featured image) feature by default.

However, if you are creating a custom WordPress theme then you will need to add support for post thumbnails by adding the following code to your theme’s functions.php file.

add_theme_support( 'post-thumbnails' );

Once you enable the support for post thumbnails, you can now use the functionality of registering additional image sizes by using the function add_image_size().

The add_image_size function is used in the following format:

add_image_size( 'name-of-size', width, height, crop mode );

Example code can look like the following:

add_image_size( 'sidebar-thumb', 120, 120, true ); // Hard Crop Mode
add_image_size( 'homepage-thumb', 220, 180 ); // Soft Crop Mode
add_image_size( 'singlepost-thumb', 590, 9999 ); // Unlimited Height Mode

Now if you notice, we have specified three different sorts of image sizes. Each has different modes such as hard crop, soft crop, and unlimited height.

Let’s cover each example and how you can use them in your own projects.

1. Hard Crop Mode

As you may notice, there is a “true” value added after the height. This tells WordPress to crop the image exactly to the size that we have defined (in this case 120 x 120px).

This method is used to ensure that everything is exactly proportionate. This function will automatically crop the image either from the sides or from the top and bottom depending on the size.

Hard crop images example

2. Soft Crop Mode

By default, soft cropping mode is turned on this is why you do not see any additional value added after the height. This method resizes the image proportionally without distorting it. So you might not get the dimensions that you wanted. Usually, it matches the width dimension and the heights are different based on each image’s proportion. An example display would look like this:

Soft crop example

Unlimited Height Mode

There are times when you have super long images that you want to use in your design, but you want to make sure that the width is limited. For instance, infographic images tend to be very long and usually wider than the content width.

This mode allows you to specify a width that will not break your design while leaving the height to be unlimited.
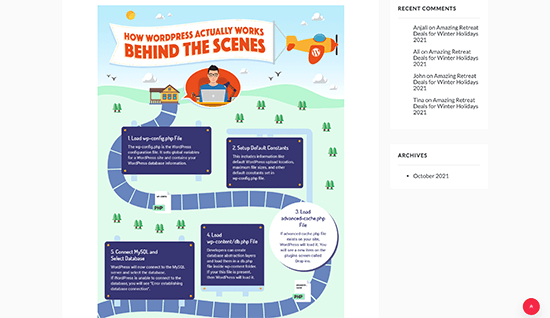
Unlimited height mode

Displaying additional image sizes in your WordPress theme

Now that you have added the functionality for the desired image sizes lets take a look at displaying them in your WordPress theme. Open the theme file where you want to display the image and paste the following code:

<?php the_post_thumbnail( 'your-specified-image-size' ); ?>

Note: This bit of code must be pasted inside the post loop.

That’s all you really have to do to display the additional image sizes in your WordPress theme. You probably should wrap it around with the styling that fits your need.

Regenerating Additional Image Sizes

If you are not doing this on a brand new site, then you probably will have to regenerate thumbnails.

The add_image_size() function only generates the sizes from the point it was added into the theme. This means any post images that were added prior to the inclusion of this function will not have new sizes.

To fix this, you need to regenerate the new image size for older images. This is made easy by the plugin called Regenerate Thumbnails. Once you install and activate the plugin, a new option is added under the menu: Tools » Regenerate Thumbnails
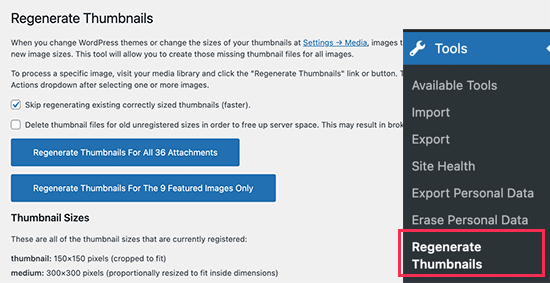
Regenerate thumbnails

You’ll see the option to regenerate thumbnail for all images or just the featured images. We recommend regenerating all images to avoid any unexpected behavior or broken images.

For more details, see our article on how to easily regenerate new image sizes in WordPress.

Enabling Additional Image Sizes for your Post Content

Even though you have enabled image sizes in your theme, the usage is limited only to your theme which does not make any sense.

All image sizes are being generated regardless, so why not make it available for the post author to use within the post content.

You can do this by adding the following code to your theme’s functions file.

function wpb_custom_image_sizes( $size_names ) {
    $new_sizes = array(
        'homepage-thumb' => 'Homepage Thumbmail', 
        'singlepost-thumb' => 'Infographic Single Post'
    );
    return array_merge( $size_names, $new_sizes );
}
add_filter( 'image_size_names_choose', 'wpb_custom_image_sizes' );

Don’t forget to save your changes after adding the code.

You can now go and upload an image to a WordPress post or page. In the image block settings you’ll see your custom image sizes under the ‘Image size’ option.
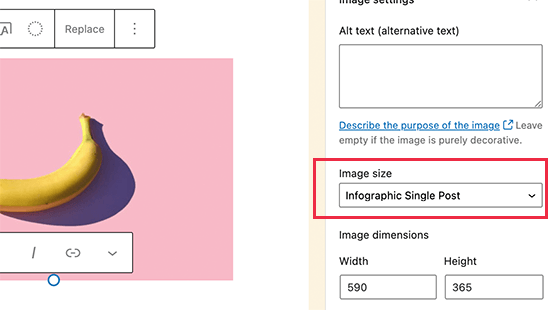
Choose your custom image size inside post editor

You and other authors working on your website can now select these size options when adding images to posts and pages.

We hope this article helped you learn how to create additional image sizes in WordPress. You may also want to see our article on the best image compression plugins for WordPress and our WordPress performance guide to improve your website speed.

If you liked this article, then please subscribe to our YouTube Channel for WordPress video tutorials. You can also find us on Twitter and Facebook.

The post How to Create Additional Image Sizes in WordPress appeared first on WPBeginner.


November 08, 2021 at 05:27PM

Friday, November 5, 2021

10 Best WordPress PayPal Plugins for Easily Accepting Payments

Are you looking to accept payments on your WordPress site using PayPal?

PayPal makes it easy for website owners to accept payments online from their customers. Using a PayPal Plugin, you can easily integrate the popular payment service with WordPress.

In this article, we will compare the best WordPress PayPal plugins for accepting payments.

Best WordPress PayPal plugins

Why Use a PayPal Plugin for WordPress?

PayPal is arguably the most popular and trusted online payment gateways in the world.

Whether you have an eCommerce store, a membership website, a blog, or any other business site, PayPal lets you collect online payments from your customers.

Since PayPal handles the entire transaction, you don’t have to worry about security issues, getting a separate merchant processor for credit cards, or PCI compliance. All you have to do is add PayPal to your WordPress website.

A WordPress PayPal plugin makes the process of connecting your site with your PayPal account very easy.

It also helps you create payment collection forms, insert shopping carts, add a pay now button, offer express checkout solutions, and more.

That being said, let’s look at some of the best PayPal plugins for WordPress.

1. WPForms

WPForms

WPForms is the most beginner friendly contact form plugin for WordPress and is trusted by over 5 million professionals.

It offers a drag & drop online form builder that allows you to easily create contact forms, email subscription forms, order forms, payment forms, donation forms, and other types of online forms with just a few clicks.

The plugin offers pre-built form templates, which lets you create any type of online form in no time. There are multiple form fields that you can add to customize your form using the drag and drop builder.

With WPForms PayPal addon, you can easily accept payments, donations, and online orders on your WordPress website.

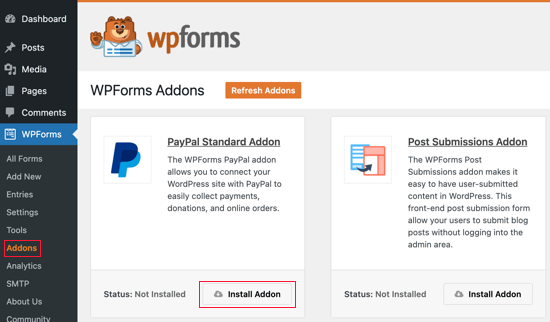
WPForms PayPal Addon

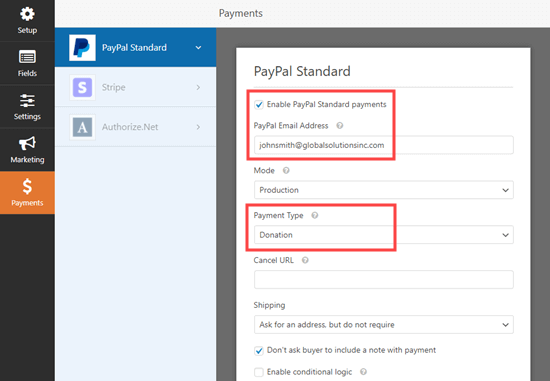
Once the addon is active, you can fill out your PayPal details in the form settings. WPForms will then automatically direct users to PayPal when they submit a form.

Enabling PayPal payments for your form in WPForms

WPForms is a perfect solution for you if you want to set up a quick online order form without setting up a full eCommerce cart.

2. MemberPress

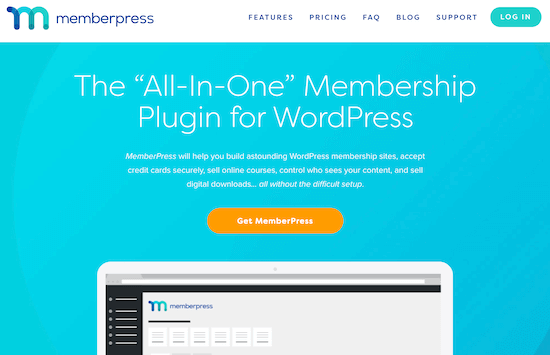
MemberPress

MemberPress is the best WordPress membership plugin and is very easy to use. You can sell courses, offer digital downloads, and allow users to access posts, pages, videos, and other content after becoming a member.

It offers lots of features and comes with a drag and drop course builder. You can also control who can access which content by setting up different membership levels.

The plugin comes with built-in integration with PayPal. You can easily accept payments using PayPal Standard and PayPal Digital Goods.

There’s no need to manually add a PayPal payment gateway to your membership website. MemeberPress comes with PayPal gateway API keys.

Simply select PayPal as your payment method, and MemberPress will add it to your membership website.

3. Easy Digital Downloads

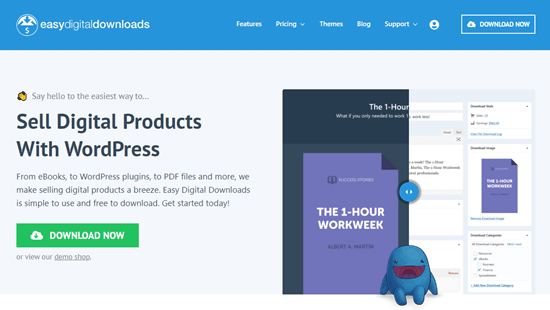
The Easy Digital Downloads website

Easy Digital Downloads is the most popular WordPress eCommerce plugin for selling digital downloads in WordPress.

Whether you want to sell an eBook, music files, digital art, software, or any other type of digital good, Easy Digital Downloads is the plugin for you.

It comes with integrations for PayPal Standard, PayPal Express, PayPal Pro, and even the new PayPal commerce platform.

Aside from PayPal, it also allows you to accept other payment solutions as well including Stripe, Apple Pay, Google Pay, and more.

You can sell subscriptions, accept recurring payments, add discount codes, and set up a full shopping cart in just a few minutes.

4. Formidable Forms

Formidable FormsFormidable Forms is an advanced WordPress forms plugin in the market. It lets you create complex forms without the need to hire a developer.

The plugin offers a drag and drop form builder, making it super easy to build all kinds of forms. For example, you can create simple contact forms, quizzes, surveys, payments forms, and more.

What makes Formidable Forms so powerful is that you can also build advanced forms like mortgage calculators, directories, job board listings, and much more.

Formidable Forms offers a PayPal addon, which allows you to collect online payments from your visitors. You can also customize your PayPal settings, like selecting different currencies and setting a one-time or recurring payment type.

To get started, all you have to do is edit or create a new form in Formidable Forms and add PayPal as a new action in your form.

5. WooCommerce

WooCommerce

WooCommerce is a popular WordPress eCommerce plugin that allows you to accept payments using PayPal. In just a few clicks, you can add the PayPal payment method to your WooCommerce store.

Along with PayPal, the plugin also integrates other WooCommerce payment options including debit card, credit card, and pay upon invoice.

WooCommerce allows you to sell physical goods, subscriptions, integrate with shipping providers, collect taxes, handle inventory, and more.

It’s the most popular WordPress eCommerce plugin if you’re selling to sell physical goods.

6. Quick PayPal Payments

Quick PayPal Payments

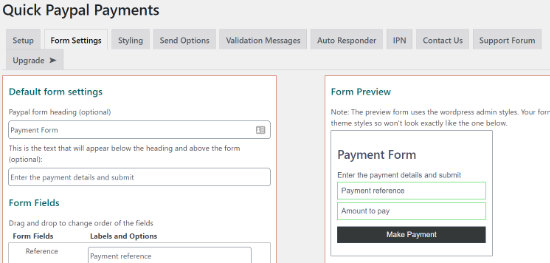
Quick PayPal Payments is a simple but powerful plugin that lets you easily accept payments using PayPal.

The plugin is super easy to use. All you need to do is set up a payment form and add it anywhere on your site using a shortcode.

The plugin also provides different options to customize the appearance and styling of your payment form. Besides that, you get fixed and variable payment options, GDPR compliance, multi-language support, and more.

Quick PayPal Payments also offers a customizable autoresponder. When you enable the autoresponder, the plugin will automatically send a confirmation message about the payment to your customer.

7. WordPress PayPal

WordPress PayPal plugin

WordPress PayPal is a WordPress plugin that allows you to create buy now, add to cart, donation, and subscription buttons.

You can place these buttons anywhere on your WordPress blog or eCommerce store using a shortcode and enable PayPal checkout for your visitors.

Another advantage of using WordPress PayPal is that it allows you to test purchases using test buyers and seller accounts in PayPal Sandbox.

This way, you can make sure that the checkout process is working properly before accepting payments from real customers.

Other features offered by the plugin include setting up recurring payments, selling in different currencies supported by PayPal, charging shipping and tax on your products, and much more.

8. PayPal Donations

PayPal Donations

PayPal Donations is a simple plugin that comes with a shortcode and a ready-to-use PayPal WordPress widget that you can add to your WordPress sidebars.

It’s beginner-friendly, and you can configure the settings from your WordPress dashboard. Simply enter your PayPal email address and choose your currency to get started.

The plugin also offers different styles of PayPal donate button you can use on your website. There is also an option to use your custom donation button.

9. WP Express Checkout

WP Express Checkout

WP Express Checkout is the next WordPress PayPal plugin on our list. Like other plugins, it also lets you create a PayPal payment button for your WordPress website.

However, what makes this plugin different is that it offers the checkout process in a popup window. This way, your customers never leave your website and allows for quick and easy checkout.

The plugin works seamlessly for selling products and services. It’s great for anyone looking to collect online payments by offering downloadable content like PDFs, eBooks, or music.

WP Express Checkout automatically allows customers to download files once they’ve paid. You can also deliver the digital downloads using an encrypted download link that expires automatically.

10. WordPress Simple PayPal Shopping Cart

WordPress Simple PayPal shopping cart

WordPress Simple PayPal Shopping Cart provides an easy way to sell products/services on your website and accept payments using PayPal.

It adds a shopping cart system and allows users to add physical products and digital goods to their cart. On checkout, users can pay using PayPal.

You can use shortcodes to display the shopping cart on any post or page and turn your WordPress blog into an online store.

We hope this article helped you find a PayPal WordPress plugin for accepting payments on your site. You may also want to check out our guide on how to start a podcast and best PayPal alternatives to collect payments in WordPress.

If you liked this article, then please subscribe to our YouTube Channel for WordPress video tutorials. You can also find us on Twitter and Facebook.

The post 10 Best WordPress PayPal Plugins for Easily Accepting Payments appeared first on WPBeginner.


November 05, 2021 at 05:33PM
Thursday, November 4, 2021

How to Create a Custom WordPress Search Form (Step by Step)

Do you need to create a custom search form for your WordPress website?

Search is how most users will find content on your site. If they can’t easily find what they are looking for, then they may move on to another website.

In this article, we’ll show you how to improve your website search by creating a custom WordPress search form, step by step.

How to Create a Custom WordPress Search Form (Step by Step)

Why Create a Custom Search Form for WordPress?

The default WordPress search feature is quite limited and doesn’t always find the most relevant content.

As you add more content to your site, you’ll need better ways to help your website visitors easily find the content on your site.

This becomes even more important if you’re running an online store or a membership site where you want users to find the right product or course.

You may also want to customize the search algorithm to show specific content higher than others, or customize the appearance of your search form.

That being said, let’s take a look at how to customize the WordPress search form and results page. We’ll cover two methods which you can choose using the links below:

How to Customize WordPress Search Form and Results

SearchWP is the best custom search plugins for WordPress. It’s easy to use, gives you complete control over your search results, and is more accurate than the default WordPress search.

The first step is to install the SearchWP plugin. For more details, see our step by step guide on how to install a WordPress plugin.

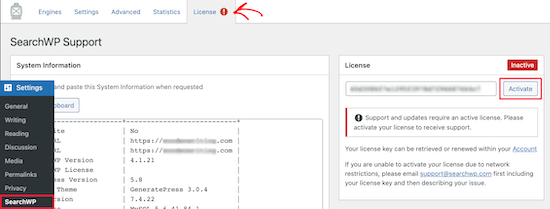
Upon activation, you need to visit the Settings » SearchWP page and then click on the ‘License’ menu option.

Enter SearchWP License Key

Then, enter your license key in the ‘License’ box and click the ‘Activate’ button. You can find this information in your account on the SearchWP website.

Customizing the Search Engine

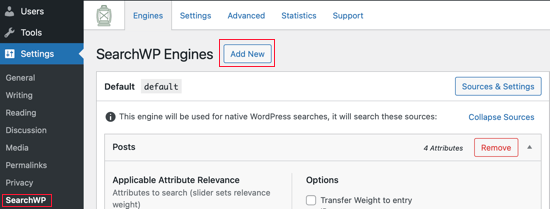
Once you’ve done that, you need to click on the ‘Engines’ menu option. Once there, you should click the ‘Add New’ button to create a new search engine.

SearchWP Add New Engine

This will create a new search engine called ‘supplemental’. To change the name you need to click the ‘Sources & Settings’ button.

SearchWP Supplemental Search Engine

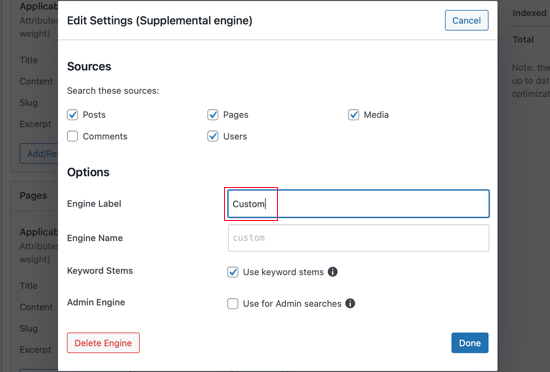
This takes you to a page that also allows you to choose whether to search posts, pages, media files, comments, and users. We’ll leave the default settings as they are.

We’ll change the search engine’s name to ‘Custom’. Go ahead and type that into the ‘Engine Label’ field.

SearchWP Engine Label

Notice that the ‘Keyword Stems’ option has been selected for you. This will disregard word endings when your users make a search so that the most relevant search results will be displayed.

Make sure you click the ‘Done’ button when you’re finished.

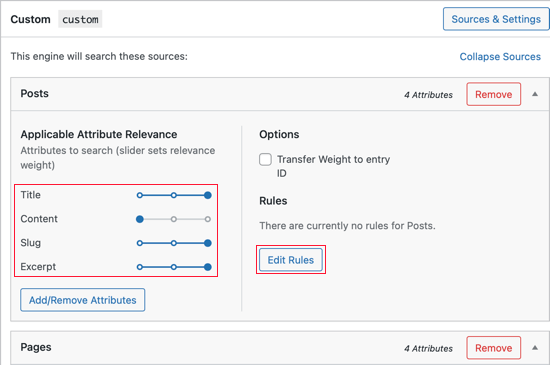
The settings page for the search engine contains sections for Posts, Pages, Media, and Users. In each section, you can give priority to different post attributes, or include only certain categories or tags in your search results.

You can do this by adjusting the ‘Attribute Relevance’ sliders.

These change how the search engines value and rank content. For example, if you want to value the post title higher than the content, then you can adjust the slider accordingly.

You should work through each section and make any adjustments to the sliders that you like.

SearchWP Attribute Relevance Sliders

You can also create rules for each section that determine whether certain content is included or excluded from the search results.

For example, you could allow your visitors to easily search for content about the same topic as they were just reading about. Or in an online store, you might help your customers to quickly find other products in the same category.

Go ahead and click the ‘Edit Rules’ button in the Posts section.

You’ll notice that you can create rules about the post’s categories, tags and format, the publish date, and the post ID.

SearchWP Edit Rules

You might want to let your visitors search specific website categories. For instance, you can add a category search feature to your archive pages to help your visitors quickly find what they’re looking for.

To learn how to do that, refer to Method 1 in our step by step guide on how to search by category in WordPress.

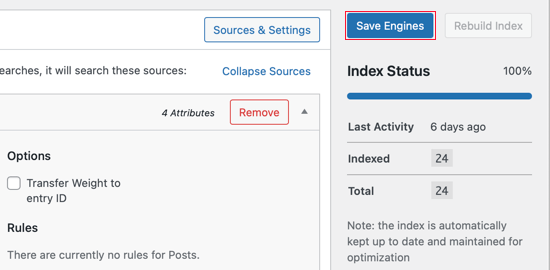
Once you’re done customizing your default search engine settings, make sure to click the ‘Save Engines’ button at the top of the page to create your custom search engine.

Click the Save Engines Button

Adding the Search Form with Shortcode

The SearchWP Shortcodes Extension simplifies the job of adding your new custom post search form to your WordPress site.

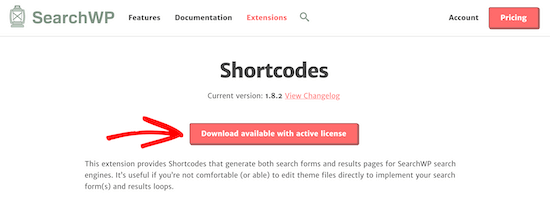
Simply visit the SearchWP Shortcodes Extension website and then click the ‘Download available with active license’ button.

Download SearchWP Shortcodes Extension

After that, you need to install and activate the extension the same way you installed the plugin above.

Now you can add a custom search form to your posts, pages, and widgets using shortcodes. If you haven’t used shortcodes before, then you can learn more in our beginner’s guide on how to add a shortcode in WordPress.

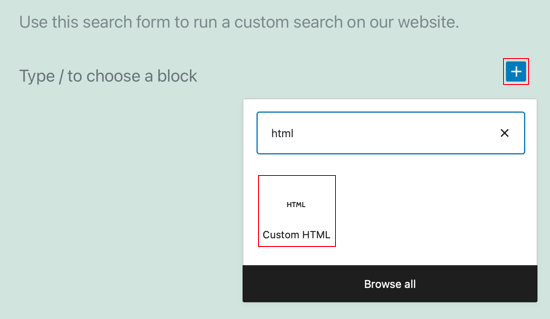
Simply edit a post and place your cursor where you want to add the search form. After that, click the plus ‘+‘ Add Block icon to bring up the blocks menu.

Add a Custom HTML Block

Next, type ‘html’ into the search box and then click on the ‘Custom HTML’ block to add it to the post.

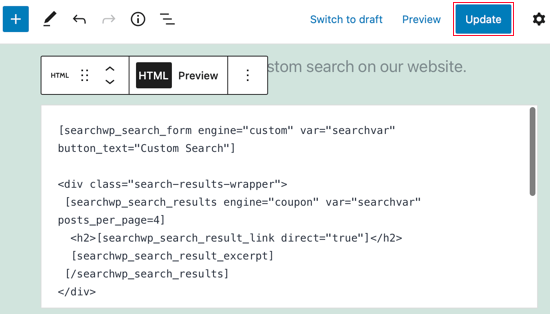
Once you’ve added the new block, you should paste the following shortcodes and HTML into it.


[searchwp_search_form engine="custom" var="searchvar" button_text="Custom Search"]
  
<div class="search-results-wrapper">
 [searchwp_search_results engine="custom" var="searchvar" posts_per_page=4]
  <h2>[searchwp_search_result_link direct="true"]</h2>
  [searchwp_search_result_excerpt]
 [/searchwp_search_results]
</div>
  
<div class="no-search-results-found">
 [searchwp_search_results_none]
 No results found, please search again.
 [/searchwp_search_results_none]
</div>
  
<div class="search-results-pagination">
 [searchwp_search_results_pagination direction="prev" link_text="Previous" var="searchvar" engine="custom"]
 [searchwp_search_results_pagination direction="next" link_text="Next" var="searchvar" engine="custom"]
</div>

This code will add your custom search form to the post, create a section to display the search results, show a no results message if necessary, and add pagination if the results go into multiple pages.

If you gave your search engine a different name, then you’ll need to change engine=“custom” to your own engine name in four places.

You might also choose to change the text on the search button to something more descriptive by editing button_text=“Custom Search”. The rest of the code can stay the same.

Make sure you click Publish or Update to save your post and make it live.

Click Publish or Update to Save Your Post

To see the search form in action, simply view the post on your WordPress website. This is how it looks on our demo site running the Twenty Twenty-One theme.

SearchWP Custom Search Form Preview

Adding Live Ajax Search

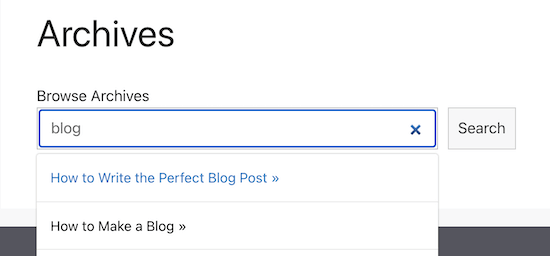
Live Ajax search improves your search form by automatically providing drop down search results as the user types their query.

Live Search Page Example

The easiest way to add Ajax live search to WordPress is the free SearchWP Live Ajax Lite Search plugin, since it enables live search automatically.

For step by step instructions on how to install it, see our guide on how to add live Ajax search to your WordPress site.

Using Advanced Settings for SearchWP

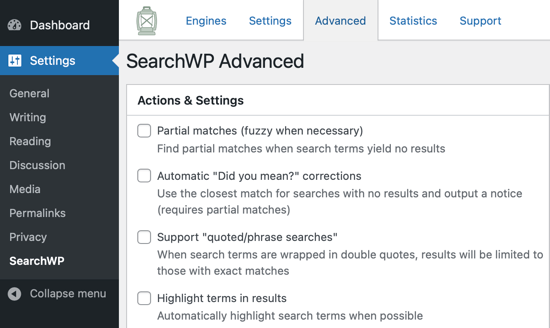
Now you should navigate to Settings » SearchWP and click on the Advanced tab. On this page, you can enable some settings that will make it easier for your users to find what they are looking for.

SearchWP Advanced Settings

Check any of these options that you would like:

  • Partial matches will also display results that don’t quite match the term that is being searched for.
  • Automatic “Did you mean?” corrections will suggest a slightly different search term that will match more posts on your website.
  • Support “quoted/phrase searches” will allow your users to use quotes when searching for exact phrases.
  • Highlight terms in results will make it easier for your visitors to find what they are looking for in the search results.

Styling the Search Form and Results Page

Your WordPress theme controls the appearance of your website, including the search form and search results page. They store the formatting rules for all elements of your WordPress site in a CSS stylesheet.

You can add your own custom CSS to override your theme’s style rules.

If you haven’t done this before, then see our article on how to add custom CSS in WordPress for beginners.

For example, here is some custom CSS that will work with most themes. The first section changes the style of the search form and the second section customizes the search results.


.searchform {
font-family:arial;
font-size:16px;
background:#ace5e3;
color:#ffffff;
border:1px solid #61c3c0;
padding:10px;
height:90px;
width:600px;
}

.search-results {
font-family:arial;
font-size:16px;
background:#ace5e3;
color:#000000;
border:1px solid #61c3c0;
padding:10px;
width:600px;
}

You can change the formatting in the code to suit your own site. You can also delete any lines that you don’t wish to modify. For example, if you don’t want to change the search form’s height and width, then simply delete those lines.

Here are screenshots of our demo website before and after adding the custom CSS.

SearchWP Custom CSS Preview

Measuring Search Results and Improving Conversions

Once you have set up, your custom WordPress search form, the next step is to measure the results.

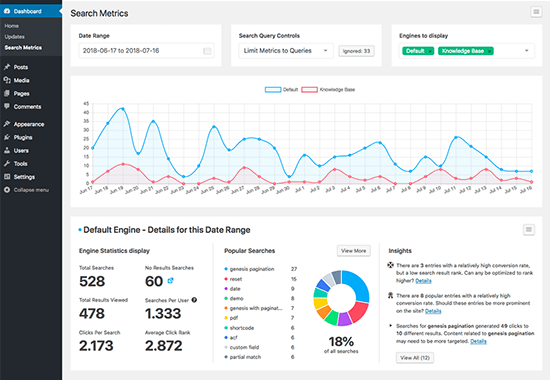
SearchWP comes with a search metrics extension that shows you exactly how your website search is performing.

SearchWP Metrics

You can also use the search metrics to automatically improve the search results by promoting results that get more clicks to the top.

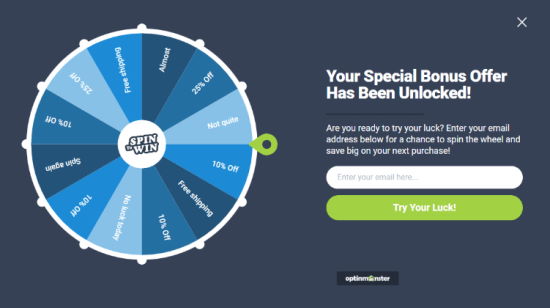
Ecommerce websites also implement exit-intent popups and gamified spin a wheel campaigns to engage users on search pages, so they can convert into email subscribers and then customers shortly after.

OptinMonster spin to win popup example

We hope this tutorial helped you learn how to create a custom WordPress search form. You may also want to see our expert pick of the best business phone services for small business, and our comparison of the best domain registrars.

If you liked this article, then please subscribe to our YouTube Channel for WordPress video tutorials. You can also find us on Twitter and Facebook.

The post How to Create a Custom WordPress Search Form (Step by Step) appeared first on WPBeginner.


November 04, 2021 at 04:00PM
Wednesday, November 3, 2021

How to Effectively Attract and Manage Guest Bloggers in WordPress

Are you looking for ways to attract guest bloggers and manage them in WordPress?

Guest blogging is a powerful way to gain exposure and build brand awareness. You can publish different types of content through guest post submissions and boost your traffic.

In this article, we will show you how to effectively attract and manage guest bloggers in WordPress.

Manage Guest Bloggers in WordPress

Benefits of Accepting Guest Posts for Publishers

Guest blogging has tons of benefits for the guest author or the company they represent, helping them to get publicity and backlinks to their website.

But what’s in it for you as a publisher?

Here are some of the advantages of accepting guest posts on your website.

  • New Perspective – Every author brings their unique perspective with their writing. Your audience will like a little change of pace and ideas.
  • New Audience – Often the guest author will share the published post with their audience. This will attract new users to your website and grow your audience.
  • New Connection – By allowing the other person to guest post on your site, you can build a relationship with them. This increases your chances of helping each other in the future.
  • New Post – You get an extra post on your site that you didn’t have to write. You can use that time to focus on growing other areas of your brand.

Now that you see the benefits of accepting guest posts on your site, let’s find out how to attract guest bloggers in WordPress.

Attracting Guest Bloggers in WordPress

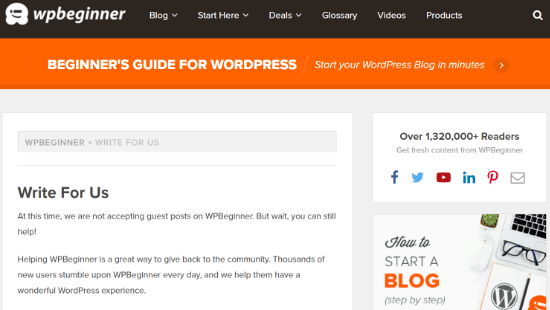
There are various ways you can attract guest bloggers in WordPress. The simplest way of doing this is by creating a Write for Us page on your site.

You can highlight the details for guest post submissions and offer publishing guidelines for writers on the write for us page. If you have particular topics to cover, then you can also list them down on the page.

Write for us section

Besides that, it’s a good idea to make this page visible to your visitors. You can place the link in the main navigation area of your WordPress website, like in the top menu or sidebar.

Other than that, you can place the ‘write for us’ page after each post in the author bio or on each guest author post.

Bonus Tip: You can create stunning write for us pages using SeedProd. It’s the best landing page plugin for WordPress and offers a drag and drop builder along with numerous customization options. You follow our detailed guide on how to create a landing page in WordPress for more details.

Another way to attract guest bloggers to your website is by offering them a monetary reward. You can set different prices for different types of content.

For example, DAME Magazine offers guest authors a monetary reward of $150 for essays and between $300 to $500 for reported features.

Sites that pay for guest posts

You can also partner with other businesses by guest posting on other sites and allowing their authors to guest post on your website.

Often bloggers tend to reciprocate guest posts, which can work out great, especially if you are in the same niche.

Lastly, you can join different communities of guest bloggers and look for opportunities to attract new guest posts to your website.

Once you know how to attract guest bloggers, let’s find out how to accept guest posts on your WordPress blog.

Accepting Guest Posts in WordPress

There are several ways to accept guest posts in WordPress. The easiest way is by allowing users to submit guest posts from the front end of your WordPress website.

This way, you won’t have to give access to the WordPress admin area or require users to register. Guest bloggers can simply upload their content using a post-submission form.

For this tutorial, we’ll be using WPForms. It’s the best form plugin for WordPress and offers a drag and drop form builder. The plugin offers a post submissions addon that makes it easy for users to upload content to your site.

You’ll need the WPForms Pro version as it includes the post submissions addon.

First, you’ll need to install and activate the WPForms plugin. If you need help, then simply follow our guide on how to install a WordPress plugin.

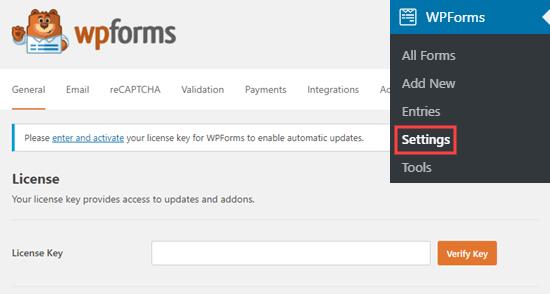
Once the plugin is active, you can head over to WPForms » Settings from your WordPress admin area and enter the license key. You can find the license key in your WPForms account area.

Enter WPForms license key

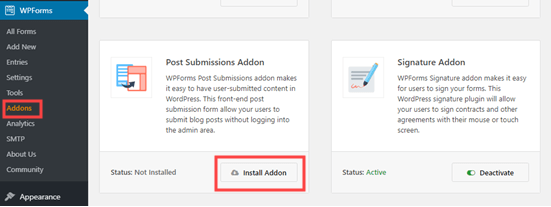
Next, you’ll need to go to WPForms » Addons page. Then scroll down to the Post Submissions Addon and click the ‘Install’ button. The addon will now automatically install and activate.

Installing the WPForms post submissions addon

Upon installing the addon, you’re now ready to create your post submission form. To start, simply go to WPForms » Add New to launch the WPForm’s form builder.

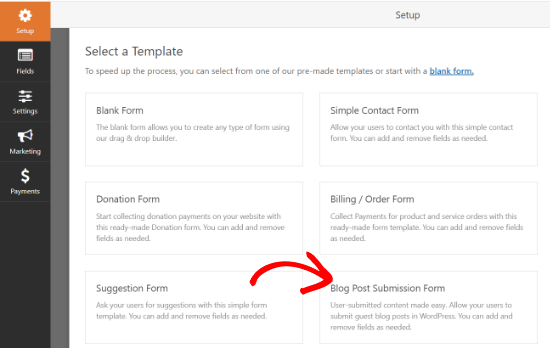
After that, go ahead and enter a name for your form and then select the ‘Blog Post Submission Form’ template in the Select a Template area.

Select Blog Post Submission Form template

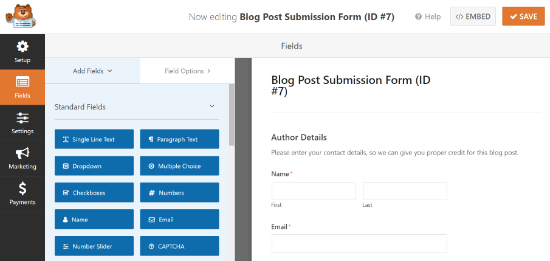
Now, you can use the drag and drop builder to customize your form. Simply add new form fields by dragging them from the options on your left and placing them where you want in the form.

Add new form fields

WPForms also lets you customize each individual field. All you have to do is click on any field you want to edit, and you’ll see options to change their label, size, format, add a description, and more.

After you’re done customizing your post submission form, you can head over to the ‘Settings’ tab.

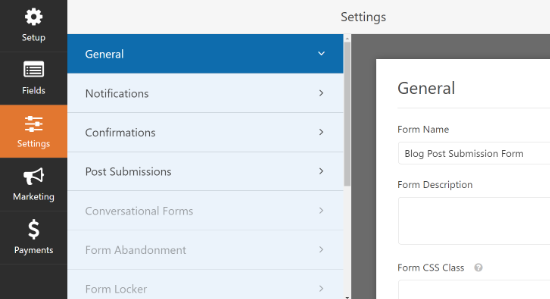
In the General settings, you’ll be able to edit your form name, form description, change the submit button text, edit the anti-spam protection option, enable AJAX form submissions, and more.

General Form Settings

Next, you can go to the Notifications settings tab to change the email address and message you’ll receive when someone submits a guest post using the form.

Once that’s done, you can head over to the Confirmations settings tab and edit the message people will see once they submit a form. WPForms lets you show a message, direct users to a new URL, or display a page.

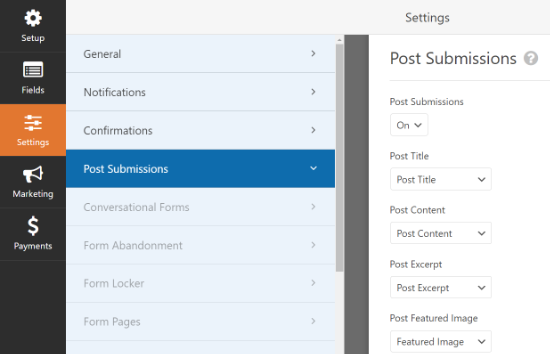
After that, go ahead and click on the Post Submissions settings tab to map each form field to the respective fields in WordPress.

Change the Post Submission settings

Now, save your settings to store your post submission form and exit the form builder.

Next, you’ll need to add your guest post submission form to your website. You can do that by adding a new page or editing an existing one.

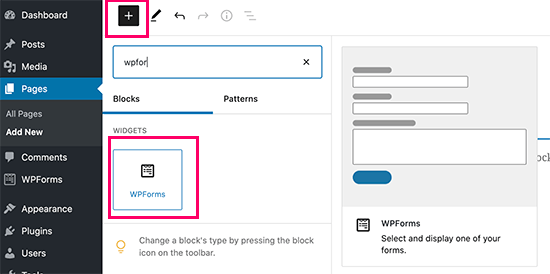
Once you’re in the WordPress block editor, simply click the plus (+) button and add a WPForms block.

WPForms block

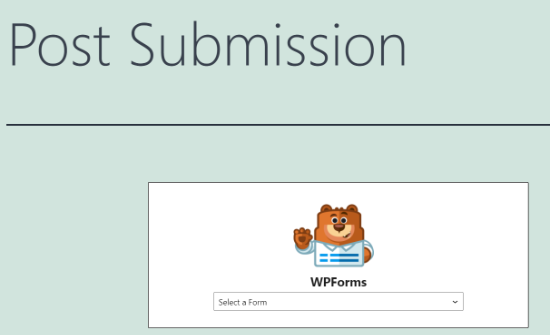
After that, you’ll need to select your posts submission form from the dropdown menu in the WPForms block.

Select your post submission form from the dropdown menu

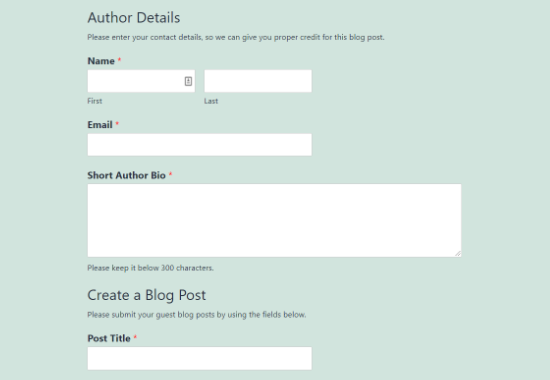
You can now go ahead and publish your page and visit your website to see the post submission form in action.

Post submission form example

Aside from using WPForms, there are more ways to allow users to submit guest posts to your WordPress website. For instance, you can create individual WordPress accounts for each contributor.

However, this would mean allowing guest writers to access your WordPress admin area and view other blog posts and pages on your website.

If you’re looking for more options to accept guest posts, then please refer to our guide on how to allow users to submit posts to your WordPress site.

Set Up Website Traffic Tracking by Authors

Once you start publishing guest posts, it’s important to know how they’re performing. One way of tracking their performance is by finding out which authors drive the most traffic to your website.

This way, you’ll get to see the most popular guest author on your website. You’ll also get to know which content your audience likes, so you can accept more guest posts on similar topics.

With MonsterInsights, you can easily set up author tracking in Google Analytics. MonsterInsights is the best Analytics solution for WordPress and is used by over 3 million businesses.

It makes it very easy to add Google Analytics to WordPress without editing code or hiring a professional. Using the MonsterInsights Dimensions addon, you can identify the most popular contributors on your blog.

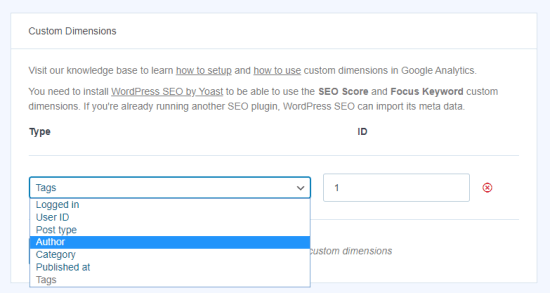
Select Author from the custom dimensions dropdown menu

The Dimensions addon lets you set up custom dimensions in WordPress. Custom dimensions are additional information that you can track in Google Analytics. This includes authors, post type, user ID, category, logged-in users, and more.

The best part about using MonsterInsights is that you can see the data inside your WordPress admin area and don’t have to switch between tabs or windows.

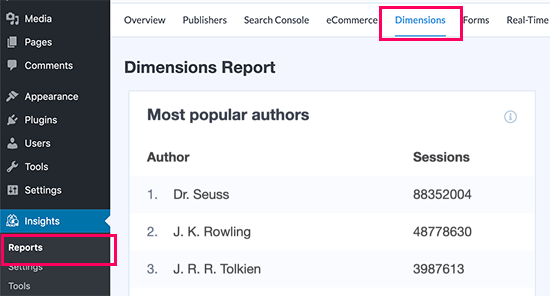
To view the most popular author on your site, simply head over to Insights » Reports and go to the ‘Dimensions’ tab.

Top authors report in MonsterInsights

For more details, you can follow our step-by-step guide on how to enable author tracking in WordPress.

Bonus: Tips for Accepting Guest Posts

Ever since Google has started cracking down on paid text links, SEO companies and spammers rely on guest posts to pick up the slack. For this very reason, no matter how popular your blog is, you will see at least a few guest posts request.

When your blog is relatively new and you get a guest post request, you get really excited. In that excitement, you tend to make the mistake of approving sub-par or even low-quality content.

To help you out, here are some rules that we think you should follow when accepting guest posts.

Ask What Keyword or Backlinks Do You Want?

You don’t want to link to spammy sites like porn, inkjet printers, car insurance companies, etc. You also don’t want to link to a specific keyword, which isn’t relevant to your industry or niche.

If you don’t ask your guest bloggers which keyword they’re focusing on or are they linking to spammy websites, then they will write an article that won’t add value.

At this point, if you reject their post, it sort of looks bad. It’s best not to waste time and get this out of the way.

Ask for Topic Ideas and Summary Before the Final Post

Often these SEO companies and spammers tend to have pre-written articles. They will say that we want to write for your blog, but they don’t suggest ideas.

Chances are, you will get a pre-written post that has been published on numerous sites. This is bad for your site as duplicate content can hurt your WordPress SEO.

It’s always best to ask them for topic ideas along with a summary or an outline of the article. This shows you how qualified they are to write the post, and you can approve or reject the topic.

It will also help you screen out generic posts or list posts that have already been covered by numerous other websites.

We hope this article helped you learn how to effectively attract and manage guest bloggers in WordPress. You may also want to check out our guides on how to choose the best blogging platform and our expert pick of the must have WordPress plugins for all websites.

If you liked this article, then please subscribe to our YouTube Channel for WordPress video tutorials. You can also find us on Twitter and Facebook.

The post How to Effectively Attract and Manage Guest Bloggers in WordPress appeared first on WPBeginner.


November 03, 2021 at 02:40PM