Wednesday, November 10, 2021

How to Add Save & Continue Functionality in WordPress Forms

Do you want to allow your user to save and resume their WordPress forms before submission?

If you have complex and lengthy forms, then having the save and continue functionality is helpful for your users. It helps get more form submissions, as people can save their progress and easily submit once they’ve finished.

In this article, we’ll show you how to add a save and continue functionality in WordPress forms to improve form completion rate.
How to Add Save and Continue Functionality in WordPress forms

When to Use Save & Continue in WordPress Forms?

Often people don’t submit a form if it takes a lot of time to complete. Having a save and resume feature for your WordPress forms can solve this issue.

Save and continue functionality allows your users to save their form’s progress and resume filling it from where they left.

It offers your visitors the flexibility to complete the form whenever they want, as they don’t have to do it in one go. As a result, you get more form submissions and reduce form abandonment.

Save and continue feature works seamlessly if you have long forms like surveys, questionnaires, job applications, or require multiple people to fill out the details at different stages in a workflow.

That being said, let’s look at how you can add the save and continue functionality in WordPress forms.

Adding Save & Continue Functionality in WordPress Forms

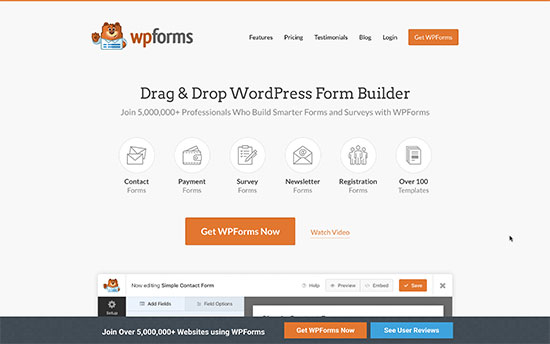
The easiest way of adding save and resume fuctionalility in WordPress is by using WPForms. It’s the best WordPress contact form plugin, and over 5 million website owners use it.

WPForms

With WPForms, you can create any type of WordPress form, including contact form, payment form, newsletter signup form, and more. It offers a drag and drop form builder, which makes it beginner-friendly to use.

You also get 300+ pre-built form templates, numerous form fields for customization, and integration with popular email marketing tools and payment collection services like PayPal.

Recently, they released a Save and Resume addon that allows your visitors to save their forms and complete them where they last left.

For this tutorial, we’ll be using the WPForms Pro version because it includes the Save and Resume addon. However, there is also a WPForms Lite version you can gat started with.

First, you’ll need to install and activate WPForms on your website. If you need help, then please see our tutorial on how to install a WordPress plugin.

Upon activation, you can head over to WPForms » Settings from your WordPress dashboard and enter your license key. You can find the key in the WPForms account area.
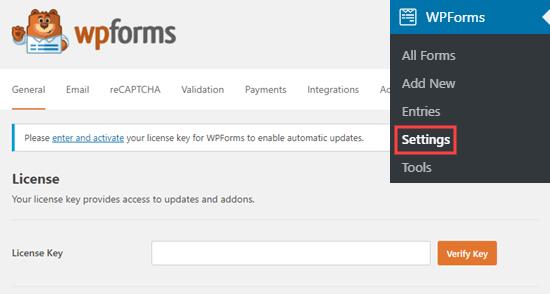
Enter WPForms license key

After that, you’ll need to activate the ‘Save and Resume Addon’ by navigating to WPForms » Addons from your WordPress admin area and clicking the ‘Install Addon’ button.
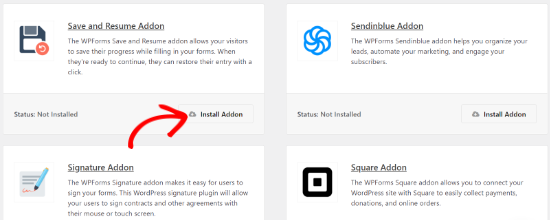
Save and resume WPForms addon

Once the addon is active, you can add the save and continue functionality to an existing form or create a new WordPress form. To start, simply head over to WPForms » Add New page.

On the next screen, you’ll see pre-built templates for your form. You can enter a name for your form and select a template to get started.

For this tutorial, let’s select the Suggestion Form template. You can hover over the template and click the ‘Use Template’ button.
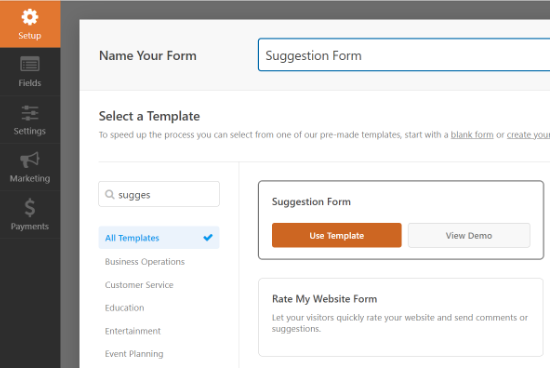
Choose a form template

Next, you can edit your form using the drag and drop builder. Simply drag any form field you want to add to your form and drop it onto the template.
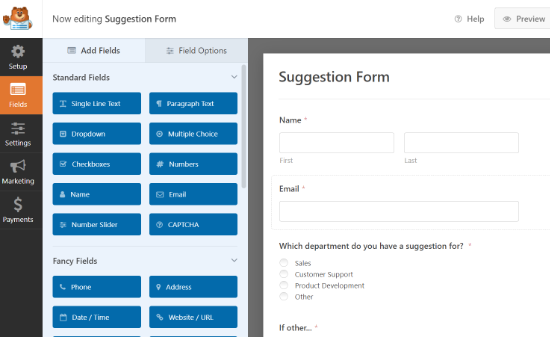
Drag and drop form fields

WPForms also lets you edit each field in the form. For example, you can edit its label, add a description, change the order of the choices, make a field required, and more.
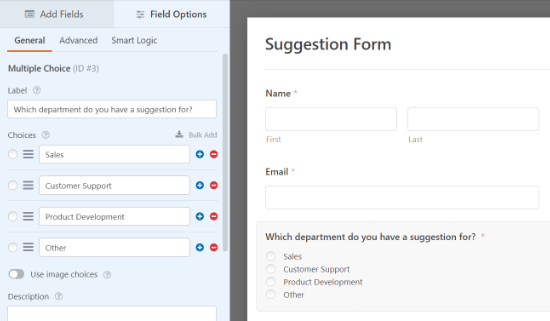
Edit form fields

After that, you can head over to the ‘Settings’ tab from the menu on your left and then select ‘Save and Resume.’
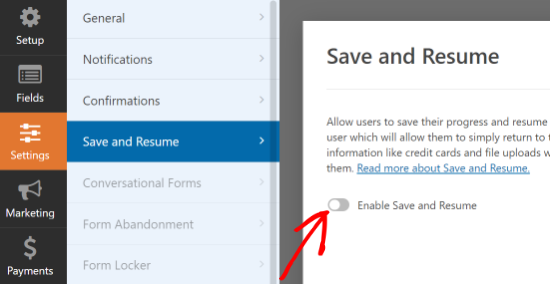
Enable save and resume settings

Next, you can click on the toggle for the ‘Enable Save and Resume’ option. This will allow your user to save their form and continue completing it later.

When you enable this option, you’ll unlock more settings to customize the save and resume functionality. For instance, you can change the text that is displayed next to the submit button and let users save their form’s progress.

Besides that, there is an option to enable a disclaimer page, which is shown to users before saving their progress. WPForms also lets you edit the confirmation page settings and change the text displayed on the page.
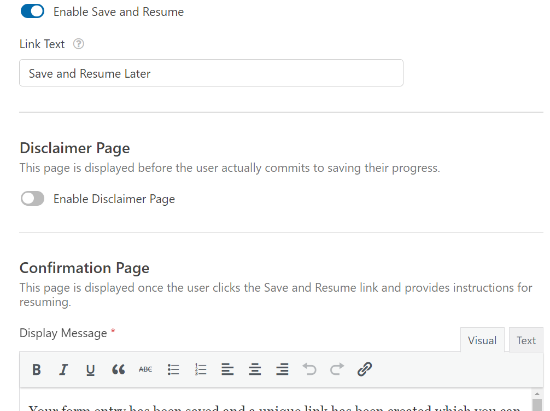
Edit save and resume settings

Next, there are more options if you scroll down. You can ‘Enable Resume Link’ to allow users to copy the form link and paste it into their browsers to resume later.

There is also an option to ‘Enable Email Notification’ that sends the link to the user’s email address, so they can access their form from their inbox.

You can also edit the email text your visitors will see in their inbox and the display message.
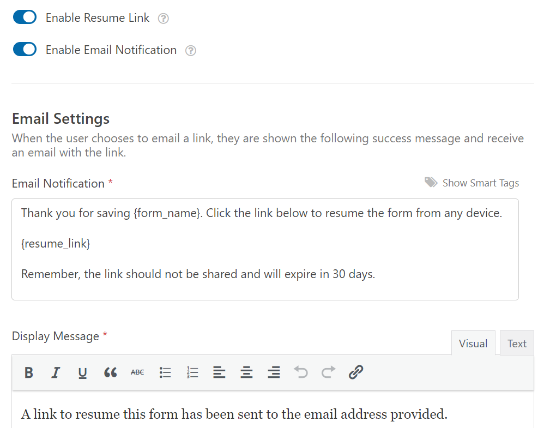
More save and resume settings

WPForms also lets you change the notification settings and the confirmation email that people will get when they submit a form.

When you’ve made the changes, go ahead and click the ‘Save’ button at the top and exit the form builder.
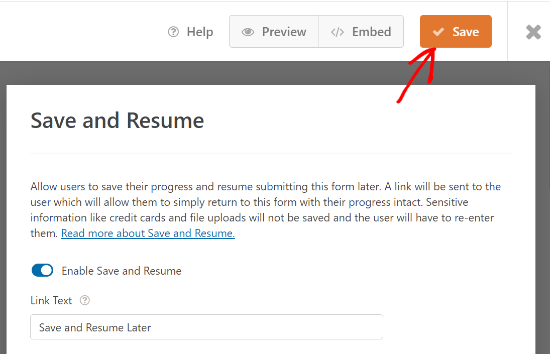
Save your form

Next, you can add your form to any blog post or page. To start, simply edit an existing page or add a new one. Once you’re in the WordPress editor, click the ‘+’ button and add a WPForms block.
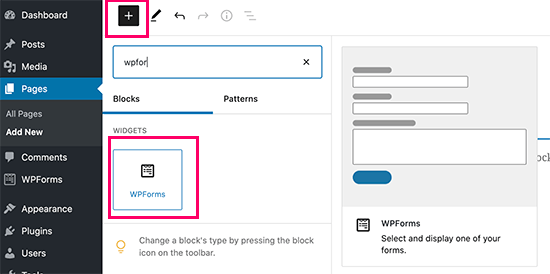
WPForms block

After that, select the form you just created from the dropdown menu and publish your page.
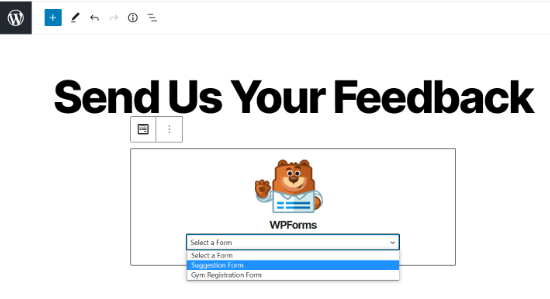
Choose your form

Now, you can visit your page and scroll down to the end of the form to see the ‘Save and Resume Later’ option next to the Submit button.
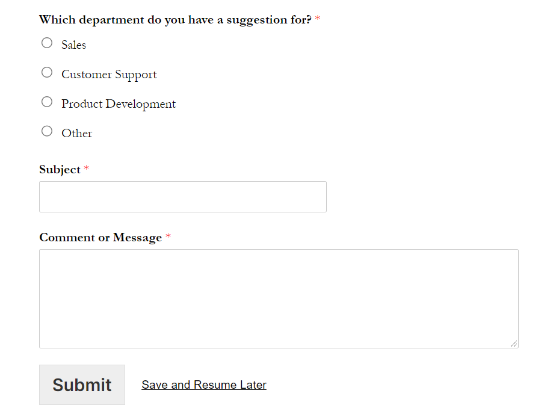
Save and resume later preview

When someone clicks on the Save and Resume Later option, they’ll see a link to the form, which they can copy. There will also be an option to enter an email address to receive the form link via email.
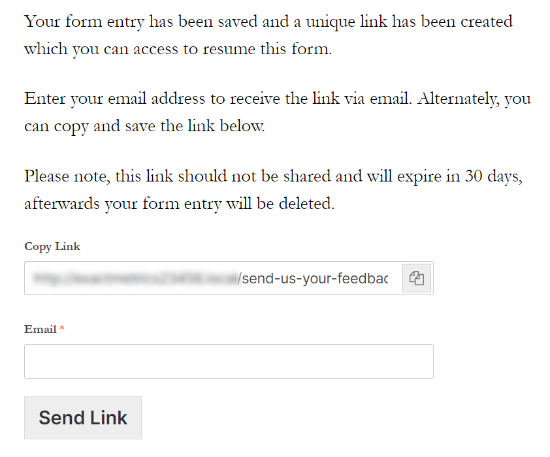
Message users will see on save and resume

Now, you can also see if someone partially completed their form and used the save and continue option in WPForms.

All you have to do is navigate to WPForms » Entries from the WordPress dashboard and select your form to view its entries.
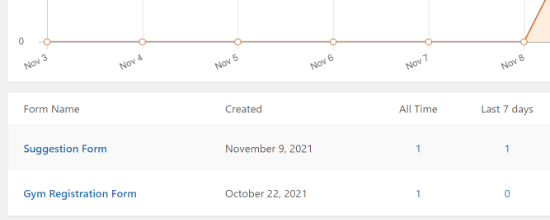
Select your form to view entries

On the next screen, you can look for entries that have a ‘Partial’ status. These are people that clicked the Save and Resume functionality and saved their form’s progress.

The status will change to Completed automatically when your user returns and completes the form.

View partial entries

We hope this article helped you learn how to add save and continue functionality in WordPress forms. You may also want to go through our guide on how to start an online store and the best WordPress plugins and tools for business sites.

If you liked this article, then please subscribe to our YouTube Channel for WordPress video tutorials. You can also find us on Twitter and Facebook.

The post How to Add Save & Continue Functionality in WordPress Forms appeared first on WPBeginner.


November 10, 2021 at 07:32PM
Tuesday, November 9, 2021

How to Set Up an Auto Attendant Phone System for Your Website

Do you want to set up an auto attendant phone system for your website?

For business owners, an auto attendant phone system can cut costs, help you answer calls faster, improve customer service, and make your small business look more professional.

In this article, we’ll share a step by step guide on how to easily set up an auto attendant phone system for your WordPress site.

How to setup an auto attendant phone system for your website

What Do You Need to Set Up an Auto Attendant Phone System for Your Website?

For most small business websites or online stores, you can simply add a phone number to your website. Your visitors can call the phone number to get in touch with you.

However, standard phone services don’t offer advanced features like call forwarding, auto attendant, call waiting, business hours, and more. Plus, it’s expensive to add on simple features like an auto attendant.

To set up an auto attendant phone system the right way, you’ll need to use a virtual business phone service provider.

We recommend using Nextiva since it’s the best business phone service in the market used by brands like Taco Bell, YMCA, Buffalo Bills, and more.

It lets you easily manage your business calls, set up auto attendant, call forwarding, and more at a much cheaper rate than a business landline or mobile provider.

Nextiva

Note: We use Nextiva here at WPBeginner for all of our business phone needs.

Since Nextiva is a VoIP phone service, it will use the internet to make and receive calls instead of traditional landlines.

This helps you save money and gives you access to advanced features like auto attendant, call forwarding, call waiting, voicemail, conference calling, and much more.

You can also get toll free number or choose a business phone number with any location.

It also lets you manage your calls from your current mobile phone, computer, or standard desk phone.

With that said, let’s show you how to set up an auto attendant phone system for your website.

Setting Up an Auto Attendant Phone System

First thing, you need to sign up for a Nextiva account. During the sign up process, you can choose a new business phone number or connect an existing phone number to your account.

After you’ve set up your account, you’ll be able to automatically make and receive calls from your business phone number across any device.

Next, you can set up an auto attendant phone system for your website.

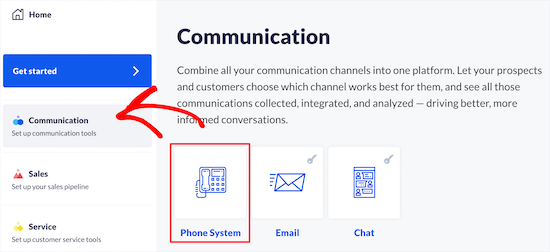
From your account page, you need to click on the ‘Communication’ menu option and then click the ‘Phone System’ button.

Click communication and phone system

This brings you to a screen where you’ll have different options for setting up business phone features.

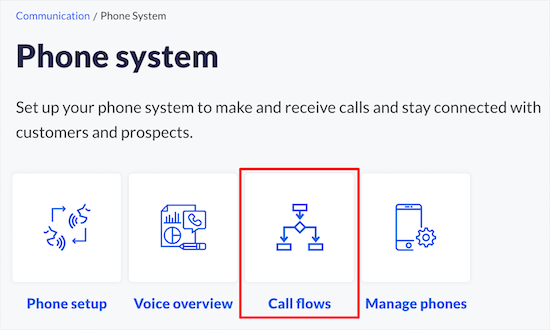
Next, click the ‘Call flows’ button.

Click call flows button

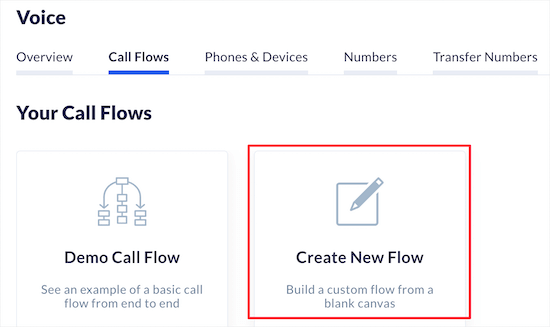
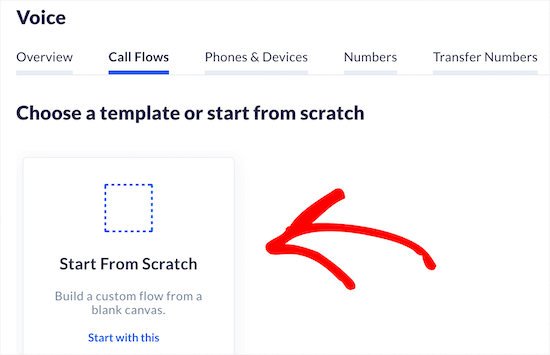
On the next screen, you need to create a new call flow.

Simply click the ‘Create New Flow’ button to get started.

Click create new flow

If you’ve created call templates for other features, then they’ll be listed here.

We’ll select the ‘Start from Scratch’ option.

Select start from scratch

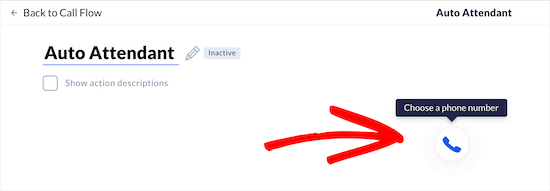
Next, you can give your call flow a name to help you remember.

After that, hover over and click the ‘Phone’ button.

Name and click phone button

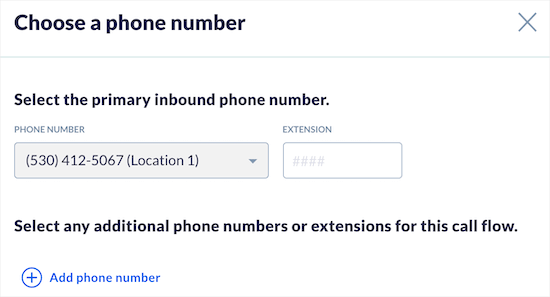
Then, you need to enter your main business phone number.

You can add an extension and additional numbers as well.

Enter business phone number

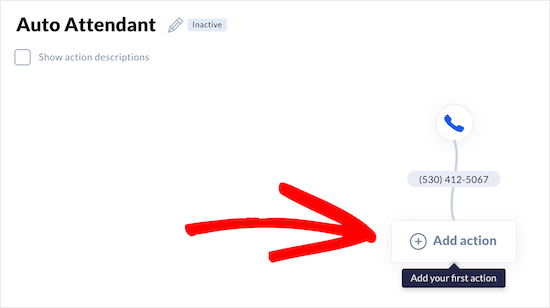
Then, click the ‘Save & Continue’ button.

Next, click the ‘Add Action’ button for the next step.

Click add action button

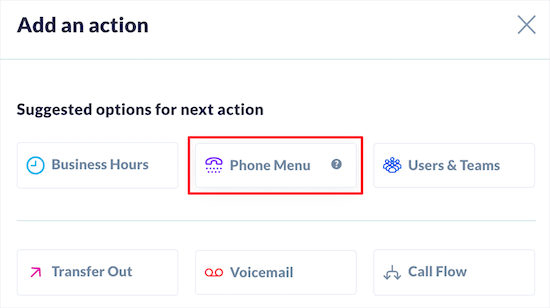
This brings up a menu where you can choose the next action.

To create an auto attendant, you can select the ‘Phone menu’, ‘Dial by extension’, or ‘Dial by name’ options.

We’ll select the ‘Phone menu’ option since this lets us record a greeting and then offer callers options to dial specific departments or team members.

Select phone menu option

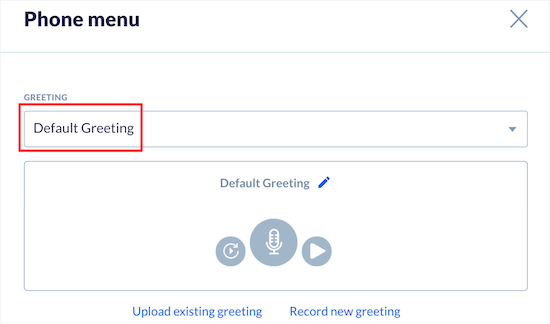
Next, you can choose the ‘Default Greeting’ from the ‘Greeting’ drop down.

You also have the option to record or upload your own greeting.

Choose call greeting

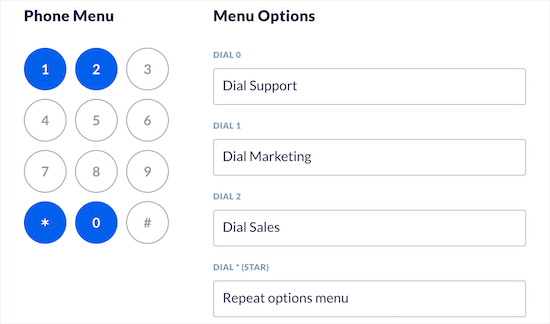
After that, you can customize the phone menu options that will play after your greeting.

You can use the keypad under the ‘Phone Menu’ for the numbers your callers will dial and the person or department they’ll be redirected to.

For multiple options, click the number, and add the corresponding department in the ‘Menu Options’ section.

Select numbers and departments

Next, you can configure the ‘Advanced Options’ settings.

You can set the timeout length, select an option for dialing the operator, and click the checkbox to allow callers to reach individual team members by dialing their extension.

Configure advanced calling options

After that, click the ‘Save & Continue’ button.

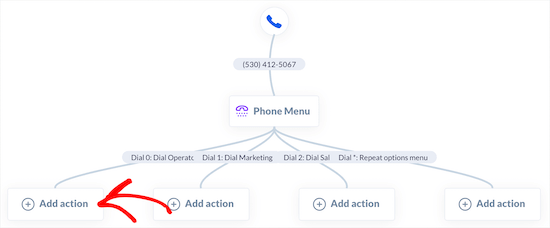
This brings you back to your main call flow screen. You need to assign team members and phone numbers to the call options you just created.

Simply click one of the ‘Add action’ buttons.

Click add action button

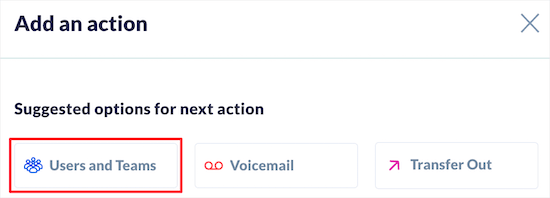
Then, click the ‘Users and Teams’ menu option.

This lets you assign the action to a specific team member or department.

Select user and teams

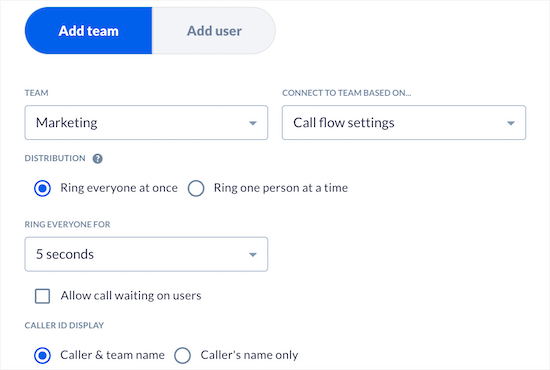
Next, you can choose who the call will ring, how it will ring, caller ID settings, and more.

Simply select the best options for your business and then click the ‘Save & Continue’ button.

Select team ring settings

You need to follow the same steps for all of the call menu options you created earlier.

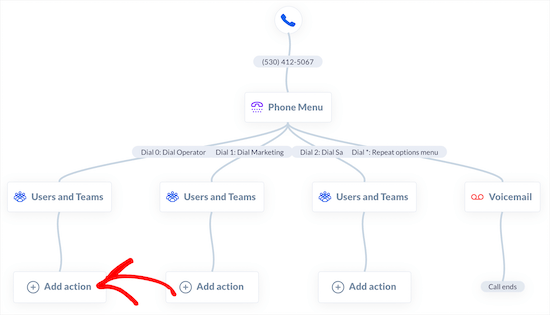
After that, you’ll be taken back to your main call flow screen where you need to click the ‘Add action’ button again to finish your call flow.

Click add action

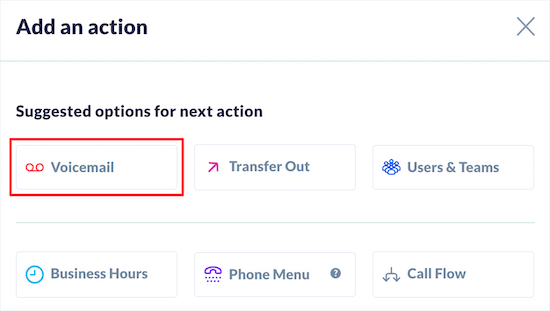
Next, you’ll have a variety of different options for what happens if no one answers.

We will select the ‘Voicemail’ option, so callers can leave a message if no one answers the phone.

Click add voicemail

On the next screen, you can choose your voicemail mailbox and message.

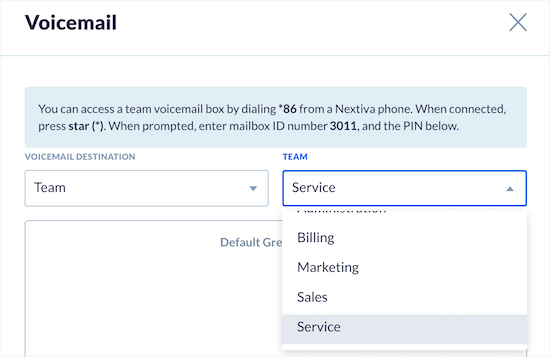
Simply select the team or person from the ‘Voicemail Destination’ drop down, and the right department from the ‘Team’ drop down.

Select voicemail destination

Then, click the ‘Save & Continue’ button.

After that, you need to follow the same steps for each extension.

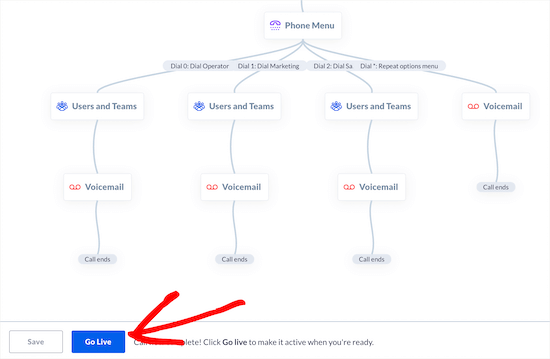
Once you’re finished, you should see ‘Call ends’ at the end of your different call flows.

Click go live button

Then, click the ‘Go Live’ button at the bottom of the screen to activate the call flow.

Make sure you test out the auto attendant feature to ensure the greeting and call forwarding works properly.

Aside from all the powerful features, our most favorite part about Nextiva is that it lets our team members have a virtual business phone number, so they can only receive calls during certain hours without losing their privacy.

Adding a Click to Call Button in WordPress

Now that you’ve set up an auto attendant phone system, you may want to add a click to call button to your WordPress website. This makes calling as simple as clicking a button.

The first thing you need to do is install and activate the WP Call Button plugin. For more details, see our beginner’s guide on how to install a WordPress plugin.

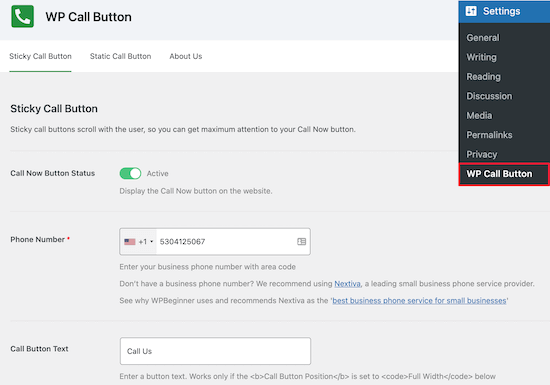
Upon activation, you need to go to Settings » WP Call Button to set up the plugin.

WP Call Button settings

On this screen you can turn on the call button and add your number.

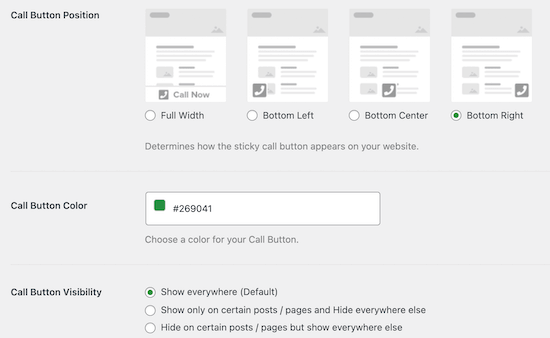
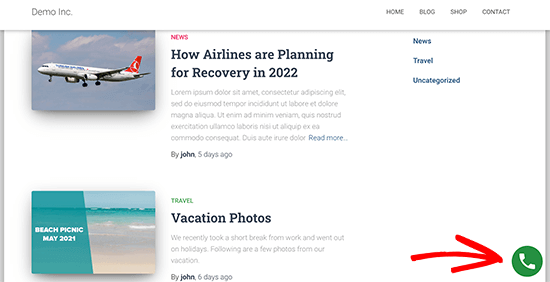
Then, you can customize the appearance of your button and add a sticky button that floats on the screen across your website.

Customize call button

You also have control over where the button appears and can choose to show or hide the button on certain posts and pages.

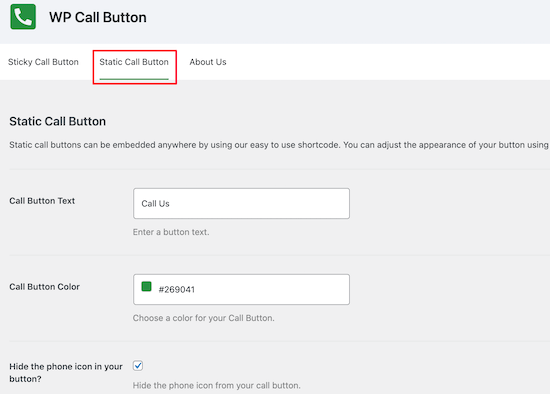
If you want more control over where the button appears, then you can display it manually. To do this, simply click the ‘Static Call Button’ menu option.

Then, you can change the button settings and copy the shortcode to add to your site.

Manually add call button

After you’re finished customizing the plugin settings, make sure to click the ‘Save Changes’ button.

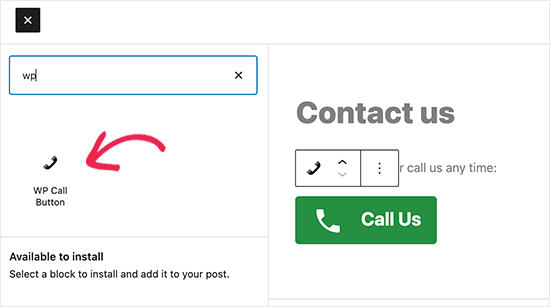
You can also add a sticky button directly to your pages, posts, and widget areas by using the included block.

Add WP Call Button block

In the block settings, you can change the colors, size of the text, alignment, and show or hide the phone icon.

Once you’re finished, make sure to click ‘Update’ or ‘Publish’ to save your changes.

Now, your visitors will see your click to call button live on your website. When they click the button, they’ll be taken to your auto attendant phone system.

WP Call Button preview

For more details on displaying a click to call button, see our guide on how to add a click to call button in WordPress.

Beyond a business phone, we recommend adding a contact form and even live chat or an AI chatbot, so your visitors can contact you with the method they prefer.

We hope this article helped you learn how to set up an auto attendant phone system for your WordPress site. You may also want to see our guide on how to choose the best website builder and our picks on the best email marketing services for small businesses.

If you liked this article, then please subscribe to our YouTube Channel for WordPress video tutorials. You can also find us on Twitter and Facebook.

The post How to Set Up an Auto Attendant Phone System for Your Website appeared first on WPBeginner.


November 09, 2021 at 05:00PM
Monday, November 8, 2021

What’s the Difference Between Landing page vs Website?

Do you want to learn the difference between landing page vs website?

Many small businesses wonder whether they should make a landing page or a full-fledged website to showcase their online presence.

In this article, we’ll show you the difference between landing page vs website and which one you should make for your business.

Landing page vs website - what is the difference

What is a Landing Page?

A landing page is a stand-alone web page designed for a specific purpose and goal. It is a highly versatile tool that can be used in marketing, advertising, and lead generation campaigns.

It can also be used as a coming soon website for a business, a single-page website on its own, a product sales page, and more.

Landing page example

Landing pages are specifically designed for higher conversions. They have unique design characteristics that make it easier for users to perform the desired action.

This action could be signing up for an email list, purchasing a product, filling out a form, and more. These actions are referred to as ‘Call to action’.

Overall, the goal of landing pages is to minimize distractions that could take users away, and provide them with all the information they need to take action.

A landing page could also be a stand-alone website on its own with different sections all leading to one clear call to action.

A landing page website

What is a Website?

A website is a collection of different landing pages and sections to help your users find what they’re looking for.

For instance, a typical business website can have an about section, a separate blog page, a contact us page, products and services pages, and more.

There are many different types of websites and they can all have different pages for different features.

How a Website Differs from a Landing Page?

Unlike a landing page, a website can have multiple pages of information with different goals and purposes.

Not each page on a website is as highly focused on conversions as a landing page.

For instance, a business website may want users to get information about all the products and services they are offering. It may also give users multiple calls to action to choose from (e.g. make a purchase, ask for quote, join email list, follow on social media, and more).

Different types of websites would have different goals and a website gives them more ways to engage the audience.

A website could also be supported by multiple landing pages for their marketing campaigns.

For instance, a membership website may utilize a landing page for a subscription plan or an eCommerce store may want to create a pre-launch landing page for an upcoming product.

Landing page vs Website – Which One to Choose?

Many beginners struggle to decide between landing page vs website and which one to choose?

The answer lies in your own requirements and what you want to achieve for your business.

If you want to quickly launch a product, create an online presence for your business, capture potential leads and customers, then a landing page would be an easy way to go.

Example of a quick landing page

On the other hand, if you want to create a multi-page online presence for your business, use an eCommerce cart, sell online courses, start a blog, and more, then you will be better off with a website.

WPForms Website example

Remember you can always choose to create a landing page as a single-page website. You can also convert your landing page to a full-fledged website as your business grows.

Similarly, you can also create a complete website with multiple pages and still add landing pages for specific campaigns.

What Do I Need to Make a Landing Page vs Website?

You’ll need a domain and a web hosting account to create a landing page or a website.

A domain name is the location of your website or landing page (e.g. wpbeginner.com). This is what your users will type in their browsers to view your landing page or website.

The web hosting account is where your landing page or website files will be stored.

Normally, a domain costs around $16 per year, and hosting plans start at $7.88 per month (usually paid annually). Now this is a significant amount if you are just starting out.

Luckily, our friends at Bluehost has agreed to offer a free domain name and a generous discount on hosting for WPBeginner users.

Basically, you can get started for just $2.75 per month.

→ Click Here to Claim This Exclusive Bluehost Offer ←

Bluehost is one of the biggest hosting companies in the world and an officially recommended WordPress hosting provider.

Once you have signed up for a hosting account, Bluehost will automatically install WordPress for you.

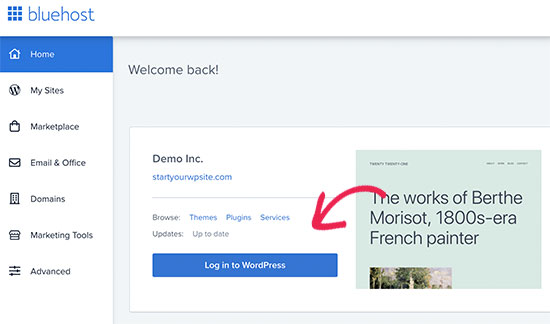
WordPres is the world’s best website builder and makes it super easy to create a website or make landing pages. Simply log in to your hosting account and then login to your WordPress account dashboard.

Log in to WordPress

How to Make a Landing Page for My Business

The easiest way to make a landing page is by using SeedProd. It is the best landing page builder on the market and allows you to easily create landing pages using a drag and drop interface and without writing any code.

First, you need to install and activate the SeedProd plugin. For more details, see our step by step guide on how to install a WordPress plugin.

Note: There is also a free version of SeedProd available that you can use to give it a try. However, you’ll need to upgrade to unlock all features and templates available in the premium version.

Upon activation, you need to enter your SeedProd license key. You can find this information under your account on the SeedProd website.

SeedProd license key

You can now start building your first landing page.

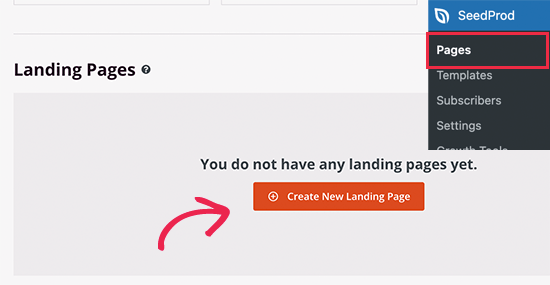
Simply head over to SeedProd » Pages page and click on the ‘Create new landing page’ button.

Creating a new landing page

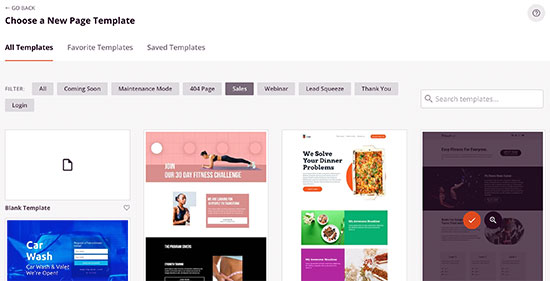
Next, you will be asked to choose a template page as a starting point for your landing page. SeedProd comes with dozens of beautiful templates that you can completely modify or you can even start with a blank template.

Choose a landing page template

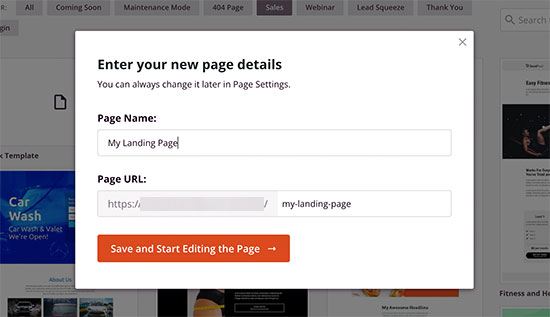
This will bring up a popup asking you to provide a name for your landing page. Enter a name for your page and then click on the ‘Save and Start Editing the Page’ button.

Name your landing page

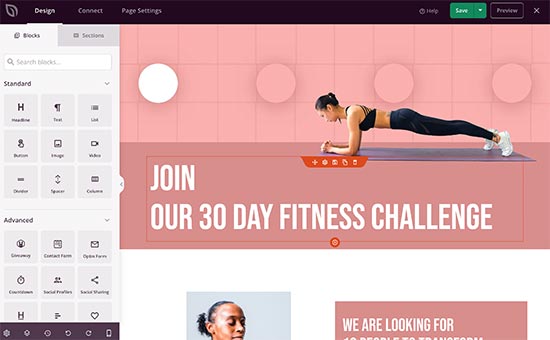
SeedProd will now load the page builder interface with a live preview of your chosen template.

SeedProd page builder interface

You can simply point and click on any item in the live preview to edit it. You can also add new blocks from the left column to your page.

SeedProd comes with all commonly used elements as blocks. Each block has its own settings that you can adjust using a simple user interface.

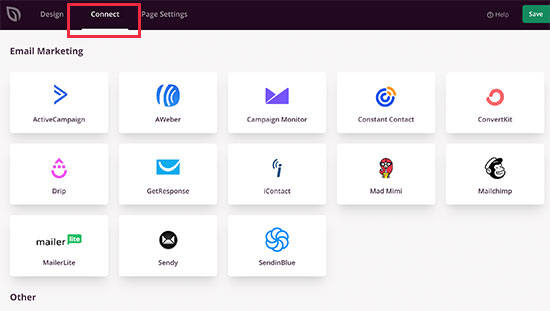
It also includes blocks for WooCommerce and integrations for all popular email marketing services under the ‘Connect’ tab.

Integrations

Once you are satisfied with your landing page, you can click to save or publish your page to make it live.

Publish landing page

Publishing Landing Page as Homepage for Your Domain

Now if you want to only display your landing page when someone enters your domain name, then you’ll need to set it up as your homepage in WordPress.

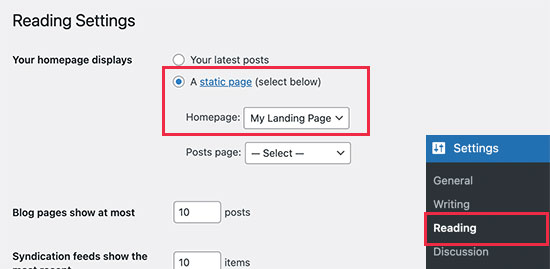
Simply go to Settings » Reading page. From here you need to select ‘A static page’ under ‘Your homepage displays’ option.

Set homepage

After that, go ahead and select the landing page you created earlier as your ‘Homepage’. Don’t forget to click on the Save changes button to update your settings.

Creating Landing Pages for Other Domain Names?

What if you wanted to create landing pages for other domain names? This comes in handy if you have multiple domains to cover different markets and regions.

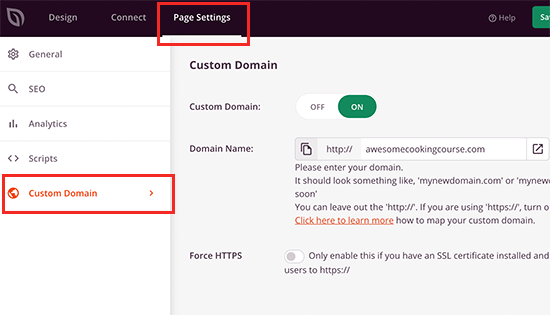
SeedProd comes with built-in domain mapping support. This allows you to easily create a landing page in SeedProd and map it to any other domain name.

Set custom domain name

For more details, see our tutorial on how to easily add a custom domain for your landing page in WordPress.

How to Make a Complete Website for My Business

WordPress is the most powerful website builder used by millions of business websites, eCommerce stores, blogs, news and media sites.

Since you have already installed WordPress on your Bluehost account, you can simply login to your account dashboard and start working on your website.

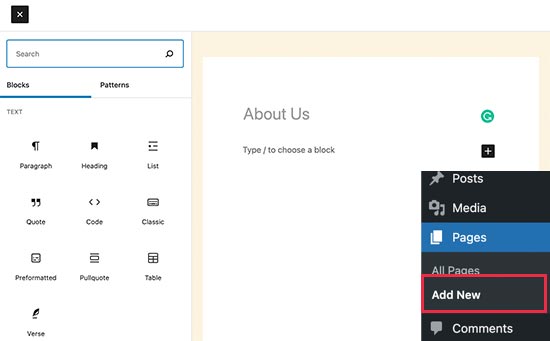
First, you want to add new pages by visiting Pages » All Pages page and clicking on the Add New button.

Adding new pages in WordPress

WordPress comes with a powerful editor that allows you to easily add design and content elements to your pages as blocks. To learn more, see our tutorial on how to use WordPress editor.

Tip: Need ideas for pages? See our list of the most important pages to create for a new WordPress website for some excellent ideas.

Next, you would want to choose a design for your website. WordPress comes with thousands of free and paid themes for all sorts of websites.

Bonus Tip: Need help choosing a theme, see our expert pick of the most popular WordPress themes or take a look at these great themes for business websites.

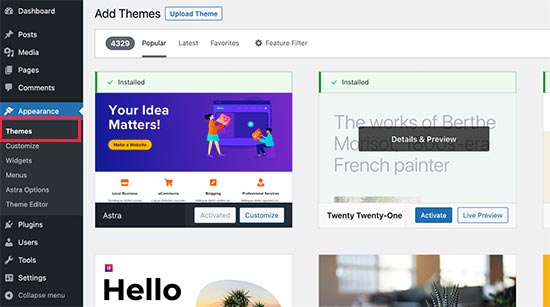
Once you have found a theme you want to use, you can go to Appearance » Themes page and click on the Add New button to install it.

Install WordPress theme

See our tutorial on how to install a WordPress theme for detailed instructions.

The real power of WordPress comes from its plugins. These are like apps for your WordPress websites that you can install to extend its features. Start by checking out our pick of the essential WordPress plugins.

Need more help with your new website? See our detailed tutorial on how to make a website with step by step instructions.

We hope this article helped you learn the difference between landing page vs website. You may also want to see our guide on how to promote your business on a budget and our tips on quickly getting more traffic to your website.

If you liked this article, then please subscribe to our YouTube Channel for WordPress video tutorials. You can also find us on Twitter and Facebook.

The post What’s the Difference Between Landing page vs Website? appeared first on WPBeginner.


November 08, 2021 at 05:00PM