Monday, December 13, 2021

How to Add Product Tags, Attributes, and Categories to WooCommerce

Do you want to learn how to add tags, attributes, and categories to your WooCommerce products?

By optimizing your WooCommerce product listings, you can help your visitors find what they’re looking for and get more traffic from search engines and social media. 

In this article, we’ll show you how to add product tags, attributes, categories, and more in WooCommerce, step by step.
How to add product tags, attributes, and categories to WooCommerce

Why Add Product Tags, Attributes and Categories to WooCommerce Products?

Adding the right product tags, attributes, and categories in WooCommerce will help you to get more traffic to your online store, make more sales, and improve the overall user experience for your customers.

Firstly, using categories, tags, and attributes in WooCommerce will make your store more organized, helping visitors find the products they’re looking for much faster.

They can also help to improve your store’s search engine optimization. That’s because using descriptive tags, attributes, and categories will help your products to appear in more searches, growing your traffic and sales.

What’s the Difference Between Categories, Tags, and Attributes in WooCommerce?

Many beginners get confused about the differences between categories, tags, and attributes. 

Categories are meant for a broad grouping of your products, like men’s, women’s, or children’s clothing.

Tags are more like keywords for a specific product. A women’s shirt could have tags like summer, discount, casual, soft, and more.

Attributes are for specific characteristics of a product. For example, you can give important information about the product’s weight, material, color, and more.

This is common in clothing stores, where customers can filter products by a specific size, color, or fabric.

Here’s an example of a WooCommerce product with the category ‘Accessorites’ and an attribute for the color red listed on the product page.
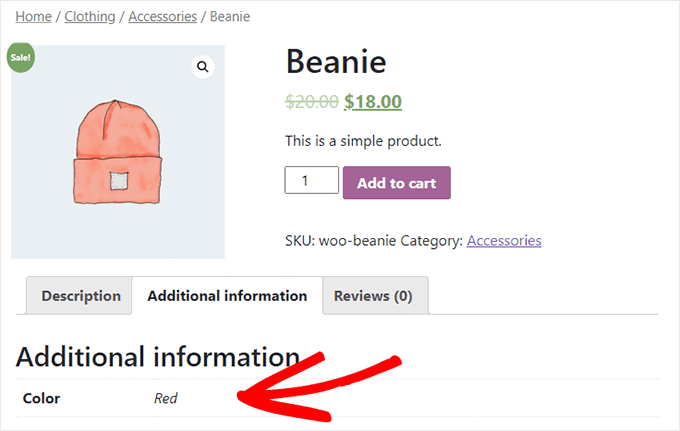
WooCommerce product with categories, tags, attributes

Categories and tags are used for your WordPress blog posts as well. You can read more about the difference in our guide to categories vs tags.

That being said, let’s show you how to add product categories, tags, and attributes to your WooCommerce products.

Adding Product Categories, Tags, and Attributes to WooCommerce Products

WooCommerce has built in settings to add categories, tags, and attributes right out of the box. 

To add categories, navigate to Products » Categories in your WordPress admin panel.

Then, you can give your category a name, add a slug, and choose whether or not it has a parent category. 
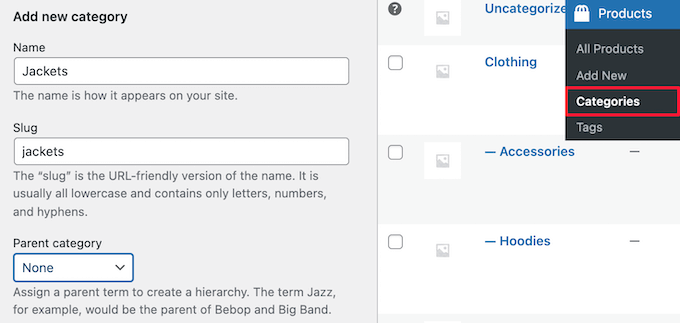
Add new product category

Next, you can optionally give your category a description and choose the ‘Display type’ from the ‘Default’ drop down.

This controls what the category landing page will look like. Here you can choose to display your ‘Default’ theme options, ‘Products’, ‘Subcategories’, or ‘Both’.

The Default option will depend on the theme you’re using. ‘Products’ would display all the products in that category and any subcategories on the main category page (for example, wpbeginner.com/shop/jackets). ‘Subcategories’ would simply display the subcategories, and the visitor would have to click on one of the subcategories to view those products.
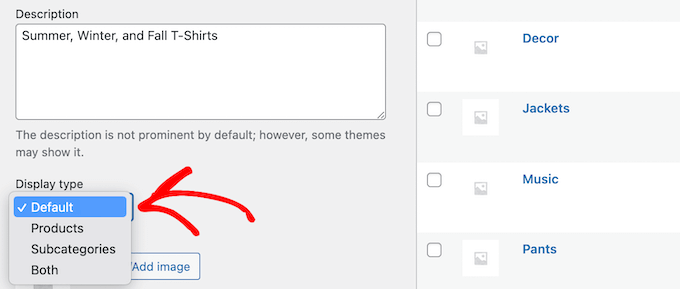
Select category display type

If you want to add a category thumbnail, then click the ‘Upload/Add image’ button.

Make sure you click the ‘Add new category’ button to save your changes.

Add product category thumbnail

To add more categories or subcategories, simply follow the same steps as above. 

Now you can assign a product to a category by going to your product page, then checking the category box in the ‘Product categories’ section.

Add category on individual product page

You can also click the ‘Add new category’ link.

This brings up a section where you can quickly create new categories on the fly. 
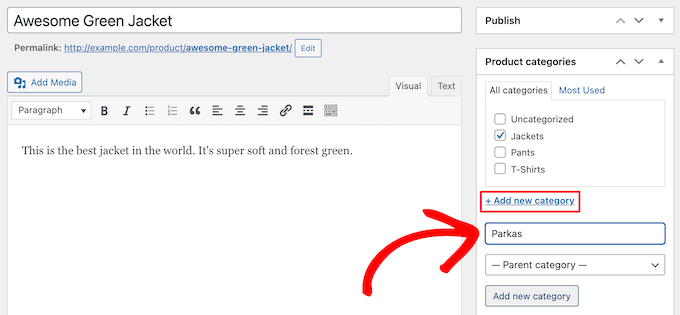
Add new category on product page

Once you’re finished assigning categories, make sure to click the ‘Publish’ or ‘Update’ button.

Adding and Editing Product Tags

Your product tags are similar to tags in your blog posts. You can use product tags to make it easier for your visitors to find the exact products they’re looking for. 

To add new tags, simply go to Products » Tags and enter the name of your tag, the slug, the description, and then click the ‘Add new tag’ button.
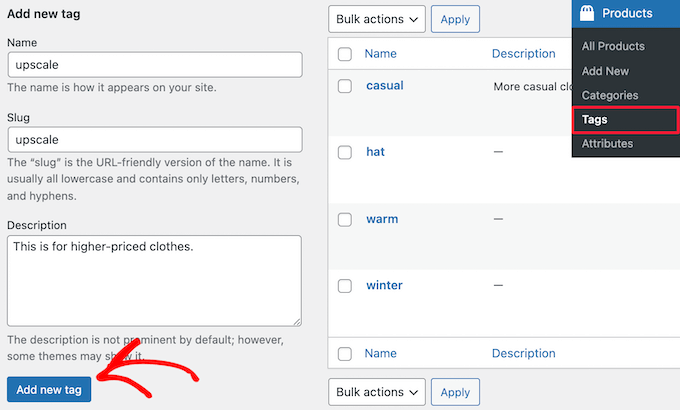
Add new product tag

To add more tags, simply follow the same steps as above. 

You can also add individual tags to your product pages. Simply open up the product page you want to edit, then enter your tags into the ‘Product tags’ box and click the ‘Add’ button.

Add tags to product page

Once you’re finished, make sure to click ‘Publish’ or ‘Update’ to save your changes. 

Adding and Editing Product Attributes

Finally, you have product attributes. These help group products together and offer users a way to filter your products.

To add product attributes, you need to go to Products » Attributes and then give your attribute a name and slug.

You can also enable archives by checking the ‘Enable Archives’ box. This gives you the ability to display all items that share that attribute on a page. 
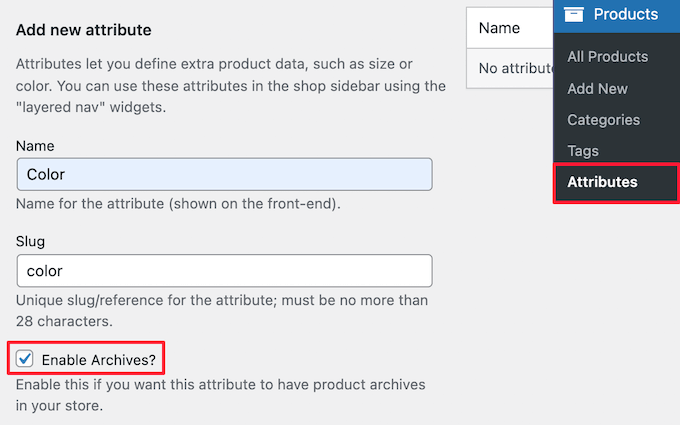
Add new product attribute

After that, you need to choose the ‘Default sort order’. This is the order your products will appear on the shop page for that attribute.

We’ll choose the ‘Custom ordering’ option to give more control, but you can also order by name, and term ID.

Set default sort order

Then, click the ‘Add attribute’ button to add it to the attribute table.

Now, you need to click the ‘Configure terms’ link to add terms to the attribute. 

Click configure terms

For example, if you created an attribute called ‘Color’, then you can add the individual colors as terms.

This brings up a screen similar to the main attribute screen, where you need to enter the name, slug, and optional description.
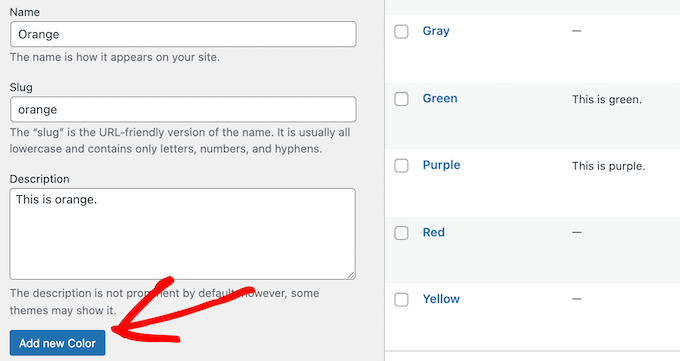
Add new attribute term

Then, click the ‘Add New Color’ button to save your attribute terms. You can add as many attribute terms as you want by repeating the process.

Once you’ve done that, you can add your attributes to individual products.

Simply open up the product page you want to edit, then click the ‘Attributes’ option in the ‘Product data’ section under the text editor.
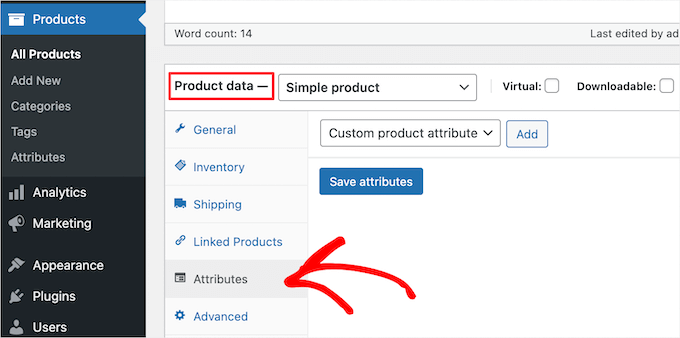
Go to product data attributes section

Next, select your attribute in the ‘Custom product attribute’ drop down.

Then, click ‘Add’.

Select product attribute drop down

This adds the attribute to your product. 

Now, you can select your attribute terms from the ‘Value(s)’ box.
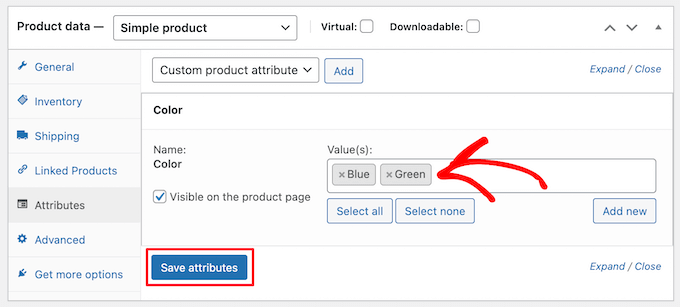
Select attribute terms

Once you’re done adding your attributes, click the ‘Save attributes’ button.

After that, make sure to click ‘Publish’ or ‘Update’ to save your product. 

Optimizing Your Product Listings for WooCommerce SEO

Once you’re done creating tags, attributes, and categories, you can improve your product pages even more with the help of an SEO plugin.

We recommend using All in One SEO since it’s the best WordPress SEO plugin in the market used by over 3 million website owners. 

AIOSEO

It’s very easy to use and lets you optimize your website for SEO without any technical skills. This means more traffic from the search engines and social media, and more eyes on your products. 

Note: There is a free version of the plugin, but we’ll be using the Pro version since it includes the WooCommerce SEO features we need. 

First thing you need to do is install, activate, and setup the plugin. For more details, see our guide on how to setup All in One SEO for WordPress correctly.

After that, you can optimize your product titles by opening the page for a product and scrolling down to the ‘AIOSEO Settings’ box below the product editor.

Here you can change the product’s SEO title and description. You can use the smart tags to automatically generate descriptions based on your product details, or enter a custom title and description instead.
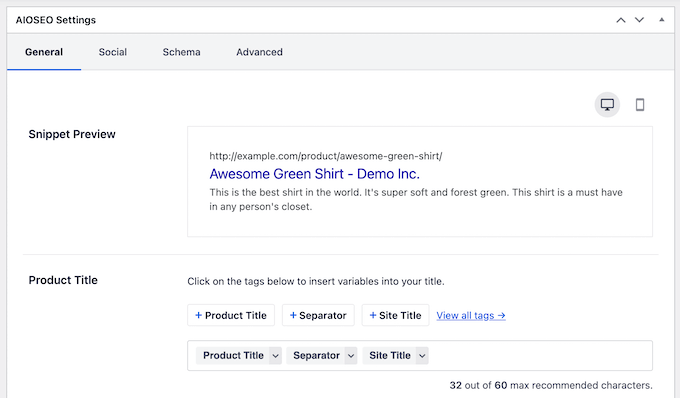
Optimize product title with AIOSEO

Make sure that you use your main product keyword in both the title and meta description fields.

After that, click on the ‘Social’ tab to optimize how your product will display across social media. 
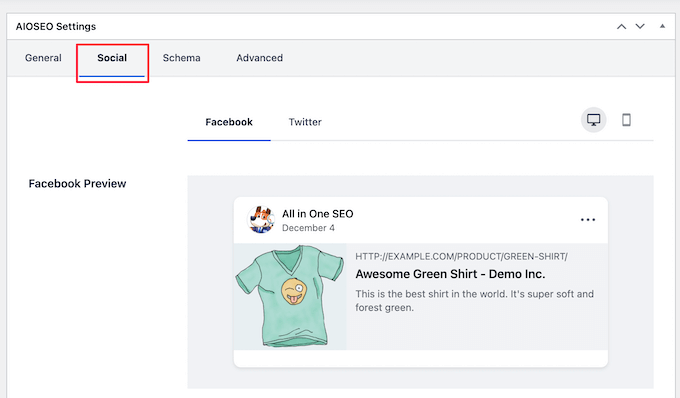
AIOSEO product social sharing settings

You have complete control over the product image you want to use, which will help you get more engagement from your followers.

Next, click the ‘Schema’ tab. Schema markup lets the search engines better display your content in the search results. 

If you’ve seen product listings with prices, star ratings, and more, then you’ve seen product schema in action.

Schema search example

All in One SEO will automatically choose the right schema type for your products and fill in the pricing, availability, and more.

You can also add additional schema markup, including the brand, identifier type, and identifier fields. Identifiers can be any unique ID such as ISBNs, GTIN codes, or UUIDs.
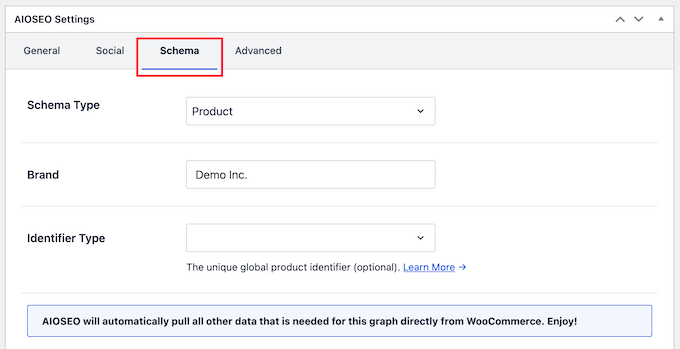
AIOSEO product schema

Once you’re done customizing your product listing for SEO, make sure to click the ‘Update’ button to save your changes. 

For more details, see our ultimate WooCommerce SEO guide for ranking higher in Google. 

We hope this article helped you learn how to add product tags, attributes, and categories to WooCommerce. You may also want to see our expert picks of the best WooCommerce plugins for your store and our guide on how to create an email newsletter the right way.

If you liked this article, then please subscribe to our YouTube Channel for WordPress video tutorials. You can also find us on Twitter and Facebook.

The post How to Add Product Tags, Attributes, and Categories to WooCommerce first appeared on WPBeginner.


December 13, 2021 at 04:25PM
Friday, December 10, 2021

12+ Things You MUST DO Before Changing WordPress Themes

Are you wondering what you should do before you change WordPress themes?

When switching your WordPress theme, there are few very important steps that you must take to ensure the process is smooth, and you don’t lose any important data. 

In this WordPress checklist, we’ll share the top things you must do before you change WordPress themes.

12+ things you must do before changing WordPress themes

Editor’s Note: If you’re looking for step-by-step instructions on how to switch themes, then please see our beginner’s guide on how to properly change your WordPress theme.

Switching a theme is an important decision that every website owner makes at least once every few years.

Of course you have to decide your reasoning of why you’re switching, and pick a theme that suits all your needs.

We have a list of best WordPress multi-purpose themes and best WordPress blog themes that you can check out if you’re looking for recommendations.

Once you have chosen the theme that you want to switch to, it’s important that you follow the checklist below to ensure that you don’t lose any content or data during the process.

1. Make Note of Any WordPress Theme Customizations

Some WordPress website owners will customize their WordPress themes by adding code snippets directly to their theme files. Code snippets can be a great way to add new features to your website that aren’t part of the stock theme.

But, if you’re adding those snippets directly to your theme files, it can be easy to lose track of them.

If you or a web developer made these changes, then make sure you go through your current theme files and note all of the additional code that’s been added. 

For adding code snippets in the future, we always recommend to use a site-specific plugin or a code snippets plugin. This way, you can keep those snippets even if you change themes later. For more details, see our beginner’s guide on pasting snippets from the web into WordPress.

2. Get Current WordPress Theme Performance Metrics 

Before changing your theme, you should check your current website’s loading speed and performance. This lets you compare any differences in the page load time after you switch themes.

Since WordPress speed and performance plays an important role in user experience and WordPress SEO, you need to ensure the new theme is faster than what you’re using now. 

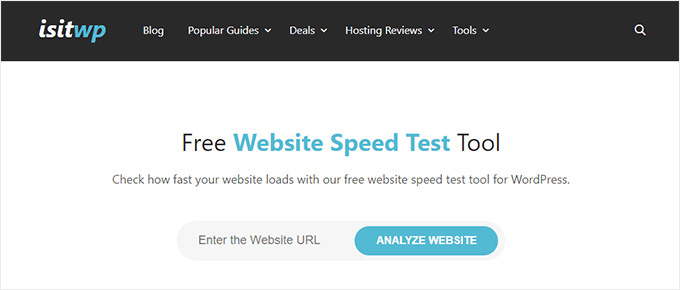
You can easily check your current website speed metrics using a WordPress speed testing tool such as IsItWP’s free website speed testing tool.

For more details, see our guide on how to run a website speed test.

3. Make Note of Current Theme Sidebars and Widget Areas

Sidebars are used for adding different widgets to your website, like email newsletter subscription forms, social media buttons, popular posts, and more.

Since every theme has different widget areas, your widgets may unexpectedly move or disappear from your site if you switch themes.

That’s why it’s important to make a note of what widgets you’re using in your WordPress sidebars and any other widget areas of your website before you change themes. Then you can easily replicate them after switching.

If you’ve added any custom code or shortcodes, then make sure to copy this code and save it somewhere safe so that you can use it with your new theme. 

4. Copy Existing WordPress Tracking Codes

Many users will add analytics tracking code directly to their theme files. Some WordPress themes also allow you to add tracking codes directly into your theme options panel.

It’s a common mistake to overlook these important tracking codes. 

You need to make sure you copy all of your website tracking codes you’re using for analytics, advertising, and more, so you can add them to your new website. 

If you want to make it easy on yourself, then we recommend using a plugin like MonsterInsights to install Google Analytics in WordPress.

By using MonsterInsights, you can rest assured there will be no interruptions to your analytics or lost data. You’ll also unlock bonus tracking like link clicks and button click tracking, WordPress category and tag analytics, author tracking, and much more.

MonsterInsights

For all other tracking codes, you can use the Insert Headers and Footers plugin. For more details, see our guide on how to add header and footer code in WordPress.

5. Back Up Your Current WordPress Website

It’s always a good idea to back up your website on a regular basis. Before changing your theme, you should completely back up your posts, pages, plugins, media, and databases.

The easiest way to do this is by using a WordPress backup plugin to create a backup of your entire site. For more details, see our guide on how to backup your WordPress site with UpdraftPlus.

This will help ensure you can easily recover your website if anything goes wrong when switching themes. 

6. Put Your WordPress Site Into Maintenance Mode

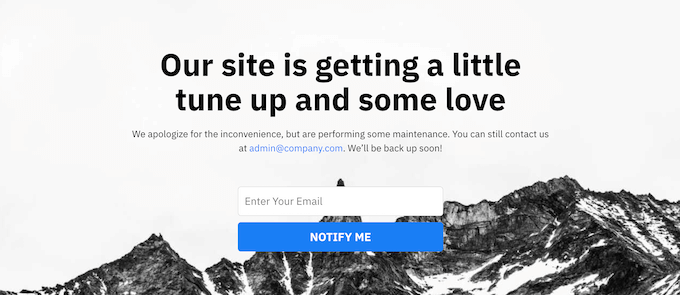
When making changes to your site, it’s always a good practice to put your website into maintenance mode. Maintenance mode lets you display a user friendly notice to your visitors.

Maintenance mode page example

This helps prevent your visitors from seeing your website when it’s half-finished or under construction.

To do this, we recommend using the SeedProd plugin. It’s the best drag and drop WordPress page builder used by over 1 million websites.

It lets you easily create custom maintenance mode pages, landing pages, coming soon pages, 404 pages, and more. 

SeedProd

For more details, see our guide on how to put your WordPress site in maintenance mode.

7. Test All Functionality and Installed WordPress Plugins

Once you have a new WordPress theme activated, you need to ensure you have the same functionality as before and that all of your old plugins work with your new theme.

You can start by adding back the code snippets that you copied from your old WordPress theme files. For more details, see our beginner’s guide to pasting code snippets into WordPress.

Then, spend some time using the features of your site that are powered by WordPress plugins. If you’re experiencing any errors at this time, see our beginner’s guide to troubleshooting WordPress errors.

8. Test New WordPress Theme Across Browsers and Devices

Cross-browser testing will help you make sure your new website looks good on different browsers, screen sizes, operating systems, and mobile devices.

Most of your visitors will probably use Google Chrome to visit your WordPress blog. However, other web browsers like Firefox, Microsoft Edge, Safari, and more are still used by hundreds of millions of users worldwide.

If your new website doesn’t work right on one of those browsers, then you’re missing out on visitors and traffic. 

Luckily, you can use all kinds of cross-browser testing tools to see how your website looks across different browsers and devices.

For more details, see our guide on how to test a WordPress site in different browsers.

9. Delete WordPress Plugins You No Longer Need

Some WordPress themes will pre-install plugins when you install the theme. Some of these may be useful, but other times you won’t need them.

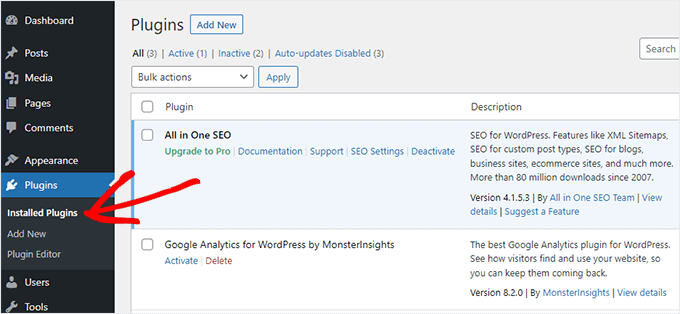
Simply go to Plugins » Installed Plugins to see if your theme has added any new plugins.

List of installed plugins

Now is also a good time to go through your entire plugin list to see if any plugins are worth deleting. 

If you’re looking for high quality plugins to use with your new theme, then see our picks of the must have WordPress plugins

10. Let Your Users Know Your New Website is Live

Once you’re ready to make your new WordPress theme live, you can turn off maintenance mode.

You should also get in touch with your readers to tell them about your new website. This will prepare your audience so that they’re not confused by any big design changes, and it will also help to keep your subscribers engaged and returning to your site to see the new design.

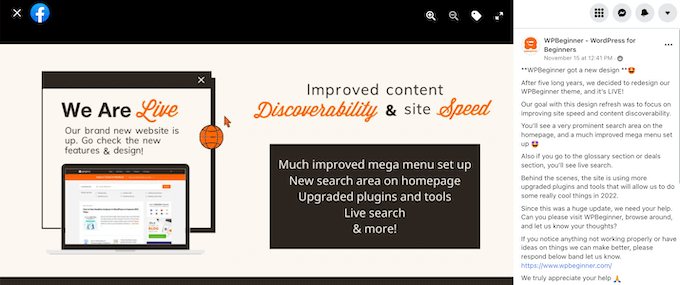
Here’s an example post we shared on Facebook about our new website redesign.

Redesign announcement example

We recommend notifying your audience via your email newsletter, social media, and push notifications.

If you’re looking for more ways to promote your site, then see our guide on how to share your blog posts with readers.

11. Test Loading Speeds for Your New WordPress Theme

Once your new theme is live and you’ve gone through the steps above, it’s time to do another speed test. Ideally, your new website will be faster and get better scores in your speed test.

To do this, simply use the same website speed tool you used earlier and compare the results. 

If the new theme is slower than your old theme, then make sure you run multiple tests, test from different areas, and check to see if you have any caching or firewall settings that could be causing the dip. 

12. Monitor Your WordPress Website Bounce Rate

Bounce rate is the percentage of visitors who land on your website and leave without continuing to a second page. A high bounce rate means that you didn’t convince your visitor to stay on your site long enough to take action.

After you switch themes, it’s important to monitor your bounce rate. Some themes are simply friendlier at helping visitors navigate around your site.

If your bounce rate has gone up since switching theme, then you’ll want to work to lower it. You can do this by improving your navigation menus, adding more internal links, adding a popular posts widget, and more.

For more details, see our guide on how to increase pageviews and reduce bounce rate in WordPress

13. Listen to Reader Feedback to Improve Your WordPress Website

Finally, it’s important you listen to reader feedback after you switch to a new theme. Some readers may love or hate certain parts of your design. 

You don’t have to listen to every reader and make the changes they suggest. But, if there’s a group of readers who are experiencing the same issue, then it’s probably worth looking into.

You can collect visitor feedback by adding a contact form to your website, or running a survey asking for reader feedback on your new design.

The easiest way to do this is by using WPForms. It’s the best WordPress survey plugin in the market used by over 5 million websites. 

WPForms

It lets you easily create engaging survey forms with the drag and drop builder.

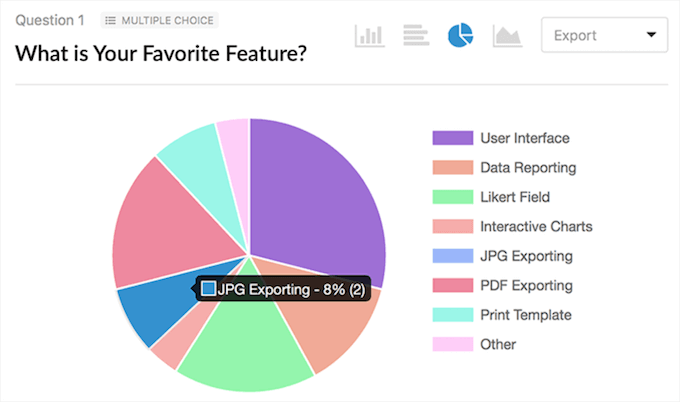
Plus, the reporting section automatically creates beautiful reports to help analyze your results. 

For more details, see our guide on how to create a survey in WordPress.

We hope this article helped you learn exactly what you should do before switching WordPress themes. You may also want to see our guide on how to choose the best WordPress hosting and our expert picks of the best AI chatbot software for your website.

If you liked this article, then please subscribe to our YouTube Channel for WordPress video tutorials. You can also find us on Twitter and Facebook.

The post 12+ Things You MUST DO Before Changing WordPress Themes first appeared on WPBeginner.


December 10, 2021 at 04:30PM
Thursday, December 9, 2021

How to Add a Scrolling News Ticker in WordPress

Do you need to add a scrolling news ticker to your WordPress site?

You’ll often see news tickers used by television networks to highlight breaking news. You can add a news ticker to your website to highlight special deals or popular posts.

In this article, we’ll show you how to add a scrolling news ticker in WordPress.

How to Add a Scrolling News Ticker in WordPress

What Is a Scrolling News Ticker?

A news ticker scrolls a single line of information continuously across the screen. They typically display current news items, sporting results, live financial and currency information, and weather information.

They are a great way to display small snippets of information that are always changing. You’ll find that a news ticker can display quite a lot of information in a limited space on your WordPress blog.

For example, you could use a news ticker to display your best performing posts, items in your store that are on sale, or any other information that you want to highlight.

Another way to display this type of information on your website is with a sticky floating footer bar.

With that being said, let’s look at how to add a scrolling news ticker to your WordPress site.

How to Add a Scrolling News Ticker in WordPress

The first thing you need to do is install and activate the Ditty News Ticker plugin. For more details, see our step by step guide on how to install a WordPress plugin.

Upon activation, the plugin adds a News Ticker menu item to your WordPress admin area.

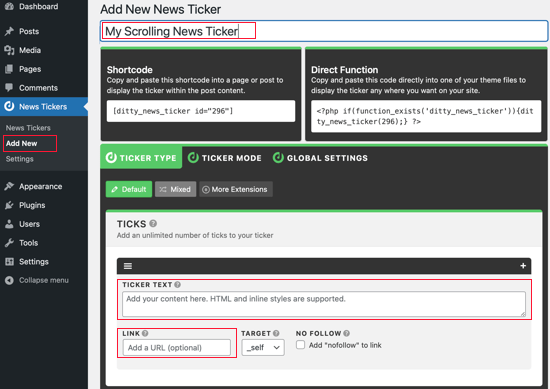
You need to navigate to News Tickers » Add New to add a news ticker. On the next screen, you will have the ability to give this particular news ticker a name, ticker text, and link.

Navigate to News Tickers » Add New

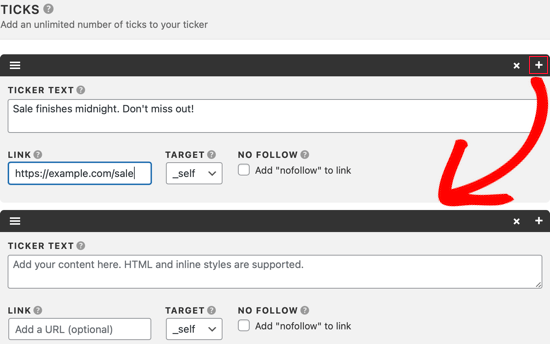
For each ticker, you can add as many ticks as you like. These are the separate pieces of information you want to display, and each can have its own link.

If you want to add another ticker item, then press the plus + button at the top right of the current tick. A new ticker item will be added.

Add a New Tick

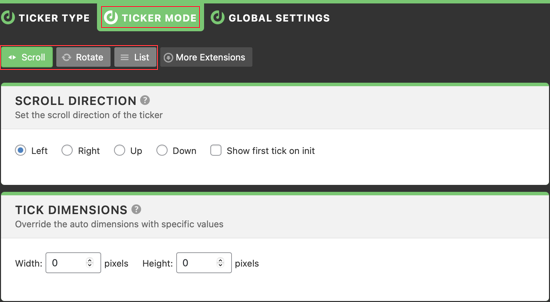
Once you are done adding ticker items, you should click on the Ticker Mode tab. There are three different ticker modes available: scroll, rotate, and list.

Ticker Mode Tab

Scroll mode is the default setting because it is the most commonly used in television networks. Rotate is another good option if you want to show one ticker at a time.

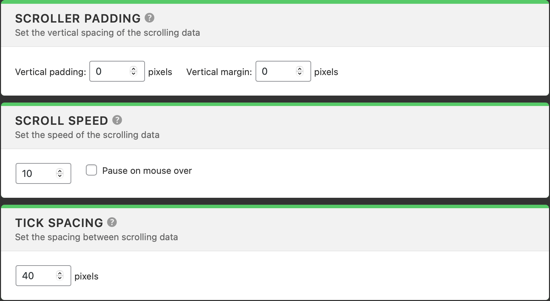
The settings on the rest of the page allow you to adjust the behavior of the news ticker. You can configure scroll speed and direction, override the default ticker dimensions, and choose the spacing between each tick.

News Ticker Mode Settings

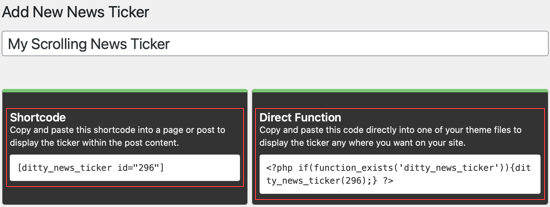
The plugin generates a shortcode as well as a PHP function for each news ticker you create. You can either add the shortcode to a post, page, sidebar widget, or you can directly insert the PHP function into your theme files.

News Ticker Shortcode and PHP Function

Once you insert the ticker shortcode or PHP function, then you can visit your website to see it in action.

News Ticker Preview

We hope this tutorial helped you learn how to add a scrolling news ticker in WordPress. You may also want to learn how to increase your blog traffic, or check out list of the best email marketing services for small businesses.

If you liked this article, then please subscribe to our YouTube Channel for WordPress video tutorials. You can also find us on Twitter and Facebook.

The post How to Add a Scrolling News Ticker in WordPress first appeared on WPBeginner.


December 09, 2021 at 04:00PM
Wednesday, December 8, 2021

How to Add the First and Last CSS Class to WordPress Menu Items

Do you need to add custom styling to the first and last items of your WordPress navigation menu?

You could simply add a custom CSS class to the first and last menu items, but if the menu is rearranged, then those items will no longer be first and last.

In this article, we’ll show you how to add a .first and .last class that will style the first and last menu items even if the menu items are reordered.

How to Add the First & Last Class to WordPress Navigation Menu Items

Why Style the First and Last Navigation Items Differently?

In a past custom design project, we needed to add some custom styling to the navigation menu items of a WordPress website. This design in particular required different styling for the first menu item and the last menu item.

Now we could easily edit the menu and add a custom CSS class to the first and last menu item. But because we were delivering the project to a client, our solution had to work even if they rearranged the order of the menus.

So we decided to do use filters instead.

In this tutorial, we’ll show you two ways to style the first and last items of your navigation menu. You can choose your preferred method from the list below:

Method 1: Adding First and Last Class Using a Filter

The first way to style your first and last navigation menu items differently is to add a filter to your theme.

You’ll need to add code to your theme’s functions.php file. If you haven’t done this before, then see our guide on how to copy and paste code in WordPress.

All you have to do is open your theme’s functions.php file then paste the following code snippet:

function wpb_first_and_last_menu_class($items) {
    $items[1]->classes[] = 'first';
    $items[count($items)]->classes[] = 'last';
    return $items;
}
add_filter('wp_nav_menu_objects', 'wpb_first_and_last_menu_class');

This creates .first and .last CSS classes for your first and last navigation menu items respectively. You can use those classes to style the menu items.

To learn how to do this in detail, refer to our guide on how to style WordPress navigation menus.

For this tutorial, we’ll add the following basic CSS formatting to our theme’s style.css stylesheet to simply bold the first and last menu items:

.first a {font-weight: bold;}

.last a {font-weight: bold;}

Here you can see screenshots before and after we added the code to our demo site.

Preview of First and Last Menu Items Styled Differently

Method 2: Styling First and Last Items Using CSS Selectors

A second way to style the first and last menu items differently is to use CSS selectors. This method is simpler, but it may not work with some older browsers, such as Internet Explorer.

To follow this method you’ll have to add code to your theme’s style sheet or the ‘Additional CSS’ section of the WordPress Theme Customizer.

If you haven’t done this before, then see our guide on how to easily add custom CSS to your WordPress site.

You should start by editing your theme’s style.css file, or by navigating to Appearance » Customize and clicking on ‘Additional CSS’.

After that, you need to paste the following code snippet and then save or publish your changes.

ul#yourmenuid > li:first-child { }
ul#yourmenuid > li:last-child { }

Note that you will need to replace ‘yourmenuid’ with the actual ID of the navigation menu. The selectors ‘first-child’ and ‘last-child’ select an element if it is the first and last child of its parent, which is the navigation menu.

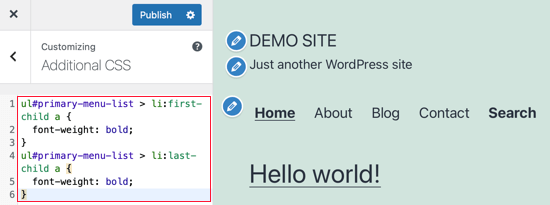
For example, we used this code to bold the first and last navigation menu items on our demo site:

ul#primary-menu-list > li:first-child a {
    font-weight: bold;
}
ul#primary-menu-list > li:last-child a {
    font-weight: bold;
}
Using CSS Selectors to Style First and Last Menu Items Differently

We hope this tutorial helped you learn how to add the .first and .last class to WordPress navigation menus.

You may also want to learn how to fix 50 common WordPress errors, or check out our list of the best drag and drop page builders.

If you liked this article, then please subscribe to our YouTube Channel for WordPress video tutorials. You can also find us on Twitter and Facebook.

The post How to Add the First and Last CSS Class to WordPress Menu Items first appeared on WPBeginner.


December 08, 2021 at 04:00PM

Tuesday, December 7, 2021

How to Submit your WordPress Site to Google News

Do you want your WordPress site to show up in Google News?

Getting your site in Google News can skyrocket your website traffic and help you reach new audiences. It also helps build credibility and authority for your brand.

In this article, we’ll show you how to submit your WordPress site to Google News.

Submit WordPress Site to Google News

What is Google News?

Introduced in 2002, Google News is a news aggregator that shows the latest news and stories from the last 30 days.

The goal of Google News is to provide recent news update and headlines from around the world. It uses multiple sources to provide content and is available in numerous languages.

You can view Google News in a dedicated ‘News’ tab in Google when you search for a topic.

Google News preview

Additionally, Google News also appears at the top of the search results under ‘Top stories’ featured snippets.

Top stories snippet in Google

Why Submit Your WordPress Site to Google News?

Google News is one of the most trusted windows when people look for the latest stories from around the world.

Getting your WordPress site to show up in the Google News section can instantly boost your organic traffic and help you reach new audiences.

It also helps build credibility and authority for your brand because your site will likely be shown next to big brands like The Wall Street Journal, The New York Times, and more. This suggests that your site is trustworthy and offers quality information.

Besides that, getting featured in Google News can have a positive impact on your WordPress SEO. More websites will pick up your content as a source which provides backlinks. As a result, your website rankings will improve for other keywords.

Now that we know the benefits, let’s take a look at the eligibility requirements for being listed in Google News.

Requirements for Being Considered in Google News

Before you can submit your WordPress website to Google News, it’s important that you meet Google News policies.

Google has set specific content guidelines which determine if your content can qualify to appear in the Google News section. If your site doesn’t meet these guidelines, then it will be rejected.

For example, your content shouldn’t be dangerous, deceptive, hateful, or include violence or gore. Similarly, advertisements shouldn’t exceed your content, and you should disclose if your content is sponsored.

Besides that, you’ll need to provide clear dates, author bylines and information about the company or network behind the content.

There are more guidelines that you’ll have to comply with. We recommend following these policies very carefully to avoid your site being rejected for Google News.

That being said, let’s see how you can create a news sitemap for your WordPress, so you can submit it to Google News.

Creating a Google News Sitemap in WordPress

The first thing you’ll need to do is create a Google News sitemap for your website. After setting up a news sitemap, you can then submit your site to Google News.

A sitemap is a file that lists all your website content and helps Google find new articles and display them in the search results. It also makes the search engine bots crawl your site faster and improves the indexing of your content.

It’s important to note that Google News Sitemap is different from the regular XML sitemap. Google News Sitemap only includes news articles, and it allows the search engine to quickly discover content that needs to appear in the news section.

To create a Google News sitemap, we recommend using All in One SEO (AIOSEO). It’s the best WordPress SEO plugin and helps you optimize your site for search engines without hiring an expert or requiring technical knowledge.

AIOSEO

We’ll be using the AIOSEO pro version for this tutorial because it includes Google News sitemap and other powerful features like the redirection manager and schema markup. There is also a free version of AIOSEO that you can use to get started, but it doesn’t come with the news sitemap.

First, you’ll need to install and activate the AIOSEO plugin. If you need help, then please refer to our guide on how to install a WordPress plugin.

Upon activation, the plugin will launch a setup wizard. You can click the ‘Let’s Get Started’ button to configure AIOSEO on your site.

AIOSEO setup wizard

You can follow our beginner’s guide on how to properly setup All in One SEO for WordPress.

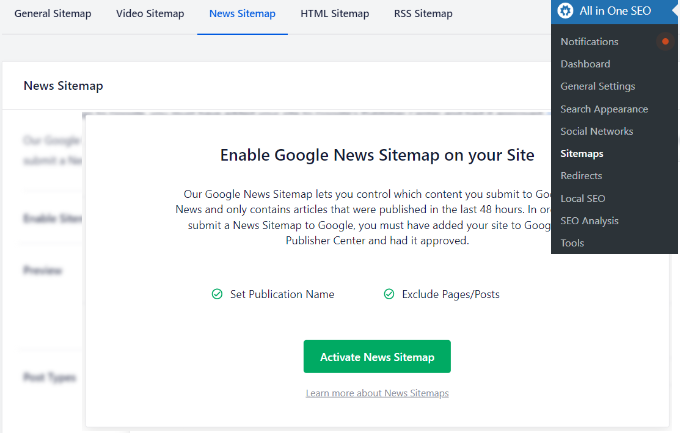
After that, you can head over to All in One SEO » Sitemaps from your WordPress dashboard and then navigate to the ‘News Sitemap’ tab.

News sitemap in AIOSEO

Next, you’ll need to click the ‘Activate News Sitemap’ button.

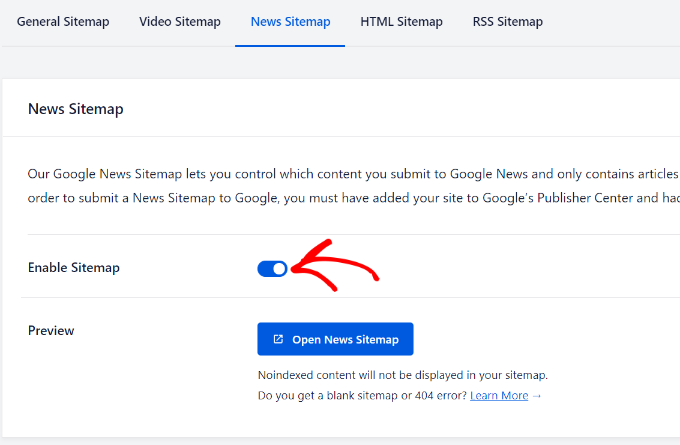
Once active, make sure that the toggle for ‘Enable Sitemap’ is switched on. There’s also an option to preview your news sitemap.

Next, you can scroll down and edit other settings related to the News sitemap.

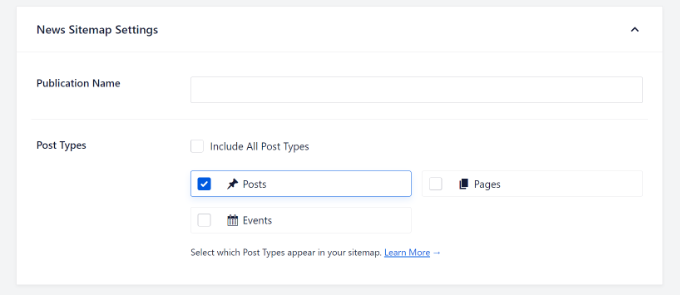
For example, you can add the Publication Name that you entered in the Publisher Center. If you don’t enter a name, then AIOSEO will automatically use your site’s title.

Aside from that, you can select which content to include in the news sitemap under Post Types.

More news sitemap settings

You can include posts, pages, events, or check the box for ‘Include All Post Types’. It’s important to note that the Google News Sitemap will consist of content that’s published in the last 48 hours.

Next, you can click the toggle for ‘Advanced Settings’ and exclude any page or post that you don’t want included in the news sitemap.

Once that’s done, go ahead and click the ‘Save Changes’ button.

Advanced settings for news sitemap

AIOSEO will now create a Google News Sitemap for your WordPress website.

Submitting Your WordPress Site to Google News

Once your news sitemap is ready, you can now submit your website to Google News.

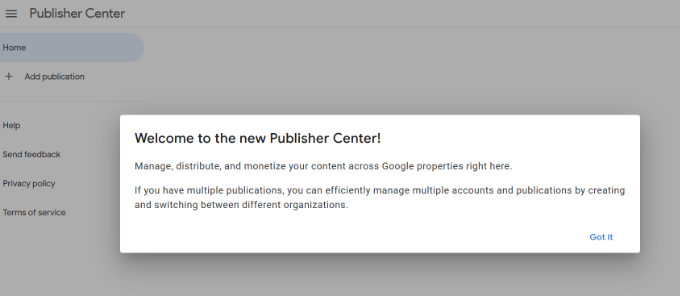
To start, you’ll need to go to the Google Publisher Center website and log in with your Google account.

Once you’re logged in, you’ll see a welcome notice. Simply click the ‘Got it’ button to continue.

Google Publisher Center welcome popup

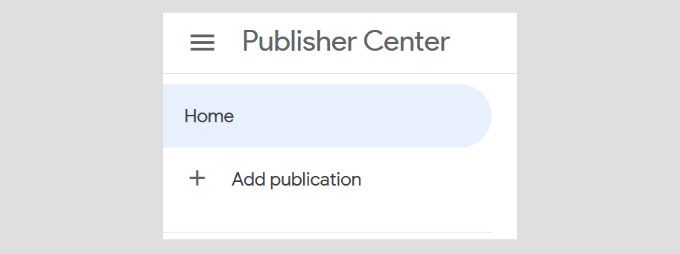
After that, you can click the ‘Add publication’ button from the options given in the menu on your left.

Add publication to Google news

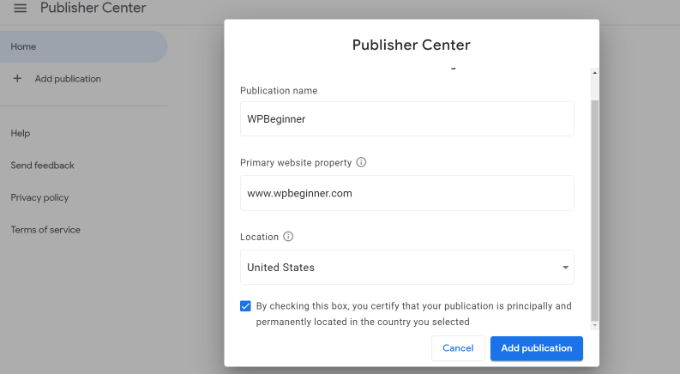
Next, a popup window will appear where you’ll have to enter the name of your WordPress blog, its URL, and select a location.

After entering these details, check the box to certify that your publication is principally and permanently located in the country you’ve selected and click the ‘Add publication’ button.

Enter publisher details

Your publication will now be added to the Publisher Center.

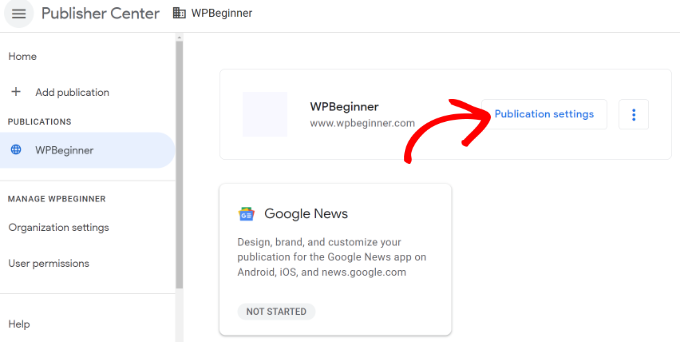
Go ahead and click the ‘Publication settings’ button for your publication.

Edit publication settings

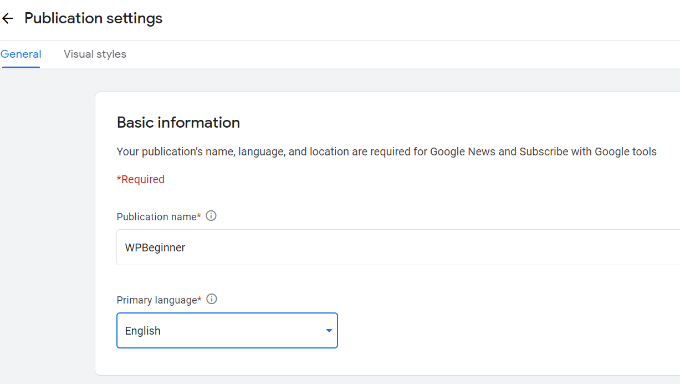
On the next screen, you can edit your Publication name and select a ‘Primary language’ from the dropdown menu under Basic information.

Enter basic publication information

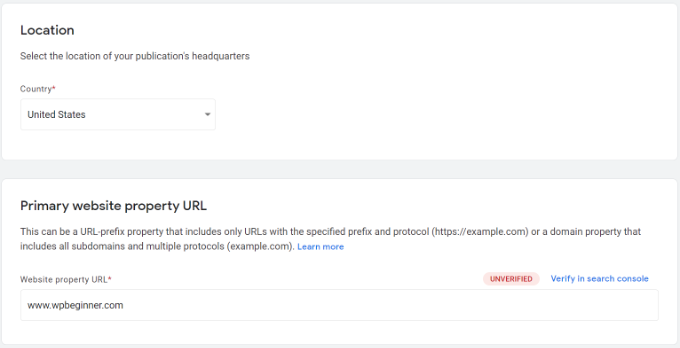
Next, you can scroll down and edit the Location for your publication and the Primary website property URL.

If you haven’t verified your website, then click the ‘Verify in search console’ button. This will open a popup asking you to open the Google Search Console so that you can verify your site’s ownership.

Edit location and verify ownership

For more details, please see our guide on how to add your WordPress site to Google Search Console.

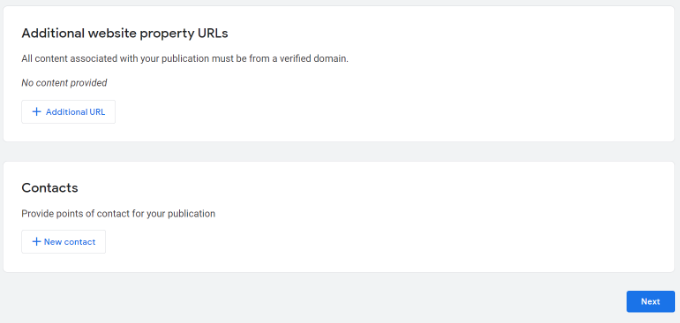
After verifying your publication, you can head back to the Publication Settings and scroll down to view more options.

For instance, you can add additional website property URLs. Google News will use these links as a content source. Similarly, you can also add a contact email address for your publication.

Additional URLs and contacts

Once you’ve added these details, click the ‘Next’ button.

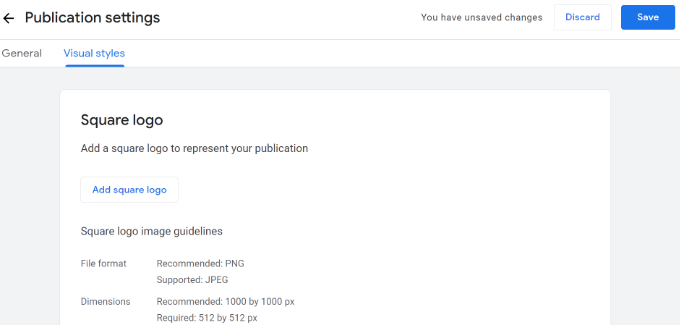
After that, you can add a logo for your publication. Google News offers multiple options for adding a logo for your site.

There is an option to enter a Square logo and a Rectangular logo. Plus, you can also upload custom fonts.

After uploading your logo, simply click the ‘Save’ button at the top and head back to the Publisher Center homepage.

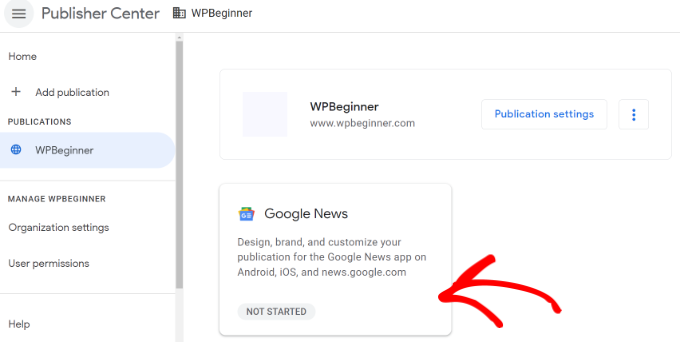
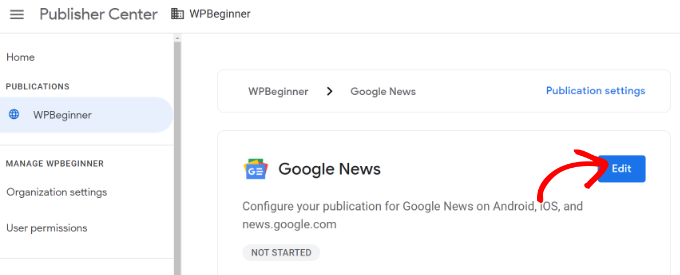
Next, select your publication from the menu on your left and then click the ‘Google News’ box.

Get started with Google News

Go ahead and click the ‘Edit’ button to configure your site for Google News.

Edit Google news information

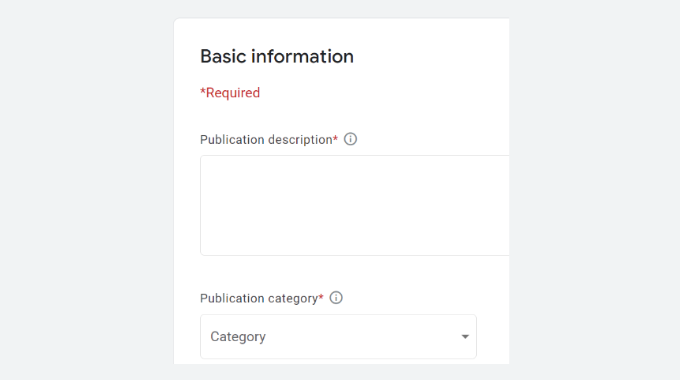
Next, enter Basic information including a Publication description, which acts as a meta description and helps people find your publication. Then you can select a Publication category from the dropdown menu.

Enter basic information

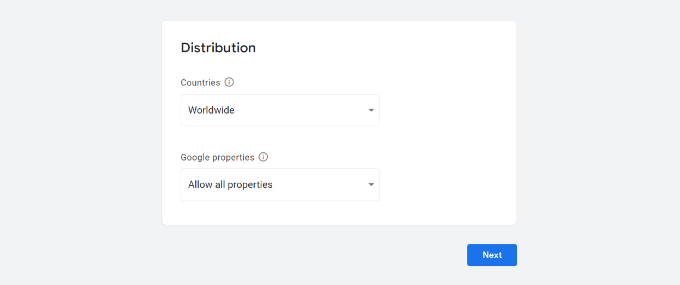
If you scroll down, you’ll see Distribution settings. By default, your content will be available in all countries and other Google products.

However, you can limit your site to appearing in certain regions by allowing and blocking specific countries from the ‘Countries’ dropdown menu. Similarly, you can also change the Google properties settings from the dropdown menu.

Don’t forget to click the ‘Next’ button when you’re done.

Add distribution information

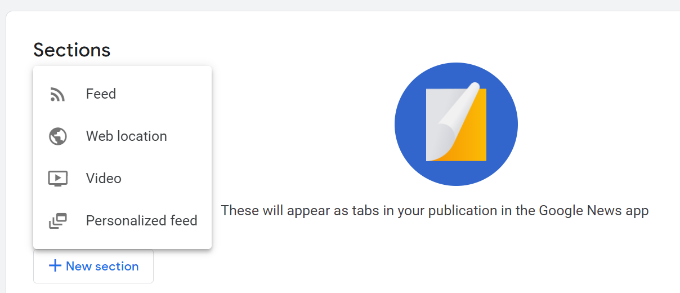
After that, you’ll need to add Sections in Google News, which will appear as tabs. Sections help organize your content in Google News.

For example, you can add videos, web location, feed, or create a personalized feed for your site.

To begin, simply click the ‘+ New section’ button and select an option. For this tutorial, we’ll add a Feed.

Add sections
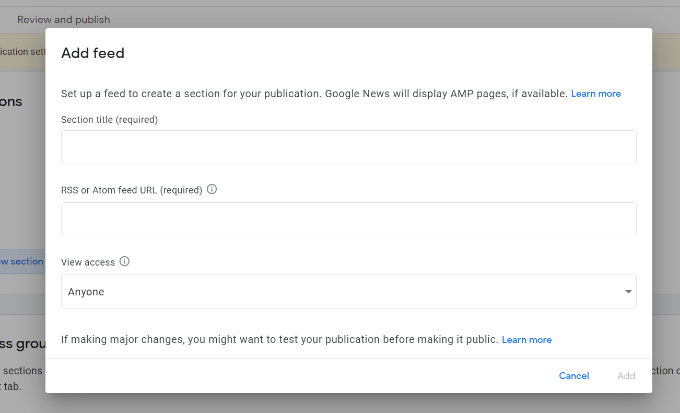
When you select Feed, a popup window will appear.

Go ahead and add a Section title, RSS feed URL that Google News will use as a content source, and choose who can view this section. After entering these details, click the ‘Add’ button.

Enter feed details

You can add as many sections as you want to organize your publication in Google News.

Besides that, you can also restrict certain sections of your publication in the Google News app for specific people under the ‘Access groups’ settings.

Access groups

When you’re done, don’t forget to click the ‘Next’ button.

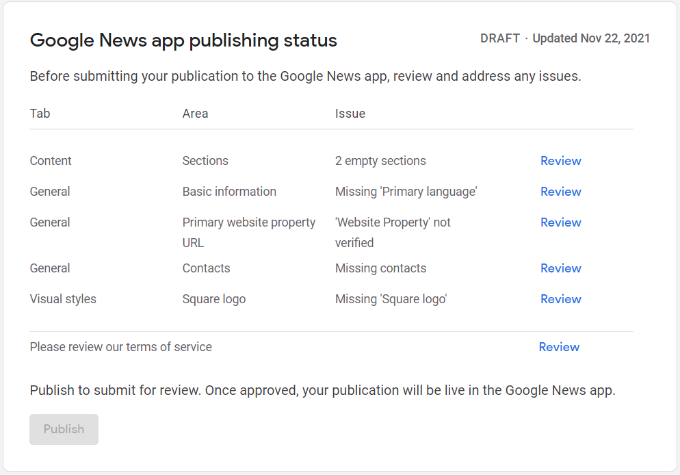
After that, you can review any missing items in ‘Google News app publishing status’ and test your application.

review your publication

Simply click the ‘Review’ button for any item and see what information is missing or what requirements you haven’t met.

Before submitting your publication, you can scroll down to the ‘Testing your publication’ section click the ‘Follow publication’ button. This will make your site appear under Favorites in the Google News app.

Testing your publication

Next, you can go ahead and click the ‘Publish’ button under the Google News app publishing status’ box and sign off on terms of service agreements.

You’ve now successfully submitted your publication for review. It usually takes 2 weeks or more for the review process to complete.

We hope this article helped you learn how to submit your WordPress site to Google News. You may also want to check out our comparison of the best email marketing services for small business, and our guide on how to choose the best WordPress hosting for your business.

If you liked this article, then please subscribe to our YouTube Channel for WordPress video tutorials. You can also find us on Twitter and Facebook.

The post How to Submit your WordPress Site to Google News first appeared on WPBeginner.


December 07, 2021 at 04:00PM