Wednesday, December 29, 2021

How To Properly Set Up eCommerce Tracking In WordPress

Are you looking to set up eCommerce tracking in WordPress?

Setting up eCommerce tracking for your online store will help you find your top-selling products, see which campaigns perform the best, understand how people find and use your website, and more. Then you can use those insights to get more traffic and boost sales.

In this article, we’ll show you how to properly set up eCommerce tracking in WordPress so you can grow your business and make more money.

Set up eCommerce tracking in WordPress

Why Set Up WordPress eCommerce Tracking?

When starting a new online store, most store owners begin by making decisions based on gut feeling or best guesses.

That’s good for getting started, but to take your business to the next level of growth, you need to start making data-driven decisions.

But what data should you base your decisions on?

That’s where WordPress eCommerce tracking comes in. It helps you make

decisions based on data from your actual visitors and customers. You’ll get tailored insights to boost your sales so you can make more money.

For instance, you can find out which products your customers like to buy the most on your WooCommerce store. This way, you can offer similar products to get more sales.

Plus, eCommerce tracking in WordPress can help you better understand your audience, where they’re from, and how they use your website, so you can invest more in the channels and strategies that are proven to work.

For example, if you find out that 80% of course sales on your membership site comes from Facebook, then you may decide to invest in ads on Facebook and stop spending time on other social media platforms that aren’t converting.

With that said, let’s take a look at how to track your eCommerce store’s performance in WordPress.

Setting Up eCommerce Tracking in WordPress

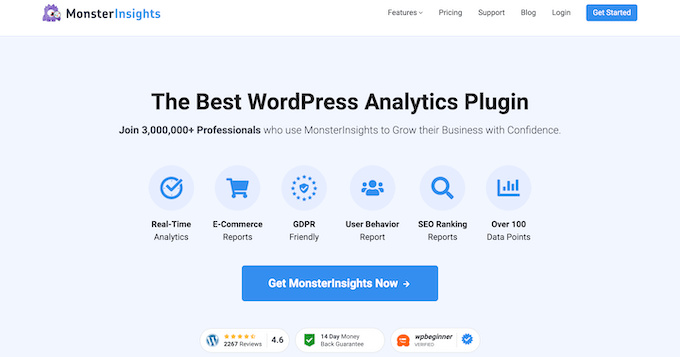
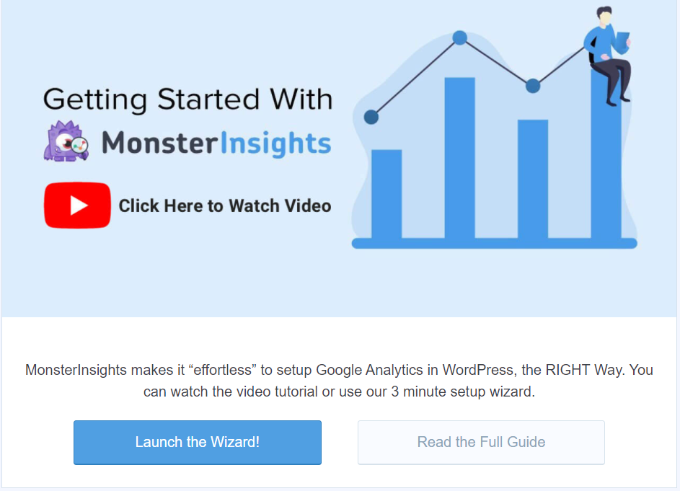
The easiest way to track the performance of your online store is by using MonsterInsights. It’s the best Analytics WordPress plugin and is used by over 3 million professionals.

MonsterInsights helps you set up eCommerce tracking in Google Analytics without editing code. The plugin works with some of the most popular eCommerce plugins, including WooCommerce, Easy Digital Downloads, MemberPress, LifterLMS, GiveWP, and more.

It also shows important stats inside your WordPress admin area, so you can quickly view how your website is performing and get insights to grow your business.

MonsterInsights

Note: You’ll need the MonsterInsights Pro version because it includes the eCommerce addon, dashboard reports, and other advanced tracking features. There is also a MonsterInsights Lite version you can use to get started.

First, you can install and activate the MonsterInsights Pro plugin on your website. If you need help, then please refer to our guide on how to install a WordPress plugin.

Upon activation, you’ll be taken to the MonsterInsights welcome screen in your WordPress dashboard. Go ahead and click the ‘Launch the Wizard’ button.

Set up MonsterInsights

Next, follow the steps in the wizard to set up the plugin and connect your website with Google Analytics. For more details, you can go through our guide on how to install Google Analytics in WordPress.

After that, you’ll need to navigate to Insights » Addons from your WordPress dashboard. Then scroll down to the eCommerce addon and click the ‘Install’ button.

Install the eCommerce addon

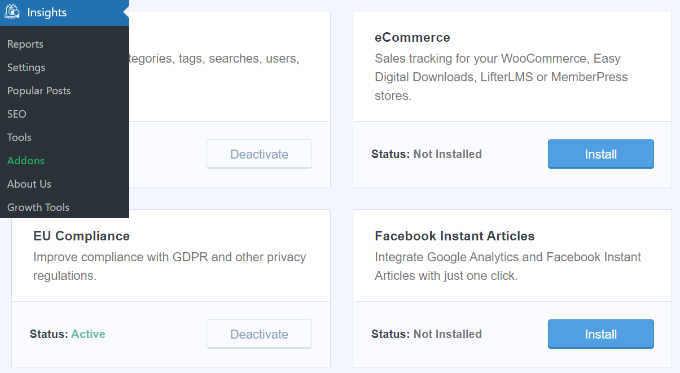
The addon will automatically activate, and you’ll see the status change to Active.

Enabling Enhanced Ecommerce Reporting

In the next step, you’ll need to enable Enhanced Ecommerce in Google Analytics. Enhanced Ecommerce allows you to track your customer’s shopping behavior, checkout behavior, top products, and sales performance in Google Analytics.

To start, you can visit the Google Analytics website and login to your Google account. Next, you’ll have to choose the property on which you’d like to enable Enhanced Ecommerce.

Select your property in analytics

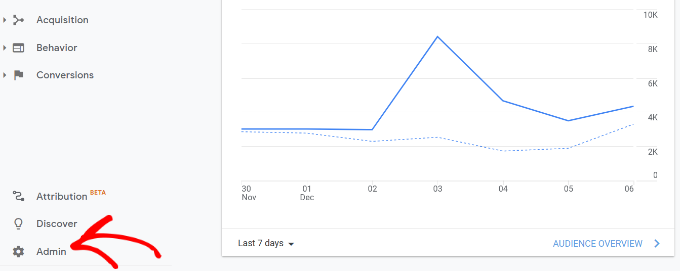
Now, go ahead and click the ‘Admin’ settings option from the menu on your left.

Click admin settings

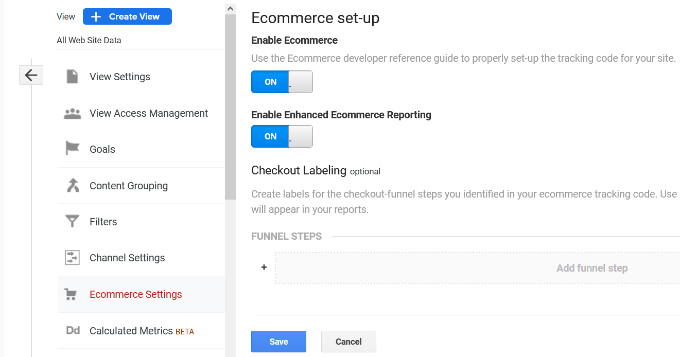
After that, you’ll need to click on ‘Ecommerce Settings’ under the View column.

Ecommerce settings

On the next screen, you can click the toggles for ‘Enable Ecommerce’ and ‘Enable Enhanced Ecommerce Reporting’ to switch them to On.

There is also an option for creating ‘Checkout Labeling’ that you can use to label your checkout funnel steps. However, this is optional and you can simply go ahead and click the ‘Save’ button.

Enable ecommerce and enhanced ecommerce reporting

Once you’ve enabled Ecommerce settings in Google Analytics, you can head back to your WordPress website dashboard.

After that, simply navigate to Insights » Settings and then click the ‘eCommerce’ tab. Next, you’ll need to ensure that the ‘Use Enhanced eCommerce’ option is enabled under the eCommerce Tracking section.

Use enhanced ecommerce option

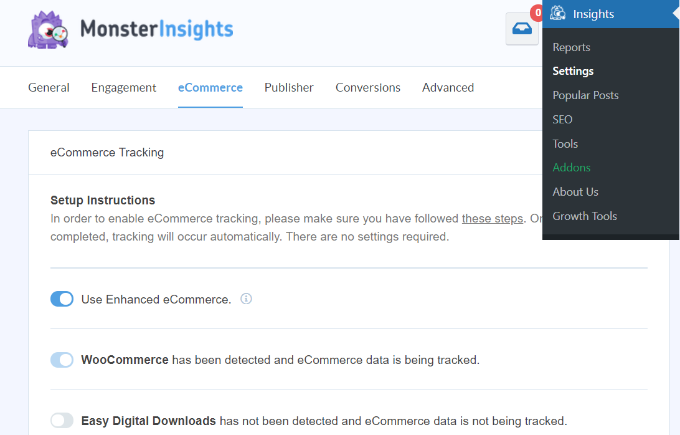
MonsterInsights will now automatically detect your WordPress eCommerce plugin and start recording analytics.

Next, let’s look at how you can use MonsterInsights’ reports to see your online store’s performance.

View eCommerce Reports in WordPress

When it comes to using Google Analytics and finding the data that you need, it can be overwhelming for beginners.

MonsterInsights makes it super easy to get the data that matters, as it brings all your important stats inside the WordPress dashboard. This way, you get to see how your eCommerce store is performing and then make decisions to grow your business.

To see eCommerce reports in WordPress, you can head over to Insights » Reports and then click the ‘eCommerce’ tab.

Ecommerce report

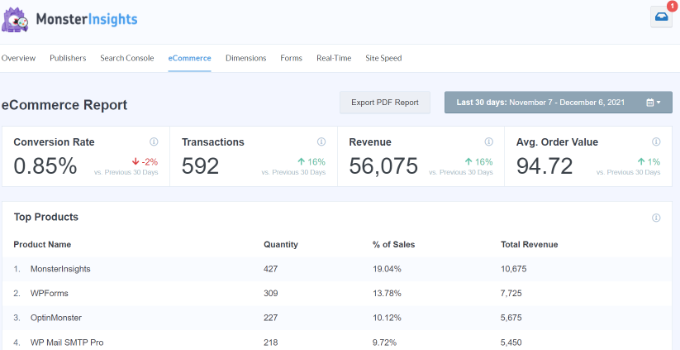
In the report, you can quickly glance at an overview of how your online store is doing by looking at the conversion rate, transactions, revenue, and average order value.

Besides that, MonsterInsights also shows your Top Products. It helps you spot your top selling items along with its quantity, percentage of sales, and total revenue. You can use this data to find out which products your customers like and then offer similar products to boost sales.

Next, you can scroll down and view the Top Conversion Sources.

Top conversion sources

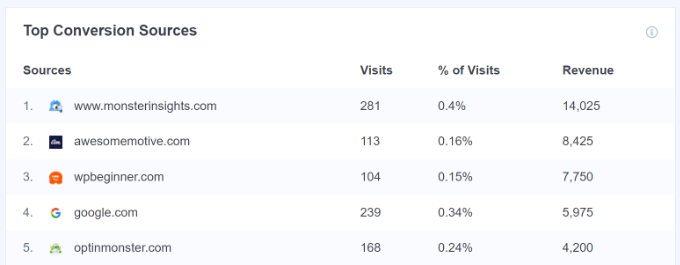
These are the websites that are sending the most sales to your store. You could invest in ads on those sites, create special discount offers or free shipping offers for people that arrive from these sources, or reach out to them to work out a cross-promotion or other partnership.

Other reports you can view in the eCommerce section in MonsterInsights includes the Total Add to Carts, Total Removed from Cart, Time to Purchase, and Sessions to Purchase.

Add to carts and time to purchase

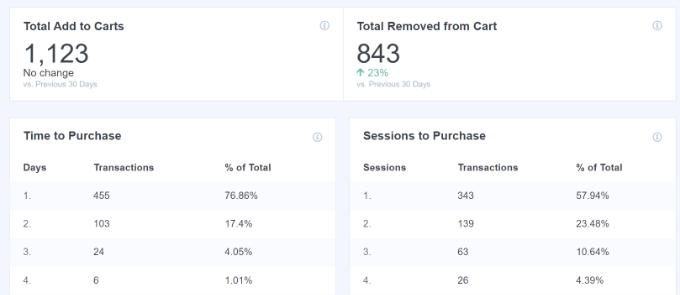
You can use these reports to better understand your customer’s behavior while shopping and during checkout.

For instance, MonsterInsights shows how long it takes for customers to purchase a product from their first visit. You can use the data to optimize your sales funnel and reduce shopping cart abandonment.

We hope this article helped you learn how to properly set up eCommerce tracking in WordPress. You may also want to see our expert pick of the best business phone services, and the best WordPress plugins for business sites.

If you liked this article, then please subscribe to our YouTube Channel for WordPress video tutorials. You can also find us on Twitter and Facebook.

The post How To Properly Set Up eCommerce Tracking In WordPress first appeared on WPBeginner.


December 29, 2021 at 02:00PM

Tuesday, December 28, 2021

How To Create A Custom Calculator In WordPress

Do you want to create a custom calculator in WordPress?

Perhaps you want users to be able to calculate something on a landing page, or you’d like to use the calculator as a tool to generate more leads for your business.

In this article, we’ll show you how to easily create a custom calculator in WordPress.

Easily create a custom calculator in WordPress

Why Add a Custom Calculator in WordPress?

Adding a custom calculator to your WordPress website allows your users to quickly calculate things without leaving your website.

For instance, on a health and fitness WordPress blog, you can add a BMI calculator allowing users to quickly calculate BMI, so they know which subscription plan or a product to purchase.

Similarly, you can use custom calculators for calculating a mortgage, car payments, product configurations, loan interest, and more.

Custom calculators can also be a useful tool to generate leads on your website. For instance, you can ask users to provide their email addresses to get the personalized results of the calculator tool sent to their inbox.

That being said, let’s take a look at how to easily create a custom calculator in WordPress.

Creating a Custom Caclulator in WordPress

The best way to create a custom calculator for your website is by using Formidable Forms. It is the best WordPress calculator plugin on the market and the easiest way to build any kind of advanced form.

Formidable Forms

The first thing you need to do is install and activate the Formidable Forms plugin. For more details, see our step by step guide on how to install a WordPress plugin.

Upon activation, you’ll need to install the free version of the plugin called Formidable Forms Lite. This free version provides the core foundation for advanced features of the plugin.

Next, you need to visit the Formidable Forms » Global Settings page to enter your plugin license key. You can find this information under your account on the Formidable Forms website.

Enter Formidable Forms license key

Now, you are ready to create your first custom calculator for your website.

Simply head over to the Formidable » Forms page and click on the Add New button.

Adding a new calculator form

This will bring up a list of available form templates to choose from.

In the search box, type ‘Calculator’ and select the ‘Calculator’ category.

Choose calculator category

This will bring up a list of calculator templates to choose from. Formidable Forms comes with a bunch of commonly used custom calculators.

Simply click to select and and then click on the add button to use that form. For the sake of this tutorial, we’ll be creating an ROI Calculator (Return on Investment calculator).

Select your custom calculator template

The plugin will load the Formidable Forms’ form builder interface with the calculator template you selected.

From here, you can simply point and click to customize amy form field if needed. You can click on a field to change its label and properties.

Edit your calculator form

You can also add new fields from the left column by simply dragging and dropping the field.

Add new field

Once you are satisfied with the form fields, you can simply click on the ‘Update’ button at the top right corner of the screen.

Save calculator

Your custom calculator form is now ready, and you can add it to any WordPress post or page on your website.

Simply edit an existing post / page or create a blank page. On the content editor screen, you need to add the Formidable Forms block to your page.

Add Formidable Forms block

After adding the block, you can simply click on the drop-down menu in the block settings and select your ROI Calculator form.

Select ROI Calculator form

Formidable Forms block will now fetch and display the preview of your calculator form inside the WordPress block editor.

ROI calculator preview in the editor

You can now continue editing your page or save and publish it on your website.

Once done, you can visit the page in a new browser tab to see your calculator in action.

Customizing Your Calculator Form in WordPress

You can always customize any calculator you create with Formidable Forms. Simply, go to the Formidable » Forms page and click on the edit button to change your calculator form.

Edit your calculator form

Any changes you make to your form will automatically appear on any posts or page where you have added this form on your website.

Viewing Your Calculator Form Entries

Formidable Forms automatically saves calculator form entries into your WordPress database.

You can easily view all calculations performed by users by visiting Formidable » Entries page.

View calculator form entries

From here, you can click on individual entries to view the data entered by users.

Alternately, you can also filter entries by specific calculator form to view data from all entries in a table format.

Calculator data entries

From here, you can also download all calculator data in the CSV format and view it in spreadsheet software.

Need even more insights? Switch to the Reports tab for your form entries and you will be able to see detailed charts and graphs for your calculator.

Viewing calculator data reports

For instance, in our ROI calculator report, we can see the average ROI percentage as submitted by users.

Average values for your calculator form data

These charts give you quick insights into how users interact with calculators on your website and average responses. You can then use this information to tailor your content for your audience’s requirements.

Capturing Leads with Your Custom Calculator

Formidable Forms makes it super easy to add customer calculators in WordPress and connect it to your email marketing service.

However, you’ll still need to nudge users into using the calculator and capture leads, and increase sales.

This is where OptinMonster comes in. It is the best lead generation software on the market and allows you to easily convert website visitors into subscribers and customers.

Popup example

It comes with tools like lightbox popups, slide-in popups, countdown timers, header and footer banners, and more. All of them help you nudge users into using your custom calculators.

OptinMonster also comes with powerful targeting rules and personalization options to show users targetted messages at the right time.

Personalization example

We hope this article helped you add a custom calculator in WordPress. You may also want to see our guide on best business phone services, or see our tips on how to track conversions in WordPress.

If you liked this article, then please subscribe to our YouTube Channel for WordPress video tutorials. You can also find us on Twitter and Facebook.

The post How To Create A Custom Calculator In WordPress first appeared on WPBeginner.


December 28, 2021 at 04:00PM

Monday, December 27, 2021

How to Make Custom Fields Searchable in WordPress

Do you want your visitors to easily search custom fields to find content on your website?

WordPress search doesn’t work with custom fields by default, which can make it harder for your visitors to find what they need. By making custom fields searchable, you can provide a better user experience for your visitors.

In this article, we’ll show you how to make custom fields searchable in WordPress.

How to make custom fields searchable in WordPress

What Are Custom Fields & Why Make Them Searchable?

WordPress custom fields allow you to store any kind of additional information (metadata) about a post or page.

WordPress adds metadata such as title, author, date, time, and more to your posts and pages. With custom fields, you can add more information about your content, and display them on your website if you wish. A lot of popular WordPress plugins and themes use custom fields to store important data.

For example, the content you enter in your WordPress SEO plugins such as All in One SEO is technically a custom field, or custom product attributes that you may add to your WooCommerce products sometimes are also custom fields.

AIOSEO Product Title Optimization

However, WordPress doesn’t search content on your website using custom fields. By default, when a visitor uses a search bar on your website, WordPress will only show them results where the title and content match their search terms.

Making your custom fields searchable improves the user experience on your WordPress website. It allows your visitors to search for any content with ease, keeping them on your website longer and reducing any frustration.

That said, let’s look at how you can make custom fields searchable.

Making Custom Field Searchable in WordPresss

The easiest way to make custom fields searchable is by using the SearchWP plugin. It’s the best WordPress search plugin and allows you to adjust the search algorithm without editing code.

The plugin indexes everything on your WordPress site. For instance, it uses custom fields, PDF documents, text, custom tables, files, categories, shortcodes, and more to improve WordPress search for your users.

Besides that, SearchWP works seamlessly with other popular plugins like Advanced Custom Fields, Meta Box, Toolset, Easy Digital Downloads, WooCommerce, and Pods.

SearchWP

To start indexing your custom fields, first you’ll need to install and activate the SearchWP plugin. If you need help, then please see our guide on how to install a WordPress plugin.

Upon activation, you can head over to Settings » SearchWP and then navigate to the ‘Engines’ tab from the WordPress admin panel.

After that, you’ll need to click the ‘Add/Remove Attributes’ button to add custom fields to the search algorithm for your posts, pages, and media.

Add and remove attributes

When you click the button, a popup window will now appear.

Go ahead and click the dropdown menu under Custom Fields and then select the ‘Any Meta Key’ option to make all your custom fields searchable. Or you can type the custom fields you want to include during the search process. if you don’t want to include them all.

Choose any meta key

Once you’ve chosen the custom fields, simply click the ‘Done’ button.

A custom fields option will now be added to the search algorithm for posts. You can see the ‘Custom Fields’ under the Applicable Attribute Relevance section.

Next, you can adjust the attribute slider to set the relevance weight given to each attribute during a search.

Adjust the search relevance

For example, if you move the slider to the right and set it to maximum, then SearchWP will give high preference to the data in the custom fields when searching content on your site.

You can now repeat the step for making custom fields searchable for pages and media files.

After making these changes, don’t forget to click the ‘Save Engines’ button.

Click the Save Engines button

SearchWP will now index your content, PDF metadata, custom fields metadata, images, files, and other types of metadata to include in WordPress search.

You’ll be able to see the ‘Index Status’ in the right corner and view how many items the plugin has indexed.

SearchWP index status

Besides that, SearchWP also offers other customization settings.

For instance, if you go to the ‘Settings’ tab, then you can add stopwords and synonyms to be ignored during the search process to improve relevancy and performance.

The plugin will already have a list by default, but you can add more stopwords if you want. Similarly, you can add synonyms for search terms that you want to ignore while searching.

Add stopwords in settings

Next, you can edit more settings by going to the ‘Advanced’ tab.

For example, the plugin lets you enable the option to show partial matches when search terms show no result, limit results to exact matches when double quotes are used, remove minimum word length, and more.

SearchWP Advanced Settings

Now, if you want to see the search history and see which queries your users search the most, then head over to the ‘Statistics’ tab.

The plugin will give all the stats about your WordPress search from the past 30 days or the last 1 year. You can use this data to see which queries your users search while on your site and come up with new content ideas.

View search stats

We hope this article helped you learn how to make custom fields searchable in WordPress. You may also want to look at our guide on how to register a domain name and the best WordPress plugins for business sites.

If you liked this article, then please subscribe to our YouTube Channel for WordPress video tutorials. You can also find us on Twitter and Facebook.

The post How to Make Custom Fields Searchable in WordPress first appeared on WPBeginner.


December 27, 2021 at 04:00PM

Friday, December 24, 2021

6 Best File Upload Plugins for WordPress (Free & Paid)

Do you want to allow your visitors to easily upload files on your WordPress site?

A WordPress file upload plugin lets your users upload documents, images, PDFs, spreadsheets, and other files without having to login to your website.

In this article, we’ll share our expert pick of the best WordPress file upload plugins.

Best file upload plugin for WordPress

Why Use a WordPress File Upload Plugin?

By default, only WordPress site users can upload files by logging in to the dashboard. That means that if you want someone to be able to upload a file to your site, then you’d have to create a new user account and let them log in to your website.

This can be time-consuming and a potential security risk.

However, you can easily accept file uploads on the front end of your WordPress website by using the right plugin.

Accepting documents, images, and other files can help you to get more information from your users when providing customer support.

It also makes it super easy to receive guest posts, resumes, quotations from clients, images, videos, and other content from your visitors.

That being said, let’s look at some of the top file upload plugins for WordPress.

1. WPForms

WPForms

WPForms is the best contact form plugin for WordPress, and it’s super easy to use. The plugin has a drag and drop builder that lets you create any type of form for your website including file upload forms.

It also offers prebuilt templates, so you can quickly get started and add forms to your website. Each template is fully customizable.

There are two different options for file upload fields: a classic file upload for just one file, or a more modern drag-and-drop file upload field that can accept multiple files at once.

WPForms file upload field

With WPForms, you can accept images, videos, documents, spreadsheets, PDFs, presentations, and much more. You can choose whether or not you’d like to save the file uploads in your WordPress media library.

There are also options to restrict different file types to keep your website safe, and you can even increase the maximum upload size, so you can accept larger files if needed.

Besides file uploads, WPForms also offers spam protection, multi-page forms, and conditional logic. It is also compatible with different email marketing services and payments services to create online payments and donations forms.

2. File Upload Types by WPForms

File upload types by WPForms

File Upload Types by WPForms is a free file upload plugin for WordPress. It lets you accept additional file types in WordPress which aren’t available by default.

WordPress allows specific file extensions that your users can upload. If someone tries to upload content outside the permitted file types, then they’re shown an error saying, ‘Sorry, this file type is not permitted for security reasons.’

To overcome this issue and fix the error, you can use the File Upload Types by WPForms plugin.

The plugin is beginner-friendly, and you can manage which file extensions to allow on your website from your WordPress dashboard. Simply enable or disable the extensions from your WordPress admin area.

Some common file extensions the plugin lets you add to WordPress include .zip, .ai, .xml, .svg, .csv, and more.

This free plugin is great for allowing additional file types in WordPress, but it doesn’t have any front-end file upload form. That’s why it must be used in combination with WPForms or any of the other plugin in our list.

3. Formidable Forms

Formidable Forms

Formidable Forms is another popular file upload plugin for WordPress. Using its drag and drop builder, you can create a file upload form for your website.

Users can add a file or drag and drop the file into the form field. The uploaded files are then stored in the WordPress Media Library, so you can easily access them when you want.

The plugin lets you accept multiple files from your visitors in the same form instead of requiring people to fill out numerous forms. Other than that, you can select which file types to allow on your form and set the maximum file size limit.

Aside from creating a file upload form, Formidable Forms also helps build complex forms like mortgage calculators and payment forms. The plugin offers prebuilt templates and multiple customization options as well.

4. WordPress File Upload

WordPress File Upload

WordPress File Upload is a free WordPress plugin that allows visitors to upload any content to your website. The plugin lets you accept file uploads from any blog post, landing page, or sidebar widget by using a shortcode.

Once a user uploads a file, you can view them inside your WordPress dashboard under the Uploaded Files menu. This makes it easy to organize and manage different content uploaded by your users.

On the downside, the plugin is a bit more complex to use. However, you can create file upload filters for different user roles in WordPress, limit file extensions that can be uploaded, and set an allowed file upload size in the plugin settings.

It also offers different customization options for your file upload form. You can add or remove existing form fields, change their colors, labels, dimensions, and add additional custom fields.

5. MemberPress

MemberPress

MemberPress is the best WordPress membership plugin. It allows you to upload files and have full access control over file permission.

For example, you can upload file in WordPress and restrict permissions, so only logged in users with paid subscription can access the file. This is great for selling online courses, eBooks, or other files.

You can also restrict permissions, so only select users can upload files. This can be helpful if you’re running a membership association where only members with a certain level of paid subscription can add files on their user profiles or submit guest posts, and more.

MemberPress has everything you need to create registration forms, set up membership subscriptions, manage transactions, and more.

6. Easy Digital Downloads

Easy Digital Downloads

Easy Digital Downloads is one of the best WordPress eCommerce plugins that allows you to sell digital products including eBooks, PDF files, music, software, and more.

It allows you to upload WordPress files to cloud platforms like AWS, Dropbox, and others. You can then password protect the files and only allow download access to those with active user licenses.

Easy Digital Downloads also comes with a multi-vendor marketplace functionality, so you can allow users to upload and sell files through your website. This basically lets you make your own marketplace like Envato or CreativeMarket.

BONUS: MonsterInsights

MonsterInsights

MonsterInsights is the best analytics solution for WordPress, and it helps you track form submissions and file downloads on your website.

Abandoned forms mean less conversions and revenue. MonsterInsights helps you to understand when and why your users abandon your forms, so you can optimize them for more conversions. For more details, see our guide on how to track and reduce form abandonment in WordPress.

If you offer content that users can download from your website like PDFs, videos, spreadsheets, and other documents, then it’s important to know which files get the most downloads.

With MonsterInsights, you can automatically track file downloads in Google Analytics without editing code. The plugin lets you track any file extension inside Google Analytics.

You also get to see the form tracking and file download reports right inside your WordPress dashboard.

We hope that this article helped you find the best file upload plugin for WordPress. You may also want to check out our guide on the best managed WordPress hosting and how to start your own podcast.

If you liked this article, then please subscribe to our YouTube Channel for WordPress video tutorials. You can also find us on Twitter and Facebook.

The post 6 Best File Upload Plugins for WordPress (Free & Paid) first appeared on WPBeginner.


December 24, 2021 at 05:00PM