Monday, February 7, 2022

How to Create a Fitness Tracker in WordPress (With Charts)

Do you want to create a fitness tracker in WordPress?

Many health and fitness-related businesses and online communities offer fitness tracking tools for their users. This helps to keep users engaged and grow your business.

In this article, we’ll show you how to easily create a fitness tracker in WordPress to boost user engagement on your website.

Creating a fitness tracker in WordPress

What is a Fitness Tracker?

A fitness tracker is an online tool that helps users track different aspects of their health and fitness performance.

It could be a weight loss tracker, a BMI calculator, a meal planner, or other type of health tracker. These online tools can be created using no-code WordPress plugins that calculate different values on the fly.

Why You Should Add a Fitness Tracker to Your WordPress Site

If you run a WordPress website for a health and fitness business or an online community, then adding a fitness tracker to your website is an easy way to build user engagement.

This includes websites like:

  • Gym websites
  • Weight loss websites
  • Fitness trainer’s personal site
  • Nutritional site or food blog
  • Health and fitness community
  • Lifestyle communities
  • and more

You can provide your users with actual tools to track their fitness performance, which is more likely to keep them on your site longer.

Improved user engagement leads to higher conversion rates and better customer retention for your business.

Building an Online Fitness Community

One of the easiest ways to monetize a health and fitness website is by using MemberPress. It is the best WordPress membership plugin and allows you to easily sell online courses and subscriptions.

You can create different types of fitness plans, hide members-only content behind a paywall, create online courses, and more.

Users can then use your built-in fitness tracker to measure their performance and progress over time. This helps them spend more time on your website which improves subscription renewals, upsells, and customer retention.

For more details, see our step by step tutorial on how to create a membership website in WordPress.

Creating an Online Fitness Tracker in WordPress

To create an online fitness tracker in WordPress, you’ll need Formidable Forms.

It is the best WordPress calculator plugin on the market that allows you to create advanced forms and calculators for your website. The drag and drop form builder makes it easy to create your fitness tracking forms without having to write any code or hire a developer.

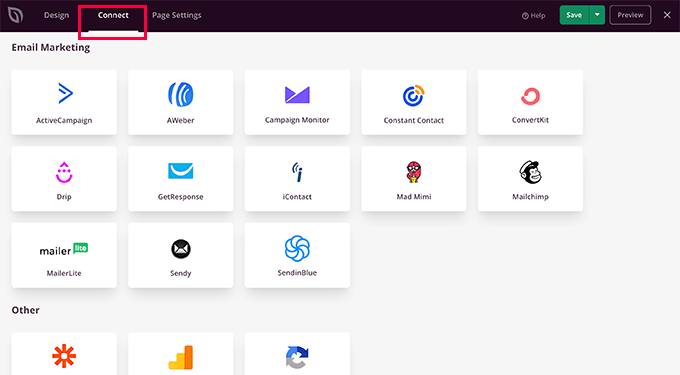
Plus, it works great with other tools that you may already be using like MemberPress, WooCommerce, or your email service provider.

First, you need to install and activate the Formidable Forms plugin. For more details, see our step-by-step guide on how to install a WordPress plugin.

Note: There is a limited free version of the plugin called Formidable Lite. However, you’ll need the premium version to unlock more features.

Upon activation, you need to visit the Formidable » Global Settings page to enter your plugin license key. You can find this information under your account on the Formidable Forms website.

Formidable Forms license key

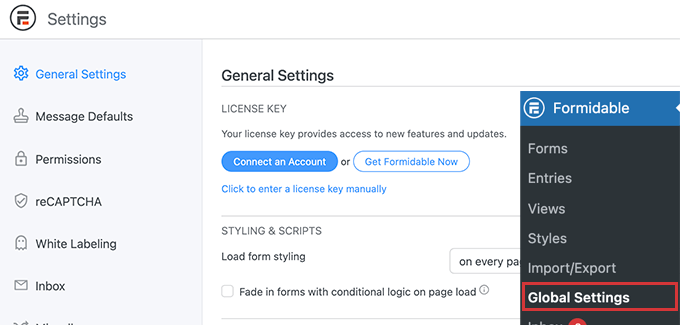
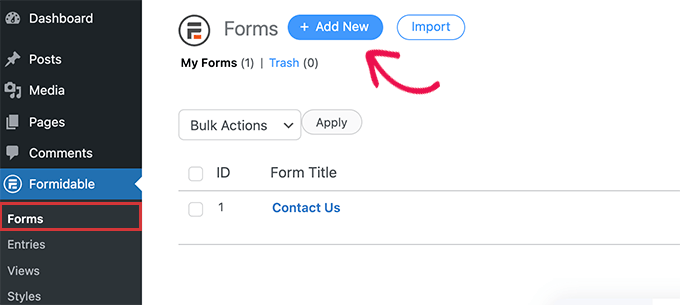
After that, you need to visit the Formidable » Forms page.

Here, simply click on the Add New button to create your fitness tracking form.

Create a new fitness tracking form

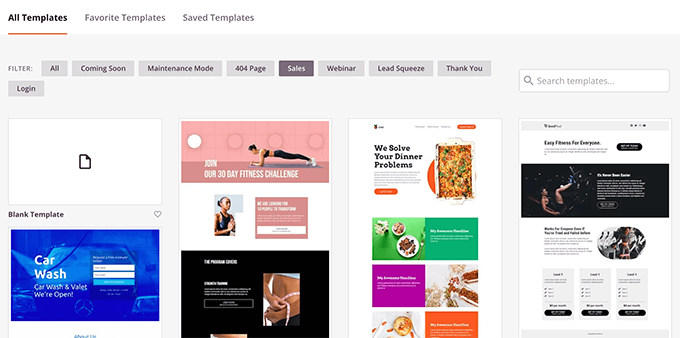
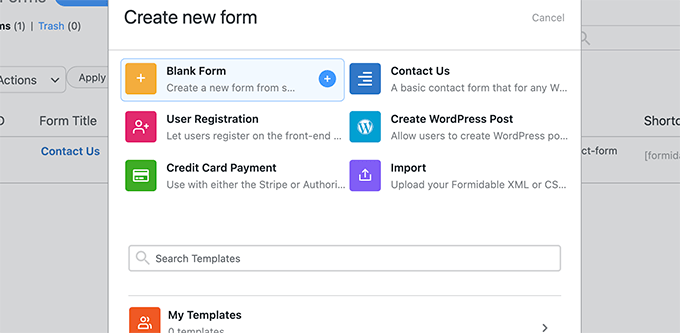
Next, you will be asked to choose a template for your form.

There are a bunch of templates that you can use, but for this tutorial we’ll be starting with a blank form.

Choose blank form template

Next, provide a name and description for your form and click on the Create button.

This will launch the Formidable Forms drag and drop builder. In the left column, you’ll see a list of the form fields that you can add.

To your right, you’ll see the form preview. Since our form is blank, there are no fields in the preview column.

Form builder interface

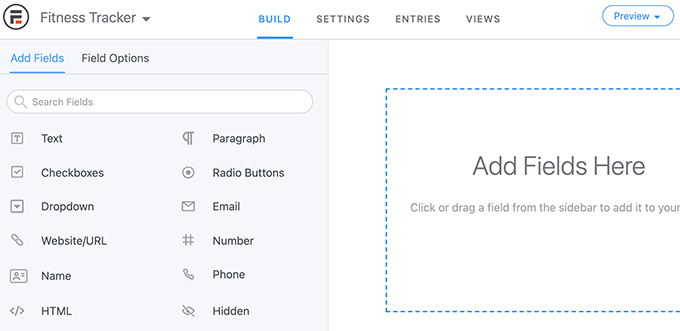
Let’s change that and add the form fields for our weight loss fitness tracker.

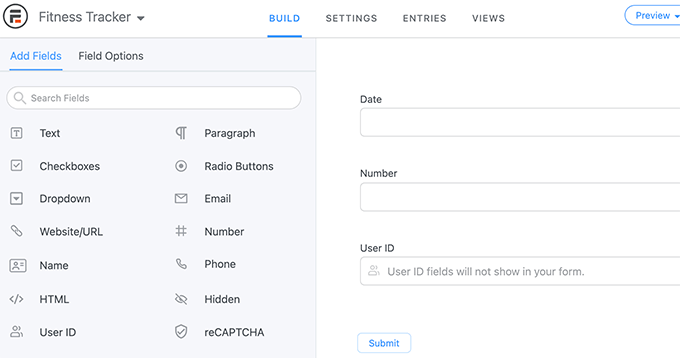
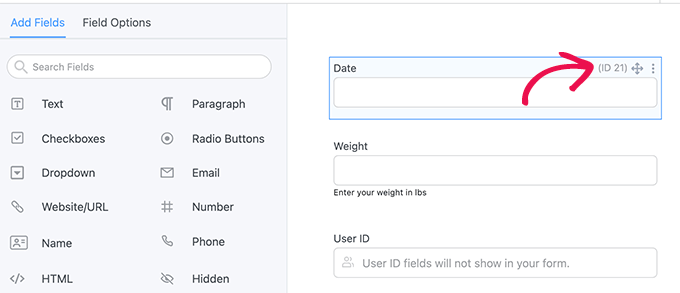
For this tracker, we’ll be adding the following form fields.

  1. User ID – This will be automatically filled by Formidable Forms for logged in users so that users can see their own performance.
  2. Date – Users will be able to enter the date they measured their weight.
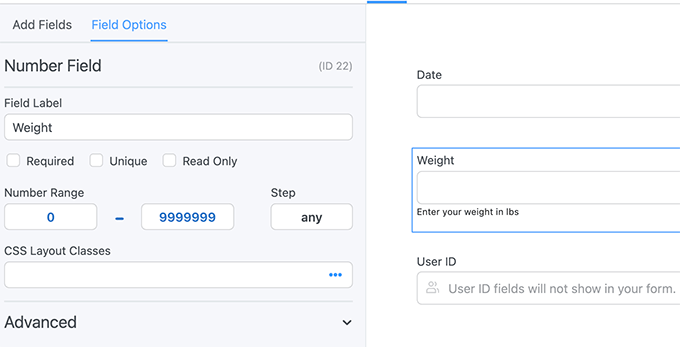
  3. Number – We’ll rename this field to ‘Weight’ and ask users to enter their weight in lbs or kg.
Add form fields

After adding the fields, you can just click on a field to change its properties.

For instance, we edited the number field to change its label to ‘Weight’ and provided instructions in the description option.

Edit the form field

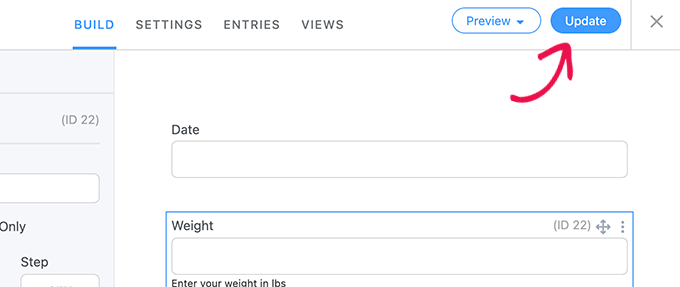
Once you are finished editing the form, click on the Update button to save your form.

Save your form

Adding Fitness Tracker in a WordPress Post or Page

Next, you would want to add the fitness tracker form to your WordPress website.

If you are using MemberPress, then you can simply edit the Account page. You can also create a new page and restrict it to members-only. This way users will be required to login to enter their fitness data.

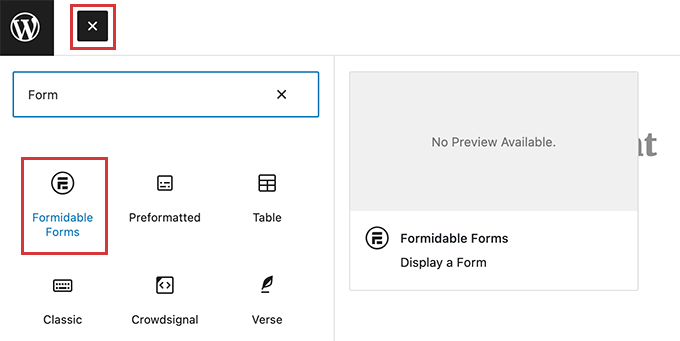
On the page edit screen, simply add the Formidable Forms block to your page and choose your Fitness Tracker from the drop down menu.

Formidable Forms block

Formidable Form will now display a preview of your form in the page editor. You can go ahead and save your changes.

You can now go ahead login with a dummy new user account and fill out a few test entries.

Live fitness tracker

Display Fitness Form Tracker Data in WordPress

Formidable Forms makes it super easy to display the data collected by your forms on your WordPress website.

You can choose exactly which fields you want to show and display the data in graphs and charts.

Simply edit the post or page where you want to display the form data. Obviously, if you are using MemberPress then you want to restrict that page so that only logged in users can view their own fitness data.

Next, you will need to add a shortcode to your page in the following format.

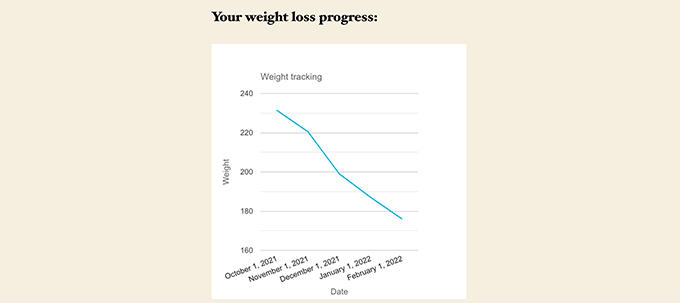
[frm-graph fields="22" y_title="Weight" x_axis="21" x_title="Date" type="line" title="Weight tracking" user_id="current" data_type="average"]

This shortcode has the following parameters.

  • Fields – ID for the field you want to use to display data from (in this case, the weight field).
  • y_title – Title for the Y Axis. In this case we will be using Weight.
  • x_axis – ID of the field you want to use in the x_axis. In this case the date field.
  • x_title – Title for x_axis. In this case, we will use Date.
  • user_id – ‘Current’ so that only logged in users can view their own data.

You can find the field ID by simply editing your fitness tracker form. You’ll see the ID for each field in the form preview.

Finding the field ID

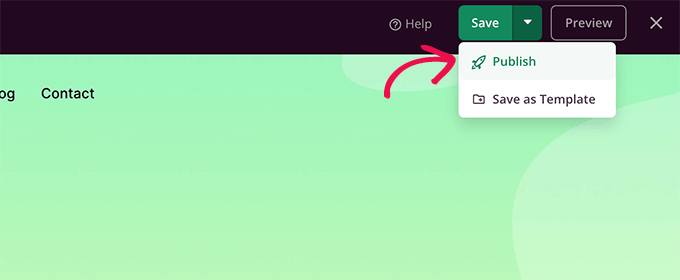
After adding the shortcode, don’t forget to save your changes.

Next, you need to login with the dummy user account you used earlier to add test entries, and visit the page you just created.

Here is how it looked on our test website:

Fitness tracker data chart

Creating More Fitness Tracking Tools in WordPress

Formidable Forms is the most advanced tools builder for WordPress.

Apart from the weight-loss tracking form, you can also use it to create several other types of online fitness calculators and tools.

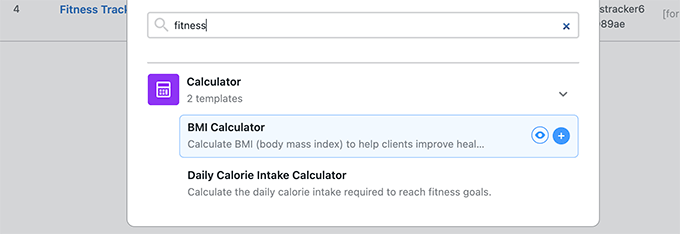
It even comes with built-in templates for a BMI calculator and a Daily Calorie Intake calculator.

Fitness calculator templates

We hope this article helped you learn how to easily add a fitness tracker in WordPress. You may also want to see our expert pick of the best live chat software for small business, or follow our complete WordPress SEO guide to get more free visitors from search engines.

If you liked this article, then please subscribe to our YouTube Channel for WordPress video tutorials. You can also find us on Twitter and Facebook.

The post How to Create a Fitness Tracker in WordPress (With Charts) first appeared on WPBeginner.


February 07, 2022 at 04:00PM

Thursday, February 3, 2022

6 Best Product Review Plugins for WordPress

Are you looking for the best product review plugins for WordPress? 

Product review plugins can help you get more traffic from search engines, boost affiliate link clicks, add user-submitted reviews to your website, and more.

In this article, we’ve hand-picked the best product review plugins for WordPress.

5+ best product review plugins for WordPress

Why Use Product Review Plugins in WordPress?

What do you do when you want to buy something online? If you’re like most people, then you probably check out product reviews to compare different options.

If you have an online store, then allowing your customers to submit reviews is a smart way to add social proof and boost sales.

Even niche review sites where you’re writing all the reviews yourself can use a product review plugin. The right review plugin will help you to optimize your reviews in search results so you can get more clicks and traffic.

WordPress makes it easy to add new blog posts and create important website pages, but writing review content or adding reviews to your website requires additional features offered by WordPress plugins. 

Product review plugins can help you make more sales, let users add reviews to your website, add reviews from third party platforms, and more. 

That being said, let’s take a look at some of the best product review plugins you can use on your WordPress site. 

1. WP Review Pro

WP Review Pro

WP Review Pro is the best WordPress product review plugin. It gives you full control over your WordPress product reviews and also makes it easy to create product comparisons and more. 

It includes a library of pre-designed templates you can customize to match the design of your website. There are different types of rating systems you can use, like percentage, star rating, points, and more. 

WP Review point rating example

By creating a custom review box, you can present all the important product information for your visitors, including a link to buy the product. Review schema markup is also automatically included, so you can show star ratings in the search results. 

You can also let your users add their own reviews to your products, rate features, and vote on other user’s comments. 

WP Review Pro user rating example

The plugin also lets you display reviews from third party sources like Facebook, Google Places, and Yelp, so you can easily add social proof to your WordPress website

2. AIOSEO

AIOSEO

All in One SEO (AIOSEO) is the best SEO plugin for WordPress in the market used by over 3 million websites. It offers the most beginner friendly and comprehensive SEO toolkit to help you get more traffic from the search engines.

It includes a setup wizard that will automatically help you choose the best SEO settings for your website to help improve your rankings.

Plus, it lets you easily add product review schema to your review blog posts. Schema markup doesn’t appear on your website for visitors to see, but it helps the search engines better understand your content and display your product reviews properly.

Rich snippets will catch potential visitor’s attention and are more likely to get clicks from the search results.

Rich snippets product schema example

When you’re writing your product reviews, AIOSEO will automatically detect the right type of schema based on what you’re writing. 

You also have full control over the product review schema and can enter relevant product information for search engine bots to read.

AIOSEO product schema

You can also add existing customer reviews to improve the search appearance even more.

You’ll find this option below the review schema box in your post editor.

AIOSEO customer reviews box

There is a free version of the plugin available, but you’ll need the pro version of the plugin to access the product review schema feature.

3. WP Customer Reviews

WP Customer Reviews

WP Customer Reviews allows you to collect customers reviews and testimonials as well as create your own product reviews. 

For example, you can create a specific page on your website to showcase your testimonials to help improve your social proof and conversions. 

You have full control over your review forms and the information you want to collect from your users. To display reviews, you can use shortcodes or the included block. 

You can review the reviews in your WordPress dashboard, so you have complete control over the ones that are displayed.

It also has the option to turn any existing WordPress blog post into a product review, and it adds product review schema to improve the search engine appearance of your review. 

4. Site Reviews

Site Reviews

Site Reviews is an easy to use review plugin that lets you collect customer reviews for your products, services, or local business, similar to a site like TripAdvisor or Yelp.

You can even let users review certain parts of your website, like posts, products, pages, and more. 

It comes with a simple settings page that allows you to control how you want to gather reviews and how you want to display them on your website. You can customize the review form and display it anywhere on your site.

You can also pin your best reviews to the top, so your customers will see them first.

Site Reviews sample review

It also integrates with WooCommerce, so you can improve how customers leave reviews on your WooCommerce product pages

You can display your reviews using the included Gutenberg block or shortcode to show specific reviews. 

5. Customer Reviews for WooCommerce

Customer Reviews for WooCommerce

Customer Reviews for WooCommerce lets you easily add more detailed reviews to your store.

This plugin helps to improve your social proof, so when visitors go to your product pages, they’re more likely to make a purchase. 

Your customers can attach pictures and vote on reviews, plus you can add a question and answer section, so your product listings look the same as Amazon.

Improved WooCommerce product page with reviews

There’s also a feature to send automated emails after a customer makes a purchase to help you generate more reviews. You can also send a coupon after a review is left on your product.

6. Schema — All in One Schema Rich Snippets

Schema All in One Schema Rich Snippets

Schema is a simple free plugin that lets you add product schema markup to your reviews, so you can display rich snippets in the search results.

It’s not as in-depth as the AIOSEO schema feature mentioned above, but it’s a solid free option. 

When you select the review schema type, you’ll have additional product details to fill in, like reviewer name, product name, price, star rating, and more. 

It also supports other types of schema markup, including articles, recipes, software, and events. 

Bonus: OptinMonster

OptinMonster

OptinMonster is the best popup plugin for WordPress used by over 1.2 million websites. You can easily create high-converting popup campaigns to grow your email list.

It comes with a library of over 400 templates you can use to quickly create spin to win optins, alert bars, yes/no optins, and many other types of popup campaigns for your website. 

You can use these popups in creative ways. For example, you can create a popup that displays a coupon for the product you’re reviewing in the article. 

OptinMonster affiliate popup example

This is a common way to increase affiliate income and earn more revenue that many of the most successful WordPress blogs use on their product review articles. 

Aside from OptinMonster, the two other plugins that could be useful based on your use case are Smash Balloon and Uncanny Automator.

Smash Balloon is the #1 social media feeds plugin for WordPress. It lets you show user generated content and product reviews from social media on your website without any code.

Uncanny Automator is the best WordPress automation plugin. It lets you automate the process of collecting reviews from customers after they purchase. It also helps you create other automated workflows on your site without any code.

We hope this article helped you find the best product review plugins for WordPress. You may also want to see our guide on how much it costs to build a WordPress website and our expert picks of the best business phone services for small businesses. 

If you liked this article, then please subscribe to our YouTube Channel for WordPress video tutorials. You can also find us on Twitter and Facebook.

The post 6 Best Product Review Plugins for WordPress first appeared on WPBeginner.


February 04, 2022 at 12:28PM

How to Disable Widget Blocks in WordPress (Restore Classic Widgets)

Do you want to restore the classic widgets editor in WordPress?

The release of WordPress 5.8 removed the classic widgets editor in favor of Gutenberg widget block editor to control your website widget areas.

In this article, we’ll show you how you can disable widget block editor in WordPress, step by step.

How to restore classic widgets (disable widget blocks) in WordPress

Why Restore Classic Widgets in WordPress?

The widget block editor offers a lot of the same functionality as the classic widget editor. Plus, it gives you more control over the appearance of your widgets.

However, if you’ve been using WordPress for a while, then you may be more comfortable using the classic widget editor on your WordPress website.

Or, you enjoy the simplicity of the classic widget editor and want to disable widget blocks, like how some users prefer disabling the block editor.

That being said, let’s take a look at how to restore the classic widget editor in WordPress. Simply use the quick links below to jump straight to the method you want to use.

Method 1. Restore Classic Widgets by Using a WordPress Plugin

The easiest way to restore the classic widget editor is by using the Classic Widgets plugin. This plugin is developed and maintained by the WordPress core team.

First thing you need to do is install and activate the plugin. For more details, see our beginner’s guide on how to install a WordPress plugin.

Upon activation, your WordPress blog will go back to the classic widget editor. There are no settings for you to configure.

Now, you can navigate to Widgets » Add New in your WordPress admin panel to go to the widget dashboard.

Go to classic widget area

To add new widgets, simply drag a widget to an available widget area.

Then, you can customize the widget settings. Make sure you click the ‘Save’ button to save your widget.

Add new classic widget

If you want to use widget blocks at any point in the future, then simply deactivate the plugin.

You can also disable Gutenberg and keep the classic editor on pages and posts as well. For more details, see our guide on how to disable Gutenberg and keep the classic editor in WordPress.

Method 2. Restore Classic Widgets by Adding Code to WordPress

Another way to disable widgets blocks is by adding code to WordPress. If you haven’t done this before, then see our beginner’s guide on how to copy and paste code in WordPress.

Next, you need to add the following code snippet to your functions.php file, in a site-specific plugin, or by using a code snippets plugin

function example_theme_support() {
    remove_theme_support( 'widgets-block-editor' );
}
add_action( 'after_setup_theme', 'example_theme_support' );

The code snippet above simply disables the Gutenberg block editor in your widget area. However, it keeps the block editor in your pages and posts.

Now, when you go to Widgets » Add New you can add widgets using the classic editor.

Go to classic widget area

We hope this article helped you learn how to disable widget blocks and restore classic widgets in WordPress. You may also want to see our guide on how to easily create a custom WordPress theme and our expert picks of the must have WordPress plugins for business websites.

If you liked this article, then please subscribe to our YouTube Channel for WordPress video tutorials. You can also find us on Twitter and Facebook.

The post How to Disable Widget Blocks in WordPress (Restore Classic Widgets) first appeared on WPBeginner.


February 03, 2022 at 02:00PM

Wednesday, February 2, 2022

How to Add Post Thumbnails to Your WordPress RSS Feeds

Do you want to show your post thumbnails in your WordPress RSS feeds?

RSS feeds help you promote your content in directories, feed readers, and other applications that use RSS feeds. However, the sad truth is that your blog posts featured images will not show up in your RSS feeds.

In this article, we will show you how you can add post thumbnails to your WordPress RSS feeds.

Add post thumbnails to WordPress RSS feeds

What is WordPress RSS Feed?

RSS or Really Simply Syndication allows users and applications to receive regular updates from a website or a blog in a web feed.

RSS feeds help you get updates from your chosen websites without having to visit them manually. It helps save time, and you get to see the latest content in your email, feed readers, and other devices.

If you have a WordPress blog, then RSS feeds can help you promote your content and drive traffic to your blog. You can make new articles easily discoverable for readers and keep them coming back to your site for fresh content.

However, the problem with WordPress RSS feeds is that they don’t show your blog posts’ featured images.

Adding post thumbnails helps you customize the RSS feed. It also helps enhance the feed and provide a better user experience.

That said, let’s take a look at how you can add post thumbnails to WordPress RSS feeds. We’ll show you 2 ways to do this, including using a WordPress plugin and adding a simple function to your theme files.

Adding Post Thumbnail to RSS Feeds Using a Plugin (Easy Way)

The easiest way to show featured images in the RSS feed is by using the Featured Images in RSS for Mailchimp & More plugin.

It’s a free WordPress plugin that helps you add images to your RSS feed so that they’ll display in your RSS email campaigns and anywhere else your RSS feed is used.

First, you’ll need to install and activate the plugin. If you need help, then please see our guide on how to install a WordPress plugin.

Upon activation, you can head over to Featured Images in RSS from your WordPress dashboard.

The plugin lets you change the RSS image size, alignment, text padding, and choose if you want to make the images clickable.

Featured images in RSS settings

When you’ve made your desired changes, don’t forget to click the ‘Save Changes’ button.

Manually Add Post Thumbnail to RSS Feeds (Coding Required)

Another way you can display post thumbnails in WordPress RSS feeds is by adding a code snippet to your theme’s function.php file.

We won’t recommend directly editing the functions.php file because the slightest mistake can break your WordPress site. An easier way of adding code is by using the Code Snippets plugin.

First, you’ll need to install and activate the Code Snippets plugin. You can follow our tutorial on how to install a WordPress plugin.

Once the plugin is active, you can go to Snippets » Add New from the WordPress dashboard. After that, you have to copy the following code:

function rss_post_thumbnail($content) {
global $post;
if(has_post_thumbnail($post->ID)) {
$content = '<p>' . get_the_post_thumbnail($post->ID) .
'</p>' . get_the_content();
}
return $content;
}
add_filter('the_excerpt_rss', 'rss_post_thumbnail');
add_filter('the_content_feed', 'rss_post_thumbnail');

Next, go ahead and paste the code in the ‘Code’ section and give your snippet a title. After entering the code, don’t forget to click the ‘Activate’ button.

RSS feed code for thumbnail images

You can follow our tutorial on how to easily add custom code in WordPress for more details.

For more tips on adding featured images to your blog posts, you can see our guide on how to add post thumbnails in WordPress.

We hope this article helped you learn how to add post thumbnails to your WordPress RSS feeds. You can also go through our guide on the best free business name generator and how to choose the best website builder.

If you liked this article, then please subscribe to our YouTube Channel for WordPress video tutorials. You can also find us on Twitter and Facebook.

The post How to Add Post Thumbnails to Your WordPress RSS Feeds first appeared on WPBeginner.


February 02, 2022 at 01:11PM

Tuesday, February 1, 2022

How to Increase Your Landing Page Conversions by 300% (Proven Tips)

Do you want to increase your landing page conversions?

Landing pages are designed to convert website visitors into customers, subscribers, and leads. However, there is always room to improve their conversion rate.

In this article, we’ll share some of the proven ways to increase your landing page conversions by up to 300%.

Increasing landing page conversions with proven and tested tips

1. Creating a Conversion Oriented Landing Page Design

First, you need to make sure that your landing page is designed for conversions.

As a business owner, you may not have the skills to design a landing page for higher conversions or code the design from scratch.

This is where SeedProd comes in.

SeedProd landing page builder

It is the best landing page builder for WordPress and allows you to easily create beautiful landing page layouts that are professionally designed and optimized for conversions and sales.

SeedProd works with essential third-party tools that you may already be using. This includes top email marketing services, WooCommerce, Google Analytics, and more.

First, you need to install and activate the SeedProd plugin. For more details, see our step by step guide on how to install a WordPress plugin.

Upon activation, you need to enter your license key. You can find this information under your account on the SeedProd website.

After that, you can simply go to SeedProd » Landing Pages and click on the Add New Landing Page button.

Add new landing page

Next, you’ll be asked to choose a template.

You can start with a blank template or choose from one of several pre-made landing page templates that are already optimized for conversions.

Choose template for your landing page

You can then provide a title and URL slug for your page.

Once you do, SeedProd’s intuitive drag and drop builder will load.

Drag and drop landing page builder

You can simply point and click on any item on the page to edit it. You can also add commonly used landing page design blocks from the left column.

For example, you can add testimonials, optin forms, FAQ accordions, and more.

Once you are satisfied with the design, you can switch to the Connect tab to integrate with popular email marketing platforms or more than 3000 third-party apps via Zapier.

Connect email marketing services

After that, you can switch to the Page Settings tab.

From here you can change the SEO settings, add Google Analytics tracking, and add header or footer scripts.

Landing page settings

You can also connect your page to a custom domain name. This comes in handy for users creating multiple landing pages targeting different regions.

Finally, you can go ahead and save or publish your landing page.

Publish your landing page

You can now see your landing page live in action by opening it in a new browser tab.

Landing page preview

Creating a beautiful landing page is not the end of conversion optimization. In fact, there is a lot more you can do to boost conversion rates even further.

Let’s take a look at some of these tried and tested landing page best practices.

2. Choose One Call to Action for Your Landing Page

One of the most common landing page mistakes is not setting a proper goal for your campaign.

For instance, having multiple calls to action on the same page can distract or confuse your visitors, so that they end up leaving without taking an action.

Best practice is to set one course of action for users to take. For instance, if your goal is to capture email leads, then your optin form should be the only action to take on your landing page.

That can mean removing navigation menus and other links from the page, or making them stand out less.

Or if you want users to make a purchase, then this should be the only course of action users are directed to.

Following are a few examples of clearer calls to action on landing pages.

1. MonsterInsights

MonsterInsights

The MonsterInsights landing page has two very clear calls to action that leads users to make a purchase.

2. OptinMonster

OptinMonster landing page example

OptinMonster is a conversion optimization software, and they have several landing pages for different use cases. Each one of them is targeted to different audiences.

3. All in One SEO for WordPress

All in One SEO landing page example

All in One SEO is the best WordPress SEO plugin on the market. For their landing page, they use a similar strategy. Under the features tab, you can view more landing pages for each feature, all of which lead users to make a buying decision.

As you can see, all of these pages have a clear call to action that is designed to stand out from the rest of the page.

3. Use Simplicity in Landing Page Design

For higher conversion rates, you want users to focus on the call to action and not get distracted.

A cluttered landing page design can easily distract users away.

To avoid this, make sure that you keep your landing page layout clean and simple. Using lots of empty space, color contrast, and large fonts can help you easily achieve that simplicity.

Keep your landing page design simple and clean

4. Use Colors and Contrast to Drive Action

It’s smart to make your call to action more prominent than other sections of your landing page, so that it draws the eyes of your visitors.

The easiest way to do this is by using bright, contrasting colors.

Using colors and contrast in your landing page

You can also use this technique to keep less significant information distracting users from main conversion goals. Simply choose a color that is similar to colors on the rest of the page.

5. Use Urgency For Higher Landing Page Conversions

Limited offers are an effective marketing technique you’ll see everywhere.

That’s because the scarcity adds urgency to an offer which makes it harder to ignore for users.

You can use the same marketing principles on your landing page by adding a countdown timer to your landing page layout.

6. Add Social Proof to Your Landing Page

People are more likely to buy a product if they see other people buying or recommending it. This concept is called social proof, and there are many different ways you can add it to your landing page to boost conversions.

The most common type of social proof is customer testimonials. SeedProd comes with a built-in testimonials block to easily add testimonials to your landing page.

Another way to add social proof is by using your landing page is by using TrustPulse.

It allows you to easily show small popup banners with live notifications of customer activity on your website.

Social proof via TrustPulse

This adds a FOMO effect to your landing page encouraging more users to convert.

TrustPulse works with all popular eCommerce platforms, and can automatically detect your visitors’ actions on your website. It can show email conversions, user sign ups, and many other notifications as well.

Lastly, you can also embed actual tweets and social media posts from your customers to your website as social proof. Smash Balloon’s Custom Feeds Pro allows you to create a custom feed of user tweets that you can then embed to your landing page.

Social media testimonials

7. Using Live Chat to Answer User Questions

Most of the time customers abandon a landing page simply because they couldn’t find the information they need.

A lot of time, they need that information instantly. Luckily there are easier ways to help your customers without setting up a dedicated team.

First, you can add a live chat bot to your website that can help users find the answers they are looking for right there on your landing page.

Add live chat to your landing page

You can also set up a business phone number that allows customers to reach out to your sales or support team directly from your landing page. You could even use an auto attendant service so you don’t have to answer the calls yourself.

8. Make It Easier for Users to Contact

Some of your customers may not have time to make a phone call or interact with live chat. Often customers just want to leave a message. 

That’s why it’s important to make sure that it’s easy for users to reach out by adding a contact form to your website.

WPForms is the best contact form plugin for WordPress. It allows you to easily add contact form to your website.

Plus it is a full-fledged form builder that you can use to capture leads by adding a request a quote form, order form, user registration form, and more.

9. Convert Abandoning Visitors with Timely Prompts

Showing users a personalized message just when they are about to leave your website has proven to be a successful technique in capturing abandoning users.

OptinMonster allows you to easily create exit intent popups that automatically detect when a user is about to leave your landing page and display a popup.

For example, Easy Digital Downloads shows this popup when a visitor is about to abandon the checkout page.

Easy Digital Downloads (EDD) exit intent popup example

You can display a popup with custom coupons, time limited offers, buy 1 get 1 free offers, and other promotional tools to convert those customers.

OptinMonster also allows you to create personalized campaigns. You can modify your popup based on user’s geographic location, pages they have seen, or products they have looked at.

10. Optimize Your Landing Page for SEO

Search engines are the main source of free traffic to any website. Optimizing your landing page for SEO helps you rank higher in search engines which brings more traffic for you to convert.

All in One SEO for WordPress is the best SEO plugin for WordPress on the market. It allows you to easily optimize your WordPress website for SEO.

For more details on using it, see our tutorial on how to properly install and setup All in One SEO for WordPress.

Another benefit of this is that it ensures that your landing page shows the right title and image on Facebook and other social networks.

11. Improve Page Load Speed for Higher Conversions

No one likes a slow website. In fact, studies show that one second delay in page load can cause 7% loss in conversions, 11% fewer page views, and 16% decrease in customer satisfaction.

Strangeloop case study

You can see how much time your landing page takes to load by testing it with an online speed test tool.

For speed optimization, see our guide on how to improve WordPress speed and performance with step by step instructions.

12. Track Conversions to Optimize Your Landing Pages

We believe that you can’t improve what you can’t measure.

To optimize for higher conversions, you need to first make sure that you properly set up conversion tracking for all your landing pages.

This helps you see how your landing page is performing. If you have multiple landing pages, then you can also see which ones are performing best.

The easiest way to set up conversion tracking is by using MonsterInsights. It allows you to easily install Google Analytics in WordPress.

Conversion tracking

It also comes with enhanced eCommerce tracking which allows you to see your eCommerce conversion rate inside the WordPress admin area.

For more details, see our ultimate guide on conversion tracking in WordPress to learn how to set it up and how to track different conversion goals on your website.

Once you have baseline data, then you can set up A/B test campaigns to further optimize your landing pages.

We hope this article helped you find ways to improve your landing page conversions. You may also want to see these bonus tips on capturing abandoned cart sales, or see these proven tips to increase your website traffic.

If you liked this article, then please subscribe to our YouTube Channel for WordPress video tutorials. You can also find us on Twitter and Facebook.

The post How to Increase Your Landing Page Conversions by 300% (Proven Tips) first appeared on WPBeginner.


February 01, 2022 at 04:00PM