Thursday, February 24, 2022

How to Rollback WordPress Plugins (Version Control for Beginners)

Have you ever updated a WordPress plugin only to have the new version break your site?

This can be extremely frustrating and is one of the main reasons why many beginners don’t always update plugins.

In this article, we will show you how to rollback WordPress plugins like a version control system for beginners.

How to Rollback WordPress Plugins (Version Control for Beginners)

When Do You Need to Rollback WordPress Plugins?

It’s best practice to keep your WordPress website up to date. That means you should always use the latest version of WordPress, plugins, and themes.

Unfortunately, on rare occasions, updates can sometimes break your website. This can happen if there’s a bug in the code, or if the update introduces some kind of conflict with your theme or another plugin.

That’s why we always recommend that you create a complete WordPress backup before performing any updates.

However, restoring your entire site from a backup can be a hassle, and you might lose other recent changes that you want to keep. So instead of restoring a backup, if you know which plugin caused the problem, then you can easily revert the changes and report the problem to the developer so it can be fixed.

Alternatively, you can manually install the older version of the plugin. But if you can still log in to your WordPress admin area, then simply rolling back the plugin version is more efficient.

Let’s take a look at how you can easily rollback WordPress plugins using a version control designed for absolute beginners. But first, we’ll show you how to fix your website if it’s broken and you’re unable to log in.

What if You Are Locked Out of Your Website?

Before you can rollback a plugin or theme you have to log in to your website.

But what if the updated plugin or theme has completely broken your website so it displays the critical error or white screen of death? Or perhaps your site is still running, but you are locked out of WordPress admin?

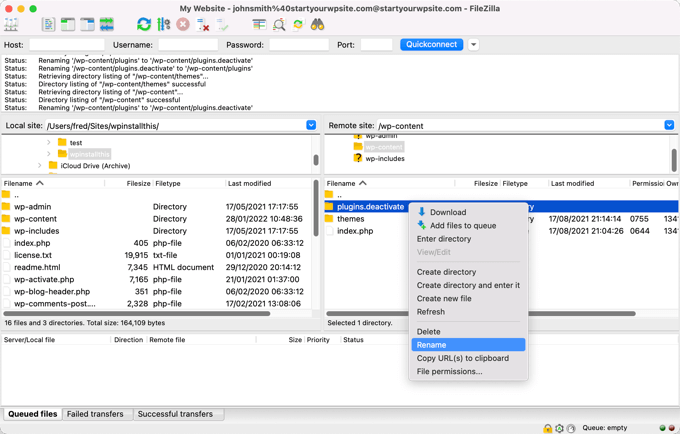
In those cases, you will have to deactivate your plugin or theme manually.

Deactivating WordPress Plugins Manually

If updating a plugin has caused a serious problem on your WordPress website, then we recommend that you deactivate all plugins and then reactivate them one by one.

You’ll need to refer to our guide on how to deactivate all plugins when not able to access wp-admin and follow one of the two methods to manually deactivate all of your plugins.

Manually Deactivate Plugins

You should now be able to log in to your WordPress admin area. You can move on to the second section below and learn how to roll back the problem plugin to an earlier version. After that, you can reactivate your plugins one by one.

Deactivating WordPress Themes Manually

If an updated theme is the cause of your website problems, then we recommend that you download a copy of that theme to your computer and then delete the theme.

You can learn how to do that in our step by step guide on how to uninstall and delete a WordPress theme. You’ll have to carefully follow the sections on how to prepare before deleting a WordPress theme, and how to delete the theme via FTP or the cPanel File Manager.

Manually Deleting a Theme

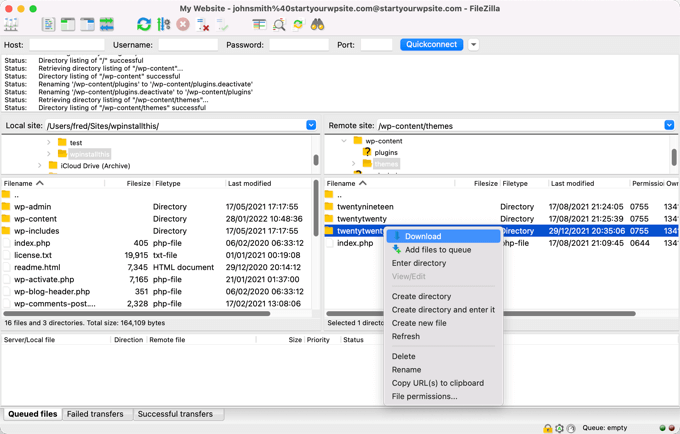
After that, you should be able to log in to your WordPress admin area again. You’ll need to upload the theme folder from your computer to your website, and then scroll down to the third section below to learn how to roll back the plugin to a previous version.

Are You Still Seeing an Error Message?

If you are still seeing an error message that prevents you from logging in to WordPress, then you should make a note of the error and then see if our guide on what to do when you are locked out of WordPress admin offers a fix for that error.

If not, then check our list of the 50 most common WordPress errors and how to fix them. You can also see our guide on how to properly ask for WordPress support for more options to get help with the error.

Rolling Back a WordPress Plugin to a Previous Version

The first thing you need to do is install and activate the WP Rollback plugin. For more details, see our step by step guide on how to install a WordPress plugin.

Upon activation, go to the Plugins » Installed Plugins page and you will notice a new ‘Rollback’ link below each plugin that you installed from the WordPress.org plugin directory.

Note: You won’t be able to rollback third party plugins that aren’t in the official WordPress plugin directory.

The Plugins Page Now Has a New Rollback Link

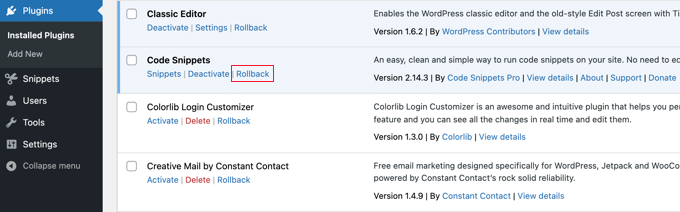
When you need to revert to a previous version of the plugin, simply visit the plugins page and click the ‘Rollback’ link below that plugin.

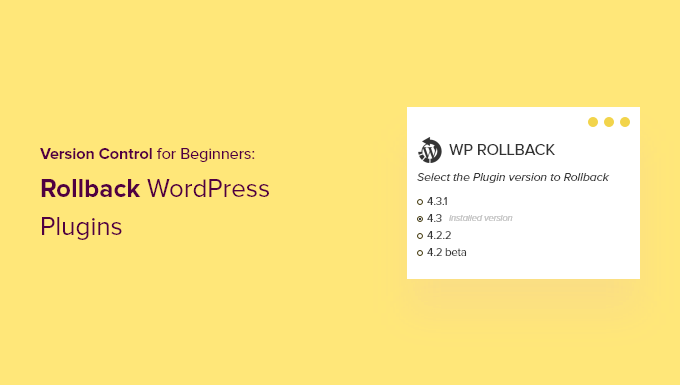
The WP Rollback plugin will take you to a page where you can see which version you have installed and the versions you can rollback to.

Select a Version to Rollback To

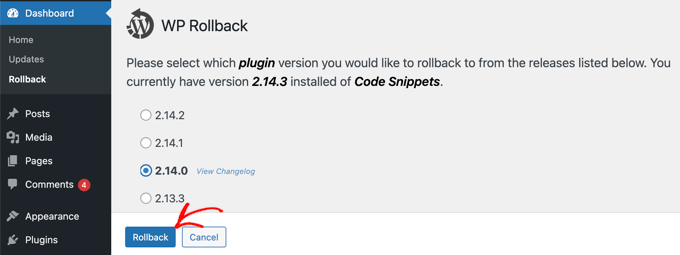
Simply select an older version and then click the ‘Rollback’ button.

The plugin will now display a warning message. This message simply informs you that you should create a complete WordPress backup before proceeding.

WP Rollback Will Display a Warning Message

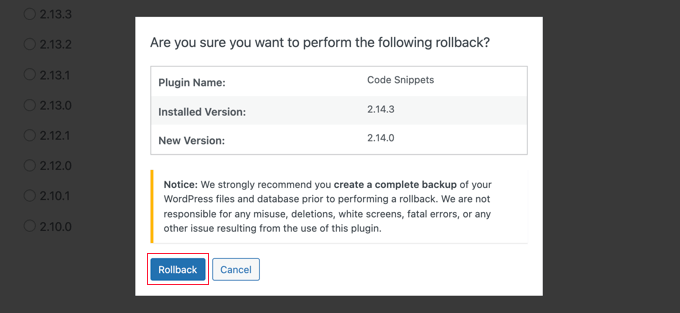
If you already have a recent backup of your WordPress site, then you can continue by clicking on the ‘Rollback’ button.

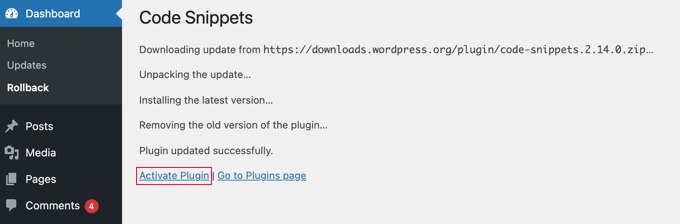
WP Rollback will download and replace your current version with the version you selected. Don’t forget to click the ‘Activate Plugin’ link when you’re ready.

WP Rollback Will Download and Install the Previous Version

Rolling Back WordPress Themes to Previous Version

If you are using a free theme downloaded from WordPress.org theme directory, then WP Rollback can also rollback your theme.

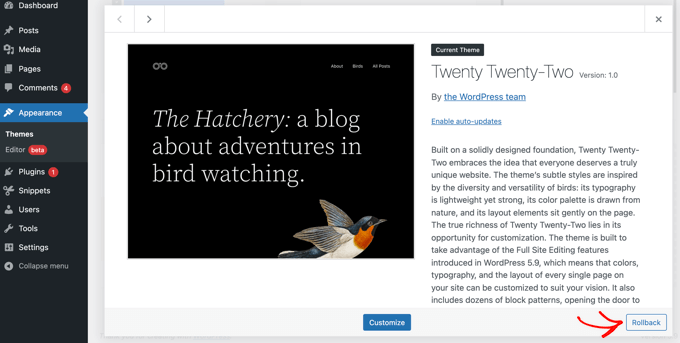
Simply go to Appearance » Themes page and click on the theme that you want to rollback.

Click the Theme You Wish to Rollback

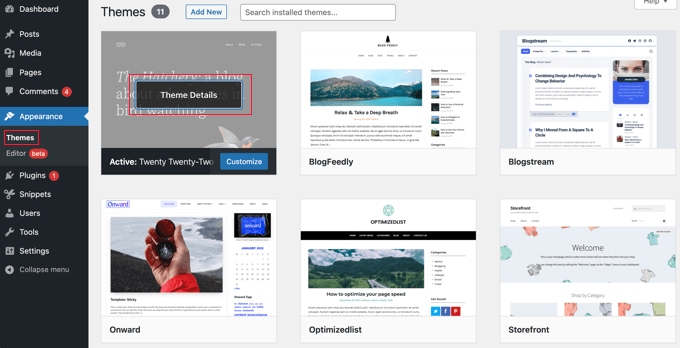
The ‘Theme Details’ popup will appear that displays the name and description of the plugin, a link to enable auto-updates, and a button to customize the theme.

You will also notice a ‘Rollback’ button in the bottom right corner.

Click the Rollback Button in the Bottom Right Corner

If you don’t see a rollback option, then first make sure that the theme is from the WordPress.org theme directory. The plugin does not work on themes downloaded from any other sources.

If you are certain that the theme you are trying to rollback is from WordPress.org directory, then you just need to visit the Dashboard » Updates page. This will force WordPress to check for updates.

Now come back to the themes page and click on the theme you wanted to rollback. You should now be able to click the ‘Rollback’ button.

This will take you to a page where you can see the theme version which is currently installed, and a list of versions you can rollback to.

Select the Version You Wish to Rollback To

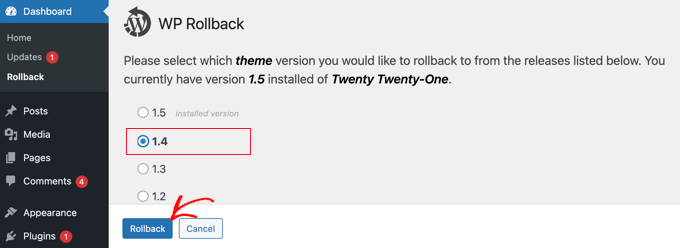
Simply select a previous version and then click the ‘Rollback’ button.

A warning message will be displayed reminding you to complete a backup before continuing.

WP Rollback Will Display a Warning Message

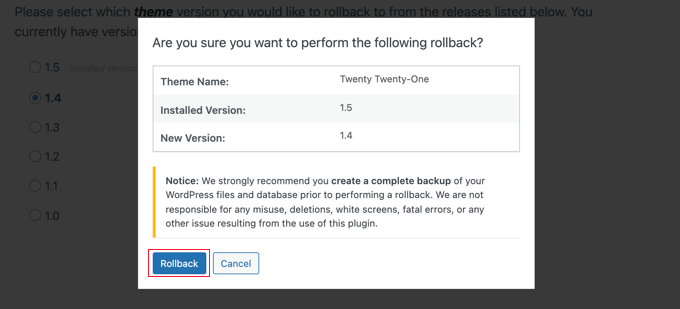
If you recently created a backup of your site, then you can safely click the ‘Rollback’ button.

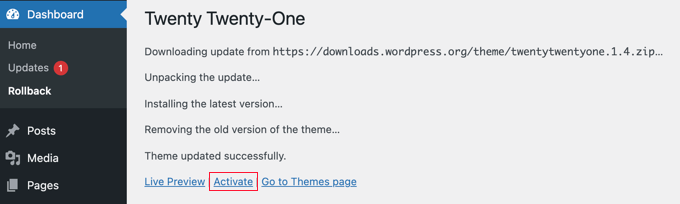
The version of the theme you selected will be downloaded and replace the current version. If you want to use the theme on your website, then you should click the ‘Activate’ link.

WP Rollback Will Download and Install the Previous Version

We hope this tutorial helped you learn how to rollback WordPress plugins like a version control system for beginners. You may also want to learn how to create a free business email address, or check out our list of the most common WordPress errors and how to fix them.

If you liked this article, then please subscribe to our YouTube Channel for WordPress video tutorials. You can also find us on Twitter and Facebook.

The post How to Rollback WordPress Plugins (Version Control for Beginners) first appeared on WPBeginner.


February 24, 2022 at 07:00PM

Wednesday, February 23, 2022

How to Embed a YouTube Playlist in WordPress (Best Method)

Are you looking to embed YouTube playlists on your WordPress website?

Adding YouTube playlists to your blog posts and landing pages can increase user engagement and improve your search engine optimization (SEO). It also helps get more subscribers and grow your channel.

In this article, we’ll show you how to embed a YouTube playlist in WordPress.

How to embed a YouTube playlist in WordPress

Why Embed YouTube Playlists in WordPress?

If you want to make your content more engaging, then adding YouTube videos is a great way to grab your visitor’s attention.

There are a lot of benefits to embedding YouTube content:

  • You can keep people engaged and get them to spend more time on your website.
  • Video content helps boost your WordPress SEO, because the high engagement and low bounce rate send a positive signal to search engines.
  • It helps you to promote your YouTube channel and get more subscribers.

There are a few different ways to add YouTube content to your site. You could embed a single YouTube video, show the latest videos from your YouTube channel, or even create a video gallery.

So, why choose a playlist?

Embedding a playlist lets you keep the videos focused on a single topic.

A playlist also helps you to guide your visitors from one video to the next one in order, helping them to stay even more engaged on your website.

That said, let’s look at how you can embed YouTube playlists on your WordPress site.

Embedding YouTube Playlists in WordPress

WordPress by default does not allow you to embed a playlist. The easiest way to embed a YouTube playlist in WordPress is by using the YouTube Feed Pro by SmashBalloon plugin.

It’s the best WordPress plugin for YouTube and helps you create custom YouTube feeds for your website. It lets you add your YouTube playlists and offers lots of customization features.

YouTube feeds pro by SmashBalloon

The plugin automatically updates the playlist when you add more videos to it on YouTube. You can even embed live YouTube streams in WordPress.

For this tutorial, we’ll be using the premium version of YouTube Feed Pro because it offers more features. There is also a free version that you can use to try it out.

First, you’ll need to install and activate the YouTube Feed Pro by SmashBalloon plugin. Please see our guide on how to install a WordPress plugin for more details.

Upon activation, you can head over to Feeds for YouTube from your WordPress dashboard and then go to the ‘License’ tab.

Simply enter your license key and then click the ‘Activate License’ button. You can find the key in your account.

Enter license key

Next, you’ll need to go to the ‘Configure’ tab and connect your YouTube account.

To do that, go ahead and click the ‘Connect to YouTube to Create a Feed’ button.

Connect to YouTube to create a feed

A popup will now appear informing you that the plugin will require read-only access to your YouTube account to retrieve the API key.

Simply click the ‘Continue’ button to move on to the next step.

Click the continue button

Next, you’ll need to select your Google account.

Select Google account

On the next screen, the plugin will require access to your Google account.

Simply click the ‘Continue’ button.

Allow access to your account

You’ll now be redirected back to your WordPress website, and a popup will appear showing that you’ve successfully connected your account.

Go ahead and click the ‘Dismiss’ button to continue.

Successfully connected your account

Next to the ‘YouTube Accounts’ section, you can see that you’ve successfully connected your Google account.

See successfully connected notification

Now, you’ll need to create an API key so that the plugin automatically fetches your playlists and displays them in WordPress.

Let’s see how you can get an API Key.

Creating a YouTube API Key

You’ll first need to visit the Google Cloud Platform website and then login to your Google account.

After that, click on the ‘My First Project’ option at the top.

Click my first project

Now, you’ll see a popup window appear where you can select your projects.

Simply click the ‘New Project’ button to get started. You can also select an existing project if you want.

Create a new project

After that, you’ll need to enter a name for your project under the ‘Project Name’ field. We’ve called ours ‘YouTube Playlist’.

Then click the ‘Create’ button.

Enter name for a project

Once your project is created, you can click the menu option in the top left corner (3 horizontal lines) next to Google Cloud Platform and go to ‘API & Services’ from the menu.

Then click the ‘+ Enable APIs and Services’ option at the top.

Enable APIs and services

This will open the API library page. Go ahead and enter YouTube in the search box to find the YouTube API.

Next, you’ll need to select the ‘YouTube Data API v3’ option.

Select YouTube data API v3

After that, simply click the ‘Enable’ button to activate the YouTube API key.

Enable YouTube API

Now, you’ll need to go to the Credentials menu in the left menu, and then click the ‘+ Create Credentials’ at the top.

From the options that appear in the dropdown, go ahead and select ‘API key.’

Create API key

A popup window will now appear with the YouTube API key.

Simply copy the API key or store it on a notepad file.

Copy the API key

Next, you can head back to your WordPress website and then navigate back to Feeds for YouTube from your dashboard.

Now, go to the ‘Configure’ tab and enter your API key.

Enter API key

When you enter the API key, you’ll notice more options will be unlocked in Feeds for YouTube, including the ‘Select a Feed Type’ options.

You can now choose ‘Playlist’ as the feed type and enter the YouTube playlist ID. There is also an option to change the frequency that your site will check for new posts in your YouTube playlist.

Unlock feed type options

You can find the playlist ID by visiting your YouTube channel and then going to the playlist you’d like to display on your website.

The string of letters and numbers after the ‘=’ symbol in the URL is your playlist ID. Simply copy the ID and enter it in the Feeds for YouTube plugin.

Find YouTube playlist ID

Now that you’ve created an API key and added the YouTube playlist ID, let’s see how you can customize the feed and embed it on your website.

Customize and Embed Your YouTube Playlist

To customize your YouTube playlist feed, simply head over to the ‘Customize’ tab in the Feeds for YouTube plugin.

Here you can edit the width, height, and background color of your YouTube feed.

Edit width and height of feed

Next, you can scroll down and change the layout of the feed. The plugin offers multiple layout options, including a grid, gallery, list, or carousel type.

Besides that, there are also options for selecting the number of columns (for mobile and desktop), the number of videos, and spacing between the videos.

Change the layout

The plugin also offers more optional options to customize your YouTube feed. For instance, you can choose what info to display, like the play icon, title, views, date, and more.

There are also options for entering translations for info text, edit header options, changing the Load More and Subscribe button settings, adding moderation, and other advanced settings.

Video experience settings

Don’t forget to click the ‘Save Changes’ button when you’re done.

Next, you can now display your YouTube playlist on any WordPress page or post.

To start, simply create a new page or edit an existing one. Once you’re in the WordPress content editor, simply click the ‘+’ button and add the ‘Feeds for YouTube’ block.

Add Feed for YouTube block

Your YouTube playlist will now appear on your page.

Go ahead and publish your article to see the YouTube playlist feed in action.

YouTube Playlist preview

We hope this article helped you learn how to embed a YouTube playlist in WordPress. You may also want to check out our guide on how to start an online store and the best live chat software.

If you liked this article, then please subscribe to our YouTube Channel for WordPress video tutorials. You can also find us on Twitter and Facebook.

The post How to Embed a YouTube Playlist in WordPress (Best Method) first appeared on WPBeginner.


February 23, 2022 at 04:00PM

Tuesday, February 22, 2022

How to Fix ‘Another Update is Currently in Progress’ Error in WordPress

Do you want to fix the ‘another update is currently in progress’ error?

This error stops you from updating WordPress. Normally, it should automatically go away. But if it doesn’t, then you’ll need to fix it manually. 

In this article, we’ll show you how to fix the ‘another update is currently in progress’ error in WordPress, step by step.

How to fix 'another update is currently in progress' error

Why Does the ‘Another Update is Currently in Progress’ Error Occur?

This message usually appears when a core WordPress update is running in the background, and a user tries to start another update process.

During the core update process, WordPress automatically sets an update lock on your WordPress database. This database lock prevents you from running simultaneous updates on your website, which could cause WordPress errors or destroy important data.

Another update in progress error

This message is set to automatically disappear in 15 minutes or when the update process has finished. However, if you are stuck on this message, then you’ll need to remove it manually. 

With that said, let’s take a look at how you can fix the ‘another update is currently in progress’ error in WordPress.

Fixing the ‘Another Update in Progress’ Error in WordPress

When you’re experiencing the another update in process error, you need to delete the ‘core_updater.lock’ file from your WordPress database. The easiest way to do this is by using phpMyAdmin.

Note: Before you make changes to your database or WordPress theme files, it’s a good idea to create a full website backup. To learn more, see our guide on how to backup your WordPress site.

First, you need to log in to the cPanel dashboard of your WordPress hosting account. We’re using Bluehost, so your screen may look a bit different if you’re using another hosting company.

From your Bluehost dashboard, you’ll need to click on the Advanced tab on the left. Next, navigate to the ‘Databases’ section and click on the ‘phpMyAdmin’ icon. If you don’t see a phpMyAdmin option in your hosting dashboard, you should contact your hosting company’s support for help.

Open phpMyAdmin from CPanel

This will launch the phpMyAdmin app, where you need to select your WordPress database. Once you click your database, it will display all of the tables inside the database.

Then, you need to click the ‘Browse’ button next to the WordPress options tables (wp_options).

Select database and wp-options

This brings up all of the rows inside the options table. 

You need to find the row with the option name ‘core_updater.lock’ and click on the delete button next to it.

Click wp-options in phpMyAdmin

Now, phpMyAdmin will automatically delete the row from your database. 

When you go back to your WordPress website, the another update in process error will be gone, and you can continue updating your site. 

If you’re still seeing other errors, then you can see our beginner’s guide on troubleshooting WordPress errors to get more help.

We hope this article helped you learn how to fix the ‘another update is currently in progress’ error in WordPress. You may also want to see our guide on how to choose the best web design software and our expert picks of the best live chat software for small businesses.

If you liked this article, then please subscribe to our YouTube Channel for WordPress video tutorials. You can also find us on Twitter and Facebook.

The post How to Fix ‘Another Update is Currently in Progress’ Error in WordPress first appeared on WPBeginner.


February 22, 2022 at 04:53PM

Monday, February 21, 2022

When Is the Best Time to Publish a Blog (+ How to Test It)

Are you looking for the best time to publish your articles to get the most engagement?

Finding the right publishing time could help you attract more visitors, get more comments, social shares, and backlinks. It can also help you see when your audience is most active, and increase your chances of going viral.

In this article, we’ll share what is the best time to publish a blog post, and how you can test it for your website.

What is the best time to publish a blog and how to test it

The Best Time to Publish Blog Posts

If you’ve just started a new blog, then you are probably looking for ways to attract more people to read your content.

While there are many ways to increase your blog traffic, you might be wondering, can publishing content at a specific time and date can help you get more visitors?

Over the years, many studies have been done to find the perfect time to publish a blog post. For instance, one study found that 70% of people read blogs in the morning, and that the average best time to publish blog posts for maximum traffic is Monday around 11 am EST.

However, another study that analyzed millions of blog posts found that there’s no difference in the number of shares or traffic on different days of the week.

After analyzing all the different studies, we found the key takeaway is that the best time to publish blog posts is different for every website.

One blog might get the most traffic by publishing on Mondays at 11 am, while another might get more views by publishing on Saturday nights.

It all depends on your audience.

You cannot pick a single day of the week to publish all your content and hope to get more engagement based on a study. That’s because most of the studies provide a generalized view across multiple industries.

It’s better to do your own testing and find out what time and day works the best for your website. You can test different days and times to see when you get the most traffic, social shares, and comments.

The good news is that it’s quite easy to test publishing times in WordPress.

Let’s take a look how you can find the best publishing time for your blog posts in WordPress.

How to Test Best Publishing Time in WordPress

The easiest way to uncover the best time to publish blog posts in WordPress is by using MonsterInsights.

It’s the best Google Analytics plugin for WordPress, and over 3 million businesses use it, including Microsoft, Bloomberg, PlayStation, and Subway.

MonsterInsights

Using MonsterInsights, you can test the best publication time through their custom dimensions feature which tracks realtime visitors data.

Let’s look at both ways you can test the best time to publish blog posts.

1. Setting Up Publication Time Analytics

By default, Google Analytics does not track your blog post publication times. However, you can use MonsterInsights to add this tracking by using a custom dimension.

Custom dimensions help track additional data like popular authors, popular post type, and best publication time in Google Analytics.

The best part about using MonsterInsights is that you don’t have to touch a single line of code to add custom dimension tracking on your website.

Note: You’ll need the MonsterInsights Pro version because it includes the Custom Dimensions addon. Plus, you also get other advanced tracking features and dashboard reports including realtime reports.

First, you’ll need to install and activate the MonsterInsights plugin. If you need help, then please see our guide on how to install a WordPress plugin.

Upon activation, you’ll be taken to Insights from your WordPress dashboard, and you’ll see the welcome screen for MonsterInsights. Go ahead and click the ‘Launch the Wizard’ button to add Google Analytics to your site.

Launch setup wizard

For more details, please see our guide on how to install Google Analytics to a WordPress website.

Next, you can head over to Insights » Addons from your WordPress dashboard and then scroll down to the ‘Dimensions’ addon. After that, click the ‘Install’ button, and the addon will automatically activate.

You’ll see the Status change from ‘Not Installed’ to ‘Active.’

Activate the dimensions addon

Once the addon is active, you can go to Insights » Settings.

Then, navigate to the ‘Conversions’ tab.

Conversion settings

Next, scroll down to the ‘Custom Dimensions’ section.

Here you’ll need to click the ‘Add New Custom Dimension’ button to get started adding the publication time tracking.

Add new custom dimension

After that, simply select the ‘Published at’ dimension from the dropdown menu.

Don’t forget to save your changes when you’re done.

Choose published at dimension

You’ll now need to add to custom dimensions in Google Analytics.

We’ll show you how to create dimensions in the older versions of Google Analytics (called Universal Analytics) and the new Google Analytics 4 version.

Add Custom Dimensions in Universal Analytics

First, you’ll need to visit the Google Analytics website and login to your account. Simply choose your website property from the menu at the top.

Choose a website property

After that, navigate to the Admin page.

Then click the ‘Create Definitions’ and ‘Custom Dimensions’ options under the Property column.

Choose custom dimensions

Next, you can click the ‘+ New Custom Dimension’ button.

Click new custom dimension

Enter a name for your custom dimension on the next screen.

Then click the ‘Create’ button.

Enter dimension name

You’ll now see codes for your custom dimensions.

Simply click the ‘Done’ button at the bottom.

Click the done button

Your custom dimension will now be created in Google Analytics.

Just make sure that the Index number in Google Analytics matches the custom dimensions ID in MonsterInsights. If this is the first custom dimension you’re setting up, they will both automatically be ‘1’, so there’s no need to adjust it.

Match dimension ID

Add Custom Dimensions in Google Analytics 4

To set up custom dimensions in Google Analytics 4 version, go ahead and login to your account.

After that, you’ll need to go to Configure from the menu on your left.

Go to configure

Next, head over to the ‘Custom definitions’ option from the left menu and then click the ‘Create custom definition’ button.

Create a new custom dimension

Now, you’ll need to enter details about your new custom dimension. Simply enter a name for the dimension and add a description for your own reference. We’ll call the new custom dimension ‘Best Publication Time’.

When selecting the Scope, go ahead and choose ‘Event’ from the dropdown menu. Lastly, enter an event parameter that you want the dimension to use and show in the reports, like ‘publication_time’.

Enter custom definition details

After entering these details, don’t forget to click the ‘Save’ button when you’re done.

You’ve successfully created a custom dimension in Google Analytics to record the best publication time on your website.

Now you can go ahead and view the best publication times on your site and see when you get the most traffic.

With MonsterInsights, you can view the Dimensions report inside your WordPress dashboard. Simply head over to Insights » Reports from your WordPress dashboard and then go to the ‘Dimensions’ report.

Best publication time report

Using the data from the stats dashboard, you can see the pageviews at different dates and times. Go ahead and schedule your blog posts at the best publication time and boost your blog traffic.

2. Monitor Realtime Visitors for Best Publishing Time

You can also view the Realtime report in MonsterInsights to see how many visitors you get immediately after publishing and promoting a blog post.

Simply go to Insights » Reports and then navigate to the ‘Realtime’ report to view the report.

Realtime report

Next, you can monitor the report after you publish a post and share it with your readers. This will help you uncover the best time to publish a blog post.

Publishing your blog posts at the right time isn’t the only way to boost your traffic. If your blog posts are properly optimized for search engines, then they’ll continue to get more traffic over time, long after they’re published. Over time, this will get you more traffic than publishing on a certain day or time.

To get started optimizing your website to get more search traffic over time, see our ultimate guide on WordPress SEO.

Another proven way to get more traffic to your new blog posts is by using push notifications. It’s a top 10 traffic source on WPBeginner. Here’s how to add push notifications in WordPress.

We hope that this article helped you learn about what is the best time to publish a blog and how to test it. Next, you can see our guide on how to choose the best WordPress hosting, or see our expert pick of the best email marketing services.

If you liked this article, then please subscribe to our YouTube Channel for WordPress video tutorials. You can also find us on Twitter and Facebook.

The post When Is the Best Time to Publish a Blog (+ How to Test It) first appeared on WPBeginner.


February 21, 2022 at 04:22PM