Friday, March 18, 2022

12 Best WordPress Database Plugins – Expert Pick (2022)

Are you looking for the best WordPress database plugins for your site?

WordPress database plugins can help you clean up your database to improve website performance, assist with website migrations, and more. 

In this article, we’ve hand picked some of the best database plugins for your WordPress site.

12 best WordPress database plugins

Why Use a WordPress Database Plugin?

WordPress stores a lot of information in your database, from comments, to posts, user information, plugin data, and more. 

Over time your database can become cluttered, which can slow down your website and even cause WordPress errors. WordPress database plugins can help optimize and clean up your database to make sure your site is as fast as possible.

Other WordPress database plugins can help you store and display data, backup your database to keep your site safe, and more.

With that said, let’s show you some of the best WordPress database plugins you can use with your site.

1. UpdraftPlus

UpdraftPlus

UpdraftPlus is the best WordPress backup plugin used by over 3 million websites.

It allows you to create a complete backup of your WordPress website and store it safely in the cloud or your computer. You can choose to backup your entire WordPress site and databases or select specific website files. 

You can also backup your site and databases to Dropbox, Amazon S3, FTP, email, Google Drive, and more. 

The premium version comes with more addons to migrate and clone websites, use database search and replace, access multisite support, and more. 

For more details, see our guide on how to backup and restore your WordPress site with UpdraftPlus.

2. WP-DBManager

WP-DBManager

WP-DBManager is an all in one tool for WordPress database optimization. The plugin is very feature rich, but it’s still beginner friendly. 

It lets you optimize your databases, repair and restore databases, create database backups, and delete database backups you’ve created. 

Plus, once you configure the initial settings, it will run in the background, so your WordPress database will always be optimized. 

3. WPForms

WPForms

WPForms is the best contact form plugin for WordPress used by over 5 million websites.

It lets you easily create any kind of form for your WordPress website like contact forms, order forms, user registration forms, and more.

There’s a library of over 300+ templates you can use to get started, and every template can be completely customized with the drag and drop builder.

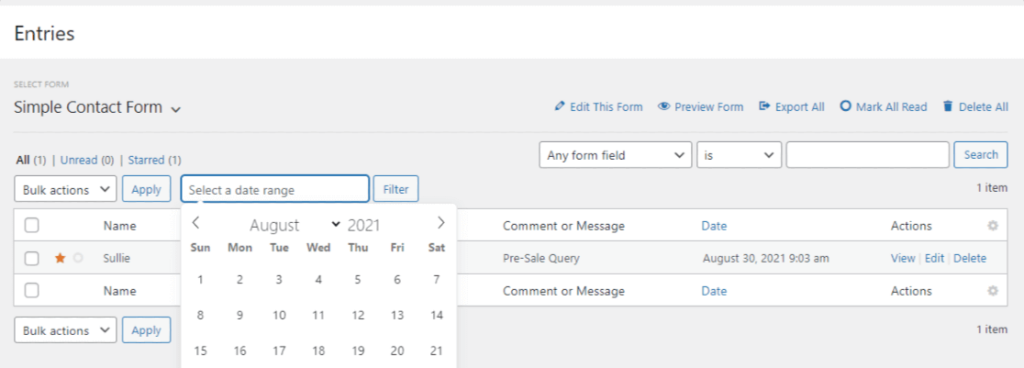
When a user submits a form on your site, all form data is automatically saved in your WordPress database.

WPForms then takes this data and makes it easy to view within your WordPress dashboard. You can see all the contact data, field labels, number of entries, and more. It’s essentially a frontend database of your contact list.

WPForms form entries

To learn more, see our guide on how to save contact form data in the WordPress database.

You can connect your WordPress forms to Google Sheets or any other email marketing service as well to help improve your workflows and save time.

4. Better Search Replace

Better Search Replace

Better Search Replace is a useful plugin that can help with moving WordPress to a new domain and various other quick find & replace tasks.

When you’re migrating a website, you usually need to make changes to the database, URLs, media files, and more.

This plugin makes it easy to run a search and replace in your WordPress database. It also has advanced controls, so you can select specific tables, see what fields will be replaced before running the plugin, and more.

It even supports a WordPress multisite network, if you’re migrating an entire network of WordPress sites at once. 

5. WP-Sweep

WP-Sweep

WP-Sweep is a WordPress database plugin that makes it easy to clean up your WordPress database and improve your WordPress performance and speed

It lets you easily clean up areas like your post metadata, comments, post revisions, uninstalled plugins, and more. 

There’s a user friendly settings screen that lets you choose which areas of your database to clean up with a single click. 

The plugin also uses the WordPress delete function to remove database data, which helps to ensure there’s no accidental data loss. 
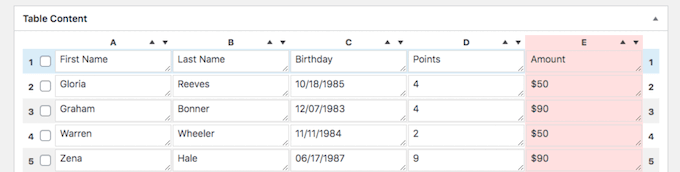
6. Formidable Forms 

Formidable Forms

Formidable Forms is a relational database plugin and the most advanced WordPress form builder in the market. 

With this plugin, you can upload and collect data through front end forms, then you can display that data on your website in a variety of different ways. 

The Formidable Views addon available on the Plus plan lets you display data in a grid, table, calendar, and other formats. This is useful for creating a job board, showing real estate listings, displaying registered users, and more. 

Formidable Forms table example

All data submitted through the forms you create with the plugin automatically goes to your WordPress database. Then, you can use the backend interface to sort, filter, and search through your data. 

You can also allow users to upload images, blog posts, and other forms of data. 

Formidable Forms lets you create a frontend database for WordPress with their advanced Views addon.

7. Easy Username Updater

Easy Username Updater

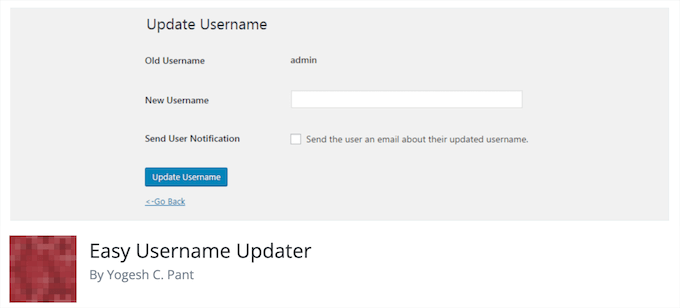
Easy Username Updater is a free plugin that makes it easy to change your WordPress username. 

WordPress makes it easy to change your full name from your user profile. But, if you want to change your username, then you’ll need to use a tool like phpMyAdmin to make changes to your database.

This plugin simplifies the process and lets you simply change your username and the usernames of other users right from your WordPress admin panel. 

To learn more, see our guide on how to change your WordPress username.

8. JetPack Backup (VaultPress)

JetPack Backup (VaultPress)

JetPack Backup is a popular WordPress backup plugin by Automattic, the company behind WordPress. It was initially launched as VaultPress but has been relaunched and redesigned as Jetpack Backup.

The plugin offers daily automated backups without slowing down your website. These backups also include a full WordPress database backup.

This backup solution is also geared towards WooCommerce store owners, so your order and customer data are always safe. 

Beyond backups, you can restore your entire site to a previous version with a single click.

9. TablePress

TablePress

TablePress is one of the best WordPress table plugins you can use to display your data. 

The plugin makes it easy to create beautiful tables without writing any code. There are unique features that make your tables more interactive, like pagination, filtering, sorting, and more. 

TablePress example

You can import and export existing tables in CSV, Excel, HTML, and JSON format. This makes it easy to migrate your tables from another table plugin.

TablePress stores all of the table data in your WordPress database. 

For more details, see our guide on how to add tables in WordPress posts and pages.
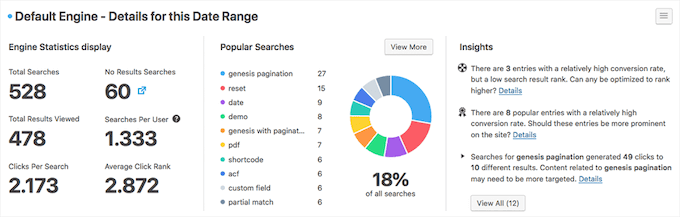
10. SearchWP

SearchWP

SearchWP is the best WordPress search plugin and makes it easy to improve WordPress search.

The plugin gives you complete control over your website search algorithm, so you can choose how you want content to rank in your WordPress search results. 

It creates its own custom WordPress database to store and maintain its own search index. 

This means you get access to your search data, so you can improve your content and create a better user experience. 

SearchWP metrics

For more details, see our guide on how to use multiple search forms in WordPress.

11. Advanced WordPress Reset

Advanced Database Reset

Advanced WordPress Reset lets you reset and restore your WordPress database to it’s original status like a fresh WordPress install.

You can also reset specific areas of your WordPress site such as clean up uploads folder, delete all comments, remove all plugins, etc.

This is a really powerful plugin that’s often used by developers and freelancers when building staging websites or testing. It’s not something you want to use on a live website. 

12. wpDataTables

wpDataTables

wpDataTables is a premium table plugin that makes it easy to add visually stunning tables to WordPress. 

The plugin has an easy to use table builder, so you can create feature rich tables without writing any code.

It’s equipped with features that let you add star ratings, style different cells, add shortcodes, and much more. 

wpDataTables example

It also has unique features that prevent deleting tables in the WordPress database and can connect your tables to multiple WordPress databases. 

Final Thoughts on WordPress Database Plugins

While the above list contains the most popular use-cases of WordPress database plugins, it’s important to emphasize that almost all WordPress plugins interact with the database.

So it’s really impossible to create a best WordPress database plugin list without fully understanding the use-case.

Here are some other bonus WordPress plugins that interact with the database:

  • AIOSEO – best WordPress SEO plugin used by over 3 million sites. It stores your website’s SEO data in WordPress database including all 404 errors and other useful insights.
  • SeedProd – best drag & drop website builder for WordPress. It lets you create custom WordPress themes without any code, and all data is stored in the database.
  • HubSpot – one of the best WordPress CRM software that helps you create a contact database in WordPress. It works well with WPForms.
  • MonsterInsights – best WordPress analytics plugin that brings your Google Analytics data inside your WordPress dashboard.
  • MemberPress – allows you to create a members only area and sell courses in WordPress. Lets you store a members directory in WordPress database.
  • AffiliateWP – best WordPress affiliates plugin that allows you to create and manage a partner referral program in WordPress database and dashboard.
  • Sugar Calendar – simple and light-weight event management system allowing you to use your WordPress database as a calendar solution.
  • WP Mail SMTP – stores a log of all emails sent by your WordPress site in a database, so you can ensure emails are actually getting delivered to your customers.

That’s just a quick list of bonus plugins that interact with the WordPress database that you may want to use.

We hope this article helped you find the best WordPress database plugins for your site. You may also want to see our guide on how to move WordPress from HTTP to HTTPS and our expert picks of the best business phone services for small businesses.

If you liked this article, then please subscribe to our YouTube Channel for WordPress video tutorials. You can also find us on Twitter and Facebook.

The post 12 Best WordPress Database Plugins – Expert Pick (2022) first appeared on WPBeginner.


March 18, 2022 at 03:03PM

Thursday, March 17, 2022

How to Regenerate Your Permalinks in WordPress

Do you need to regenerate or flush your WordPress permalinks?

If you are not able to view your website content, then neither can your visitors. Broken links and 404 errors can damage the user experience, and your position in SEO rankings. 

In this article, we will show you how to fix these dead URLs by regenerating your permalinks in WordPress. We will also talk about what causes this error, and how to spot broken links, before your visitors do. 

How to Regenerate Your Permalinks in WordPress

Why Do I Need to Regenerate Permalinks in WordPress?

Most of the time, the URLs on your WordPress site are permanent and won’t cause any problems. They just work.

However, sometimes you may click on a link and get a 404 error. You might even get a 404 when trying to access your entire WordPress website.

This sometimes happens after moving your WordPress site to a new host or server. It could also happen after you install a new plugin. This is because some plugins edit your site’s .htaccess file without your knowledge. This can affect your site in lots of different ways, including damaging your URLs. 

Note: For this tutorial, you’ll need to be able to log in to the WordPress dashboard. If you can’t access your WordPress admin page, then see our step by step guide on what to do when you are locked out of WordPress admin.

Often, regenerating your permalinks can be a quick and easy fix for those issues. Let’s take a look at how to do that.

How to Regenerate Your Permalinks in WordPress

When you regenerate your links, you’re rebuilding and repairing the WordPress permalink structure. This may sound complicated, but don’t worry. You simply need to click on a button, and WordPress will handle the rest.

To get started, head over to Settings » Permalinks from your WordPress admin menu.

The WordPress Permalink settings.

This will take you to the WordPress Permalinks Settings page. Here, you’ll see the permalink structure that you’re currently using.

WordPress supports several options for permalinks. You can see our guide on how to create custom permalinks in WordPress for step by step instructions on how to customize them.

To regenerate your permalinks, just scroll to the bottom of the page and click on the ‘Save Changes’ button.

After a few moments, you should see a message confirming that WordPress has updated your permalink structure. 

WordPress' 'Permalink structure updated' notification.

That’s it! WordPress has now regenerated your permalinks.

To make sure it worked, head over to your site and try clicking on a few different links. 

Are You Still Seeing Permalink Errors After Regenerating?

If you’re still getting 404 errors, then you may have to clear your browser cache. For more details, see our guide on how to clear your browser cache in all major browsers.

If this doesn’t fix the problem, then think about what happened right before you started seeing these 404 messages. If you’d just installed or updated a plugin, then this might have affected your links. You can try disabling this plugin, to see whether this removes the 404 error.

The Plugin settings, as seen in the WordPress dashboard.

If this doesn’t work, then you can try deactivating all plugins to see whether this fixes your broken links. 

This is a bit of a drastic step, so it’s smart to put your site into maintenance mode first. This will keep visitors informed while you test your plugins, giving a better impression than seeing a broken website.

If deactivating all of your plugins solves the problem, then you’ll know that at least one plugin is affecting your URLs. In this case, reactivate each plugin individually and then test how this impacts your links.

When the 404 error reappears, you’ve found the plugin that’s causing the issue. You can then delete this plugin from your site or ask the developer for support.

Your site should now be error-free and running smoothly. If not, then check our list of the most common WordPress errors and how to fix them

How to Track and Avoid Broken Permalinks in WordPress

Broken links are bad news for visitors, conversions, and your search engine rankings. Over time, dead URLs can impact where you appear in the search engine rankings. This means less traffic to your website.   

With so much at stake, you’ll want to know about any dead links as soon as possible.

The easiest way to track and fix broken links on your WordPress website is by using the All in One SEO (AIOSEO) plugin for WordPress. Over 3 million website owners use AIOSEO including us here at WPBeginner.

The All in One SEO (AIOSEO) WordPress plugins.

AIOSEO allows you to easily find broken links and fix them with just a few clicks using their powerful redirection manager. For more details, please see our guide on how to track 404 pages and redirect them in WordPress.

We hope this article helped you learn how to regenerate your permalinks in WordPress. You can also go through our guide on how to choose the best website builder, or our expert pick of the best domain registrars.

If you liked this article, then please subscribe to our YouTube Channel for WordPress video tutorials. You can also find us on Twitter and Facebook.

The post How to Regenerate Your Permalinks in WordPress first appeared on WPBeginner.


March 17, 2022 at 03:55PM

Wednesday, March 16, 2022

How to Install and Setup W3 Total Cache for Beginners

Do you want to install and set up W3 Total Cache on your WordPress website?

W3 Total Cache is a popular WordPress caching plugin that helps you to improve your website speed and performance.

In this beginner’s guide, we’ll show you how to easily install and set up W3 Total Cache on your WordPress website.

W3 Total Cache installation and setup guide for WordPress beginners

Editor’s Note: We don’t use W3 Total Cache on our website anymore and have switched to WP Rocket which is a premium caching plugin. W3 Total Cache is still a fine solution that works well.

What is W3 Total Cache?

W3 Total Cache is one of the best WordPress caching plugins that allows you to easily improve WordPress performance and speed.

By default, WordPress uses PHP to dynamically generate each page on your website when it is requested by a user.

PHP is a server-side programming language. This means each user request increases the load on your server. This affects your website’s performance, user experience, and SEO.

WordPress caching plugins help you reduce this by skipping PHP and serving a cached copy of your webpage.

How caching works

It also allows you to easily connect your website to a CDN (content delivery network) to further improve your website performance.

Installing W3 Total Cache in WordPress

Before you install the W3 Total Cache plugin in WordPress, you’ll need to make sure that you deactivate any other caching plugin on your website. This would help you save server resources and prevent any plugin conflicts.

After that, you can go ahead and install and activate the W3 Total Cache plugin. For more details, see our step-by-step guide on how to install a WordPress plugin.

Upon activation, W3 Total Cache will add a new menu item labeled ‘Performance’ to your WordPress admin sidebar. Clicking on it will launch the plugin’s setup wizard.

W3 Total Cache set up

Simply click on the Next button to continue.

First, you will be asked to turn on Page Cache. Click on the Test Page Cache button to continue.

Configure page cache

W3 Total Cache will show you different storage engine options. You need to choose one that saves you the most time. Usually, it will be the ‘Disk: Enhanced’ option for most shared hosting platforms.

Click on the Next button to continue.

Now, you will be given the option to Test Database Cache. We recommend choosing None. For most small to medium sized websites your MySQL server will be able to fetch data more quickly than the Database cache.

Database cache

Click on the Next button to move on to the next step.

This will bring you to the Object Cache section. Object Caching allows W3 Total Cache to store database queries for dynamic pages and reuse them to improve performance.

Object cache in W3 Total Cache

If the test result shows barely a few milliseconds difference then you can choose None.

Click on the next button to continue.

After that, click on the Test Browser Cache button and then select the ‘Enabled’ option under the test results.

Browser cache

This option requests user’s browsers to store a copy of the web page for a limited time. Loading a page from browser cache is much faster than loading it from your web server’s cache.

Click on the next button to move on to the next step.

Lastly, the setup wizard will ask you to enable lazy loading for images.

Now, WordPress comes with built-in lazy loading for images. However, some older browsers may not have support for that feature.

W3 Total Cache uses JavaScript to add lazy loading for images, which can be even faster and more efficient.

Enable Lazy Loading

After that, click on the Next button to finish the setup wizard and view W3 Total Cache dashboard.

Advanced Caching Options in W3 Total Cache

The basic settings would work for most websites. However, there are many advanced options that you can configure to further improve performance.

Let’s take a look at the most important ones.

Minifying JavaScript and CSS in W3 Total Cache

The term ‘minify’ is used to describe a method that makes your website file sizes smaller. It does this by removing white spaces, lines, and unnecessary characters from the source code.

Note: Minifiying JS and CSS files can potentially break your website. If you turn it on and your website doesn’t look right, then simply disable these options.

W3 Total Cache allows you to easily minify JavaScript, CSS, and HTML source code as well. However, we recommend only minifying JavaScript and CSS files.

Simply head over to Performance » Minify page and scroll down to the JS section.

Enable JS minify in W3 Total Cache

Check the box next to ‘JS minify settings’ to enable it.

Now, scroll down to the CSS section and enable CSS minify settings the same way.

Enable CSS minify

Don’t forget to click on the Save All Settings button to store your settings.

For alternate methods, see our guide on how to minify JavaScript and CSS files in WordPress.

Enable CDN Support in W3 Total Cache

CDNs or content delivery networks help you further improve your website performance by serving static files like images, CSS, JavaScript from a global network of servers.

This reduces the load on your WordPress hosting server and improves page load speed.

W3 Total Cache comes with built-in support for various CDN platforms.

We recommend using Bunny.net which is the best CDN solution on the market. This is what we use for our OptinMonster website.

First, you need to signup for a Bunny.net account. After signup, you need to create a Pull Zone for your website.

Bunny CDN dashboard

A pull zone adds a hostname to Bunny.net CDN. This hostname is then used to serve static files for your website.

Add a name for your pull zone and then provide your website’s domain name.

Create pullzone

After adding the pullzone, you need to visit the Performance » General Settings page and scroll down to the CDN section.

Enable CDN

Check the Enable box next to the CDN option and choose Generic Mirror next to the CDN Type option.

Don’t forget to click on the Save All Changes button to store your settings.

Next, you need to visit the Performance » CDN page and scroll down to the Configuration: Objects section.

Add CDN hostname

From here, you need to add the hostname you created earlier for your pullzone and click on the test mirror button.

W3 Total Cache will check the availability of your hostname, and will show the Test Passed message when it’s successful.

You can now click on the Save All Changes button to store your settings.

W3 Total Cache will now start serving your static resources from CDN server.

W3 Total Cache also works well with Cloudflare free CDN. Alternately, you can also use it with Sucuri which is the best website firewall service with built-in CDN service.

Troubleshooting W3 Total Cache Issues

Once you have configured W3 Total Cache properly, it should work seamlessly in the background to improve WordPress speed and boost performance.

Occasionally, you may come across issues where you don’t see changes you made to your website right away, or a plugin may not be working properly.

Most common reason for those issues is that you are probably seeing an old cached version of your website.

This can be easily fixed by clearing cache in WordPress.

Simply click on the Performance menu at the top and then select Purge All Caches option. W3 Total Cache will clear all cached content on your website.

Clear all cache in W3 Total Cache

If you are still seeing the old version of your website, then try clearing your browser cache too.

We hope this article helped you install and setup W3 Total Cache in WordPress. You may also want to see our complete WordPress security guide for beginners to strengthen your website security, or check out our comparison of the best GoDaddy alternatives that are cheaper and more reliable.

If you liked this article, then please subscribe to our YouTube Channel for WordPress video tutorials. You can also find us on Twitter and Facebook.

The post How to Install and Setup W3 Total Cache for Beginners first appeared on WPBeginner.


March 16, 2022 at 06:00PM

Tuesday, March 15, 2022

How to Find a Backdoor in a Hacked WordPress Site and Fix It

Has your WordPress website been hacked?

Hackers will often install a backdoor to make sure they can get back in even after you secure your website. Unless you can remove that backdoor, there’s no stopping them.

In this article, we’ll show you how to find a backdoor in a hacked WordPress site and fix it.

How to Find a Backdoor in a Hacked WordPress Site and Fix It

How to Tell if Your Website Has Been Hacked

If you are running a WordPress website, then you need to take security seriously. That’s because websites are attacked an average of 44 times every day.

You can learn best practices to keep your site safe in our ultimate WordPress security guide.

But what if your site has already been hacked?

Some signs your WordPress site has been hacked include a drop in website traffic or performance, added bad links or unknown files, a defaced home page, an inability to log in, suspicious new user accounts, and more.

Cleaning up a hacked website can be incredibly painful and difficult. We take you through the process step by step in our beginner’s guide to fixing your hacked WordPress site. You should also make sure you scan your site for any malware that the hackers left.

And don’t forget to close the backdoor.

A smart hacker knows that you’ll eventually clean up your website. The first thing they might do is install a backdoor, so they can sneak back in after you secure the front door to your WordPress website.

What Is a Backdoor?

A backdoor is code added to a website that allows a hacker to access the server while remaining undetected, and bypassing the normal login. It allows a hacker to regain access even after you find and remove the exploited plugin or vulnerability to your website.

Backdoors are the next step of a hack after the user has broken in. You can learn how they may have done that in our guide on how WordPress sites get hacked and how to prevent it.

Backdoors often survive WordPress upgrades. That means your site will remain vulnerable until you find and fix every backdoor.

How Do Backdoors Work?

Some backdoors are simply hidden admin usernames. They let the hacker log in as normal by typing a username and password. Because the username is hidden, you’re not even aware that someone else has access to your website.

More complex backdoors can allow the hacker to execute PHP code. They manually send the code to your website using their web browser.

Others have a full fledged user interface that allows them to send emails as your WordPress hosting server, execute SQL database queries, and much more.

Some hackers will leave more than one backdoor file. After they upload one, they will add another to ensure their access.

Where Are Backdoors Hidden?

In every case we’ve found, the backdoor was disguised to look like a WordPress file. The code for backdoors on a WordPress site are most commonly stored in the following locations:

  1. A WordPress theme, but probably not the the one you’re currently using. Code in a theme is not overwritten when you update WordPress, so it’s a good place to put a backdoor. That’s why we recommend deleting all inactive themes.
  2. WordPress plugins are another good place to hide a backdoor. Like themes, they’re not overwritten by WordPress updates, and many users are reluctant to upgrade plugins.
  3. The uploads folder may contain hundreds or thousands of media files, so it’s another good place to hide a backdoor. Bloggers almost never check its contents because they just upload an image and then use it in a post.
  4. The wp-config.php file contains sensitive information used to configure WordPress. It’s one of the most highly targeted files by hackers.
  5. The wp-includes folder contains PHP files required for WordPress to run properly. It’s another place that we find backdoors because most website owners don’t check to see what the folder contains.

Examples of Backdoors We’ve Found

Here are some examples of where hackers have uploaded backdoors. In one site we cleaned up, the backdoor was in the wp-includes folder. The file was called wp-user.php, which looks innocent enough, but that file doesn’t actually exist in a normal WordPress installation.

In another instance, we found a PHP file named hello.php in the uploads folder. It was disguised as the Hello Dolly plugin. What’s strange is that the hacker put it in the uploads folder instead of the plugins folder.

We’ve also found backdoors that don’t use the .php file extension. One example was a file named wp-content.old.tmp, and we’ve also found backdoors in files with a .zip extension.

As you can see, hackers can take very creative approaches when hiding a backdoor.

In most cases, the files were encoded with Base64 code that can perform all sorts of operations. For example, they can add spam links, add additional pages, redirect the main site to spammy pages, and more.

With that being said, let’s take a look at how to find a backdoor in a hacked WordPress site and fix it.

How to Find a Backdoor in a Hacked WordPress Site and Fix It

Now you know what a backdoor is and where it might be hidden. The difficult part is finding it! After that, cleaning it up is as easy as deleting the file or code.

1. Scan for Potentially Malicious Code

The easiest way to scan your website for backdoors and vulnerabilities is with a WordPress malware scanner plugin. We recommend Securi because it helped us block 450,000 WordPress attacks in 3 months, including 29,690 backdoor related attacks.

They offer a free Sucuri Security plugin for WordPress that lets you scan your website for common threats and harden your WordPress security. The paid version includes a server side scanner that runs once each day and looks for backdoors and other security issues.

Learn more in our guide on how to scan your WordPress site for potentially malicious code.

2. Delete Your Plugins Folder

Searching through your plugin folders looking for suspicious files and code is time consuming. And because hackers are so sneaky, there’s no guarantee you will find a backdoor.

The best thing you can do is delete your plugins directory, and then reinstall your plugins from scratch. This is the only way to know for sure that there are no backdoors in your plugins.

You can access your plugins directory using an FTP client or your WordPress host’s file manager. If you haven’t used FTP before, then you may want to see our guide on how to use FTP to upload files to WordPress.

You will need to use the software to navigate to your website’s wp-content folder. Once there, you should right click on the plugins folder and select ‘Delete’.

Delete Your Plugins Folder

3. Delete Your Themes Folder

In the same way, instead of spending time searching for a backdoor among your theme files, it’s better just to delete them.

After you delete your plugin folder, simply highlight the themes folder and delete it in the same way.

You don’t know whether there was a backdoor in that folder, but if there was, it’s gone now. You just saved time and you eliminated an extra point of attack.

Now you can reinstall any themes that you need.

4. Search the Uploads Folder for PHP Files

Next, you should take a look through the uploads folder and make sure that there are no PHP files inside.

There is no good reason for a PHP file to be in this folder because it’s designed to store media files such as images. If you find a PHP file there, then it should be deleted.

Like the plugins and themes folders, you’ll find the uploads folder in the wp-content folder. Inside the folder you will find multiple folders for each year and month you have uploaded files. You will need to check each folder for PHP files.

Some FTP clients offer tools that will search the folder recursively. For example, if you use FileZilla, then you can right click the folder and select ‘Add files to queue’. Any files found in any subdirectories of the folder will be added to the queue in the bottom pane.

Make Sure There Are No PHP Files in the Uploads Folder

You can now scroll through the list looking for files with the .php extension.

Alternatively, advanced users who are familiar with SSH can write the following command:

find uploads -name "*.php" -print

5. Delete the .htaccess File

Some hackers may add redirect codes to your .htaccess file that will send your visitors to a different website.

Using an FTP client or file manager, simply delete the file from your website’s root directory, and it will be recreated automatically.

Delete the .htaccess File

If for some reason it isn’t recreated, then you should go to Settings » Permalinks in your WordPress admin panel. Clicking the ‘Save Changes’ button will save a new .htaccess file.

Recreate the .htaccess File if Necessary

6. Check the wp-config.php File

The wp-config.php file is a core WordPress file that contains information that allows WordPress to communicate with the database, the security keys for your WordPress installation, and developer options.

The file is found in your website’s root folder. You can view the file’s contents by selecting the Open or Edit options in your FTP client.

Look for Anything Out of Place in the wp-config.php File

Now you should look at the contents of the file carefully to see if there is anything that looks out of place. It might be helpful to compare the file with the default wp-config-sample.php file which is located in the same folder.

You should delete any code that you’re certain doesn’t belong.

7. Restore a Website Backup

If you have been making regular backups of your website and are still concerned that your website isn’t completely clean, then restoring a backup is a good solution.

You will need to completely delete your website and then restore a backup that was taken before your website was hacked. This isn’t an option for everyone, but it will leave you 100% confident that your site is safe.

For more information, see our beginner’s guide on how to restore WordPress from backup.

How to Prevent Hacks in the Future?

Now that you’ve cleaned up your website, it’s time to improve your site’s security to prevent hacks in the future. It doesn’t pay to be cheap or apathetic when it comes to website security.

1. Regularly Backup Your Website

If you don’t already make regular backups of your website, then today is the day to start.

WordPress does not come with a built-in backup solution. However, there are several great WordPress backup plugins which allow you to automatically backup and restore your WordPress website.

UpdraftPlus is one of the best WordPress backup plugins. It allows you to setup automatic backup schedules and will help you restore your WordPress site if something bad happens.

Learn more in our guide on how to backup and restore your WordPress site with UpdraftPlus.

Back Up Your Website With UpdraftPlus

2. Install a Security Plugin

You can’t possibly monitor everything that goes on your website when you’re busy working on your business. That’s why we recommend you use a security plugin like Sucuri.

We recommend Sucuri because they’re good at what they do. Major publications like CNN, USA Today, PC World, TechCrunch, The Next Web, and others agree. Plus, we rely on it ourselves to keep WPBeginner secure.

3. Make WordPress Login More Secure

It’s also important that you make your WordPress login more secure. The best way to start is to enforce the use of strong passwords when users create an account on your website. We also recommend you start using a password manager utility like 1Password.

The next thing you should do is add two-factor authentication. This will protect your website against stolen passwords and brute force attacks. It means that even if a hacker knows your username and password, they still won’t be able to log in to your website.

Finally, you should limit login attempts in WordPress. WordPress allows users to enter passwords as many times as they want. Locking a user out after five failed login attempts will significantly reduce a hacker’s chance of working out your login details.

4. Protect Your WordPress Admin Area

Protecting the admin area from unauthorized access allows you to block many common security threats. We have a long list of tips on how you can keep WordPress admin safe.

For example, you can password protect the wp-admin directory. This adds another layer of protection to the most important entry point to your website.

You can also limit access to the admin area to the IP addresses used by your team. This is another way to lock out hackers who discover your username and password.

5. Disable Theme and Plugin Editors

Did you know that WordPress comes with a built-in theme and plugin editor? This plain text editor allows you to edit your theme and plugin files directly from the WordPress dashboard.

While this is helpful, it can lead potential security issues. For example, if a hacker breaks into your WordPress admin area, then they can use the built-in editor to gain access to all your WordPress data.

After that, they will be able to distribute malware or launch DDoS attacks from your WordPress website.

To improve WordPress security, we recommend removing the built-in file editors completely.

6. Disable PHP Execution in Certain WordPress Folders

By default, PHP scripts can be run in any folder on your website. You can make your website more secure by disabling PHP execution in folders that don’t need it.

For example, WordPress never needs to run code stored in your uploads folder. If you disable PHP execution for that folder, then a hacker won’t be able to run a backdoor even if they successfully uploaded one there.

7. Keep Your Website Up to Date

Every new version of WordPress is safer than the previous one. Whenever a security vulnerability is reported, the core WordPress team works diligently to release an update that fixes the issue.

This means that if you are not keeping WordPress up to date, then you are using software with known security vulnerabilities. Hackers can search for websites running the older version and use the vulnerabilty to gain access.

That’s why you should always use the latest version of WordPress.

Don’t just keep WordPress up to date. You need to make sure that you also keep your WordPress plugins and themes current.

We hope this tutorial helped you learn how to find and fix a backdoor in a hacked WordPress website. You may also want to learn how to move WordPress from HTTP to HTTPS, or check out our list of WordPress errors and how to fix them.

If you liked this article, then please subscribe to our YouTube Channel for WordPress video tutorials. You can also find us on Twitter and Facebook.

The post How to Find a Backdoor in a Hacked WordPress Site and Fix It first appeared on WPBeginner.


March 15, 2022 at 02:00PM

Monday, March 14, 2022

How to Customize the Display of WordPress Archives in Your Sidebar

Do you need to customize how your WordPress archives are displayed in the sidebar?

The default WordPress archives widget offers limited customization. You may like your post archives to use less space, display more information, or have a more attractive appearance.

In this article, we’ll show you how to customize the display of WordPress archives in your sidebar.

How to Customize the Display of WordPress Archives in Your Sidebar

Why Customize the Display of WordPress Archives in Your Sidebar?

Your WordPress website comes with an archives widget that lets you display monthly blog post archive links in a sidebar.

The widget has two customization options: you can display the archive list as a dropdown menu, and you can display the post counts for each month.

The Default WordPress Archives Widget

However, you may wish to display your sidebar archive list differently. For example, as your site grows, the default list may become too long, or you may want to make it easier for your visitors to navigate.

Let’s look at some ways to customize the display of WordPress archives in your sidebar:

Creating Compact Archives

If your archives list has become too long, then you can create a compact archive that displays your posts using much less space.

You’ll need to install and activate the Compact Archives plugin which is developed and maintained by the WPBeginner team. For more details, see our step by step guide on how to install a WordPress plugin.

Upon activation, you can add the compact archives to a post, page, or widget using the ‘WPBeginner’s Compact Archives’ block.

The Compact Archives Plugin

The compact archives list saves vertical space by being a little wider. That means it may fit better in a footer or archives page than in a sidebar.

However, the plugin is quite configurable and you can make it narrower by displaying just the first initial or a number for each month. You can learn more in our guide on how to create compact archives in WordPress.

Displaying Archives in a Collapsable Outline

Another way to deal with long archives lists is to display a collapsable outline of years and months when you published blog posts.

To do this, you need to install and activate the Collapsing Archives plugin. Upon activation, you need to visit Appearance » Widgets page and add the ‘Compact Archives’ widget to your sidebar.

The Collapsing Archives Plugin

The Collapsing Archives widget uses JavaScript to collapse your archive by year. Your users can click on years to expand them to view monthly archives. You can even make monthly archives collapsible and allow users to see post titles underneath.

You can learn more by referring to Method 1 in our guide on how to limit the number of archive months displayed in WordPress.

Here’s how it looks on our demo website.

Preview of a Collapsing Archive

Limiting the Number of Archive Months Displayed

A third way to stop your archives list from becoming too long is to limit the number of months displayed to, say, the last six months.

To do that, you’ll have to add code to your WordPress theme’s files. If you haven’t done this before, then see our guide on how to copy and paste code in WordPress.

The first step is to add the following code snippet to your functions.php file, in a site-specific plugin, or by using a code snippets plugin.

// Function to get archives list with limited months
function wpb_limit_archives() { 
 
$my_archives = wp_get_archives(array(
    'type'=>'monthly', 
    'limit'=>6,
    'echo'=>0
));
     
return $my_archives; 
 
} 
 
// Create a shortcode
add_shortcode('wpb_custom_archives', 'wpb_limit_archives'); 
 
// Enable shortcode execution in text widget
add_filter('widget_text', 'do_shortcode'); 

You can change the number of months displayed by editing the number on line 6. For example, if you change the number to ’12’ then it will display 12 months of archives.

You can now go to Appearance » Widgets page and add a ‘Custom HTML’ widget to your sidebar. After that, you should paste the following code into the widget box:

<ul>
[wpb_custom_archives]
</ul>
Adding Shortcode to a Custom HTML Widget

Once you click the ‘Update’ button, your sidebar will display just six months of archives.

For further details, see Method 3 in our guide on how to limit the number of archive months displayed in WordPress.

Listing Archives Daily, Weekly, Monthly or Annually

If you want more control over how your archives are listed, then the Annual Archive plugin will help. It lets you list your archives daily, weekly, monthly, annually, or alphabetically, and can group the lists by decade.

Get started by installing and activating the Annual Archive plugin. After that, you can head over to the Appearance » Widgets page and drag the Annual Archive widget to your sidebar.

The Annual Archive Plugin

You can give the widget a title and then select whether to display a list of days, weeks, months, years, decades, or posts. You can scroll down to other options to limit the number of archives displayed, choose a sort option, and add additional text.

If you navigate to Settings » Annual Archive, then you can customize the archive list further using custom CSS.

Displaying Monthly Archives Arranged by Year

Once we were working on a client’s site design that needed monthly archives arranged by year in the sidebar. This was difficult to code because this client only wanted to show the year once on the left.

Displaying Monthly Archives Arranged by Year

We were able to modify some code by Andrew Appleton. Andrew’s code didn’t have a limit parameter for the archives, so the list would show all archive months. We added a limit parameter that allowed us to display only 18 months at any given time.

What you need to do is paste the following code into your theme’s sidebar.php file or any other file where you want to display custom WordPress archives:

<?php
global $wpdb;
$limit = 0;
$year_prev = null;
$months = $wpdb->get_results("SELECT DISTINCT MONTH( post_date ) AS month ,  YEAR( post_date ) AS year, COUNT( id ) as post_count FROM $wpdb->posts WHERE post_status = 'publish' and post_date <= now( ) and post_type = 'post' GROUP BY month , year ORDER BY post_date DESC");
foreach($months as $month) :
    $year_current = $month->year;
    if ($year_current != $year_prev){
        if ($year_prev != null){?>
         
        <?php } ?>
     
    <li class="archive-year"><a href="<?php bloginfo('url') ?>/<?php echo $month->year; ?>/"><?php echo $month->year; ?></a></li>
     
    <?php } ?>
    <li><a href="<?php bloginfo('url') ?>/<?php echo $month->year; ?>/<?php echo date("m", mktime(0, 0, 0, $month->month, 1, $month->year)) ?>"><span class="archive-month"><?php echo date_i18n("F", mktime(0, 0, 0, $month->month, 1, $month->year)) ?></span></a></li>
<?php $year_prev = $year_current;
 
if(++$limit >= 18) { break; }
 
endforeach; ?>

If you want to change the number of months displayed, then you need to edit line 19 where the current $limit value is set to 18.

You can also show the count of posts in each month by adding this bit of code anywhere in between lines 12–16 of the above code:

<?php echo $month->post_count; ?>

You will need to use custom CSS to display the archive list correctly on your website. The CSS we used on our client’s website looked something like this:

.widget-archive{padding: 0 0 40px 0; float: left; width: 235px;}
.widget-archive ul {margin: 0;}
.widget-archive li {margin: 0; padding: 0;}
.widget-archive li a{ border-left: 1px solid #d6d7d7; padding: 5px 0 3px 10px; margin: 0 0 0 55px; display: block;}
li.archive-year{float: left; font-family: Helvetica, Arial, san-serif; padding: 5px 0 3px 10px; color:#ed1a1c;}
li.archive-year a{color:#ed1a1c; margin: 0; border: 0px; padding: 0;}

We hope this tutorial helped you learn how to customize the display of WordPress archives in your sidebar. You may also want to learn how to install Google Analytics in WordPress, or check out our list of proven ways to make money blogging with WordPress.

If you liked this article, then please subscribe to our YouTube Channel for WordPress video tutorials. You can also find us on Twitter and Facebook.

The post How to Customize the Display of WordPress Archives in Your Sidebar first appeared on WPBeginner.


March 14, 2022 at 01:30PM