Wednesday, April 6, 2022

How to Accept Apple Pay in WordPress (The EASY Way)

Would you like to accept Apple Pay on your WordPress site?

Over the last several years Apple Pay has significantly grown in popularity, and now there are several easy ways to offer Apple Pay as a payment option on your website.

In this article, we’ll show you how to accept Apple Pay in WordPress.

How to Accept Apple Pay in WordPress

Why Accept Apple Pay in WordPress?

If you’re selling products or services on your WordPress website, then it’s important to let your visitors to pay with their preferred method.

Often that means using a credit card, but newer methods like Apple Pay and Google Pay are becoming more popular. Apple Pay now has over 40% of the mobile payment market in the US, and it makes online payments simple.

However, online Apple Pay payments can only be made from the Safari browser running on a Mac or iOS device.

That being said, let’s take a look at how to accept Apple Pay in your online store.

Note: We’ll cover how to add an Apple Pay option in WordPress without adding a full eCommerce cart, but we will leave other helpful resources at the end of this article for those looking for full eCommerce solutions.

How to Accept Apple Pay in WordPress

The first thing you need to do is install and activate the

WP Simple Pay plugin. For more details, see our step by step guide on how to install a WordPress plugin.

WP Simple Pay is one of the top WordPress invoicing and payments plugins among small business owners because it’s both simple and powerful. The best part is that WP Simple Pay does not charge you any additional transaction fees, and you can set it up without the complexity of a cart system.

While there is a free version of the plugin, you need the Pro plugin to accept Apple Pay, create on-site payment forms, and more.

Upon activation, the WP Simple Pay setup wizard will start automatically. You simply need to click the ‘Let’s Get Started’ button to continue.
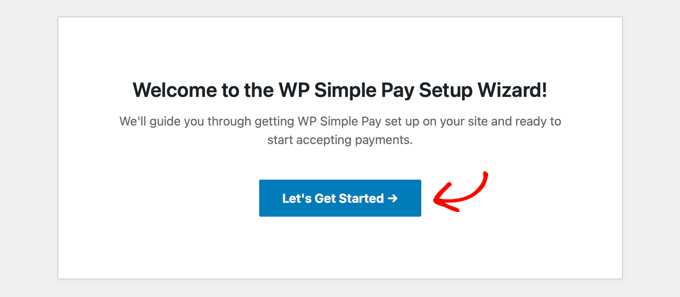
The WP Simple Pay Setup Wizard Will Start Automatically

First, you’ll be asked to enter your license key. You can find this information from your account on the WP Simple Pay website.

After that, you need to click the ‘Activate and Continue’ button to move to the next step.
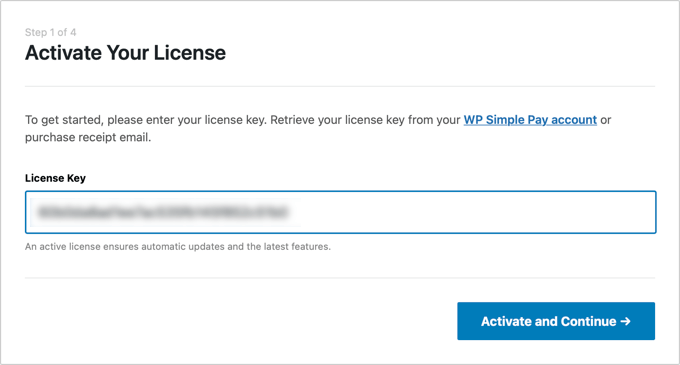
You’ll Be Asked to Enter Your WP Simple Pay License Key

Now you’ll need to connect WP Simple Pay to Stripe. Stripe is a popular payment gateway, and it’s the easiest way to add Apple Pay to your WordPress site. It also supports all top credit and debit cards, Google Pay, and more.

Simply click the ‘Connect with Stripe’ button, and from there you can log in to your Stripe account or create a new one. Anyone with a legitimate business can create a Stripe account and accept payments online.

You Need to Connect WP Simple Pay to Stripe

Note: Stripe requires your site to be using SSL/HTTPS encryption. If you don’t already have an SSL certificate for your website, then please see our step by step guide on how to add SSL in WordPress.

Once you’ve connected to Stripe, you’ll be asked to configure your WP Simple Pay emails.
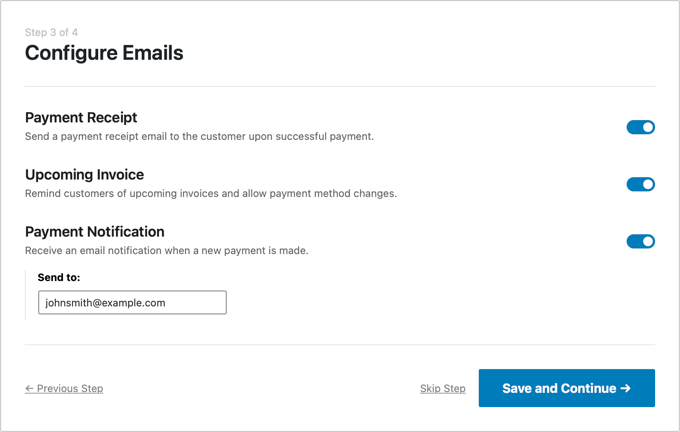
Configure Your WP Simple Pay Emails

The options for payment and invoice emails to your customers have already been enabled for you. So is the option for sending payment notification emails.

You just need to enter the email address where the notifications should be sent.

Once you’ve done that, you need to click the ‘Save and Continue’ button. This completes your setup of WP Simple Pay.
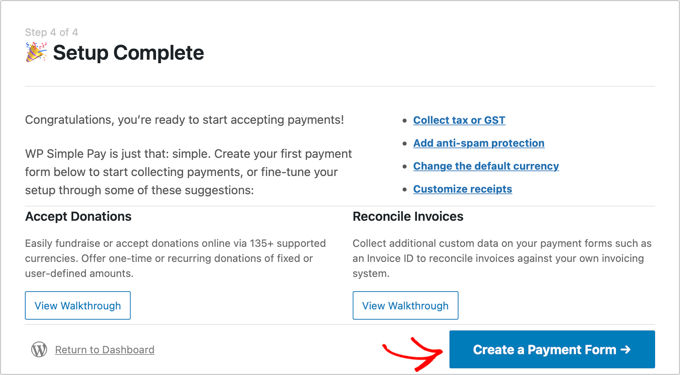
WP Simple Pay Setup Is Complete

Creating a Payment Form in WordPress

Next, you need to create a payment form.

You can get started by clicking the ‘Create a Payment Form’ button on the last page of the setup wizard. This will automatically take you to the WP Simple Pay » Add New page.
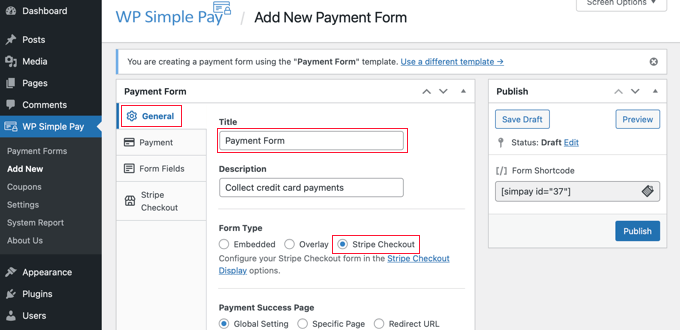
Give Your New Payment Form a Name and Description

You should start by giving the payment form a name and description. After that, you will need to select the ‘Stripe Checkout’ option under Form Type.

Next, you need to click on the Payment tab. Here you can set the payment mode to either live or testing. Testing mode will let you make payments that are not actually charged to Apple Pay so you can make sure your form is working properly and emails are being sent.

Don’t forget to change this to ‘Live’ when you’ve finished testing and are ready to start receiving payments from your customers.
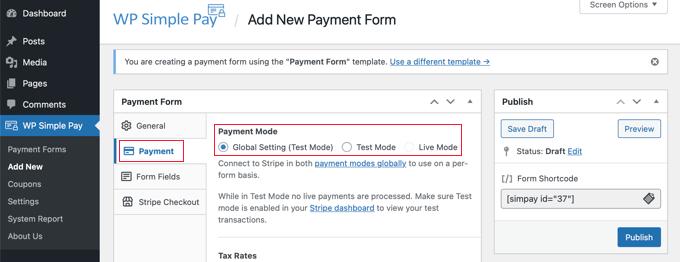
Set the Payment Mode to Either Live or Testing

You can also add the products or services that you offer, along with their prices and whether they are a one-time payment or a subscription.

Simply click the ‘Add Price’ button until you have added as many prices as you need. Then for each one, you will need to add a label and price. You can also select other options, such as if the price is a subscription, or the user can determine the price, as in a donation.
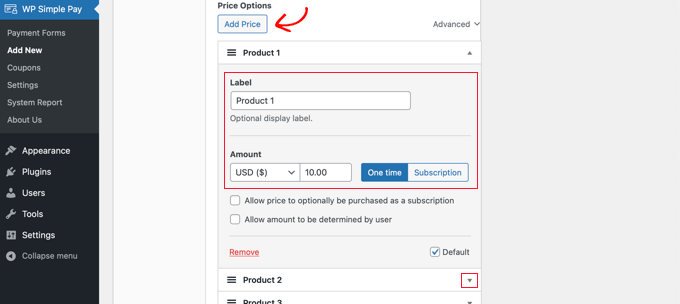
Add Your Products and Services to the Payment Form

You can show or hide a price by clicking the small arrow on the right.

Next, we’ll move on to the ‘Form Fields’ tab. The essential fields have already been added to the form, and you can add more if necessary.

Using the ‘Form Fields’ drop down, you can choose additional fields and add them by clicking the ‘Add Field’ button. Options include name, phone number, address, and much more.
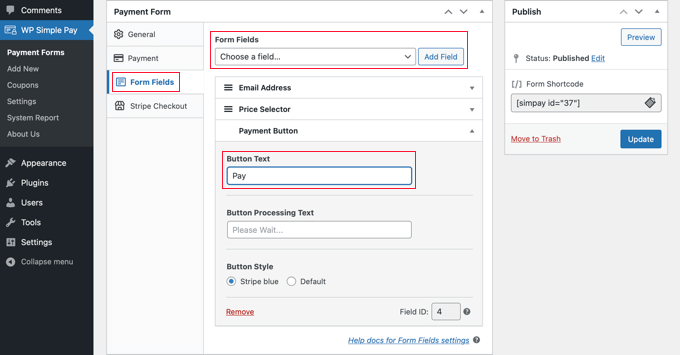
You Can Add Fields to Your Payment Form

The default text on the button is ‘Pay with Card’. If you like, you can change the text to something more generic, such as simply ‘Pay Now’. Then your customers won’t assume that credit cards are the only payment option.

Finally, the ‘Stripe Checkout’ tab allows you to select additional payment methods and tweak the checkout form that is displayed after the user clicks the ‘Pay’ button.

For this tutorial, we’ll leave those settings as they are.
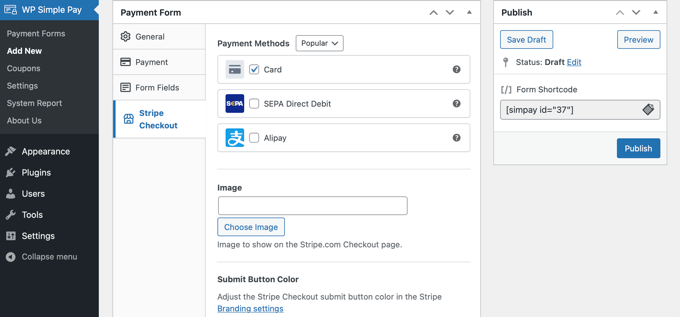
Select any Additional Payment Methods and Tweak the Checkout Form

When you are happy with your payment form, click on the ‘Publish’ button to store your settings and push the form live.

Now we can add the form to a post or page on your website.

Adding the Payment Form to Your Website

WP Simple Pay makes it super easy to add forms anywhere on your website.

Simply create a new post or page, or edit an existing one. Then, click on the plus (+) sign at the top and add a WP Simple Pay block in the WordPress block editor.
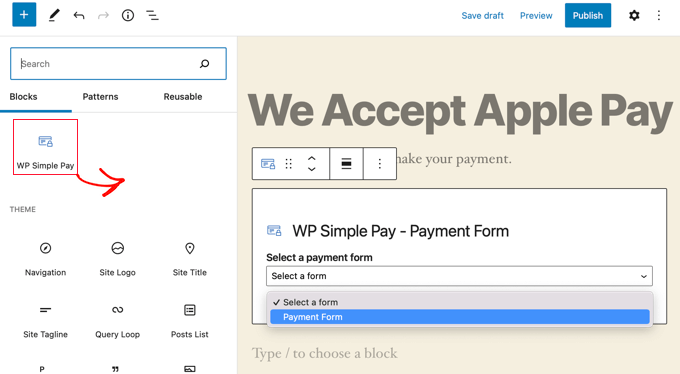
Add the WP Simple Pay Block to a Post or Page

After that, select your order form from the dropdown menu in the WPForms block.

Once you’re finished, you can update or publish the post or page, and then click on the preview button to see your form in action.
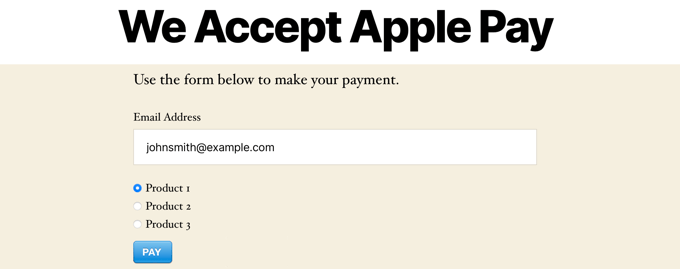
Visit Your Website to See the Payment Form in Action

When your users click the Pay button, the Stripe checkout form will be displayed.

If they are using the Safari browser on a Mac or an iOS device like iPhone, then the Apple Pay option will be displayed at the top of the form. Otherwise, the Apple Pay option will be hidden, and your customers can pay using a credit card.
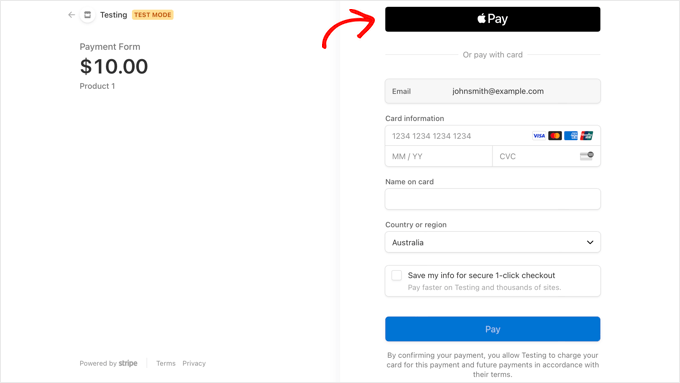
Apple Pay Will Be Offered When Checking Out on Safari on a Mac or iOS Device

If you’re looking for other ways to add Apple Pay in WordPress, then you can use full eCommerce solutions like Easy Digital Downloads or WooCommerce. Both of them have support for Apple Pay and Google Pay options.

We hope this tutorial helped you learn how to accept Apple Pay in WordPress. You may also want to learn how to create a contact form in WordPress, or check out our list of the best live chat software for small business.

If you liked this article, then please subscribe to our YouTube Channel for WordPress video tutorials. You can also find us on Twitter and Facebook.

The post How to Accept Apple Pay in WordPress (The EASY Way) first appeared on WPBeginner.


April 06, 2022 at 03:00PM

Tuesday, April 5, 2022

Welcome WooFunnels to the WPBeginner Growth Fund

Today, I’m extremely excited to announce that WPBeginner Growth Fund has taken an investment stake in Wisetr, the parent company behind the popular WordPress sales funnel and automation plugin called WooFunnels.

Over 18,000+ smart store owners use WooFunnels sale funnel builder to create high-converting checkouts, order bumps, one click upsells & automations that are proven to boost profit.

Welcome WooFunnels to WPBeginner Growth Fund

About WooFunnels & Autonami

WooFunnels is an India based WordPress company founded by Daman Jeet Singh, Aman Saxena, and Tavleen Kaur.

It’s essentially a ClickFunnels alternative for WordPress. Their mission is simple: help store owners grow revenue through optimized sales funnels and automation.

You can use WooFunnels no-code sales funnel builder to capture more leads, increase order value, do timely follow-ups with customers, and add other eCommerce automation features that are proven to boost your revenue.

Some of the popular WooFunnels features include:

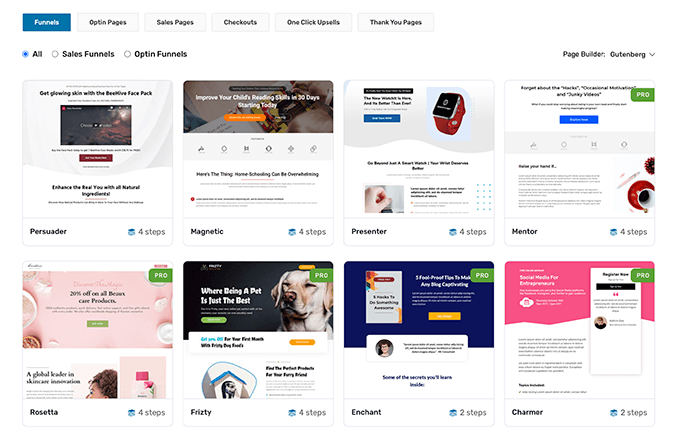
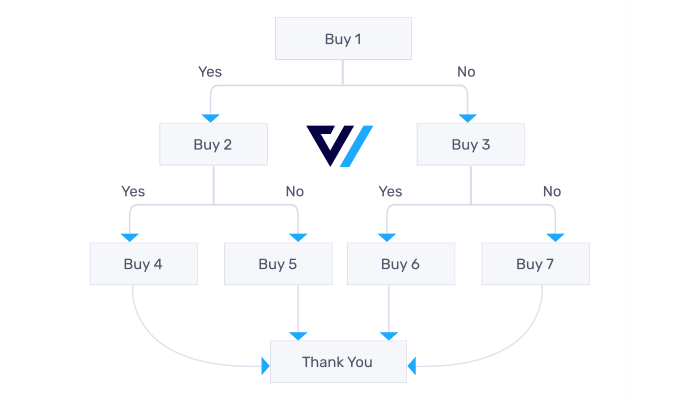
High converting sales funnel templates – these pre-made designs are proven to improve conversions, and they are compatible with WordPress block editor as well as other popular WordPress page builders like Elementor, Divi, etc. (See all templates)

WooFunnels Template Library

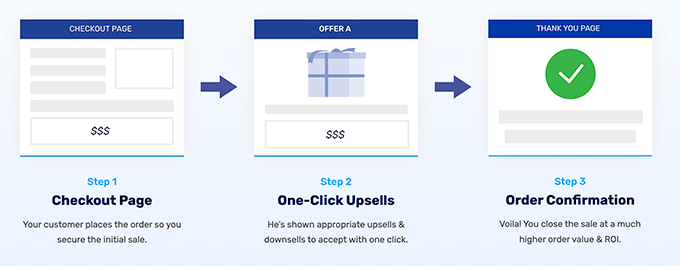
One-Click Upsells – this helps you increase profits without increasing traffic or ad spend. Simply present complimentary one-click upsell offers after sale that proven to increase average order value.

WooFunnels One Click Upsell

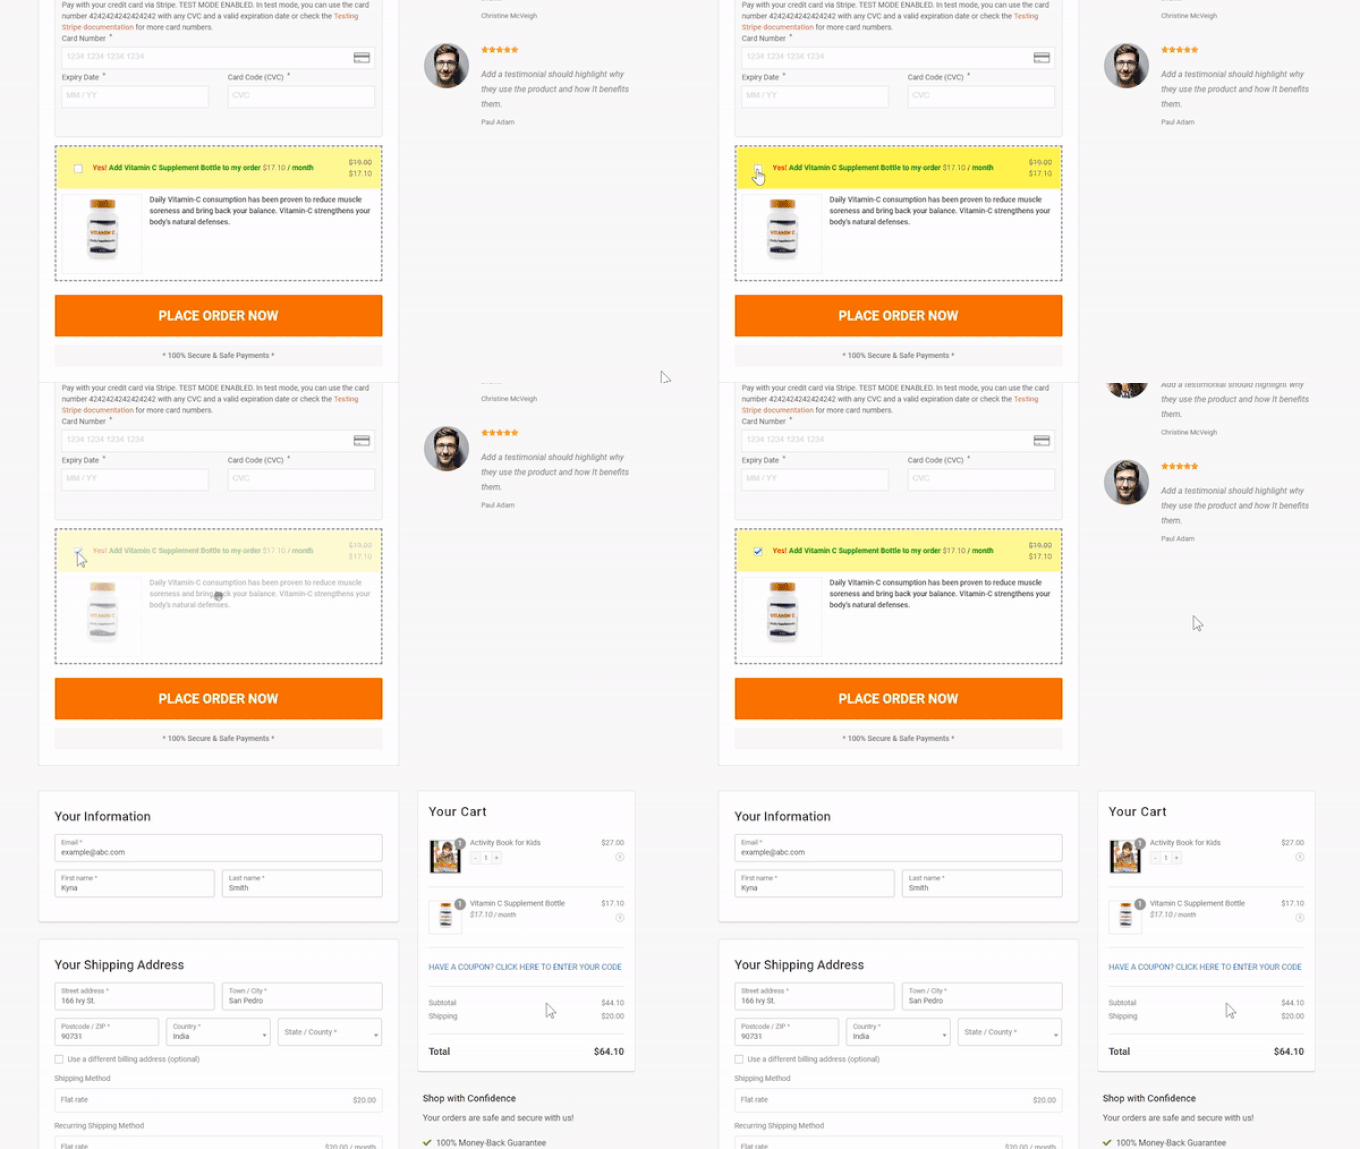
Order Bumps – easily add complimentary product upsells to your checkout without to grow your revenue by up to 30%.

WooFunnels Order Bump for WooCommerce

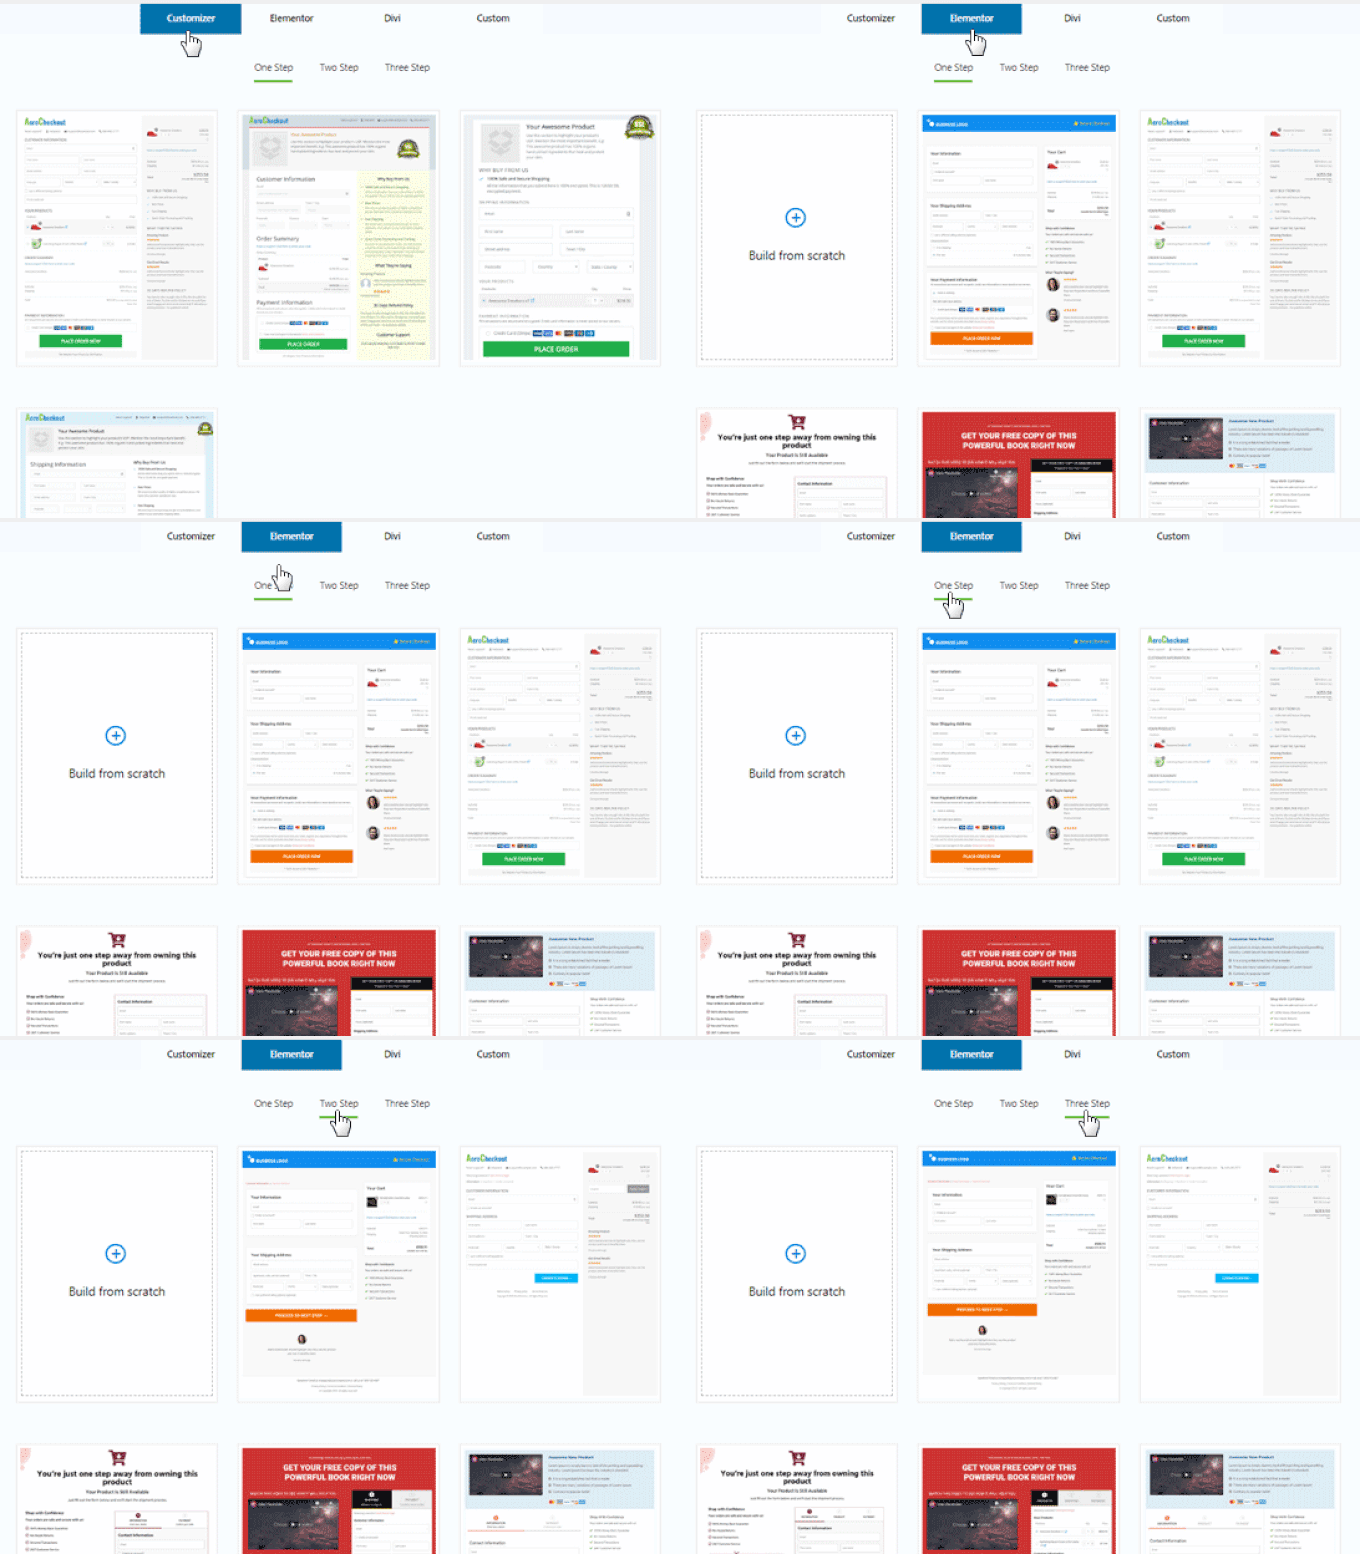
Frictionless Checkout – default WooCommerce checkout pages aren’t optimized for conversion. Create custom checkout forms with just a few clicks to match your business needs. Include features like 2-step order form, Shopify style layout, express pay options, and more features to help reduce cart abandonment.

WooFunnels Checkout Example

Dynamic Offers – show only the relevant upsell offer to customers based on dynamic cart rules. This is proven to boost order value.

Dynamic Offers and Upsells for WooCommerce

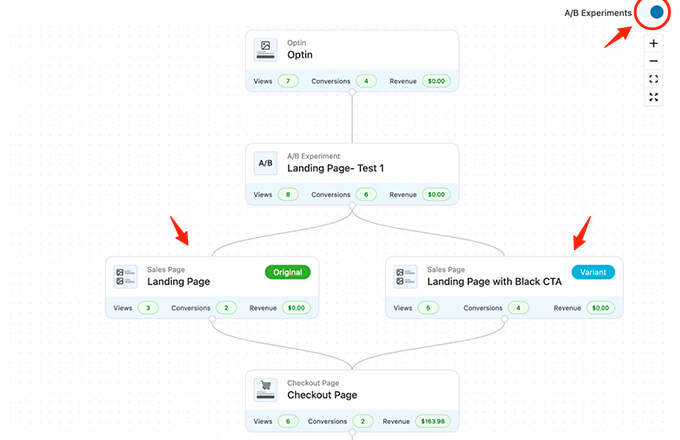
Built-in A/B Testing – uncover hidden profits with split testing. You can setup A/B tests for everything including headlines, buttons, checkout design & more in less than 5 minutes.

WooFunnels A/B Testing for WooCommerce

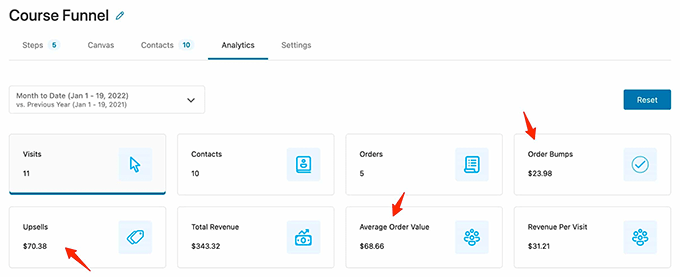
In-depth Analytics – See how every page in your funnel is performing with real-time analytics, so you can tweak your pages and offers to continuously improve conversions.

WooFunnels Ecommerce Analytics for WordPress

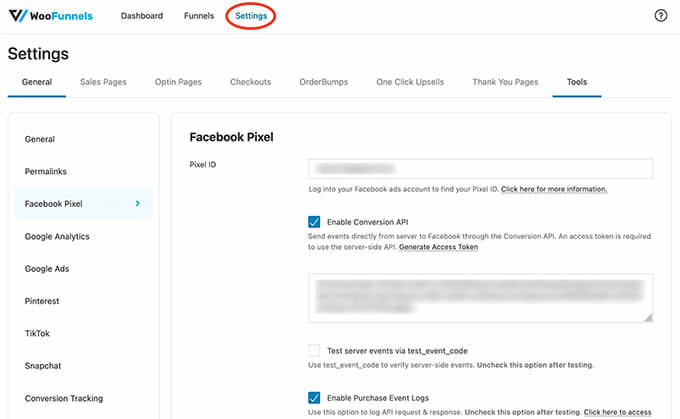
Detailed Conversion Tracking (Pixel Events) – If you run PPC ads, then you’ll love this. WooFunnels makes it super easy to add advertising pixels and track conversions for Google, Facebook, Pinterest, TikTok, and Snapchat ads without writing any code or relying on 3rd-party plugins.

WooFunnels Conversion Pixel Tracking

In today’s age of eCommerce marketing, automation is the name of the game. This is why WooFunnels comes with a marketing automation and CRM tool for WordPress called Autonami.

It allows you to have a 360 degree contact view, so you can get rich insights about every contact including their last order date, average order value (AOV), total revenue & more all in one place.

Autonami lets you set up funnel automations, so you can deploy automated campaigns for lead nurturing, welcome series, post purchase upsell, customer win-back & more.

You can also set up automated cart abandonment tracking and send automated follow up to increase your revenue (this is something we use on all our eCommerce stores).

Other Autonami features include ability to send email broadcasts like promotional newsletters to your customers, smart audience segmentation to deliver the right message to the right customer, and seamless workflow integrations that connect all your plugins and marketing tools to work together, so you can grow your business faster.

Background Story

I met Daman Jeet and Tavleen exactly 5 years ago at a marketing event called Traffic & Conversion Summit where I was speaking.

Daman Jeet, Tavleen, and Syed at Traffic and Conversion Summit

At the time, they were building XLPlugins, a collection of conversion focused plugins for WooCommerce.

Since then I have followed their journey from the sideline and watched the product suite evolve into becoming the most powerful sales funnel builder for WordPress.

Last year, I sent out a tweet on my 31st birthday to celebrate a surprise milestone about my plugin WPForms passing 5 million active installs.

And in the replies, I saw a congratulatory message from Daman Jeet.

I reached out to catch up via Twitter DM, and our conversation led to discussing a potential partnership. I’m always amazed by how powerful Twitter DMs are.

After the crazy busy period of Black Friday, Christmas Holidays, and the New Year, we got on a Zoom call and decided that it would be a great decision to join forces.

I invested in the WooFunnels business through the WPBeginner Growth Fund and will be advising the team on how to expand their WordPress product business.

At Awesome Motive, we have years of experience building popular WordPress plugins that are used by over 19 million websites including OptinMonster, AIOSEO, MonsterInsights, and many more.

Not to mention, our WPBeginner growth fund portfolio companies like MemberPress, Formidable Forms, Pretty Links, Wholesale Suite, Uncanny Automator, and others have seen tremendous growth over the years.

Sharing our combined knowledge with WooFunnels will help all of us better serve the larger WordPress community.

We met up two weeks ago in Orlando at the WPBeginner Growth Fund meetup where all the founders shared their experiences and best practices to help each other improve.

WPBeginner Growth Fund Meetup 2022

I’m really excited to be working with Daman Jeet, Aman, and the entire team to help accelerate their growth in 2022 and beyond.

Thank you so much for your continued support of WPBeginner.

Sincerely,

Syed Balkhi
Founder of WPBeginner

P.S. Want us to acquire or invest in your WordPress business? Learn more about the WPBeginner Growth Fund.

The post Welcome WooFunnels to the WPBeginner Growth Fund first appeared on WPBeginner.


April 05, 2022 at 07:32PM

Monday, April 4, 2022

How to Add Custom Items to Specific WordPress Menus

Do you want to add custom items to specific WordPress menus?

WordPress menus are navigational menus that are displayed at the top of most websites. Sometimes you may want to display custom items other than plain links in navigation menus.

In this article, we’ll show you how to easily add custom items to specific WordPress menus.

Adding custom items to WordPress menus

Why Add Custom Items to WordPress Menus

WordPress menus are navigational links usually displayed at the top of a website. On mobile devices, they are often displayed when you tap a menu icon.

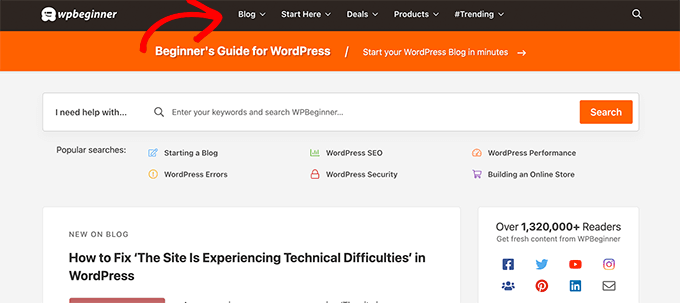
example navigational menu

Since this is a prominent location in a typical WordPress website layout, it’s smart to take advantage of it by placing custom items other than plain links in the menu.

For instance, some users may want to display the search form like we do at WPBeginner. A membership website may want to show login and logout links, or you may want to add icons or images to your menu.

By default, navigation menus are designed to display plain text links. However, you can still place custom items in WordPress menus.

That being said, let’s take a look at how you can add custom items to specific menus in WordPress while keeping the rest of your navigation menu intact.

Adding Custom Items to Specific Navigation Menus in WordPress

There are different ways to add custom items to a navigation menu in WordPress. It depends on what type of custom item you are trying to add.

We’ll show you some of the most common examples. You’ll need to use plugins for some of them, while others will require you to add some code.

If you want to skip ahead to a certain section, you can use this table of contents:

Let’s get started.

1. Adding a Search Popup in WordPress Menu

Normally, you can add a search form to your WordPress sidebar by using the default Search widget or block. However, there is no way to add search to the navigation menu by default.

Some WordPress themes have an option to add a search box to your main menu area. But if yours doesn’t, you can use the method below.

For this, you need to install and activate the SearchWP Modal Search Form plugin. For more details, see our step by step guide on how to install a WordPress plugin.

This plugin is an addon for SearchWP, which is the best WordPress search plugin on the market.

The addon is free and will work with default WordPress search as well. However, we recommend using it with SearchWP if you want to improve your WordPress search.

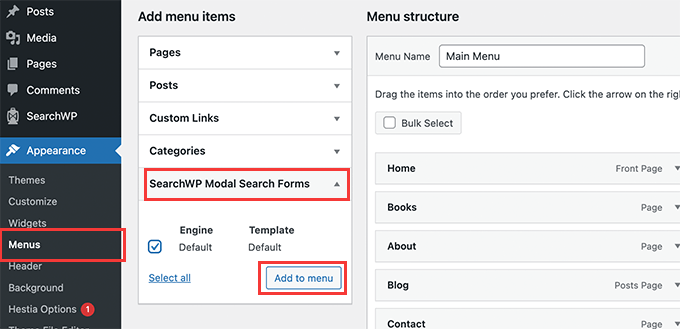
After installing the addon, simply head over to the Appearance » Menus page. Under the ‘Add menu items’ column, click on the ‘SearchWP Modal Search Forms’ tab to expand it.

Add search to menu

Select your search engine and then click on the Add to menu button.

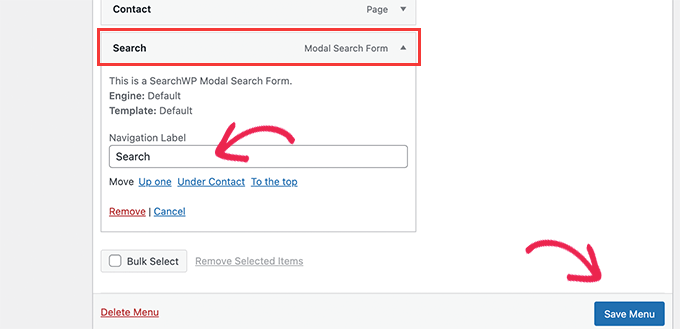
The plugin will add the search to your navigation menu. Click on the ‘Modal search form’ under your menu items to expand it and change the label to Search or anything else you want.

Change search label

Don’t forget to click on the Save Menu button to store your changes.

You can now visit your website to see Search added to your navigation menu. Clicking on it will open the search form in a lightbox popup.

Search in navigation menu

For more details, see our guide on how to add a search button to a WordPress menu.

2. Add Icons and Custom Images to Specific Menus

Another popular custom item that users often want to add to a specific menu is an image or an icon.

For that, you’ll need to install and activate the Menu Image Icon plugin. For more details, see our step by step guide on how to install a WordPress plugin.

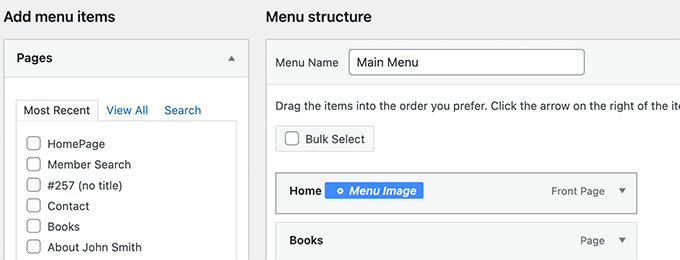
Upon activation, go to the Appearance » Menus page and move your mouse over the menu item where you want to display an icon or image.

Menu Image button

Click on the blue Menu Image button to continue.

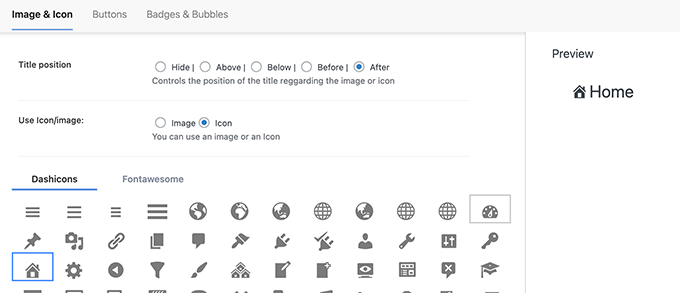
This will bring up a popup. From here, you can choose an image or icon to be displayed with that menu item.

Choose image or icon

You can also choose the position of the image or icon with respect to the menu item. For example, you can display the icon right before the menu item like in our example below, or even hide the menu title so only the icon shows.

Don’t forget to click on the Save changes button to store your settings. Repeat the process if you need to add icons or images to other menu items.

After that, you can visit your website to see the custom image or icon in specific menu items.

Menu icons

For more detailed instructions, see our tutorial on how to add images in WordPress menus.

3. Add Login / Logout Links to Specific WordPress Menu

If you are using a WordPress membership plugin or running an online store, then you may want to allow users to easily log in to their accounts.

By default, WordPress doesn’t come with an easy way to display login and logout links in navigation menus.

We’ll show you how to add them by using a plugin or by using code snippet.

1. Add Login / Logout Links to Menus using a Plugin

This method is easier and recommended for all users.

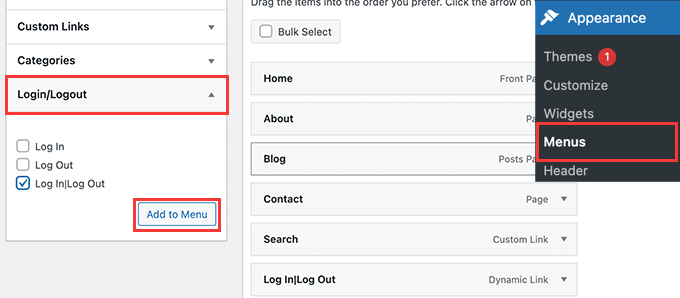
First, you need to install and activate the Login or Logout Menu Item plugin. After that, you need to visit the Appearance » Menu page and click on the Login/Logout tab to expand it.

Add login or logout link to specific WordPress menu

From here, you need to select ‘Log in|Log Out’ item and click on the Add to Menu button.

Don’t forget to click on the Save Menu button to store your changes. You can now visit your website to see your custom login logout link in action.

Login and Logout link preview

The link will dynamically change to login or log out depending on a user’s login status.

Learn more in our tutorial on how to add login and logout links in WordPress menus.

2. Add Login / Logout Links using Custom Code

This method requires you to add code to your WordPress website. If you haven’t done this before, then take a look at our guide on how to add custom code in WordPress.

First, you need to find out the name that your WordPress theme uses for the specific navigation menu location.

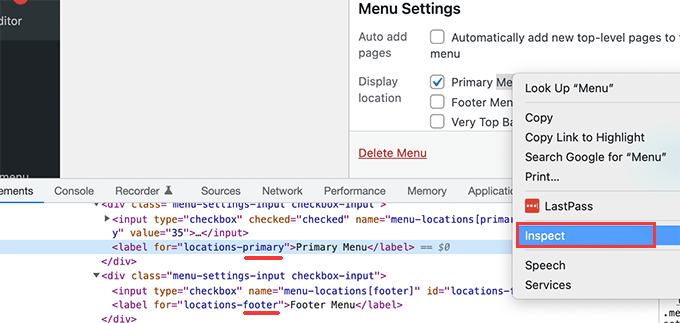
The easiest way to find this is by visiting the Appearance » Menus page and taking your mouse over to the menu locations area.

Find menu location name

Right-click to select Inspect tool and then you’ll see the location name in the source code below. For instance, our demo theme uses primary, footer, and top-bar-menu.

Note the name used for your target location where you want to display the login / logout link.

Next, you need to add the following code to your theme’s functions.php file or a site-specific plugin.

add_filter( 'wp_nav_menu_items', 'add_loginout_link', 10, 2 );
function add_loginout_link( $items, $args ) {
    if (is_user_logged_in() && $args->theme_location == 'primary') {
        $items .= '<li><a href="'. wp_logout_url() .'">Log Out</a></li>';
    }
    elseif (!is_user_logged_in() && $args->theme_location == 'primary') {
        $items .= '<li><a href="'. site_url('wp-login.php') .'">Log In</a></li>';
    }
    return $items;
}

After that, you can visit your website and you’ll see the login our log out link in your navigation menu.

Login link added via custom code

This dynamic link will automatically switch to login or logout based on user’s login status.

4. Adding Custom Text to Your WordPress Navigation Menu

What if you just wanted to add text and not a link to your navigation menu?

There are two ways you can do that.

1. Add Custom Text to a Specific Menu (Easy Way)

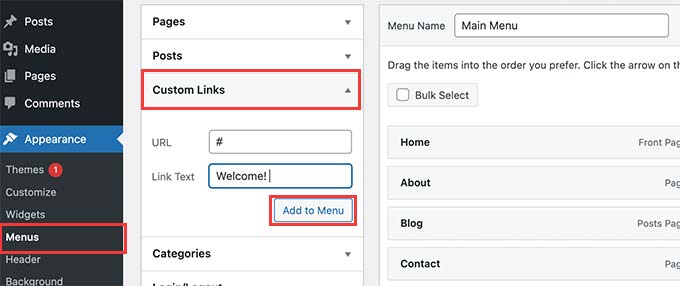
Simply go to the Appearance » Menus page and add a custom link with # sign as the URL, and the text you want to display as your Link Text.

Add custom text with dummy link

Click on the Add to Menu button to continue.

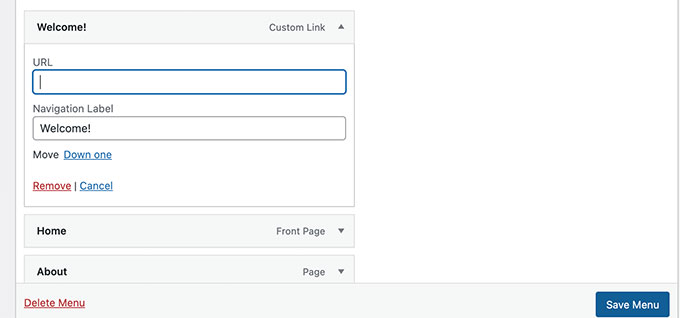
WordPress will add your custom text as a menu item in the left column. Now, click to expand it and delete the # sign.

Remove link

Don’t forget to click on the Save Menu button and preview your website. You’ll notice your custom text appear in the navigation menu.

It is still a link, but clicking on it doesn’t do anything for the user.

custom text in navigation menu

2. Add Custom Text to a Navigation Menu Using Code

For this method, you’ll add a code snippet to your website. First, you’ll need to find out the name of your theme location as described above in the login/logout link section.

After that, you need to add the following code to theme’s functions.php file or a site-specific plugin.

add_filter( 'wp_nav_menu_items', 'your_custom_menu_item', 10, 2 );
function your_custom_menu_item ( $items, $args ) {
    if ( $args->theme_location == 'primary') {
        $items .= '<li><a title="">Custom Text</a></li>';
    }
    return $items;
}

Simply replace where it says ‘Custom Text’ with your own text.

You can now save your changes and visit your website to see your custom text added at the end of your navigation menu.

This code method may come in handy if you want to programmatically add dynamic elements to specific WordPress menu.

5. Add Current Date in WordPress Menu

Do you want to display the current date inside a navigation menu in WordPress? This trick comes in handy if you run a frequently updated blog or a news website.

Simply add the following code to your theme’s functions.php file or a site-specific plugin.

add_filter('wp_nav_menu_items','add_todaysdate_in_menu', 10, 2);
function add_todaysdate_in_menu( $items, $args ) {
    if( $args->theme_location == 'primary')  {
         
        $todaysdate = date('l jS F Y');
        $items .=  '<li><a>' . $todaysdate .  '</a></li>';
 
    }
    return $items;
}

Don’t forget to replace ‘primary’ with your menu’s location.

You can now visit your website to see the current date in your WordPress menu.

Current date in WordPress menu

You can also change the date format to your own liking. See our tutorial on how to change the date and time format in WordPress.

6. Display User Name in WordPress Menu

Want to add a little more personalization to your navigation menu? You can greet logged in users by their name in your navigation menu.

First, you’ll need to add the following code to your theme’s functions.php file or a site-specific plugin.

add_filter( 'wp_nav_menu_objects', 'username_in_menu_items' );
function username_in_menu_items( $menu_items ) {
    foreach ( $menu_items as $menu_item ) {
        if ( strpos($menu_item->title, '#profile_name#') !== false) {
                         if ( is_user_logged_in() )     {
                                $current_user = wp_get_current_user();
                                 $user_public_name = $current_user->display_name;
                $menu_item->title =  str_replace("#profile_name#",  " Hey, ". $user_public_name, $menu_item->title . "!");
                         } else { 
                         $menu_item->title =  str_replace("#profile_name#",  " Welcome!", $menu_item->title . "!");
                         }
        }
    }

    return $menu_items;
} 

This code first checks if you have added a menu item with #profile_name# as link text. After that, it replaces that menu item with logged in user’s name or a generic greeting for non-logged in users.

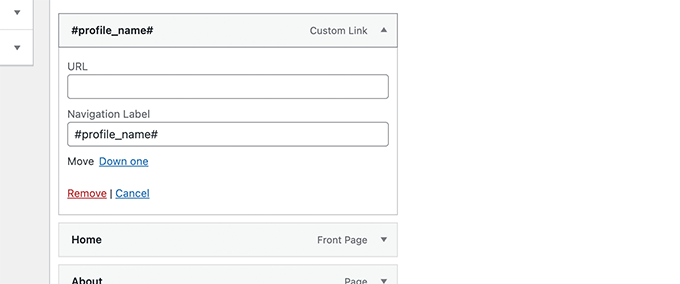
Next, you need to go to Appearance » Menus page and add a new custom link with the #profile_name# as Link text.

Add special tag to a menu item

Don’t forget to click on Save Menu button to store your changes. After that, you can visit your website to see the logged-in user’s name in the WordPress menu.

User name in WordPress navigation menu

7. Dynamically Display Conditional Menus in WordPress

So far we have shown you how to add different types of custom items to specific WordPress menus. However, sometimes you may need to dynamically show different menu items to users.

For instance, you may want to show a menu only to logged in users. Another scenario is when you want the menu to change based on what page the user is viewing.

This method allows you to create several menus and only display them when certain conditions are matched.

First, you need to install and activate the Conditional Menus plugin. For more details, see our step by step guide on how to install a WordPress plugin.

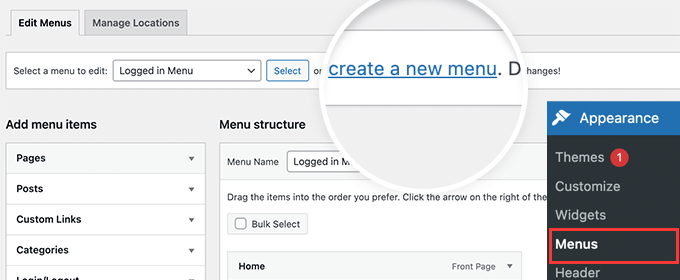
Upon activation, you need to visit Appearance » Menus page. From here you need to create a new menu that you want to display. For instance, in this example we created a new menu for logged in users only.

Create new menu

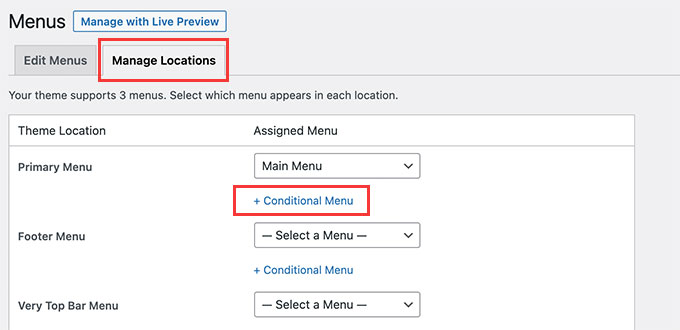
After you have created the menu, switch to the Manage Locations tab.

From here, you need to click on the Conditional Menus link next to the menu location.

Add a conditional menu

After that, you need to select the menu you created earlier from the drop down menu.

Then, click on the ‘+ Conditions’ button to continue.

Select menu you want to show

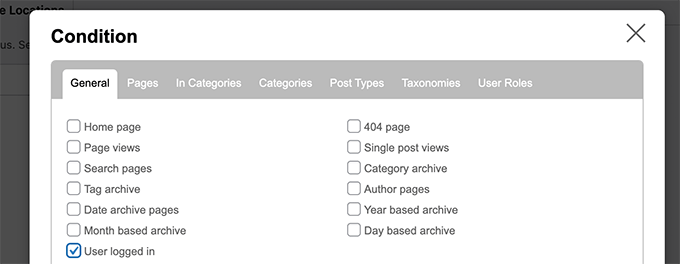
This will bring up a popup window.

From here, you can select the conditions that need to be met in order to display this menu.

Choose condtions

The plugin offers a bunch of conditions to choose from. For instance you can show the menu based on specific page, category, post type, taxonomy, and more.

You can also show different menus based on user roles and logged in status. For instance, you can show a different menu to existing members on a membership website.

We hope this article helped you learn how to add custom items to specific WordPress menus. You may also want to see our guide on how to choose the best web design software, or our expert comparison of the best live chat software for small business.

If you liked this article, then please subscribe to our YouTube Channel for WordPress video tutorials. You can also find us on Twitter and Facebook.

The post How to Add Custom Items to Specific WordPress Menus first appeared on WPBeginner.


April 04, 2022 at 03:30PM
Friday, April 1, 2022

9 Best Internal Linking Plugins for WordPress (Automatic + Manual)

Are you looking for the best internal linking plugins to improve your SEO strategy?

Internal links play an important role in search engine optimization (SEO). They help search engines discover your content and rank them higher in search results. An internal linking plugin can help automate the process and provide suggestions for building better links.

In this article, we’ll show you some of the best internal linking plugins for WordPress.

Best internal linking plugins for WordPress

Why Use an Internal Linking Plugin for WordPress?

Internal links are links between pages on your own website. Having internal links is important for your WordPress SEO. They help search engines like Google crawl your website and discover new content to index and rank.

For example, the paragraph above has two internal links to our relevant content which not only helps users, but also helps search engines rankings.

Generally, the more links a page has pointing to it, the more likely it is to rank higher in search results. That means that you can use internal links to point to important pages on your site as a way to increase their traffic.

Internal links also help your visitors easily find related articles and provide a better user experience overall. This can also help increase pageviews and reduce your bounce rate.

WordPress provides an easy way to add links to your blog posts and pages. However, manually adding internal links can be time-consuming, and the chances are that you might miss an opportunity to link an important page.

This is where an internal linking plugin for WordPress comes in handy. It helps save time and lets you automatically link specific keywords and focus keyphrases.

You also get suggestions for adding internal links. This way, you won’t miss out on linking essential pages. It even helps find content that doesn’t have any internal links and offers recommendations for building internal links.

That said, let’s look at the best internal link plugins for WordPress.

1. All in One SEO (AIOSEO)

The All in One SEO plugin

All in One SEO (AIOSEO) is the best SEO plugin for WordPress. Over 3 million people use the plugin to optimize their site for search engines.

The plugin is beginner-friendly and helps you improve your SEO score without technical knowledge.

AIOSEO offers a Link Assistant feature which enables you to build better internal links.

Link assistant overview

It crawls the links on your WordPress website and provides a detailed report. You can see the number of internal links, outbound links, and affiliate links for each post and page.

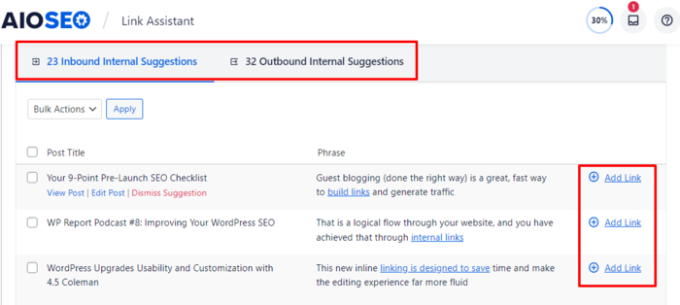
The plugin also shows opportunities to improve your internal links. You can see the exact phrase and the anchor text on which it will create the link. With a click of a button, you can then add them to your content.

Find internal link opportunities and orphaned pages

Plus, you get to see orphaned pages. These are pages that have no internal links. Adding links to these pages can help them to get indexed faster and rank higher in search results.

AIOSEO also lets you quickly search for blog posts to link to from inside the WordPress content editor, and provides options to add nofollow, sponsored, and UGC (user-generated content) tags.

Other than that, AIOSEO offers many other powerful features to optimize your website. You can create XML sitemaps, perform an SEO audit, find and fix broken links, optimize your site for rich snippets, and more.

2. MonsterInsights

MonsterInsights

MonsterInsights is the best Google Analytics plugin for WordPress and is trusted by over 3 million professionals.

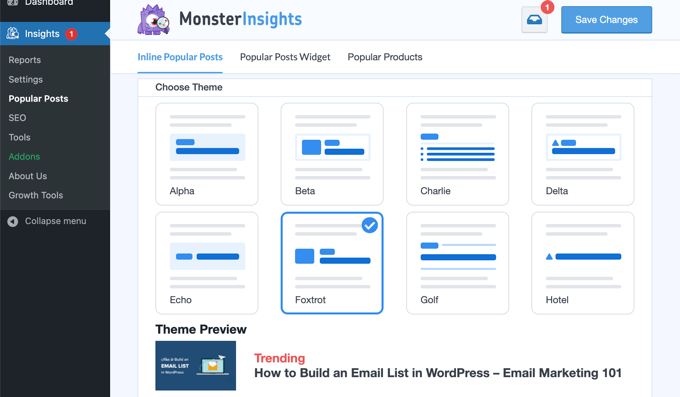
It offers a Popular Post feature that lets you show your best articles anywhere on your site. Using the Inline Popular Post option, you can show your top blog posts within the content.

MonsterInsights Popular Posts Widget

The plugin offers different themes you can choose from and customize the color and size of the title, label, and background. MonsterInsights also lets you select whether to show popular posts based on views, comments, and share count.

With MonsterInsights, you can also track affiliate link clicks and outbound link clicks on your WordPress website. This way, you get to see how people interact with your content and which link they click the most.

Other advanced features offered by MonsterInsights include eCommerce tracking, form conversion tracking, dashboard reports, and more.

3. Yoast SEO

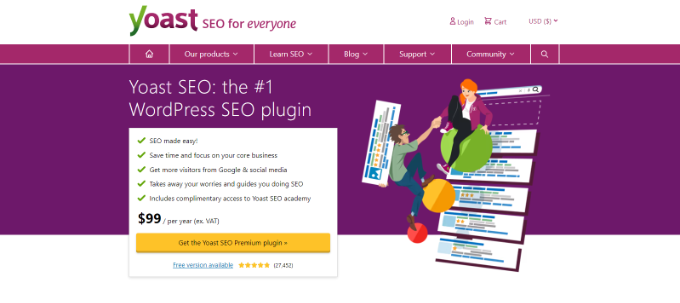
Yoast SEO

Yoast SEO is another popular WordPress SEO tool that helps optimize your site for search engines. It is an alternative to All in One SEO.

The plugin also comes with a basic internal linking tool for premium users. It scans your content for internal links and then provides suggestions for improving your links from within the WordPress content editor.

However, it is not as comprehensive as the All in One SEO link assistant. You can see our detailed comparison of Yoast SEO vs AIOSEO for more details.

Yoast offers several other basic SEO features like adding SEO titles and meta descriptions, adding images for Facebook and Twitter cards, generating XML sitemaps, and more.

4. Internal Link Juicer

Internal Link Jucier

Internal Link Juicer is the next internal linking plugin for WordPress on our list. It’s a free WordPress plugin and helps you automatically build internal links in your content.

You can add specific keywords and phrases in the plugin, and it will add links for you. It gives you more control over your internal links, such as diversifying anchor text, so they look natural and don’t appear computer-generated.

The plugin also lets you backlist and whitelist specific posts from internal linking. This way, you can prevent authors from linking particular articles and pages. It even provides an option to limit the number of links per post.

5. Rank Math

Rank math

Rank Math is another SEO plugin for WordPress that has built-in basic features to help you improve your internal linking strategy. The plugin quickly scans your website for links and then provides you suggestions for adding internal links.

It shows the suggestions inside your WordPress content editor. You can simply copy the recommended link and add it to your text.

Rank Math link builder is not as comprehensive as AIOSEO but rather more in line with the basic link building solution like Yoast.

Besides link suggestions, the plugin also offers other features like Google Schema Markup, keyword rank tracking, 404 error tracking, redirection manager, and more.

6. Link Whisper

Link whisper

Link Whisper is a premium WordPress plugin that helps you create internal links for your website and boost your search engine rankings.

Like many other plugins on our list, it also suggests adding internal links to your content inside the WordPress editor. The plugin is straightforward to use and offers a simple interface.

Using the plugin, you can also find blog posts and pages with little or no internal links. Then using the internal link suggestion tool, you can add links to these orphaned pages.

7. Interlinks Manager

Interlinks Manager

Interlinks Manager is a free internal linking plugin for WordPress. The plugin lets you monitor and optimize your internal links with ease, and you can see the data inside your WordPress admin area.

This plugin is different from the rest because it uses an algorithm to detect whether your internal links are properly optimized and estimates the link juice for each link.

Using this information, you can improve the link juice distribution and build internal links to important pages to boost your SEO. The plugin also offers options to customize the algorithm and lets you tweak it according to your needs.

8. YARPP

YARPP

YARPP or Yet Another Related Posts Plugin is a free-to-use plugin and it’s great for showing your top landing pages anywhere on your website.

When your site starts to grow, your top pages could get buried under new pages. Using the plugin, you can make your top pages visible to visitors and create internal links so search engines can also easily find them on your site.

What’s different about the plugin is that it not only lets you show related pages, but you can also use it to show related blog posts, media files, and call to action buttons.

YARPP is extremely easy to use, and it offers options to change the algorithm that determines which pages and posts to show. Besides that, it comes with pre-built themes, and you can customize them according to your website’s design.

9. Internal Links Manager

Internal links manager

Internal Links Manager is a simple and beginner-friendly WordPress plugin that helps you automatically add links to specific keywords.

The plugin only focuses on adding internal links when certain words and phrases are mentioned in the content. All you have to do is provide the URL and the keyword for the link.

The user interface is straightforward to use. However, you don’t get internal linking suggestions or a report showing how many internal and external links are on your website.

Which Internal Linking Plugin is the Best?

After going through the list, we believe that All in One SEO (AIOSEO) is the best internal linking plugin for WordPress.

It provides a comprehensive internal link report and offers detailed suggestions to add internal links to your content. AIOSEO also helps find pages that don’t have any internal links.

Other than that, it’s a complete SEO toolkit with powerful features. You can use it to optimize your WordPress site for search engines and grow your organic traffic.

At WPBeginner, we use AIOSEO to optimize our site for higher rankings.

We hope this article helped you pick the best internal linking plugin for WordPress. You may also want to see our guide on how to get a free SSL certificate for your website, or our comparison of the best domain registrars.

If you liked this article, then please subscribe to our YouTube Channel for WordPress video tutorials. You can also find us on Twitter and Facebook.

The post 9 Best Internal Linking Plugins for WordPress (Automatic + Manual) first appeared on WPBeginner.


April 01, 2022 at 03:00PM