Are you looking for a Patreon alternative to make more money from your YouTube and other social channels?
Patreon is a popular crowdfunding platform that helps content creators monetize their work. Fans can subscribe and pay a regular fee to support their favorite artist or creator. However, Patreon may not be the right platform for many people due to fees and censorship issues.
In this article, we’ll share the best Patreon alternatives to monetize your audience.
Why Do You Need a Patreon Alternative?
Patreon provides a platform for vloggers, musicians, writers, journalists, podcasters, and other creators to generate a consistent income stream from their content, but it has several big shortcomings.
First, it’s hard to create your own brand since there are over 6 million monthly active users on Patreon. You’ll compete with other creators in your niche, and it can be challenging to make your content discoverable for new users. Not to mention, you get limited tools to promote your content.
Then there is an issue of censorship. Patreon’s content restrictions can be strict for people in particular niches, as political content creators faced crackdowns in the past. As a result, their fan base reduced dramatically.
Lastly, the fee charged by Patreon can be a big turn-off for some content creators. For instance, it charges a flat 5%, 8%, and 12% on top of the payment processing fee on your monthly income on Patreon, depending on the pricing tier you’re subscribed to.
Creators just don’t need another tax on their earnings.
This is why many power users switch away to Patreon alternative like WordPress because it’s more powerful, and it gives you full control.
Let’s look at why you should use WordPress as a Patreon alternative.
What Makes WordPress a Great Alternative to Patreon?
WordPress is a popular website builder powering more than 43% of all the websites on the internet, and it’s free to use. You might think that starting a website from scratch is a lot of work and takes too much time, but that’s not the case anymore.
You can create a WordPress website of any type in no time using a drag and drop website builder like SeedProd, which requires no coding at all.
WordPress comes with over 59,000+ free plugins that you can use to maximize your earnings, grow your traffic, get more followers, and build an email subscriber base that can never be taken away from.
Another benefit of using WordPress is that it offers more control over your content than Patreon. You’ll be protected from changes in terms of service and don’t have to worry about losing your fan base due to content restrictions.
With WordPress, you can even offer different payment options on your site and make money online without worrying about paying a portion of your earnings to Patreon.
Here’s what you’ll need the following to create your WordPress website:
A domain name. This will be the address of your online store (e.g. wpbeginner.com).
A WordPress hosting account. This is where your website files will be stored.
An SSL certificate. This allows you to securely accept payments online.
Normally, web hosting costs $7.99 per month, a domain name starts at $14.99 per year, and an SSL certificate costs around $69.99 per year.
This can be a big investment when you’re just starting out.
Luckily, Bluehost has agreed to offer our readers a big 60% discount on web hosting, plus a free domain name and SSL certificate.
Basically, you can get started for as low as $2.75 per month.
Simply click on the Bluehost button below, and the discount will automatically be applied.
It’s a great alternative to Patreon because the plugin lets you set up multiple membership tiers and enables you to restrict access to any premium content based on the user’s membership level. You can even use the plugin to create a video membership website in WordPress.
Besides that, it comes with a powerful course builder. You can create and sell online courses using MemberPress. They also have a content drip feature that allows members to see the content after they’ve completed a certain course or been a member for a particular time.
Another advantage of using MemberPress is that it easily integrates with popular payment providers like Stripe and PayPal, and all the best email marketing services.
If you’re an artist, musician, writer, developer, or any other content creator that sells digital products like music, ebooks, PDF files, videos, premium software licenses, and more, then Easy Digital Downloads is the perfect Patreon alternative for you.
Using the plugin, you can manage and sell files with ease. It has a built-in shopping cart system that makes it effortless for users to purchase your digital products.
You can also track the download activity of your customers inside the WordPress dashboard and get reports to see how your downloads are performing.
Note: There’s also a free version of Easy Digital Downloads that you can install in WordPress. Alternatively, you can use SiteGround’s EDD hosting which comes with WordPress and EDD pre-installed.
Using WooCommerce, you can sell digital and physical products. It’s excellent for content creators that want to sell merchandise to their fans. Plus, it offers an inventory management feature that helps you keep track of how many products you have available for purchase.
WooCommerce also supports popular payment gateways like Stripe and PayPal. Other than that, the plugin offers extensive documentation, community forums, and support to help you out.
WP Simple Pay is the best Stripe payment plugin for WordPress. As a content creator, you can monetize your site by adding a payment button using the plugin, and there’s no need to set up a shopping cart.
Simply add the payment option to your site to let your fans support you. Using the plugin, you can easily accept credit card payments, Apple Pay, Google Pay, ACH payments, iDEAL, and more.
You can even set up different subscriptions for recurring payments, just like Patreon only with much lower fees.
WP Simple Pay also helps in collecting donations. You also get an option to set up discount coupon codes, allow users to subscribe or pay one-time, add free trials, and more.
You can create a podcast website in no time with Blubrry. Another advantage is that you can easily distribute your podcast to popular platforms like Spotify, Apple Podcasts, Google Podcasts, Amazin Music, TuneIn, iHeart Radio, Pandora, and more.
Blubrry comes with a powerful podcast plugin called PowerPress that lets you manage your podcast files in WordPress. Blubrry also has a large community of podcasters, and you can easily find forums to learn from other experienced and successful podcasters.
The plugin is based on WooCommerce and allows you to raise funds for your creative project. Its native wallet system helps keep track of all the funds you’ve raised.
WP Crowdfunding also easily integrates with payment gateways like Stripe, PayPal, Authorize.net, Skrill, and more. The plugin is super easy to use and offers a beginner-friendly user interface.
Which is the Best Pateron Alternative?
After carefully evaluating all the popular Patreon alternatives, we believe the top Pateron alternative is MemberPress. It lets you restrict premium content, sell courses, and offers a comprehensive set of features.
Do you want to add document collaboration and editing to the WordPress block editor, similar to Google Docs?
Google Doc-style inline commenting can make collaboration and editing a lot easier in WordPress for multi-author blogs.
In this article, we’ll show you how to easily add Google-Doc style document collaboration and editing in WordPress block editor.
Why Use a Collaborative Editing Plugin for WordPress?
If you run a multi-author WordPress website, then you may often come across situations where you may want to leave a suggestion or feedback for an author.
Similarly, you may need to work with multiple authors on the same article in WordPress. However, you’ll have to rely on external tools like email, Google Docs, or text to communicate with other authors.
This way your team can more efficiently collaborate to create better content for your users.
That being said, let’s take a look at how to easily make collaborative editing possible in WordPress.
Adding Document Collaboration in WordPress Editor
By default, WordPress doesn’t come with a built-in solution for teams to communicate inside the WordPress admin area, so in this tutorial we’ll be using a collaborative editing plugin.
Upon activation, you need to edit an existing WordPress post or page, or create a new one.
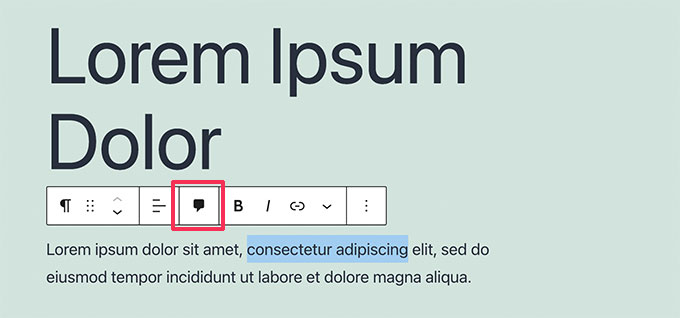
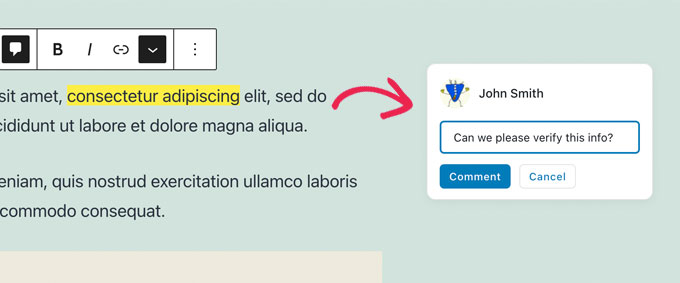
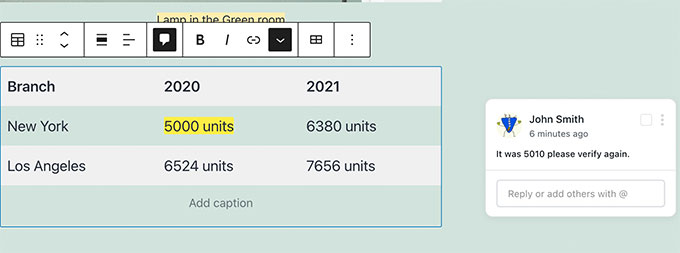
On the post edit screen, select any text that you want to highlight for your team members and click on the Comment button in the toolbar.
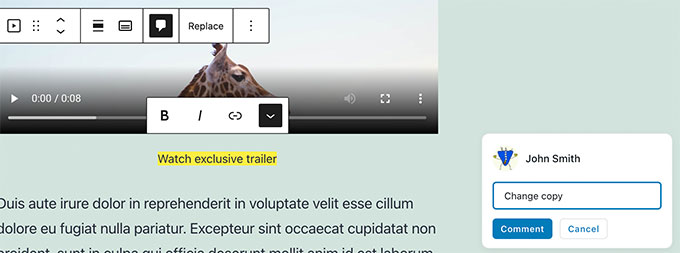
This will bring up a popup where you can leave a comment for other team members to view.
Simply type in the field and click the Comment button when you’re done.
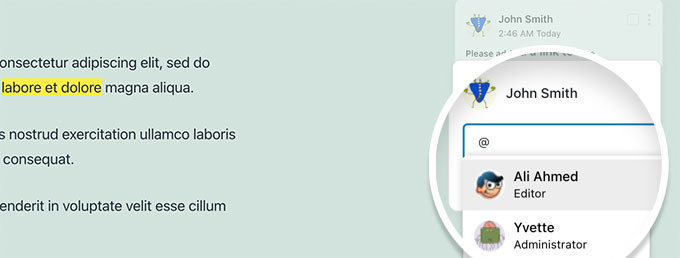
If you want to add a particular user to the conversation, that’s easy.
Just type the @ sign and select their username from the dropdown.
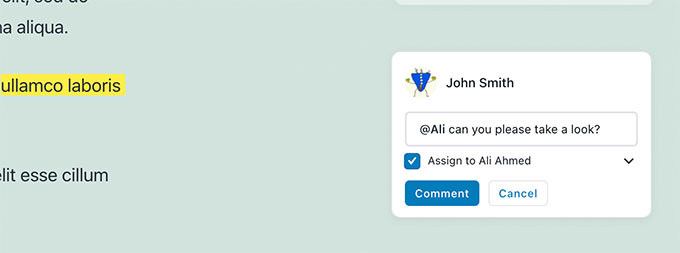
You can also choose to assign a particular comment to the tagged user.
This will allow them to track any tasks and feedback assigned to them and mark them complete.
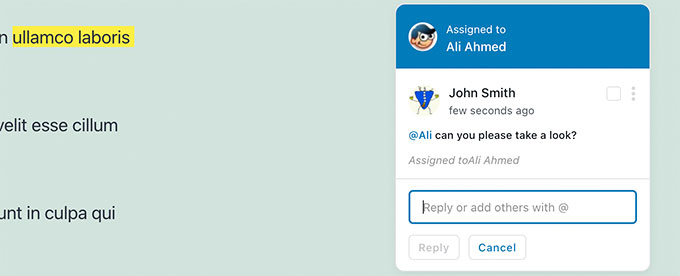
You’ll notice the comment assigned to the specific user you have tagged.
You can add comment on almost any text anywhere in the post or page.
The comment button will appear on most blocks including headings, tables, columns, blockquotes, and more.
You can also add comment to the caption fields for images, audio, and video embeds.
Note: Adding the comment does not save them. Your comments will only be saved when you save the post or page you are editing.
Now, you may want to see how it would appear for other users. To do that, you can simply log in to your WordPress website with another account.
Make sure this other account has the user role or permission to edit the post or page where you left comments.
Upon login, simply edit the post, and you’ll see that the text areas where you left comments earlier are highlighted. Clicking on them will bring up the comment popup.
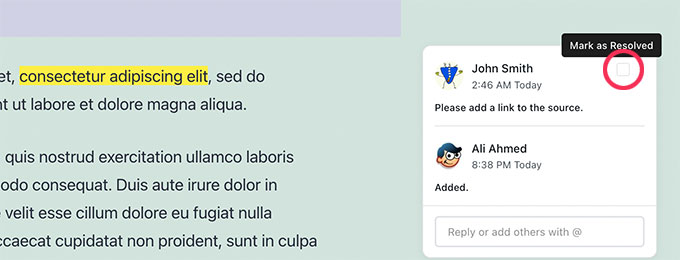
Go ahead and feel free to add a reply to one of the comments. Your reply will then appear below the original comment.
Once an issue is fixed, you can close that comment thread by clicking on the Resolved checkbox.
Managing Document Activity and Comments
Want to view all of a post’s comments in one place?
You can view and manage all document activity and comments by clicking on the Multicollab button at the top right corner of the screen.
It will show you recent comments under the Activities tab. From here, you can directly reply to a comment or mark it as resolved.
If you don’t want to see comments while working on an article, then simply switch to the Settings tab and turn on the Hide Comments option.
The plugin also lets you see the overall summary of activities on the current document under the Summary tab.
Here you can see last edited by information and overall comment stats for the current article.
Send Email Notifications for Editorial Comments in WordPress
The premium version of the plugin allows you to send email notifications for each comment.
We recommend using WP Mail SMTP plugin to make sure that email notifications are delivered. There’s also a free version available that’s more than sufficient.
By default, WordPress uses PHP mail() function to send emails. However, this function can be easily abused, and most WordPress hosting companies don’t have it properly configured.
WP Mail SMTP fixes this problem by allowing you to easily send WordPress emails using a proper SMTP server.
Do you want to easily sell digital downloads online?
Maybe you’re planning to sell ebooks, online courses, your own photography, digital art, music, or something else.
No matter the type of digital product, WordPress makes it easy to sell these premium downloads and deliver them to your customers in a secure way.
In this article, we will show you how to sell digital downloads on WordPress.
Which Platform Should You Use to Sell Digital Products?
First, you’ll need to choose an eCommerce platform that you’ll use to sell digital products.
Digital downloads are basically products that users can download to their computers after making a purchase. Products like eBooks, digital art, images, illustrations, printables, software, music, and videos are a few examples of the most commonly sold digital products online.
An eCommerce platform is a software that allows you to upload your digital files and offer them for sale.
You’ll want to choose your eCommerce platform carefully. That’s because moving platforms can be complicated and take a lot of time and effort.
Some platforms are better suited for selling physical goods vs digital ones. You want to be sure that you’re choosing a solution that has features to protect your digital downloads, have proper licensing, subscriptions, and other key features built-in.
WordPress is the best website builder on the market used by over 43% of all websites on the internet. Easily Digital Downloads is the best WordPress eCommerce plugin to sell digital products.
In fact, we use this plugin ourselves to sell many of our premium WordPress plugins which are downloadable files restricted for members only, and it comes with license keys built-in.
WordPress has a huge advantage over other platforms like Gumroad, Sellfy, or Sendowl. It gives you full control over your website, and you can sell as many products as you want without paying a high monthly or transaction fees.
Now, it’s important to know that there are two types of WordPress software, and you don’t want to choose the wrong one.
First, there is WordPress.com, which is a blog hosting platform. Then, there is WordPress.org which is also known as self-hosted WordPress.
You need to use the self-hosted WordPress.org platform because it gives you full control over your website with complete freedom to sell any type of digital products.
We’ll show you how to easily setup your WordPress site with Easy Digital Downloads with just a few steps.
Step 1. Setting Up Your WordPress Website
To start selling digital downloads with WordPress, you’ll need a domain name, web hosting, and an SSL certificate.
A domain name is your website’s address on the internet. This is what visitors will type into their browsers to reach your website, such as wpbeginner.com.
Web hosting is where your website lives online. You can think of hosting as your website’s house on the internet. To help you out, we’ve hand-picked some of the best WordPress hosting that you can buy.
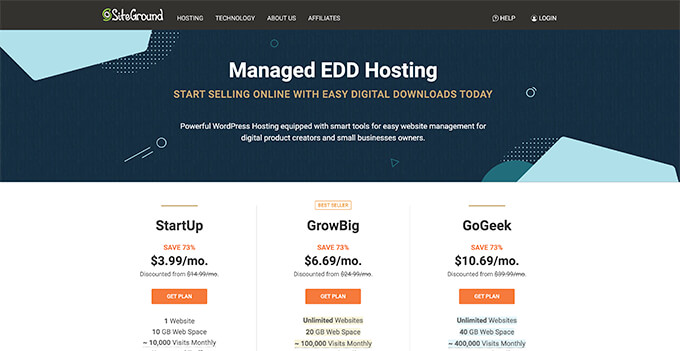
One of our top recommended hosting provider, SiteGround, offers managed WordPress hosting for Easy Digital Downloads. It comes with a free SSL certificate, EDD pre-installed, all the optimization features, and you get a huge 73% off.
Basically, you can create and run your website for less than $5 per month.
Lastly, you will need to add your account information. You will also be able to purchase some optional extras.
You can always add these extras at a later date if you decide that you need them. If you’re unsure then we recommend skipping this step.
After entering your payment details, SiteGround will send you an email with instructions on how to log into hosting account. This is a web hosting control panel where you can manage your new website.
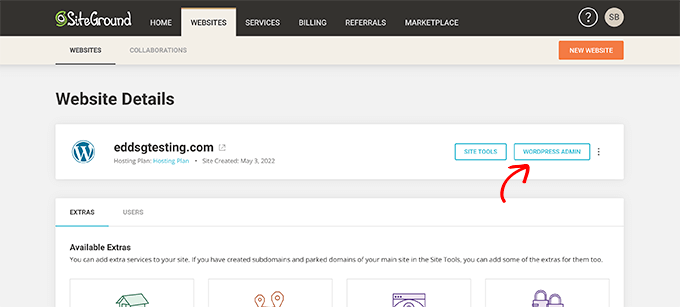
Simply log into your SiteGround account, and you’ll see that SiteGround has already installed WordPress for you, and it comes with Easy Digital Downloads (pre-installed as well).
You can then click on the ‘WordPress Admin’ button.
This will take you to your WordPress site’s dashboard where you’ll see Easy Digital Downloads pre-installed.
If for some reason, you don’t want to use SiteGround, then you can also install WordPress on other hosting companies like Bluehost, Hostinger, and WP Engine following a fairly similar process.
Step 2. Setting Up Easy Digital Downloads
By default WordPress doesn’t include an eCommerce functionalityout of the box, and that’s why you’ll need a plugin in order to sell your digital downloads.
Plugins for WordPress sites are like apps for your phone. They add all kinds of different features and functionality to your website.
Note: For this tutorial, we’ll be using the free version of Easy Digital Downloads. There’s also a premium version with more advanced features such as powerful email marketing service tools, additional payment gateways, email support, and much more.
Now if you used SiteGround, then Easy Digital Downloads comes pre-installed. But if you’re using other hosting provider, then you’d to manually install the Easy Digital Downloads plugin.
Upon activation, you need to visit Downloads » Settings page in your WordPress admin area.
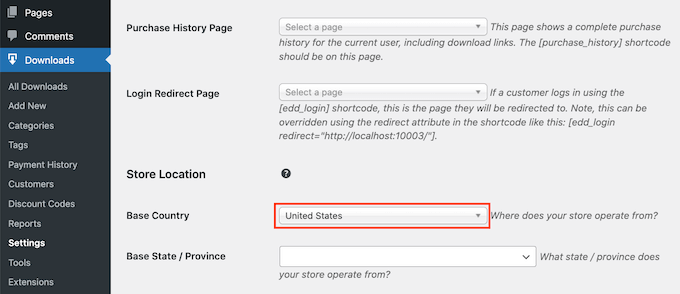
From here, first you need to set your store’s location.
You might wonder, why is your location needed if you’re not selling physical products? It’s because when a customer makes a purchase, Easy Digital Downloads will use the country and state information to auto-fill some fields. Also, your location may be used to calculate sales tax.
To add your location, open the ‘Base Country’ dropdown menu. You can now choose the location where your business is based.
Next, find the ‘Base State / Province’ field. Here you can type the base state or province where your store operates from.
After entering this information, scroll to the bottom of the screen and click on the Save Changes button.
Step 3. Setting up Your Payment Gateway
If you want to sell downloads, then you’ll need a way to process payments from your customers.
Easy Digital Downloads supports PayPal, Stripe, and Amazon Payments. These are all popular payment gateways.
If you want to add more payment gateways, then you may want to take a look at the Easy Digital Download extensions which includes other solutions like Braintree, Authorize.net, and many more.
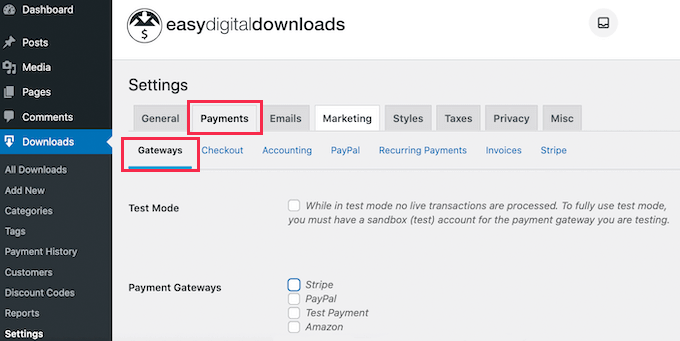
To choose your payment gateways, click on the Payments tab. Then make sure the Gateways tab is selected.
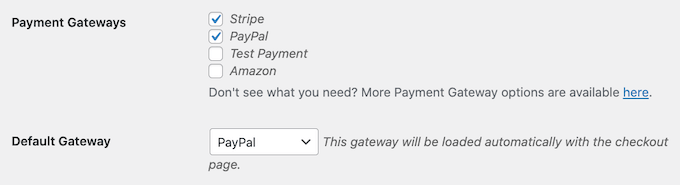
In the Payment Gateways section, select all of the gateways that you want to use on your new WordPress website.
The most common payment gateways are Stripe and PayPal, so we’ll show you how to set those up.
If you’re using multiple payment providers, then you’ll need to choose a default payment gateway. This is the option that will be selected automatically when the visitor loads your checkout page.
We recommend setting Stripe as the default since most people want to pay with credit cards.
Now scroll to the bottom of this page and click on Save Changes.
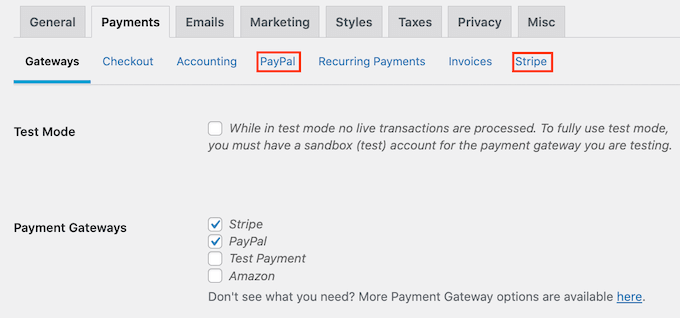
Once the page reloads, it will have some new tabs. You can use these tabs to configure your chosen payment gateways.
If you want to use PayPal, then click on the PayPal tab. You can now type your PayPal email address and password.
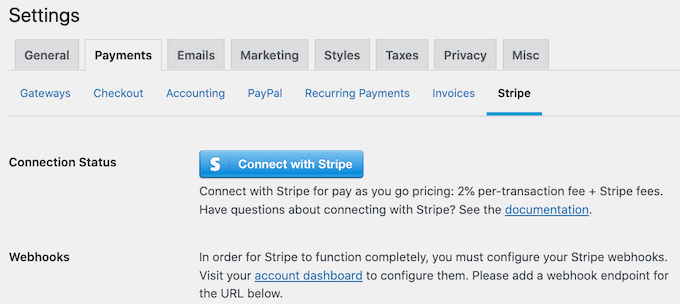
To set up Stripe, click on the Stripe tab. Then click on the ‘Connect with Stripe’ button.
This opens a setup wizard, which will help you connect your website to Stripe.
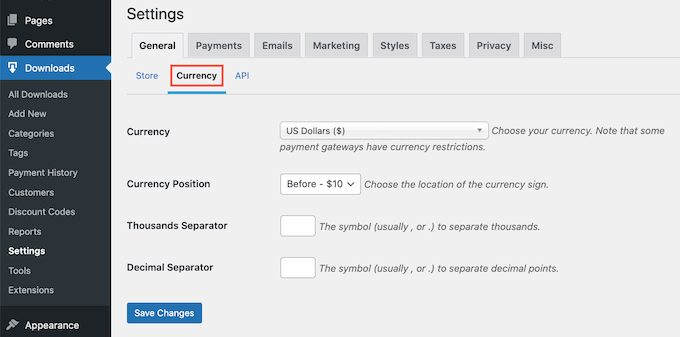
Now, depending on your location, you may also want to customize the currency used on your website.
By default Easy Digital Downloads shows all of your prices in US dollars. It also places the dollar sign in front of the price, so five dollars is shown as ‘$5.’
To change the default currency settings, scroll to the top of the screen and click on the Currency tab.
Next, open the Currency dropdown. You can now choose a new currency.
Just be aware that some payment gateways may not accept every currency. If you’re unsure, then it’s a good idea to check the website for your chosen payment gateway. Most payment gateways have a list of the currencies that they support.
If you’ve made any changes on this page, then don’t forget to click on the Save Changes button.
Step 4. Creating Your First Digital Product
Now that your WordPress site is set up, you’re ready to start selling your digital goods!
To create your first digital product, go to Downloads » Add New.
You can now type a name for your product into the ‘Enter download name here’ field.
Next, type out a description for this product. WordPress will show this description to your visitors, so you’ll want to make sure it’s descriptive and convincing.
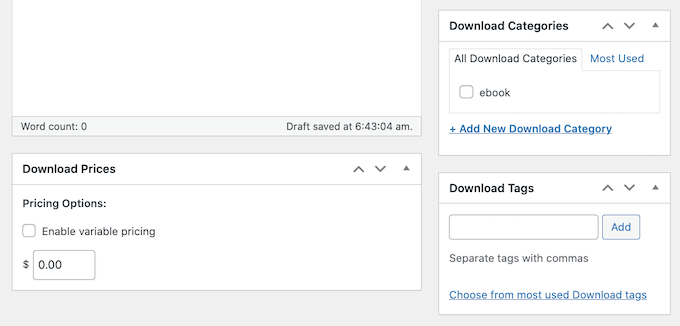
Many online stores and websites use product categories and tags. This can help shoppers find the product they’re looking for and can also encourage them to explore related products.
You can create categories and tags in the Download Categories and Download Tags sections.
After that, scroll to the Download Prices section.
By default Easy Digital Downloads will offer your product as a free download. If you’re going to sell your digital downloads, then you’ll want to set a price.
To add a price, scroll to the Download Prices section. You can then type the amount that visitors will need to pay in order to download this product.
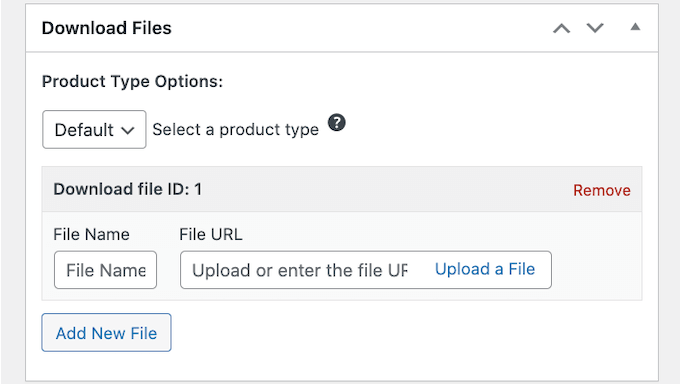
The next step is uploading your product. This might be an ebook, a recorded webinar, a PDF guide, photograph, or any other file that WordPress supports.
To add your downloadable file, simply scroll to the Download Files section.
In the File Name field, type a name for your downloadable file. Then you can click on the ‘Upload a file’ button.
This will launch the WordPress media library. Here you can choose the file you want to offer for download.
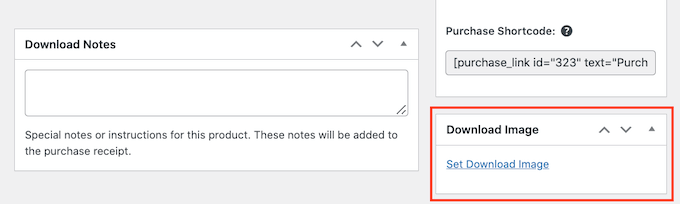
The final step is adding a product image.
When you’re selling digital downloads, you may need to get creative with your product images. For example, if you’re selling a recorded webinar, then you might use a screenshot from the video.
You can easily create a professional-looking product image using web design software such as Canva.
To add a product image, you just need to scroll to the Download Image section.
You can then click on the ‘Set Download Image’ link. This launches the WordPress media library where you can choose your product image.
When you’re happy with the information you’ve entered, click on the Publish button.
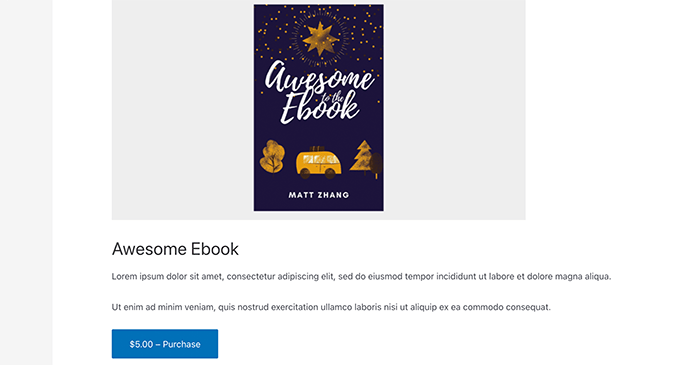
Your first digital product is live! You can now preview your product page in action.
You can now create more digital downloads simply by repeating these steps.
Step 5. Selecting and Customizing Your WordPress Theme
Themes control how your WordPress website looks to the people when they visit it, including the layout, colors, and fonts.
There are thousands of WordPress themes, so it can be hard to decide which one to start with. You can check out our pick of the most popular WordPress themes for some great options.
Once you’ve chosen a theme, you can see our beginner’s guide on how to install a WordPress theme to get it live on your website.
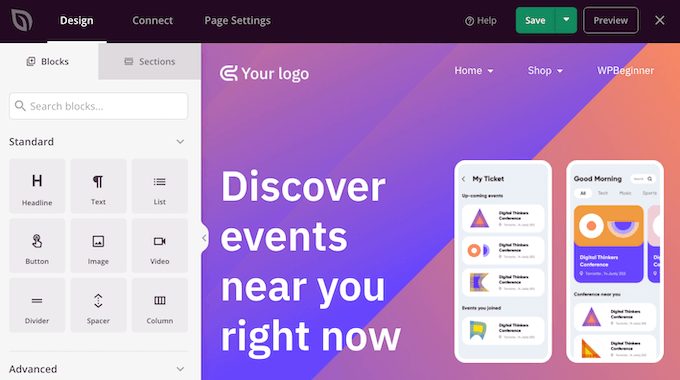
It is the best website builder plugin in the market and is used by over 1 million websites. You can use it to create beautiful layouts that are professionally designed and optimized for conversions and sales.
SeedProd also comes with lots of ready-made templates. This includes designs that are perfect for promoting your digital downloads.
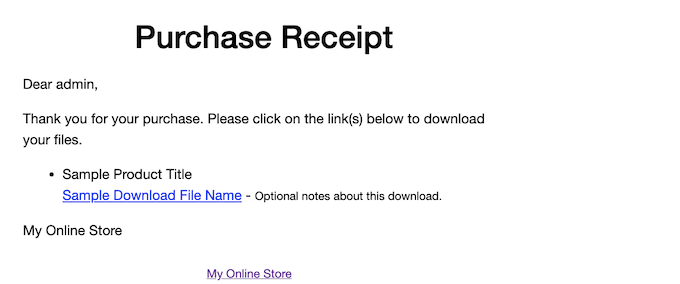
Every time someone buys a digital download, Easy Digital Downloads will send an email to that person.
This email has a link that the customer can use to download the file they just purchased.
You may want to customize this email to add your own text and branding. Strong branding can make your business look more professional and inspire loyalty.
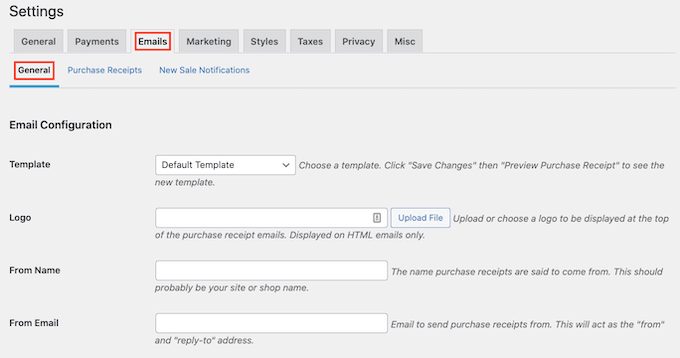
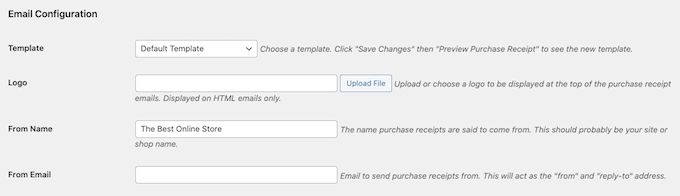
To customize your emails, go to Downloads » Settings and click on the Emails tab. Then, make sure the General tab is selected.
This logo will be shown at the top of your purchase receipt emails.
To add a logo to your emails, click on the Upload File button and upload or choose an existing image from your WordPress media library.
You can also add a ‘From Name.’ This name will be shown in the customer’s inbox. You’ll want to use something that immediately lets customers know who you are, such as the name of your website.
You’ll also need to add a ‘From Email.’
This email will act as the ‘from’ and ‘reply-to’ address. Since customers may reply to your messages, you’ll want to use a professional email address that you check frequently.
Once you’re happy with your email branding, click on the Purchase Receipts tab. In this tab you can write the email that customers will get every time they make a purchase.
You may want to start by checking how this email currently looks. To do this, click on the ‘Preview Purchase Receipt’ button. This will show your email in a new tab.
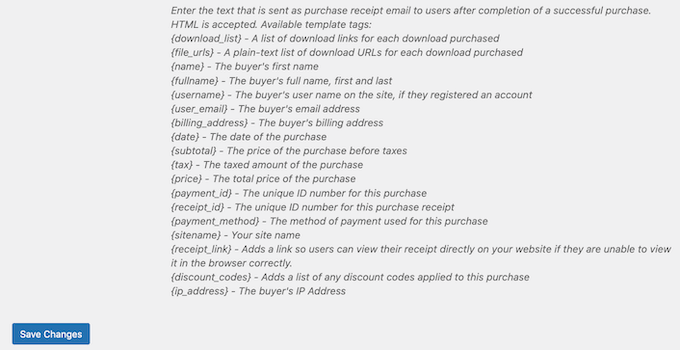
In the Purchase Receipts tab, you can add an email subject and heading. You can also change the email’s body text.
Here dynamic text can be your secret weapon. Dynamic text is simply text that changes based on factors such as the buyer’s name and the date.
Easy Digital Downloads supports dynamic text. If you scroll down, then you’ll find all of the different dynamic text that you can use.
You can copy and paste these different pieces of dynamic text into your emails.
Every time it sends an email, Easy Digital Downloads will replace this placeholder dynamic text with real values such as the customer’s name.
As you’re working on your email, you may want to send a test email. Simply click on the Send Test button and Easy Digital Downloads will send an email to your admin email address.
Have you clicked on the Send Test email button, but haven’t received an email? Then you can follow our guide on how to fix WordPress not sending email issue to make sure your emails reach your customers.
When you’re happy with your purchase receipt emails, scroll to the bottom of the screen and click on the Save Changes button.
Step 7. Promoting Your Digital Downloads
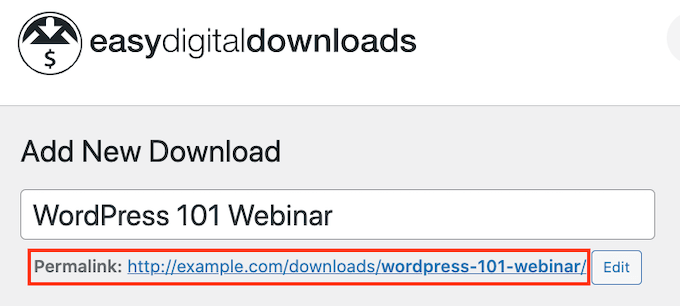
Easy Digital Downloads publishes each product as a new page. If you’re going to sell your digital downloads, then you’ll need to drive traffic to these pages.
This might mean adding these pages to your website’s menu. You can also link to your product pages from different areas of your website. This may include your blog posts, landing pages, or even an announcement bar.
To add these links, you’ll need to know the product page’s URL. You’ll find this information directly beneath the product’s title.
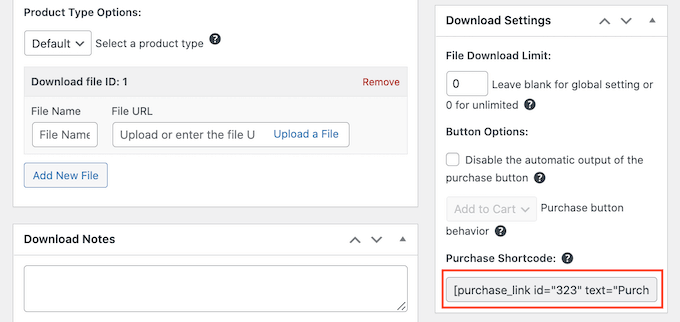
Another option is adding the product’s Purchase Shortcode to a page or post.
To create a Purchase button, scroll to the product’s Download Settings section. You can then copy the Purchase Shortcode.
You can then add the shortcode to any post or page, or even a widget area like your sidebar.
The shortcode will add a purchase button. Whenever a visitor clicks on this button, it will add the digital download to their shopping cart.
The purchase button will also turn into a checkout button. Clicking on this button will take the customer to the Easy Digital Downloads checkout, where they can enter their payment information and buy their download.
Here are some of our top picks for plugins that can help you sell more digital downloads.
OptinMonster is the conversion optimization software on the market. You can use it to create optin forms to grow your email list and convert visitors into paying customers. It can also reduce shopping cart abandonment.
MonsterInsights is the best Analytics solution for WordPress. It helps you see where your visitors are coming from and what they do on your website, so you can make decisions and update your marketing strategy based on real data.
AffiliateWP can help you reach a whole new audience with affiliate marketing. AffiliateWP has everything you need to create your own affiliate program, so people can promote your products to their audience for a commission.
PushEngage is the best push notification software for WordPress. It allows you to send personalized web push notifications to let your customers know about everything from new digital downloads, to special offers, and even exclusive coupon codes.
FAQs About Selling Digital Downloads
Many of our readers regularly reach out to us with questions about selling digital downloads. We have tried to answer some of the most frequently asked questions below.
1. Can I start selling digital downloads for free?
The Easy Digital Downloads plugin is 100% free. It has everything you need to start selling digital downloads on your WordPress website.
While Easy Digital Downloads is free, you’ll need a domain name and web hosting account to run it which will cost money.
2. How much does it cost to create a WordPress website?
It depends on your business plan and budget. You can start with Bluehost for $2.75 per month and use free plugins and themes to limit your costs. We recommend a business model where you start small and then spend money as you start to sell more digital downloads.
Absolutely! It’s not unusual for a successful business to expand into new areas.
Despite the name, you can use Easy Digital Downloads to sell physical products. There’s even a Simple Shipping addon that adds shipping features to the Easy Digital Downloads plugin.
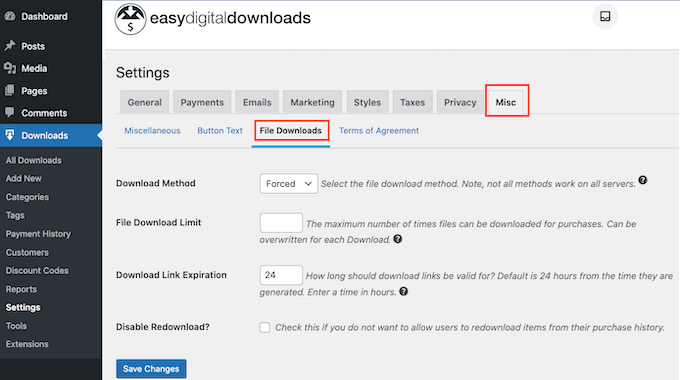
4. Will my customers’ digital download links expire?
By default every digital download link will expire after 24 hours. This is designed to stop customers from sharing your links, or even posting them publicly.
You can change this 24 hour deadline by going to Downloads » Settings in your WordPress dashboard. You can then click on Misc » File Downloads.
Now, find the Download Link Expiration field. Then simply type in the number of hours you’d like the download link to be available before it expires.
We hope that this tutorial helped you learn how to sell digital downloads. You may also want to see these easy ways to drive traffic to your new website, or see our expert comparison of the best live chat software for small businesses.
If you liked this article, then please subscribe to our YouTube Channel for WordPress video tutorials. You can also find us on Twitter and Facebook.