Monday, May 23, 2022

How to Add Advanced Gift Cards in WooCommerce (Easy Way)

Do you want to add advanced gift cards in WooCommerce?

Gift cards allow your customers to buy store credit and then either keep it for themselves, or give it away as a gift. Since they’re so popular with shoppers, gift cards can help you get more sales and boost profits.

In this article, we will show you how to easily add advanced gift cards in WooCommerce.

How to add advanced gift cards in WooCommerce

Why Add Advanced Gift Cards in WooCommerce?

Whether you sell physical items or you sell digital downloads in WordPress, gift cards give your customers an easy way to buy store credits in advance. Although some shoppers may buy a gift card for themselves, they also make a very convenient gift.

By selling gift cards, you can make your WooCommerce store the go-to place for shoppers who need to get a present but are unsure what to buy.

This means more sales and more profits for your online store.

Gift cards can also help spread the word about your brand, particularly if the shopper buys a gift card for someone who hasn’t heard of your online store yet.

Convincing a new customer to make their first purchase is often a challenge. However, if someone gets a gift card, then they’re almost guaranteed to use it, even if they’re not familiar with your store.

When this person uses their gift card, you will be able to collect their contact information to build your email list in WordPress and encourage first-time shoppers to become loyal repeat customers.

That being said, let’s take a look at how you can easily add advanced gift cards in your WooCommerce store.

How to Add Advanced Gift Cards in WooCommerce

The easiest way to add advanced gift cards in WooCommerce is by using the free Advanced Coupons plugin with the Advanced Gift Cards for WooCommerce premium addon.

You’ll need both plugins installed in order to create gift cards. That’s because the gift card addon needs the core Advanced Coupons plugin in order to work.

Advanced Coupons is the best WordPress coupon code plugin on the market. It allows you to create coupons to boost your sales and grow your business.

In this guide, we’ll be using the free Advanced Coupons plugin. However, there is an Advanced Coupons Premium plugin that adds extra features such as ​​BOGO coupons, cart conditions, and the option to auto-apply coupons. Both the free and premium versions are fully compatible with the Advanced Gift Cards for WooCommerce addon.

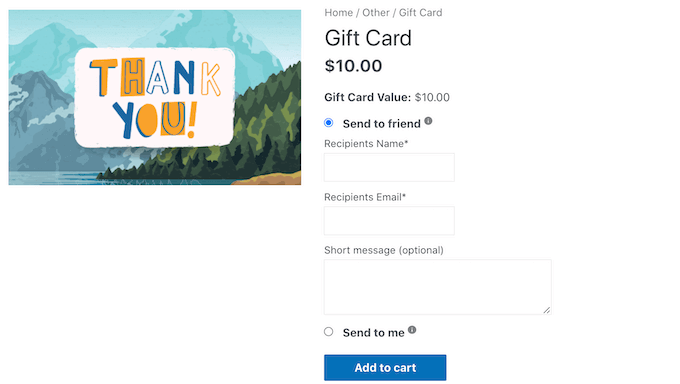
In the following image you can see an example of a gift card, created using Advanced Gift Cards for WooCommerce.

An advanced gift card created for WooCommerce

When the customer buys a gift card, WordPress will send them an email with a unique coupon code that they can use on your online store.

To create and sell gift cards, you’ll need to first install and activate the free Advanced Coupons plugin. If you need help, then please see our guide on how to install a WordPress plugin.

Then, you’ll need to install the Advanced Gift Cards for WooCommerce addon.

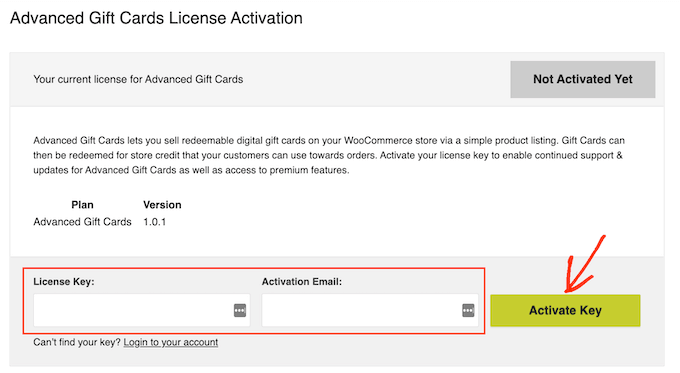
After activating this premium addon, your first task is entering your Advanced Gift Cards license key. You’ll find this key in the purchase confirmation email you got when you purchased the Advanced Gift Cards addon.

You can also get this key by logging into your Advanced Coupons account. In your account, click on ‘View Licenses.’

The Advanced Gift Cards for WooCommerce dashboard

Simply copy the key that appears in the ‘License key’ field. If you have bought other Advanced Coupons plugins and addons, then make sure you’re using the license key for the Advanced Gift Cards addon.

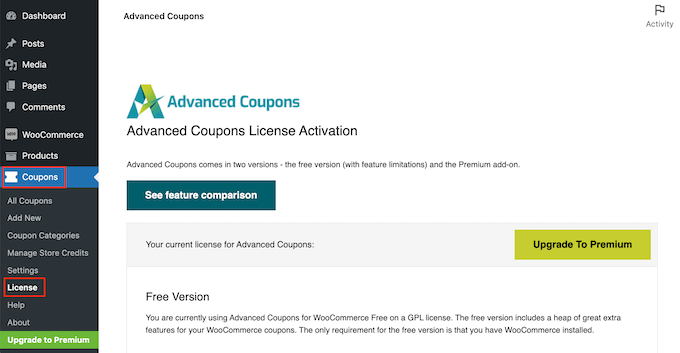
After you’ve done that, go to Coupons » License in your WordPress dashboard.

Adding your license key to the Advanced Gift Cards plugin

Next, scroll to the Advanced Gift Cards License Activation section. You can now go ahead and paste your key into the ‘License key’ field.

After that, type in the email address that you used to buy the Advanced Gift Cards addon. Then, just click on the Activate Key button.

Activating the Advanced Gift Cards for WooCommerce plugin

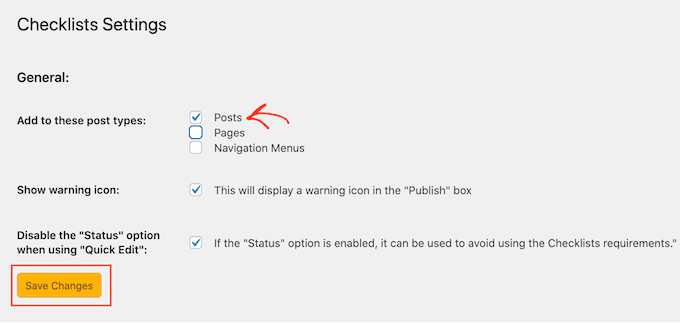
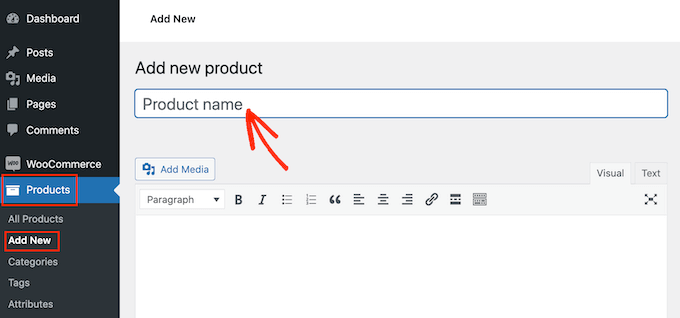
You’re now ready to create gift cards for your customers. To get started, go to Products » Add New.

First, you need to type in a title for your gift card in the ‘Product name’ field. Most WooCommerce themes show the product name at the top of the product’s page, so it’s one of the first things that shoppers will see.

WooCommerce's 'New Product' screen

Directly below the ‘Product Name,’ you can type in a description for your gift card. To get more sales, your description should be helpful, informative, and convincing.

After that, scroll to the ‘Product Categories’ section. Product categories allow your customers to easily browse related products on your WordPress website. This can help you sell more products and make more money.

To add this gift card to a category, simply check the category’s box.

The WooCommerce product category settings

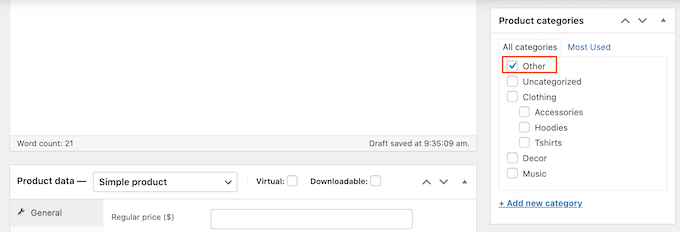
Another option is to create a new category, such as a special Gift Card category where shoppers can browse through all of your different cards. You can see our guide on how to add categories in WordPress for detailed steps.

Once you’re done selecting a category, scroll to the Product Data section and open the dropdown that shows ‘Simple product’ by default.

WooCommerce's Product Data settings

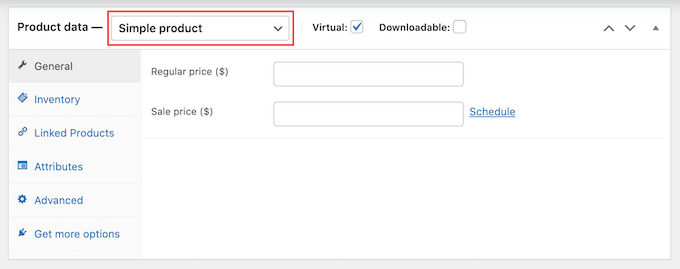
Then, go ahead and click on the new ‘Advanced Gift Card’ option. WooCommerce will now show all the settings you can use to create your gift card.

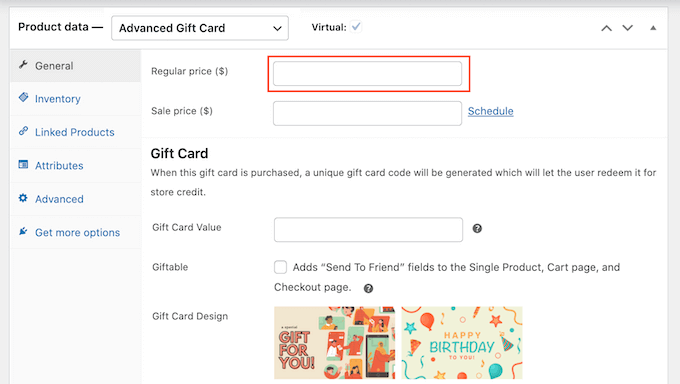
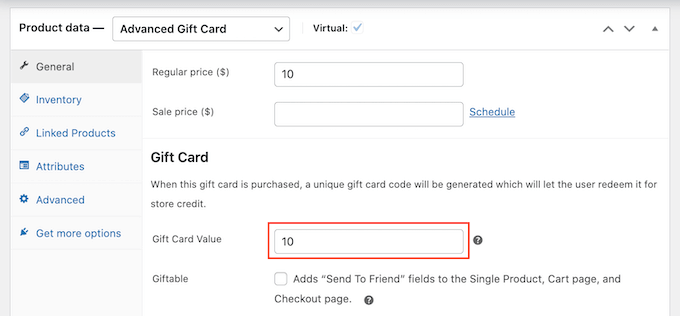
In the ‘Regular price’ field, go ahead and type in how much this card will cost to buy.

Setting a price for your WooCommerce gift card

When a customer buys this gift card, your store will create a unique coupon code. The customer can then enter this code at your store’s checkout, similar to any other smart coupon in WooCommerce.

In Gift Card Value, type the amount that will be credited to the customer’s account when they use this coupon. This will usually be the same as the gift card’s Regular Price.

How to add advanced gift cards in WooCommerce

By default, Advanced Gift Cards will send the card to the buyer’s email address. However, gift cards are usually meant for other people such as a friend or family member.

With that in mind, you may want to give customers the option to send this card to a different email address, as you can see in the following image.

A gift card created using Advanced Gift Cards for WooCommerce

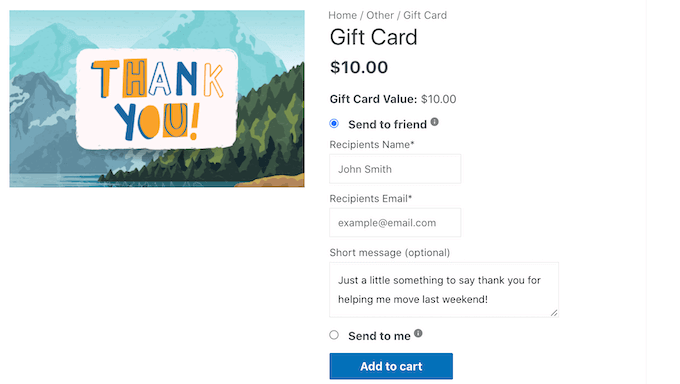
To give your customers this choice, check the ‘Giftable’ box.

Now, your customers can choose whether to send the gift card to their own email address, or a different address.

Making a gift card giftable

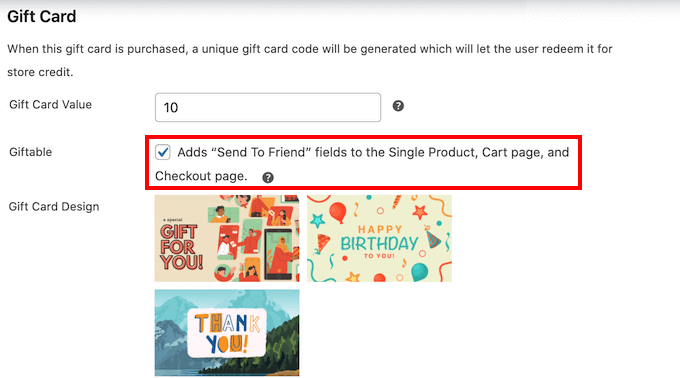
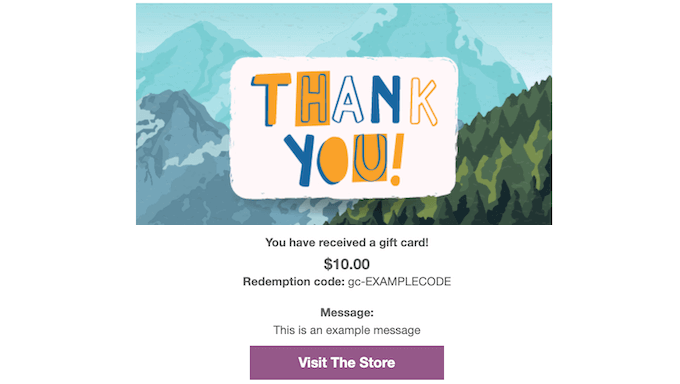
When a customer buys a gift card, the plugin will send them an email with their coupon code plus some information about your store.

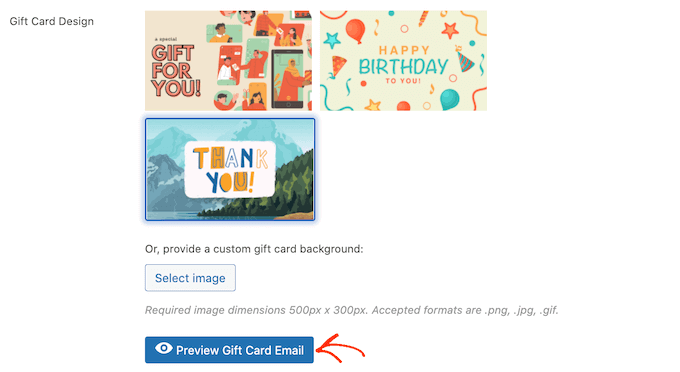
Advanced Gift Cards has several ready-made designs that you can add to these emails, as you can see in the following screenshot.

A sample gift created created using WordPress and WooCommerce

To use one of these designs, scroll to the Gift Card Design section and then click on any of the ready-made designs.

To preview how your emails will look, simply click on the Preview Gift Card Email button.

Ready-made designs for your WooCommerce gift card

This will open a popup showing how your email will look with your chosen design.

Another option is uploading an image of your choice. For example, you might use web design software to create a Thank You image that features your store’s unique branding.

To use your own image, click on the ‘Select image’ button.

Adding a custom image to your coupon

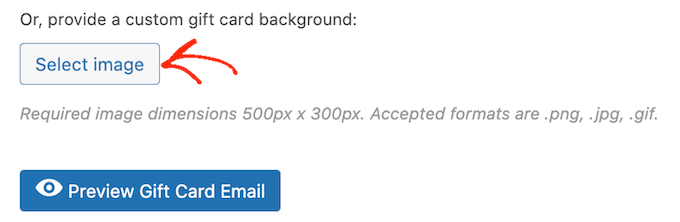
This will open the WordPress media library where you can either choose an image or upload a new image to your WordPress blog from your computer.

There are few other settings that you may want to take a look through. However, this is all you need to create an advanced gift card in WooCommerce.

Before you publish your gift card, you may want to customize the email that’s sent to every customer who buys this product.

With that in mind, click on the Save Draft button to save your gift card without publishing it to your online store.

How to Customize the Advanced Gift Cards Email

Whenever a customer buys a gift card, they’ll get an email with instructions on how to use their card.

You may want to customize this email, so it better aligns with your brand and has the messaging you need. You may also want to add any information that you feel is missing from the default email.

To edit this email, go to WooCommerce » Settings. Once you’ve done that, click on the ‘Emails’ tab.

Editing the gift card email

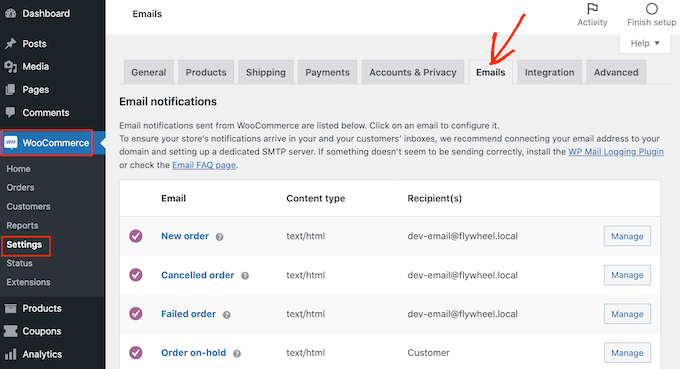
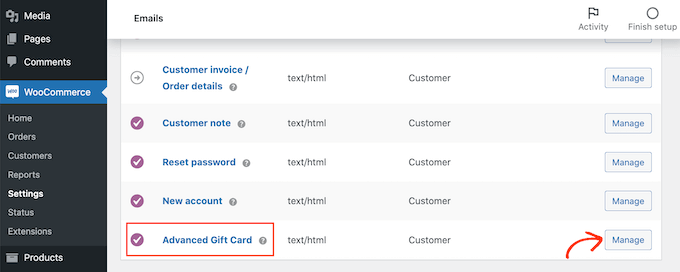
On this screen, scroll to find the ‘Advanced Gift Card’ email.

Then, click on its ‘Manage’ button.

The Advanced Gift Cards email

You will now see the template that Advanced Gift Cards uses for all of its emails.

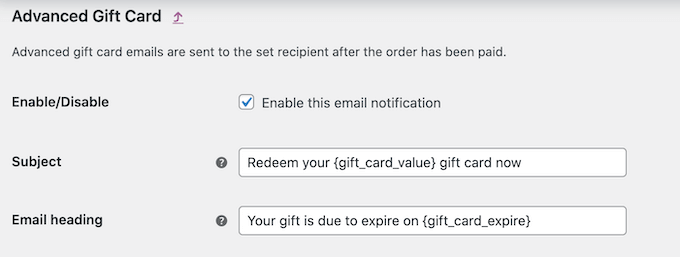
You may want to start by editing the email heading and subject.

The WooCommerce email templates

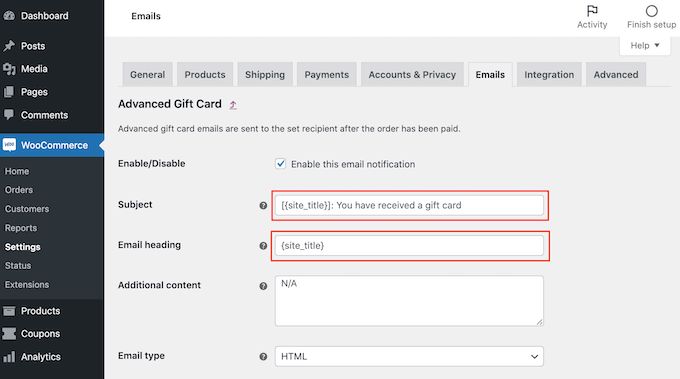
One option is to simply type in plain text into these fields. WooCommerce will then use this text for all of its gift card emails.

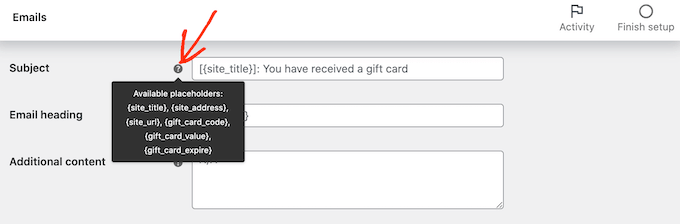
You can also add dynamic text. This is text that will update automatically based on factors such as the value of the gift card or the date when it is due to expire.

Dynamic text can help you create more helpful and engaging emails. To see all the dynamic text that you can use, simply hover your mouse over a field’s ‘?’ icon.

You will then see a popup that shows all the different dynamic text you can use in this field.

A choice of dynamic text

Now, you can simply type this dynamic text into the field, and WooCommerce will handle the rest.

You can even use a mix of plain text and dynamic text, as you can see in the following image.

Customizing the gift card email template

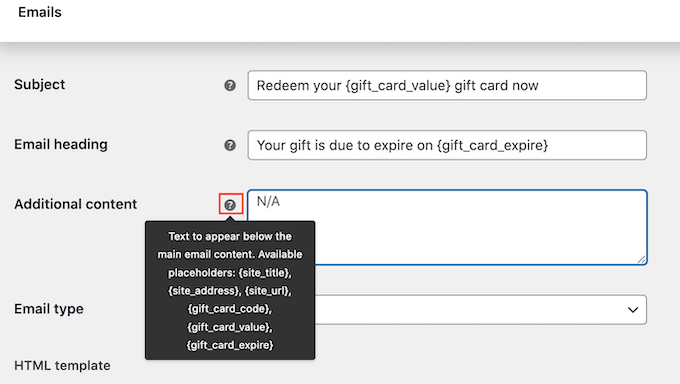
Want to add some more text to the default email? Then you can type it into the ‘Additional content’ box. This text will appear beneath the main email content.

As before, the ‘Additional content’ box supports both plain and dynamic text. To see the different dynamic text that you can use for your additional content, just hover your mouse over its ‘?’ icon.

Editing the WooCommerce eCommerce emails

When you’re happy with your email, click on the ‘Save changes’ button.

You’ll want to make sure all of the emails sent from your WooCommerce store go to the recipient’s email inbox and not to the spam folder.

The best way to do this is by using an SMTP service provider to improve email deliverability. For more details, see our guide on how to fix WordPress not sending email issue.

We recommend using the free WP Mail SMTP plugin to get started.

Once you’ve set up your emails, you’re ready to start selling your gift card.

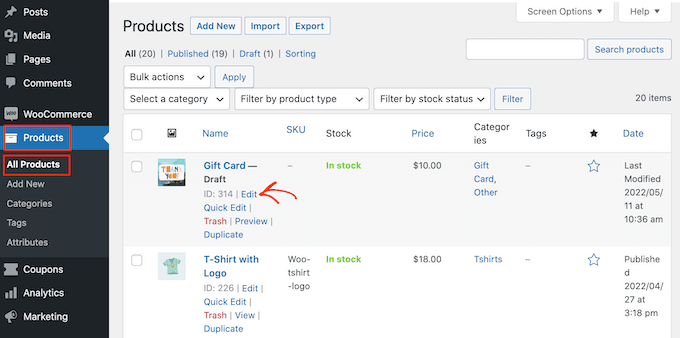
To publish your gift card product, simply go to Products » All Products. On this screen, find the gift card that we created earlier, and click on its ‘Edit’ button.

How to add an advanced gift card in WooCommerce

After that, go ahead and publish your gift card by clicking on the ‘Publish’ button. This gift card will now appear on your WooCommerce store, ready for shoppers to buy.

We hope this article helped you learn how to easily add advanced gift cards in WooCommerce. You may also want to check out our guide on how to create a WooCommerce popup to increase sales and the best WooCommerce plugins for your store.

If you liked this article, then please subscribe to our YouTube Channel for WordPress video tutorials. You can also find us on Twitter and Facebook.

The post How to Add Advanced Gift Cards in WooCommerce (Easy Way) first appeared on WPBeginner.


May 23, 2022 at 02:30PM

Sunday, May 22, 2022

How to Add a Reading Progress Bar in WordPress Posts

Have you noticed how some popular sites show a reading progress bar indicator at the top of their articles?

This little bar shows users how much more of the article is left to scroll and encourages them to continue reading. It can help keep visitors on your website reading your content and improve the overall user experience.

In this article, we will show you how to add a reading progress bar in WordPress posts.

How to Add reading progress bar in WordPress

Why and When You Should Add Reading Progress Bar in WordPress

Users spend only a couple of seconds on a webpage before deciding whether to stay or leave. Keeping users engaged becomes a little more challenging if you publish long-form articles, as they require users to scroll down.

Some site owners add inline related posts, while others use videos or image galleries to keep users on the page.

A reading progress bar adds a little user-interface enhancement that encourages users to scroll down. It also motivates users to finish the article they are reading.

Many popular websites like to use the reading progress indicators to engage their readers. However, you also need to make sure that the reading progress indicator is subtle and does not distract from the content itself.

Having said that, let’s see how you can easily add a reading progress indicator for your WordPress posts.

Adding Reading Progress Bar in WordPress Posts

The easiest way of showing a reading progress bar in blog posts and pages is through a plugin like Worth The Read.

It’s a free WordPress plugin that’s lightweight and helps add a reading progress bar to your website. The plugin offers multiple customization options and lets you change its style to fit your website theme. You can even use it to show the reading time for your articles.

The first thing you need to do is install and activate the Worth The Read plugin. For more details, see our step-by-step guide on how to install a WordPress plugin.

Upon activation, you need to visit the Worth The Read Reading » Progress page from the WordPress admin panel and go to the ‘Functionality’ tab to set up your progress bar indicator.

Next, you can choose whether to show the progress bar on your posts, pages, and homepage. There’s also an option to display the reading bar on custom post types.

Enable worth the read on posts and pages

If you scroll down, you’ll find more customization options.

You can include comments in the total length of the progress bar by enabling the ‘Include Comments’ option. If you are including comments, then you can also choose a different background color for the comments progress area.

The plugin also lets you select the placement of the reading progress bar. The default option is on the top which is used by most sites. You can change it to display the progress bar on right, left, or bottom of the page.

Change the placement of the bar

Other than that, there are more options for customizing the reading progress bar.

For instance, you can move the bar from right to left, use fixed opacity, enable the progress bar for touch devices like mobiles and tablets, enable the debug mode, and more.

When you’re done, don’t forget to click the ‘Save Changes’ button.

Next, head over to the ‘Style’ tab under Reading Progress to edit the appearance of the reading progress bar.

Edit the style of the bar

The plugin allows you to choose the thickness of the progress bar and select foreground and background colors to match your WordPress theme.

The background color is used to fill the empty progress bar and the foreground color will be used to show progress as a user scrolls down.

It even allows you to use a transparent background for the progress bar. Checking this option will override background color options and only the foreground color will be displayed as users scroll down an article.

After editing the style, don’t forget to save the changes to store your settings.

You can now visit any blog post or landing page on your website to see the progress bar in action.

Reading progress bar preview

We hope this article helped you add a reading progress bar in WordPress. You may also want to see our list of best WooCommerce plugins and how to choose the best web design software.

If you liked this article, then please subscribe to our YouTube Channel for WordPress video tutorials. You can also find us on Twitter and Facebook.

The post How to Add a Reading Progress Bar in WordPress Posts first appeared on WPBeginner.


May 22, 2022 at 04:00PM

Friday, May 20, 2022

8 Best Small Business Cell Phone Plans for 2022 (with Free Option)

Are you looking for a small business cell phone plan to stay in touch with your customers and team members?

A business cell phone plan gives you the freedom and flexibility to answer calls, communicate with your team, and attend meetings while on the go. It helps you stay connected from anywhere in the world.

In this article, we’ll share the best small business cell phone plans with pros and cons, so you can pick the best solution for your needs.

Best small business cell phone plans

Why Do You Need a Business Cell Phone Plan?

A business cell phone plan is important for many small business owners, so they can keep their business phone separate from their personal phone and easily coordinate with other team members.

With the right cell phone plan, your customer support staff will be able to help out customers and respond to their questions while on the go. This way you can improve retention and create a long-term relationship with your customers.

Similarly, if you have a remote team spread across different locations, then a cell phone plan can improve business communication since you can hold webinars and meetings to keep everyone connected.

As a business owner, you have a lot of choices when it comes to selecting a cell phone plan for your company. There are traditional wireless carriers, business VoIP services, and virtual calling systems that provide a business cell phone service.

That said, let’s look at some of the best small business cell phone plans in the market.

1. Nextiva

Nextiva

Nextiva is the best VoIP and virtual business phone service in the market. It’s a cloud-based business phone system that offers a powerful set of features, and it’s super easy to set up.

This is what we use for our business here at WPBeginner.

Nextiva is often referred to as a UCaaS (unified communication as a service) because it brings separate communication channels like video, text message chat, voice, and collaboration tools together in one place.

There are Nextiva apps for mobile phones, tablets, desktop, and even desk phones, so your team can use a separate business phone number or extension without needing two separate devices which helps reduce cost.

Some of the features you get include an auto-attendant feature, HD video conferencing option, nationwide unlimited calling and SMS messages, free number porting, voicemail to email notifications, toll-free numbers, a cloud-based VoIP call center, cloud PBX, call pop with caller ID details, and more.

The VoIP service also helps your team improve communication and automate different workflows. For example, you can set up email automation and create automated replies to quickly respond to business customer queries that come in through your WordPress website.

Another benefit of using Nextiva is that it easily integrates with other communication tools and CRMs like Salesforce, Google Contacts, Zendesk, Oracle Sales Cloud, Zoho, and more.

Nextiva offers 3 business cell phone plans that you can choose from.

  • Essential – The prices start from $18.95 per user per month, and you get unlimited voice and video calling, toll-free numbers, Outlook and Google contacts integrations, and more.
  • Professional – Starting at $22.95 per user per month. In addition to the features in the Essential plan, you also get unlimited conference calls, a screen sharing option, mobile and desktop SMS/MMS feature, auto-attendant, and more.
  • Enterprise – In this plan, you get all the features that Nextiva offers, and it will cost $32.95 per user per month. Plus, you get a call recording option, Microsoft Teams integration, voicemail transcription, and more.

If you’re looking for a small business cell phone plan that doesn’t require getting a separate device and allows for sharing the business phone number with multiple team members, then Nextiva is the way to go.

This is what we use for our business, and many other top organizations like UnitedWay, TacoBell, YMCA, Stanford University, and others also use Nextiva for their business phone.

2. RingCentral

RingCentral

RingCentral is also one of the best business cell phone services that you can use for your website. The VoIP phone service provider allows your support team to handle customer support from anywhere using its Android and iOS mobile app and desktop app.

This way, you can also implement a bring your own device (BYOD) policy and allow your team members to use their own devices to handle work-related tasks from any place at any time.

With RingCentral, you get unlimited phone calls within the US and Canada, voice-to-text features, video conferences, business SMS, internet fax, toll-free number, and more.

There’s also an auto attend feature in RingCentral and advanced call handling features where support agents can see the caller’s interaction history, get real-time analytics, and allow managers or another team member to take over a call.

RingCentral offers 4 business cell phone plans that you can use, and the best part is that you get a 14-day free trial.

  • Essentials – Starting from $19.99 per user per month, you get up to 20 users, a toll-free number, unlimited calls in the US/Canada, team messaging, and more.
  • Standard – In this plan, RingCentral offers an unlimited number of users, business phone numbers in 100 countries, unlimited internet fax, video meetings, 24/7 support, and more for $27.99 per user per month.
  • Premium – It will cost you $34.99 per user per month. You get more features like automatic call recording, hot desking, advanced call handling features, real-time analytics, CRM integrations, etc.
  • Ultimate – This plan is for $49.99 per user per month, and it includes all the features along with device status reports, status alerts, and unlimited storage.

3. Ooma

Ooma

Ooma is an all-in-one virtual phone service for small businesses. With Ooma, you get amazing features to keep you connected with your customers and remote team members.

The phone service offers HD audio, video conferencing, messaging, virtual receptionists, free 1-800 toll-free numbers, and free local phone numbers. The best, you get mobile apps that let you receive calls and answer your customers’ queries on the go.

Besides that, there’s also an Ooma Office suite that works out of the box and is very easy to set up. With Ooma Office, you can attend meetings and video conferences to keep your team connected with each other.

Other features offered by Ooma include voicemail transcription, online fax, enhanced call blocking, call recording, call forwarding, unlimited calling in the US, Canada, Mexico, and Puerto Rico, affordable international call rates, and more.

Ooma offers 2 pricing plans for small business cell phones.

  • Ooma Office – It will cost you $19.95 per month per user and you get a lot of features like a mobile app, virtual receptionist, call transfer, call logs, and more.
  • Ooma Office Pro – This plan will cost you $24.95 per month per user and you get additional features like a desktop app, call recording, enhanced call blocking, caller info match, and more.

4. Grasshopper

Grasshopper

Grasshopper is a top virtual phone service for small businesses that’s affordable and packed with valuable features.

Using Grasshopper, you can get a toll-free number, a local number, a vanity number, and transfer users to an existing virtual number easily. The cloud-based phone service offers a desktop and mobile phone app, so you can take calls and respond to messages from anywhere.

Other than that, you can set up custom greetings to welcome callers and ensure that you never miss a call by routing customers to another phone or team member. The service also offers virtual fax, voicemail, incoming call controls, analytics, and more.

The only downside is that Grasshopper is only available in the USA and Canada. That said, you get a 7-day free trial with 3 premium plans.

  • Solo – It will cost you $26 per month. You get to choose 1 phone number and 3 extensions.
  • Partner – This plan costs $44 per month and offers up to 3 types of phone numbers and 6 extensions.
  • Small Business – You can use unlimited extensions and up to 5 phone numbers for $80 per month.

5. Phone.com

Phone.com

Phone.com is a versatile virtual phone service that’s great for small businesses and startups. It offers affordable pricing plans and lets you mix and match plans based on your business needs.

The VoIP service offers business mobile and desktop apps so that you can handle customer support from an office or on the move.

With Phone.com, you get additional functionality like audio conferencing, call analytics, call recording and screening, call forwarding, text messaging, fax-from-phone option, and much more.

Phone.com offers 3 pricing plans with a monthly billing cycle, and you can combine these plans according to what you need. Plus, each plan comes with a 30-day money-back guarantee.

  • Basic Users – Starting from $10.39 per month per user, you get 300 minutes and 1000 text messages. It also includes video conferencing up to 10 participants, document sharing, fax from phone feature, and more.
  • Plus Users – It will cost you $15.99 per month per user and includes everything in the basic user package along with unlimited minutes and business text messages.
  • Pro Users – This plan will cost you $23.99 per month per user, and you get all the features that Phone.com has to offer. Plus, you get advanced call management features like call recording, call analytics, and CRM integrations.

6. AT&T

AT&T

AT&T is one of the largest wireless carriers in the United States, and it offers unlimited domestic mobile data usage, talk minutes, and text messages. It’s a great alternative to VoIP business cell phone plans and you get exceptional call quality.

With AT&T, you get no roaming charges along with unlimited talk time and instant messaging for Mexico and Canada. There are also shared data plans where you can make the data shareable for up to 25 phones, tablets, and other devices.

There is also an international addon that lets you make calls and send messages to over 210 countries. Each mobile plan also comes with 5G and 5G+ access, so you won’t worry about slow internet speeds.

Other than that, AT&T offers a video streaming feature, but the video quality will depend on your plan. It also offers powerful security measures to protect your business. For instance, you get spam and fraud call blocking, identity monitoring, safe browsing, and more.

There are the 3 business cell phone plans offered by AT&T, and you get to choose up to 10 lines per plan. However, the prices go down if you select 6 to 10 lines per plan. Also if you exceed the data limit, then your internet speeds are slowed down to 128 Kbps.

We’ll show you prices for 6 – 10 lines.

  • Business Unlimited Starter – Priced at $30 per month per line, you get basic security features, 5G/5G+, standard definition video streaming quality, 5GB mobile hotspot data per line, and more.
  • Business Unlimited Performance – It will cost $35 per month per line, and you get HD video streaming, 40GB of mobile hotspot data per line, and advanced security features.
  • Business Unlimited Elite – This plan is for $40 per month per line. It offers advanced security features, business fast track, HD and 4K video streaming, and 100GB of mobile hotspot data per line.

7. Verizon

Verizon

Verizon is another wireless carrier that you can use for your business cell phone needs. It also offers some of the best cell phone plans and features like unlimited calling, texting, and data plans within the US.

With Verizon, you get extended high-speed data coverage across the USA and selected international countries. It even offers flexible plans for adding unlimited data for tablets. However, you’ll need compatible devices and ensure that 5G coverage is available in your area.

Besides, the wireless carrier offers different security measures. For instance, you can use its call filter to block spam, protect your device against phishing and web risks, Wi-Fi protection notice, and more.

Verizon offers 3 different pricing plans, and you can choose the number of lines you require. The more lines you add, the lower will be the overall prices.

  • Business Unlimited Start 2.0 – It will cost you $30 per line per month, and you get unlimited talk, text, and data. It also includes 5G/4G LTE, an unlimited mobile hotspot, and a call filter spam blocker. You can also save $5 per month for paper-free billing and autopay.
  • Business Unlimited Plus 2.0 – You can select this plan for $35 per line per month. It includes a 5G ultra-wideband, 100GB of data, and more security features.
  • Business Unlimited Pro 2.0 – This unlimited plan is priced at $45 per line per month. In addition to everything in Start and Plus plan, you get unlimited premium network access and more perks. Since you get unlimited data, there are no overage charges.

8. Google Voice

Google voice

Google Voice is the last business cell phone plan on our list, and it’s a virtual phone service that you can use for your business. With Google Voice, you can work from anywhere, as it works on your mobile device, laptop, and supported desktop phones.

Google Voice also offers ease of use with a simple interface that helps manage your workflows, assignments, and billing from a single platform.

Currently, the cell phone service is only available in the US. However, you get free calling to the US from any country, free calling to Canada from the US and unlimited SMS in the US.

A few other features offered by Google Voice include spam call blocks, voicemail transcriptions, and integration with Google Workspace. You can easily use Google Voice with Google Meet and Calendar.

You can choose from 3 monthly plans for Google Voice.

  • Starter – It will cost you $10 per user per month, and up to 10 users can use the service in 10 domestic locations. However, you cannot use Google Voice internationally if you use this plan.
  • Standard – You can get this plan for $20 per user per month. It includes an unlimited number of users and domestic locations along with all the basic features. You also get auto attendant, Ring Groups, desk phone support, and eDiscovery for calls, voicemails, and SMS records.
  • Premier – Priced at $30 per user per month, this plan offers unlimited users, domestic and international locations, and advanced features like advanced reporting.

Which Small Business Cell Phone Plan is the Best?

If you’re looking for a VoIP business phone service that offers lots of flexibility and features, then we recommend Nextiva.

It’s simple to use, and you can stay connected with your customers and team from anywhere. Plus, it offers mobile, desktop, and tablet apps, so you handle calls, take meetings, organize workflows, and provide a great customer experience while on the go.

RingCentral and Ooma are great alternatives for Nextiva, and they round out the top 3 providers in our list.

On the other hand, if you want to use a traditional wireless carrier, then you can consider using AT&T. It offers unlimited text, talk, and data, along with an addon to include international calling and messaging. Plus, if you’re an Apple iPhone or Samsung Galaxy phone user, then are no limits to 5G wireless service when using traditional carriers.

We hope that this article helped you find the best small business cell phone plans. You may also want to see our comparison of the best email marketing services and best push notification software for small business.

If you liked this article, then please subscribe to our YouTube Channel for WordPress video tutorials. You can also find us on Twitter and Facebook.

The post 8 Best Small Business Cell Phone Plans for 2022 (with Free Option) first appeared on WPBeginner.


May 20, 2022 at 04:00PM

Thursday, May 19, 2022

How to Add a Blog Post Checklist to the WordPress Editor

Do you want to add a blog checklist to the WordPress editor?

A checklist can help you to make your posts the best they can possibly be. If you’ve added multiple authors to your site, then a checklist can also help everyone write in the same style and remember all the details.

In this article, we’ll show you how to add a blog post checklist to the WordPress editor.

How to add a blog post checklist to the WordPress editor

Why Add a Blog Post Checklist to the WordPress Editor

Writing a good blog post for your WordPress website is only the first step.

Once you’ve finished writing, you’ll want to edit, proofread, add categories and tags, optimize the post for search engines, and more.

This is where a checklist can help. Checklists show a list of tasks you need to do before publishing your post, such as adding internal links or alt text.

Some WordPress plugins such as AIOSEO use checklists to help site owners with search engine optimization.

The AIOSEO plugin's SEO checklist

Checklists typically monitor your post as you’re writing and then check off each task as you finish it. This makes it easy to see what you’ve done well, and what you still need to work on.

But what if you wanted to create your own custom checklist in WordPress?

Perhaps you have a multi-author blog where you want to ensure a certain quality standard for your content. That’s where checklists come in handy.

With that in mind, let’s see how you can add a blog post checklist to the WordPress editor.

How to Add a Blog Post Checklist to the WordPress Editor

The easiest way to add a blog post checklist to the WordPress editor is by using PublishPress Checklists. This plugin adds a checklist to the right-hand menu of the WordPress editor.

A blog post checklist created with PublishPress

PublishPress has a list of default tasks that you can add to your checklists. It also lets you create custom checklist tasks for your WordPress blog.

First, you’ll need to install and activate the plugin. If you need more instructions, then please see our guide on how to install a WordPress plugin.

Upon activation, head over to Checklists » Settings.

The PublishPress Checklist settings

Here you can choose where WordPress will show your checklist. To add a blog checklist to the WordPress editor, you’ll want to check the ‘Posts’ checkbox.

Once you’ve done that, click on the ‘Save Changes’ button.

Adding a checklist to the WordPress post editor

You can then build your checklist by going to Checklists » Checklists.

Here you’ll see all of the default tasks that you can add to your blog post checklist. PublishPress is able to detect when these tasks are completed and check them off for you.

Tasks for your WordPress blog post checklist

All these tasks are disabled by default.

To add a task to your blog post checklist, simply open the ‘Disabled, Recommended or Required’ dropdown menu.

The Recommended and Required checklist dropdown

You can now choose between ‘Required’ or ‘Recommended.’

If you click on ‘Required,’ then authors won’t be able to publish their blog post without checking off this task first.

If the user clicks on the ‘Publish’ button without completing all ‘Required’ tasks, then WordPress will show a ‘Please complete the following tasks before publishing’ message.

A WordPress blog post checkbox

If you choose ‘Recommended’ instead, then the editor will show a message encouraging authors to complete any outstanding ‘Recommended’ tasks before publishing.

However, authors will be able to publish their post without completing these tasks.

A list of recommended blog post tasks

After choosing between ‘Recommended’ and ‘Required,’ you can move onto ‘Who can ignore the task?’

Here, you can let certain user roles publish a post without completing the task, even if that task is ‘Required.’ For example, you may trust your site’s admins or editors to skip this task if they think it’s for the best.

To add a user role to your ‘ignore’ list, click on the ‘Who can ignore the task?’ box.

Creating an 'ignore' list for your WordPress checklist

This opens a dropdown showing all of the different user roles on your site.

You can now simply click on a role to add those users to your ‘ignore’ list.

Adding a blog post checklist to the WordPress editor

For some tasks, you may need to set a maximum and minimum value. For example, you can set a minimum number of categories that authors must add to a post. To learn more, please see our guide on how to add categories and subcategories in WordPress.

If the task has a ‘Min’ and ‘Max’ section, then you can type in the numbers you want to use.

Setting maximum and minimum tasks

To add more tasks to your checklist simply repeat the process described above.

You can also add custom tasks to your blog post checklist.

The drawback is that PublishPress can’t check whether the author has completed custom tasks. This means the author will need to do this check manually.

For more information about custom tasks you may want to add, please see our guide on how to optimize your blog posts for SEO like a pro.

To create a custom task, simply scroll to the very bottom of your screen and then click on ‘Add custom task.’

Creating custom blog list checklist tasks

This adds a new task ready for you to customize.

To start, type the task’s name into the ‘Enter name of custom task’ field. This text will be shown in your checklist, so make sure it lets authors know exactly what they need to do.

Adding a title to your custom checklist task

You can now make this task ‘Recommended’ or ‘Required,’ and give some users the option to ignore this task by following the process described above.

For custom tasks, you can specify the users who can mark this task as a complete. For example, you might use custom tasks to create a special ‘Editing’ checklist for users who have the Editor role.

How to add a blog post checklist to WordPress

To do this, click on the ‘Which roles can mark this task as complete’ box. This opens a dropdown where you can click to select any of your user roles.

Once you’ve added all the tasks to your checklist, click on the ‘Save Changes’ button. Now, you can visit the WordPress editor to see your blog post checklist live.

We hope this article helped you learn how to add a blog checklist to the WordPress editor. You may also want to check out our guide on how to create an email newsletter, and our expert pick of the best WordPress SEO plugins and tools you should use to improve your rankings.

If you liked this article, then please subscribe to our YouTube Channel for WordPress video tutorials. You can also find us on Twitter and Facebook.

The post How to Add a Blog Post Checklist to the WordPress Editor first appeared on WPBeginner.


May 19, 2022 at 04:00PM

Wednesday, May 18, 2022

How to Accept Google Pay in WordPress (The Easy Way)

Would you like to accept Google Pay on your WordPress site?

When you allow your customers to choose their preferred payment method, you’ll build trust and increase conversions on your website.

In this article, we’ll show you how to accept Google Pay in WordPress.

How to Accept Google Pay in WordPress

Why Accept Google Pay in WordPress?

If you’re selling products or services on your WordPress website or asking for donations, then it’s important to let your visitors pay using their preferred method.

Often they will want to pay by credit card or PayPal, but newer methods like Google Pay and Apple Pay are becoming more popular.

Google Pay is available in 40 countries around the world and makes online payments simple. However, your customers can only use it if they’re on an Android device running version Lollipop 5.0 or higher, so you’ll probably want to include additional payment options for people using other devices.

That being said, let’s take a look at how to accept Google Pay in your online store.

Note: We’ll cover how to add a Google Pay option in WordPress without adding a full eCommerce cart, but we will leave other helpful resources at the end of this article for those looking for full eCommerce solutions.

How to Accept Google Pay in WordPress

The first thing you need to do is install and activate the WP Simple Pay plugin. For more details, see our step by step guide on how to install a WordPress plugin.

WP Simple Pay is a simple yet powerful WordPress invoicing and payments plugin. The best part is that WP Simple Pay does not charge you any additional transaction fees, and you can set it up without the complexity of a cart system.

It lets you add Apple Pay, Google Pay, credit card as well as ACH bank payments, so you can give users multiple payment options which improves conversion.

While there is a free version of the plugin, you need the Pro plugin to accept Google Pay, create on-site payment forms, and more.

Upon activation, the WP Simple Pay setup wizard will start automatically. You simply need to click the ‘Let’s Get Started’ button to continue.

The WP Simple Pay Setup Wizard Will Start Automatically

On the first page, you’ll be asked to enter your license key. You can find this information from your account on the WP Simple Pay website.

After that, you need to click the ‘Activate and Continue’ button to move to the next step.

You’ll Be Asked to Enter Your WP Simple Pay License Key

On the second page, you will need to connect WP Simple Pay to Stripe. Stripe is a popular payment gateway, and it’s the easiest way to add Google Pay to your website. It also supports all top credit and debit cards, Apple Pay, ACH payments, and more.

Simply click the ‘Connect with Stripe’ button, and from there you can log in to your Stripe account or create a new one. Anyone with a legitimate business can create a Stripe account and accept payments online.

You Need to Connect WP Simple Pay to Stripe
Note: Stripe requires your site to be using SSL/HTTPS encryption. If you don’t already have an SSL certificate for your website, then please see our step by step guide on how to add SSL in WordPress.

Once you’ve connected to Stripe, you’ll be asked to configure your WP Simple Pay emails.

The options for payment and invoice emails to your customers have already been enabled for you. So is the option for sending payment notification emails.

Configure Your WP Simple Pay Emails

You just need to enter the email address where the notifications should be sent.

Once you’ve done that, you need to click the ‘Save and Continue’ button to complete your setup of WP Simple Pay.

WP Simple Pay Setup Is Complete

Google Pay is enabled by default when using Stripe Checkout, and will be automatically offered to Android users in participating countries.

If you decide to disable Google Pay in the future, then you will need to change the payment method settings in the Stripe Dashboard.

Creating a Payment Form in WordPress

Next, you need to create a payment form.

You can do that by clicking the ‘Create a Payment Form’ button on the last page of the setup wizard.

This will automatically take you to the WP Simple Pay » Add New page.

You’ll be shown a list of payment form templates. You need to scroll down until you locate the Apple Pay / Google Pay template.

Simply hover over the template and click the ‘Use Template’ button when it appears.

Select the Apple Pay / Google Pay Template

This will take you to the payment form editor.

If you like, you can rename the form and give it a description.

After that, you need to select the ‘Stripe Checkout’ option under Form Type.
Select the Stripe Checkout Option

After you’ve done that, we’ll move on to the Payment tab.

Here you can set the payment mode to either live or testing. Testing mode will let you make payments that are not actually charged so you can make sure your form is working properly and emails are being sent.

Don’t forget to change this to ‘Live’ when you’ve finished testing and are ready to start receiving payments from your customers.

Set the Payment Mode to Either Live or Testing

You can also add the products or services that you offer, along with their prices and whether they are a one-time payment or a subscription.

Simply click the ‘Add Price’ button until you have added as many prices as you need. After that, you will need to add a label and price for each one. You can also select other options, such as recurring payments, or the user can determine the price, as in a donation.

Add Your Products and Services to the Payment Form

You can show or hide a price by clicking the small arrow on the right.

Next, we’ll move on to the ‘Form Fields’ tab. Notice that the essential fields have already been added to the form, including an ‘Apple Pay / Google Pay’ button, credit card details, and a checkout button.

The Essential Form Fields Have Been Added For You

Using the ‘Form Fields’ drop down, you can choose additional fields and add them by clicking the ‘Add Field’ button. Options include name, phone number, address, and much more.

Finally, the ‘Stripe Checkout’ tab allows you to select additional payment methods and tweak the checkout form that is displayed after the user clicks the ‘Pay’ button.

For this tutorial, we’ll leave those settings as they are.

Select any Additional Payment Methods and Tweak the Checkout Form

When you are happy with your payment form, click on the ‘Publish’ button to store your settings and push the form live.

Now we can add the form to a post or page on your website.

Adding the Payment Form to Your Website

WP Simple Pay makes it super easy to add forms anywhere on your website.

Simply create a new post or page, or edit an existing one. Then, click on the plus (+) sign at the top and add a WP Simple Pay block in the WordPress block editor.

Insert a WP Simple Pay Block and Choose the Correct Form

After that, select your order form from the dropdown menu in the WP Simple Pay block.

Once you’re finished, you can update or publish the post or page, and then click on the preview button to see your form in action.

WP Simple Pay Payment Form Preview

When your users click the Pay button, the Stripe checkout form will be displayed.

If they are using an Android device running Lollipop 5.0 or higher, then the Google Pay option will be displayed at the top of the form. Otherwise, the Google Pay option will be hidden, and your customers can pay using a credit card.

Stripe Checkout Preview With Google Pay

If you’re looking for other ways to add Google Pay in WordPress, then you can use full eCommerce solutions like Easy Digital Downloads or WooCommerce. Both of them have support for Apple Pay and Google Pay options.

We hope this tutorial helped you learn how to accept Google Pay in WordPress. You may also want to learn the right way to create an email newsletter, or check out our expert pick of the best contact form plugins for WordPress.

If you liked this article, then please subscribe to our YouTube Channel for WordPress video tutorials. You can also find us on Twitter and Facebook.

The post How to Accept Google Pay in WordPress (The Easy Way) first appeared on WPBeginner.


May 18, 2022 at 04:00PM