Wednesday, May 25, 2022

How to Switch to Google Analytics 4 in WordPress (The RIGHT Way)

Are you looking to switch to the latest Google Analytics version?

Google is now recommending website owners to move to the new Google Analytics 4 because they will be sunsetting the previous Universal Analytics on July 1, 2023. After the sunset day, you won’t be able to track data in the older version.

In this article, we’ll show you how to easily switch to Google Analytics 4 in WordPress.

Switch to Google Analytics 4 in WordPress

Why Switch to Google Analytics 4?

Google Analytics 4 (GA4) is the latest version of Google Analytics. It lets you track your mobile apps and websites in the same account, and offers new metrics, reports, and tracking features.

If you haven’t created a GA4 property yet, then now is the best time to switch to the latest version. That’s because Google announced that it will be closing down the old Universal Analytics on July 1, 2023.

What this means is that Universal Analytics will no longer receive data from your WordPress website, and it will eventually stop working after the sunset date. That means that all your old analytics data will be lost.

Switching to Google Analytics 4 as soon as possible will protect you from starting from scratch with no historical data.

To do this right, a lot of smart website owners are using the dual tracking method which allows you to continue using the current Universal Analytics while start sending data to GA4.

This way, you can future-proof your data while giving yourself plenty of time to learn the new Google Analytics dashboard and features.

That being said, let’s see how you can switch to Google Analytics 4 in WordPress with dual tracking.

Creating a Google Analytics 4 Property

If you already have an existing Google Analytics account using the old version, then you can eaily create a new GA4 property and start sending stats to GA4.

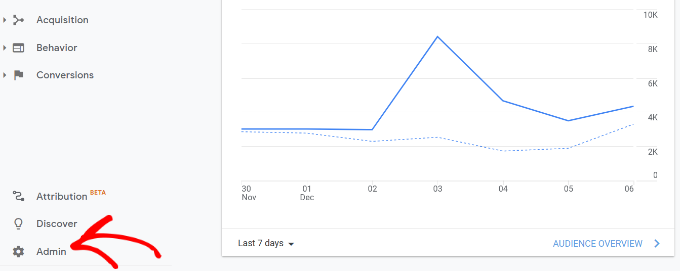
First, you’ll need to visit the Google Analytics website and login to your account.

After that, head over to the ‘Admin’ settings page in the bottom left corner.

Click admin settings

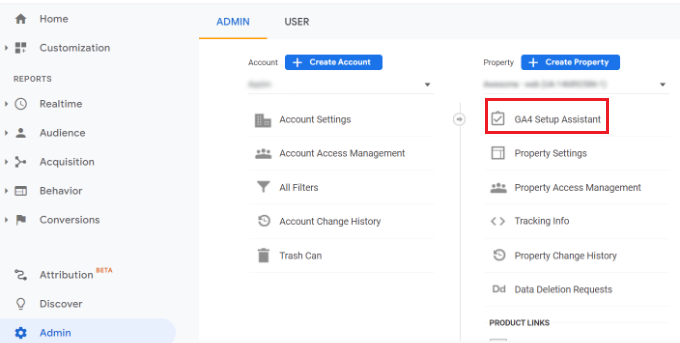
If you’re on classic Google analytics, then you’ll see the option to setup GA4.

Go ahead and click on ‘GA4 Setup Assistant’ under the Property column.

Click on GA4 setup assistant

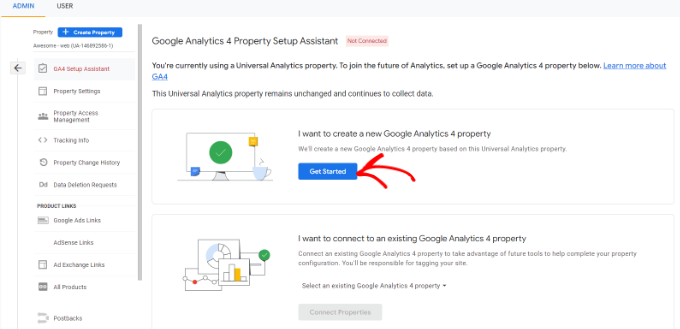
In the next step, the setup assistant will give you 2 options. You can create a new Google Analytics 4 property or connect an existing one.

Since we’re setting up a new property, simply click the Get Started button under the ‘I want to create a new Google Analytics 4 property’ option.

Create a new GA4 property

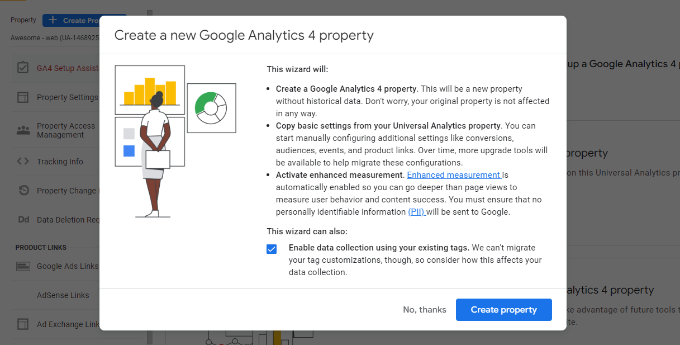
A popup will now appear with the details about the setup wizard.

If you’ve implemented your Universal Analytics using the Global Site Tag (gtag.js) code, then you’ll see an option to Enable data collection using existing tags.

This uses the existing tracking code on your site to collect information. That said, if you don’t already have the right tracking code on your website, we’ll show you how to add it to your WordPress blog below.

For now, you can go ahead and click the ‘Create property’ button.

Click the create property button

The setup wizard will add a new GA4 property and copy the Universal Analytics property name, website URL, timezone, and currency settings.

You can now view your new Google Analytics 4 property in the GA4 Setup Assistant.

View your connected property

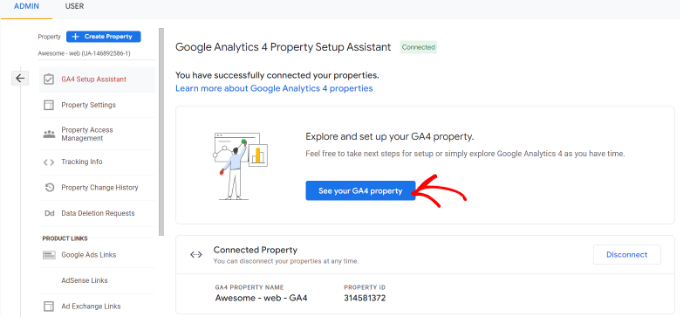
Next, you’ll need to click on the ‘See your GA4 property’ button to see your Google Analytics tracking code.

After clicking on the button, simply click on the ‘Tag installation’ option to retrieve your tracking code.

Go to tag installation

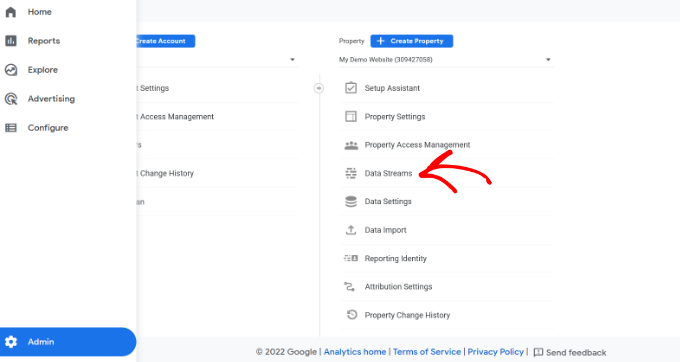
You should now see your new GA4 property under Data Streams.

Go ahead and click on your new property.

Select your data stream

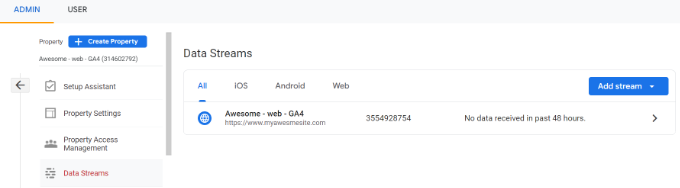
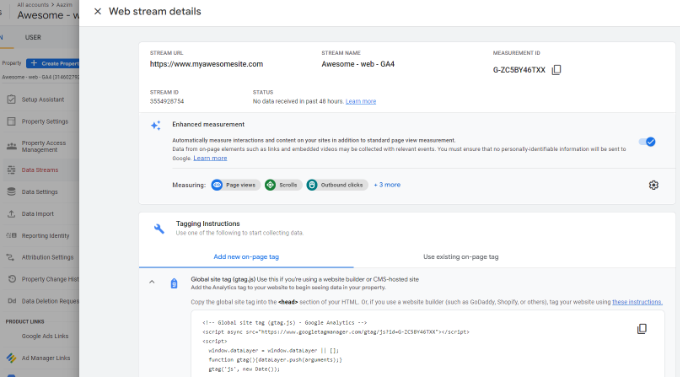
A new window will slide in from the right, and you’ll be able to see your web stream details.

Note: Google Analytics 4 uses both ‘data stream’ and ‘web stream’. These both simply mean the flow of analytics data that Google Analytics receives from your website.

Simply scroll down to Tagging Instructions section and click the Global site tag (gtag.js) option to expand the settings. You’ll now see your Google Analytics tracking code that needs to be added to your WordPress site.

See web stream details

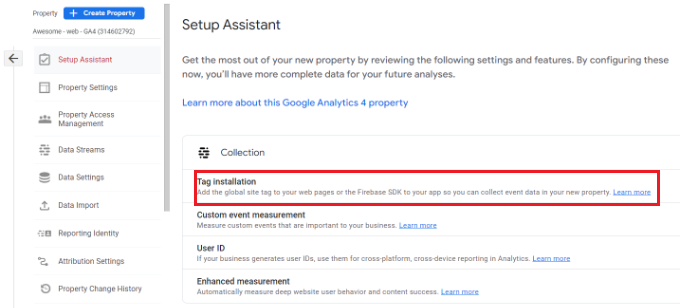
One thing you need to know is that Google Analytics 4 reports are quite different than what you’re used to in Universal Analytics.

They have introduced new terminology, and many familiar metrics and reports are missing completely. Basically if you were using common reports like the Top Landing Pages report or others, then you’d have to recreate those from scratch in Google Analytics 4.

That’s why we recommend using MonsterInsights Pro or even the free version of MonsterInsights.

It will help you see all the familiar analytics reports right in your WordPress dashboard, and it also lets you use both Universal Analytics and Google Analytics 4 at the same time.

Not to mention, with MonsterInsights you get all the powerful tracking features such as outbound link tracking, author tracking, and more which can be enabled without writing any code.

Let’s take a look at how to easily set up Google Analytics 4 on your WordPress site with MonsterInsights.

Adding Google Analytics Tracking Code to WordPress Site

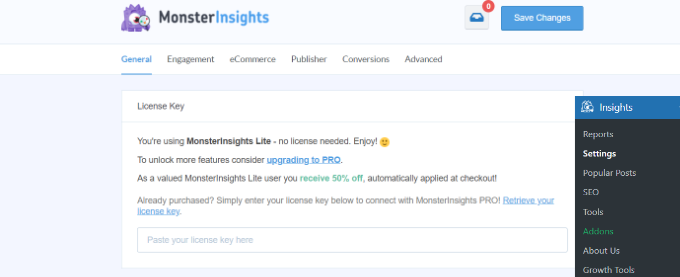
The best way to add Google Analytics tracking code to your WordPress website is by using MonsterInsights. This is the plugin that we use on WPBeginner.

MonsterInsights is the best Analytics solution for WordPress, and it’s trusted by over 3 million websites because it lets you easily setup advanced tracking without any coding skills.

You can use the MonsterInsights Lite version to set up Google Analytics in no time. There are also premium MonsterInsights plans that offer more features like custom dashboard reports, email summaries, scroll tracking, eCommerce tracking, premium integrations, and more.

MonsterInsights also offers dual tracking, meaning you can use both Universal Analytics and Google Analytics 4 at the same time. This is available in both the free version as well paid, and we highly recommend using this to ensure that your transition to GA4 goes smoothly.

First, you’ll need to install and activate the MonsterInsights plugin. For more details, please see our guide on how to install a WordPress plugin.

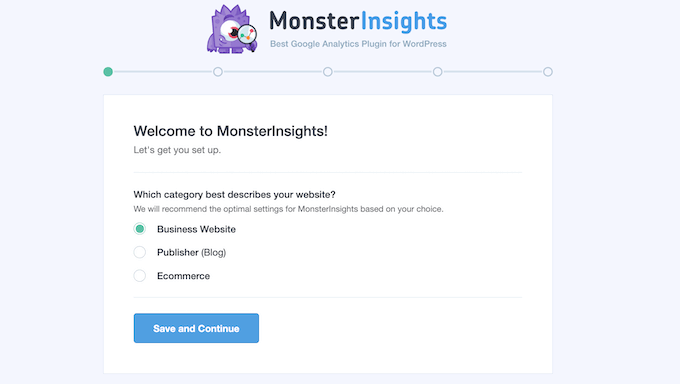
Upon activation, you’ll be taken to the MonsterInsights welcome screen in your WordPress dashboard. Simply click the ‘Launch the Wizard’ button to add Google Analytics to your site.

Launch setup wizard

After clicking the button, the setup wizard will ask you to choose a category that best describes your website.

You can choose from a business website, publisher (blog), or online store. Once you’ve selected a category, click the ‘Save and Continue’ button.

The MonsterInsights setup wizard

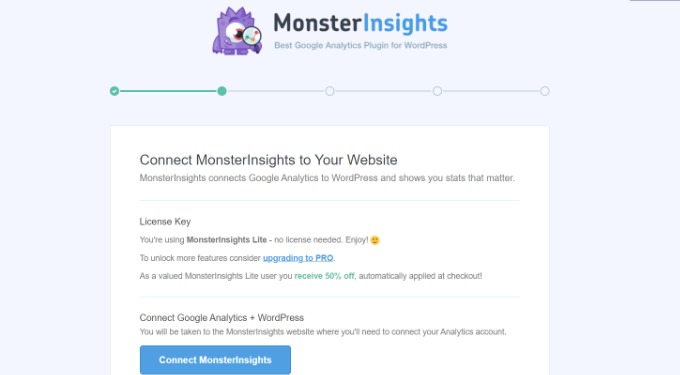
In the next step, you’ll need to connect MonsterInsights with your WordPress site.

Go ahead and click the ‘Connect MonsterInsights’ button.

Connect MonsterInsights with your site

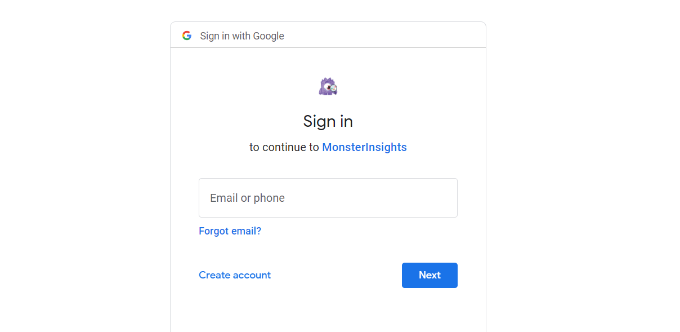
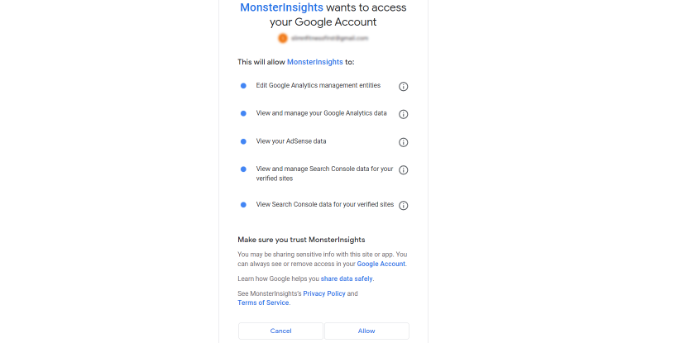
Once you click the button, you’ll need to sign in to your Google Account.

Simply select your account and click the ‘Next’ button.

Choose Google account to sign in

Next, MonsterInsights will require access to your Google Analytics Account.

MonsterInsights App needs these permissions, so it can help you setup analytics properly and show you all the relevant stats right inside your WordPress dashboard.

You can click the ‘Allow’ button to continue.

Allow access to your Google account

After that, you’ll be redirected back to the MonsterInsights setup wizard.

To complete the connection, select your Google Analytics 4 property from the dropdown menu and click the ‘Complete Connection’ button.

Select your GA4 property

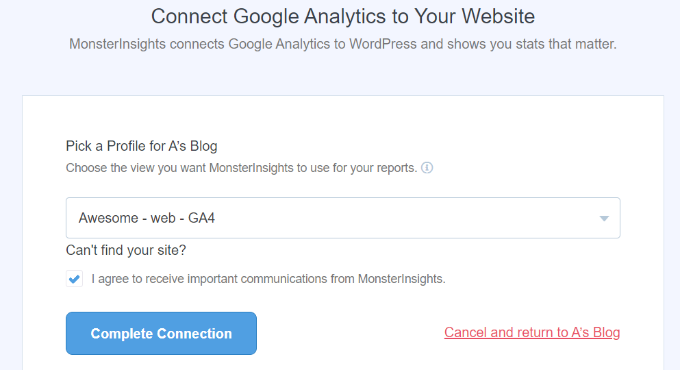
Next, MonsterInsights will connect Google Analytics with your WordPress website.

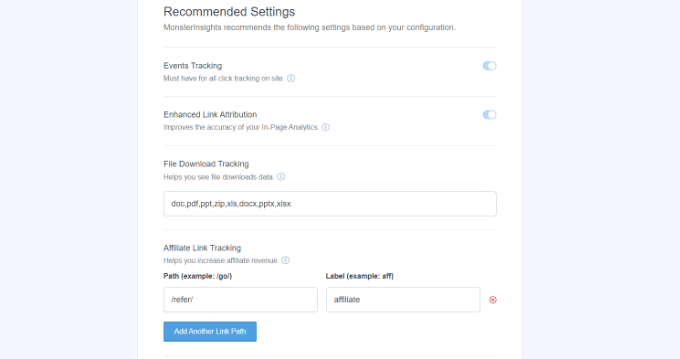
On the next screen, you’ll see some recommended settings like file download tracking and affiliate link tracking.

You can use the default settings in the setup wizard. However, if you’re using an affiliate link plugin, then you’ll need to enter the path you use to cloak the affiliate links.

Recommended settings

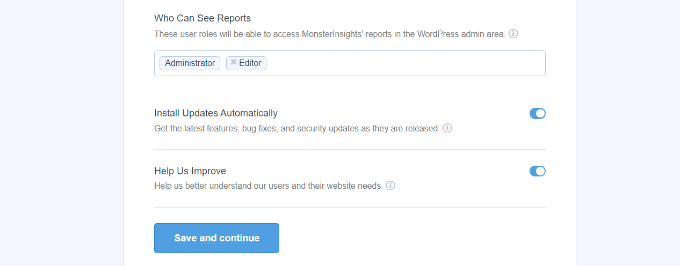
Next, you can scroll down and select who can see reports and add different WordPress user roles.

Once you’re done, click the ‘Save and continue’ button.

Who can see the reports

After that, MonsterInsights will show different tracking features that you can enable for your website.

You can scroll down and click the ‘Skip for Now’ button.

Choose which tracking features to enable

Next, you’ll see a checklist showing that you’ve successfully connected Google Analytics to your website.

For example, it will show that you’re successfully connected to Google Analytics, the tracking code is properly installed, and the data is being collected.

Tracking should be all setup

That’s it, you’ve added Google Analytics 4 property to your WordPress site.

Creating a Measurement Protocol API Secret

If you want to MonsterInsights to track eCommerce purchases, form conversions, and more advanced tracking in Google Analytics, then you’ll need to create a Measurement Protocol API Secret.

First, you’ll need to go back to your Google Analytics account and then go to Admin settings. Next, click on the ‘Data Streams’ option under Property column.

Go to admin and data stream settings

Then you’ll need to select the Google Analytics 4 property that we created earlier.

Go ahead and select your property under Data Streams.

Select your data stream

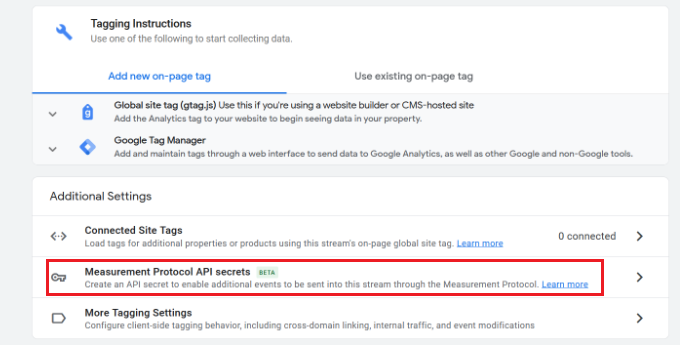
After that, you can scroll down to the ‘Advanced Settings’ section.

Simply click the ‘Measurement Protocol API secrets’ option.

Select measurement protocol API secrets option

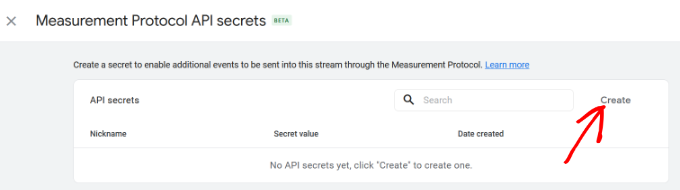
A new window will now slide in with your Measurement Protocol API secrets.

You will have to click the ‘Create’ button.

Create an API key

After that, enter a nickname for your API secret so it’s easily identifiable.

When you’re done, click the ‘Create’ button.

Enter a name for your API

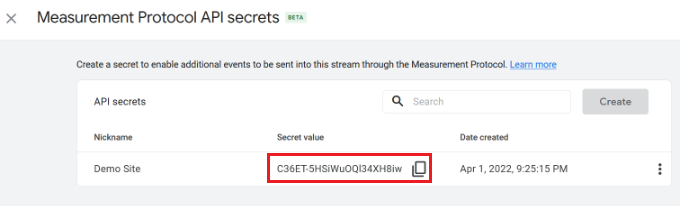
You should now see your Measurement Protocol API secret.

Simply copy the API secret under the ‘Secret value’ field.

Copy the secret value

After that, you can head back to your WordPress website and navigate to Insights » Settings from your dashboard.

Now click on the ‘General’ tab at the top.

General settings tab in MonsterInsights

Next, you will have to scroll down to the ‘Google Authentication’ section.

Go ahead and enter the Secret value you just copied in the Measurement Protocol API Secret field.

Enter measurement protocol API secret in MonsterInsights

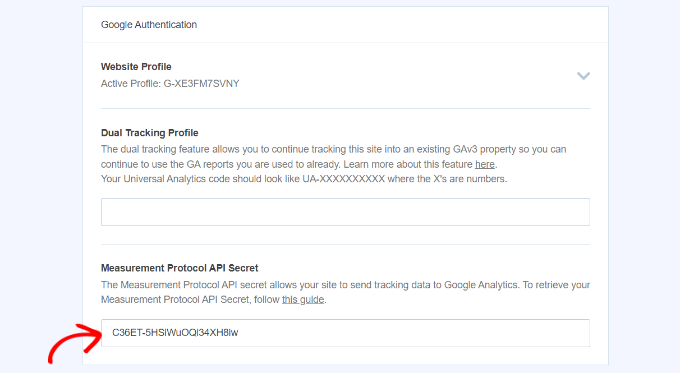
You’ve successfully added Measurement Protocol API Secret in MonsterInsights.

Setting Up Universal Analytics Dual Tracking

Now that you have setup GA4, the next step is to enable dual tracking for Universal Analytics, so it can run alongside your Google Analytics 4 property in WordPress.

With MonsterInsights, you can easily set up dual tracking and simultaneously track both properties without writing code.

Note: If you already have Universal Analytics tracking code added to your WordPress website, then we recommend disabling it first. Otherwise, it could lead to double-tracking and can skew your data.

To start setting up dual tracking properly, you can head to Insights » Settings from your WordPress admin panel and then click on the ‘General’ tab.

General settings tab in MonsterInsights

Next, you’ll need to scroll down to the ‘Google Authentication’ section.

Now under the Dual Tracking Profile, enter your Universal Analytics (UA) code.

Enter your UA Code

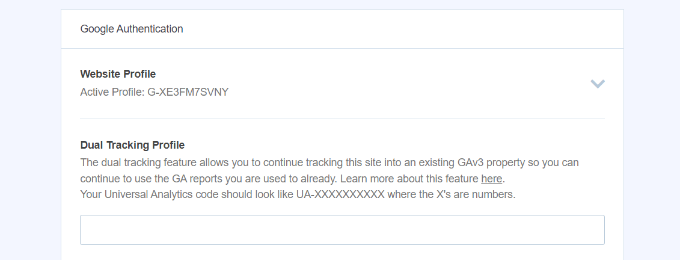
You can easily find your UA code in Google Analytics Admin settings.

Simply go to the Admin settings page in Google Analytics of your Universal Analytics property.

Click admin settings

Then click on ‘Property Settings’ under the Property column.

You should see the Tracking Id, and it will look like this: UA-123856789-5

Find your tracking ID

You’ve now successfully set up dual tracking on your WordPress website.

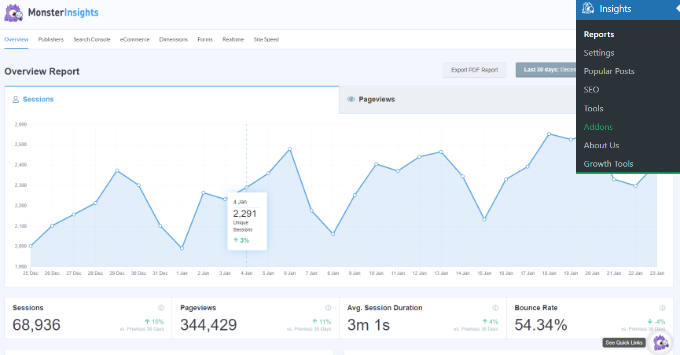
To see how your website is performing, simply go to Insights » Reports. Here you’ll find all the data you need to make the right decisions to grow your website.

Dashboard reports

We hope this article helped you learn how to switch to Google Analytics 4 in WordPress. You may also want to see our ultimate WordPress SEO guide to improve your rankings, or see our comparison of the best email marketing services for small business.

If you liked this article, then please subscribe to our YouTube Channel for WordPress video tutorials. You can also find us on Twitter and Facebook.

The post How to Switch to Google Analytics 4 in WordPress (The RIGHT Way) first appeared on WPBeginner.


May 25, 2022 at 04:00PM

Tuesday, May 24, 2022

What’s New in WordPress 6.0 (Features and Screenshots)

WordPress 6.0 was released earlier today, and it is the second major release of 2022.

This new release contains significant updates to the full site editing experience, bringing in a new way to build websites.

In this article, we’ll show you what’s new in WordPress 6.0, and which features you should try after updating your websites.

New features in WordPress 6.0 with Screenshots

Note: WordPress 6.0 is a major release, and unless you are on a managed WordPress hosting service, you’ll have to manually initiate the update. Here’s how to safely update WordPress.

Important: Don’t forget to create a complete WordPress backup before updating.

That being said, here’s all that’s new in WordPress 6.0.

New and Improved Full Site Editing

Earlier, WordPress introduced a block-based theme editor as part of the new Full Site Editing experience in WordPress 5.9.

WordPress 6.0 brings more improvements to the full site editing feature with new site-wide blocks, editable templates, and more patterns.

Note: You’ll need a theme that supports full-site editing, such as the default Twenty-Twenty theme, to try all its features. Full-site editing is still in beta and needs more work to compete with custom theme builder solutions.

Easily Switch Theme Styles

WordPress 6.0 comes with an easy way to switch your entire theme style with a single click.

Click on the Style button at the top right corner and then switch to the Browse Styles tab to see available styles for your theme.

Browse and switch styles in WordPress 6.0

Theme styles is a WordPress theme feature and its availability depends on your WordPress theme.

Edit More Theme Templates with WordPress 6.0

WordPress 6.0 brings the ability to edit even more templates inside the theme editor.

Edit more templates in WordPress 6.0

The new archive templates that you can edit include:

  • Author
  • Category
  • Date
  • Tag
  • Other custom taxonomies

Export Your Block Theme with All The Changes

WordPress 6.0 now allows you to save and export all the changes you made to your block theme.

Export block theme

WordPress will prepare a theme zip file that includes all the changes you made using the full site editor. You can then download and install that theme on any other WordPress website.

New Blocks in Block Theme Editor

WordPress 6.0 brings many new blocks that you can now use inside the theme editor.

1. Comment Query Loop

WordPress 6.0 replaces the Post Comments block with the new Comment Query Loop block.

It comes with sub-blocks like comment author name, avatar, comment content, edit link, and more. You can edit them individually to style your comments on your WordPress blog for a more engaging experience.

Comment Query Loop block in WordPress 6.0

2. Read More Block

You can now add a Read More block to your post excerpts in WordPress 6.0. This allows you to apply more styling options to make the Read More link more noticeable.

Read more block

3. No Results in Query Loop

When adding a Query Loop block, you can now insert the No Results block inside it.

However, the block will only be available when your selected query doesn’t have any results.

No results block for the query loop

4. Post Author Biography

The new post author biography block can now be used along with Post Author and Avatar blocks.

Add post author biography

5. Avatar

The avatar block allows you to display a user’s Avatar (profile photo). You can choose if you want to display the Avatar for a specific user or display the current post/page author’s avatar.

Avatar block

Choose a Page Pattern

Your WordPress theme can now include patterns for must-have pages for most websites.

This means that with WordPress 6.0 the ‘Add New Page’ screen will now bring up a popup with a list of patterns you can use to create pages.

Choose a pattern to create a page

Since it is a brand new feature, your WordPress theme may not yet include any page patterns. In that case, you’ll not be able to see the popup.

However, you can still use the patterns library to find and add patterns for the page you want to create.

Block Editor Changes in WordPress 6.0

The block editor is the area where most WordPress users spend much of their time writing content and creating pages for their websites.

Each WordPress release builds upon that to improve the writing and content creation experience for WordPress users.

WordPress 6.0 includes some really cool features that can greatly improve the way you work on your website.

Block Locking in WordPress 6.0

WordPress 6.0 now allows you to lock a block to prevent users from removing it or changing its position.

Block locking in WordPress 6.0

A major pain point with the reusable blocks is that if any user makes changes to them, then those changes are saved. Block locking in WordPress 6.0 doesn’t solve that issue at the moment.

Easier Text Selection in Multiple Blocks

Earlier it was quite difficult for users to select the text between multiple WordPress blocks.

Selecting text across multiple blocks in WordPress 5.9

WordPress 6.0 now makes it super easy to select text and move the selection cursor across the blocks more smoothly.

Selecting text across multiple blocks in WordPress 6.0

Responsive Group and Row Blocks

With WordPress 6.0, you can choose how you want blocks to behave on different screen sizes.

For group blocks, you’ll see the option to display the blocks inside as a row or a stack.

Responsive group blocks

You can also select multiple blocks and then choose between a row or a stack layout.

Multi block row or stack layout

Miscellaneous Block Editor Enhancements

Following are a few more enhancements in the block editor that you’ll see in WordPress 6.0.

1. Quick Shortcut to Add Internal Links

You can now quickly add links by adding two square brackets followed by the post or page title. It’s much faster than clicking a button.

Add link shortcut

Want to learn more tips for faster writing with the block editor? See the full list of keyboard shortcuts in the WordPress block editor.

2. Select Multiple Blocks in List View

With WordPress 6.0, you can now select multiple blocks in the list view. Plus, you can use Shift+Click or Shift+Up+Down to select multiple adjacent blocks in the list view.

Move multiple blocks

After selecting them, you can now also move them up or down or perform other actions.

3. Border for Columns Block

You can now add a border around the column block.

Border around columns block

4. Spacing for Gallery Images

Galleries can now be manually adjusted to have as much spacing as you need between thumbnails.

Gallery spacing

5. Choose the Opacity of the Separator Block

The color options in the separator block can now have gradients and opacity control.

Separator block opacity

Accessibility Improvements in WordPress 6.0

One of the core missions of WordPress is to democratize publishing for all. Each WordPress release brings improvements to the core software to make it more accessible for all users.

Following are some of the more notable accessibility improvements in WordPress 6.0.

  • The post title will be used as the ALT text for featured images if no other ALT text is provided
  • Better tabbing in blocks with placeholder elements
  • Search announcements in block search
  • Read description for blocks with a placeholder setup
  • Admin bar text labels will be readable by screen readers on smaller screens
  • More descriptive announcements for screen readers when a draft is saved

For a detailed roundup, see accessibility improvements in WordPress 6.0.

Copy Image URL from Media Library List View

If you view your media library in the list view, then you can now see a ‘Copy URL to clipboard’ link below each image and media file.

Copy URL to clipboard

Under the Hood Improvements in WordPress 6.0

WordPress 6.0 comes with several important changes for developers. Following are a few of the developer changes.

  • Webfonts API will provide theme authors a more efficient way to manage local fonts via PHP or theme.json. (See details)
  • An API to prevent blocks from appearing on Widgets screen. (#55301)
  • Make get_the_author_link pluggable. (#51859)
  • Improved sticky post query. (#36907)
  • New filter edit_custom_thumbnail_sizes to work with individual image sizes. (#28277)

We hope this article helped you discover what’s new in WordPress 6.0 and which new features to try out. We are particularly excited about patterns for pages and the full site editing experience.

If you liked this article, then please subscribe to our YouTube Channel for WordPress video tutorials. You can also find us on Twitter and Facebook.

The post What’s New in WordPress 6.0 (Features and Screenshots) first appeared on WPBeginner.


May 25, 2022 at 02:00AM

How to Include Custom Post Types in WordPress Search Results

Do you want to include custom post types in WordPress search?

By default, WordPress will never show custom post types in its search results. That means your visitors may miss out on some great content, and you’ll miss out on extra page views.

In this article, we will show you how to include custom post types in WordPress search.

How to include custom post types in WordPress search

How to Include Custom Post Types in WordPress Search

Although WordPress has a built-in search feature, its quite limited. If you create custom post types in WordPress, then WordPress won’t include these items in search results.

The easiest way to include custom post types in WordPress search is by using the SearchWP plugin.

SearchWP is the best custom search plugin for WordPress, used by over 30,000 websites. It’s easy to use and lets you search content that isn’t included in the default WordPress search.

To include custom post types in WordPress search, you’ll need to install and activate SearchWP. If you need help, then please see our guide on how to install a WordPress plugin.

Upon activation, click on the new ‘SearchWP’ button in your website’s toolbar. You can then go ahead and click on ‘Activate License.’

Activating the SearchWP WordPress plugin

After you’ve done that, click on the ‘License’ tab.

You can now paste your license key into the ‘License’ box. You’ll find this key in the email you got when you purchased SearchWP and in your account on the SearchWP site.

The SearchWP advanced search WordPress plugin

Once you’ve pasted this information into the ‘License’ field, go ahead and click on the ‘Activate’ button next to it.

You can now set up SearchWP to include custom post types in WordPress search results.

To start, simply click on the ‘Engines’ tab.

SearchWP's Engine tab

On this screen, you’ll see sections for the different types of content on your WordPress site that SearchWP includes in its search results.

By default, this plugin searches your website’s media, posts, and pages.

To include custom post types in your searches, click on the ‘Sources & Settings’ button.

Configuring the SearchWP search plugin

Under ‘Sources,’ you’ll see all your post types listed along with comments, media, and more. Simply find all of the custom post types that you want to include in your search results, and check their boxes.

After that, click on the ‘Done’ button.

Including custom post types in WordPress search

You’ll now see a new section for each of your custom post types on your WordPress blog.

In each section, SearchWP shows all the attributes that it will look at when searching your custom post types.

For each attribute, SearchWP has an ‘Applicable Attribute Relevance’ scale. This is the weight that SearchWP gives to this attribute when searching your custom post types.

By default, the sliders for Title, Slug, and Excerpt are all the way to the right, so they have the most weight. The slider for Content is in the center, so it has less weight.

SearchWP's attribute weight settings

Want to change an attribute’s weight? Simply drag its slider.

You may want to try different relevancy settings to see what gives you the most accurate and helpful search results.

You can also remove attributes. For example, your custom post type may have attributes that you want SearchWP to ignore, like attributes that you added for your internal reference only.

To add or remove attributes, click on the ‘Add/Remove Attributes’ button.

Adding custom post type attributes to WordPress search

To add an attribute, simply click to check its box.

If you want SearchWP to ignore an attribute, then go ahead and uncheck its box.

Removing custom post type attributes from WordPress search

If you’ve created any custom taxonomies or custom fields, then you might want SearchWP to look at this content when searching your custom post types.

To do this, simply click on either the ‘Custom Fields’ or ‘Taxonomies’ fields. You can then type in the name of the attribute that you want to add, and click on it when it appears.

Adding custom post types in WordPress search

When you’re happy with your settings, click on the ‘Done’ button.

If you’ve added any attributes, custom fields or taxonomies, then you can change how much weight this content has. Just like we mentioned earlier, moving the slider to the right will give this attribute more weight which means it will have a bigger impact on the search results.

Changing the attribute relevancy for custom post types in WordPress search

Once you’ve finished customizing SearchWP’s settings, scroll to the top of the screen.

You can then click on the ‘Save Engines’ button to save your changes.

Saving your WordPress custom search settings

At this point, SearchWP may show you the message ‘The index needs to be rebuilt.’

If you see this message, then go ahead and click on the ‘Rebuild Index’ button. This will add your custom post types to your site’s search index, so they will show up in the search results.

Rebuilding the WordPress search index

That’s it. WordPress will now include your custom post types in its search results.

Once you’ve done that, you may want to enable some advanced settings that will make it easier for visitors to find what they are looking for.

To take a look at these settings, click on the ‘Advanced’ tab.

SearchWP's advanced search settings

This screen lists some of the more advanced settings that you may want to use.

For example, if you want to show results that don’t quite match the term that the visitor searched for, then you can check the ‘Partial matches (fuzzy when necessary)’ box.

The 'fuzzy' partial search settings in SearchWP

For more tips on SearchWP’s advanced settings, please see our step by step guide on how to improve WordPress search with SearchWP.

After adding custom post types to WordPress search, you may want to create a search form that only show the search results from your custom post type category, which can make it easier for visitors to find what they’re looking for. For more details, see our step-by-step guide on how to create advanced search form in WordPress for custom post types.

We hope this article helped you learn how to include custom post types in WordPress search. You can also go through our guide on how to make money online blogging with WordPress, and see our expert pick of must have WordPress plugins for business sites.

If you liked this article, then please subscribe to our YouTube Channel for WordPress video tutorials. You can also find us on Twitter and Facebook.

The post How to Include Custom Post Types in WordPress Search Results first appeared on WPBeginner.


May 24, 2022 at 04:00PM