Friday, June 3, 2022

14 Best WordPress SEO Plugins and Tools That You Should Use

Often we’re asked about what are the best WordPress SEO plugins and tools that we recommend.

That’s because search engines are a major source of traffic for most websites on the internet. Optimizing your website for search engines can help you rank higher in search results and significantly grow your business.

In this article, we will share the best WordPress SEO plugins and tools that you should use. Some of these tools offer similar functionalities, so we will also highlight which ones are the best for specific use-cases.

best wordpress seo plugins

Things You Must Know About WordPress SEO Plugins & Tools

When reading SEO WordPress tips or searching for “best free WordPress SEO plugins”, you will come across articles that feature several dozen tools.

This can be quite overwhelming for beginners and non-techy users.

The truth is that you don’t need dozens of top SEO tools to get higher search engine result rankings.

While most blog posts (including ours) will share the top most popular SEO plugins, it is extremely important for you to understand the use-cases of each tool.

For example, you never want to use more than one WordPress SEO plugin on your website. We will mention All in One SEO (formerly All in One SEO Pack), Yoast SEO, SEOPress, and Rank Math. You need to pick only one to avoid plugin conflict.

We’ll mention SEMRush, Ahrefs, and few other powerful tools, but you don’t need them all when you’re first starting out since they have a similar feature set. We will share what tools we use in our business, and which features are the best among each tool.

With that said, let’s take a look at our expert pick of the best WordPress SEO plugins and tools.

1. All in One SEO for WordPress (AIOSEO)

All In One SEO - AIOSEO

All in One SEO for WordPress (AIOSEO) is the best WordPress SEO plugin on the market. Used by over 3+ million users, it is the most comprehensive SEO toolkit that helps you improve search rankings without learning any complicated SEO jargon.

The free version of AIOSEO has all the essential features, but the pro version gives you everything you need to outrank your competitors.

It comes with the easiest setup wizard that automatically helps you choose the best SEO settings for your business. AIOSEO shows you TruSEO on-page analysis with an actionable checklist to optimize your posts and pages.

The on-page SEO checklist includes a smart meta tag generator where you can use dynamic values (current year, month, day, custom fields, author info, and much more) in your SEO title and meta descriptions. This means you don’t need to update a post just to change SEO titles.

All in One SEO (AIOSEO) dynamic meta title and description

AIOSEO also comes with Rich snippet schema markup, smart XML sitemaps (with advanced controls), SEO health check, and other useful features to grow your search engine visibility.

There is a built-in social media integration to add Open Graph metadata as well. This means you can choose which image or thumbnail you want to show when your pages are shared on social media websites like Facebook, Twitter, Pinterest, etc.

All in One SEO for WordPress (AIOSEO) social media profiles

AIOSEO also comes with built-in WooCommerce SEO tools for eCommerce sites. This includes features like dynamic optimizations, individual product page optimizations, product image SEO, and other handy features to bring more organic traffic to your online store.

For more SEO savvy users, it includes full control of RSS feeds, Robots.txt editor, local SEO, breadcrumbs, Google News sitemaps, video SEO, advanced redirect manager, 404 tracking, IndexNow integration, and more.

For business owners, it comes with SEO user roles, so you can manage access to important SEO features without handing over control of your website.

Update: Recently AIOSEO added a Link Assistant which is a game-changer for internal linking. It helps identify link opportunities, gives you linking suggestions in real-time, and you can bulk-add internal links with just a few clicks.

Overall, All in One SEO (AIOSEO) is the most beginner-friendly and comprehensive WordPress SEO plugin on the market. It’s easy to configure and eliminates the need to install multiple plugins to do things on your WordPress site. It works perfectly for all types of businesses, eCommerce, blogs, news, and other websites.

As a WPBeginner user, you get 50% off AIOSEO Pro.

For those who’re on a budget, you can use the free version of AIOSEO to get started.

2. SEMRush

Semrush review

SEMRush is the best overall SEO tool on the market. Used by professional SEO experts, marketers, bloggers, large and small businesses, it provides a comprehensive set of tools to grow your traffic.

You can use it to find organic keywords and search terms that you can easily rank for. It also allows you to do competitive research and see which keywords your competitors rank for, and how you can beat them.

SEMRush SEO Writing Assistant tool helps you improve your website content to beat the top 10 results for your focus keyword. It integrates with WordPress, and this will help you write more SEO-friendly content.

You can also generate SEO templates and get easy search engine optimization suggestions for your content along with advanced SEO recommendations.

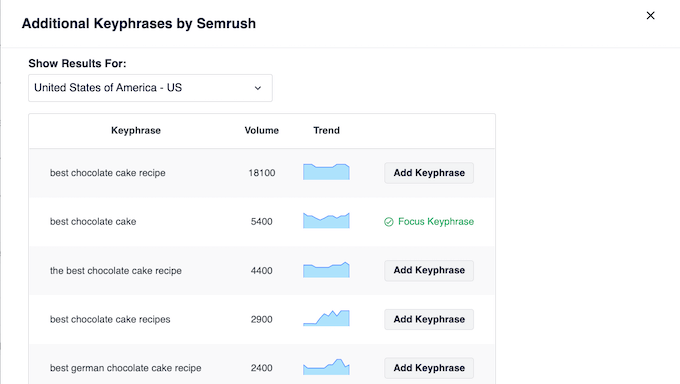
SEMRush seamlessly integrates with All in One SEO (AIOSEO) to help you find additional keyphrases for your focus keyphrase. You can see related keyphrases and their search volume right from WordPress. Then, you can add them to your content with the click of a button.

AIOSEO's Semrush integration

To learn more, see our complete guide on how to do keyword research for your website.

We use SEMRush for our websites because of their competitive intelligence and SEO rank tracker features.

3. Google Search Console

google search console

Google Search Console is a free tool offered by Google to help website owners and webmasters monitor and maintain their site’s presence in Google search results.

It alerts you when Google is unable to crawl and index pages on your website. You also get helpful tips on how to fix those crawl errors.

Most importantly, it shows which keywords your website is ranking for, anchor texts, average position, impressions, and more. You can use this data to find keywords where you can easily rank higher by simply optimizing your content. You can also use this keyword data to come up with new blog post ideas.

For more details, see our comprehensive Google Search Console guide for beginners.

Tip: You can use MonsterInsights to track your keyword rankings inside WordPress admin area using Google Seach Console data. We will cover this tool later in the article below.

4. Yoast SEO

yoast seo

Yoast SEO is a popular WordPress SEO plugin that allows you to optimize your WordPress website for search engines.

It lets you easily add SEO titles and descriptions to all posts and pages on your website. You can also use it to add Open Graph metadata and social media images to your articles.

Yoast SEO automatically generates an XML sitemap for all your website content which makes it easier for search engines to crawl your website. It also helps you easily import your SEO data if you have been using another SEO plugin.

Other features include readability analysis, Google and social previews, and faster load times for a better user experience.

For more details, see our complete guide on how to install and set up Yoast SEO plugin in WordPress.

5. Google Keyword Planner

google keyword planner

Google Keyword Planner tool helps you generate your own keyword ideas from Google itself.

No one on the planet has more insights into what people are searching for than the search giant Google. This free tool is offered to Google’s advertisers for free and anyone can use it. Its main purpose is to show advertisers the keywords they can bid on for their advertising campaigns.

It also helps advertisers choose the right keywords by showing them an estimate of search volume, number of results, and difficulty level.

As a content marketer or blogger, you can use this data to find keywords with high search volume, high advertiser interest, and more importantly keywords where you can easily outrank all other sites.

Bonus: See these 103 Blog Post Ideas that your Readers will Love (Cheat Sheet).

6. Ahrefs

ahrefs

Ahrefs is an all-in-one SEO analysis tool for marketers, bloggers, and businesses. It is a popular alternative to SEMRush and offers a lot of similar tools and features.

It allows you to do keyword research, competition analysis, backlink research, SEO audit, monitor keyword rankings, and more.

It also offers a detailed content analysis tool that helps you improve content while targeting specific keywords.

While there’s a huge feature overlap, what Ahrefs does really well is backlink analysis. We can use it to see which sites are linking to multiple competitors, but not us. This helps us get more backlinks and build more partnerships.

They also help us identify which content multiple of our competitors are ranking for that we aren’t, so we can create content on those subjects to get more exposure.

Last but not least, Ahrefs helps us better identify duplicate content and keyword cannibalization which helps us merge and upgrade the right content to boost our rankings.

For the reasons above, we pay for both SEMRush and Ahrefs because they’re both good for specific use-cases.

7. SEOPress

seopress

SEOPress is another simple yet powerful WordPress SEO plugin. It includes all the features you would expect from an SEO plugin like meta title, description, open graph support, image and content XML sitemaps, redirects, and more.

It comes with a straightforward setup for beginners and advanced controls for more experienced users. It is comparable to other top WordPress SEO plugins on the market in terms of features and options.

The paid version of the plugin is cheaper than some other premium WordPress SEO plugins on the market.

Note: SEOPress is a WordPress SEO plugin. Remember, you only need one WordPress SEO plugin on your site.

8. Rank Math

rankmath

Rank Math is another user-friendly WordPress SEO plugin that allows you to optimize your website for search engines and social media. It comes with a setup wizard and allows you to import data from other SEO plugins during the setup.

You can use it to easily add meta title, description, and Open Graph metadata to your blog posts. The plugin also allows you to generate an XML sitemap, connect Google Search Console, and control access to plugin features based on user roles.

Note: Rank Math is an AIOSEO alternative. Remember, you only need one WordPress SEO plugin on your site.

9. Schema Pro

schema pro

Schema Pro allows you to add rich snippets to your website which makes it stand out in search results.

Rich Snippets allow you to make your website stand out in search results by showing star ratings below a review, prices below a product, image or video next to the description, and so on.

Top WordPress SEO plugins, like All in One SEO (AIOSEO) already add structured rich snippets data to your website. However, if you need more schema types or want to extend the functionality of your existing WordPress SEO plugin then Schema Pro is the way to go.

Schema Pro also allows you to use it alongside your existing WordPress SEO plugin by mapping the plugin data to Schema Pro fields.

10. KeywordTool.io

keyword tool io

KeywordTool.io is one of the best free keyword research tools available right now. It allows you to simply generate keyword ideas by typing in a keyword. These keyword suggestions are gathered from Google’s autosuggest feature. It also shows you keyword suggestions from Bing, YouTube, Amazon, and more.

These keyword suggestions are a treasure of information. You can also get search volume, cost per click, and other data for each keyword by upgrading to their paid plan.

11. Redirection

redirection plugin

Redirection helps you set up SEO friendly redirects in WordPress. It is a handy broken link checker that helps you easily fix 404 errors in WordPress by setting up redirects.

Broken links can affect your site’s SEO and create a bad experience for your users. If you have been running a blog for some time, then you should check your site from time to time for broken links and fix them.

There are multiple ways to easily find broken links in WordPress. Once you find a broken link, you may need to fix it by pointing users to the correct link or removing the incorrect link.

For more details, see our step by step guide on how to find and fix broken links in WordPress.

Alternative: AIOSEO Advanced Redirects is a powerful alternative to the Redirection plugin.

12. SEOQuake

seoquake

SEOQuake is a useful SEO tool for website owners. It is available as a browser add-on for Google Chrome, Mozilla Firefox, Opera, and Safari web browsers.

It provides SEO related information for any website. This data includes page health, age, last updated, Alexa rank, and many other parameters. It is one of the most downloaded browser addons by SEO professionals.

Apart from that, the SEOQuake toolbar can show you all the same data search results when you type in a keyword. This information can be extremely useful if you are gauging competition for different keywords. You can even download search results in CSV format and prepare your own excel sheets of search data.

Alternative: Ahrefs SEO Toolbar

Bonus Plugins for WordPress Website Owners

These tools give you the additional advantage when optimizing your website for SEO. They do not advertise themselves as SEO tools but they are essential for every website and play a significant role in your website’s search performance.

13. WP Rocket

WP Rocket review

Site speed is a major factor in search rankings. That’s why you need to monitor your website speed & performance to make sure it’s not affecting your SEO.

The easiest way to boost your website speed is by enabling caching. WP Rocket is the best WordPress caching plugin on the market, which allows you to set up caching without diving into any technical stuff.

Alternative: WP Super Cache

14. MonsterInsights

MonsterInsights

Many beginners rely on their best guess to make their marketing decisions. You don’t need to do that when you can easily get the insights you need to improve your website’s SEO strategy.

MonsterInsights is the best Google Analytics plugin for WordPress. It allows you to easily install Google Analytics in WordPress and shows human-readable reports inside your WordPress dashboard.

It tells you where your users are coming from, your top content, what users do on your website, and more. It also allows you to track your eCommerce SEO by seeing which products are popular and where you are losing customers.

Bonus tip: See what other marketing data you must track on your website to grow your business.

Other Powerful Growth Tools:

Aside from the above plugins, we also recommend the following tools to increase your traffic and conversions from SEO visitors:

  • PushEngage – connect and engage with SEO visitors after they leave your website with web push notifications.
  • OptinMonster – convert abandoning visitors into email subscribers & customers.
  • Constant Contact – stay in touch with SEO visitors through email marketing.
  • WPForms – get more leads from your SEO traffic with #1 WordPress form builder.
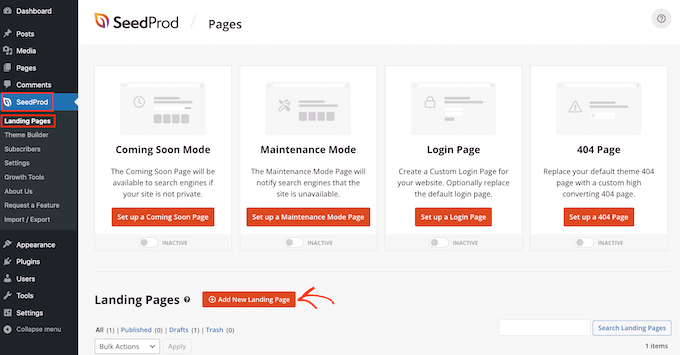
  • SeedProd – create SEO friendly custom landing pages with drag & drop WordPress page builder (no coding needed).

We hope this article helped you find the best WordPress SEO plugins and tools for your website. You may also want to see our proven tips to easily increase your website traffic, and our comparison of best chatbot software to boost conversions.

If you liked this article, then please subscribe to our YouTube Channel for WordPress video tutorials. You can also find us on Twitter and Facebook.

The post 14 Best WordPress SEO Plugins and Tools That You Should Use first appeared on WPBeginner.


June 03, 2022 at 05:00PM

Thursday, June 2, 2022

How to Remove the Remember Me Option from WordPress Login

Do you want to remove the remember me option from your WordPress login page?

The ‘Remember Me’ option is a small checkbox that lets you and your users save their username and password on the WordPress login screen.

In this article, we’ll show you how to remove the ‘Remember Me’ option, step by step.

How to Remove the Remember Me Option from Your WordPress Login (2 Ways)

Why Remove ‘Remember Me’ from Your WordPress Login Screen?

When you or your website users check the ‘Remember Me’ box on the WordPress login page, it will store that information in a browser cookie for 2 weeks.

Remember me checkbox example

That means that next time they’re on your site, they can access the dashboard right away without having to go to the login page again.

Although it makes logging in faster, it could be a potential security risk for people accessing their WordPress admin area from public computers and WiFi networks.

By disabling the ‘Remember me’ checkbox, you and your users will have to log in every time the web browser is closed. They can still save their username and password in their browser’s storage or a password manager app so they don’t have to type it in every time.

Overall, this improves your WordPress security and helps to keep your website safe from hackers.

With that said, let’s show you how to remove the ‘Remember Me’ option on your WordPress login page. Simply use the quick links below to jump straight to the method you want to use.

Method 1. Removing the Remember Me Option from the Default WordPress Login Page

The easiest way to remove the remember me option from the default WordPress page is by using the Remember Me Controls plugin. 

First thing you need to do is install and activate the plugin. For more details, see our beginner’s guide on how to install a WordPress plugin.

Note: We’ve tested the plugin as of this post’s last updated date, and it works with WordPress 6.0 with no issues. 

Upon activation, navigate to Settings » Remember Me to configure the plugin settings.

Then, simply check the box in the ‘Disable the “Remember Me” feature’ section and click the ‘Save Changes’ button.

Disable remember me checkbox

Now, you can log out of your WordPress site.

When you return to the login screen, the ‘Remember Me’ checkbox will be disabled. 

Remember me checkbox disabled

Method 2. Removing the Remember Me Option from Custom WordPress Login Pages

If you’re creating a custom WordPress login page for your WordPress membership site or online store, then you can hide the ‘Remember Me’ option by using SeedProd.

SeedProd Website Builder Coupon Code

SeedProd is the best drag and drop WordPress page builder in the market used by over 1 million websites. You can use it to create a completely custom WordPress theme without writing any code.

Aside from create custom WordPress themes, SeedProd also comes with the ability to create custom WordPress login pages, custom 404 pages, and more.

First, you will need to use SeedProd plugin to create a custom login page. For more details, see our step by step guide on how to create a custom login page.

Then, when you’re customizing the login page, you can disable the ‘Remember Me’ option by clicking on the ‘Additional Options’ drop down in the left-hand options menu.

Click additional options in page builder

Next, delete the text in the ‘Remember User Label’ box. 

Then, click the ‘Save’ button and select the ‘Publish’ drop down to make your login page live.

Delete remember me text and publish

Now, you can visit your custom login page to see the ‘Remember Me’ option is gone.

Custom login page no remember me

We hope this article helped you learn how to remove the remember me option from your WordPress login page. You may also want to see our ultimate guide on how to speed up WordPress, and our expert picks of the best business phone services for small businesses.

If you liked this article, then please subscribe to our YouTube Channel for WordPress video tutorials. You can also find us on Twitter and Facebook.

The post How to Remove the Remember Me Option from WordPress Login first appeared on WPBeginner.


June 02, 2022 at 05:00PM

Wednesday, June 1, 2022

How to Add Text on Top of an Image in WordPress (3 Methods)

Do you want to add text on top of an image in WordPress?

A text overlay is a great way to provide some extra information about an image. It’s also a quick and easy way to create banners, headers, and even online advertisements.

In this article, we will show you how you can add text on top of an image in WordPress.

How to add text on top of an image in WordPress

Adding Text Over Images in WordPress

Images can make your WordPress website look more interesting and help to break up large paragraphs of text.

However, sometimes your images may need more explanation. For example, you might add text on top of an image to explain what the image shows and why you’ve added it to your post.

Many WordPress blogs also add text on top of an image to create eye-catching and informative banners and headers.

In this post we have three different ways to add text on top of an image in WordPress. If you prefer to jump straight to a particular method, then you can use the links below.

One way to add text on top of an image in WordPress is by using the Cover block. You can use this block to show any image, and then type text over the image. This makes the Cover block perfect for creating hero images, headers, and banners.

To add a Cover block to a page or post, simply click the plus (+) sign in the WordPress block editor.

You can now type in ‘Cover’ and select the right block when it appears.

The WordPress Cover block

By default, the Cover block has a placeholder image and some placeholder text.

To replace the default image, simply click to select the image. Once you’ve done that, click on the ‘Replace’ button.

How to add text on top of an image in WordPress

If you want to use an image that’s already in your WordPress media library, then simply click on ‘Open Media Library.’ You can then choose an existing image.

If you want to upload a new image, then click on ‘Upload’ instead.

Uploading an image to the WordPress Cover block

This opens a window where you can choose any file from your computer.

After you choose an image, you can use the block settings to create some interesting and eye-catching effects. For example, you can make the image fixed in place as the visitor scrolls the page, or add a color overlay to the image.

A colored cover overlay

If you do use an overlay, then you can change its opacity by using the ‘Opacity’ slider. Opacity setting control the transparency of the background image.

When you’re happy with how the image looks, you’re ready to add some text.

By default, the Cover block has a Heading and a Paragraph block where you can add text on top of the image.

How to add text on top of an image in WordPress

To add some text, simply click to select either the Heading or Paragraph block. Then, go ahead and type in the text that you want to use.

When you add text on top of an image, that text can sometimes be difficult to read. This is particularly true for any visitors who have poor vision. To learn more, please see our guide on how to improve accessibility on your WordPress site.

That being said, you may want to style your text so it’s easier to read.

If you’re working with a Heading block, then you can also try the different heading styles to see which one is easiest to read.

Styling the text on top of a WordPress image

You can also help your text stand out by using a contrasting color.

To choose a different color, select the ‘Block’ tab in the right-hand menu. Then, go ahead and click on ‘Color’ to expand this section.

Once you’ve done that, click on ‘Text.’ This opens a popup where you can choose a new color for all the text in the block.

Changing the color of text on top of an image

Typically, larger text is easier to read.

To make your text bigger, go ahead and click on the field next to ‘Size’ and then type a larger number into this field.

Adding text on top of an image in WordPress

Once you’re happy with how your Cover block looks, you can publish or update your page as normal. Now if you visit your website you’ll see your text on top of the image.

Method 2. How to Add Text on Top of an Image Using the Image Block

The Cover block is great for creating banners and headers. However, you can also add text on top of a standard WordPress Image block.

To start, you’ll need to add an Image block to your page or post. To do this, simply click on the plus (+) sign in the WordPress block editor.

You can then type in ‘Image’ and select the right block to add it to your post.

The WordPress Image block

You can then either upload an image from your computer, or click on Media Library to choose an image from the WordPress media library.

After choosing your image, you can change its focal point, add an overlay, and change the opacity following the same process described above.

You can also try the different ‘Fixed background’ and ‘Repeated background’ sliders to see what works best for your Image block.

When you’re happy with how your image looks, click on the ‘Add text over image’ button.

Adding text on top of an image in WordPress

This adds an area where you can type in your text.

Depending on your image, visitors may struggle to read your text. Here, it may help to make the text bold or change its color following the same process described above.

Changing the text color in WordPress

You can also make your text bigger.

To do this, find the ‘Size’ section in the right-hand menu. You can then go ahead and click on the different numbers to make your text larger, or smaller.

Increasing the text size

When you’re happy with how your text and image look, click on Save Draft, Update, or Publish to save your changes.

Method 3. How to Create a Custom Page Layout with Text on Top of an Image

The built-in WordPress blocks are a quick and easy way to add text on top of an image in WordPress. However, if you want the freedom to create completely custom page designs, then you’ll need a page builder plugin.

SeedProd is the best WordPress page builder plugin on the market. It allows you to add text on top of any image across your entire website.

Note: There is a free version of SeedProd, but for this guide we’ll use the Pro version since it has more features.

First, you need to install and activate the SeedProd plugin. For more details, see our step by step guide on how to install a WordPress plugin.

Upon activation, you’ll need to enter your SeedProd license key. You can get this key by logging into your SeedProd account. Then, click on the ‘Downloads’ tab.

Once you’ve done that, you can copy the key in the ‘License key’ section.

The SeedProd Downloads page

You can now paste this key into your WordPress admin area by going to the SeedProd » Settings page.

Once you’re here, go ahead and paste your key into the ‘License key’ field.

Verifying your SeedProd license

Then you simply need to click on ‘Verify Key.’

After that, we’re going to head over to SeedProd » Landing Pages, and click on Add New Landing Page.

SeedProd's page design templates

Your next task is choosing a template, which will be your page’s starting point. No matter what SeedProd template you choose, you can customize every part of the template to perfectly suit your website and branding.

If you prefer to start with a blank canvas, then you can click on Blank Template.

The SeedProd ready-made templates

In all our images we’re using the Tasty Squeeze Page template, which is perfect for getting more subscriber campaigns.

Once you’ve found a template that you may want to use, hover your mouse over it. You can then click on the ‘Preview’ icon.

SeedProd's professionally-designed templates

This will show a preview of the template.

If you’re happy with how this template looks, then go ahead and click on the ‘Choose This Template’ button.

A lead generation and squeeze template

In the ‘Page Name’ field, type in a name for the page.

By default, SeedProd will use this name as the page’s URL. If you want to change this automatically-created URL, then simply edit the text in the ‘Page URL’ field.

Creating a custom page layout with SeedProd

When you’re happy with the information you’ve entered, click on the ‘Save and Start Editing the Page’ button. This will open the template in SeedProd’s drag and drop editor.

In the left-hand menu, you’ll see all the blocks and sections that you can add to your page using drag and drop.

Adding blocks to your SeedProd design

Unless you’re using the Blank Template, your SeedProd page will already have some blocks and sections. To edit any of this content, simply click to select the block or section.

SeedProd’s left-hand menu will now show all the settings you can use to customize this block or section. As you can see in the following image, if you click on a Headline block, then you can change the text that shows up in this block.

Customizing a ready-made SeedProd page design

The easiest way to add text on top of an image is by using one of SeedProd’s ready-made Hero sections.

These sections have a placeholder background image, with some placeholder text added on top. You can simply replace the default background image and text with your own content.

To get started, click on the ‘Sections’ tab in SeedProd’s left-hand menu.

You can then click on ‘Hero’ to see all of the ready-made hero sections that you can add to your page.

A SeedProd section template

To preview any of these section templates, simply hover over the template and then click on the magnifying glass icon.

To go ahead and add this hero section to your design, just click on ‘Choose This Section.’

A SeedProd hero template

Next, you’ll want to replace the template’s stock image with your own image. To do that, simply click on the stock image to select it.

Then, in SeedProd’s left-hand menu hover over the ‘Background Image’ preview until a trash can icon appears.

You can then go ahead and click on this icon to delete the placeholder image.

Deleting a background image in SeedProd

Next, click on ‘Use Your Own Image.’ You can then either choose an image from the WordPress media library, or use a stock image.

SeedProd gives you easy access to thousands of royalty free stock images. To take a look through SeedProd’s stock image library, click on ‘Use a Stock Image.’

In the search bar, type in a word or phase that describes the image you’re looking for and click on the ‘Search’ button.

Choosing a SeedProd stock image

SeedProd will now show all the stock images that match your search term.

When you find an image that you want to add to your design, simply give it a click.

SeedProd's stock image library

Once you’ve added an image, you’re ready to replace the placeholder text.

To do this, click to select the text block. Then in the ‘Text’ area, simply type in the text that you want to use.

Add text on top of an image using SeedProd

Some of SeedProd’s hero templates have extra content, such as call to action buttons.

Want to change this content? Then simply click to select the block and then make your changes in SeedProd’s left-hand menu.

Editing your SeedProd text

Another option is to delete the block from the hero template.

To do this, simply click to select the block and then click on the trash can icon.

Deleting SeedProd sections and blocks

When you’re happy with your page design, you can click on the ‘Save’ button.

From here, you can choose to publish the page or save it as a template.

Publishing a SeedProd design

For more details on creating custom page layouts with SeedProd, you can see our guide on how to create a landing page in WordPress.

We hope this article helped you learn how to add text on top of an image in WordPress. You can also go through our guide on how to choose the best web design software or see our expert pick of the best SEO plugins and tools you should use.

If you liked this article, then please subscribe to our YouTube Channel for WordPress video tutorials. You can also find us on Twitter and Facebook.

The post How to Add Text on Top of an Image in WordPress (3 Methods) first appeared on WPBeginner.


June 01, 2022 at 04:00PM