Do you want to add an old post notification in WordPress?
If you have been producing content for some time now, then there is a chance that some of your content may be outdated.
In this article, we’ll show you how to easily add old post notification to your WordPress blog.
Why Add Old Post Notification to WordPress Blog Posts
Content decay (outdated blog posts) can be a bit of a problem for a growing WordPress blogs.
Depending on your niche, sometimes your content may become irrelevant, incorrect, or inappropriate over a period of time. This may cause a bad user experience, a higher bounce rate, and lower search rankings.
Ideally, you would want to edit those articles and update them with more useful, accurate, and up-to-date information.
But that’s not always possible because your site may have too many old articles, and you may not have enough resources to update them. In that case, adding an old post notification may be helpful for your users.
It will let them know that the content is a bit older, and they should keep this in mind when using the information presented on that page.
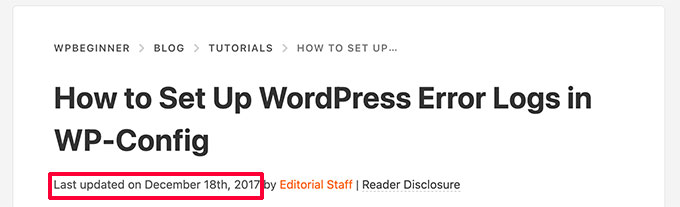
Another solution that many blogs use is by simply adding the ‘Last updated date’ instead of the publishing date.
That being said, let’s take a look at how you can add the old post notification in WordPress, and how to display the last updated date on your articles.
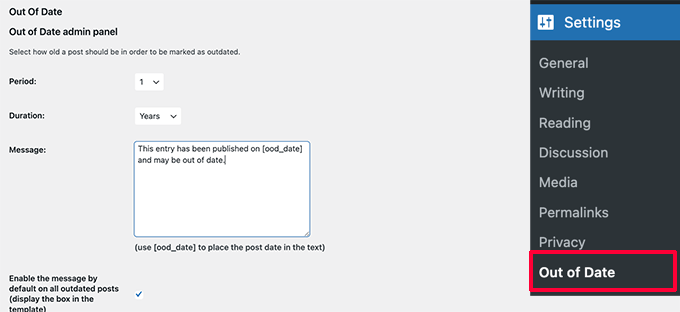
Upon activation, you need to visit the Settings » Out of Date page to configure plugin settings.
Here, you need to choose the period and duration. This is the time after which a post will be considered old by the plugin.
Below that you can provide a custom message to display on older posts and enable the notification to be displayed for all old posts. Don’t worry, you’ll be able to hide it for specific posts by editing them.
On the settings page, you can also choose post types, colors for the notification box, and add custom CSS if needed.
Don’t forget to click on the Save Changes button to store your settings.
You can now visit an old post on your website to see the plugin in action.
Hiding Old Post Notification on Individual Posts
Now let’s say you have an article that is older, but it is still accurate, up-to-date, and has great search rankings. You may want to hide the old post notification there.
Similarly, what if you have updated an old post with new information. The plugin will keep showing old post notification because it uses the post’s published date to determine its age.
To fix this, you can edit the post and scroll down to the ‘Out of Date Notification’ tab under the Post panel of the block editor. From here, simply uncheck the notification option and save your changes.
The plugin will now stop showing old post notification on this particular article.
Method 2. Display Last Modified Date for Your Posts
A lot of WordPress websites display the last modified date for their blog posts. Some replace the publish date with the last modified date as well.
The advantage of this method is that it shows users when a post was last updated without showing an old post message.
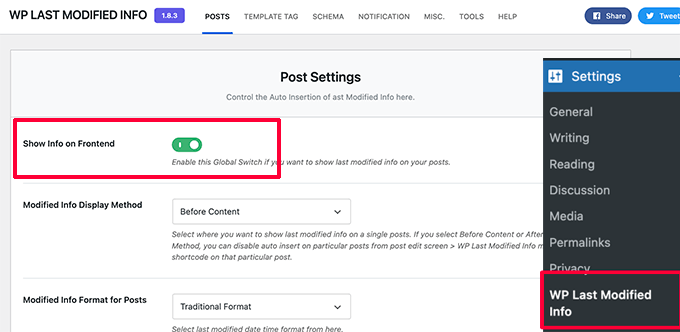
Upon activation, head over to Settings » WP Last Modified Info page to configure plugin settings.
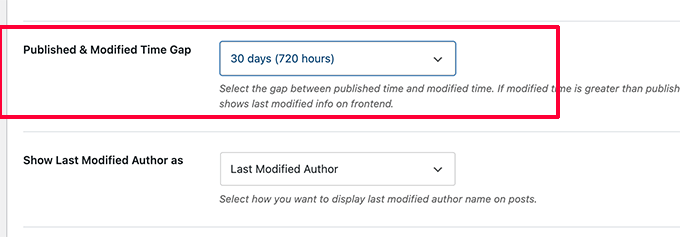
On the settings page, you need to turn on the Global display of the last modified info toggle. After that, you can choose how you want to display the modified date.
You can replace the published date, show it before or after the content, or manually insert it into a post.
Below that, you’ll find a bunch of options. If you are unsure, then you can leave them to default.
Don’t forget to click on the Save Settings button to store your changes.
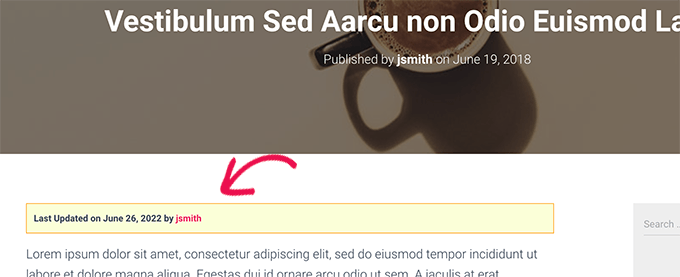
You can now visit your website to see the last updated information for all your blog posts.
This problem with this method is that it will show the last updated date for all posts including the newer posts.
You can set a time gap under plugin settings. But this gap is only limited to 30 days.
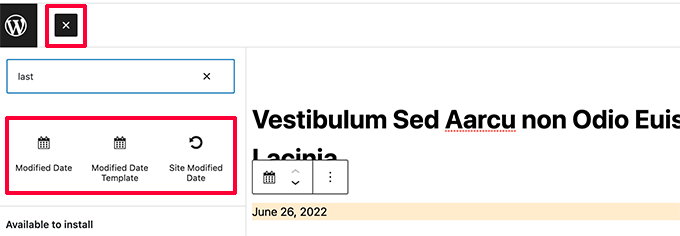
The plugin also provides three blocks that you can manually insert into a post or page to display last modified info.
You also have the option to use custom CSS to style your last updated date notice. We used the following custom CSS in the screenshots above.
This method requires you to manually add code to your WordPress theme files. If you haven’t done this before, then take a look at our guide on how to add custom code snippets in WordPress.
Simply copy and paste the following code in your theme’s single.php template.
// Define old post duration to one year
$time_defined_as_old = 60*60*24*365;

// Check to see if a post is older than a year
if((date('U')-get_the_time('U')) > $time_defined_as_old) {

$lastmodified = get_the_modified_time('U');
$posted = get_the_time('U');

//check if the post was updated after being published
 if ($lastmodified > $posted) {

// Display last updated notice
      echo '<p class="old-article-notice">This article was last updated ' . human_time_diff($lastmodified,current_time('U')) . ' ago</p>';

  } else {
// Display last published notice
echo '<p class="old-article-notice">This article was published ' . human_time_diff($posted,current_time( 'U' )). 'ago</p>';

}
}
This code defines old posts to be any articles published at least one year ago.
After that, it checks if a post is older than a year. If it is, then it checks if the post was updated after publication. Then it displays a notice based on those checks.
Here is how it looked on our demo website for post that is old and was never updated.
Here is how it looked for a post that is old, but it was updated after being published.
We customized the old post notification with the following custom CSS.
Are you looking for the best WordPress eCommerce plugin to build your online store?
Choosing the right eCommerce plugin is crucial for your business because a better platform means more opportunities for growth. Often users end up losing money because they didn’t do proper research when choosing the eCommerce platform to start their store.
In this article, we will compare the best WordPress eCommerce plugins. We will also explain their pros and cons to help you find which eCommerce plugin is right for your business.
What to Look for in a WordPress eCommerce Plugin for Your Site?
There are plenty of WordPress eCommerce plugins in the market. But not all of them have the right set of features for your use case.
For example, some eCommerce plugins are made for selling digital goods like eBooks, photos, music, etc. Others are better suited for selling physical products that need shipping.
If you want to run a drop-shipping business, then you’ll need an eCommerce solution that provides better support for drop-shipping.
Basically, you need to consider what you will be selling and what kind of features you would need to efficiently run your online store.
Apart from that, the following are some of the most important factors you need to look for when choosing an eCommerce platform.
Payment solutions – Your eCommerce plugin should have support for your preferred payment gateways by default or through an extension.
Design and customization – Your store’s design is your customer’s first interaction with your business. Make sure there are plenty of templates and easy customization options available
Apps and integrations – Check out integrations available for third-party apps like email marketing services, CRM software, accounting software, etc. You’ll need those tools to manage and grow your eCommerce business more efficiently.
Support options – Make sure that there are support options available. Good support can save you a lot of money in the long run.
What Do You Need to Run an eCommerce Website?
Ecommerce websites are resource-intensive, so the first thing you will need is the best WordPress hosting that you can afford.
If you’re on a budget, then you can start with SiteGround or Bluehost. All their plans are eCommerce ready and comes with SSL Certificate which you need to collect payments securely, dedicated IP, and a dedicated support line. They also offer 1-click install options for the most powerful WordPress eCommerce plugins (as you’ll find out later in this article).
If budget is not an issue, and you want the best performance, then we recommend using a managed WordPress hosting provider like WPEngine.
Next, you will need to choose a domain name for your website. Here is our guide on how to pick the right domain name for your eCommerce site.
Having that said, let’s take a look at the best WordPress eCommerce plugins.
Best WordPress Ecommerce Plugins – The Contenders
Now that you know what to look for in an eCommerce platform and what you need to get started, here are our top picks for the best eCommerce platform for WordPress users.
WooCommerce is the most popular WordPress eCommerce plugin. It’s also the most popular eCommerce platform in the world. WooCommerce was acquired by Automattic (the company behind WordPress.com’s blog hosting service) in 2015.
There is a large number of addons and themes available for WooCommerce. They also have a passionate developer community behind it. Recently several hosting companies have started creating specialized WooCommerce hosting solutions.
Pros of Using WooCommerce
Here are some of the advantages of using WooCommerce as your WordPress eCommerce plugin:
Extensions and Themes – There are hundreds of extensions and themes available for WooCommerce, which makes it easy for you to add new features to your eCommerce site. A large collection of themes means you have tons of options when choosing your site’s design and layout.
Supports Both Digital and Physical Goods – With WooCommerce, you can sell physical as well as digital downloads (such as ebooks, music, software, and more).
Sell Affiliate or External Products – Using WooCommerce, you can add affiliate or external products to your site. Affiliate marketers can create product sites and provide users with a better experience.
Complete Inventory Management – WooCommerce comes equipped with tools to easily manage your inventory or even assign it to a store manager.
Payment and Shipping Options – WooCommerce has built-in support for popular payment gateways, and you can add many other payment options using extensions. It can also calculate shipping and taxes.
Affiliate Management – You can easily add built-in affiliate management to WooCommerce using AffiliateWP and create your own referral program. This helps you avoid paying middle man fees.
Ecommerce SEO – WooCommerce is fully SEO optimized with the All in One SEO plugin (AIOSEO). This helps your product page ranks higher in search engines.
Ecommerce Growth Tools – WooCommerce has third-party extensions like WooFunnels that help you with funnel optimization to get maximum sales. You can also use Advanced Coupons extensions to add BOGO deals, free shipping, and even sell gift cards.
Support and Documentation – There is excellent documentation available online for WooCommerce. Apart from documentation, there is a knowledge base, help desk, and community forums available.
Cons of Using WooCommerce
Too Many Options – WooCommerce is very easy to use, but the number of options available on the settings page can be quite intimidating for a new user.
Finding Addons – There are lots of addons available for WooCommerce, sometimes a user may not find the right addon for features that they need.
Theme Support – WooCommerce works with any WordPress theme, but it’s not always as easy to set up or good-looking with all themes. You need a WooCommerce-ready theme to take full advantage of its features without too much hassle. Alternatively, you can use SeedProd builder to create custom WooCommerce pages with drag & drop interface.
Scalability – As your store gets larger, you will need to move to a managed hosting provider like WP Engine to scale your WooCommerce store.
WooCommerce is the perfect choice for any kind of eCommerce website. It has a large community of developers and users, a lot of addons and themes, excellent support for multilingual websites, and the best free and paid support options.
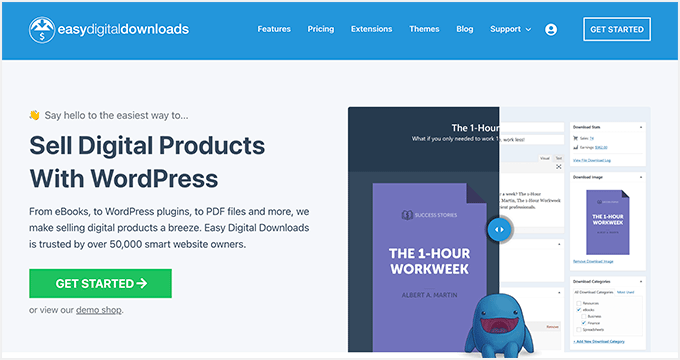
Easy Digital Downloads (EDD) allows you to easily sell digital downloads online using WordPress. It’s very easy to use and comes with powerful features to create a beautiful and functional digital goods store.
We use Easy Digital Downloads to sell our software like WPForms and MonsterInsights, so we can easily say that it’s the best eCommerce platform for your site.
With Easy Digital Download’s growth, there are now even managed EDD hosting offerings that comes with EDD pre-installed.
Pros of Using Easy Digital Downloads
Designed To Sell Digital Goods – Easy Digital Downloads is built from the ground up to sell digital downloads. Unlike eCommerce plugins that can be used to sell all kinds of products, EDD provides a far better experience for selling digital goods.
Easy To Use – Easy Digital Downloads is very easy to use, from the start you would instantly figure out how to add products and display them. This is really useful for the first-timers.
Extensions – There are hundreds of extensions available for Easy Digital Downloads including addons for payment gateways, email marketing platforms, and other marketing tools.
Themes – Easy Digital Downloads works with almost any WordPress theme, however, if you have not chosen a theme yet, then Easy Digital Downloads has themes built specifically for the plugin.
Software Licensing – Easy Digital Downloads comes with robust software licensing support that allows you to sell plugins as well as SaaS products with proper digital rights management.
Affiliate Management – You can easily add built-in affiliate management to Easy Digital Downloads using AffiliateWP and create your own referral program. This helps you avoid paying middle man fees.
Ecommerce Growth Tools – Easy Digital Downloads seamlessly integrates with growth tools like MonsterInsights to offer you enhanced eCommerce tracking, AIOSEO to offer you maximum eCommerce SEO growth, and OptinMonster to offer content personalization and conversion optimization features.
Awesome Support – The plugin is very well documented, and you have free support forums, videos, tutorials, and even an IRC chatroom. There is also a priority support option for premium users.
Cons of Using Easy Digital Downloads
Digital Downloads Only – As the name suggests, Easy Digital Downloads makes it easier to create eCommerce sites for digital goods. But if you want to sell non-digital goods along with digital downloads then it will become quite complicated.
Selling External Products – If you want to add an external product or an affiliate product to your EDD store, then you will need to install a third-party add on for it.
When it comes to selling digital products online, we believe that Easy Digital Downloads is the best plugin to do that. We have used Easy Digital Downloads with great success, not only on client sites but also on our own projects to generate tens of millions each year.
You can use SiteGround EDD hosting to start your Easy Digital Downloads store with just a few clicks.
Note: There’s also a free version of Easy Digital Downloads that you can download from WordPress directly.
MemberPress allows you to sell subscription-based digital products and services. It’s the best WordPress membership plugin with tons of integration options. It can even integrate with WooCommerce.
Let’s take a look at the pros and cons MemberPress.
Pros of Using MemberPress
Sell Subscription-Based Products – This allows you to easily sell subscription-based products, membership plans, pay-per-view content, and more.
Powerful Access Rules – Powerful access control allows you to define user access levels and content restrictions. Only users with permissions will be able to access restricted content.
Built-in Course Builder – MemberPress comes with a course builder that allows you to create & sell courses by offering your users an immersive online learning platform.
Content Dripping – MemberPress allows you to release paid content over time similar to episodes on Amazon Prime shows or other platforms. This feature is known as automatic drip content.
Affiliate Management – You can easily add built-in affiliate management to MemberPress using AffiliateWP or Easy Affiliates plugin. This let you create your own referral program. This helps you avoid paying middle man fees.
Powerful Extensions – You can integrate it with your WooCommerce store or LearnDash LMS. There are tons of extensions to connect MemberPress with third-party services such as AffiliateWP to create your own affiliate program.
Cons of Using MemberPress
Limited Payment Options – MemberPress only supports PayPal, Stripe, and Authorize.net.
Yearly Pricing – Pricing plans are available on yearly terms alone.
MemberPress is the perfect eCommerce plugin to sell subscription-based products, sell courses, or build a membership website. It’s beginner-friendly and can be easily extended with addons that allow you to take your eCommerce website in any direction you want.
BigCommerce is a fully hosted eCommerce platform that offers seamless integration with WordPress. This allows you to use a scalable eCommerce platform while using WordPress to manage your content and run your website.
It has a powerful integration plugin for WordPress which makes it very easy to embed your products in WordPress. It automatically creates the sign-in, cart, account, and other important pages for you.
Let’s take a look at some of the advantages and disadvantages of using BigCommerce as your WordPress eCommerce platform.
Pros of Using BigCommerce
High scalability – It includes all the features you will need with enterprise-grade security, high performance, and easy scalability.
Less Maintenance – Keeping your eCommerce engine separate from other content makes it easier to run your WordPress site.
Sell across Multiple Channels – You can use it to sell not only on your website but also on other channels like Facebook, Instagram, and Amazon.
No transaction charges – Unlike some other eCommerce platforms, it does not charge you on each transaction. You can choose from dozens of top payment gateways and only pay the payment service provider.
Cons of Using BigCommerce
Limited Integrations – BigCommerce integrates with all the top third-party apps and tools. However, its app store is still growing, and you may not find an integration for some less popular apps.
Yearly Sales Threshold – They have a yearly threshold on sales for each plan. If you reach that threshold then you’re upgraded to the next plan. This may increase costs as your business grows.
BigCommerce is an incredibly powerful yet very easy-to-use eCommerce platform. It’s a SaaS eCommerce platform, but with their BigCommerce WordPress plugin, you can have the best of both worlds.
It takes away the pains of scaling your hosting requirements as your business grows. At the same time, you don’t have to worry about security, performance, or finding extensions for SEO and caching.
BigCommerce is a rising contender in WordPress for headless eCommerce. It takes care of technology infrastructure, so you can focus on growing your business.
Shopify is a fast-growing eCommerce platform that handles everything for you. Shopify isn’t a plugin, but it’s an all-in-one solution that’s completely hassle-free. See our guide on Shopify vs WooCommerce for a detailed side-by-side comparison of the two platforms.
Let’s look at the Pros and Cons of Shopify.
Pros of Using Shopify
Super Easy for Beginners – No need to worry about the technical aspects of an eCommerce store such as setting up SSL, integrating with different payment gateways, handling shipping, worrying about taxes, etc. Shopify handles it all.
Supports Both Digital and Physical Goods – Whether you’re selling physical goods like shirts or digital downloads like music, Shopify can handle it all.
Complete Inventory Management – Shopify comes with an inventory editor and bulk importer combined with an order tracker which makes managing inventory a breeze.
Payment and Shipping Options – Shopify makes it easy for you to accept credit cards both online and in person. Their shipping system streamlines your fulfillment process with direct integration with popular providers like USPS.
Facebook Store and Buyable Pins – Shopify integrates with everything. Whether you want to create a Facebook store or create buyable Pins on Pinterest, you can do it all with Shopify.
Cons of Using Shopify
Monthly Platform Fee – Shopify charges you a monthly fee to use their platform which is comparable to purchasing hosting and individual addons using the other plugins in this list.
Shopify Payments – Shopify encourages you to use their payment platform which is powered by Stripe and is a very good option for beginners. However, if you want to overcomplicate things and use external systems, then Shopify charges you an additional fee.
If you want to have a powerful platform without having to deal with technical issues, then Shopify is the solution for you. While the monthly fee sounds bad at first, the hassle-free approach and peace of mind are definitely worth it because it allows you to focus on what you do best, your business!
Shopify does not have a native integration with WordPress. Often times, business owners end up switching from Shopify to WordPress to get more features while reducing their overall cost.
Conclusion – The Best WordPress eCommerce Plugin is:
If you want maximum control, flexibility, and features, then WooCommerce is the best solution for you.
If you’re selling digital goods like eBook, software, music, or other files, then Easy Digital Downloads is the best WordPress eCommerce plugin for you. You can use SiteGround’s EDD hosting to get started with 1-click.
If you don’t want to manage all the technical stuff of building an online store, then BigCommerce is the best option for you. It lets you use a SaaS eCommerce platform side by side with WordPress as your content management system.
Do you want to disable directory browsing in WordPress?
Directory browsing can put your site at risk by showing important information to hackers which can be used to exploit vulnerabilities in your site’s plugins, themes, or even your hosting server.
In this article, we will show you how you can disable directory browsing in WordPress.
What Does Disabling Directory Browsing in WordPress Do?
Every time someone visits your website, your web server will process that request.
Usually, the server delivers an index file to the visitor’s browser, such as index.html. However, if the server can’t find an index file, then it may show all the files and folders in the requested directory instead.
This is directory browsing, and it’s often enabled by default.
If you’ve ever visited a site and seen a list of files and folders instead of a webpage, then you’ve seen directory browsing in action.
The problem is that hackers can use directory browsing to see the files that make up your website, including all the themes and plugins that you’re using.
If any of these themes or plugins have known vulnerabilities, then hackers can use this knowledge to take control of your WordPress blog or website, steal your data, or perform other actions.
Attackers may also use directory browsing to look at the confidential information inside your files and folders. They might even copy your website’s contents, including content that you would usually charge for such as ebook downloads or online courses.
This is why it’s considered a best practice to disable directory browsing in WordPress.
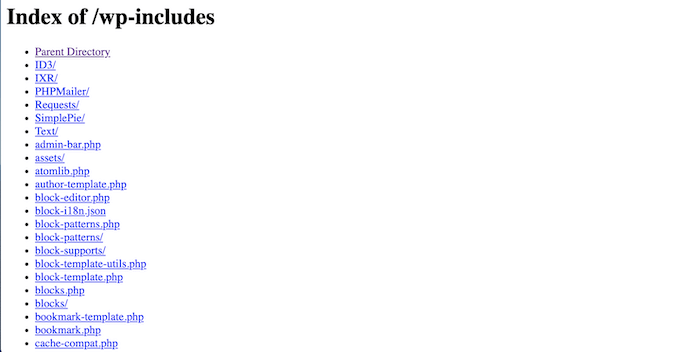
How to Check is Directory Browsing is Enabled in WordPress
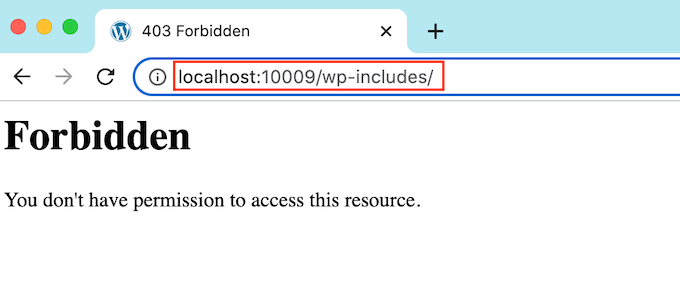
The easiest way to check whether directory browsing is currently enabled for your WordPress website is by simply visiting the /wp-includes/ folder link like this: https://ift.tt/wm3OPGq.
You’ll want to replace www.example.com with your website’s URL.
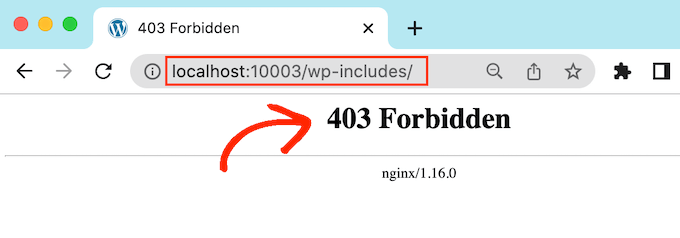
If you get a 403 Forbidden or similar message, then directory browsing is already disabled on your WordPress website.
If you see a list of files and folders instead, then this means that directory browsing is enabled for your website.
Since this makes your website more vulnerable to attack, you’ll typically want to block directory browsing in WordPress.
How to Disable Directory Browsing in WordPress
To disable directory listing, you’ll need to add some code to your site’s .htaccess file.
To access the file, you’ll need an FTP client, or you can use the file manager app inside your WordPress hosting control panel.
After connecting to your site, simply open your website’s ‘public’ folder and find the .htaccess file. You can edit the .htaccess file by downloading it to your desktop and then opening it in a text editor like Notepad.
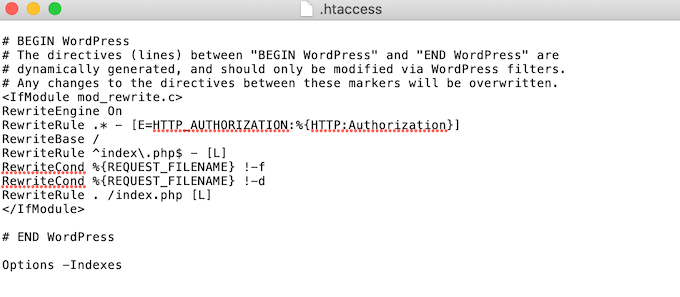
At the very bottom of the file, simply add the following code:
Options -Indexes
It will look something like this:
Once you’re done, save your .htaccess file and upload it back to your server using an FTP client.
That’s it. Now if you visit the same https://ift.tt/XyvKzie URL, you’ll get a 403 Forbidden or similar message.
Do you want to do keyword research for your WordPress blog?
Keyword research helps you find betters content ideas so you can grow your traffic and create highly engaging content that users will love.
In this article, we will show you how to do keyword research for your WordPress site.
What is Keyword Research and Why Do You Need it?
Keyword research is a technique used by content creators and search engine optimization (SEO) experts. It helps you discover the words that people search for when looking for content just like yours.
Once you know the words that people are entering into the search engines, you can use these keywords to optimize your blog posts for SEO. This can help you get more traffic from search engines such as Google.
Some website owners fall into the trap of assuming they already know what their audience are searching for. However, you don’t need to make guesses when there are powerful tools that can help you make decisions based on real data.
By doing keyword research as part of your WordPress SEO strategy, you can:
Find the words and phrases that your audience are actually entering into the search engines
Increase the traffic you get from search engines
Find content ideas that are easy to rank for and have decent search volume
Find out what your competitors are doing – and do better!
That being said, let’s take a look at how to do keyword research for your WordPress blog.
In this post we have hand-picked the best keyword research tools that we have personally used for our own projects. We will explore each tool and how it can help you perform keyword research like a pro.
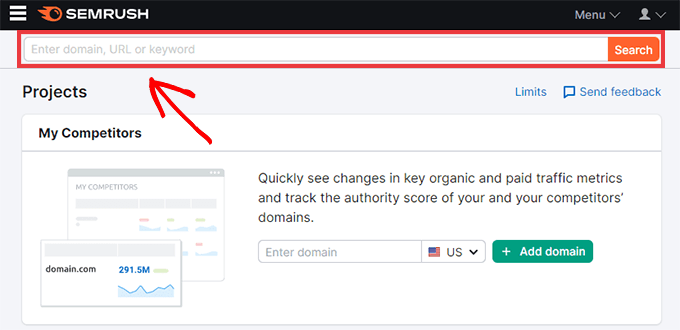
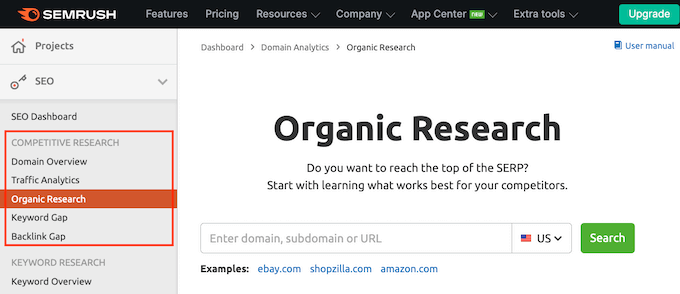
Semrush is one of the best SEO Tools on the market. It is a complete SEO suite with tools that can help you do organic research, paid advertising research, keyword research, and in-depth competition analysis.
To get started, simply go to the Semrush website. Then type a keyword into the ‘Enter domain, keyword or URL’ field.
If you don’t already have some keywords in mind, then you can use any word or phrase related to your business. For example, if you run an eCommerce site that sells headphones, then the word ‘headphones’ might be a solid starting point.
Click on the ‘Start now’ button and Semrush will display lots of information about the keyword you just entered.
This include the CPC for paid advertising, the number of search results, and search volume.
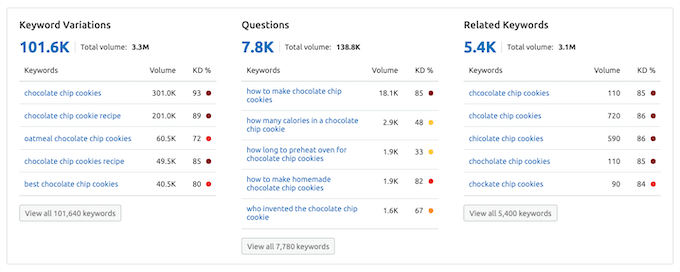
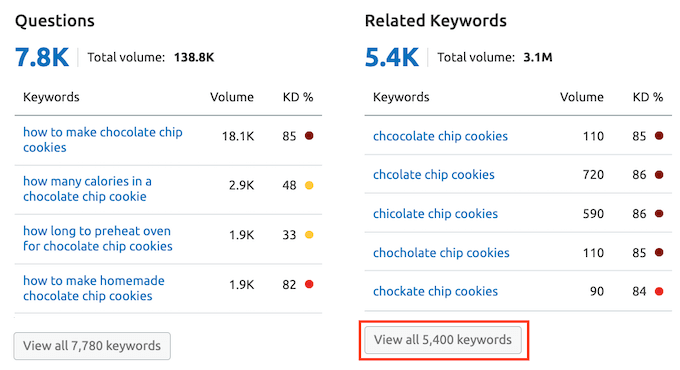
Scroll down a little and you will see a list of related keywords. Related keywords are search terms that are related to the keyword you typed into the Semrush homepage.
Some websites are guilty of stuffing the same keyword into their content over and over again, in an attempt to rank for that keyword. This makes your content more difficult to read.
In fact, Google may even give your website a penalty if they suspect you’re using these tactics. This can lower your position in the search engine rankings.
By adding lots of related keywords to your content, you can show the search engines that you’re writing about your chosen topic in a genuine, detailed way. For this reason, it’s smart to add related keywords to your content wherever possible.
To see the full list of related keywords, click on the ‘View all…’ button.
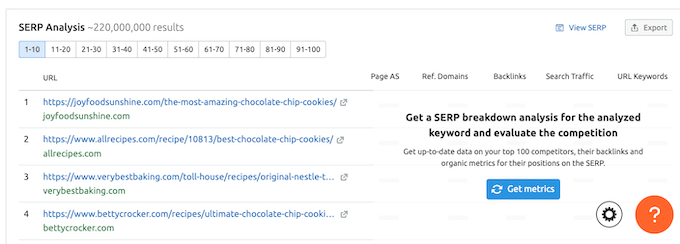
Next, scroll down to the SERP Analysis section. SERP stands for search engine results page. This is the page that the search engines display after a user searches for a word or phrase.
The SERP Analysis section displays the list of top search results for the keyword that you originally entered.
If you want to rank for this keyword, then these sites are your biggest competition.
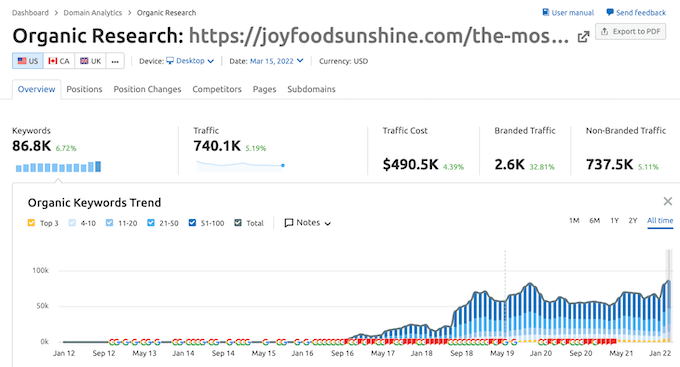
To view a detailed Organic Report for each result, simply click on its URL.
By analyzing this report, you can better understand why this page ranks so highly for this particular keyword.
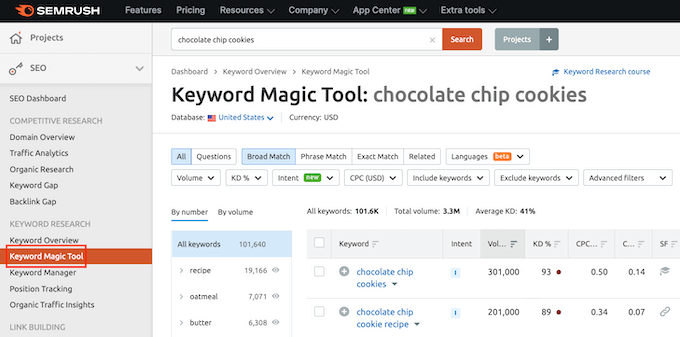
If you want to learn more about the related keywords, then Semrush has a Keyword Magic Tool. This gives you fast access to information about a wider range of related keywords.
To see this tool in action, click on Keyword Magic Tool in the Semrush sidebar.
When you spot a promising keyword, you can click on its add (+) icon. This will add this word or phrase to Semrush’s keyword analyzer where you can learn even more about it.
Once you have figured out the best keywords with the highest search volume, the next step is analyzing competition for those words or phrases. If a keyword has a huge search volume but very high competition, then you may struggle to earn a cut of that traffic.
To see a detailed analysis, click on the links that are already ranking for your chosen keyword. You can also see the backlinks for that URL, other keywords that page ranks for, and an estimate of how much search traffic this link gets.
Overall, Semrush is the best keyword research tool on the market. It not only gives you keyword ideas, it also helps you find out how you can rank for those keywords.
Even better, Semrush integrates with All in One SEO (AIOSEO) to help you find and research related keywords directly in your WordPress dashboard.
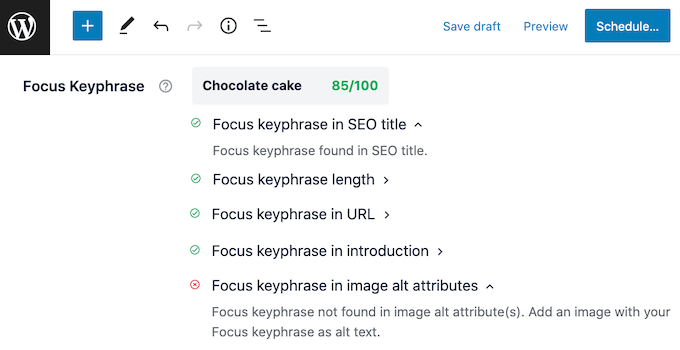
When you’re creating a page or post in WordPress, simply scroll down the page to AIOSEO’s Focus Keyphrase section. You can then enter the keyword that you want to target with this content.
Then, click on the Add Focus Keyphrase button. AIOSEO will now scan your content and give you an SEO score. This is an easy way to make sure it’s optimized for the phrase that you want to rank for.
AIOSEO will also suggest ways to improve your score.
These tips can help you rank for your focus keyphrase.
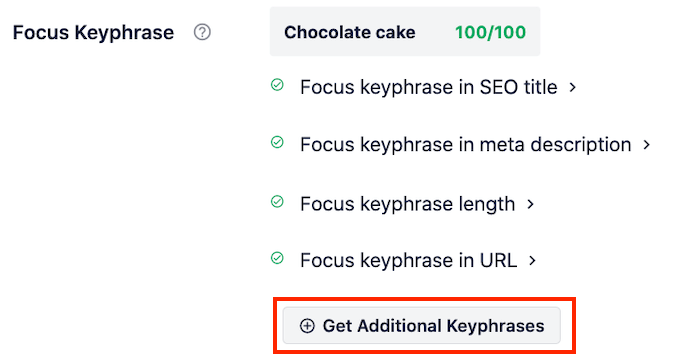
The Semrush integration also makes it easy to discover related words and phrases.
To start, simply click on the Get Additional Keyphrases button. This launches a popup where you can log into your Semrush account.
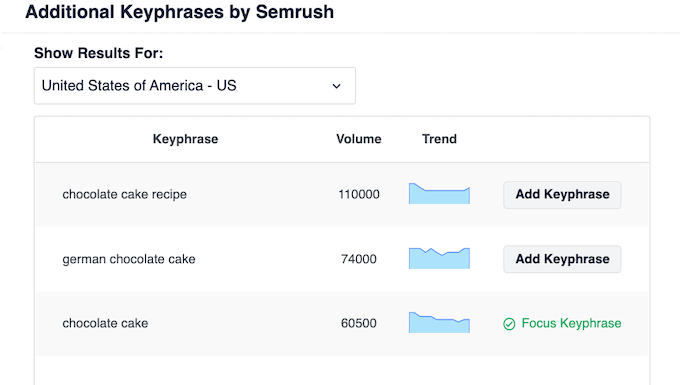
After connecting your Semrush account to AIOSEO, you can explore the related keywords inside your WordPress dashboard.
AIOSEO will even display the search volume and trends for each related keyphrase. This can help you pinpoint the terms that could deliver the most visitors to your website.
If you have AIOSEO Pro, you’ll also see an Add Keyphrase button. This makes it easy to add any keyphrase to your post.
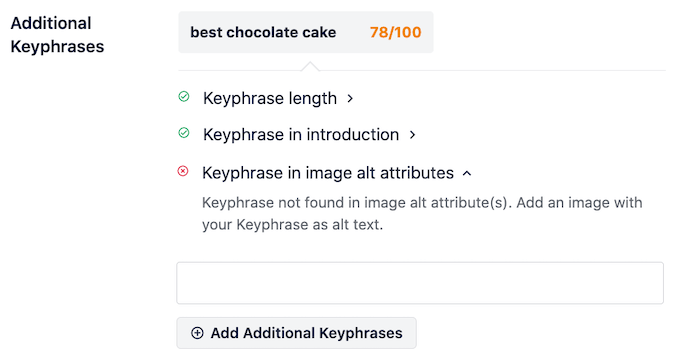
After adding a related keyword, AIOSEO will check all of your content for this new phrase. It will then give you a score, which reflects how well you’re targeting the related keyword.
AIOSEO will even give you feedback and suggestions on how to improve your content. By following these recommendations, you’ll stand the best possible chance of ranking for this additional keyphrase.
Ahrefs is one of the most powerful keyword research tools on the market. It helps you learn why your competitors are ranking so high, and what you need to do to outrank them in search results.
Ahrefs crawls more than 6 billion pages every day, with over 22 trillion links in their index from over 170 domain names. That’s a lot of data, but the real beauty is how the Ahrefs platform helps you use this data to perform keyword research.
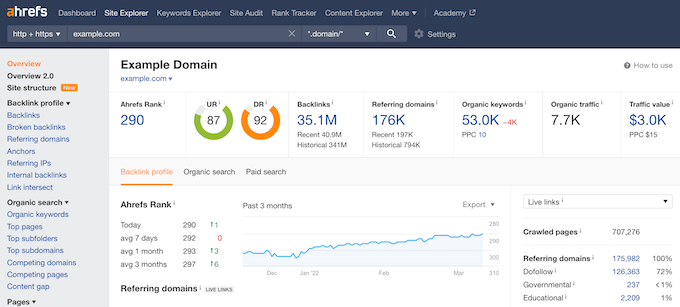
Ahrefs has a user-friendly interface that breaks this data into different sections. Simply type a domain into the search field and Ahrefs will display a wealth of information in an easy to understand format.
Ahfres will start by showing you an overview of the information for this domain. This includes the total number of backlinks, referring domains, organic keywords, and content review. You can click on any of these sections to learn more.
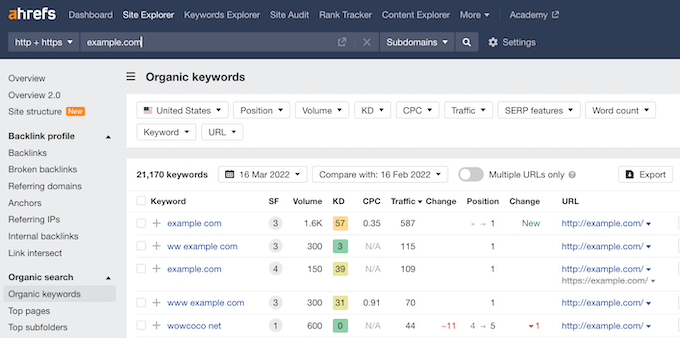
There is lots to explore. You can see one of the most useful reports by clicking on ‘Organic Keywords.’ This will display a list of keywords for the domain name along with search volume, search rank, URL, and more.
If you want to generate some keyword ideas, then start entering phrases or words into the search box. This can be anything from the name of your top-selling product, to a new buzzword in your industry.
Ahrefs’ keyword explorer tool will then generate a list of keyword suggestions, along with their search volume, difficulty score, and clicks. We recommend looking for keywords that have a high search volume, and a lower difficulty score.
Ahrefs also comes with powerful tools for content analysis, rank tracking, web monitoring, and more. You can export all reports in CSV or PDF format and then work on them in your favorite spreadsheet software.
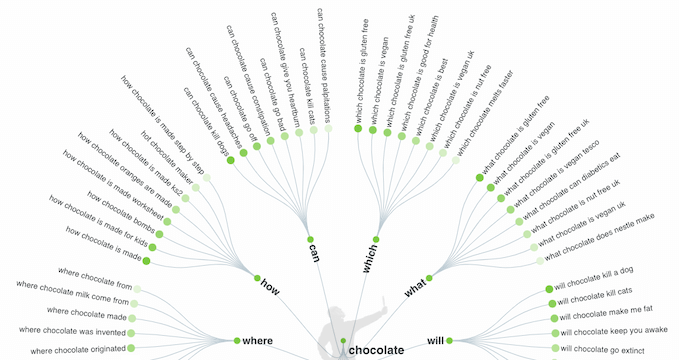
AnswerThePublic is a free visual keyword research and content ideas tool. It uses Google and Bing’s auto-suggest features, and presents this data in a format that’s easier to understand.
To get started, simply visit the AnswerThePublic website and enter a keyword or phrase. The tool will then load related keywords and present them as a visual map.
You can click on any keyword and AnswerThePublic will show this word’s Google search results in a new browser tab. This is an easy way to explore the questions that people are searching for, so you can create content that answers those questions.
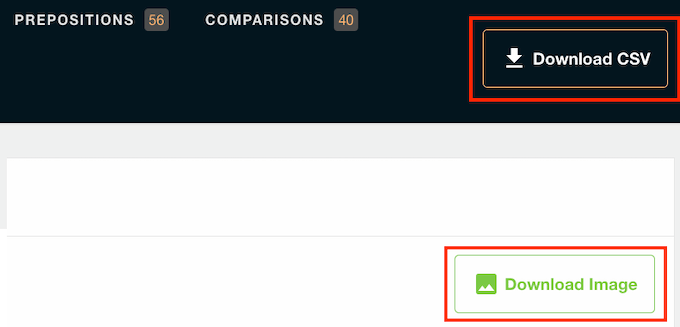
AnswerThePublic presents all its keyword research on a single page. You can also download this data as images.
Another option is exporting AnswerThePublic’s data to a CSV file. You can then explore this data using your preferred spreadsheet software.
More Keyword Research Tips
All the above tools will provide you with a wealth of data.
If you’re unsure where to start, then here’s some tips on how to find the keywords that will deliver lots of traffic to your website.
1. Start With Broader Search Terms
Keyword research isn’t about finding the perfect search terms on your first try.
After all, there’s a reason why it’s called research!
It often makes sense to start with more general, vague search terms. This could be the name of your products, company, or important topics within your industry.
You can then explore the results, and refine your potential keywords. If you’re using AIOSEO, then you can use the Additional Keyphrases feature to easily find related keywords.
You can then view the search volume and trends for these related words and phrases. This can help you find new keywords that could potentially bring lots of high-converting, highly-focused traffic to your website.
2. Do Competitor Research
Competitor research is where you use a tool to analyze your own keyword performance and then compare it with your competitors. For more details, please see our guide on how to do an SEO competitor analysis in WordPress.
Some tools can even help you spot opportunities to outperform your competitors. For example, the Semrush sidebar has an entire section dedicated to competitor research.
3. Focus on Search Intent
Search intent is what the user hoped to achieve by searching for this particular keyword.
Some keywords have a very clear search intent. Others are a bit more vague.
Imagine someone types ‘burrito’ into a search engine. This person may want to order takeout, or they might be searching for a burrito recipe. They may even be looking for the definition of the word ‘burrito.’
The search intent is unclear. Even if you manage to rank for this keyword, you may struggle to create content that matches the visitor’s search intent. This is simply because there are lots of different possible search intents for the word ‘burrito.’
Now, think about the search term ‘best vegetarian burrito recipe.’ Here, the search intent is much more clear.
There may be less people searching for this keyphrase, but it’s easier to create content that perfectly matches the search intent.
When it comes to keyword research, there’s always the temptation to use generic search terms that have a huge search volume.
However, it’s important to keep the search intent in mind.
Here, a tool such as AIOSEO can help you find related keywords that have a lower search volume, but a very clear search intent.
How to Apply Keyword Research in Your Business or Blog?
The main goal of keyword research is to find out what your customers are searching for, and then rank for those words in the search results. There are different ways to do that depending on your content strategy.
To start, plan a proper content marketing strategy around the keywords that you want to target. This might involve creating useful content articles, blog posts, infographics, and videos about this keyword.
Business websites can create landing pages, documentation, FAQs and other content targeting their new keywords.
When writing your content, you can enter your target keyword into a tool such as AIOSEO. AIOSEO will then help you optimize your content for this focus keyword.
If you run an online store, then you can also use those keywords in your product titles, descriptions, and product categories. If you’re using WooCommerce for your online store, then please see our step-by-step guide to ranking #1 in Google.
How Do I Track the Performance of My Keyword Research?
Was your keyword research a success? Are you getting more traffic from the search engines, or do you still have work to do?
If you’re going to answer these questions, you’ll need to track your performance.
First, you need to sign up for Google Search Console. This tool provides insights into how Google views your website. You can also use Google Search Console to track the keywords that you rank for and your average position in the search results.
To properly track the performance of your content, you’ll need to add Google Analytics to your WordPress website.
Do you want to change the category base prefix in WordPress?
By default, WordPress automatically adds /category/ as a prefix to URLs for all category pages. However, you can easily change the category base prefix or completely remove it.
In this article, we will show you how to change the category base prefix in WordPress.
What is Category Base Prefix? Should You Change It?
Each category on your WordPress site gets its own page and RSS feed. You can view all posts filed under a category by visiting that category archive page.
By default, WordPress adds ‘category’ as a base prefix to URLs for category pages. This helps differentiate pages and posts from category and tag archives.
For example, if you have a category called ‘News’ then its URL will look like this:
https://ift.tt/2oTXCzh
Similarly, WordPress also adds tag prefixes to URLs for tag archives.
https://ift.tt/2A63sMQ
This SEO-friendly URL structure helps users and search engines understand what kind of page they are visiting.
Most websites don’t need to change the base prefix at all. However, if you are creating a niche site where you would like to use a different word or phrase for your categories, then you can change the category base prefix to reflect that.
Changing Category Base Prefix in WordPress
Changing the category base prefix is quite simple in WordPress.
You need to visit the Settings » Permalinks page from your WordPress dashboard and scroll down to the ‘Optional’ section.
In the ‘Category base’ field, you can enter the prefix you would like to use next to the category base option. You can also change the tag base prefix if you want.
For example, you can add ‘topics’ as the new prefix. In this case, your category URLs will look like this:
https://ift.tt/gcN7R1x
Don’t forget to click on the ‘Save Changes’ button to store your settings.
Removing Category Base Prefix from URLs
Many of our users have asked us about removing the category base prefix from WordPress URLs altogether. This will change your category URLs to look like this:
https://ift.tt/c27ERvC
This is not a good idea, and we recommend that you do not remove category base prefix.
The category base prefix helps both users and search engines distinguish between posts/pages and categories. Removing the prefix makes your URLs ambiguous, which is not good for user experience or WordPress SEO.
You may also run into technical issues with various WordPress plugins. For example, if you have a category and a page with the same name or when you are using %postname% as your URL structure for single posts, then your site will experience an infinite redirect loop causing the pages to never load.
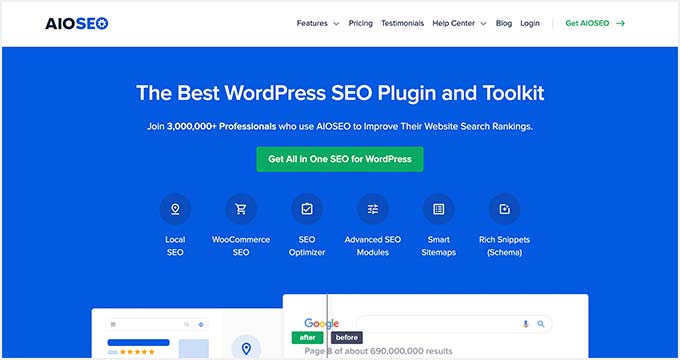
It is the best SEO plugin for WordPress and makes it super easy to optimize your website for search engines. Plus, it gives you an option to strip the category base prefix with a click of a button.
For this tutorial, we’ll use the AIOSEO Pro license because it includes the feature to remove category base and other powerful options like the redirection manager and link assistant. There’s also a free version of AIOSEO that you can use.
First, you’ll need to install and activate the AIOSEO plugin. For more details, please see our guide on how to install a WordPress plugin.
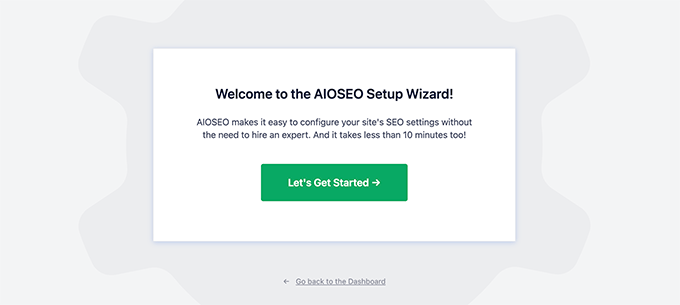
Upon activation, you’ll see the AIOSEO setup wizard. Simply click the ‘Let’s Get Started’ button. You can see our guide on how to setup All in One SEO for WordPress for more information.
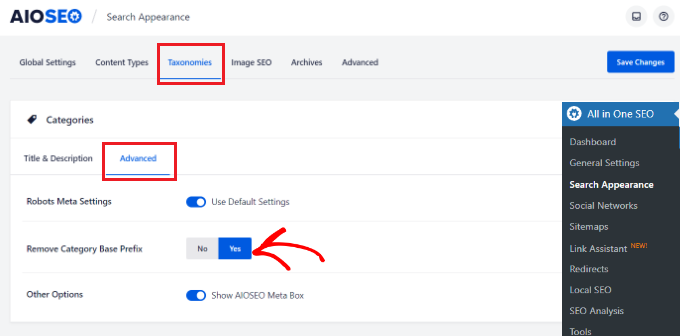
Next, you can head over to All in One SEO Search » Appearance from your WordPress admin panel and click on the ‘Taxonomies’ tab.
After that, go to the Categories section and switch to the ‘Advanced’ tab. From here, simply click the toggle to Yes for ‘Remove Category Base Prefix’ option.
Don’t forget to click the ‘Save Changes’ button when you’re done.
Setting Up Redirects After Changing Category Base Prefix
If you are changing or removing the category base prefix on a new WordPress website, then you don’t need to do anything. However, if you are doing this on an existing website, then users visiting the old category page will see a 404 error.
To fix this, you will need to set up a redirect to make sure both search engines and regular visitors are properly redirected to the correct category page on your site.
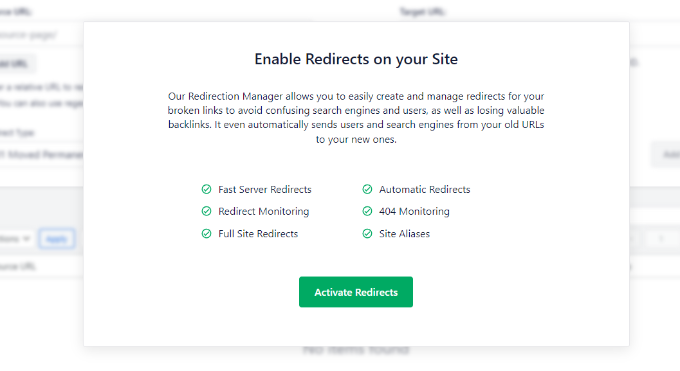
The easiest way of setting up redirection in WordPress is by using the All in One SEO (AIOSEO) plugin.
To start, you can go to All in One SEO » Redirects from the WordPress admin panel and then click the ‘Activate Redirects’ button.
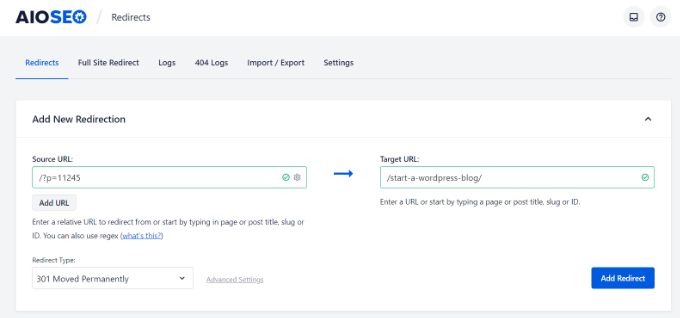
Once it’s active, you can go to the ‘Redirects’ tab to setup redirection.
Simply enter the URL you want to redirect under the ‘Source URL’ field and the new location for the link under the ‘Target URL’ field.
As for the Redirct Type, you can select ‘301 Moved Permanently’ from the dropdown menu. This will permanently move your old category pages to the new destination.
Don’t forget to click the ‘Add Redirect’ button when you’re done.