Wednesday, August 3, 2022

How to Set Up Automated Drip Notifications in WordPress

Do you want to send a series of automated drip notifications to your subscribers?

Automated drip campaigns are great for welcoming new users and boosting engagement on your WordPress site. You can use them to guide your users along a specific journey.

In this article, we’ll show you how to setup automated drip notifications in WordPress using both push notifications and email notifications.

Setup drip notifications in WordPress

When Should You Use Automated Drip Notifications in WordPress?

Drip notifications are automated messages that are sent to your subscribers, usually in the form of a push notification or an email.

These messages are part of a series, and they are automatically triggered to send at a predefined interval. In other words, they are ‘dripped’ to your subscribers over time rather than ‘poured out’ all at once.

You can use drip campaigns to promote a product, get more pageviews to your WordPress blog, build a relationship with your users, increase sales, and even teach a course over a specific period of time.

Here are a few use-cases to get the most out of automated drip campaigns in WordPress:

  • You can send an automatic welcome drip notification to new subscribers and customers. This way, you can educate users about your products and services and build brand trust.
  • If you’re running an eCommerce store, then having automated drip notifications setup can help upsell and cross-sell different products upon purchase.
  • You can promote your most important content and get people to revisit your website.
  • Using drip notifications, you can show targeted messages to people from different regions. This helps get more conversions based on geographic segmentation.
  • You can get people to register for your webinars and upcoming events using automated drip notifications.

In this guide, we’ll cover push notifications and email drip campaigns:

That said, let’s see how you can set up drip notifications in WordPress.

How to Set Up an Automated Push Notification Drip Campaign

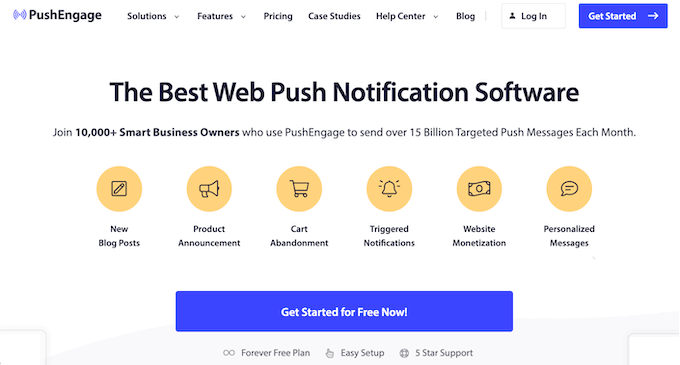
The easiest way to setup automated push notifications is through PushEngage. It’s the best web push notification software for WordPress, and over 10,000 businesses use it to send targeted messages.

First, you’ll need to visit the PushEngage website and click the ‘Get Started for Free Now’ button.

The PushEngage push notification software

Next, you’ll need to select a pricing plan that meets your needs. PushEngage offers a free plan that includes 30 campaigns and up to 200 subscribers.

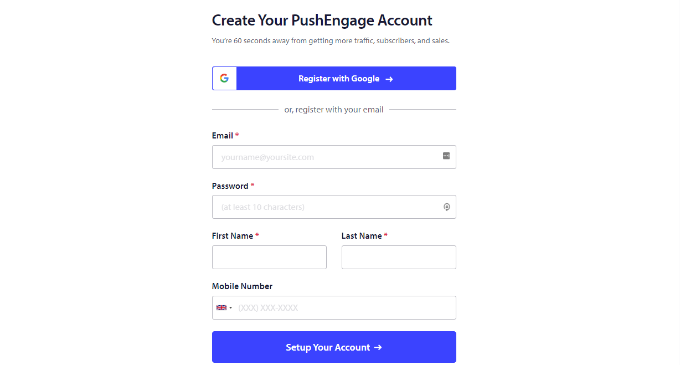
After selecting a pricing plan, you can create an account or register with a Google account.

Create an account on PushEngage

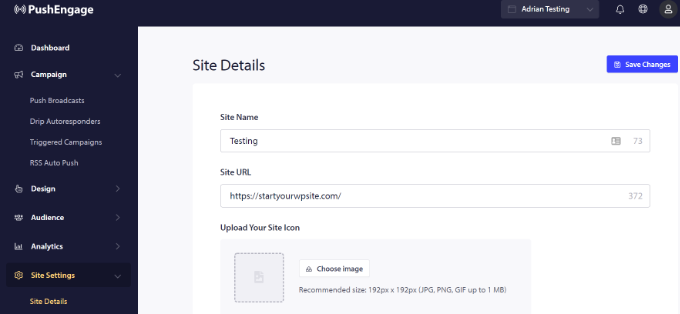
Upon signing in to your account, you’ll see the PushEngage dashboard.

The tool will then take you to Site Settings » Site Details and ask you to enter your website details, like site name, domain name, site icon, and more.

Enter website details

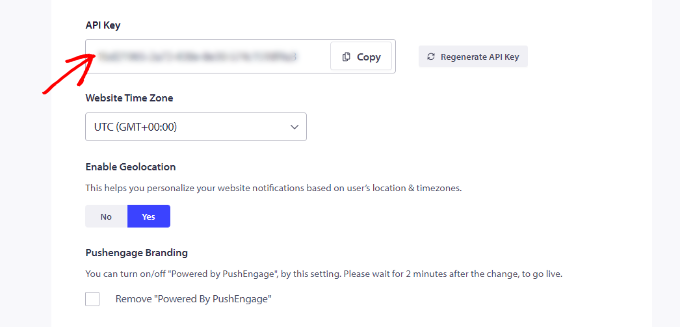
If you scroll down further in the ‘Site Details’ section, you can generate the API key for connecting your WordPress site with PushEngage.

Go ahead and copy the API key and paste it into a Notepad file for safekeeping. You’ll need it in the next step.

Copy the API key

Next, you’ll need to connect your WordPress website with PushEngage.

First, you’ll need to install and activate the PushEngage WordPress plugin. If you need help, then please see our guide on how to install a WordPress plugin.

Upon activation, look for PushEngage in your WordPress dashboard menu and click the ‘Setup’ tab.

Go to PushEngage plugin

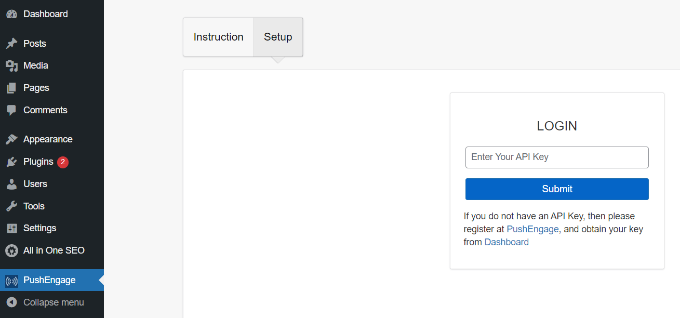
Next, you’ll need to enter the API key you just copied into the field labeled ‘LOGIN.’

After entering the API key, simply click the ‘Submit’ button.

You should now see more settings in the PushEngage section of the WordPress dashboard.

Subscription box settings

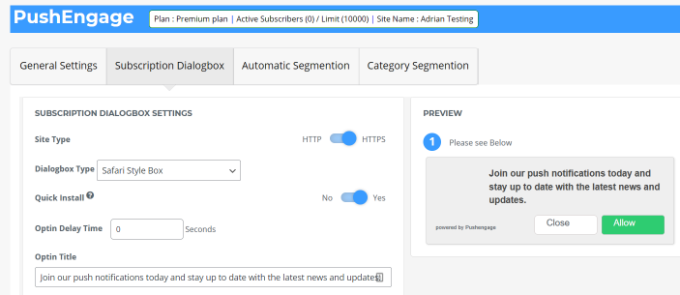
You’ll see options to automatically send push notifications whenever a new post is published, set up UTM parameters, customize the subscription dialog box text, and more.

You can follow our detailed guide on how to add web push notifications to your WordPress site for more details.

Next, you can setup automated drip notifications using PushEngage. For this example, we’ll create a welcome campaign for new subscribers.

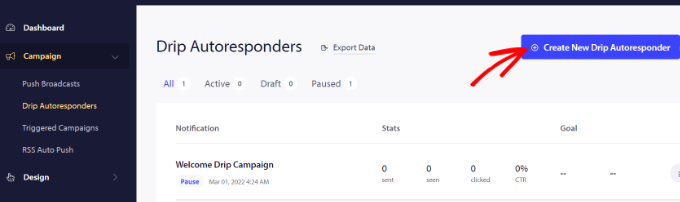
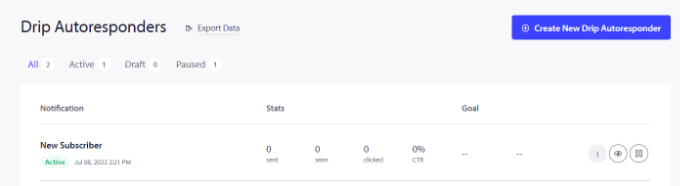
To start, you will need to head to your PushEngage dashboard, not the WordPress admin dashboard. Find Campaigns » Drip Autoresponders and then click the ‘Create New Drip Autoresponder’ button.

Create a new drip autoresponder

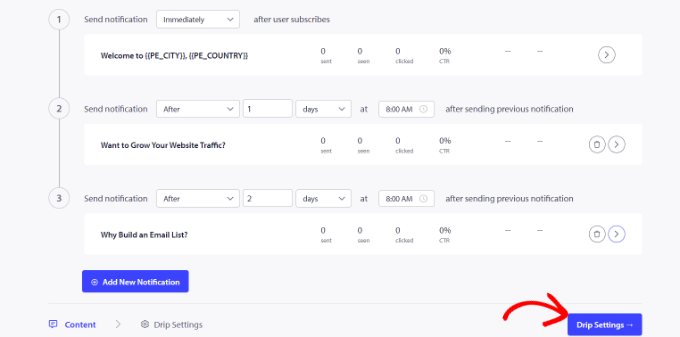
After that, you can add different push notifications and edit the content you want to display.

Go ahead and click the arrow at the end of the notification to see more options.

For each notification, you can change the notification title, message, URL, icon image, and more by expanding each notification. There’s also a preview of how your notifications will look in the browser.

Edit your push notifications

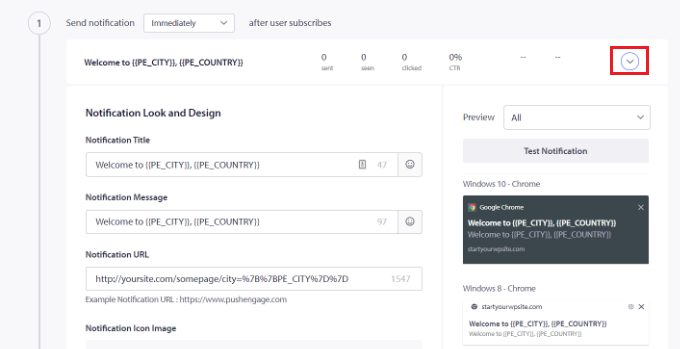
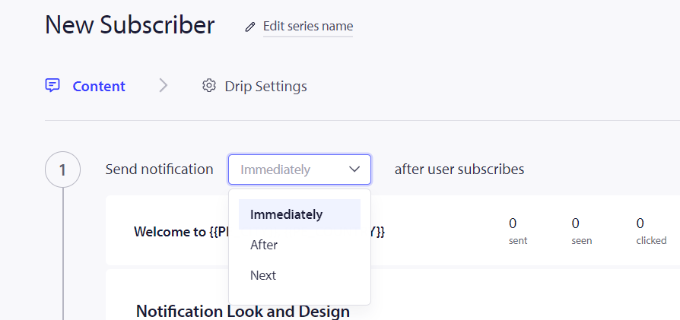
PushEngage also lets you choose when to send each notification. For example, you can send the first notification immediately and select a different time for the following notification.

To select when you’d like to send the push notification, simply click the ‘Send notification’ dropdown menu.

Select when to send the notification

To add another notification to the drip campaign, simply click the ‘Add New Notification’ button.

Once you’ve added all the notifications, simply click the ‘Drip Settings’ button.

Edit drip settings

Next, you can choose whether you’d like to send the notifications to all your subscribers or a specific audience group that you create.

PushEngage lets you segment your subscribers and create different groups. For this tutorial, we choose the ‘Send to All Subscribers’ option.

Select user segment and activate autoresponder

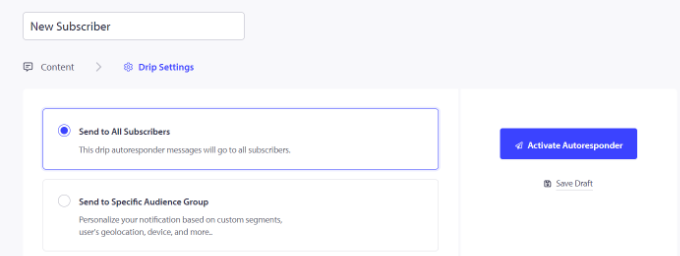
After that, you can simply click the ‘Activate Autoresponder’ button to enable automated push notifications for your WordPress website.

You can then go to Campaigns » Drip Autoresponders from your PushEngage dashboard and see the drip notifications as ‘Active’.

See active status

That’s it! You’ve set up an automated push notification drip campaign for your site.

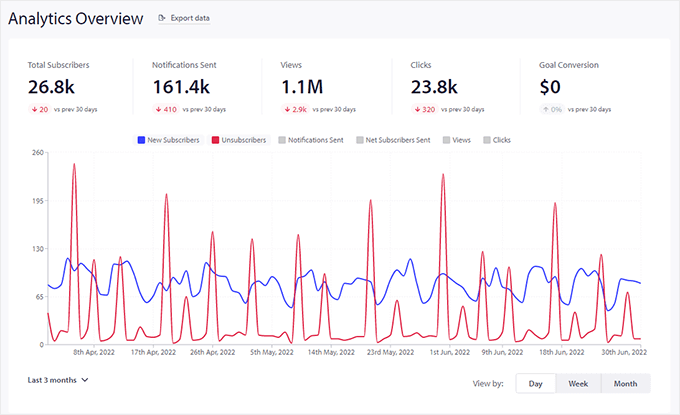
Now you’ll be able to get detailed stats on its performance in the Analytics section of your PushEngage account.

PushEngage analytics overview

Set Up Automated Drip Notifications Using an Email Marketing Tool

Another way you can create automated drip notifications in WordPress is by using an email marketing tool.

We recommend using Constant Contact because it’s the best email marketing service on the market. It’s super easy to use and offers a drag-and-drop email builder.

However the drip email notification functionality exists in all major email marketing platforms including Sendinblue, HubSpot, and others.

You can set up email automation in just a few clicks and send email series to your subscribers with ease. Plus, Constant Contact integrates with WordPress plugins like WPForms and OptinMonster.

It even works with eCommerce platforms like WooCommerce and Shopify, so you can automate emails for new customers or help recover abandoned carts.

To start, you can visit the Constant Contact website and create an account. The best part about using this software is that you get a 60-day free trial. This way, you can try out the tool before committing to a premium plan.

Constant Contact Website

If you use our Constant Contact coupon code, then you can also get 20% off by purchasing upfront.

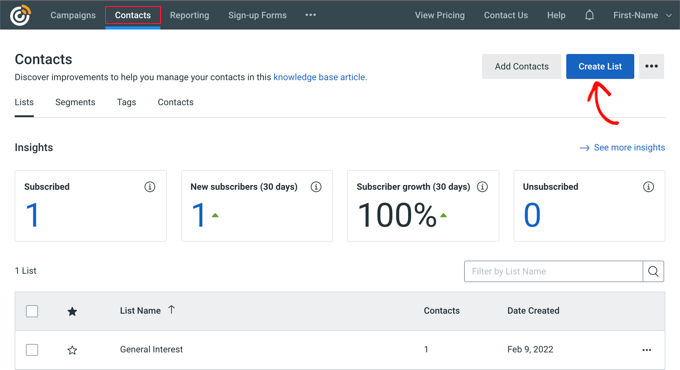
After creating an account, you can visit the Constant Contact dashboard to create a contact list.

Constant Contact will have already created a default list for you. However, you can create your own list by going to the ‘Contacts’ tab in the top menu, and then clicking the ‘Create List’ button.

Creating a New Email List

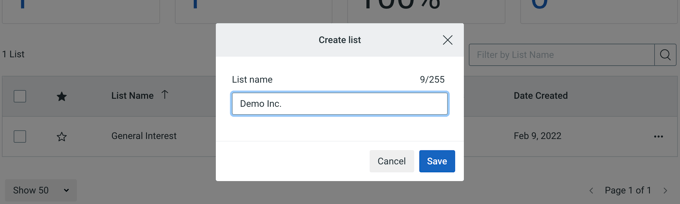
Next, a popup window will appear where you’ll need to enter a name for your list.

Simply click the ‘Save’ button after entering a name.

Choose a Name for Your Email List

After that, you can add contacts to your email list.

You can manually add contacts by going to the ‘Contacts’ tab and clicking the ‘Add Contacts’ button.

Email List Created

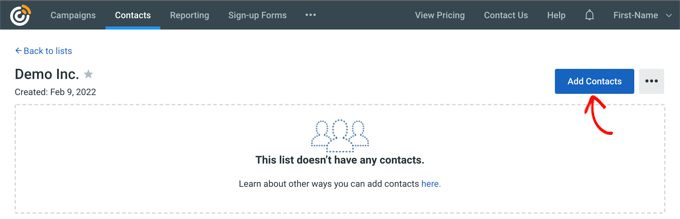
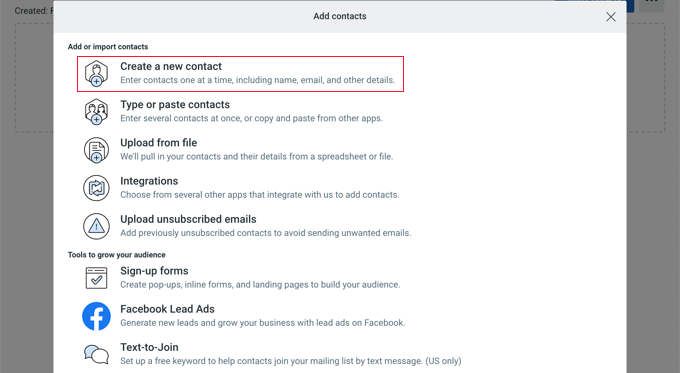
A popup window will open with multiple options for adding new contacts.

You can connect your WordPress newsletter form with Constant Contact and start building an email list. For more details, see our guide on how to add email subscriptions to your WordPress blog.

Alternatively, you can manually create new contacts, upload a spreadsheet or CSV file, or integrate with lots of other platforms to import saved email addresses.

Add Contact to Your Email List

Now that you’ve added subscribers to your Constant Contact list, the next step is to create an automated drip campaign.

To do that, head over to the ‘Campaigns’ tab and then click the ‘Create’ button.

Create Welcome Email Campaign

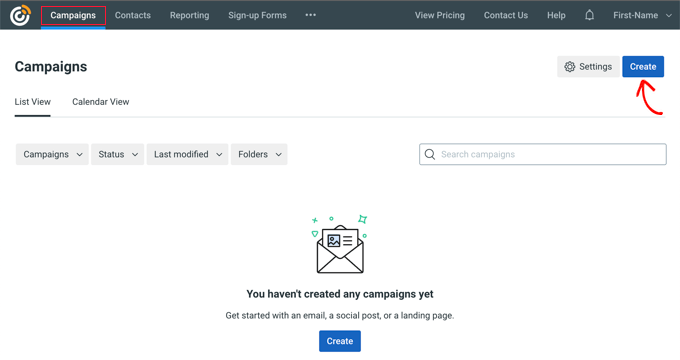
Next, Constant Contact will show you multiple options for creating a campaign.

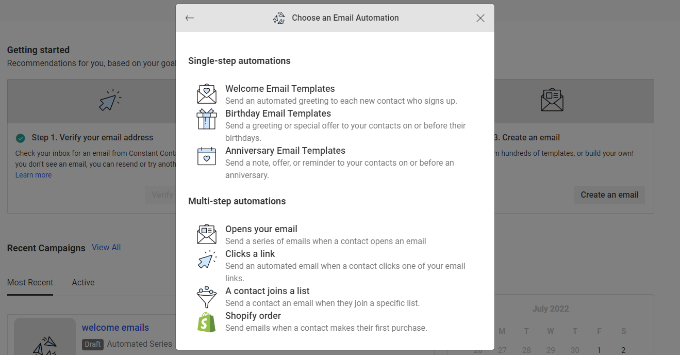
Go ahead and select the ‘Email Automation’ campaign.

Email Automation Campaign

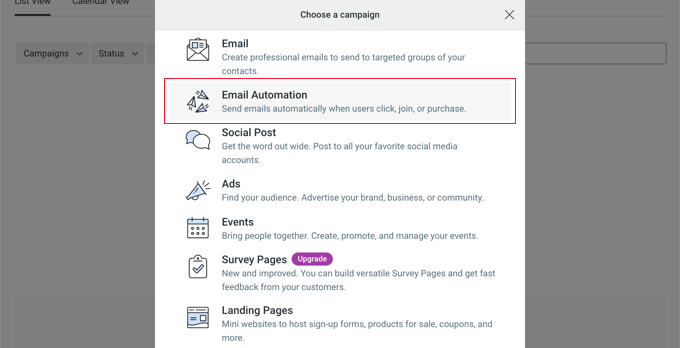
From here, you can select single-step automations or multi-step automation.

In single-step automation, you can only send 1 email to your subscribers and not drip more emails. For instance, you can send a welcome email or a special offer to new subscribers.

On the other hand, multi-step automation lets you create a series of emails that are automatically sent to your subscribers. This way, you can educate users about your products and services or send special offers over a period of time.

Let’s create multi-step automation when new subscribers join your email list. Go ahead and select the ‘A contact joins a list’ option.

Choose an email automation

Next, you will have to enter a name for your campaign.

Once that’s done, simply click the ‘Save’ button.

Name the Automated Series

Constant Contact will then ask you to choose what activity will trigger the email. For example, the drip series is automatically triggered when a user joins your email list, opens an email, clicks a link, or buys a product.

You can use the default ‘Contact joins a list’ option as the trigger type. Then you can choose the email list you created earlier.

Choose contact list

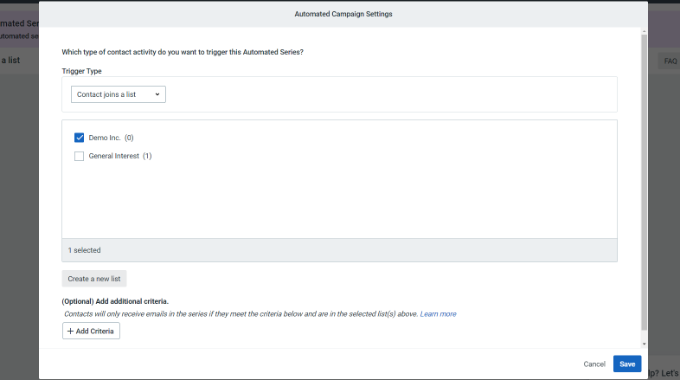
Go ahead and click the ‘Save’ button when you’re done.

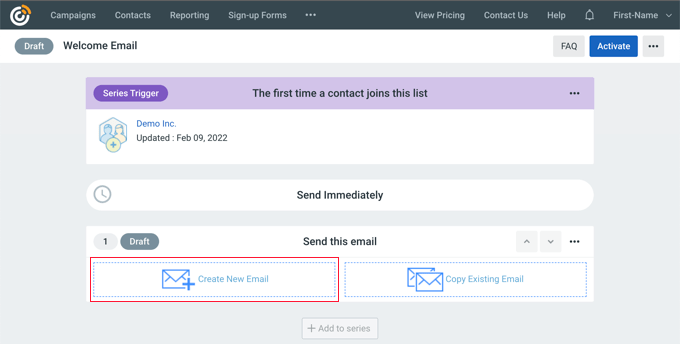
Next, you’ll need to create the emails to send in your automated drip campaign. The first one you create will send automatically to the user upon sign-up.

To begin, simply click the ‘Create New Email’ option.

Create a New Email

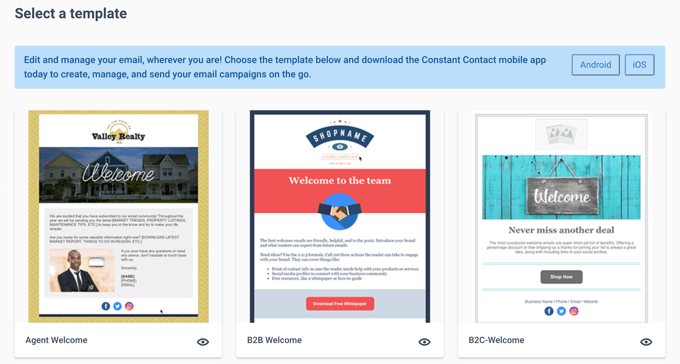
Constant Contact will now show different email templates to choose from.

Go ahead and select a template for your email. We’ll use the ‘Agent Welcome’ template for this tutorial.

Select Welcome Email Template

Next, you can customize the email template using the drag-and-drop email builder.

You can choose multiple elements from the menu on your left and place them on the template. If you have ever used a page builder like SeedProd, then you will feel right at home.

You can also click the ‘Untitled Campaign’ in the top left corner to rename your campaign.

Creating Welcome Email

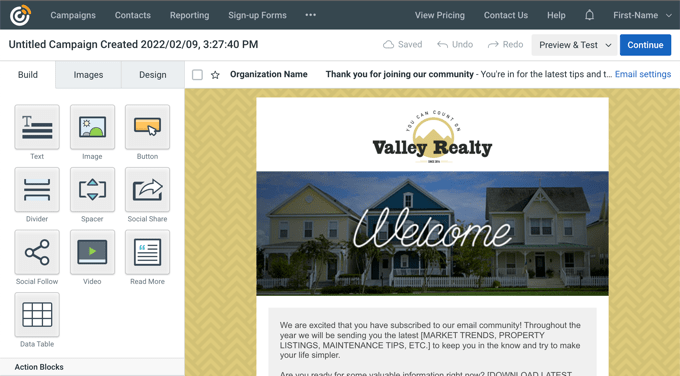
At this point, you will not only style and customize the template, but you will also add the content to the email for the drip campaign. Be sure to check over the entire message and remove placeholder content and replace it with your own.

After you’re done, simply click the ‘Continue’ button at the top right of the editor.

Your email will now be added to the automated series. Simply click the ‘+ Add to series’ button to add another email to the drip campaign.

Now, click the ‘Create New Email’ button once again.

Add another email to series

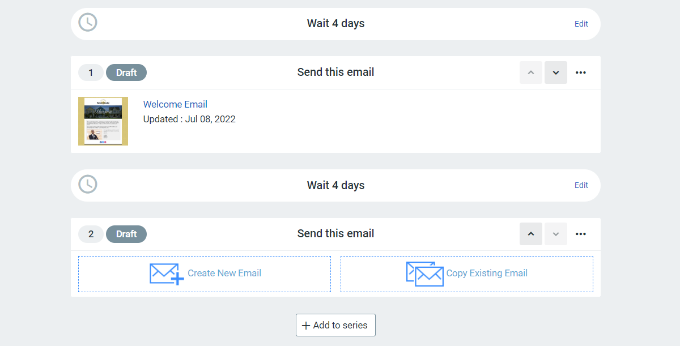
After that, you can select a new template and customize this new email as you did in the step above.

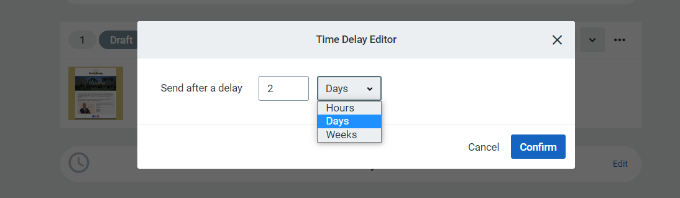
After you have customized that email to your liking, you can set the delay before the drip campaign sends its next email.

By default, this value is set to 4 days. To change this, just click the ‘Edit’ button in front of the section titled ‘Wait 4 days.’ This will open the ‘Time Delay Editor’ where you can choose when the next email in the drip campaign will be delivered.

The tool lets you choose intervals of days, hours, or weeks. You can click the ‘Confirm’ button when you’re done.

Change time delay

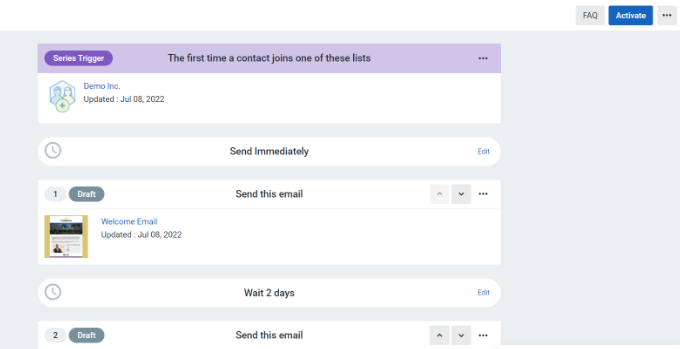
Now, you should see all your emails in the campaign summary area.

Go ahead and click the ‘Activate’ button in the upper-right corner to launch your campaign.

Activate your campaign

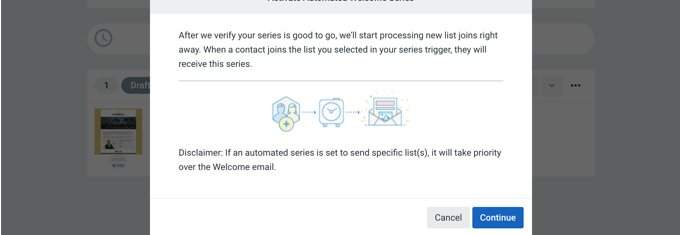
Constant Contact will then show a prompt to verify if you want to activate your campaign.

Simply click the ‘Continue’ button, and the tool will check if everything is working properly and activate your campaign.

Verify and launch your campaign

You’ve now successfully launched an automated drip notification campaign using an email marketing tool.

You can also follow our step-by-step guide on how to create an email newsletter in WordPress. If you need help getting more subscribers, then see our guide on how to grow your email list.

We hope this article helped you learn how to setup automated drip notifications in WordPress. You may also want check out our expert pick of the best WordPress plugins, and our ultimate WordPress SEO guide to improve your SEO rankings.

If you liked this article, then please subscribe to our YouTube Channel for WordPress video tutorials. You can also find us on Twitter and Facebook.

The post How to Set Up Automated Drip Notifications in WordPress first appeared on WPBeginner.


August 03, 2022 at 03:11PM

Tuesday, August 2, 2022

How to Easily Add Emojis in Your WordPress Blog

Do you want to add emoji support to your WordPress blog?

Using emojis in WordPress is super easy because WordPress has built-in emoji support. You can use emojis in WordPress anywhere without installing any separate plugins.

In this article, we’ll show you how to easily use emojis in WordPress on different devices.

Easily add and use Emojis in WordPress

What are Emojis?

Emojis are tiny image icons that can be used in line with text to express emotions and other expressions.

Using emojis on the web

Emojis came from the textual representation of facial expressions in online communications. In the early days of the internet, text and punctuation were used to represent facial expressions, and these were called smileys.

Gradually, this evolved into graphical representations of those expressions. They were called several names Emoticons, Emojis, Twemojis, and more.

They have been around since the late 90s and were gradually adapted by different platforms on the web and mobile devices.

WordPress added support for modern emoji characters in WordPress 4.2. Before that, you needed a separate WordPress emoji plugin to add emoji on your WordPress website.

That being said, let’s look at how to add emojis in WordPress.

Using Emojis in WordPress on Windows

Simply edit the post or page where you want to insert emojis. In the WordPress content editor, click on a text area and then press the Windows + . (Period) shortcut keys on your keyboard.

Adding emojis in WordPress on Windows computers

This will bring up a popup showing emojis. You can search for emojis you want to use or browse them.

Once you have found the Emoji that you want to use, click to insert it into the text area.

Using Emojis in WordPress on Mac

Once again, you need to edit the post, page, or any other text edit area on your WordPress blog.

Click to ensure the cursor is inside a text area, and then press the Command + Control + Space keys together.

Inserting emojis in WordPress on a Mac computer

This will bring up a popup where you can browse and look for emojis. Once you find the emoji you want to use, you’ll need to double-click to insert it into your text.

Using Emojis in WordPress on iOS and iPadOS

If you are working on your WordPress website using iPhone or iPad, then you can easily switch to the emoji keyboard on your device to add emojis.

Simply login to WordPress on your iOS or iPad device. Edit the post or page where you want to use emojis and tap on a text area. You’ll now see the native keyboard appear on screen.

Emoji button in iOS

Now tap the Emoji button to switch to the Emoji keyboard. Your device will show emojis that you can add.

iOS emoji keyboard

You can browse emojis by category or search for an emoji icon. Once you have found the emoji, simply tap to insert it into your post.

You can then tap on the ABC button to switch back to the text keyboard.

Using Emojis in WordPress on Android

Android phones and tablets also come with built-in support for emojis.

Simply edit the WordPress post or page where you want to use emojis. On the edit screen, tap on a text area and your device’s native keyboard will appear.

On the keyboard, tap on the Emoji button to switch to the Emoji keyboard.

You’ll now see the emoji keyboard where you can search or browse to find the emoji that you want to add.

Android Emoji keyboard

Simply tap on the emoji to add it to your WordPress post.

You can switch back to the text keyboard by taping on the ABC button.

How to Disable Emoji in WordPress

You can turn off Emoji support in WordPress by using the Disable Emojis plugin. For more details, see our step by step guide on how to install a WordPress plugin.

Disable Emojis plugin disables Emoji functionality in WordPress. However, you can still add emojis in all modern web browsers.

The plugin only disables the DNS prefetching of emojis within WordPress. This is done to improve privacy and make a WordPress website more GDPR compliant.

We hope this article helped you learn how to use Emojis support in WordPress. You may also want to see our beginner’s guide to WordPress keyboard shortcuts or see our pick of the most useful WordPress plugins for all websites.

If you liked this article, then please subscribe to our YouTube Channel for WordPress video tutorials. You can also find us on Twitter and Facebook.

The post How to Easily Add Emojis in Your WordPress Blog first appeared on WPBeginner.


August 02, 2022 at 03:00PM

Monday, August 1, 2022

How to Easily Integrate Shopify with WordPress (Step by Step)

One of our readers recently asked if it was possible to integrate Shopify in your WordPress website?

Using Shopify with WordPress allows you to combine the eCommerce features of Shopify with the powerful website platform on the planet, WordPress. This gives you more flexibility and freedom to grow your business.

In this article, we’ll show you how to easily connect Shopify with WordPress to grow your business.

Using Shopify with WordPress

Here is a quick overview of the topics we’ll cover in this article.

Let’s get started.

Why Use Shopify with WordPress?

WordPress is the best website builder in the world powering more than 43% of all websites on the internet.

It is incredibly easy to use and gives you access to thousands of free and paid WordPress themes and plugins (apps for your WordPress website).

On the other hand, Shopify is a popular eCommerce platform that helps you easily sell products online.

You can use WordPress with WooCommerce to create your online store, but some users may want to use Shopify for their online store and WordPress for their website.

For more details, see our comparison of Shopify vs WooCommerce with the pros and cons of both platforms.

Combining Shopify and WordPress gives you the advantages of both platforms. You can sell products with Shopify while enjoying the flexibility and freedom of WordPress to manage your website.

That being said, let’s take a look at how to easily use Shopify with WordPress.

What Do You Need to Get Started?

If you don’t have a Shopify store, then you can go ahead now and create your Shopify store. You can quickly add a few products and then come back here.

Shopify website

Next, you’ll need to set up your WordPress website.

There are two types of WordPress. First, there is WordPress.com which is a website hosting service. Then you have WordPress.org also called self-hosted WordPress.

You’ll need WordPress.org because it gives you instant access to all WordPress features out of the box. For more details, see our comparison of WordPress.com vs WordPress.org.

To make a WordPress.org website, you’ll need a domain name (like wpbeginner.com) and a web hosting account.

A domain name costs around $14.99 per year, and website hosting plans start at $7.99 per month (usually paid yearly).

Our friends at Bluehost have agreed to offer WPBeginner users a free domain name with a generous discount on hosting. Basically, you can get started for $2.75 per month.

Once you have signed up for Bluehost, they’ll automatically install WordPress for you.

You’ll see your WordPress site under the My Sites section in your Bluehost account.

Bluehost dashboard

Simply click on the ‘Log into WordPress’ button to access your WordPress admin dashboard.

It would look something like this:

WordPress dashboard

Connecting WordPress to Your Shopify Store

Now, the next step is to connect your WordPress website to your Shopify store.

For that, you’ll need the ShopWP plugin. It is a Shopify plugin for WordPress that allows you to easily connect WordPress to your Shopify account.

First, you need to install and activate the ShopWP plugin on your WordPress site. For more details, see our step by step guide on how to install a WordPress plugin.

Upon activation, you need to visit the ShopWP Pro » Connect page and click on the ‘Begin the connection process’ button to launch connection wizard.

Start Shopify connection wizard

This will launch the connection wizard.

First, you’ll be asked to enter your myshopify.com domain name.

Your Shopify store URL

Click on the ‘Connect your Shopify store’ button to continue.

Next, you’ll be asked to allow ShopWP app access to your Shopify store. Simply click on the Install App button to start the connection process.

Install App

This will take you back to your WordPress website.

The plugin will confirm that your website is connected to the Shopify store.

Connected to your Shopify store

Click on the Next button to continue.

Now, you’ll be asked to configure different settings for your store, starting with the pages you want to use for your Shopify products.

Create pages

You can turn on listing pages and then choose a WordPress page or use the default ShopWP Products page.

Similarly, you can turn on collection pages and individual product detail pages.

In the next step, you can choose what happens when users click on the products. You can show the product in a modal, or redirect users to Shopify or the WordPress product detail page.

Product click settings

Next, you can choose how you want to display the cart. ShopWP comes with a custom cart experience that shows the cart in a slide-in modal. You can turn it off if you are using individual product detail pages in WordPress.

Click on the Save and Finish Setup button to exit the wizard.

Next, you need to sync products between your WordPress website, and your Shopify store.

Simply switch to the Sync tab under plugin settings.

Sync products

From here, you need to click on the Sync Detail Pages and Connect Auto Post Syncing buttons. This will allow the plugin to fetch any product details as you add new products to your Shopify store.

That’s all! You have successfully connected your Shopify store to WordPress.

Displaying Shopify Products in WordPress

ShopWP allows you to easily display your Shopify products anywhere on your WordPress blog.

If you are using the default settings, then the plugin will create a ShopWP Products page for you which will display your Shopify products.

Shop page

You can also display products on any WordPress post or page by simply editing it and adding the Products block.

For more details, you can see our guide on how to use the WordPress block editor.

ShopWP Products block

The block comes with a bunch of settings that you can configure to change the appearance of products.

The settings include the layout, colors, product details to display, and more.

Product block settings

Similarly, you can also add a Single product block to display a single product.

You’ll be able to find the product you want to display by typing product title in the block settings.

Single product block

The plugin comes with powerful display options that you can control in block settings or under the plugin settings page.

Customizing Your WordPress Website

Now that you have connected your Shopify store to your WordPress website, the next step is to continue setting up your WordPress site properly.

First, you would want to choose a theme for your WordPress site. Your WordPress theme controls your site’s overall design and layout.

There are thousands of premium and free WordPress themes to choose from. To get started, you can take a look at our roundup of the most popular WordPress themes. We’ve also hand-picked a list of of the best clothing store themes.

Want to design your own theme layout? You can do that with SeedProd. It’s a drag-and-drop WordPress site builder that allows you to create your own custom theme without writing any code.

The SeedProd Visual Editor

Next, you would want to create content for your WordPress website.

You can use pages to create your website structure by adding home, blog, shop, contact, and about pages. See our list of important pages to create in WordPress.

After that, go ahead and add pages to the navigation menu in WordPress.

Site navigation

For more details, you can see our tutorial on how to customize your WordPress theme.

Growing Your WordPress Website and Shopify Store

The best part about using WordPress is that it comes with thousands of plugins and works with all the marketing tools that you’ll need to grow your business.

Following are a few essential tools and plugins that you may want to install right away.

1. OptinMonster – The best conversion optimization software, OptinMonster allows you to convert website visitors into customers. It comes with tools like sticky banners, countdown timers, lightbox popups, and more. The best thing is that OptinMonster works with both WordPress and Shopify, so you can use one plugin for both platforms.

2. WPForms – The best WordPress form builder plugin that allows you to easily create contact forms, surveys, polls, and basically any kind of forms you need for your website.

3. All in One SEO for WordPress – The best WordPress SEO plugin on the market, it allows you to easily optimize your website for search engines. This helps you bring more traffic to your website. The one feature you absolutely need from this plugin is the ability to add your Shopify store to your WordPress sitemap.

4. MonsterInsights – Want to see where your traffic is coming from? MonsterInsights helps you install Google Analytics and easily setup enhanced eCommerce tracking.

5. TrustPulse – Adds social proof to your eCommerce store by displaying targeted messages to users with real time user actions on your website. TrustPulse works with both WordPress and Shopify.

6. PushEngage – The best web push notification software that helps you connect with your visitors after they leave your site through push notifications.

For more recommendations, see our list of essential WordPress plugins for business websites.

We hope this article helped you learn how to easily integrate Shopify with WordPress. You may also want to see our expert pick of the best email marketing services and best live chat software to grow your business.

If you liked this article, then please subscribe to our YouTube Channel for WordPress video tutorials. You can also find us on Twitter and Facebook.

The post How to Easily Integrate Shopify with WordPress (Step by Step) first appeared on WPBeginner.


August 01, 2022 at 03:00PM