Saturday, September 3, 2022

How to Monitor Your WordPress Website Server Uptime (Easy Way)

Do you want to monitor the server uptime for your WordPress site?

You want your website to be available whenever your customers come to visit, so you need to make sure it stays online. When you monitor server uptime, you’ll be alerted if your website goes down so you can get it fixed quickly.

In this article, we’ll show you how to easily monitor server uptime in WordPress. We’ll share multiple uptime monitoring solutions, and you can choose one that works best for you.

How to Monitor Your WordPress Website Server Uptime (Easy Way)

Why Monitor Your WordPress Website Server Uptime?

The servers used by poor-quality hosting companies go down frequently and stay down for minutes or even hours. While many WordPress hosting companies promise 99.9% server uptime, they don’t always live up to their promise.

Whether you run a blog, online store, or any other kind of site, downtime can affect your business, website reputation, and user experience:

  1. More Downtime Means Losing Money: If your website remains inaccessible for a long period of time, then you will inevitably lose revenue.
  2. User Experience and Brand Reputation: Having your website down is like closing your door in a visitor’s face, even if you’re not doing it intentionally. It creates a bad impression and you may lose potential customers.
  3. Search Engine Influence: If your website is frequently down, then search engines might assume that your website is too unreliable to recommend. Often they penalize those websites that fail to maintain 24/7 uptime.

You can monitor your server’s actual uptime to track outages on your WordPress website. You use tools that will notify you immediately by email or SMS if something goes wrong with your site. This will allow you to get it fixed as soon as possible.

With that being said, let’s take a look at some of the best tools for monitoring server uptime for your website. You can use the list below to jump to the tool you are most interested in:

Monitoring Server Uptime Using UptimeRobot

UptimeRobot is a website monitoring tool that offers both a free plan that checks your website every 5 minutes and a Pro plan that checks every 60 seconds.

Pro pricing starts at $7.00 per month and includes SMS, voice call, email, and other alerts.

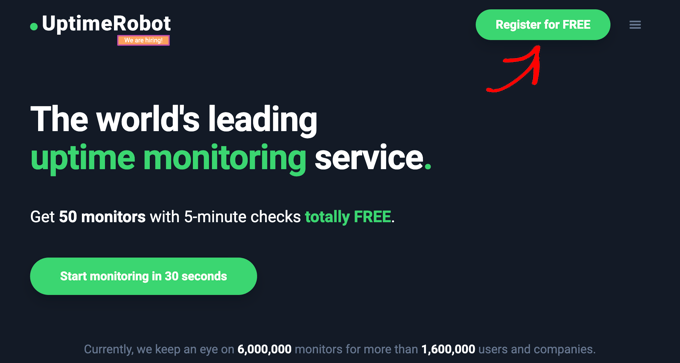
The first thing you need to do is visit the UptimeRobot website. Once there, you should click the ‘Register for FREE’ button at the top of the screen.

Uptime Robot Website

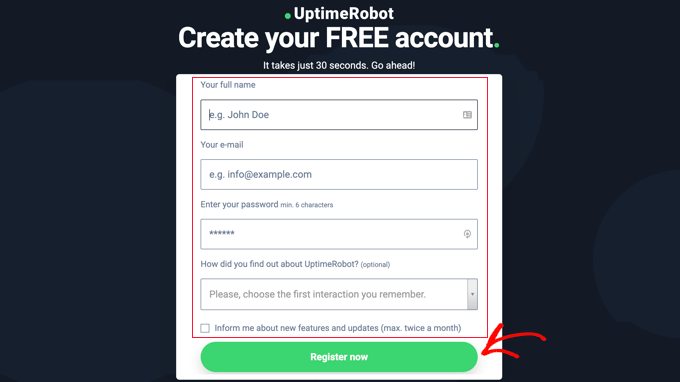
Next, you create a free UptimeRobot account.

Simply fill in your personal details and a password, and then click the ‘Register Now’ button.

Sign Up for a Free UptimeRobot Account

A message will be displayed asking you to go to your email inbox to proceed.

You should find an email with the subject ‘UptimeRobot – Account Activation.’ It will contain a link you need to click to activate your account.

This will take you back to the UptimeRobot website. You can click on the ‘Upgrade now’ button to get a discount on the Pro plan, or the ‘Maybe later’ link to choose the free plan.

UptimeRobot Upgrade Offer

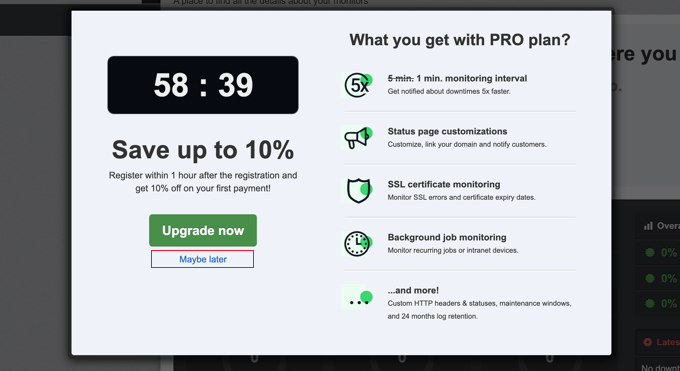
In this tutorial, we’ll use the free plan.

You should now see your UptimeRobot Account Dashboard. From here, you need to click the ‘Add New Monitor’ button.

Add a New Monitor

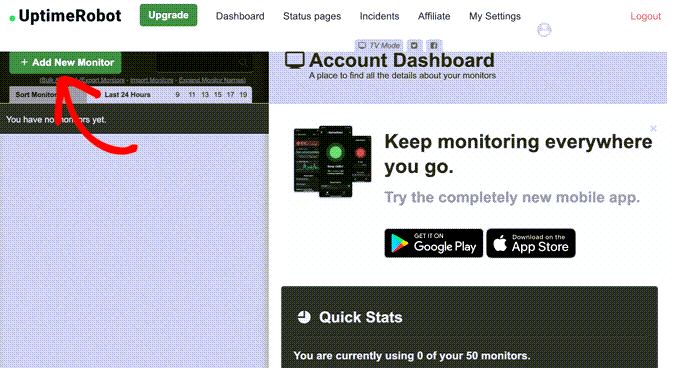
This will bring up a popup where you can configure the monitor.

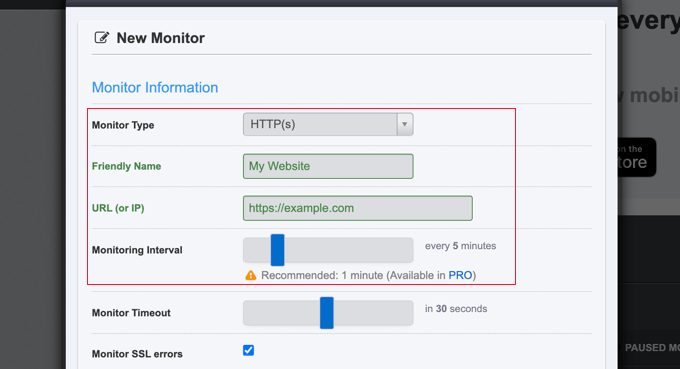
You should select ‘HTTP(s)’ for the monitor type and then add the name and URL of your website. Make sure you set the monitoring interval to 5 minutes if you have the free plan, or 1 minute if you are a Pro user.

UptimeRobot New Monitor Settings

As you scroll down the popup you need to check the box next to your email address so you are notified when your site goes down.

Clicking the gear icon reveals additional optional controls for your notifications.

Click Create Monitor

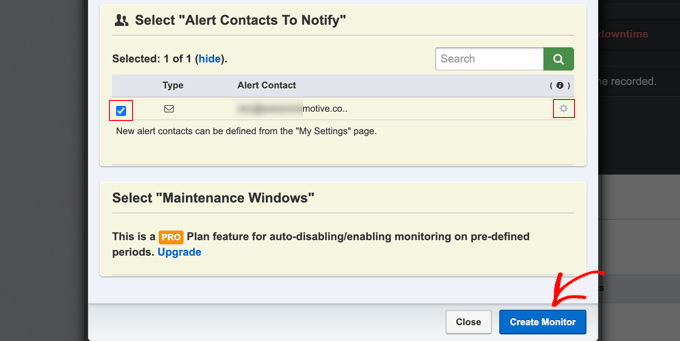
Pro users can select maintenance windows that allow you to automatically disable monitoring for predefined periods, such as when you perform maintenance on your site.

Once you are done, make sure you click the ‘Create Monitor’ button to save your changes.

UptimeRobot will now start monitoring your server uptime.

Uptime Robot Dashboard Stats

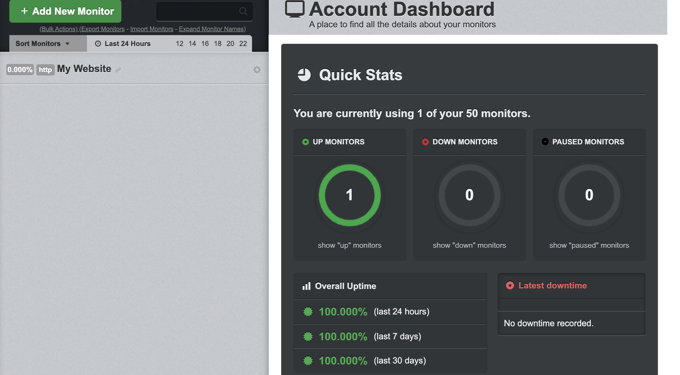
You’ll see detailed stats on your UptimeRobot account dashboard and receive alerts when your website is down.

Monitoring Server Uptime Using Pingdom

Pingdom is a popular performance monitoring tool that allows you to set up server uptime monitoring for your website. It is a paid service with plans starting from $10 per month.

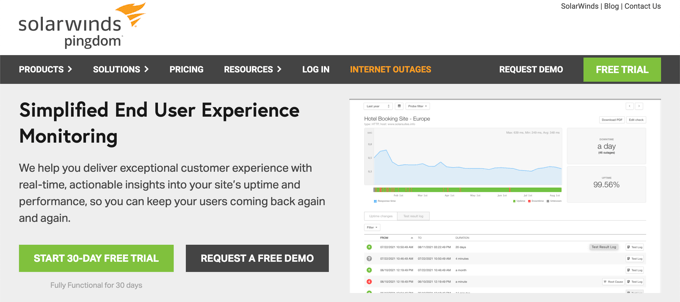
Pingdom is a more robust platform offering a real-time uptime monitoring service. They offer detailed stats, logs, monitoring from various geographic locations, and more.

First, you need to visit the Pingdom website and click on one of the green buttons to start your free trial.

Pingdom Website

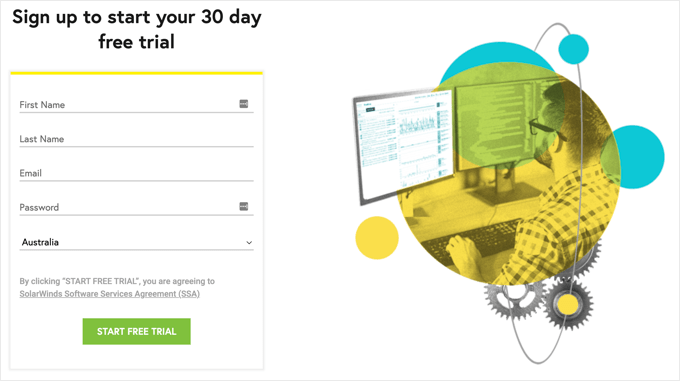
You’ll be asked to provide some personal details to create an account. These include your name, email address, password, and country.

When you’re ready, click the ‘Start Free Trial’ button.

Sign Up for a Free Trial of Pingdom

Next, you will be asked to fill in some additional account information, including your state and time zone.

You should carefully check the phone number and email address because that is how you will be notified if your site goes down.

Finally, add the URL of your website so that Pingdom can monitor it.

Fill In Pingdom Account Information

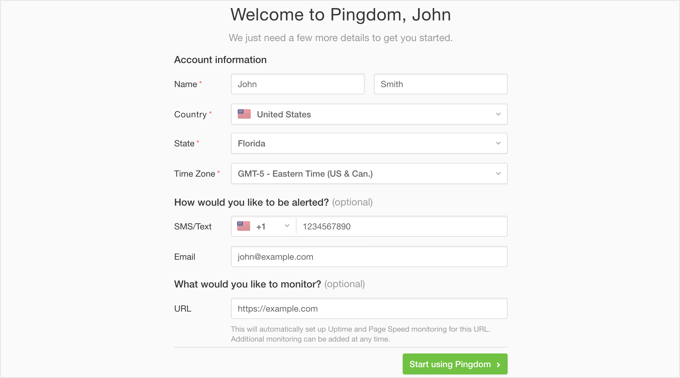
As soon as you click the ‘Start using Pingdom’ button, Pingdom will automatically set up monitoring. You will receive a test alert to your email address and cell phone.

That’s all. You have successfully set up uptime monitoring for your website using Pingdom.

Pingdom Monitoring Your Site's Uptime

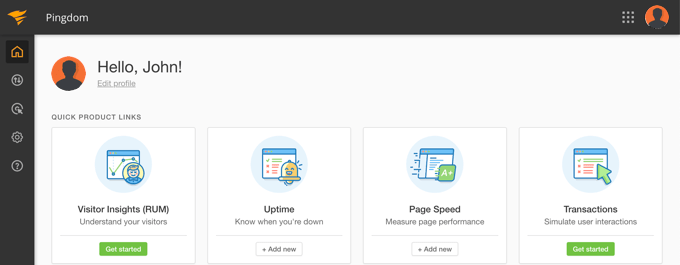
You can set multiple alerts and track for various locations. Pingdom documentation and support can help you set that up, but their interface is fairly straightforward.

Pingdom also keeps your uptime history so you can evaluate your web hosting company’s performance over time.

If you like the service, you can keep using it without interruption, starting at $10 per month.

Checking Whether Your Website Is Currently Up or Down

When you have difficulty accessing your website, you won’t know whether the site is really down or you’re simply facing internet issues. You can quickly check using IsItWP’s free uptime checker tool.

Simply visit the Website Uptime Status Checker website, then enter the URL of your own site.

IsItWP Uptime Checker Tool

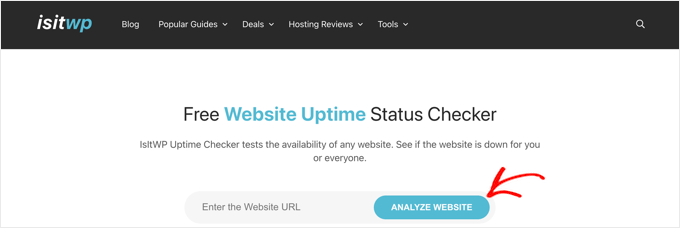
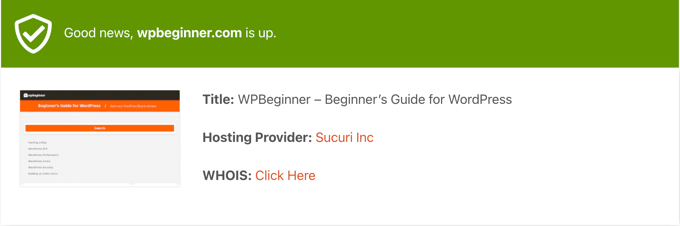
The Uptime Uptime Status Checker tool will quickly check your website and let you know if it is up or down.

Uptime Checker Tool Result

What to Do When Your Website is Down

If your website is down and you need to figure out what to do next, then here are the step-by-step instructions you should follow.

You should start by checking your site with IsitWP’s Uptime Checker tool. This will let you know if your website is down for everyone, or just for you.

What to Do if Your Website Is Down for Just You

If your website is up but you’re unable to access it, then you should first clear your browser cache and DNS cache. After that, you should try reloading the website.

If that doesn’t work, then see if you can access your website from a different IP address. You can do so by using a VPN service or even just using your mobile phone’s internet.

If you can access your website this way, then this means that either your internet service provider or your hosting company has accidentally blocked your IP address. You can contact both service providers to resolve the issue.

If you recently changed your domain name‘s DNS settings, then this could also mean that the DNS has not been updated in your particular geographic location.

All you can do is wait until the DNS changes are propagated around the world. This may take a few hours to a day.

What to Do if Your Website Is Down for Everyone

If you have verified that your website is down for everyone, then you need to immediately reach out to your hosting provider. They may be having issues with their server and can provide you with more details.

Most hosting companies are quick to respond to such issues, and your website should be back up again soon.

However, if your website is down frequently, or you don’t get a satisfactory answer from the support team, then you should switch to a better hosting provider.

What to Do if You Need a Better Hosting Provider

Due to tough competition in the hosting industry, some less reputable companies have cut costs by using outdated technologies, unskilled staff, and inadequate customer service.

If your website is frequently down, then you need to move to a better hosting provider.

Here’s our list of reliable WordPress hosting providers:

For more options, see our list of the best WordPress hosting companies.

Next, you’ll need to transfer your website to the new host. We have a complete step-by-step tutorial on how to move your website to a new hosting provider without losing SEO and without any downtime.

Some providers, like SiteGround, offer free website migration services. You just need to ask for their support.

We hope this article helped you learn how to monitor server uptime in WordPress. You may also want to learn how to keep your WordPress site secure, or check out our list of common WordPress errors and how to fix them.

If you liked this article, then please subscribe to our YouTube Channel for WordPress video tutorials. You can also find us on Twitter and Facebook.

The post How to Monitor Your WordPress Website Server Uptime (Easy Way) first appeared on WPBeginner.


September 03, 2022 at 04:00PM

Friday, September 2, 2022

7 Best WordPress Training Courses for Beginners

Are you looking for the best WordPress training courses for beginners?

WordPress is incredibly easy to use, but training courses can help you get started much faster. Learning anything new can be scary, but these WordPress resources make it as easy as possible.

In this article, we’ll share the best WordPress training courses for beginners (both free and paid).

Training courses for WordPress beginners

Who Needs WordPress Training Courses?

Anyone who wants to make a WordPress website can benefit from WordPress training courses.

WordPress is quite easy to learn, and most beginners can get started without taking any special training course.

However, we know that learning a whole new platform can be intimidating. We want to help lower the learning curve, so you can become an expert at using the world’s best website builder without becoming discouraged.

Taking a WordPress training course can help you quickly familiarize yourself with the platform, learn the basics, and get comfortable troubleshooting without struggling all by yourself.

That being said, let’s look at some of the best WordPress training courses that you can take.

Best WordPress Training Courses

This list includes both free and paid WordPress training courses. All of them are suitable for absolute beginners.

Some of them will help you familiarize yourself with WordPress basics, and how to use it to make modern websites.

Then there are WordPress development courses, which will show you how to write code and build products for WordPress.

You are free to choose your path, or you can go from top to bottom to get expert-level training in WordPress.

Here are the top WordPress training courses for beginners.

1. WPBeginner Videos

WPBeginner Videos

WPBeginner Videos is a collection of free WordPress video tutorials for beginners that shows you how to get started with WordPress within hours.

This WordPress video training course consists of 34 lessons or modules. Starting with the introduction, it gradually walks you through different sections.

You’ll learn how to create and manage content, add images, videos, and new users, use the block editor, create menus, install themes and plugins, and more.

Designed with absolute beginners in mind, this video series will provide you with a solid foundation to build your website.

Price: Free

2. WPBeginner on YouTube

WPBeginner on YouTube

WPBeginner on YouTube is the best WordPress YouTube channel, with over 277,000+ subscribers, 37.8 Million views, and 889+ free videos.

It is the companion channel for the WPBeginner website, managed and run by our team.

We regularly upload new videos with useful how-to tutorials aimed at beginner-level users. These videos are short, sweet, and easy to follow.

You will also get a link to the text version of the tutorial, and you can even ask questions in the comments for the support team to answer.

Joining our YouTube channel will help you stay up to date, brush up on your WordPress skills, and discover new tools and plugins for your website.

If you need guided instructions, we recommend switching to the Playlists tab, where you’ll find our videos organized in different topics. For absolute beginners, the best starting point would be our New User playlist.

Price: Free

3. WPBeginner Blog

WPBeginner

WPBeginner is the #1 WordPress resource site for beginners with over 2000+ free WordPress tutorials and guides. We have been publishing WordPress tutorials since 2009.

For new users, you can check out our Start Here guide, which shows you how to get started with WordPress using WPBeginner’s free tutorials.

Need more specific tutorials? Try one of these entry points. All of them have been written specifically for absolute newcomers to WordPress.

  1. How to make a WordPress website
  2. How to start a blog
  3. How to create an online store
  4. How to learn WordPress for free in a week
  5. How to find the best WordPress theme
  6. Best WordPress plugins to install on your new website

Once you have made your website, you’ll be faced with new WordPress challenges.

Don’t worry! We’ve got you covered for those as well:

  1. The complete WordPress SEO guide for beginners
  2. Improve WordPress performance and speed
  3. Improve WordPress security
  4. Fix common WordPress errors

Have a WordPress question? There is a good chance we may have already answered that.

Simply click on the search icon at the top right corner and type your question.

Search WPBeginner

Can’t find an answer? Drop us a message using the contact form or post it on our WPBeginner Engage Facebook group. We’ll try to answer your question as quickly as possible.

Price: Free

4. OptinMonster University

OptinMonster University

OptinMonster University offers a free digital marketing training course for WordPress users and online business owners.

This course includes practical lessons that will teach you how to start with digital marketing, email marketing, converting website visitors into paying customers, and more.

This marketing course comes with practical examples, downloadable checklists, worksheets, and a complete library of ebooks and guides.

Email is one of the highest converting marketing tools out there, so new WordPress should begin learning how to build an email list as early as possible.

Price: Free to all OptinMonster subscribers

5. WP101

WP101

WP101 is a popular WordPress-focused training platform. They offer 175+ WordPress training videos and multiple WordPress courses on various topics.

All their videos are well-scripted, free of technical jargon, and professionally produced. They have content for basic-to-intermediate WordPress, as well as advanced-level topics so you can be sure to keep learning for a long time.

The training platform also gives you access to their community forums and a free WordPress sandbox website where you can practice your WordPress skills and try new things.

Price: $19 per month ($79 for a lifetime membership)

6. LinkedIn Learning

LinkedIn Learning

LinkedIn Learning (formerly Lynda) is an online learning platform and marketplace where industry experts and professionals offer online courses.

Now, LinkedIn Learning is not a WordPress-specific platform but it comes with dozens of WordPress courses that you can join.

Courses are created by WordPress experts and cover a wide range of WordPress-related topics from plugins and themes to PHP and JavaScript.

As a bonus, whenever you complete a course on LinkedIn Learning, you can showcase it on your profile so that your connections and potential employers can see just how much you’re learning and how dedicated you are.

Price: $26.99 per month (paid annually)

7. Udemy

Udemy

Udemy is one of the most popular online learning platforms where course creators from all industries share their knowledge.

It currently has dozens of WordPress training courses offered by individual course creators and WordPress experts.

Courses range from content aimed at brand-new users and advance to expert-level coursework. You can choose which courses will be best for you so that you can cover a wide range of topics.

For example, you can start with WordPress basics and learn the platform, and then gradually take other courses on more advanced topics such as theme development or security.

Udemy also offers regular discounts on courses across the site, so you can often get very expensive courses for a fraction of the retail price.

Price: Varies on a course-by-course basis

We hope this article helped you find the best WordPress training courses for beginners. Need some inspiration? See the types of websites you can make with WordPress or explore the multiple options that you can use to make money online from your WordPress website.

If you liked this article, then please subscribe to our YouTube Channel for WordPress video tutorials. You can also find us on Twitter and Facebook.

The post 7 Best WordPress Training Courses for Beginners first appeared on WPBeginner.


September 02, 2022 at 03:07PM

Thursday, September 1, 2022

How to Create Custom Single Post Templates in WordPress

Do you want to create a custom single post template in WordPress?

Custom single post templates allow you to use different layouts for your individual blog posts. Many WordPress themes come with a few different page templates, and you can also create your own if needed.

In this article, we’ll show you how to easily create custom single post templates in WordPress. We’ll share multiple methods, so you can choose one that works best for your needs.

How to Create Custom Single Post Templates in WordPress

When Do You Need a Custom Single Post Template?

Sometimes you may want a different look and feel for certain posts on your WordPress website. For instance, you may want to use a different layout for featured articles or stories in a particular category.

This is where you need a custom single post template in WordPress.

By default, WordPress uses the single post template based on the WordPress template hierarchy. All themes come with a single.php template, and this is used by default for all of your single posts.

Some themes may also include additional templates or layout choices that you can use.

It is very much like creating a custom page template. Most WordPress themes also come with page templates that you can use while editing a post or page in WordPress.

Choosing a Page Template

Having said that, let’s take a look at how to easily create custom single post templates in WordPress. We’ll show you multiple methods, so you can use the one that works best for you.

Creating Single Post Templates Using the Block Editor

This method does not really create a post template and is limited in flexibility. However, it is the easiest way to save your own single post layouts and then reuse them.

The default WordPress block editor comes with a built-in feature that allows you to save and reuse blocks. One such reusable block is the group block.

The group block allows you to put several blocks and entire post layouts into one group. You can then save this group block and reuse it in your other posts.

Let’s take a look at how to use the group block to save your custom post templates.

First, you need to create a new post in WordPress. After that, simply add a group block to the content area.

Add Group Block

Now you can start adding blocks into the group block to create a single post layout for your WordPress blog.

You can add any blocks you want including columns, media and text, cover images, and more.

Add Blocks to the Group

Once you are satisfied with the layout you have created, you need to take your mouse up and select the group block.

Simply click on the three-dot menu icon and then select the ‘Add to Reusable blocks’ option.

Add Reusable Block

Next, you need to provide a name for the reusable block and then click on the Save button. WordPress will now save your reusable block including all the blocks inside the group block.

You can then edit any existing post on your website or create a new one. On the post edit screen, simply click on the add new block button and look for your saved block under the ‘Reusable’ tab.

Reuse Block

Add the block to your post and WordPress will load your entire group block with all the blocks and settings as you saved them.

This method allows you to save your custom layouts. However, it does not allow you to change how your theme handles single posts.

If you would like greater flexibility, then continue reading the next step.

Creating Custom Single Post Templates Using SeedProd

The easiest way to create a custom single post template is by using SeedProd. It’s the best WordPress website builder plugin and can create beautiful website layouts and custom templates without writing any code.

You can use SeedProd’s drag-and-drop builder to create a fully custom WordPress theme, including custom single post templates.

The first thing you need to do is install and activate the SeedProd plugin. For more details, see our step by step guide on how to install a WordPress plugin.

Upon activation, you need to enter your license key. You can find this information under your account on the SeedProd website.

SeedProd license key

After that, it’s time to create a custom WordPress theme. This is much simpler than it sounds.

Creating a Custom WordPress Theme

First, you need to head over to the SeedProd » Theme Builder page. Here, you’ll use one of SeedProd’s ready-made themes as a starting point. This will replace your existing WordPress theme with a new, custom design.

You can do that by clicking the ‘Themes’ button.

Create your custom theme

You will be shown a list of professionally designed themes that are designed for different types of websites. For example, there are templates called ‘Modern Business’, ‘Marketing Agency’, and ‘Mortgage Broker Theme’.

Take a look through the options and select one that best matches your needs by clicking the checkmark icon.

Select a Theme That Matches Your Needs

Once you have chosen a theme, SeedProd will generate all the theme templates you need, including one for single pages and another for single posts.

Each template comes set up with attractive layouts and placeholder content that’s easy to customize.

SeedProd Creates All the Templates You Need for Your Theme

To learn more about creating a theme with SeedProd, see our guide on how to easily create a custom WordPress theme without any code.

Customizing the Default Single Post Template

SeedProd makes it easy to customize the default ‘Single Post’ template using a drag and drop page builder.

Simply click the ‘Edit Design’ link found under the template. This will open your post template in SeedProd’s visual editor.

Click the 'Edit Design' Link Under the Single Post Template

SeedProd’s visual editor has a 2 column layout. On the left, you’ll find blocks and sections that you can add to your design. And on the right is a preview of the template where you can see your changes in real-time.

SeedProd Visual Editor Blocks and Sections

It’s also easy to customize the layout of your post template. Simply click on any block to see its settings in the left column.

For example, if you click on the post title, then you’ll be able to see its settings. Now you can change the alignment, font size, heading level, and more.

Click on a Block to Change Its Settings

Clicking the Advanced tab lets you change font colors, spacing, and other styles.

You can add additional blocks by dragging them from the left column into the preview column. SeedProd uses template tags to pull in dynamic content like post titles, featured images, comments, and more. This lets you add content to the template without having to edit each post individually.

For example, you can add a Posts block at the end of your post content. This will display recent posts that your visitors may wish to read when they finish the current post. This block will be shown automatically on all posts using this template.

Add a Posts Block to the Bottom of Your Single Posts Template

Next, you can change the settings of the Posts block to customize the content that is shown.

For example, you can display content from specific categories, use a two-column layout, and change the number of posts that are shown.

SeedProd Posts Block Settings

Feel free to spend time experimenting with different blocks and exploring their settings.

After creating something you’d like to use as your post template, it is time to save it by clicking the green ‘Save’ button in the top right corner. After that, you can close the SeedProd visual editor by clicking the ‘X’ close icon.

When You're Finished, Save the Single Post Template

You can customize the rest of your WordPress theme in the same way. But if you need a little help, then refer back to our step-by-step guide on how to create a custom WordPress theme with SeedProd.

When you’re happy with how everything looks, make sure the ‘Enable SeedProd Theme’ switch is toggled to the on position. Your WordPress site will now use your SeedProd theme and custom single post template.

Enable the SeedProd Theme

Using Theme Settings to Create Custom Single Post Layouts

Many popular WordPress themes come with built-in settings to customize the appearance of your single post template.

If your theme supports these settings, then you’ll be able to find them on the post edit screen. The options available may change depending on the theme you are using.

For instance, the Astra theme offers customization options when editing a single post. Using these options, you can change sidebars, hide headers, title, menus, and more.

Astra Theme Single Post Template Customization

On the other hand, many of the top WordPress themes come with ready-to-use templates that you can use.

If your theme includes single post templates, then you will find them under the ‘Template’ or ‘Post Attributes’ panel while editing a post.

Choosing a Template When Writing a Single Post

These templates are complete layouts that you can use with no configuration required.

Manually Creating Custom Single Post Templates With Code

This method is a bit advanced as it requires you to edit theme files, copy and paste code, and optionally add custom CSS. If you haven’t done this before, then check out our tutorial on how to copy and paste code in WordPress.

First, you need to open a plain text editor on your computer like Notepad and paste the following code inside it:

<?php
/*
 * Template Name: Featured Article
 * Template Post Type: post, page, product
 */
  
 get_header();  ?>

This code defines a new template called ‘Featured Article’ and makes it available for post, page, and product post types.

You should save this file as wpb-single-post.php on your desktop. Next, you need to add the template to your WordPress site. To do that, you need to use an FTP client to upload the file to your current theme folder.

Now you can log in to your WordPress admin area and create or edit a post. Scroll down a little on the post edit screen, and you will notice a new ‘Template’ panel or ‘Post Attributes’ meta box with an option to select the template.

Select Your Custom Post Template

You will see your ‘Featured Article’ custom template listed there.

Right now your template is essentially empty so selecting it will simply display a white screen.

Let’s fix this.

The easiest way to do that is by copying the code from your theme’s single.php file and using it as a starting point. You’ll have to open the single.php file and then copy everything after the get_header() line.

Next, you need to paste this code at the end of your wpb-single-post.php file. Now you can save this file and upload it back to your server.

However, this will look exactly the same as your current single post template. You can now start making changes to your custom single post template.

You can add your own custom CSS classes, remove sidebars, create a full width template, or anything you want.

Creating Custom Single Post Templates by Category

Would you like to use a custom single post template based on categories? For example, you can give posts in the travel category a different layout to posts in the photography category.

You can do that using either the SeedProd Theme Builder or code.

Creating Custom Single Post Templates by Category Using SeedProd

Earlier we covered how to customize the SeedProd Theme Builder’s default single post template. But it doesn’t stop there. With SeedProd you can add as many custom post templates as you like, such as a different layout for every post category.

To add a new single post template, just click the ‘Duplicate’ link under the original post template. A new template called ‘Single Post – Copy’ will be created and added to the top of the theme templates page.

Create a New Post Template by Duplicating the Default Post Template

You can customize the new template in the same way you customized the default Single Post template earlier. Simply click the template’s ‘Edit Design’ link and make any changes you like using SeedProd’s visual editor.

When you’ve finished customizing the template, you will need to add some conditions so that SeedProd will know which posts should use this template. In this case, we want it displayed when viewing posts within a single category.

Click the 'Edit Conditions' Link

You can do that by clicking the template’s ‘Edit Conditions’ link and a new window will pop up.

Here you can give the template a name and priority. The default Single Post template has a priority of 0, so make sure you give this template a higher priority so it will be displayed on matching categories.

Add Conditions to Display the Template for a Certain Category

Under ‘Conditions’, select ‘Has Category’ from the second drop down menu, then type the name of the category in the last field. For example, if you only want posts from the photography category to use this layout, then type ‘photography’.

When you’re finished, click the ‘Save’ button and now this template will be used for all posts in the matching category.

This is the easiest way to create multiple custom post templates in WordPress. It doesn’t require any knowledge of code and won’t accidentally mess up any theme files.

Creating Custom Single Post Templates by Category Using Code

This is another method for those who are comfortable adding code to their theme files.

First, you need to add this code to your theme’s functions.php file or a code snippets plugin.

/*
* Define a constant path to our single template folder
*/
define(SINGLE_PATH, TEMPLATEPATH . '/single');
 
/**
* Filter the single_template with our custom function
*/
add_filter('single_template', 'my_single_template');
 
/**
* Single template function which will choose our template
*/
function my_single_template($single) {
global $wp_query, $post;
 
/**
* Checks for single template by category
* Check by category slug and ID
*/
foreach((array)get_the_category() as $cat) :
 
if(file_exists(SINGLE_PATH . '/single-cat-' . $cat->slug . '.php'))
return SINGLE_PATH . '/single-cat-' . $cat->slug . '.php';
 
elseif(file_exists(SINGLE_PATH . '/single-cat-' . $cat->term_id . '.php'))
return SINGLE_PATH . '/single-cat-' . $cat->term_id . '.php';
 
endforeach;
}

This code first checks to see if WordPress is requesting a single post. If it is, then it tells WordPress to look for the template in the /single/ folder of your WordPress theme.

Now you need to add template files defined by this code.

Connect to your WordPress hosting using an FTP client or File Manager in cPanel and go to /wp-content/themes/your-theme-folder/.

Inside your current theme folder, you need to create a new folder called ‘single’. Next, you need to open this folder and create a new file inside it. Go ahead and name this file single-cat-{category-slug}. Replace {category-slug} with your actual category slug.

For example, if you have a category called ‘News’, then you will create single-cat-news.php file. If you have a category called ‘Travel Tips’, then create a template single-cat-travel-tips.php, and so on.

Creating Single Post Template for Categories

Now, these template files will be totally empty. As a starting point, you can copy the contents of your single.php file from your theme folder and paste them inside each of these templates. After that, you’ll need to edit these templates to make your desired changes.

Once you’re done, you can go to your website and view a post. It will use the template that you have created for the category where this post is filed.

Now let’s suppose you have a post filed in two categories News and Travel Tips. WordPress will automatically show the template for ‘News’ because it appears first in alphabetical order.

On the other hand, if you filed a post in a category and didn’t create a template for that category, then WordPress will fall back to the default single.php template of your theme.

Creating Custom Single Post Templates for Specific Authors

Let’s suppose you want posts written by a specific author to look different on your website. You can do that using code by following the same technique we showed for categories.

First, you need to add this code to your theme’s functions.php file or a

code snippets plugin.
/**
* Define a constant path to our single template folder
*/
define(SINGLE_PATH, TEMPLATEPATH . '/single');
 
/**
* Filter the single_template with our custom function
*/
add_filter('single_template', 'my_single_author_template');
 
/**
* Single template function which will choose our template
*/
function my_single_author_template($single) {
global $wp_query, $post;
 
/**
* Checks for single template by author
* Check by user nicename and ID
*/
$curauth = get_userdata($wp_query->post->post_author);
 
if(file_exists(SINGLE_PATH . '/single-author-' . $curauth->user_nicename . '.php'))
return SINGLE_PATH . '/single-author-' . $curauth->user_nicename . '.php';
 
elseif(file_exists(SINGLE_PATH . '/single-author-' . $curauth->ID . '.php'))
return SINGLE_PATH . '/single-author-' . $curauth->ID . '.php';
 
}

Next, you should connect to your website using FTP or cPanel file manager in cPanel and then go to /wp-content/themes/your-theme-folder/. If you haven’t already created a folder called /single/ inside it, then go ahead and create it now.

Inside this folder, you need to create a template using the author’s username in the template name. For example, single-author-johnsmith.php.

This template will be empty, so you can copy and paste the contents of your theme’s single.php template and use it as a starting point.

You can now visit your website to view a post created by a specific author. It will use the template you created.

We hope this article helped you learn how to create custom single post templates in WordPress. You may also want to learn how to track website visitors to your WordPress site, or see our list of must have WordPress plugins to grow your site.

If you liked this article, then please subscribe to our YouTube Channel for WordPress video tutorials. You can also find us on Twitter and Facebook.

The post How to Create Custom Single Post Templates in WordPress first appeared on WPBeginner.


September 01, 2022 at 02:45PM

Wednesday, August 31, 2022

How to Enable Search by Product SKU in WooCommerce

Would you like your customers to be able to search for your WooCommerce products using a SKU code?

Because SKU codes uniquely identify your products, searching for them will help users quickly find exactly what they are looking for. The challenge is that SKU search is not enabled in WooCommerce by default.

In this article, we’ll show you how to enable search by product SKU in WooCommerce.

How to Enable Search by Product SKU in WooCommerce

Why Enable Search by Product SKU in WooCommerce?

To run a successful WooCommerce store, it’s important for your customers to easily find the products they wish to purchase. To make this simple, most eCommerce platforms use SKUs, or Stock Keeping Units, to uniquely identify each product.

If a customer knows the SKU for the product they wish to purchase, why not let them search for the SKU to instantly find the correct product in your store?

The problem is that WooCommerce SKUs are stored in custom fields, and these are not indexed or included in search results by default. As a result, searching for the SKU won’t help.

Let’s take a look at how to solve this problem by enabling users to search by SKU in WooCommerce using a product search plugin.

How to Enable Search by Product SKU in WooCommerce

The first thing you need to do is install and activate the SearchWP plugin. You’ll need at least the Pro plan to access WooCommerce integration. For more details, see our step-by-step guide on how to install a WordPress plugin.

SearchWP is the best custom search plugin for WordPress and is used by over 30,000 websites. It lets you customize the search algorithm, add live Ajax search for real-time results, and more.

Upon activation, you need to visit the SearchWP » Settings page and switch to the ‘Support’ tab to enter your license key. You can find it in your downloads area for your account on the SearchWP site.

Paste Your SearchWP License Key

Next, you need to install and activate the WooCommerce Integration extension for SearchWP.

You’ll find this in the downloads area for your account on the SearchWP website, too. You should install it as you would install any other WordPress plugin.

Install the WooCommerce Integration Extension

Now you are ready to customize the SearchWP search engine to index your product SKUs.

Simply go to the SearchWP » Settings page and make sure you’re on the ‘Engines’ tab. Once there, you need to click the ‘Sources & Settings’ button.

Click on the 'Sources & Settings' Button

This will bring up a popup where you should make sure the checkbox next to ‘Products’ is checked. This will allow SearchWP to index your WooCommerce products.

Also, if you’d also like to include WooCommerce product reviews in your search results, then make sure you check the ‘Comments’ box, too. That’s because product reviews are actually stored as comments in WooCommerce.

Check the Products and Comments Boxes

Once you’ve done that, click on the ‘Done’ button to close the popup and get ready to add the SKU search.

Now you need to scroll down to the ‘Products’ section. Notice that by default, the plugin will only look at the product title, content (description), slug, and excerpt (short description).

Click the 'Add/Remove Attributes' Button in the Products Section

You can extend SearchWP’s reach to include SKUs by clicking on the ‘Add/Remove Attributes’ button. This will bring up a popup where you can include specific custom fields and taxonomies in searches.

You’ll need to type ’SKU’ into the Custom Fields field and choose the _sku option from the dropdown menu. This will add SKUs to WooCommerce search results pages.

Select _sku From the Custom Field Drop Down Menu

You can now click the ‘Done’ button.

Notice that there is now a new section labeled ‘Custom Fields’ with the _sku field underneath.

Slide the SKU Relevance Slider to the Right

To begin with, the relevance slider will be set all the way to the left, which means that SKU search results will be given the lowest priority in search results.

Since SKUs are an important way to find your products, you should move the _sku slider all the way to the right, as you can see above.

When you’re done, go ahead and click on the ‘Save Engines’ button at the top of the screen to save your settings.

Click the 'Save Engine' Button

SearchWP will then start rebuilding your search index in the background. It may take a few minutes to complete, but after that, you will be able to search your WooCommerce store by product SKU.

SearchWP will automatically use any search forms on your online store, so there is no need to take any additional steps if you have them on your site already.

However, if you need to add a search form, then see our step-by-step guide on how to create a custom WordPress search form. This will also teach you how to style the results page using custom CSS.

Now you can go to your WooCommerce store to try out the search feature.

In our demo store, the long sleeve tee has the SKU ‘woo-long-sleeve-tee.’ When we search for that SKU, the correct product is displayed.

Preview of Product SKU Search in WooCommerce

To learn more about improving search on your online store, see our guide on how to make a smart WooCommerce product search.

We hope this tutorial helped you learn how to enable product search by SKU in WooCommerce. You may also want to learn how to create a WooCommerce popup to increase sales, or check out our list of the best WooCommerce plugins to grow your online store.

If you liked this article, then please subscribe to our YouTube Channel for WordPress video tutorials. You can also find us on Twitter and Facebook.

The post How to Enable Search by Product SKU in WooCommerce first appeared on WPBeginner.


August 31, 2022 at 04:24PM