Wednesday, September 21, 2022

The Ultimate Guide to GA4 in WordPress for Beginners

Do you want to use Google Analytics 4 (GA4) but are unsure how to start?

Google Analytics 4 is the latest version of Google’s analytics platform. It has many changes, like a new reporting system and metrics. The way GA4 collects and processes data is also different from the previous version known as Universal Analytics (UA).

In this article, we’ll cover everything about GA4 in WordPress and help you get started.

The ultimate guide to GA4 for beginners

What is Google Analytics 4?

Google Analytics 4, also called GA4, is the new version of Google’s stats dashboard, and it lets you track your website and apps in the same account. It is designed to protect users’ privacy and provide more accurate reports than previous versions.

With Google Analytics 4, you’ll first notice that it has a new interface. It also categorizes some of the old reports differently, as well as adds all-new reports and metrics.

GA4 reports interface

Behind the scenes, GA4 works in a new way for collecting and processing your website data. It records data as event-based instead of using page hits.

For example, when your visitors click a link, view a page, play a video, or download a file, all these website interactions will count as events.

This way, your website performance is measured more accurately, as the event-based model can better track user behavior.

It also makes it easier to enable enhanced measurement features like tracking outbound clicks and scroll depth. You can enable these options with a click of a button instead of performing a complicated setup process.

That said, let’s see why you should use Google Analytics 4 instead of the previous Universal Analytics.

Why Switch from Universal Analytics to Google Analytics 4?

If you haven’t created a GA4 property yet, then you should know that Google will sunset the old Universal Analytics on July 1, 2023.

This means that Universal Analytics will no longer record data from your WordPress site after the sunset date. You’ll still be able to view your old data for at least 6 months after the sunset date, but Universal Analytics won’t track your site’s traffic.

That’s why it is important to switch to a Google Analytics 4 as soon as possible. You won’t have to start from scratch when Universal Analytics stops working and have historical data in GA4 for comparison. Plus, you’ll get all the new features and improvements with Google Analytics 4.

The best way of setting up GA4 is using MonsterInsights and its dual tracking feature. Dual tracking allows you to use Universal Analytics while simultaneously sending data to the GA4 property.

There’s also a free version of MonsterInsights that you can use if you’re just getting started.

For more details, please see our guide on how to switch to Google Analytics 4 in WordPress.

MonsterInsights Dual Tracking GA v4

On the other hand, if you’ve just started a new website and want to set up analytics tracking code, then follow our guide on how to install Google Analytics in WordPress.

Now, let’s look at some of the changes you’ll notice in GA4.

What Has Changed in Google Analytics 4?

The new Google Analytics 4 brings a lot of changes to the analytics platform. While the most noticeable difference is how it works using events, here are a few more changes you’ll see in GA4:

1. A Completely New Reporting Interface

As we mentioned earlier, the first difference you’ll see is the new Google Analytics 4 interface. Many reports from Universal Analytics have been removed or renamed in GA4.

New reporting interface

For example, you will see reports like Engagement, Monetization, and Retention in Google Analytics 4.

2. New Metrics in Google Analytics 4

In Google Analytics 4, you’ll find new metrics. Some metrics names in Universal Analytics have also changed in GA4.

For instance, the new engagement report helps measure your visitors’ interaction with your site, and it offers metrics for average engagement time. In Universal Analytics, this was called average session duration.

See average engagement time report

Another noticeable change is that there is no bounce rate metric in GA4.

Instead of seeing a percentage of how many people left your site without interacting, you’ll see metrics like Engaged sessions per user to see how people used your site and interacted with your content.

3. There are No Goals in GA4

If you had set up different goals in Universal Analytics, then you won’t find them in GA4. However, you get various GA4 events to help you track user interactions on your website.

Events to enable in ga4

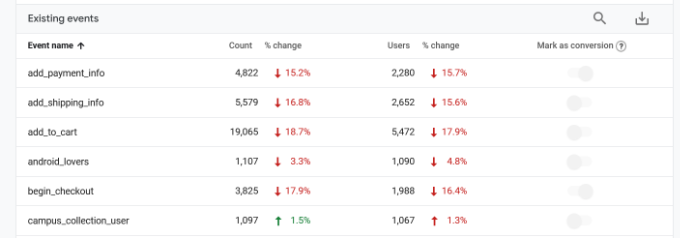
For example the number of users who began the checkout process in your online store is an interaction event. You can also see events for anyone who reached different points in the checkout process.

That way, you can see which specific steps in the process people give up at.

4. Absence of Form Conversion Tracking

Tracking your WordPress forms is important in understanding how people use your website. Forms help gather leads, get user feedback, resolve queries, and more.

However, you won’t know which form performs best without tracking them in Google Analytics. With MonsterInsights, you can easily track forms out of the box and see a report inside your WordPress dashboard.

Forms report

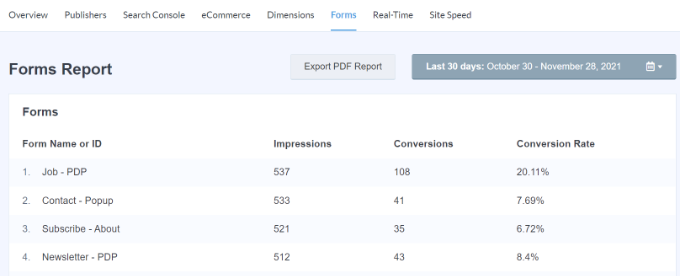
For even more control over the forms on your site, we recommend installing WPForms, the best form builder plugin for WordPress. It integrates with MonsterInsights, too, so you can get even more useful information out of Google Analytics.

5. Perform Advanced Analysis to Uncover Insights

One of the most powerful changes GA4 brings is the ability to perform advanced analysis and create multiple data visualizations.

You can head to the Explore tab and create custom reports. There are prebuilt templates you can use or use a blank template.

Explorations tab in ga4

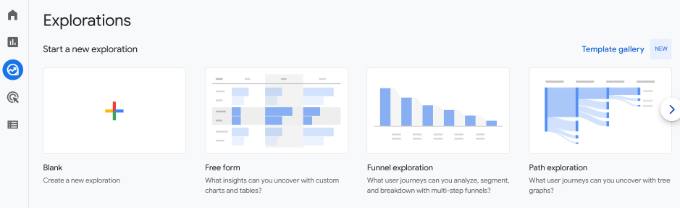
For example, you can perform a funnel analysis and see the steps customers take before purchasing. Similarly, the path exploration template helps you see which events users trigger as they visit your website.

However, this feature is for advanced or power users who are experienced with Google Analytics 4 and know their way around. It can be tricky for beginners since there is a steep learning curve.

As an alternate, you can use MonsterInsights to add a stats dashboard inside your WordPress site and see data that matters for your business.

How to Use Google Analytics 4 Reports

Now that you know what Google Analytics 4 is, how it works, and what’s the difference between GA4 and Universal Analytics, let’s see how to use different reports.
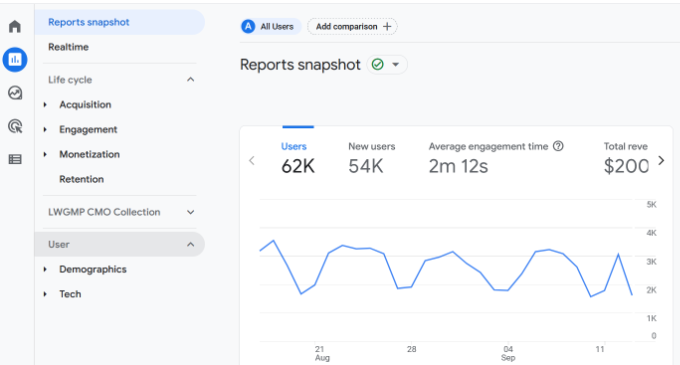
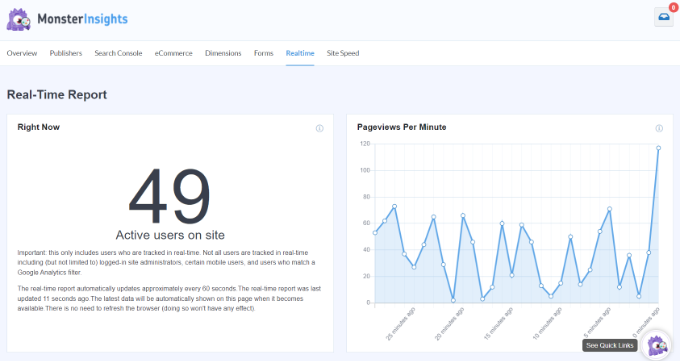
Realtime Report

The first report you can view is the real-time report in Google Analytics 4. It helps you monitor your website activity as it happens.

You can use the report to see if your analytics tracking code is working, track the performance of a campaign like a flash sale in real-time, see traffic from social media campaigns as it happens, and more.

Realtime report in GA4

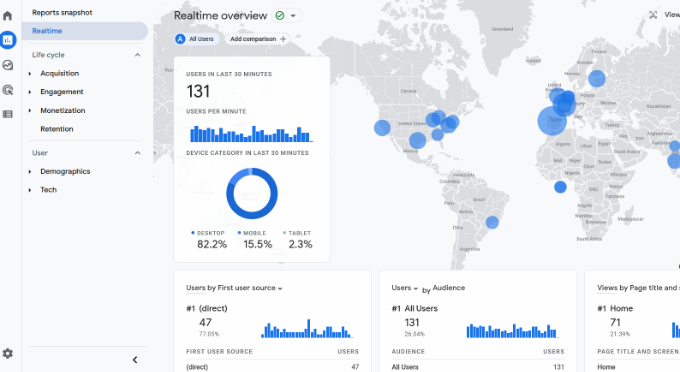
If you’re using MonsterInsights, then you can quickly see the real-time reports inside your WordPress dashboard. You just need to go to Insights » Reports in your admin panel, and then just click on the ‘Realtime’ tab.

The plugin brings important data from Google Analytics and displays them in easy-to-understand reports. This way, you can quickly see data that matters for your business and check how your site performs.

Realtime report

For more details, please see our guide on how to show real-time online users in WordPress.

Acquisition Report

The acquisition report is part of GA4’s ‘Life cycle’ reports, and you’ll see where your visitors are coming from. It shows the channels that are driving traffic to your website.

For example, you can see whether people use search engines like Google and Bing, directly typing in your website URL in the browser, clicking on paid search ads, and more.

Acquisition report in ga4

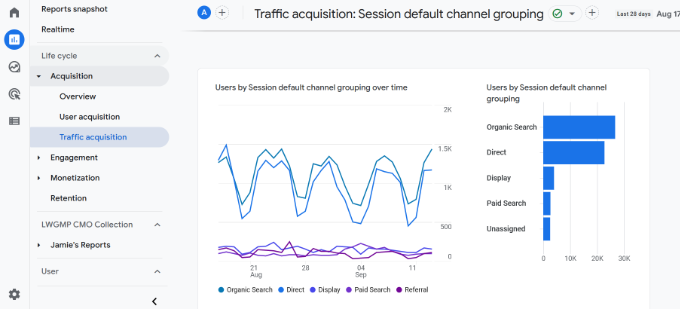
Using this report, you can figure out which channels to invest your resources in and get the maximum result. It also helps optimize your WordPress SEO and increase organic traffic to your website.
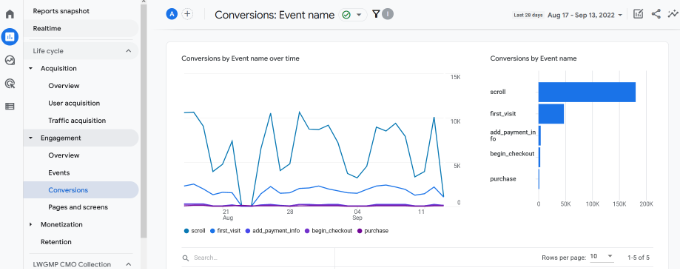
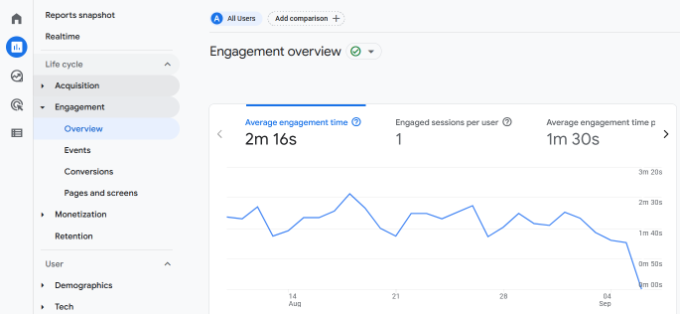
Engagement Report

The engagement report is a new report you’ll see in Google Analytics 4. It helps you track how many people are engaged with your website.

Under this report, you’ll find more sub-reports to track different events and conversions, as well as see your most important pages and app screens.

Engagement report in ga4

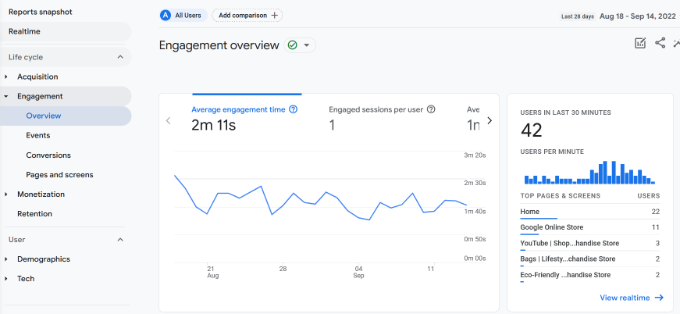
These reports are important in understanding how people use your website. For example, you can see which page is getting the most views. Using the data, you can create similar content to get more website traffic.

Monetization Report

If you run an eCommerce store, then you can view its performance in the Monetization report.

For instance, this report shows the total revenue, purchases, average purchase revenue per user, and other metrics.

Monetization report

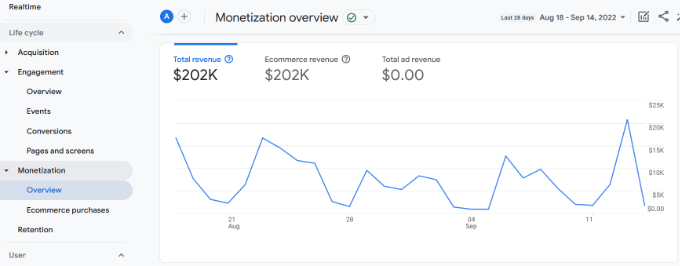
You can also see the eCommerce purchases report to find out which products get the most sales in your store.

With MonsterInsights, you can easily see your top products inside your WordPress admin panel. Its eCommerce report shows an overview of your store’s performance along with the best-selling products.

MonsterInsights ecommerce report example

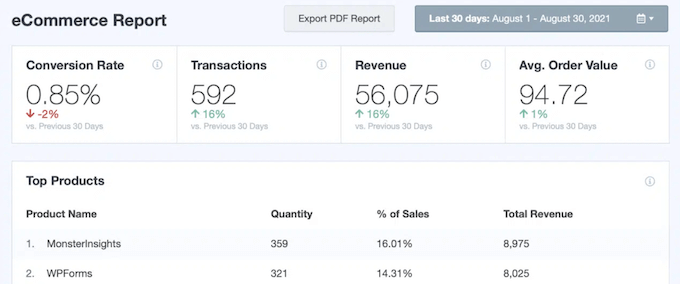
Using this information, you can display your popular products throughout the website, upsell other products, and offer bundles and discounts to boost sales.

For more details, please see our guide on how to set up eCommerce tracking in WordPress.

Retention Report

A retention report helps track how many new users visit your site compared to returning users.

You can use this data to bring back users to your site by getting them to sign up for your newsletter or follow you on social media. On the other hand, you can offer exclusive discounts or free resources like ebooks for returning visitors to get more conversions.

Retention report in ga4

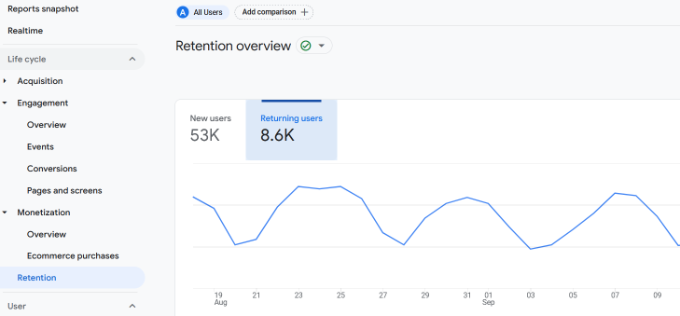
In the retention report, you can also see graphs for user engagement and user retention over time, lifetime value, and more.

Demographics Report

Under the User section of GA4, you will find your demographics data, where you can see which country your visitors are coming from.

This helps create geolocation marketing campaigns and personalized messages for users from different locations. For example, you can offer exclusive discounts for people coming from Singapore or come up with blog topics for users from India.

Demographics report

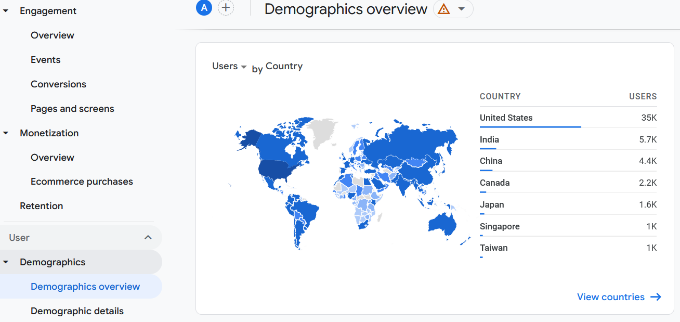
It even breaks down the language your users speak, so you can translate your website into the most popular languages.

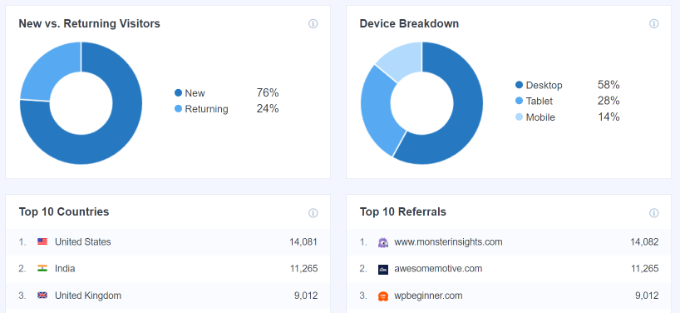
With MonsterInsights, you can also view this data inside your WordPress dashboard. Plus, it also shows a device breakdown, top referrals, top countries, and new vs. returning visitors reports.

Device breakdown and top countries report

Tech Report

The last report you’ll see in Google Analytics 4 is the Tech report. It shows the device your visitors use to view your website, such as whether they are on desktop, mobile, or tablet.

Besides that, you can also see the operating system, browser, screen resolution, and app version people are using when visiting your site.

Tech report in ga4

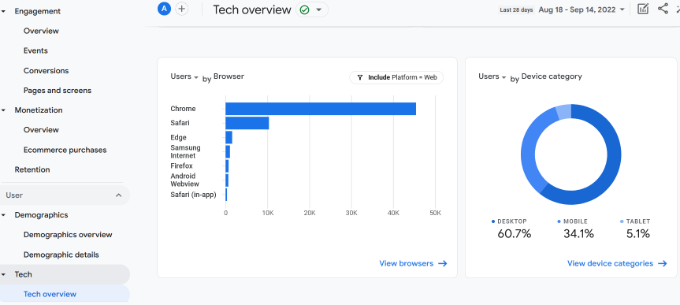
This report is especially useful when optimizing your site for multiple devices. You can provide a better user experience and ensure that people can easily read your content on any device.

We hope this article helped you learn about Google Analytics 4 in WordPress. You can also see our guide on how to increase your website traffic, and the must have WordPress plugins to grow your website.

If you liked this article, then please subscribe to our YouTube Channel for WordPress video tutorials. You can also find us on Twitter and Facebook.

The post The Ultimate Guide to GA4 in WordPress for Beginners first appeared on WPBeginner.


September 21, 2022 at 04:05PM

Tuesday, September 20, 2022

How to Add Google Maps Store Locator in WordPress

Do you want to add a Google Maps store locator to your WordPress website?

A store locator is a map pointing to your business location. If you run a local business, it will help your users to find you on the map, get driving directions, and share your location.

In this article, we will show you how to easily add a Google Maps store locator in WordPress.

How to Add Google Maps Store Locator in WordPress (Free Option)

Why Add Google Maps Store Locator in WordPress?

A lot of WordPress users run small business websites that serve a particular town or region. This includes businesses like restaurants, real estate agents, plumbers, maintenance service providers, small stores, salons, and more.

Adding a Google Maps store locator to your site will help your users to find you. They will be able to get driving directions to your store and share the location with their friends.

It can also help improve your site’s search engine visibility and attract more website visitors.

Let’s take a look at how to add a Google Maps store locator on your WordPress site. We’ll show you both free and paid methods with their pros and cons, then you can choose the one that best suits your needs.

Method 1: Adding a Simple Store Locator to WordPress (Free)

This method is free and easy because it doesn’t require the extra effort of creating a Google Maps API key. It’s recommended for users who want to add a simple map of their store location.

First, you need to visit the Google Maps website on your computer. Next, enter your store’s address in the search field and Google Maps will show it on the map with a pinned marker.

Search for Your Store Location in Google Maps

Make sure that the marker is placed in the correct location. You can select a zoom level by clicking the zoom buttons in the bottom right corner.

Once you are satisfied with how the map looks, you need to click on the share button from the left column. This will bring up a popup where you need to switch to the ‘Embed a Map’ tab.

Select Google Map's Embed a Map Option

You will now see your searched location on the map with HTML code. You should click the ‘Copy HTML’ link to get the embed code.

Now head over to the admin area of your WordPress website and edit the post or page where you want to display the store locator map.

Normally, users add a store locator map on their contact form page with their business phone number and open hours.

On the post edit screen, you need to add a ‘Custom HTML’ block.

Add a Custom HTML Block to Your Page

You should paste the code you copied from Google Maps into the text area of the ‘Custom HTML’ block.

You can now preview the page to see Google Maps embedded into your page. It will show your store location marked on the map with links to get directions there or to save the location.

Preview of Embedded Google Map

This method works for quickly embedding Google maps, but it doesn’t give you maximum SEO benefits. In other words, it won’t help you to rank higher and get more traffic from search engines or Google map searches.

If you’re a small business, restaurant, or online store in one or more physical locations, then we recommend using the next solution to improve your local SEO rankings.

Method 2: Adding a Store Locator With Local SEO (Recommended)

Nearly 46% of all searches on Google have local intent. All in One SEO (AIOSEO) is the best WordPress SEO plugin on the market and helps you bring more free traffic from search engines to your website.

With AIOSEO, you can enter your store locations, contact details, and business hours using

schema markup so that information is displayed on search engine results pages.

For example, when you search Google for ‘Mcdonald’s locations in Florida,’ you will be shown a featured snippet with the different destinations and a map with pinned locations.

Multiple location map preview on Google

This will help improve your website’s SEO rankings and increase your click rate in search

Note: You’ll need at least the AIOSEO Plus plan to access the Local SEO feature needed for this tutorial.

First, you need to install and activate the AIOSEO for WordPress plugin. For more details, see our step-by-step guide on how to install a WordPress plugin.

Upon activation, the plugin will run a setup wizard. If you need help configuring the plugin, then please take a look at our guide on how to set up AIOSEO for WordPress.

AIOSEO setup wizard

Once the setup process is complete, you’ll need to head over to All in One SEO » Local SEO on your WordPress dashboard.

You can click the ‘Activate Local SEO’ button to get started configuring the local settings.

Activate Local SEO in AIOSEO

Next, you need to click the ‘Maps’ tab at the top Local SEO page.

On the Maps page, you should see the ‘API Key’ field.

Paste Your Google Maps API Key

You can obtain an API key for Google Maps by going to the Google Maps Platform and logging in with your Google account.

After that, you should click the ‘Get Started’ button.

Welcome to Google Maps Platform

Google Cloud resources are organized by project. If you don’t already have a project, then one will be created for you automatically.

Note that you will need to enable billing for the project in order to use the Google Maps API. However, it’s unlikely you will ever pay anything.

Map embed requests are free with unlimited usage as detailed in Google’s documentation, and you’re also given $200 of monthly credit each month.

You need to click the ‘Create Billing Account’ button.

Enable Billing for Your Project

You will now see the Account Information page. You should select your country from the drop-down menu and agree to the terms of service.

When you’re ready, click the ‘Continue’ button.

Agree to Google Maps Terms of Service

Now you need to select an existing payments profile or create a new one.

The profile will be either for an individual or a business and will include the name of the individual or business, a payment method, and an address.

Start Your Free Trial

Once you’ve entered that information, you need to click the ‘Start My Free Trial’ button.

Don’t worry about the ‘Free Trial’ wording. Map embed requests remain free even when the free trial has ended, and your credit card will never be charged until you manually upgrade to a paid account.

You may also be asked to fill in a 30-second survey of your business to make sure you are given the most relevant information.

You May Be Asked to Fill In a 30 Second Survey

When you click the ‘Submit’ button, your Google Maps API key will be displayed. You will need to enter this key into the plugin settings for Methods 2 and 3.

Then, you can click the ‘Copy to Clipboard’ icon at the end of the ‘Your API Key’ field. Once you’ve done that, just dismiss the popup by clicking the ‘Go to Google Maps Platform’ button.

Copy Your API Key

Restricting Your Google Maps API Key

We recommend that you restrict the key so that it can’t be used by others.

After you create your API key, Google will show a ‘Protect your API key’ popup where you can restrict your key so it only works on your own website.

In the ‘Select restriction type’ drop down, you need to select ‘HTTP referrers (web sites).’ Then in the next field, you should type your website domain name into the ‘New item’ field using the pattern *example.com/*.

Protect Your API Key

You should see a message saying, ‘Successfully restricted your API key.’ Now the key will only work for Google Maps embedded on your specific website.

Back on your website, you should enter your API key in the field. Next, you can scroll down to edit the map settings.

AIOSEO lets you display Google Maps using a Gutenberg (WordPress editor) block, shortcodewidget, or PHP code. It also lets you choose different map styles and add a custom marker to your map.

Edit map settings

For this tutorial, make sure the ‘Gutenberg Block’ setting is selected. Don’t forget to click the ‘Save Changes’ button when you’re done.

Now you can create your store locator map. How you do this depends on whether your business has just one store or multiple locations.

Adding a Map for a Single Location

If your business operates out of a single physical location, then the map will use the information you provide on All in One SEO’s ‘Locations Settings’ page.

Go ahead now and switch to the ‘Locations’ tab of the All in One SEO » Local SEO page.

Since you have a single physical location, you should make sure that the ‘Multiple Locations’ option is set to ‘No’.

Set Multiple Locations to No

Next, you should scroll down to the ‘Business Info’ section and fill in as much information about your business as possible.

This is important because the information may be displayed when someone searches for your business using Google search or Google Maps.

Business Info Will Be Displayed in Google Searches

After that, scroll down to the ‘Maps’ section to pin your exact location.

Simply enter your address in the ‘Enter a query’ field. A pin will be added at that location, and you can move the pin by dragging it to a new location if necessary.

Enter Your Store Location as a Query in the Map Section

When you’re finished, you need to scroll to the top or bottom of the page and click the ‘Save Changes’ button to store your settings.

Now you can add your store locator map to any WordPress post or page. To start, simply edit or add a new post or page on your website.

Once you’re in the block editor, click the ‘+’ button at the top and add the ‘AIOSEO Local – Map’ block anywhere on the page. Make sure you click the ‘Update’ or ‘Publish’ button when you’re finished.

Add an AIOSEO Local Map Block to Your Page

Congratulations, you have successfully added a Google Maps store locator to your site.

Adding Maps for Multiple Locations

To add a map for a different location, you need to navigate to the Locations tab of the All in One SEO » Local SEO page. Once there, you need to click the ‘Yes’ option for Multiple Locations, and then click the ‘Save Changes’ button at the top of the screen.

Set Multiple Locations to Yes

Once you save your changes, you will notice that a new Locations custom post type has been added to the admin sidebar. This is where you will enter your business locations.

Go ahead and navigate to Locations » All Locations and then click the ‘Add New’ button.

Add a new location

This will take you to the Locations editor. You will need to add a title for the location you are adding, such as the name of the store or the town.

Now you should scroll down to the ‘AIOSEO Local Business’ section of the page, under the post content.

Make sure you enter as much information as possible because it may be displayed when someone searches for your business in Google search or Google Maps.

Fill In the Business Info Section

After that, you should find the ‘Maps’ section and enter your address in the ‘Enter a query’ field.

A pin will be displayed at that location.

Add multiple map locations

After entering your location on the map and adding location information, go ahead and click the ‘Publish’ button.

You can now repeat this step and add your other business locations.

Once you’ve finished, you can add a store locator map to your website for each location by using the ‘AIOSEO Local – Map’ block in the WordPress editor.

Add an AIOSEO Local Map Block to Your Page

Now you will need to choose which location to display on the map.

To do that, look at the block settings pane on the right of the screen, and choose the store you wish to display from the ‘Location’ drop-down menu.

Choose a Store Location From the Drop Down Menu on the Settings Pane

Simply add additional local map blocks for any other locations. Don’t forget to click the ‘Publish’ or ‘Update’ button at the top of the page to display the maps on your website.

Method 3: Displaying Multiple Store Locations on a Single Map

The first two methods let you add store locator maps with a single location. If you have multiple locations, then you need to add a separate map for each one.

Alternatively, you can use our third method to display multiple locations on a single map.

The first thing you need to do is install and activate the Locatoraid Store Locator plugin. For more details, see our step-by-step guide on how to install a WordPress plugin.

On activation, you need to visit Locatoraid » Configuration and set up the plugin.

In the ‘Google Maps’ tab, you’ll need to paste a Google Maps API key. You can follow the method above in Method 2 to create one.

Then you need to click the ‘Save’ icon to store the key. You should notice that Google Maps is able to load correctly in the ‘Map Style Preview’ window.

Paste Your Google Maps API Key

Next, you can visit the ‘Configuration’ tab and choose whether to display miles or kilometers on the map.

You can also check the other options, such as the address format, the details you would like to display on the map, and which users can use the plugin.

Configure Your Map Including the Units You Wish to Use

Once you are happy with the plugin’s settings, make sure you click the ‘Save’ button to store your settings.

Now you are ready to add your store locations. You should navigate to Locatoraid » Locations. Once there, you need to click the ‘Add New’ button.

Click the Add New Button on the Locations Page

This will take you to the ‘Add New Location’ page. Here you can type the store name, location, and other details.

When you finish, you should click the ‘Add New Location’ button at the bottom of the page.

Fill In Your Store's Address and Other Information

You will be taken to the ‘Edit Location’ page where you can see the store location on a map.

If everything looks good, then you should click the ‘< Location’ button at the top of the screen to return to the Locatoraid » Locations page in your dashboard.

Confirm That the Map Is Correct Then Click the Locations Button

You can add more locations by clicking the ‘Add Location’ button and repeating these steps.

Once all of your store locations have been created, you can add the map to your website.

Simply add or edit a page and click the blue ‘+ Add Block’ icon. You should drag a Shortcode block onto the page and then enter the shortcode [locatoraid] into the field.

Add a Shortcode Block to Your Page

This default shortcode will work well for most websites. However, you can customize the map by using a different shortcode. Visit the Locatoraid » Publish page to learn more.

Now you can publish or update the page and visit your website to see your store locator map.

All of your store locations will be displayed on the same map. If your users type their address or click the ‘Locate Me’ link, then they can find the closest stores and get directions.

Preview of Locatoraid Map With Multiple Locations

We hope this tutorial helped you learn how to add a Google Maps store locator in WordPress. You may also want to learn how to create a free business email address or check out our list of the best AI chatbots for your website.

If you liked this article, then please subscribe to our YouTube Channel for WordPress video tutorials. You can also find us on Twitter and Facebook.

The post How to Add Google Maps Store Locator in WordPress first appeared on WPBeginner.


September 20, 2022 at 06:00PM