Saturday, September 24, 2022

How to Sell Group Memberships in WordPress for Corporate Teams

Do you want to sell group memberships for corporate teams?

Normally, membership websites only allow you to sell single user subscriptions. But what if you wanted to sell group memberships, so businesses can easily add their team members to the same account?

In this article, we will show you how to easily sell group memberships in WordPress for corporate teams.

How to sell group memberships in WordPress for corporate teams

Why Create Group Memberships in WordPress?

Selling membership subscriptions is a popular way to make money online blogging with WordPress. However, businesses may want to buy memberships for multiple people at once, such as an entire team or department.

Creating group memberships in WordPress makes it easier for companies to purchase your product licenses in bulk. It also allows the account administrator to easily add or remove licenses as needed.

Group memberships aren’t just useful for corporate teams. Volunteer groups and nonprofit organizations, church groups, or even families may find it easier to buy a group membership rather than multiple individual subscriptions.

You could also create this type of account to help teachers set up a virtual classroom for a group of students.

You may even allow members to re-sell your subscriptions. For instance, let’s say you run a membership site with healthy eating plans and online yoga classes.

Personal trainers or health and fitness experts could buy a corporate membership from your site and then sell access to their own clients.

That being said, let’s take a look at how to sell group memberships in a WordPress website.

Setting Up Group Memberships in WordPress for Corporate Teams

For this guide, we’ll be using MemberPress. It is the best WordPress membership plugin on the market and allows you to easily sell online subscriptions on your website.

First, you need to install and activate the MemberPress plugin. For more details, see our step by step guide on how to install a WordPress plugin.

Note: You will need a MemberPress Plus account or higher in order to install the Corporate Accounts add-on.

Upon activation, you’ll need to visit the MemberPress » Settings » License page in the WordPress admin area and enter your license key.

Adding the MemberPress license key

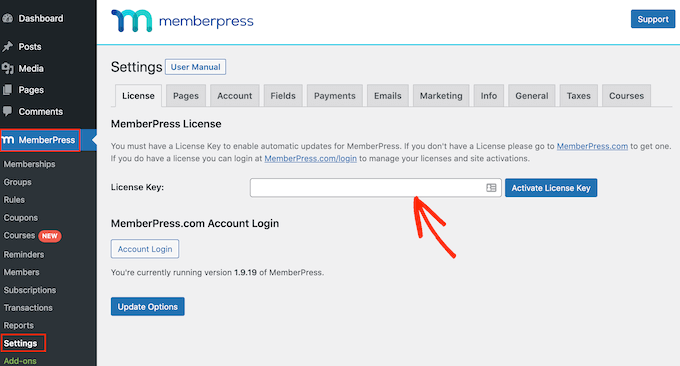
You’ll find this information under your account on the MemberPress website. It’s also in the email you got when you purchased MemberPress.

After entering this information, click on ‘Activate License Key.’

Next, you need to set up at least one payment gateway so you can easily accept credit card payments for your group memberships.

MemberPress Pro supports PayPal, Stripe, and Authorize.net. To add one of these payment gateways, simply click on ‘Add Payment Method’ and chose a payment method from the ‘Gateway’ dropdown.

Configuring a Stripe payment gateway

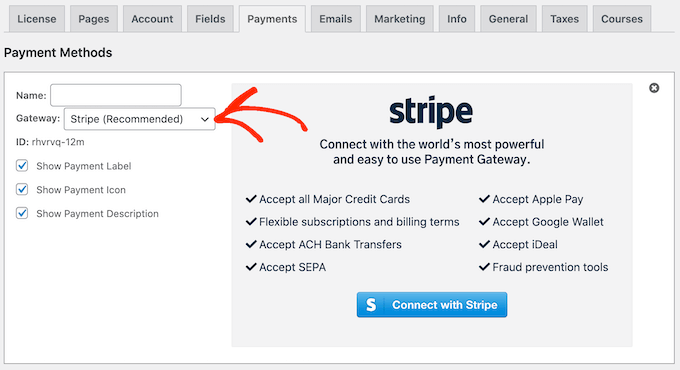
MemberPress will now show all the settings you need to configure before you can use this payment gateway.

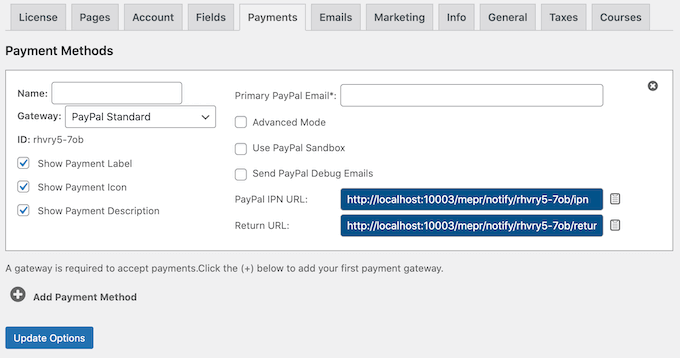
Each gateway has different settings, for example in the following image we’re adding PayPal payment to WordPress.

Configuring a PayPal gateway

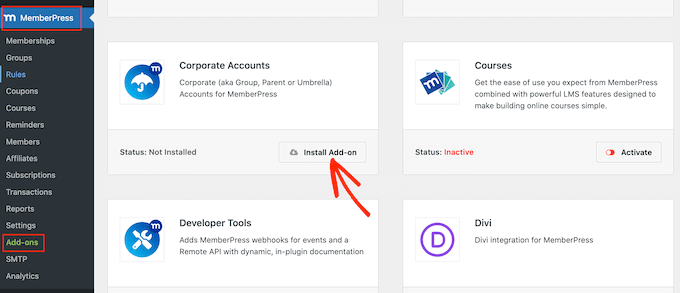
After adding one or more gateways, it’s time to enable the corporate membership features.

To do that, go to MemberPress » Add-ons and click on the ‘Install Add-on’ button next to the Corporate Accounts add-on.

The MemberPress Corporate Accounts add-on

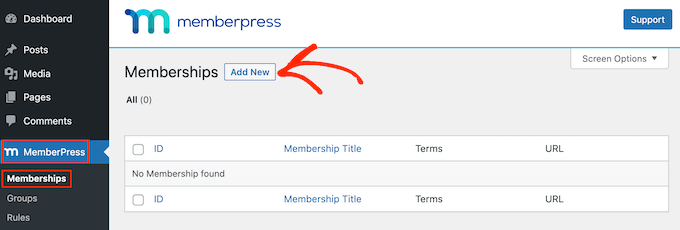
Now it’s time to create a corporate membership level by going to the MemberPress » Memberships page.

Here, click on ‘Add New.’

Creating a new membership subscription

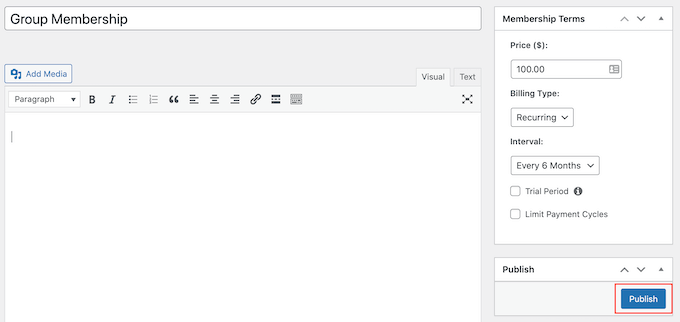
To start, type a title for your corporate membership plan.

You can then set a price by typing into the ‘Price’ field.

Adding a price to a corporate group membership

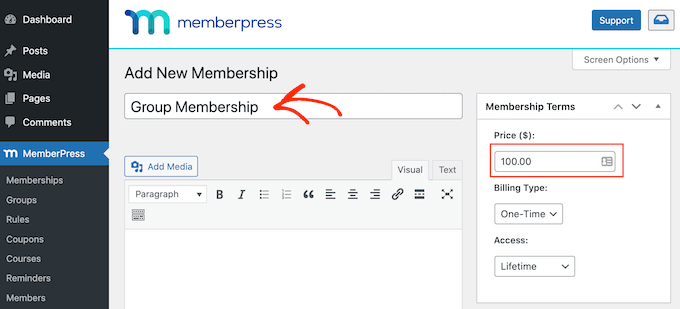
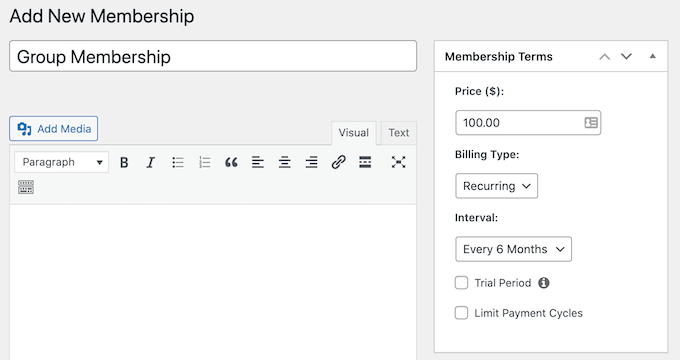
Next, use the ‘Billing Type’ dropdown to create the billing cycle, for example you might charge a one-time fee for lifetime access or create a recurring monthly subscription.

In the following image, we’re charging $100 every 6 months.

Creating a recurring group membership for corporate teams

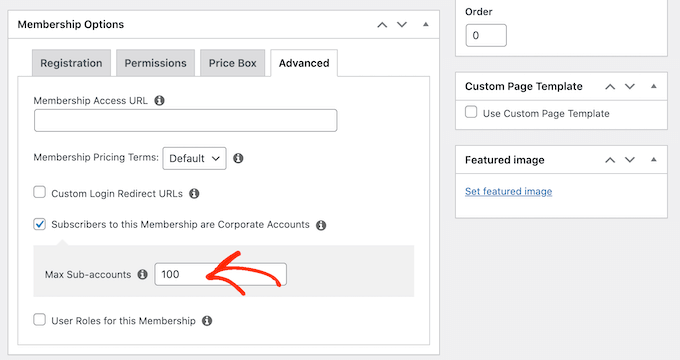
Next, you need to scroll to the Membership Options area and click on the ‘Advanced’ tab. Here, check the box next to ‘Subscribers to this Membership are Corporate Accounts.’

After that, you will see a new field where you can set the maximum number of sub-accounts that the account owner can add to this subscription.

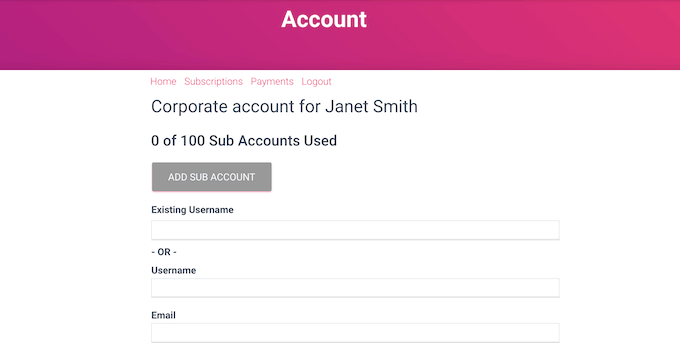
Anyone who purchases a corporate membership subscription will see a new ‘Sub Accounts’ link on their Account page.

How to add sub-accounts to a corporate membership

If they click the link, then they’ll see how many sub-accounts they have left to use.

They can add people to their account by typing in information such as the person’s first name, last name, and email address.

Adding a sub-account to a group team membership

By default, members can create an unlimited number of sub-accounts.

However, you’ll typically want to limit the number of sub-accounts to stop people from adding hundreds or even thousands of people to the same account.

To set a limit, type a number into the ‘Max Sub-Accounts’ field.

Setting a maximum sub-accounts for corporate group memberships

There are some more settings that you can use to further customize the membership level. However, this is enough to create a basic corporate membership subscription.

When you’re happy with how the plan is set up, go ahead and click on the ‘Publish’ button.

Publishing a corporate team membership level using MemberPress

Restricting Content for the Corporate Team Members to Access

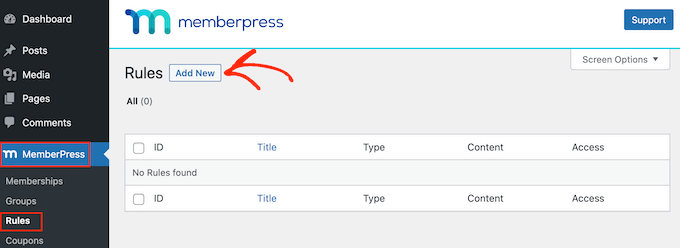
The next step is restricting your content so only people with the right subscription can access it. You do this by creating membership rules.

For example, you might lock all child pages of a ‘Corporate Membership’ parent page, or restrict access to all posts that have the ‘corporate’ category or tag.

To create a rule, go to MemberPress » Rules in your WordPress dashboard. Then, simply click the ‘Add New’ button.

Creating a new content dripping rule

The ‘Content & Access’ section allows you to restrict access in lots of different ways.

For example, you might make a single page members-only.

Restricting access to content on your WordPress website

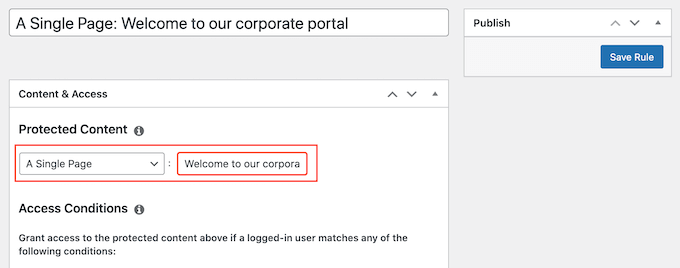
You can also restrict access to entire groups of content.

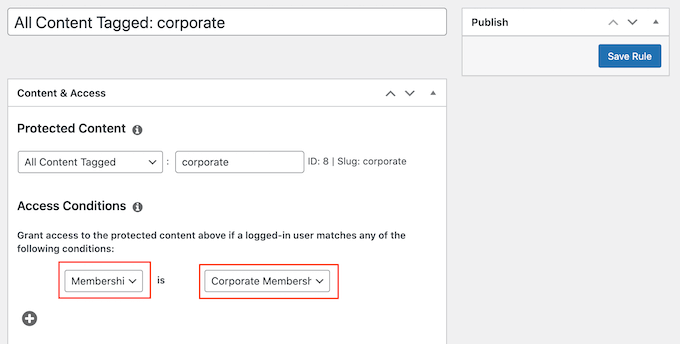
In this example, we’re going to restrict access to all content that has the ‘Corporate’ tag.

To do this, open the ‘Protected Content’ dropdown and choose ‘All Content Tagged.’ Then, type ‘Corporate’ into the field next to it.

Creating a content restriction rule using MemberPress

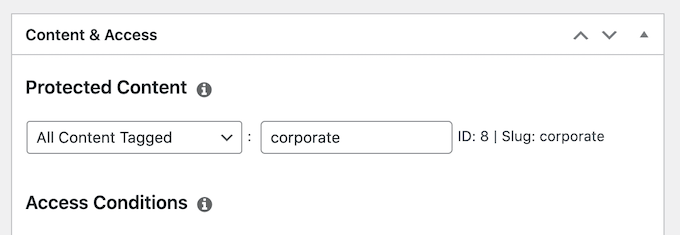
After that, open the ‘Access Conditions’ dropdown and select ‘Membership.’

You can then open the second dropdown and choose the corporate membership level you created earlier.

Restricting access to content using MemberPress levels

There are lots of other settings that you can try, including showing a preview to non-members. For example, you might show the post excerpt to people who don’t have a corporate membership. This can encourage visitors to buy a subscription so they can read the entire post.

To learn more about creating advanced membership rules, please see our ultimate guide to creating a WordPress membership site.

When you’re happy with how the rule is set up, scroll to the top of the screen and click on ‘Save Rule.’ You can create more content restriction rules, simply by repeating the same process described above.

We hope this article helped you learn how to sell group memberships in WordPress for corporate teams. You may also want to see our guide on how to create an email newsletter and our expert pick of the best business phone services for small businesses.

If you liked this article, then please subscribe to our YouTube Channel for WordPress video tutorials. You can also find us on Twitter and Facebook.

The post How to Sell Group Memberships in WordPress for Corporate Teams first appeared on WPBeginner.


September 24, 2022 at 03:52PM

Friday, September 23, 2022

How to Find Which Files to Edit in WordPress Theme

We are often asked about how to find which files to edit in a WordPress theme.

WordPress themes consist of several different files. Sometimes it may be hard for beginners to figure out which files they should edit to make certain changes in their theme.

In this article, we’ll show an easy and quick way to figure out which files to edit in your WordPress theme.

Finding which WordPress theme file to edit

Understanding WordPress Theme Template Files

WordPress themes consist of several files. These include template files, custom template tags and functions, template parts, images, JavaScript, and CSS files.

All the top WordPress themes follow the official best practices. This means they use the standard file and template structure to organize all the code.

For instance, all WordPress themes have archive.php, single.php, functions.php, and other files.

Each of these files is used as a template to display a particular area of your WordPress website. For example, single.php is used to display single posts and page.php template is used to display a single page.

Understanding the WordPress template hierarchy gives you a better understanding of how WordPress works.

If you ever need to add code to your WordPress theme, then it also helps you figure out which files you may need to edit.

For more details, see our complete cheat sheet for the WordPress template hierarchy for beginners.

That being said, let’s take a look at how to easily find which files to edit in WordPress theme.

Finding Template Files to Edit in WordPress Theme

First thing you need to do is install and activate the What The File plugin. For more details, see our step by step guide on how to install a WordPress plugin.

The plugin works out of the box, and there are no settings for you to configure.

Upon activation, you need to visit the front end your website and you will notice a new ‘What The File’ menu in WordPress admin bar.

What the file menu

Now you need to just take your mouse over to the menu item, and it will display a drop-down menu listing the template files used to display this page.

Clicking on the file name will take you to the default WordPress file editor where you can edit that particular file.

WordPress theme file editor

However, we do not recommend using WordPress file editor to edit theme files because there is no undo option.

If you accidentally lock yourself out of your website, then you would have to use an FTP client to fix it. That’s why we recommend using a FTP client or the File Manager app in your WordPress hosting control panel.

You can edit theme files using any plain text editor like Notepad.

Making direct changes to your WordPress theme is also a bad idea. Those changes will disappear when you update your theme.

If you are just adding some CSS, then you can add it as custom CSS in WordPress. For all other changes to your theme files, you should create a child theme.

The ‘What The File plugin’ can help you locate the theme files that you need to copy and edit in your child theme.

Note: The menu item added by the plugin in the admin bar will be visible to all logged-in users, and it has a link to an external site. You should only use this plugin in the development environment such as a staging site.

We hope this article helped you find which files to edit in your WordPress theme.

You may also want to see our WordPress theme development cheat sheet or take a look at WordPress generated CSS classes that you can use to style your themes.

If you liked this article, then please subscribe to our YouTube Channel for WordPress video tutorials. You can also find us on Twitter and Facebook.

The post How to Find Which Files to Edit in WordPress Theme first appeared on WPBeginner.


September 23, 2022 at 08:36PM

45+ Web Design Industry Statistics and Latest Trends for 2022

Are you searching for the latest web design statistics and trends?

With over 1 billion websites on the internet, it’s important that your site is well designed and provides a great user experience for your visitors.

In this article, we’ll share the most up-to-date web design industry statistics. With these insights and trends, you can design a website that drives results for your business.

Web Design Industry Statistics and Trends

Big List of Web Design Industry Statistics and Trends

We’ve divided this list of web design statistics into specific categories to make it easier to navigate. You can jump to the section you’re most interested in using the links below.

General Web Design Statistics

General Web Design Statistics and Trends
  • Currently, there are around 1.14 billion websites in the world. 17% of these websites are active, and 83% are inactive.
  • WordPress is used by 43.2% of all websites on the internet. Behind WordPress, Shopify, Joomla, Squarespace, and Wix are the other top website builders.
  • 50% of consumers believe that website design is crucial to a business’s overall brand.
  • It takes about 50 milliseconds (0.05 seconds) for users to form an opinion about whether they like your website or not.  
  • 75% of people form their opinion of a website based on its design.
  • Given 15 minutes to consume content, 2/3rds of people would rather read something beautifully designed than something plain, according to Adobe. 
  • 38.5% of web designers believe that outdated design is a top reason why visitors leave a website.

The importance of web design is clear from these statistics. How your website looks can have a huge impact on your online presence and how people view your business.

Since 75% of people form their opinion of a website based on its design and it only takes them 0.05 seconds to decide whether they like it or not, it’s important your site makes a good first impression.

Luckily, with WordPress, it’s easy to create a beautiful website, even if you don’t have any design experience.

With WordPress.org, the most popular website builder platform, you get access to thousands of free and premium WordPress themes. Themes instantly customize the appearance of your site including the layout, color, typography, and other design elements.

Plus, you can also use drag and drop page builders to easily create custom designs, or even design a custom theme from scratch.

It makes sense why WordPress is used by 43.2% of all websites on the internet.

To get started with WordPress, see our detailed guide on how to make a WordPress site.

Mobile & Responsive Web Design Statistics

Responsive Web Design Statistics
  • People on mobile devices account for about half of the web traffic worldwide. In the second quarter of 2022, mobile devices (excluding tablets) generated 58.99% of global website traffic. 
  • 61% of internet users have a higher opinion of companies with mobile-friendly website design.
  • 73.1% of web designers believe that a non-responsive design is a top reason why visitors leave a website.
  • 57% of internet users say they won’t recommend a business with a poorly designed website on mobile. 
  • Decreasing mobile site load times by just one-tenth of a second resulted in major increases in conversion rates.
  • 32% of small businesses already have a mobile app, and 42% plan to build one in the future. On the other hand, 26% of small businesses are unlikely to ever release one.
  • 50% of smartphone users are more likely to use a company or brand’s mobile site when browsing or shopping on a smartphone because they don’t want to download an app.
  • Google introduced worldwide mobile-first indexing in 2018. This means that Google primarily uses the mobile version of content when ranking your webpages in search engine results.

Considering that mobile devices account for about half of the web traffic worldwide, it’s essential that your website design is optimized for mobile users.

To easily design a responsive website, you can use a WordPress theme to ensure that it looks equally great on mobile phones, tablets, and desktops. Check out our recommendations for the best responsive WordPress themes.

Aside from how your mobile website looks, you also need to consider how fast it loads. Increasing mobile site loading speed by just 1/10th of a second results in higher conversion rates.

See our guide on how to speed up WordPress performance to enhance the user experience, boost conversions, and improve SEO.

On-Page Web Design Statistics

On-Page Web Design Statistics
  • Photos/images (40%), color (39%), and videos (21%) were the top visual elements consumers appreciate in website design. 
  • When visiting a website for the first time, 22% of visitors look for eye-catching colors. But, 21% will leave a site because of outlandish colors. 
  • 46% of people say that their favorite color to see on a website is blue, while only 23% say their favorite color for website design is yellow.
  • While it’s an important part of web design, only 8% of respondents notice whitespace when viewing a website for the first time. 
  • Similarly, only 18% of consumers look at a website’s font styles when visiting their pages for the first time, despite the importance of typography.
  • 38% of people look at a website’s page layout or navigational links when visiting a website for the first time. 
  • Users spend an average of 5.94 seconds looking at a website’s main image. 
  • 88.5% of website designers reported that ‘Flat design’ is currently the most popular web design trend. It’s a simple design style that uses two-dimensional elements and bright colors.
  • According to a study by Small Biz Trends, 70% of small business websites lack a call-to-action (CTA) on the homepage. 
  • 51% of people think “thorough contact information” is the most important element missing from many company websites.
  • 84.6% of web designers said that crowded web design is the most common mistake made by small businesses.

The statistics above will give you an idea of what design elements your website visitors appreciate the most, as well as any elements you could do without, such as Google Fonts.

High-quality images, color, and videos are the top visual elements consumers appreciate in website design. But, 70% of small business websites lack a call-to-action on the homepage.

While your design might impress visitors, if you don’t have a call-to-action, you won’t be able to convert those visitors into leads or customers.

You can redesign your website for higher conversions by following this tutorial on how to add call to action buttons in WordPress.

UI/UX Web Design Statistics 

UI/UX Design Statistics
  • Good UI (user interface) can raise a website’s conversion rate by up to 200%, while a better UX design can raise the conversion rate by up to 400%.
  • Companies who invest in UX (user experience) can expect to see an ROI of $100 for every $1 invested.
  • 31% of people think that an engaging user experience is a top priority for website designs. 
  • 88% of users will never return to a website after a poor user experience.
  • Gen Z users prefer UX/UI design that is highly personalized and intuitive.
  • Millennials are familiar with technology and have a low tolerance for anything that doesn’t work as it should. 
  • Gen X users want a pain-free UX experience.
  • Baby Boomers prefer simple and easy designs.
  • 47% of visitors expect loading time to be less than 2 seconds.
  • Website speed statistics show that pages loading within 2 seconds have an average 9% bounce rate. For page load times of 5 and 6 seconds, the rates are 38% and 46%.

User interface (UI) and user experience (UX) are two common terms used in the web design industry. Both are important for creating a successful, user-friendly site design.

UI refers to the screens, buttons, toggles, and icons that a user interacts with when visiting a website. While UX refers to the entire interaction a user has with a website and how they feel about it overall.

As you can see above, Gen Z users prefer UX/UI design that is highly personalized. See this guide on how to show personalized content to different users in WordPress.

In addition, 31% of people think that an engaging user experience is a top priority for website designs.

There are multiple easy ways you can make your WordPress website more engaging. For example, you can add interactive content like conversational forms, infographics, or quizzes.

eCommerce Web Design Statistics 

eCommerce Web Design Statistics
  • 85% of shoppers say product information and pictures are important to them when deciding which brand or retailer to buy from.
  • 78% of shoppers want eCommerce sites to include more images on their product pages.
  • 60% of consumers rate usability as an important design characteristic for an online shop.
  • The percentage of users who will continue shopping because of great UX is 90%.
  • In 2021, 53.9% of all retail eCommerce is expected to be generated via mobile devices.
  • Slow-loading websites cost retailers $2.6 billion in lost sales each year.
  • 23% of small retail businesses don’t have a website and rely solely on their social media accounts.
  • 24% of small retail businesses without a website responded that their reason for not having one was that they don’t know how to create/run a website.

What’s surprising here is that 23% of small retail businesses don’t have a website because they don’t know how to create one.

Yet, 53.9% of all retail eCommerce was expected to be generated via mobile devices last year.

If your retail business doesn’t have a website, you’re missing out on a ton of sales.

Like we mentioned earlier, creating a website is easy with WordPress and WooCommerce. Simply follow our tutorial on how to start an online store for step by step instructions.

In eCommerce web design, 85% of shoppers say product information and pictures are important to them when deciding which brand or retailer to buy from.

To improve your WooCommerce design and generate more sales, read this tutorial on how to customize WooCommerce product pages.

Web Design Industry Statistics

Web Design Industry Statistics
  • In 2020, the total number of web developers and designers in the United States was around 178,900. By 2030, this number is projected to reach over 205,000.
  • Employment of web developers and digital designers is projected to grow 13% from 2020 to 2030, much faster than the average for all occupations.
  • The web design services market size in the US is 40.8 billion.
  • Do-it-yourself website builder platforms are currently worth $24 billion in the US. They also experience a 4.9% annual growth rate.
  • The median pay for web developers and digital designers was $77,200 per year, or $37.12 per hour, in 2020. 
  • A client looking for a custom WordPress site usually pays between $3,000 and $15,000 dollars to a remote freelancer. 
  • 80.7% of website designers take one month to design a website. 

Employment of web developers and digital designers is projected to grow 13% from 2020 to 2030, much faster than the average for all occupations.

WordPress developers are in especially high demand, since WordPress powers 43.2% of all websites.

If you’re interested in becoming a WordPress developer, you can get started by reading our guide on how to learn WordPress for free.

Another interesting statistic is that the cost of a custom WordPress site or theme is between $3,000 and $15,000 dollars.

But, if your small business doesn’t have the budget, you can easily create a custom WordPress theme with a plugin like SeedProd.

SeedProd is the best drag and drop website builder for WordPress. It allows even complete beginners to create custom WordPress themes and page layouts, without editing any code.

Plus, SeedProd comes with ready-made themes and templates, color schemes, font pairings, design-related blocks, and more.

To get started, follow this guide on how to easily create a custom WordPress theme.

List of Sources

Adobe, Top Design Firms, Google, Deloitte, Statista, GoodFirms, IBISWorld, U.S. Bureau of Labor Statistics, Digital.com, SWEOR, Siteefy, W3Techs, Toptal, HubSpot, Forrester, Small Biz Trends, KoMarketing, Wilderness Agency, WPEngine, IsItWP, Hootsuite, WebFX, Neil Patel

We hope these website design statistics will help you make the best design decisions, whether you’re designing a brand new website or redesigning an existing one. You may also want to check out our pick of the best web design software and best SMTP services to improve your email deliverability.

If you liked this article, then please subscribe to our YouTube Channel for WordPress video tutorials. You can also find us on Twitter and Facebook.

The post 45+ Web Design Industry Statistics and Latest Trends for 2022 first appeared on WPBeginner.


September 23, 2022 at 03:29PM

Thursday, September 22, 2022

How to Add a Slide Panel Menu in WordPress Themes

Would you like to add a slide panel menu to your WordPress site?

Adding a responsive menu will make it easier for users to navigate your website when using mobile devices. When they tap your menu icon, a panel menu will slide onto the screen using a beautiful animation.

In this article, we’ll show you how to add a slide panel menu in WordPress themes without writing any code.

How to Add a Slide Panel Menu in WordPress Themes

Why Add a Slide Panel Menu in WordPress Themes?

Well-designed menus help your visitors find their way around your WordPress website. Many of your visitors will be using mobile devices, so it’s important to preview the mobile version of your WordPress site to see how your navigation menu looks on smaller screens.

Luckily, many WordPress themes come with built-in styles that will automatically show mobile-friendly menus when viewed on a small screen.

However, you may want to customize your mobile navigation even more and add a fullscreen responsive menu or animated slide panel menu.

With that in mind, let’s take a look at how to add a slide panel menu in WordPress themes.

How to Add a Slide Panel Menu in WordPress Themes

The first thing you need to do is install and activate the Responsive Menu plugin. For more details, see our step-by-step guide on how to install a WordPress plugin.

There is a premium version of Responsive Menu with extra themes and additional features such as conditional logic, but for this tutorial, we’ll use the free plugin.

Upon activation, navigate to the Responsive Menu » Menus page. Once there, you should click the ‘Create New Menu’ button at the top of the screen.

Create a New Responsive Menu

You will then see four themes that you can use for your new responsive menu. Additional themes are available for purchase.

For this tutorial, we’ll use the automatically selected theme. You can then click the ‘Next’ button.

Select a Theme for Your Responsive Menu

This will take you to the Menu Settings page. Here you can enter a name for your responsive menu, and then select which WordPress menu you’d like to be displayed in the panel.

For the sake of this tutorial, we chose the ‘Navigation’ menu. If you need to create a new menu, then you can learn how by following our guide on how to add a navigation menu in WordPress.

Give the Menu a Name and Link It With the WordPress Menu You Wish to Use

You can also hide the normal menu that comes with your WordPress theme so that your users will only see the new slide panel menu. You do this by entering CSS code into the ‘Hide Theme Menu’ field.

The code you need to enter here varies from theme to theme, and you can learn more details by clicking the ‘Know More’ link.

Users with the Pro version have a few additional settings. For example, Pro users can select the devices and pages where the menu should be shown.

Once you’re happy with the settings, you should click the ‘Create Menu’ button at the bottom of the page. This will take you to a page where you can finish customizing your menu.

You will see a preview of your website on the right of the screen, and there are buttons at the bottom to switch between phone, tablet, and desktop view. You’ll also find customization options on the left.

You Can Now Customize Your Responsive Menu

Notice that there is some text displayed above the menu. This is the menu’s title text and a line of text that the plugin calls ‘additional content’.

You can edit or hide the text by clicking on ‘Mobile Menu’ and then ‘Container’ in the menu on the left of the page.

Customize or Hide the Text Shown at the Top of Your Menu

You can type anything you like into the ‘Title Text’ field, such as ‘Main Menu’ or ‘Navigation.’ If you don’t want to display a title, then simply slide the ‘Title’ switch to the off position.

After that, you need to scroll down to the ‘Additional Content’ setting. You can toggle this setting off or type alternate content. In the screenshot below, you’ll notice that the switch has been toggled off so the words ‘Add more content here…’ are now hidden.

Customize or Hide the Additional Content for Your Menu

Once you’re happy with the menu settings, make sure you click the ‘Update’ button at the bottom of the page to store your settings.

The Responsive Menu plugin comes with many other options that allow you to change the behavior and appearance of your slide panel menu. You can explore these options on the plugin’s settings page and adjust them as needed.

Now you can visit your website to see the menu in action. Here’s how it looks on our demo website. Note that if the current page is in the menu, then it is highlighted with a color band.

Animation of a Slide Panel Menu in WordPress

We hope this tutorial helped you learn how to add a slide panel menu in WordPress themes. You may also want to learn how to track visitors to your WordPress site, or check out our list of must-have plugins to grow your site.

If you liked this article, then please subscribe to our YouTube Channel for WordPress video tutorials. You can also find us on Twitter and Facebook.

The post How to Add a Slide Panel Menu in WordPress Themes first appeared on WPBeginner.


September 22, 2022 at 05:44PM

Wednesday, September 21, 2022

How to Add Spin to Win Optins in WordPress and WooCommerce

Do you want to add a spin-to-win optin to your WordPress site or online store?

A spin-to-win optin adds gamification to your signup forms. You can use it to share discounts, special offers, and perks as a reward. This kind of optin is proven to increase engagement and sales.

In this tutorial, we’ll show you how to easily add a spin-to-win optin to your WordPress site or WooCommerce store.

How to Add spin-to-win optins in WordPress

What is a Spin-to-Win Optin?

A spin-to-win optin is a signup form or a discount coupon wheel which adds gamification to your WordPress website.

Your users play a game to win discounts, unlock special offers, or access downloads after playing the game.

Case studies have shown that gamified optins get conversion rates as high as 30% or more. The reason for that is quite simple. These gamified optins are fun, interactive, and instantly get users’ attention.

Spin the wheel popup preview

With rewards and coupons, you also encourage users to complete the game they started by using the reward they have earned, like making a purchase using a discount code.

Similarly, you can use spin-to-win options to offer incentives like free shipping and bundle offers for your online store and boost conversions.

That said, let’s see how you can easily add spin-to-win optins in WordPress and WooCommerce.

Adding a Spin-to-Win Optin in WordPress and WooCommerce

The best way to add gamification to your website is by using OptinMonster. It is the best lead generation software on the market.

With OptinMonster, you can grow your email list, get more leads, and convert website visitors into paying customers. Its drag-and-drop campaign builder makes it super easy to create a spin-to-win optin and set up powerful display rules.

First, you will need to visit the OptinMonster website and click the ‘Get OptinMonster Now’ button to sign up for an account.

OptinMonster

To create a spin-to-win wheel, you’ll need their ‘Growth’ plan to access the Coupon Wheel Campaigns feature.

After that, you need to install and activate the free OptinMonster plugin on your WordPress website. For more details, see our step-by-step guide on how to install a WordPress plugin.

The plugin connects your WordPress website to the OptinMonster app.

Upon activation, you’ll see the OptinMonster welcome screen. Simply click the ‘Connect Your Existing Account’ button.

Connect your existing account

Next, a popup window will open where you can connect your WordPress site with the OptinMonster account.

Go ahead and click the ‘Connect to WordPress’ button.

Connect OptinMonster to WordPress

Once you’ve connected OptinMonster with your site, you can also connect it with your WooCommerce account.

For this, you can go to OptinMonster » Settings from your WordPress dashboard.

Under the ‘General’ tab, scroll down to the WooCommerce section and click the ‘Auto Generate Keys + Connect WooCommerce’ button.

Auto generate keys and connect WooCommerce

WooCommerce will now automatically generate keys and connect to your OptinMonster account. After connecting WordPress and WooCommerce to your OptinMonster account, you’ll need to create a new campaign.

First, head to OptinMonster » Campaigns from your WordPress dashboard and then click the ‘Create Your First Campaign’ button.

Create first OptinMonster campaign

Next, you’ll need to select a campaign type and a template for your spin-to-win optin.

For the campaign type, go ahead and select the ‘Gamification’ option.

Select gamification campaign type

After that, you can select a campaign template.

OptinMonster offers multiple templates to choose from. Simply hover over one and click the ‘Use Template’ button.

Select a template

Once you select a campaign, you’ll be asked to provide a name for your template.

Simply enter a name and click the ‘Start Building’ button.

Enter a name for your campaign

After that, you will see the OptinMonster campaign builder interface.

You can drag and drop different blocks from the menu on your left onto the templates, like buttons, videos, countdown timers, and more.

Add blocks to your campaign

OptinMonster also lets you change your campaign design, text colors, fonts, spacing, and more. You can simply point and click on any item in the template to edit its appearance.

Next, go ahead and click on the wheel element in the template to see more options. For instance, you can edit the section and wheel colors.

From here, you can click on the ‘Customize Wheel Sections’ button to edit the values for each of the coupon wheel sections.

Customize your wheel

A popup window will now open with all the sections in your gamification wheel.

This popup allows you to add coupon codes and special offers to the wheel. You can select whether or not each option has a chance of winning.

When you turn an option off or on, the win percentages will be automatically recalculated.

Edit wheel sections

After customizing each section, you can simply close the popup window.

Choose When to Show the Spin to Win Optin

Next, you must select when you want your spin-to-win campaign to be displayed on your website or online store.

OptinMonster gives you powerful targeting and display options that allow you to trigger the spinner anywhere and at any time on your website.

Simply switch to the ‘Display Rules’ tab in the OptinMonster dashboard. From here, you can select different display rulesets for your campaign.

For example, you can use the ‘Exit Intent’ ruleset to launch the spinner campaign when a user is about to leave your website.

You can also configure the sensitivity of the exit intent and change it to low, medium, or high.

Add exit intent display rules

Next, scroll down to combine different rulesets. For example, you can set another rule to launch the campaign only on specific pages.

For this tutorial, we’ll select the ‘current URL path’ from the dropdown menu and then choose the ‘is any page’ option. This way, your spin-to-win optin will appear on all the pages and posts throughout your website.

Choose pages to show your campaign on

After adding display rules, click on the ‘Next Step’ button.

From here, you’ll be asked to select a view. Simply select the ‘Optin’ view and also choose a sound effect for your campaign.

If you don’t want to add a sound effect, then you can keep the default setting to ‘None.’

Choose sound effect and effects for campaign

Go ahead and click on the ‘Next step’ button.

Once you’re done, you’ll see a summary of your display rules. You can now click on the ‘Save’ button at the top to store your changes.

View a summary of display rules

Adding the Spin to Win Wheel to WordPress and WooCommerce

Now that your spin wheel campaign is almost ready, let’s add it to your website.

First, you will need to publish your campaign. From the OptinMonster dashboard, switch to the ‘Published’ tab and change the Publish Status to the ‘Publish’ option.

Publish your spin-to-win campaign

Don’t forget to click the ‘Save’ button to store your changes and close the campaign builder.

You can now visit OptinMonster » Campaigns from your WordPress dashboard.

You’ll see your recently created spin-to-win wheel campaign along with the ‘Published’ status highlighted in green.

If you don’t, then click on the ‘Change Status’ option under your campaign name and then change the status to ‘Published.’

Change status of your campaign

You can visit your website or WooCommerce store in a new incognito browser window to see a live preview of your campaign.

Based on your display rules, you’ll see the spin-to-win wheel popup on the screen.

Spin the wheel popup preview

We hope this article helped you add a spin-to-win optin to your WordPress website or WooCommerce store. You may also want to see our ultimate guide to boosting WordPress speed and how to choose the best design software.

If you liked this article, then please subscribe to our YouTube Channel for WordPress video tutorials. You can also find us on Twitter and Facebook.

The post How to Add Spin to Win Optins in WordPress and WooCommerce first appeared on WPBeginner.


September 22, 2022 at 02:46AM