Tuesday, October 4, 2022

How to Add a Stats Dashboard On Your WordPress Site

Do you want to add a stats dashboard on your WordPress site?

Analytics helps you discover how people find and use your website, so you can keep them coming back.

In this article, we will show you how to easily add a stats dashboard on your WordPress site.

How to add a stats dashboard on your WordPress site

Why You Need a Stats Dashboard in WordPress

Usually, you can install Google Analytics and view your reports by logging into your Google account. This sounds great, but many people forget to check their blog stats on a regular basis.

The two biggest reasons for that are:

  1. You have to log in to a separate website like Google Analytics to check the stats.
  2. You have to dig around in the Google Analytics dashboard to find what you’re looking for.

While GA is a powerful tool, it often takes a lot of time and clicking around to get to the data you want to view. Most beginners never make it this far.

Adding a stats dashboard to your WordPress website solves this problem. You will be able to quickly view the stats that matter without leaving your WordPress admin area.

That said, let’s take a look at how to easily add a stats dashboard on your WordPress site.

Adding a Stats Dashboard in WordPress

The best way to add a stats dashboard in WordPress is by using MonsterInsights. It’s the best Analytics solution for WordPress, and it helps you set up Google Analytics in WordPress without editing code.

For this tutorial, we will use the MonsterInsights Pro version because it includes powerful addons and advanced tracking features such as affiliate link tracking, eCommerce tracking, and dashboard reports.

There is also a MonsterInsights Lite version you use for free. It helps you configure Google Analytics in WordPress and shows a quick overview report in the dashboard.

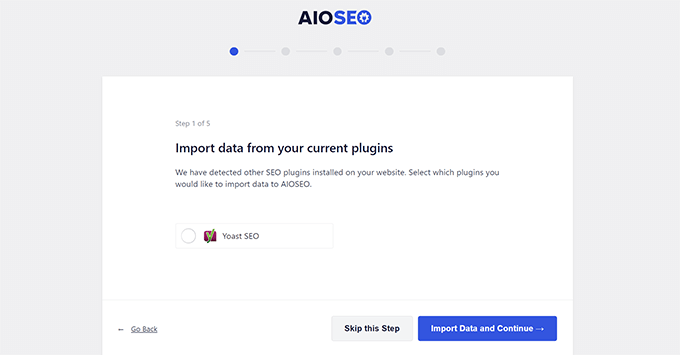
The first thing you need to do is install and activate the MonsterInsights plugin. For more details, see our step-by-step guide on how to install a WordPress plugin.

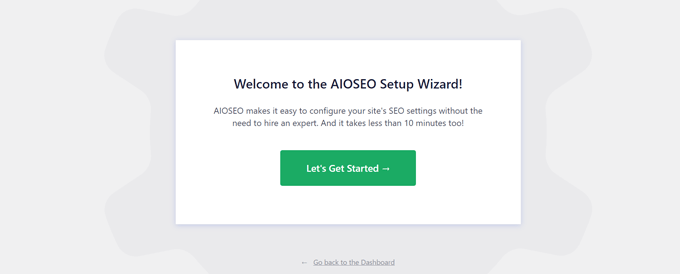
Upon activation, you’ll be taken to the MonsterInsights welcome screen. Simply click the ‘Launch the Wizard’ button and follow the onscreen instructions to set up Google Analytics.

Launch setup wizard

For more details, please see our guide on how to install Google Analytics in WordPress.

Now, let’s look at the stats dashboard MonsterInsights adds on your site.

How to Add Stats to WordPress Dashboard

On your main WordPress dashboard screen, MonsterInsights adds a widget that shows stats about your site’s performance. You can quickly view your website traffic and identify top posts and pages.

Simply log in to your WordPress admin panel. On the home screen, you’ll see the MonsterInsights dashboard widget.

Dashboard widget stats

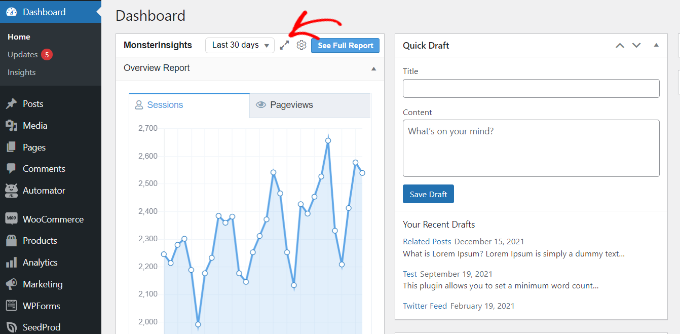
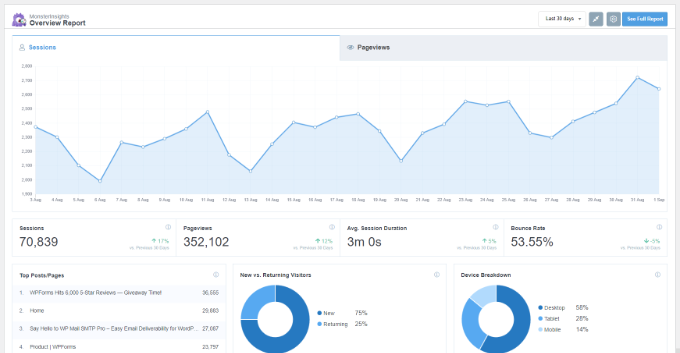
You can also click the expand icon at the top and view the dashboard widget report in full-width mode to get more details.

The expanded widget displays the number of sessions, pageviews, average session duration, and bounce rate in the last 30 days.

Additionally, it also shows your top-performing posts and pages, new vs. returning visitors, and a device breakdown.

Expand dashboard widget report

Next, let’s see how MonsterInsights helps you view statistics for each blog post and landing page in the WordPress dashboard.

See Page and Post Stats in WordPress Dashboard

To see how individual articles and pages perform, you can use the MonsterInsights Page Insights addon.

First, you can head to Insights » Addons from the WordPress admin panel and navigate to the ‘Page Insights’ box. Go ahead and click the ‘Install’ button.

Install page insights addon

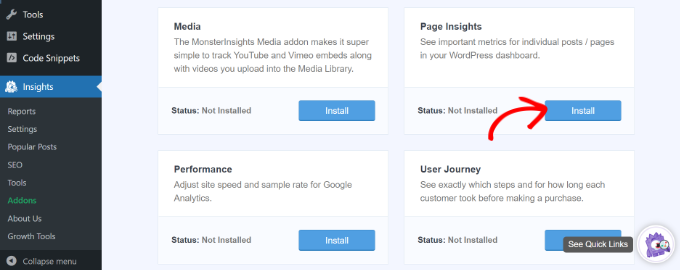
The addon will now automatically install and activate on your site.

Next, you can go to Posts » All Posts from your admin panel to see the stats of individual posts.

You’ll see an ‘Insights’ column added to your WordPress posts and pages screen.

View insights column in dashboard

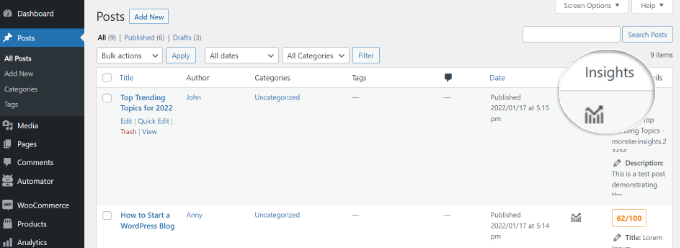
A small window will open if you click the ‘Insights’ icon for any blog post.

You can then view stats for a specific post or page. For instance, the plugin shows stats for only that post, including bounce rate, entrances, page views, time on page, page load time, and exits.

MonsterInsights page insights reports

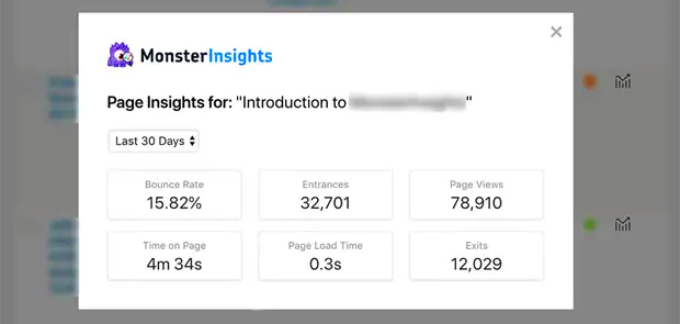
Using these stats, you can find out how your content is performing without having to leave your WordPress dashboard.

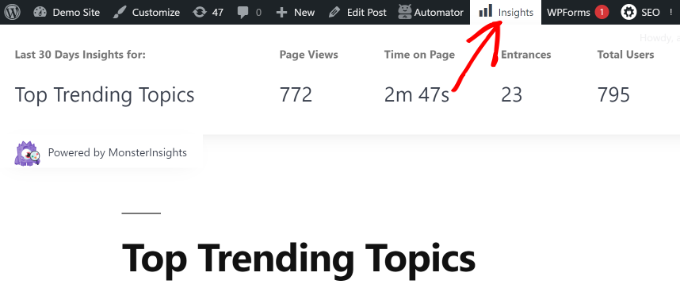
On top of that, MonsterInsights also lets you see stats for any post or page from the front end of your site. When viewing any post or page, you can simply click the ‘Insights’ button in the admin bar to see 30 days of performance stats for that post.

View insights stats on frontend

Viewing More WordPress Stats with MonsterInsights

With MonsterInsights, you get easy-to-understand dashboard reports. It neatly organizes data from Google Analytics and helps you make data-driven decisions.

Here’s a quick rundown of the reports you can see in MonsterInsights and how you can use them.

Overview Report

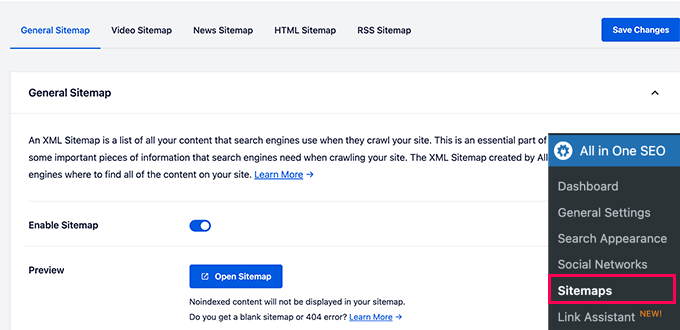
To view your WordPress stats dashboard, simply go to the Insights » Reports page.

First, you’ll see the ‘Overview Report.’ At the top, you will see two tabs, each giving you a graph of your WordPress visitor sessions or pageviews. This gives you a quick overview of incoming traffic to your website.

Overview report in MonsterInsights

Below that, you will see a comparison of your website stats against the previous 30 days. These boxes will show the number of sessions, page views counter, session duration, and bounce rate.

Below that, you will see a chart showing new vs. returning visitors. You can use these stats to see how many people return to your site. Similarly, there is a device breakdown chart, which helps you optimize your site for different devices.

Device breakdown and top countries report

This is followed by a list of the top countries people visit your website from, as well as the top websites that send the most traffic your way. You can use the top countries report to set up geolocation targeting, create personalized messages, and boost conversions.

MonsterInsights also acts as a pageview counter and shows your most popular WordPress posts and pages. This helps you find your top-performing content so that you can plan your content strategy accordingly.

Top posts and page report

Publishers Report

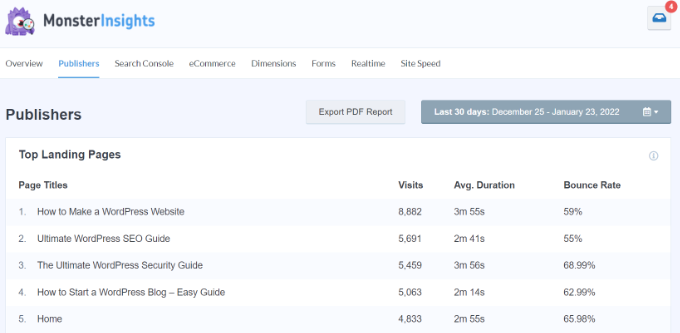
In the Publishers report, you get more details about the performance of your content. It’s great for content-rich websites like blogs, news, or magazine sites.

The report shows your top landing pages and the number of visits, average duration, and bounce rate they got in the last 30 days.

Top landing pages report

You can also view the top exit pages and see from where people leave your website. It helps optimize any WordPress blog a high exit rate. For example, you can show a popup and offer a free ebook to leaving visitors in exchange for their email addresses.

If you scroll down, then you’ll see reports on top outbound links and top affiliate links. With the help of these 2 reports, you get to track link clicks on your site.

Outbound and affiliate links report

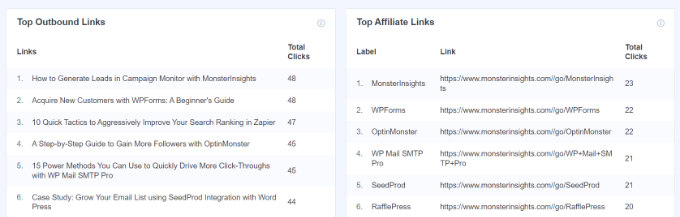
For example, you can see which affiliate is performing the best, so you can promote it more on your site. Similarly, outbound link tracking helps create new partnership opportunities where you can get more backlinks, sign up for an affiliate program, and more.

MonsterInsights also helps track file downloads on your site. It shows which download links are getting the most clicks. This way, you can uncover the type of downloadable content your audience prefers.

Lastly, you get to see your visitor’s demographics and interests in the Publishers report. MonsterInsights will show the age and gender of your audience and their interests.

Demographics and interest reports

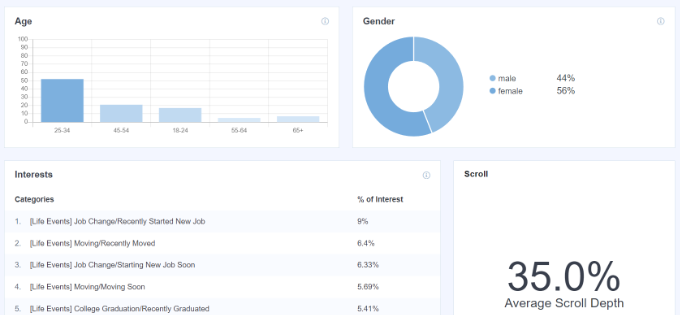
The plugin also enables scroll tracking on your site. It shows how far people scroll your content before exiting. You can use this information to improve conversions and placement of call-to-action (CTA) buttons and ads.

Search Console

If you’ve connected Google Search Console with Google Analytics, then MonsterInsights will show the top 50 search terms in your WordPress dashboard.

Simply visit the search console report and find out which keywords people use to find your website on the internet. You also get to see the number of clicks, impressions, CTR, and average position for each search term.

Search console report

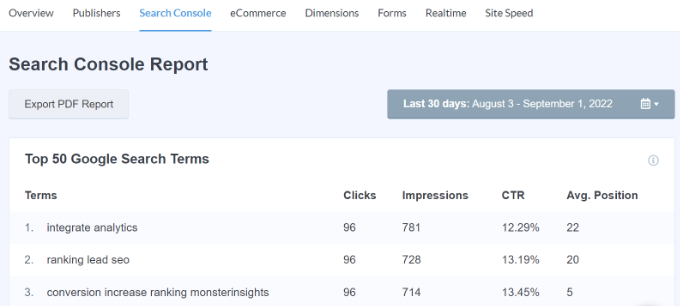
Using the report, you can optimize keywords close to reaching the top 10 positions in Google search and increase your organic traffic. Plus, the report helps perform keyword research and uncover new search term ideas for your site.

eCommerce Report

If you run an online store or a membership website, then you’ll love MonsterInsights eCommerce tracking features.

MonsterInsights offers an eCommerce addon that helps track your online store’s performance in Google Analytics. The best part is that MonsterInsights works with popular eCommerce plugins like WooCommerce, MemberPress, Easy Digital Downloads, GiveWP, and more.

For more details, please see our guide on how to set up eCommerce tracking in WordPress.

To view stats about your online store, you can head to the eCommerce tab.

eCommerce reports

In the reports, you will see a breakdown of conversion rate, transactions, revenue, and average order value. This gives you a quick overview of your store’s performance.

Besides that, MonsterInsights also shows top products on your website. For instance, if you have a WooCommere store, then you can see which product your customers like to buy the most. This way, you could find similar products or bundle different items together to boost sales.

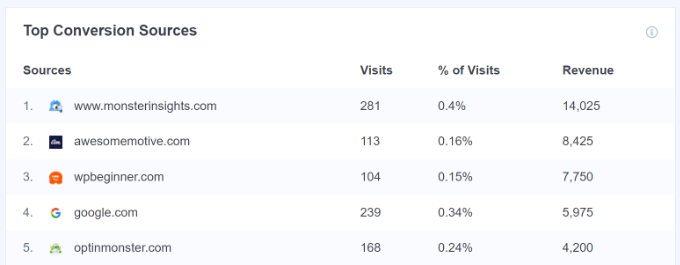
MonsterInsights also shows your top conversion sources. These are sites that send the most sales to your store. You can partner with these sources and offer exclusive discounts to visitors from these websites.

Top conversion sources

Dimensions Report

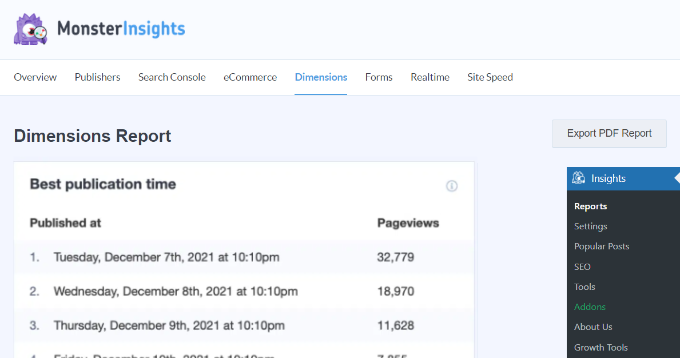
With MonsterInsights, you can easily track additional information in Google Analytics that’s not possible by default and view them in the dimensions report.

For example, you can set up author tracking and see which writer’s posts attract the most visitors. Similarly, you can also track categories and tags using custom dimensions.

It also helps test the best publication time for your blog posts. This way, you can publish articles to get more engagement, comments, and shares.
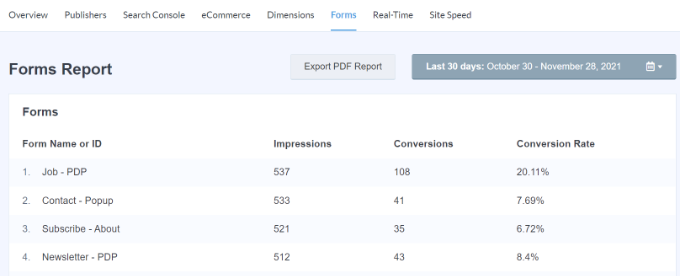
Best publication time report

Forms Report

Do you want to see stats on how your online forms are performing?

MonsterInsights helps you track form conversions in Google Analytics and shows a report in your WordPress dashboard.

Simply view the Forms report and see which form gets the most impressions and conversions. This way, you can optimize low-performing forms and increase the visibility of forms that are converting well.
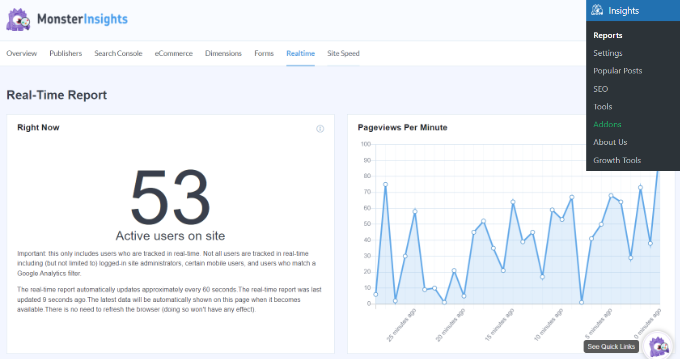
Forms report

Real-Time Report

A real-time report is great for getting up-to-the-minute stats about your website.

For example, a real-time report comes in handy if you’re running a flash sale and want to know how your campaign is performing. You get to monitor your website activities as they happen.

View real-time report in MonsterInsights

For more details, please see our guide on how to show real-time online users in WordPress.

Site Speed Report

The last report you’ll see in MonsterInsights is the Site Speed report. Although the report doesn’t relate to the website traffic, but it is crucial for your WordPress SEO and user experience.

Using the report, you can see an overall score of your site’s load time on mobile and desktop.

Site speed report

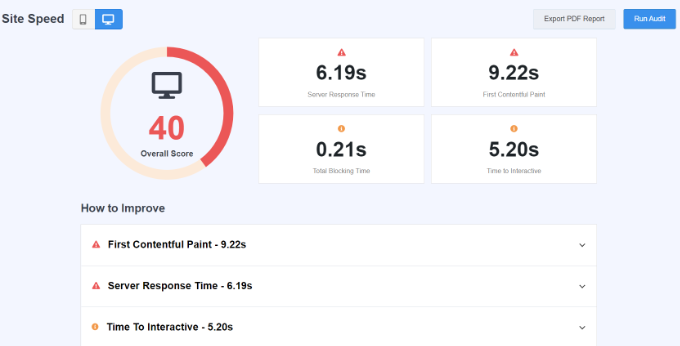
There are other metrics as well that you can use to improve your site’s user experience. MonsterInsights also provides recommendations for enhancing the score for these metrics and reducing the page load time.

You can see our guide on how to boost WordPress speed and performance for more tips and tricks.

We hope this article helped you learn how to easily add a stats dashboard in WordPress. You may also want to see our guide on how to start your own podcast or our expert pick of the best business phone services.

If you liked this article, then please subscribe to our YouTube Channel for WordPress video tutorials. You can also find us on Twitter and Facebook.

The post How to Add a Stats Dashboard On Your WordPress Site first appeared on WPBeginner.


October 04, 2022 at 11:20PM

9 Reasons Why We Switched from Yoast to All in SEO

Many of our users have asked us about the reasons we switched from Yoast SEO to All in One SEO for WordPress.

At WPBeginner, we decided to finally move to the All in One SEO for WordPress. It has improved our SEO workflow and given us the tools we needed to manage our website.

In this article, we’ll share our top reasons for switching to All in One SEO for WordPress and why we believe it is the best WordPress SEO toolkit on the market.

Why we switched from Yoast to All in One SEO

Why All in One SEO for WordPress?

If you are making a website, then installing an SEO plugin is one of the first things you should do in order to start getting traffic.

When we first started WPBeginner in 2009, we were using All in One SEO Pack because it was the original WordPress SEO plugin. After a couple of years, we switched to Yoast SEO because it was a newer plugin, and they had added new innovations.

Over the next several years, our website grew a lot. However, we felt that Yoast SEO stopped innovating and no longer had the features we needed. For instance, we needed better control over XML sitemaps, powerful schema.org tools, and more.

In 2020, our parent company Awesome Motive acquired the All in One SEO plugin.

The All in One SEO team did a fantastic job of completely overhauling the plugin, adding all the latest SEO features, and truly made it best in class. After numerous rounds of testing, we decided to make the move from Yoast SEO to AIOSEO in November 2021 because our team was convinced that AIOSEO had simply surpassed Yoast in terms of SEO features.

Since then, we have noticed a significant improvement in our editorial workflow and day-to-day SEO tasks.

That being said, here are the top reasons we switched from Yoast SEO to All in One SEO.

1. Better On-Page SEO Tools

On-page SEO is the term used for optimizing blog posts for SEO. This is one of the biggest day-to-day SEO tasks for most users as they add content to their websites.

All in One SEO offers the best on-page SEO experience with helpful features and tools at your fingertips.

On-page SEO in All in One SEO

You’ll see two prominent buttons in the top-right corner of your screen while writing content.

First, there is The Headline Analyzer tool, which gives a score for your post title with suggestions to improve it.

You can also try different headlines without changing the post tile and pick the best one. See our article on how to use the headline analyzer to write better SEO titles.

Headline Analyzer

Under the General settings, you can add a focus keyphrase. This will give you an SEO score for your focus keyphrase with tips to improve it.

Plus, you can optimize your content for more than one focus keyphrase.

Analyze focus keyphrase

The snippet editor allows you to easily add SEO title, meta description, and focus keyphrases.

You’ll also see a live preview of how the page would look in search engines.

Snippet editor

All in One SEO allows you to use dynamic tags in your SEO title and description. This way, you can automatically change the title and description.

For instance, you can use current month and year tags to always display the current year in the post title without editing them manually each year.

Best of all, the tags are searchable and you can easily add them from the drop-down menus, so you don’t need to know all the tags or look up any documentation.

Dynamic SEO title and description

The Social tab under SEO settings will show a preview of how your article would appear on Facebook and Twitter.

From here, you can set the title, description, and thumbnail that you want to use.

Social preview

All in One SEO allows you to choose from a bunch of options for your social media thumbnails.

You can also just use the custom image option, and manually upload an image to use as a social media thumbnail for each article.

Social media image

Need to redirect an article to a different post or page? No worries.

The Redirects feature lets you easily set up redirects for any post or page on your website without harming your site’s SEO.

Set up redirects

Other on-page SEO tools include a Schema generator and Link Assistant. We will talk about them individually later in this article.

Overall, we believe that All in One SEO offers a much easier yet incredibly powerful on-page SEO experience than any other tool on the market.

2. Powerful XML Sitemaps

WordPress itself comes with built-in XML sitemaps and almost all other SEO plugins include some kind of XML sitemap functionality.

However, All in One SEO lets you take your XML sitemaps to the next level.

The plugin will automatically generate sitemaps for all your content types, including posts, pages, custom post types, products, and more.

AIOSEO sitemaps

You can easily exclude any post or page that you don’t want to include in your sitemaps.

Plus, you can also exclude any content types or taxonomies from your sitemaps.

Exclude post types and taxonomies from sitemaps

Some users want to include their standalone landing pages to their sitemaps.

All in One SEO lets you include any page not generated by WordPress to your sitemaps.

Additional pages in sitemap

The plugin also generates an RSS sitemap.

This includes the latest updates to your content and helps your newer content get indexed much more quickly.

RSS sitemap

If you run a news website, then you can generate a news sitemap to appear in the Google News carousel.

Additionally, you can generate a video sitemap. This helps your videos appear in Video search results.

Video, News, and HTML sitemaps

This is the most extensive XML sitemap tool currently available to WordPress users, and it is still incredibly easy to use even for absolute beginners.

3. Most Comprehensive Schema Markup Support

Schema markup is a special type of HTML code that you can add to your WordPress website to tell search engines more about your content.

For instance, you can tell the search engines that a particular page is a blog post, a recipe, a FAQ, a news article, or a product page in your online store. Search engines can then use this data to display rich results.

Rich snippets example

All in One SEO comes with the most comprehensive support for schema markup for your WordPress website.

Starting with the Knowledge Graph data that helps search engines like Google get additional information about your website or business.

Knowledge graph

After that, you can set the default schema type to use for each post type.

Setting default schema markup for post types

You can also generate schema markup for individual posts or pages.

For instance, you can differentiate your regular articles from recipes, FAQs, online courses, and more.

Generate schema markup for individual post

If you run a local small business, then All in One SEO lets you easily add local SEO schema markup.

With local SEO markup, your site gets more exposure in local search results and Google Maps.

You can add multiple locations, display business hours, provide contact information, and more.

Local SEO

This extensive Schema.org support allows you to easily optimize your content for rich results in Google.

AIOSEO also lets you generate custom schema markup for recipes, videos, products, FAQ schema, and more. You can use their next-gen Schema templates to get rich snippets.

AIOSEO Custom Schema Generator for WordPress

For power users, you can even write your own custom schema and save it as reusable templates, and it even has built-in schema validation.

4. Beginner-Friendly User Experience

Not all WordPress users are SEO experts, and even those with SEO expertise can benefit from a smooth user experience.

All in One SEO for WordPress makes SEO simpler for both beginner and advanced users.

It comes with a much cleaner and simpler onboarding experience than other SEO plugins, and a simple setup wizard walks you through the basic SEO setup.

All in One SEO wizard

It uses a modern user interface that is easy on the eyes and fast.

It saves you from unnecessary page loads when making changes to SEO settings.

All in One SEO user experience

The plugin also gets out of your way when you just want to write content or work on your website.

Once properly set up, beginner users can focus on creating content and growing their business instead of reviewing SEO settings.

At the same time, all the advanced features are easily accessible when you need them.

We believe this polished user experience makes a big difference when working on your website and performing day-to-day SEO tasks.

Links play a crucial role in SEO. They not only help your users and search engines discover new content, but they also help search engine rankings.

However, tools that allow you to analyze your website’s internal and external links are usually very expensive.

All in One SEO brings that same functionality to your WordPress website.

The Link Assistant tool helps you analyze internal and external links added to each article.

Link assistant in All in One SEO

The plugin will also make smart link suggestions. You can click on a post to review a suggestion and add the link without editing a post.

This comes in particularly handy for promoting newer articles by adding links to your older articles.

Link suggestions

You can also click on the edit button and change the anchor text or surrounding text without editing the entire article.

We feel that the link assistant tool alone is a strong reason for switching to All in One SEO for WordPress.

6. Redirection Manager

Broken links cause 404 errors in WordPress, which may affect your site’s SEO.

All in One SEO comes with a powerful redirects manager tool that allows you to easily set up redirects on your website.

Redirects manager in AIOSEO

It keeps a log of 404 errors on your WordPress site so that you can easily find posts that may need to be redirected.

404 error log in AIOSEO

Also, if you change a post or page’s permalink, AIOSEO will immediately ask if you want to redirect the old URL to the new one.

Plus, if you ever plan to move your WordPress site to a new domain name, All in One SEO comes with a full site redirect that automatically redirects users to your new domain name.

Full site redirect

7. Social Media Integration

Social media platforms play an important role in promoting your website beyond organic search traffic.

All in One SEO provides deep integrations to social media platforms with open graph metadata integration.

You can add links to all your social media profiles associated with your website and help search engines discover them.

Social networks

Each author on your website can also add links to their individual social media profiles.

This allows search engines to discover social media accounts for authors on your website.

Social profiles for authors

Finally, you can easily set open graph metadata and thumbnails for each article.

This allows you to override default settings and get more control over how each article appears when shared on social media.

Social preview

8. Enhanced Image SEO for WordPress

Image search is an important source of traffic for many websites. All in One SEO allows you to easily optimize your images to get more search traffic.

Simply go to All in One SEO » Search Appearance and switch to the Image SEO tab.

Image SEO in All in One SEO

From here, the plugin can automatically use the filename to generate an image title and alt tags.

You can also tell it to replace dashes and underscores with spaces and change letter casing.

Generate image title and alt tags

With Image SEO, You can also disable WordPress attachment pages and redirect them to the original post or page where the image is embedded.

Lastly, you can optimize filenames by not stripping dashes, changing letter casing, and stripping common stop words.

9. Sitewide SEO Audit

For many beginners and small businesses, purchasing an expensive SEO tool for a site-wide SEO audit or competitor analysis is not a viable option.

All in One SEO comes with a built-in sitewide SEO audit and competitor analysis tool.

SEO audit in AIOSEO

With an SEO audit, you can see an overall SEO health score for your website.

It will also give you a detailed report with practical suggestions to improve your SEO score.

You can also see how your competitors are doing and get an SEO score check for any website.

Competition analysis tool in All in One SEO

Bonus SEO Tools included with AIOSEO

Aside from the above reasons, AIOSEO also gives us dozens of other powerful SEO features that we simply didn’t have previously.

For example, they were the first ones to add IndexNow support in WordPress to speed up search indexing for Bing.

Recently, they added a powerful table of content block that not only helps improve user experience, but it also helps you get multiple links in your Google search results.

Google Includes Table of Contents Entries in Search Results

You can add a table of content block right inside your WordPress editor, and the best part is that AIOSEO automatically generates the markup while letting you fully customize the content (including hiding certain headings).

Your Table of Contents Can Be in a Bulleted or Numbered List

Also if you’re using headless WordPress site, then they also have a full REST API support to improve your SEO rankings.

How to Switch From Any WordPress SEO Plugin to All in One SEO?

Switching to All in One SEO for WordPress is quite simple.

First, you’ll need to install and activate the All in One SEO for WordPress plugin. For more details, see our step-by-step guide on how to install a WordPress plugin.

Note: There is also a free version of All in One SEO that you can use. However, it may not have all the features we mentioned above.

Upon activation, you will be asked to run the setup wizard. During the setup, the plugin will automatically detect your other SEO plugin and will offer to import SEO data.

Import SEO data from other plugins

Simply check the box next to the old SEO plugin and click on the Import Data and Continue button.

All in One SEO will automatically import all your SEO data, including post titles, meta descriptions, keywords, and more.

You can also manually run the importer by visiting the All in One SEO » Tools page and switching to the Import/Export tab.

Manually import SEO data

Simply select the SEO plugin you were using before and hit the Import button.

We hope this article helped explain the reasons why we switched from Yoast to All in One SEO for WordPress. You may also want to see our complete WordPress SEO guide for beginners or take a look at our detailed side-by-side comparison of Yoast SEO vs All in One SEO.

If you liked this article, then please subscribe to our YouTube Channel for WordPress video tutorials. You can also find us on Twitter and Facebook.

The post 9 Reasons Why We Switched from Yoast to All in SEO first appeared on WPBeginner.


October 04, 2022 at 04:24PM

Monday, October 3, 2022

How to Create a Child Page in WordPress

Do you want to create a child page in WordPress?

WordPress pages can be standalone or hierarchical, which means the page has its own sub-pages known as child pages. For instance, you may want to create a Case Studies parent page and then create child pages for each of your separate case studies.

In this article, we will show how to organize your pages by creating a child page in WordPress.

How to create a child page in WordPress

What is a Child Page in WordPress?

WordPress comes with two default post types called posts and pages.

Posts are blog content, and are shown in reverse chronological order so the people who visit your WordPress blog will see the newest posts first.

Posts are normally organized with categories and tags, which is a great way to help visitors find related content.

Pages are one-off or standalone content that is not part of a blog. For example, many websites have an About Us and a Contact Us page. These pages can be hierarchical, which means you can organize them with parent and child pages.

Typically, business websites use pages to build a website without necessarily creating a blog. Businesses who want to add a blog to their content marketing strategy can still do so by simply creating a separate blog page, but this isn’t mandatory.

If you have too many pages, then it becomes difficult to organize them. This is where child pages come in.

You can create a parent page and then add child pages to better organize your navigation menus and your website as a whole. For example, the MonsterInsights website has a ‘Features’ parent page with a separate child page for each feature. This makes it easier for customers to find the feature they want to read about.

The MonsterInsights website

Many online stores also use child and parent pages to help visitors explore their eCommerce site and find products to buy.

Any child page can also have its own child pages. In this way, you can build relationships between your pages and create a logical structure that’s easier for visitors to navigate.

When pages are organized into parent and child categories, they also tend to be easier to manage in the WordPress admin area. This is particularly true as your WordPress website continues to grow.

That being said, let’s take a look at how to easily create a child page in WordPress.

How to Create a Child Page in WordPress?

To create a child page, you first need a parent page. You can use any page as a parent, or create a new page.

Once you have a parent page, you’re ready to add some child pages. Again, you can turn any existing page into a child, or create an entirely new page which will become your child page.

Then, simply open the child page for editing.

In the right-hand menu, click on the ‘Page’ tab. Then, find the ‘Page Attributes’ section and give it a click to expand.

The WordPress page attributes settings

If you look at the ‘Parent Page’ field then this is blank by default. This means the page is currently a parent page.

To turn this parent into a child page, simply open the ‘Parent’ dropdown. You can then select the page that you want to use as the parent page.

Creating a child page in WordPress

After that, go ahead and save your changes by clicking on the Update or Publish button.

To create more child pages, simply repeat the process described above.

To see all of your child pages, head over to Pages » All Pages. WordPress will show all of your child pages listed under their parent page with a — prefix.

In the following image, you can see that ‘Google Analytics dashboard’ and ‘WooCommerce Analytics’ are child pages of ‘MonsterInsight Features.’

WordPress parent and child pages

After creating some child pages, you may want to add a list of child pages for a parent page to your WordPress website.

We hope this article helped you learn how to create a child page in WordPress. You may also want to see our complete guide on how to create a landing page in WordPress and the best drag and drop WordPress page builders.

If you liked this article, then please subscribe to our YouTube Channel for WordPress video tutorials. You can also find us on Twitter and Facebook.

The post How to Create a Child Page in WordPress first appeared on WPBeginner.


October 04, 2022