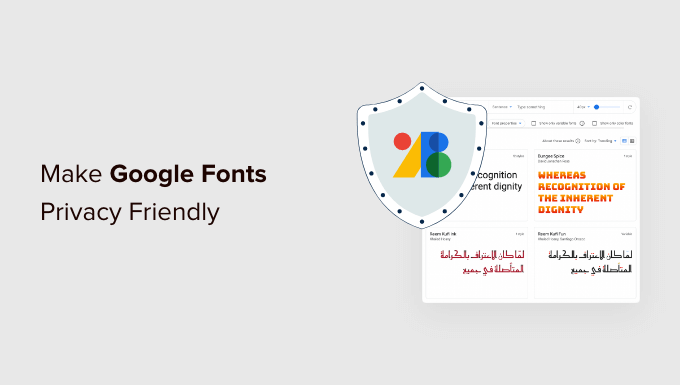
Are you concerned about the privacy issues and legal risks of using Google Fonts on your WordPress site?
Google Fonts have been found to breach the EU’s privacy regulations. That means if you have website visitors from Europe, then you may be at risk of paying legal damages.
In this article, we’ll show you how to make Google Fonts privacy friendly in WordPress.
Why Are Google Fonts Not Privacy Friendly?
Your WordPress website’s typography plays an important role in your design and brand identity. That’s why many website owners customize their typography by using Google Fonts.
However, when someone visits a website that uses Google Fonts, their IP address is logged by Google when the fonts are loaded. This is done without their permission and the European Union considers it a breach of privacy regulations.
This means that websites using Google Fonts are no longer GDPR compliant. That’s an important legal consideration if you have website visitors from the European Union because it may make you liable for damages (of course you should consider your legal advisors before taking any action).
With that being said, let’s take a look at how to make Google Fonts privacy friendly. We’ll cover three methods, and you can use the list below to jump to the one you wish to use.
One way to make Google Fonts privacy friendly is to host them locally in WordPress. Luckily, that’s easy to do by using a plugin.
The first thing you need to do is install and activate the OMGF (Optimize My Google Fonts) plugin. For more details, see our step-by-step guide on how to install a WordPress plugin.
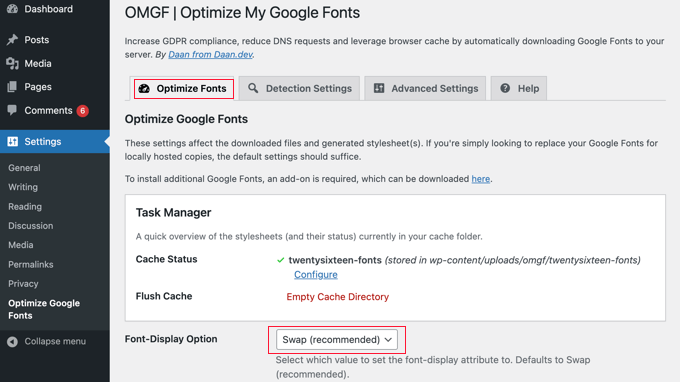
Upon activation, you need to visit Settings » Optimize Google Fonts to configure the plugin. You will see a statement that the default settings will automatically replace your Google Fonts with locally hosted copies.
All you need to do is scroll down the page and make sure that the ‘Font-Display Option’ has the default setting of ‘Swap (recommended)’ selected.
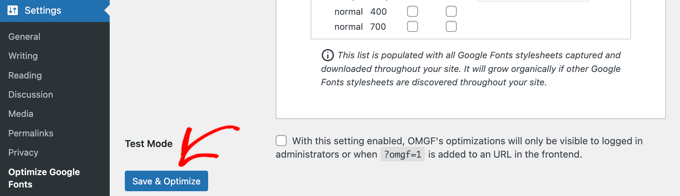
After that, simply click the ‘Save & Optimize’ button at the bottom of the page.
You’ll see a message at the top of the screen that says ‘Optimization completed successfully.’ Your Google Fonts are now hosted locally.
Bunny Fonts is an alternative to Google Fonts that puts privacy first. Their zero tracking and no-logging policies help you stay fully GDPR compliant. The Bunny Fonts API is fully compatible with the Google Fonts API, and this makes switching simple.
There will be no configuration needed. Once you’ve activated Bunny Fonts, they will immediately replace Google Fonts on your WordPress blog, shop, and every other part of your site.
Method 3: Disable Google Fonts in WordPress
Another way of avoiding the privacy issues of using Google Fonts is to disable them altogether, and simply use the system fonts installed on your users’ computers. We did this when we redesigned the WPBeginner website, and it improved our page load times.
Upon activation, the plugin will automatically disable all Google Fonts used by your theme and plugins. It doesn’t need to be configured.
Now WordPress will automatically use a default font in place of any Google Fonts that were being used. If you would like to choose different fonts, then see our guide on how to change fonts in your WordPress theme.
Would you like to learn more about custom post types?
WordPress allows you to create custom types of content. Besides posts and pages, you might like to add other types of content to your website, such as products, reviews, or recipes.
In this article, we will share the 12 most useful WordPress custom post types tutorials.
What Are Custom Post Types in WordPress?
Custom post types are a type of content on your WordPress site that are not the default posts and pages. Custom post types are often added to a WordPress site using custom code or plugins.
For example, you can create custom post types for portfolios, testimonials, and products. Many WordPress plugins also use custom post types to store data on your website.
How can you use custom post types on your WordPress website?
As the largest free WordPress resource site for beginners, we’ve written a lot about custom post types over the years. Let’s take a look at the most useful custom post types tutorials here on WPBeginner.
1. Decide Whether You Need A Custom Post Type
Before you start creating custom post types or taxonomies on your WordPress site, it’s important to evaluate your needs. A lot of times you can get the same results with the default WordPress posts and pages.
With the help of built-in categories and tags, you can sort your content in many different ways. For example, with pages, you can set up a hierarchical layout of content with child pages. You can also set up subcategories.
Using the default WordPress features makes content management easier in many ways. For example, a custom post type wouldn’t appear on your blog page or in your post RSS feeds.
After looking at the default options, you may find that you don’t need custom post types after all.
Once you decide that you do need a custom post type, you’ll need to create it. You can do this with a plugin, or manually by using code.
The Custom Post Type UI plugin makes it easy to create custom post types and is recommended for most users. You do this from the ‘Edit/Add Post Types’ page.
Alternatively, you can add a custom post type by pasting a code snippet into your theme’s functions.php file. The advantage of this method is your custom post types won’t disappear if the plugin is deactivated, but it’s only suitable if you’re comfortable handling code.
Adding custom post types in WordPress has become very easy thanks to the Custom Post Type UI plugin. However, many beginners have trouble displaying them on their websites.
To add a custom post type archive page, you first need to make sure that archives are enabled for your custom post type. In most cases they are, but if not then you can enable them in Custom Post Type UI’s advanced options or by using code.
Now you can visit the custom post type archive page. Let’s say your custom post type is called ‘movies’ and you have SEO friendly permalinks enabled. Then your post type archive will be located at:
http://www.example.com/movies/
You’ll need to replace ‘example.com’ with your own domain name, and ‘movies’ with your custom post type name.
You can now add this archive page to your navigation menu. You can also customize it by adding a custom template to your WordPress theme or using a theme builder like SeedProd.
By default, WordPress only includes your blog posts in your site’s main RSS feed. This means that your custom post type content won’t be visible to your main RSS feed subscribers.
You can easily include all publicly available post types into your main RSS feed by adding the following code to your theme’s functions.php file or a site-specific plugin.
function myfeed_request($qv) {
if (isset($qv['feed']))
$qv['post_type'] = get_post_types();
return $qv;
}
add_filter('request', 'myfeed_request');
However, you can use a different code snippet to only include specific custom post types.
5. Make a Separate RSS Feed for Each Custom Post Type
WordPress automatically generates separate RSS feeds for different archive pages of your website, including custom post types.
Let’s say you have a custom post type called ‘movies’ on your website. We’ve already seen that you can view all content created in that post type by visiting the post type archive page.
https://example.com/movies
To view the RSS feed, all you need to do is add /feed/ to the custom post type archive URL.
https://example.com/movies/feed/
Alternately, you can also view the feed by adding the post type parameter to your main WordPress RSS feed. For example:
https://example.com/feed/?post_type=movies
Now that you know how to access the RSS feeds for any custom post type on your website, you can use that URL to create links to your custom post type feeds.
For instance, you may want to display an icon or plain text link on the custom post type archive page, so that your visitors can easily subscribe to those posts.
By default, WordPress will never show custom post types in its on-site search results. That means your visitors may miss out on some great content, and you’ll miss out on extra page views.
The easiest way to include custom post types in WordPress search is with the SearchWP plugin. It’s easy to use and lets you search content that isn’t included in the default WordPress search.
To include custom post types in your searches, simply click on the plugin’s ‘Sources & Settings’ button. Here you can put a checkmark next to each post type you wish to include in search results.
You can also choose how important each custom post type is when displaying search results, and customize the search engine in other ways.
You can also create a custom search form that will only show results from your custom post type. For example, if you have a custom post type called ‘movies’, then you can create a special movie search form that only returns movies in the search results.
This kind of custom search helps your visitors view more pages and spend more time on your website. This will give off positive WordPress SEO signals like lower bounce rate and increased dwell time.
You can create an advanced search form for custom post types using the SearchWP plugin. It allows you to create a second search engine that will only search your custom post type. You can then create a custom search form that you can add to your posts or sidebar.
By default, WordPress categories can only be used to organize posts, not custom post types.
You could create a custom taxonomy to organize your custom posts, but what if you want to use the same categories you use for your blog posts?
The easiest way to associate your custom post type with categories is the Custom Post Type UI plugin. It adds a ’Taxonomies’ area in the settings for each custom post type.
Simply check the ‘Categories (WP Core)’ box and you will be able to use categories to organize your custom post types.
The sticky posts feature in WordPress allows you to add featured posts. By default, it only works for blog posts and not for custom post types.
You can enable sticky posts for your custom post types as well by installing the Sticky Posts – Switch plugin. You simply check the box next to the custom post types that you wish to support this feature.
Now when you visit the admin page for that custom post type, you will notice a new column where you can make posts sticky.
All you need to do is click the star next to the posts you wish to feature.
These sticky posts will be shown on your WordPress home page. To display sticky posts on your custom post type archive page as well, you’ll need to add some code to your theme files.
10. Add User Submitted Content to Custom Post Types
You may want to allow users to submit content for custom post types on your site, such as movie reviews or recipes. This is an easy way of adding extra content to your site.
One way to do this is by giving users access to your WordPress admin area and assigning them the author user role. Alternatively, you can add a submission form to your website.
You can do that using the WPForms plugin. You will need the Pro version to access the post submissions addon, and the provided ‘Blog Post Submission Form’ template makes creating the form simple.
By default, user submitted posts are saved as ‘Drafts’ pending review. You can change the post type in the form’s settings so content is submitted to a custom post type instead.
You may come across situations where you will have to merge or convert custom post types. For example, you may want to move items from one post type to another.
Simply install and activate the Post Type Switcher plugin. Upon activation, you should go to the custom post type admin page and select the posts you want to move.
When you bulk edit the posts, you will notice there is a new drop down menu allowing you to change the post type for that item.
Custom meta boxes allow you to add custom fields to the WordPress post editor screen. This way you can create additional input fields for your post types.
The easiest way to create custom meta fields in WordPress is by using the Advanced Custom Fields plugin. Simply click the ‘Add New’ button on the Custom Fields page.
After that, you should follow the on-screen instructions to create a group of custom fields to add to your custom post type.
Are you looking for the latest CMS market share trends and usage stats?
These statistics can help you better understand the CMS market so you can choose the best CMS for your needs. Or you might even learn something new about your favorite content management system.
In this CMS market share report, we’ve collected the latest trends and usage stats for all the biggest content management systems.
CMS Popularity and Market Share Report 2022
We’ve divided this CMS market share report into several different categories. Simply use the table of contents below to jump straight to the statistics or content management system you’re most interested in.
When we look at the top 1 million websites based on traffic, almost 900,000 use a CMS. That’s nearly 90%.
However, experts warn that content management systems may be less popular in the business space. This is due to the higher costs of setting up a CMS for business use and a lack of CMS knowledge among small-to-medium enterprises.
The best content management systems make it easy to manage your content and create web pages, usually without having to write any code.
While it is possible to build a website without a CMS, you would need to learn a few different programming languages such as HTML, CSS, and PHP. You might even need to hire expert developers or web design specialists.
Without a CMS, you would need to write code every time you wanted to update your site. You might also have to deal with common errors if you make a mistake in the code.
With that being said, it’s not surprising that so many websites already use a CMS. In the future, we expect to see the number of hand-coded sites continue to fall, as more and more people realize the benefits of a good CMS.
CMS Market Share
Throughout 2021, North America held a dominant share of the global CMS market, with Europe holding the second largest share.
Experts predict that North America’s share will continue to grow throughout the 2022-2028 time period.
When compared to other regions, it is estimated that Latin America, the Middle East, and Africa will contribute the least to the global market throughout 2022-2028.
According to experts, the government, life science, medical and health, retail, consumer goods, and defense sectors all contribute “significantly” to the size of the CMS market.
In 2021, enterprise web content management dominated the CMS sector, although the healthcare sector did acquire a “significant” share of the CMS market.
Experts predict that the Asia Pacific region will see the highest compound annual growth rate (CAGR) throughout 2022-2028. CAGR is the average rate that an investment grows or shrinks over a period of time.
According to experts, the CMS market in the Asia Pacific region is currently experiencing growth due to more small and medium-sized businesses adopting content management systems.
North America may continue to dominate the CMS market, but experts predict that the Asia Pacific region will get the highest return on investment out of all the regions.
This suggests the Asia Pacific market will play a much larger role in the CMS space, moving forward.
Content Management System Market Value
The global CMS market was valued at approximately $35,903 million in 2018.
By 2021, the global CMS market was worth around $17.5 billion.
The CMS sector is predicted to hit $25.5 billion by 2028.
Experts predict that the CMS market will have a compound annual growth rate of roughly 6.5% between 2022 and 2028.
There are over three million, five hundred thousand WordPress blogs and websites in the US alone.
When we look at the top 1 million sites based on traffic, 28.7% of those sites use WordPress open-source software.
29.65% of the top 100 thousand websites use WordPress, and 29.41% of the top 10 thousand sites run on WordPress.
The WordPress CMS market share has grown from 55.3%-64.2% between 2011 and 2022, which is an 8.9% increase.
WordPress is the world’s most popular CMS, and that seems unlikely to change anytime soon.
The figures show that the number of hand-coded websites has decreased every year since 2011. At the same time, the number of WordPress websites has increased every single year. This suggests that WordPress is a popular choice among first-time CMS users.
This makes sense, as WordPress is one of the most user-friendly content management systems. WordPress is also one of the most flexible and customizable CMS platforms, and you can even download it for free from WordPress.org.
No matter whether you want to start a personal blog, an online store, or a multilingual website, you’ll have no problems finding the perfect WordPress theme and plugins. You can think of plugins as modules or apps that extend the core CMS.
WordPress is also optimized for search engines and gives you easy access to specialist SEO tools such as AIOSEO. All of this explains why WordPress has such a big user base.
Since WordPress is an open-source CMS, you can use it with a huge range of different WordPress hosting providers. Again, this makes WordPress a flexible CMS that appeals to lots of different people and businesses.
However, although WordPress has a far bigger market share than any other CMS, the content management system space is huge.
Even a 1% market share still translates to millions of websites. With that in mind, many of the content management systems in this report are still big players on the CMS market, even if they can’t compete with the sheer number of WordPress websites.
When you look at the top 1 million eCommerce sites, 2.67% of them use WooCommerce, a popular WordPress plugin.
3.84% of the top 100 thousand websites use WooCommerce, and 3.82% of the top 10 thousand sites use WooCommerce.
Out of the top 1 million eCommerce sites, Shopify is the second most widely used CMS at 2.05%.
Meanwhile, 0.85% of those sites use Magento, and 0.49% use OpenCart.
It may not be a standalone CMS, but the statistics show that a significant number of online stores use WordPress and WooCommerce to create a CMS with eCommerce functionality. For this reason, we’re including WooCommerce in our CMS market share report.
According to the data, eCommerce sites that get the most traffic are more likely to use WooCommerce, although Shopify is a close second favorite among the top online stores.
Shopify is a fully hosted platform so you don’t need to worry about performance, which could explain why Shopify is used by 2.05% of high-traffic eCommerce sites.
Similarly, there is no shortage of managed WordPress hosting providers who can fine-tune your WooCommerce store and make sure it provides the best possible customer experience.
If you choose WordPress and WooCommerce as your eCommerce CMS, then you’ll also have access to lots of WooCommerce plugins that can extend and optimize the platform.
With their managed hosting and high performance, both Shopify and WooCommerce have a lot to offer online store owners and entrepreneurs. For a more detailed look at these two platforms, please see our Shopify vs WooCommerce comparison.
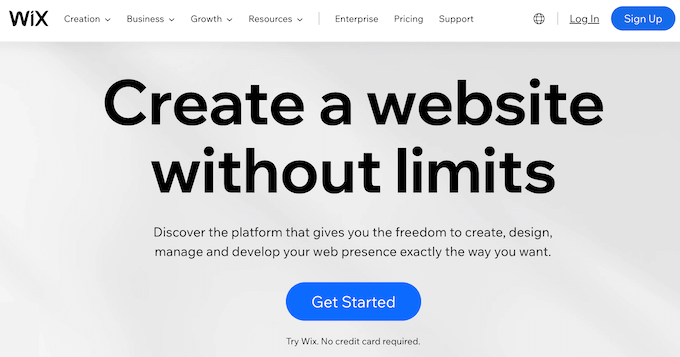
Wix Market Share
Out of all the websites that use a known CMS, around 10% of those sites use Wix. This makes Wix one of the most popular content management systems.
Despite holding a 10% share of the global CMS market, Wix only powers 0.56% of the top 1 million websites.
0.69% of the top 100 thousand websites use Wix, and 0.98% of the top 10 thousand sites use Wix.
When we compare Wix’s market share to its closest competitor, we get interesting results.
Out of the top 1 million sites, 28.7% of those websites use WordPress but only 0.56% use Wix. This suggests that Wix appeals to small sites and businesses that get less traffic, rather than high-traffic websites.
By comparison, high-traffic websites are much more likely to use WordPress.
1.36% of the top 100 thousand websites use Squarespace, while 3.16% of the top 10 thousand sites use this popular hosted platform.
Squarespace’s CMS market share has grown from 0.2%-3.0% between 2011 and 2022, which is a 2.8% increase in 10 years.
Similar to Wix, Squarespace is much more popular among sites that have less traffic, compared to sites that get lots of visitors.
This makes sense, as Squarespace is best known for its ready-made templates and ease of use, which makes it a great platform for first-time website owners and smaller businesses.
Squarespace also has some limits that may be less appealing to larger businesses. For example, Squarespace only has a few integrations with third-party services. This can be a problem for big companies that want to use lots of different software and services with their content management system.
All of this may explain why we see larger organizations opt for flexible platforms such as WordPress, while smaller sites tend to choose hosted platforms like Squarespace or Wix.
2.24% of all websites with a known CMS, use the GoDaddy website builder.
It is estimated that 1,750,645 live websites are GoDaddy sites.
When we look at the top 1 million sites, 0.02% of those sites use GoDaddy.
0.02% of the top 100 thousand websites use GoDaddy, while 0.03% of the top 10 thousand sites are built with GoDaddy.
Our market share stats show that very few high-traffic websites use GoDaddy, which reflects the audience that GoDaddy seems to be targeting.
GoDaddy’s website builder is a simple and easy tool that lets you create a professional looking website without any special design or development skills. It comes with ready-made blocks and layouts, which are perfect for anyone who is looking to create a website, fast.
However, GoDaddy is not as feature rich or flexible as some of the other content management systems and builders on our list. This could explain why it’s only used by 0.02% of the top 1 million websites.
If you’re looking to move away from GoDaddy, then you can see our expert pick of the best GoDaddy alternatives.
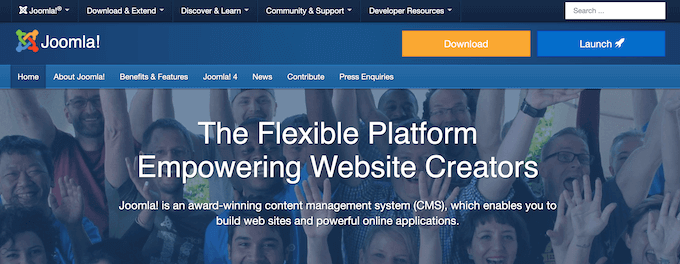
Joomla CMS Market Share
1.72% of all websites with a known CMS, use Joomla.
It is estimated that 1,325,993 live websites use Joomla.
When we look at the top 1 million sites based on traffic, 1.34% of those sites use the Joomla CMS.
2.04% of the top 100 thousand websites run on Joomla, while 1.89% of the top 10 thousand sites rely on Joomla as their CMS.
Joomla’s CMS market share has reduced from 10.9% to 2.5% between 2011-2022. That’s a 8.4% decrease in 10 years.
Joomla still has a significant user base, but the growing popularity of user-friendly platforms such as WordPress and Shopify have affected its market share.
Many shared hosting providers offer one-click install packages for Joomla. However, the Joomla control panel isn’t as straightforward as other systems, with lots of different menus and settings that you can use to customize your site. This means that Joomla has a steep learning curve.
By default, Joomla also doesn’t allow users to install extensions and templates from the control panel, which can make it difficult for first-time users to find helpful addons.
This is a powerful platform with a loyal fanbase, but with so many user-friendly alternatives we may see Joomla’s market share continue to decline.
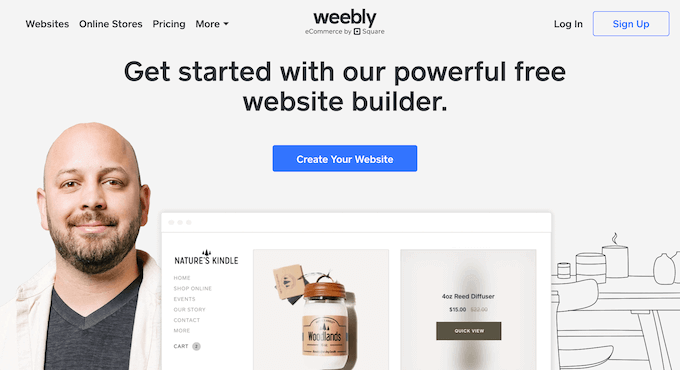
1.28% of all websites that use a known CMS use Weebly.
It is estimated that 991,368 live websites run on Weebly.
When we look at the top 1 million sites based on traffic, 0.09% of those sites use the Weebly CMS.
0.17% of the top 100 thousand websites are built using Weebly, while 0.31% of the top 10 thousand sites use Weebly.
Weebly is a fully hosted platform that has everything beginners need to build a website, including ready-made templates. a built-in contact form, professionally-designed sliders, and photo galleries.
It’s an easy-to-use platform, which explains why Weebly has a user base of over 991,000 websites.
However, as a fully hosted platform you’re locked into the functionality that Weebly provides. You can’t hire a developer or designer to add new features to a Weebly website, which might be why so few high-traffic websites use Weebly.
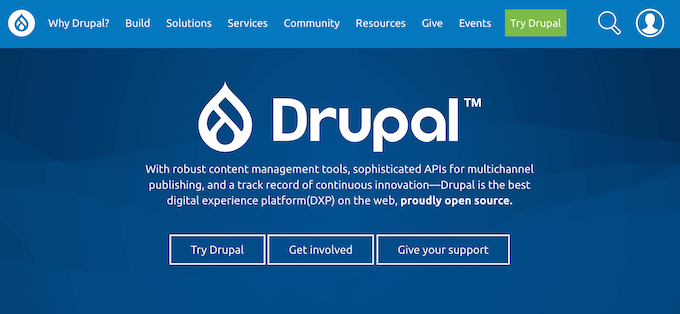
0.71% of all websites whose CMS is known, use Drupal.
It is estimated that 555,754 live websites use Drupal.
When we look at the top 1 million sites based on traffic, 2.93% of those sites are built using Drupal.
6.82% of the top 100 thousand websites use Drupal, compared to 10.46% of the top 10 thousand sites.
Drupal’s CMS market share has reduced from 6.1%-1.8% between 2011 and 2022. That’s a 4.3% decrease in 10 years.
The CMS statistics show that Drupal has a smaller overall market share compared to other content management systems on our list. Despite this, Drupal is used by a much larger percentage of high-traffic sites.
By comparison, Wix has a much larger overall market share (10%) but is used by a much lower percentage of the top 1 million websites (0.56%).
Drupal may not be the most popular CMS platform, but it’s a powerful software with lots of support resources. It also has a reputation as a very secure CMS.
While smaller websites, first-time site owners, and bloggers are choosing user-friendly platforms, the figures show that Drupal still has a loyal following among high-traffic websites.
Impressively, Shopify’s market share has risen from just 3.4% in 2020 to 6.6% in 2022. That’s an increase of 3.2% in just two years.
It is estimated that 3,834,405 live websites use Shopify.
Shopify is used by 2.05% of the top 1 million eCommerce websites.
2.62% of the top 100 thousand websites use Shopify, while 3.99% of the top 10 thousand sites are Shopify websites.
During the fourth quarter of 2020, Shopify reported earnings of $977.7 million, which was a 94% increase compared to the same period in 2019.
In 2020, Shopify reported a 53% year-over-year increase in subscription revenue.
Shopify had a sudden spike in popularity between 2020-2022, which saw its market share rise by 3.4% in just two years.
Many experts say this is due to the COVID-19 pandemic. With physical shops closed around the world, many businesses needed an easy way to sell their products online during this time.
As an all-in-one fully hosted eCommerce platform, Shopify is a user-friendly choice for anyone who wants to launch an online store, fast. Shopify comes with full inventory management, unlimited products, powerful analytics, marketing tools, and lots of designs, all in one product.
However, Shopify forces you to use its Shopify Payment platform. If you prefer to use your own payment processing solution, then Shopify charges an extra 2% transaction fee which is very high compared to other eCommerce solutions.
Experts predict that artificial intelligence and machine learning will be big trends in the CMS space.
In particular, they see an increasing demand for image recognition, voice recognition and transcription, natural language understanding and natural language processing in content management systems.
Studies predict that personalized technologies will be another must-have feature among CMS users.
Artificial intelligence and machine learning promise to make all kinds of tasks easier and more efficient.
The world of content management systems is no exception, and it will be interesting to see how these platforms use advanced technologies in the future.
Do you want to notify users when their comment is approved in WordPress?
By default, WordPress doesn’t notify users when you publish their comment. This can leave visitors wondering whether you’ve received their comment, or whether you plan to publish it at all.
In this article, we will show you how to notify users when you approve their comment.
Why Notify Users When Their Comment is Approved in WordPress
Comments allow your website visitors to communicate with you and other readers.
They are a great way to get engagement and feedback, and can help build a community around your WordPress blog.
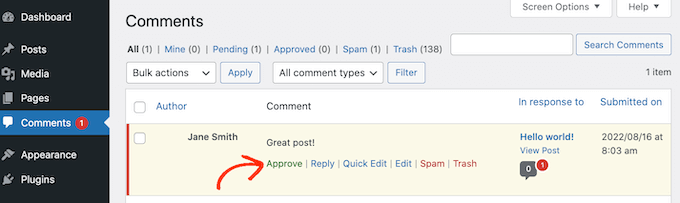
By default, WordPress puts all new comments into a moderation queue. You can see these comments in the admin area, but they won’t appear on your website until you approve them.
Comment moderation is the best way to keep discussions safe and spam free. However, by default WordPress doesn’t notify users when you approve their comment.
Instead, visitors would need to keep checking your site to see whether their comment has appeared. Most commenters will forget to do that. Sometimes, visitors may even assume that you’ve rejected their comment if they don’t get a notification.
By confirming that you’ve published their comment, you can encourage visitors to come back to your WordPress website. This is great for engagement and can create a more interesting and lively discussion.
With that being said, let’s see how to notify users when you approve their comment.
How to Notify Users When Their Comment Is Approved in WordPress
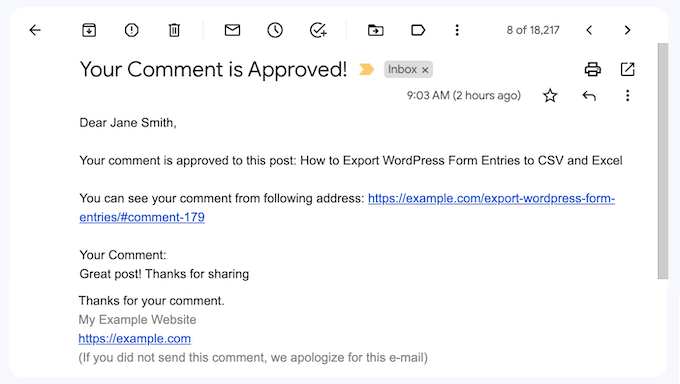
The easiest way to notify people when you publish their comment is by using Comment Approved Notifier Extended. This plugin is simple to set up and lets you send a custom email to your users.
First, you’ll need to install and activate the plugin. If you need help, then please see our guide on how to install a WordPress plugin.
Upon activation, the plugin works automatically. Every time you approve a comment, WordPress will send a notification to that person’s email address.
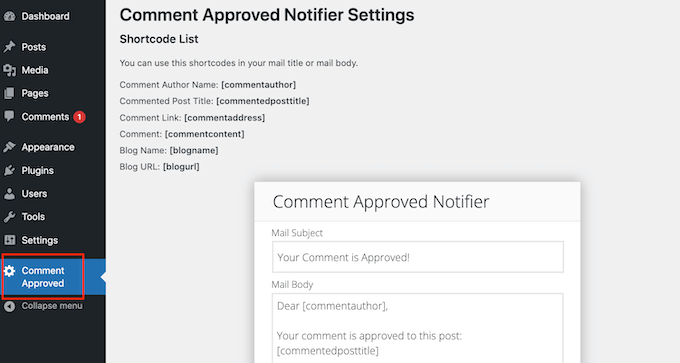
If you want to change the email’s content, then simply click on Comment Approved in the WordPress dashboard.
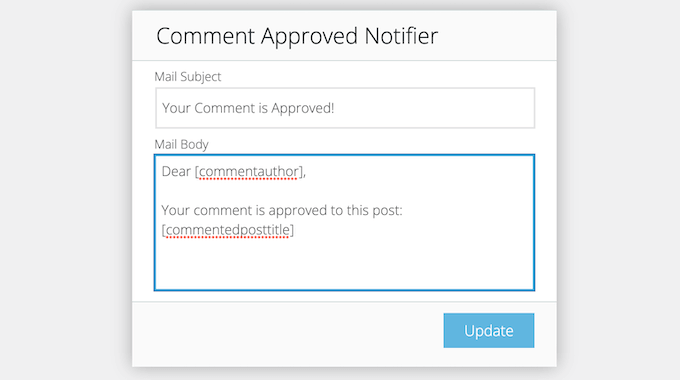
You will now see the default email and all of the different pieces of shortcode that you can use in your message.
When it creates an email, Comment Approver Notification will replace the shortcode with real information. For example, it will replace [commentauthor] with the name the person typed into your WordPress website.
You can either type or paste any shortcode into the small email editor. You can also type in plain text, as you can see in the following image.
When you’re happy with how the email looks, you can simply go ahead and click on the ‘Update’ button.
Now Comment Approver Notification will send the new email to your users.
Email is an important way to communicate with your visitors, users, and customers. With that in mind, it’s a good idea to use an SMTP plugin to improve email deliverability and keep your comment notifications out of the spam folder.
WP Mail SMTP is the best WordPress SMTP plugin on the market. It allows you to easily use any SMTP server to send WordPress emails safely and reliably.
Do you want to try WordPress for free without buying domain name or hosting?
Normally, you need a domain name and hosting to build a WordPress website. However, many users may want to give it a try before spending money.
In this article, we’ll show you multiple ways to try WordPress for free without domain or hosting. We’ll also talk about things to try in WordPress and making a live website.
Why Try WordPress for Free without Domain or Hosting?
1. Try WordPress Online with Full Refund on Hosting
The easiest way to try WordPress online is by using a a WordPress hosting company that offers a risk-free money back guarantee (i.e full refund for up to 30 days or even 90 days in some cases).
The benefit of this method is that you get to try WordPress for building your website. If you like it, then you can make your website online with a single click (no extra work needed).
And if you don’t like it, then you can request a full refund from your WordPress hosting company.
For this method, you’ll need a credit card to pay for the WordPress hosting upfront, but if you don’t like it, then you can get a full refund.
Bluehost – offers free domain + web hosting with 30 day money back guarantee.
Hostinger – offers free domain + web hosting with a 30 day refund policy.
SiteGround – offers cloud WordPress hosting with risk-free 30 day refund policy.
Dreamhost – offers free domain + WordPress hosting with 97 day refund policy.
All of the above hosting companies come with WordPress pre-installed, or they offer 1-click WordPress setup option.
You can quickly get started with any of them to try WordPress online risk free.
For the sake of this tutorial, we will show a step by step process on what this looks like with Bluehost which is one of the top WordPress recommended hosting provider.
First, you need to visit the Bluehost website and click on the green ‘Get Started Now’ button.
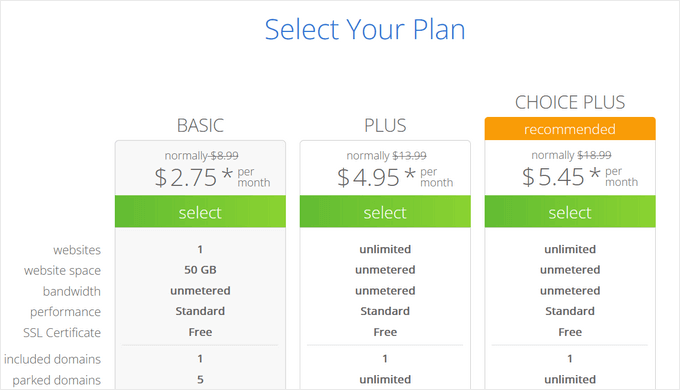
Next, you’ll be asked to choose a plan.
We recommend starting with Basic since you just want to try WordPress. You can always upgrade your hosting plan if you decide to stay on Bluehost.
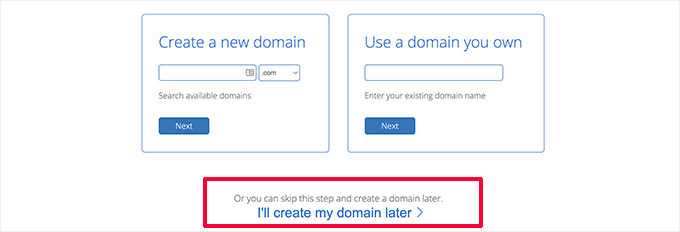
Now you’ll be asked to choose a domain name. Bluehost is currently offering WPBeginner users a free domain name and 72% discount using our Bluehost coupon .
However, if you register a domain name, then the company will deduct the domain cost when you ask for a refund. You need to click on ‘I’ll create my domain later’ option at the bottom to skip this step, so you qualify for a full refund.
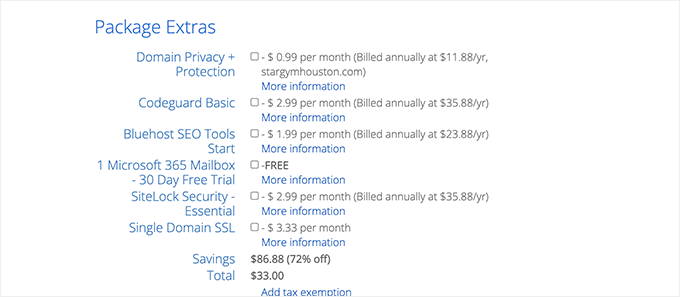
Next, you’ll be asked to provide personal details and finalize the hosting package.
It is important that you uncheck all optional extra addons on this page.
Addon costs are non-refundable, and you are only eligible for the full refund of your hosting bill, not addons.
Lastly, you need to enter your payment information to complete the purchase.
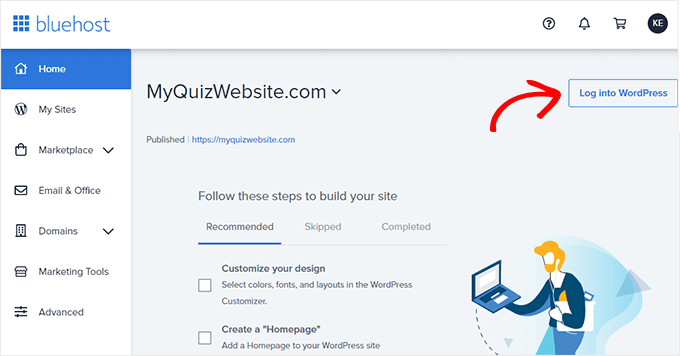
Bluehost will now create your hosting account and will send you an email with instructions on how to access your hosting control panel.
From your hosting control panel, you’ll notice that Bluehost has already installed WordPress for you. You can simply click on the log into WordPress button to access your website.
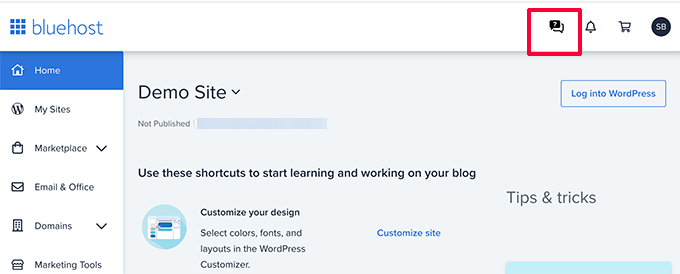
Requesting Refund on Bluehost
Login to your Bluehost account dashboard and click on the Support icon. From there, you need to scroll down to the contact section and start a live chat session.
Once connected to a live chat agent, you can request them to issue a full refund and cancel your account.
Important: If you’re using a hosting company that’s not mentioned above, then please make sure to read and fully understand their refund policy before making a purchase. If in doubt, reach out to the hosting company by dropping them an email.
2. Try WordPress on Your Computer
Another popular way to try WordPress is by installing it on your computer. This is what many expert developers do for client websites.
This method allows you to try WordPress for free without buying any domain or hosting. You can install plugins, themes, and make a complete website on your own computer.
There are several amazing free software available that allow you to set all this up on your computer.
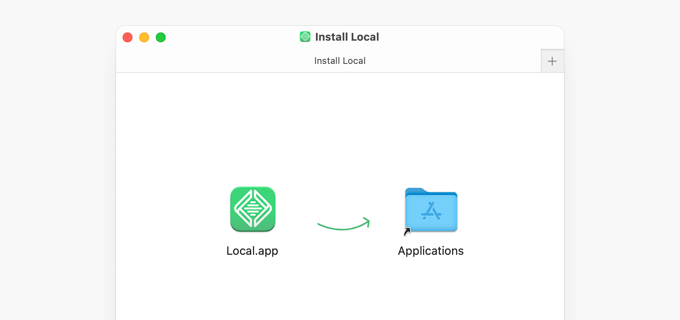
The easiest of them all is called Local. It allows you to easily set up a local WordPress development environment on your computer. It works on MacOS, Windows, and Linux.
Simply head over to Local website and download it for your operating system.
Depending on your operating system, the installation wizard may differ slightly. For MacOS, simply click on the downloaded package and then drag and drop Local.app to the Applications folder.
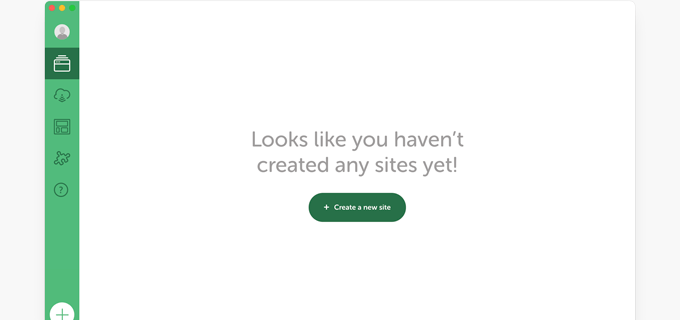
Once you have installed Local, open the app on your computer.
Then click on the ‘Create a new site’ button.
Next, you’ll be asked to provide a title for your website.
Simply enter any name you want to website for your demo site and click on the Continue button.
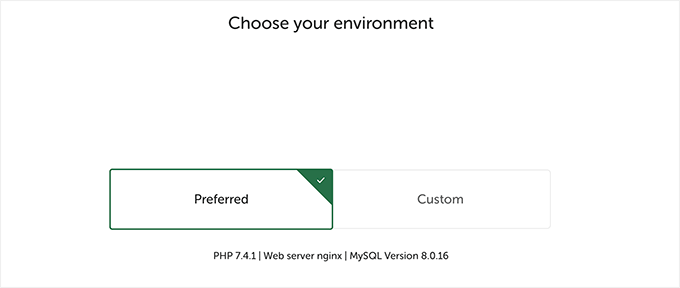
After that, you’ll be asked to choose local environment. For instance, which server software you want to use, which MySQL or PHP version to use.
If you are not sure, then you can simply use the Preferred options and click Continue.
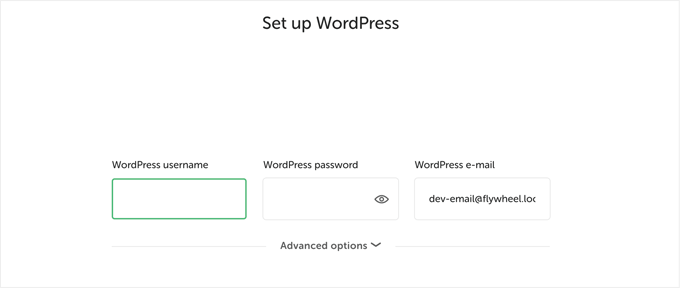
On the next screen, you’ll be able to choose a username and password to access WordPress admin area of your local site.
You can also change the WordPress admin email, in case you need to recover your login info.
Click on the Continue button to finish the set up wizard.
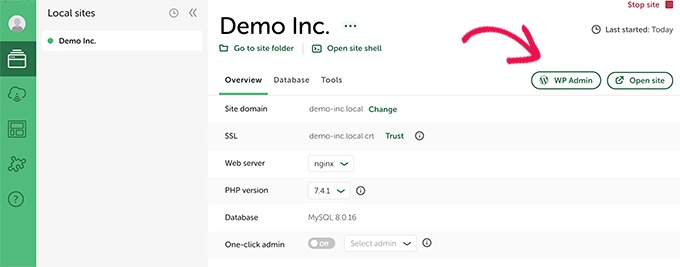
Local will now fetch and install the latest version of WordPress and create a new local website for you.
Once finished, you’ll see your local website details. From here, you can click on the WP Admin button to access WordPress dashboard.
If for some reason Local doesn’t work, or you simply want to try an alternative, then you can check out MAMP (for MacOS) or WAMP (for Windows).
3. Try WordPress with WordPress.com (No Domain Needed)
Another option that you’ll often come across for trying WordPress is WordPress.com.
Before you do that, it is important that you understand how WordPress.com is different from a self-hosted WordPress.org website.
WordPress.com is a website hosting company and a publishing platform. Basically, you don’t need to install WordPress or take care of any website maintenance.
The downside is that you don’t get full control over the software running in the background. This takes away the flexibility and freedom.
WordPress.com have a limited free plan that you can try. However, it will be missing many features of a self-hosted WordPress.org website.
In the recent years, WordPress.com has added a Pro plan that lets you install plugins and themes, but it is far more expensive than other WordPress hosting options that we have shared above.
Things You May Want to Try in WordPress
Now that you have created a free WordPress website, you are probably wondering which things you should try.
After that, you may want to choose a design for your website. There are so many free and paid WordPress themes that you can use. We recommend picking up a free theme and customizing it to make your own.
You can even install a free page builder plugin like SeedProd to experience designing your website with a drag & drop interface.
3. Exploring WordPress Plugins
The real power of WordPress comes from WordPress plugins. These are like apps for your WordPress website and allow you to extend website functionality by adding new features.
There are over 60,000+ free WordPress plugins available.
Following are a few must have WordPress plugins that you should try.
1. WPForms – It allows you to add a beautiful contact form or survey to your website. There is a WPForms Lite version that you can try for free.
Need more plugin suggestions? See our full list of essential WordPress plugins that you can try on your free WordPress demo.
4. Learning WordPress Basics
Now if you are struggling finding your way around WordPress or just want to cover WordPress basics, then you can learn WordPress for free right here.
WPBeginner is the world’s largest WordPress resource site for beginners. We have been around since 2009 and have a massive library of resources for beginners.
The best place to start, would be our page on how to learn WordPress for free. There, you’ll find a step by step WordPress program divided into seven days of training.
You can also start with our free WordPress video series. That’s also a step by step program for beginners.
Once you have covered the basics, you can continue exploring WordPress Tutorials, check out WordPress glossary, or subscribe to our YouTube channel for a regular installment of WordPress tips, tricks, and how-tos.
Launching Your WordPress Website
Once you have tried WordPress, you may want to officially launch a live WordPress website.
To do that, you’ll need a domain name and a hosting account.
We recommend using Bluehost. They are the largest WordPress hosting companies and have agreed to offer WPBeginner users free domain name and a generous discount on hosting.
We hope this article helped you learn how to try WordPress for free without domain name. You may also want to see our comparison of the best website builders on the market, or see our guide on how to add create an online store and start selling.
If you liked this article, then please subscribe to our YouTube Channel for WordPress video tutorials. You can also find us on Twitter and Facebook.