Thursday, November 3, 2022

How to Easily Create a Quiz in WordPress

Do you want to create a quiz in WordPress?

No matter whether you’re testing knowledge or creating viral content like Buzzfeed, quizzes can get more engagement on your site. You can even use them to collect feedback and ideas from your customers, so you can improve their experience.

In this article, we will show you how to easily create a quiz in WordPress.

How to easily create a quiz in WordPress

Why Add Quizzes to Your WordPress Site?

Quizzes are fun and engaging. Since they’re so interactive, users find them more rewarding than other types of form.

Marketers have been using quizzes to generate leads since the very early days of the internet. For example, you might ask for the visitor’s email address so you can send them their quiz results, or ask them to sign up for your email newsletter.

They’re also a great way to get more social shares by encouraging visitors to post their results.

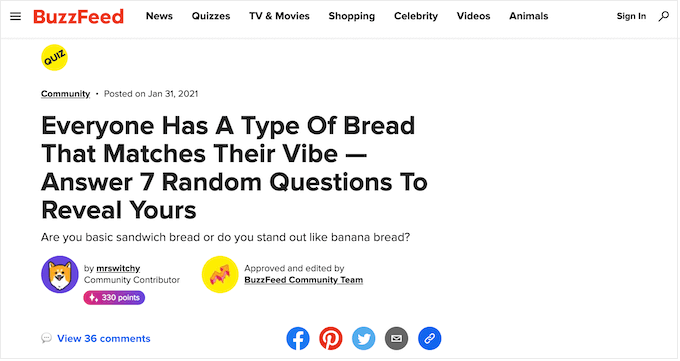
BuzzFeed is probably the most popular example of viral quizzes.

An example of a Buzzfeed quiz

If you sell online courses, then quizzes are an important way to test the student’s knowledge and reinforce learning. Since these quizzes are automated, they’re also an easy way to improve the student experience.

If you run an online store, then you might even create a short quiz that asks the shopper for some information and then suggests a product or service based on their answers.

An example of a product quiz

This is much more engaging than asking them to read through product descriptions and could get you some extra sales.

Having said that, let’s go ahead and see how to easily create a quiz in WordPress.

Creating a WordPress Quiz with Formidable Forms

For this guide, we’ll be using the Formidable Forms plugin. It is one of the best WordPress quiz plugins on the market and allows you to create advanced quizzes using a simple drag-and-drop builder.

Formidable Forms is also one of the best WordPress form builder plugins. This means that once it’s set up on your website, you can use it to build all kinds of forms including contact forms, registration forms, booking forms, and more.

With that being said, let’s see how you can create a WordPress quiz using Formidable Forms.

Step 1: Install the Formidable Forms and Quiz Maker Addon

To create a quiz, you’ll need to use the Formidable Forms Business plan, as it includes the Quiz Maker addon.

The first thing you need to do is install and activate the Formidable Forms plugin. For detailed instructions, see our guide on how to install a WordPress plugin.

Upon activation, you’ll also need to install Formidable Forms Lite. This free plugin provides the core foundation for the premium plugin’s more advanced features.

Once you’ve done that, go to the Formidable Forms » Global Settings page in your dashboard and select ‘Click to enter a license key manually.’

Adding the Formidable Forms license

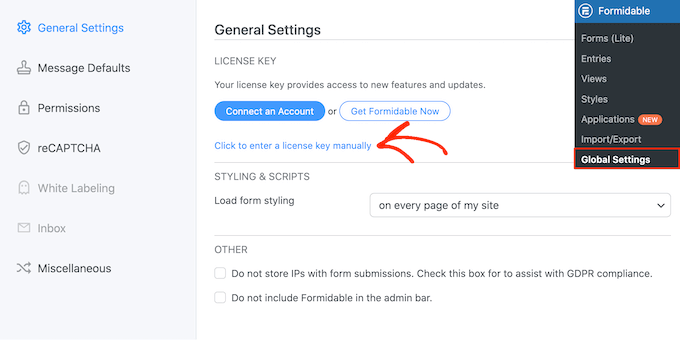
You can find the license key under your account on the Formidable Forms website. After entering this information, go ahead and click the ‘Save License’ button.

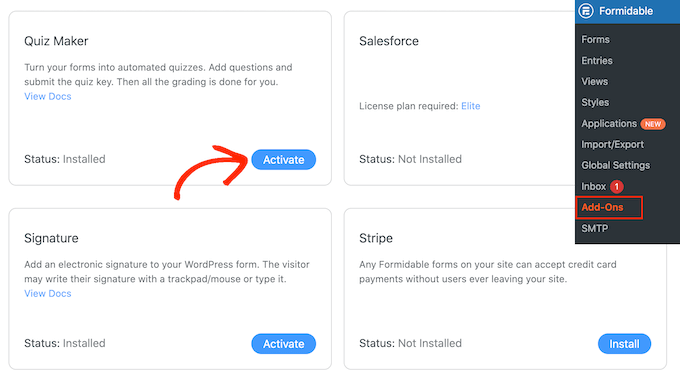
Next, you will need to install the Quiz Maker addon by going to Formidable » Add-Ons. On this screen, find the Quiz Maker addon and click on its Install button.

After a few moments, Formidable Forms will mark the Quiz addon as ‘Active.’

Installing the Quiz Maker addon

Step 2: Create a WordPress Quiz with Formidable Quiz Maker

Now you’ve installed the Formidable Forms Quiz Maker, you’re ready to create your first WordPress quiz.

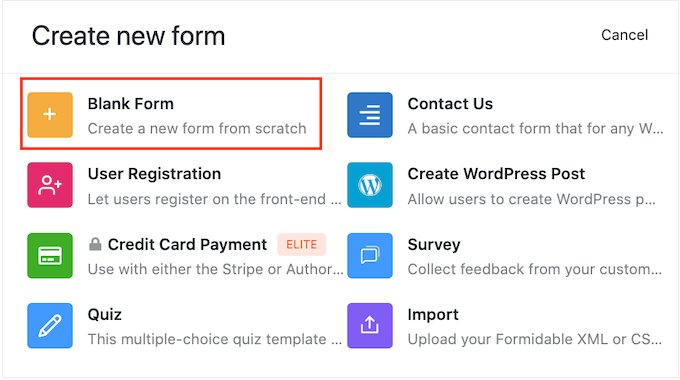
To get started, go to Formidable » Forms and then click the ‘Add New’ button.

Creating a new WordPress form

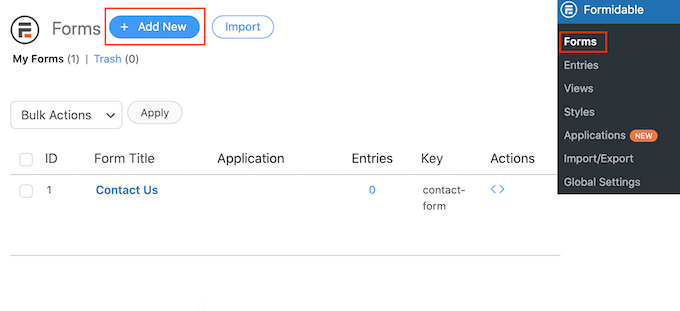
This opens a popup showing all of the plugin’s ready-made templates, including templates that you can use to create a mortgage calculator and a booking form.

In this guide, we’ll be starting from scratch so click on the ‘Blank Form.’

A blank Formidable Form template

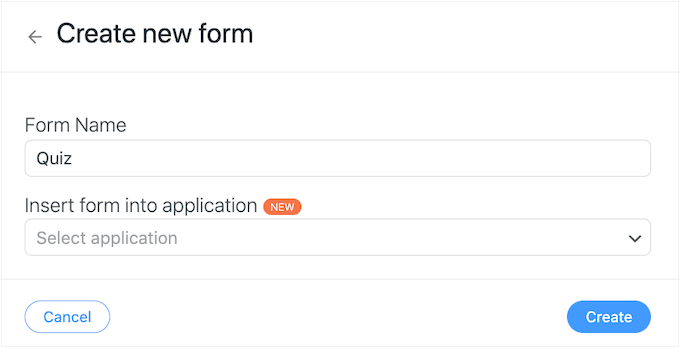
Once you’ve done that, type a title into the ‘Form Name’ field and enter an optional description. This information is just for your reference so you can use anything you want.

Then, simply click on the ‘Create’ button.

Creating a new quiz using Formidable Forms

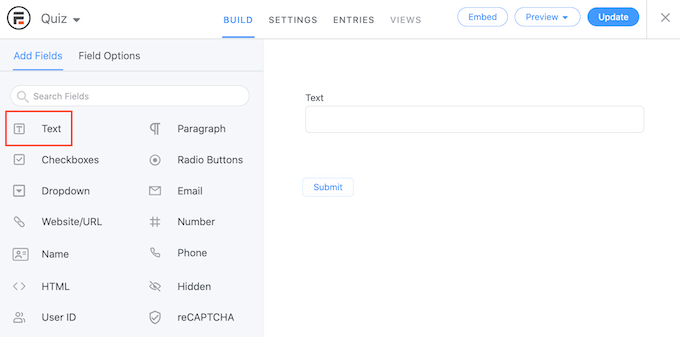
This will open the template in the Formidable Forms editor.

To the right is a live preview, and on the left-hand side is a menu with all the fields you can drag and drop into your quiz.

The Formidable Forms editor

You can create quizzes for lots of different purposes, including getting customer feedback, performing market research on your WordPress blog, testing knowledge, and more.

You may need different types of fields depending on the kind of quiz you’re creating. As an example, we’ll show you how to create a simple quiz that tests the visitor’s knowledge. We’ll be creating different kinds of questions, including multiple choice.

To add a field to your quiz, simply drag it from the left-hand menu and then drop it onto the live preview. Let’s start by adding a ‘Text’ field.

Adding fields to your form

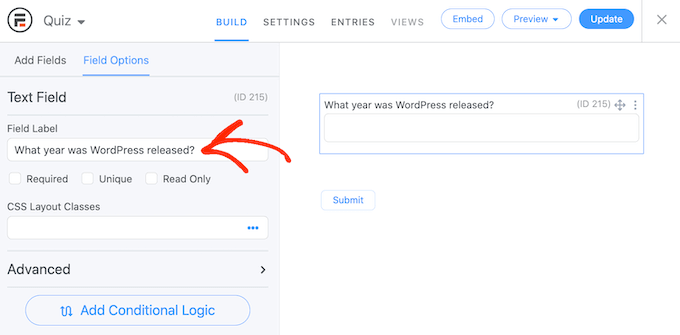
After that, click to select your new ‘Text’ field in the live editor.

You can then go ahead and type your question into the ‘Field Label.’

Creating a simple text question

Next, we’re going to create a multiple choice question.

Simply drag a ‘Dropdown’ field onto the form.

How to create a multiple choice question

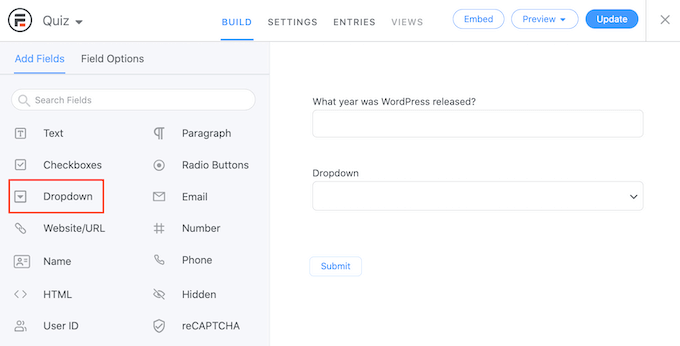
Once again, click the ‘Dropdown’ field in the preview to the right and then type your question into the ‘Field Label.’

You can now type the possible answers into the ‘Dropdown Options’ section.

Adding multiple answers to a quiz question

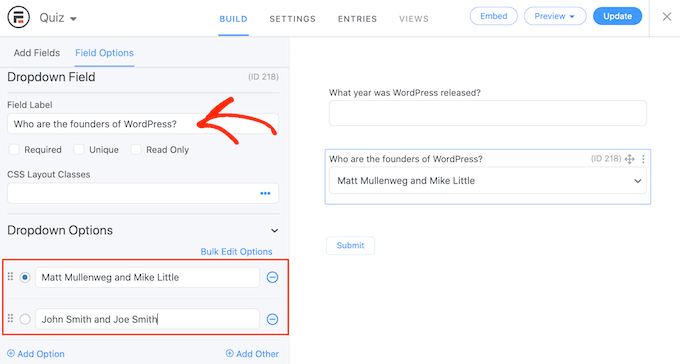
To add more answers to your multiple choice question, simply click on the ‘Add Option’ button. You can repeat these steps to add more questions to your quiz.

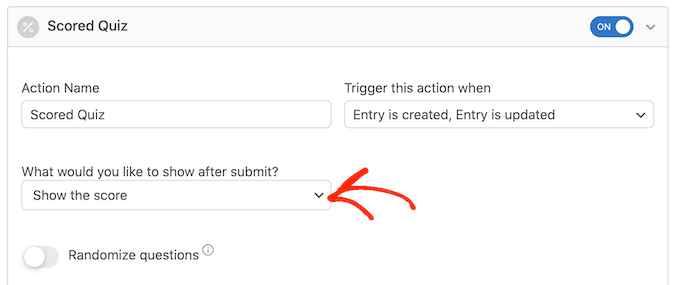
When you’re happy with how the quiz looks, it’s time to configure the correct answers and how to show the user’s score.

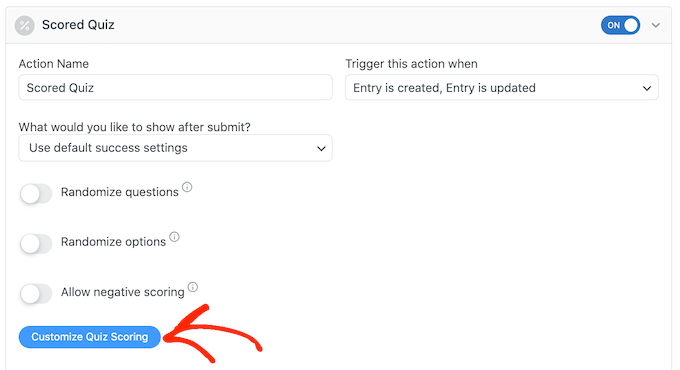
To do this, click on the ‘Settings’ tab and then select ‘Actions & Notifications.’ You can now click on ‘Scored quiz.’

Creating a quiz in WordPress

If you scroll to the new ‘Scored Quiz’ section, then you’ll see that this action already has some default settings.

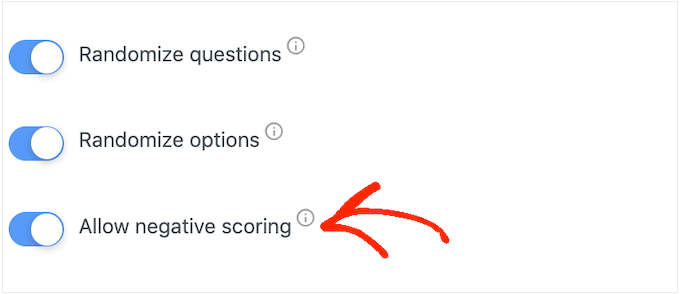
Formidable Forms can randomize the questions and answers, which will make it more difficult for people to cheat.

By default, these settings are disabled but you may want to enable them by clicking on the ‘Randomize questions’ and ‘Randomize options’ toggles.

Randomizing questions in your online quiz

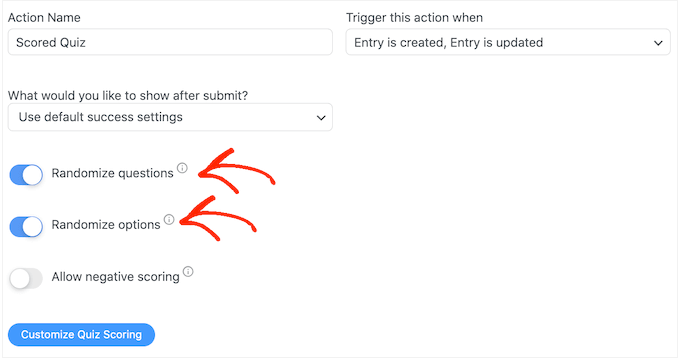
Formidable Forms awards one point for every right answer. However, if you enable advanced scoring then you can take points away for wrong answers.

We’ll be covering advanced scoring shortly, but if you plan to deduct points then you can click to activate the ‘Allow negative scoring’ toggle.

Enabling negative scoring for your quiz

Next, let’s set the correct answers so that Formidable Forms can score visitors automatically.

To do this, go ahead and click on the ‘Customize Quiz Scoring’ button.

Set up quiz scoring in WordPress

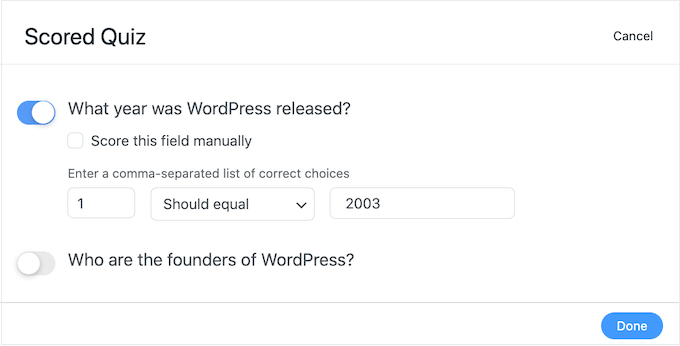
To add the correct answer, simply click on the toggle next to each question.

For text questions, simply type the correct answer into the field. You can also use the dropdown to specify whether the user’s answer should include this exact text, some of the text, or none of the text.

Setting the correct answers for an online test

For multiple choice questions, click on ‘Add Correct Answers’ to open a menu showing all the possible options.

You can now check the box next to each correct answer.

Setting the right answers for an online exam

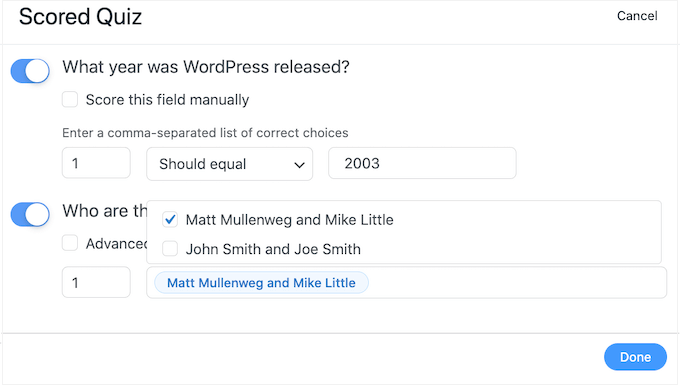
By default, each correct answer is worth 1 point. To award more points, simply type a different number into the ‘Max score’ box.

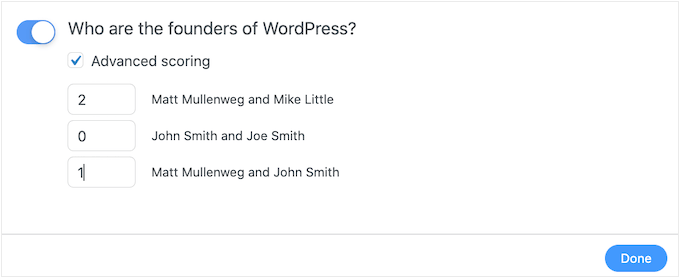
Sometimes you may want to assign a unique score to the different answers in a multiple choice question.

To do this, select ‘Advanced scoring’ and then type in the score for each answer.

Setting up advanced scoring for your online questionnaire

Once you’ve set all of the correct answers, click on ‘Done’ to save your changes.

After that, you can set the action that Formidable Forms will perform every time someone submits a quiz. Simply open the following dropdown to see the different options: ‘What would you like to do after submit?’

Creating a quiz in WordPress

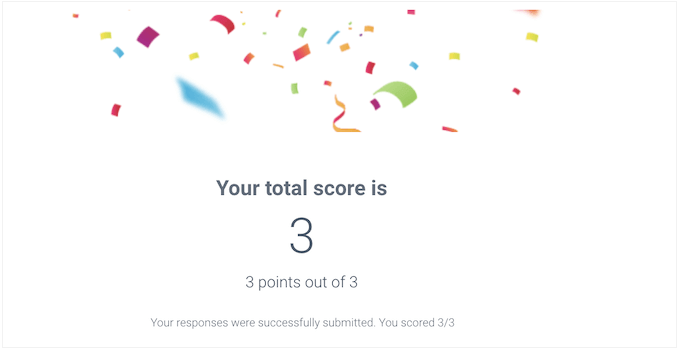
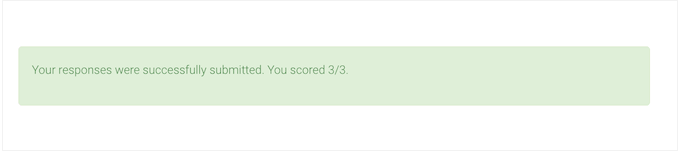
If you choose ‘Show the score,’ then Formidable Forms will display a standard message with the visitor’s score.

You can see an example of this in the following image.

Showing the score to your learners

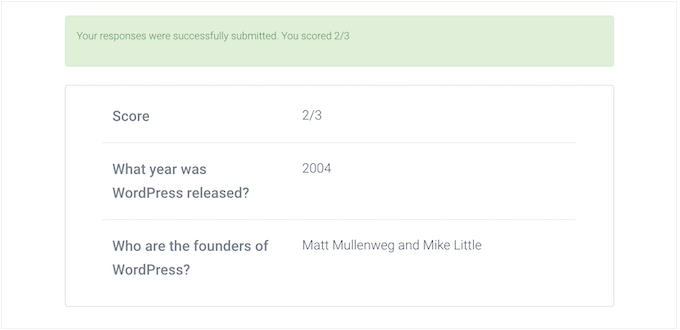
If you select ‘Show user’s answers,’ then Formidable Forms will show the user’s score plus their answers.

This can help reinforce learning by encouraging visitors to review their answers and think about which ones they may have answered wrong.

Showing the answers to your students

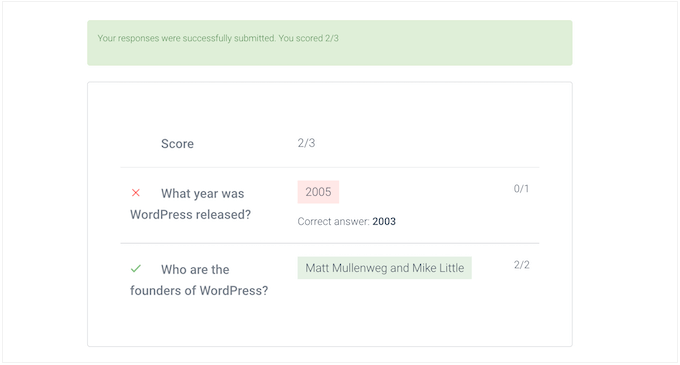
There is also ‘Show correct answers’ that shows users which questions they got right.

If they got a question wrong, then Formidable Forms will show the right answer. This can help students learn from their mistakes.

However, it isn’t a good option if learners have the option to retake the quiz as this could lead to cheating.

Displaying the right answers to customers

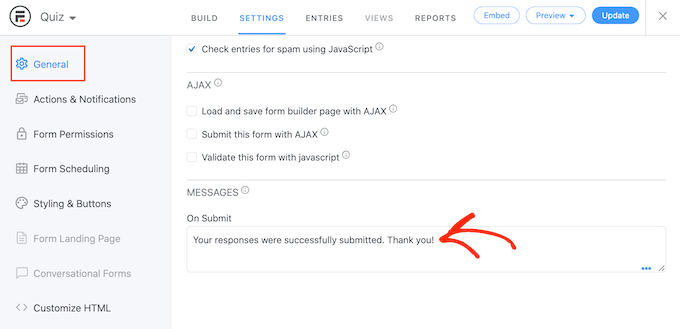
The final option is ‘Use default success settings,’ which shows a message that reads, ‘Your responses were successfully submitted. Thank you!’

You’ll typically want to change this message to include the user’s score. To do this, click on ‘General’ and customize the message in the ‘On Submit’ box.

Showing a custom success message to learners

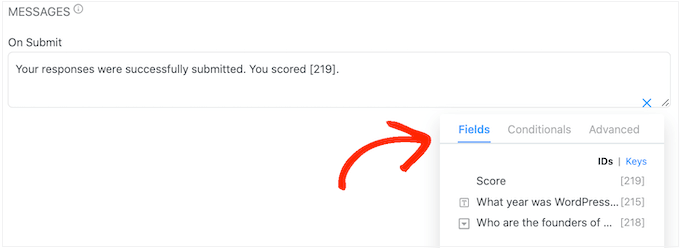
To show the user’s score, simply add the [219] key. A ‘key’ is a dynamic value you can use to customize messages to each user.

For example, you might type in: ‘Your responses were successfully submitted. You scored [219].’ The [219] will automatically be replaced with their score.

A custom score message, created using Formidable Forms

There are more keys that can help you create a more personalized message.

To take a look at the different keys, simply click on the ‘Keys’ tab in the little popup.

Using keys to create a personalized message

After that, click the ‘Update’ button to store your changes. You’ve now successfully created your first quiz.

Step 3: Adding Your Quiz to Your WordPress Site

You can now add your quiz to any post or page, or any widget-ready area of your WordPress theme. In our example, we’ll add the quiz to a page, but the steps will be similar when adding the quiz to other areas of your WordPress site.

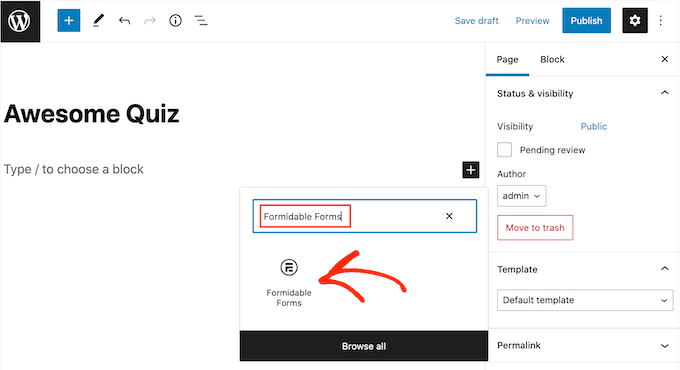
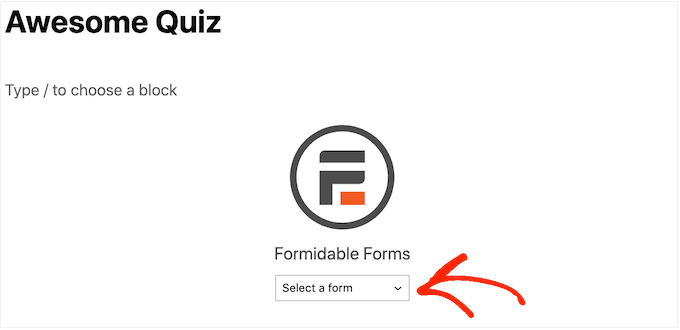
To start, go to Pages » Add New in your WordPress admin area. Once inside the content editor, click on the ‘+’ button to add a new block.

In the popup that appears, type ‘Formidable Forms’ to find the right one, and then add the block to your post.

The Formidable Forms block

After that, simply open the ‘Select a form’ dropdown.

Then, choose whichever quiz you have already created, and now WordPress will load the quiz automatically.

Adding a quiz to your WordPress website

Now you can add any other content to the page, including any categories and tags or customized permalinks that you want to use.

When you’re ready, either publish or update the page. Your WordPress quiz is now live and users can start answering questions.

We hope this article helped you add a quiz to your WordPress site. You may also want to see our guide on how to run a giveaway in WordPress and our expert pick of the best LMS plugins.

If you liked this article, then please subscribe to our YouTube Channel for WordPress video tutorials. You can also find us on Twitter and Facebook.

The post How to Easily Create a Quiz in WordPress first appeared on WPBeginner.


November 03, 2022 at 11:56PM

GA4 vs Universal Analytics: What’s the Difference

Are you wondering what’s the difference between Google Analytics 4 and Universal Analytics?

GA4 is the latest version of Google Analytics and will soon replace Universal Analytics. In the new version, you get new reports, metrics, tracking systems, and more.

In this article, we’ll compare GA4 vs Universal Analytics and show you what the real difference is between the two platforms.

Difference between Google Analytics 4 and Universal Analytics

GA4 vs Universal Analytics: A Brief Overview

Google Analytics 4 is the new generation of Google’s famous analytics platform. It is designed to track your WordPress website and apps in the same property. Previously you’d have to track your apps and websites separately in Universal Analytics.

With Google Analytics 4, you get a better picture of your customer’s journey across multiple channels and devices. GA4 also offers better data privacy for users.

GA4 reports interface

On the other hand, Universal Analytics (UA) is the previous version of Google Analytics. It was introduced in 2012 and is probably the version many websites use today for tracking their website traffic.

However, Universal Analytics will sunset on July 1, 2023. This means that it will no longer track your visitors after the sunset date, and Google will not support or introduce new features for it.

That’s why it is important that you switch to Google Analytics 4 as soon as possible. This way, you’ll protect your data and have historical records to compare to when UA shuts down.

Let’s look at some significant differences between GA4 and Universal Analytics. You can click any of the links below to be taken to the section for that specific feature.

A Changed Reporting Interface

The first difference you’ll notice between Google Analytics 4 vs Universal Analytics is the new reporting interface.

In GA4, most of the reports have been replaced or renamed. One of the reasons for this is that the latest analytics version uses a different measurement model compared to Universal Analytics.

For example, you’ll see new reports such as Engagement, Monetization, and Retention in GA4.

New reports in GA4

On the other hand, Universal Analytics has a completely different reporting interface.

For example, all the reports are grouped together under 5 main categories.

  • Realtime
  • Audience
  • Acquisition
  • Behavior
  • Conversions.

You can find each of these in the left-hand menu on your main GA4 dashboard.

Universal analytics interface

That said, it can be overwhelming for beginners to understand these reports and uncover insights about their website traffic.

An easier way to get the information you need for decision-making is by using MonsterInsights. It is the best Google Analytics plugin for WordPress and offers a beginner-friendly reporting interface.

You get to see important data inside your WordPress dashboard without worrying about navigating the complex Google Analytics reports.

Overview report in MonsterInsights

If you haven’t set up analytics on your website, then please see our guide on how to install Google Analytics in WordPress.

New Data Measurement Model in GA4

Another major difference between GA4 vs Universal Analytics is how they work when collecting and processing your website data. Universal Analytics uses a measurement model based on sessions and pageviews. Whereas, GA4 uses an event-based model to track your data.

Sessions can link data to a single individual and track them specifically as they interact with your site. Event data is anonymous, and the importance is placed on specific actions taken instead of specific users taking those actions.

This allows you to track complex buyer journeys across multiple devices accurately.

It also makes it easier to enable enhanced measurement features in Google Analytics 4. For example, you can set up outbound link click and scroll depth tracking with a click of a switch in GA4.

With Universal Analytics, on the other hand, you’d have to perform a complex setup or tweak the tracking code to configure that kind of link click-tracking or scroll-tracking.

No Bounce Rate and New Reporting Metrics

With Google Analytics 4, you get new metrics along with new reports. Right off the bat, you’ll notice that there is no bounce rate metric in Google Analytics 4.

Bounce rate tells you the number of users that left your website without interacting, like clicking a link, signing up for a newsletter, or purchasing a product.

Instead, GA4 shows a new metric called ‘Engaged sessions per user.’ It shows how many people interacted with your content. This includes a session where a user stays on a page for 10 seconds or more, triggers 1 or more events, or a user views 2 or more pages.

See average engagement time report

Besides that, GA4 also offers more new metrics in the Engagement report. For instance, there is an average engagement time metric, which used to be the average session duration in Universal Analytics.

Another new metric you’ll find in Google Analytics 4 is the Pages and screens. It shows the pages and app screens that get the most traffic on your website.

You can find this data in UA under the top landing pages report. If you’re using MonsterInsights, then the plugin will show your most important pages inside the WordPress dashboard.

Top landing pages report in MI

Google Analytics 4 Doesn’t Track Form Conversions

The next difference you’ll notice when comparing GA4 vs Universal Analytics is that of form conversions.

Forms are really useful for any business. They allow users to get in touch with you, provide feedback, and resolve their queries. Tracking your WordPress form in Google Analytics helps you see which form performs better.

However, setting up form conversion tracking in Google Analytics 4 requires adding custom code. This can be very tricky if you’re not a developer. The slightest mistake can mess up your tracking and break your website.

That said, MonsterInsights helps you track forms out of the box. You don’t have to edit code or hire a developer. Plus, it shows a report inside your WordPress admin area with impressions, conversions, and conversion rates for each form.

Forms report

Universal Analytics Goals Are Replaced with Events

In Universal Analytics, you can record different user interactions using goals. You get 4 types of goals in UA, which include:

  • Destination – You can set a destination goal to track when a user arrives on a specific page, like a thank you page or a product landing page.
  • Duration – This goal helps you see how long people stay on your website before exiting.
  • Pages per Visit – Using the pages per visit goals allows you to uncover the number of pages a visitor views before leaving your site.
  • Event – With the help of events, you can track user interactions on your site that Universal Analytics doesn’t track by default.

However, Google Analytics 4 replaces these goals with events. For example, if you have an online store, then you can enable events to track interactions and how many people enter payment details and shipment information.

Events to enable in ga4

Perform Advanced Analysis in Google Analytics 4

Another difference between both analytics platforms is the level of advanced analysis you can perform in Google Analytics 4.

In Universal Analytics, you can create custom reports and use secondary dimensions to uncover insights. However, GA4 takes it a step further with its Exploration reports.

Explorations tab in ga4

You get prebuilt templates for different analyses you’d like to perform or if you’d like to set up a custom report.

For example, you can use the ‘Funnel’ exploration template to see your customers’ journey before purchasing.

Besides that, GA4 exploration reports also offer multiple options to add different segments, dimensions, and metrics to your custom reports.

Customize your exploration reports

On a side note, using Exploration reports can be tricky for beginners. These reports are mainly for power users or people with advanced Google Analytics knowledge.

An easier way of uncovering insights is by using MonsterInsights. It shows a stats dashboard inside your WordPress dashboard. You can quickly see how your site performs, which pages people view the most, and much more without creating a complex custom report in Google Analytics.

We hope that this article helped you learn about the difference between GA4 vs Universal Analytics. You can also see our guide on the best WordPress plugins and the ultimate guide to WordPress SEO.

If you liked this article, then please subscribe to our YouTube Channel for WordPress video tutorials. You can also find us on Twitter and Facebook.

The post GA4 vs Universal Analytics: What’s the Difference first appeared on WPBeginner.


November 03, 2022 at 05:02PM

Wednesday, November 2, 2022

How to Put Your WordPress Site in Maintenance Mode

Do you want to put your WordPress site in maintenance mode?

Maintenance mode allows you to show a user-friendly notice to visitors instead of a broken website. You can also control exactly who has access to your site while you’re working on it.

In this article, we will show you how to easily put your WordPress site in maintenance mode.

How to put your WordPress site in maintenance mode

Why and When You Need to Put WordPress in Maintenance Mode

A lot of the time you can make changes to your WordPress website without having to put it in maintenance mode. For example, you can publish new posts, update WordPress, and install new plugins without any downtime.

However, sometimes you may need to work on your website for a longer period. For example, you might want to completely redesign your WordPress blog.

Some changes are also riskier than others, such as setting up a new plugin that changes your website’s behavior. While you’re making the change, your website may appear broken to your users.

You might even lose data that’s created during this period. For example, if you’re making major changes to an online store, then you might lose any new orders that customers place.

If your website gets lots of visitors, then you don’t want them to see a broken website.

One solution is to set up a staging website so you can work on your site in private.

Many of the top WordPress hosting companies offer 1-click staging websites, including Bluehost, SiteGround, and WP Engine.

If you don’t use a staging site, then it’s crucial you put your website into maintenance mode.

An example maintenance mode, created using SeedProd

Instead of a broken website, visitors will see a helpful maintenance page that lets them know what’s happening.

You might even suggest some alternative actions that visitors can take, such as following you on social media or joining your email list.

An example 'under construction' page

Having that said, let’s take a look at how to put your WordPress site in maintenance mode.

Video Tutorial

If you’d prefer written instructions, then simply use the quick links below to jump to the method you want to use.

Method 1. Set up WordPress Maintenance Mode using SeedProd Plugin (Recommended)

The easiest way to create a completely custom maintenance page is by using SeedProd.

SeedProd is the best landing page builder for WordPress, used on more than a million websites. It allows you to create beautiful coming soon pages in WordPress, improve your 404 page, and even design unique landing pages using drag and drop.

There’s a premium version of SeedProd that comes with more than 180 professionally-designed templates and blocks. However, you can put your site into maintenance mode using the free SeedProd plugin, so that’s what we’ll be using in this guide.

The first thing you need to do is install and activate the SeedProd plugin. For more details, see our guide on how to install a plugin in WordPress.

Upon activation, go to SeedProd » Pages. In the ‘Maintenance Mode’ section, click on the ‘Set up a Maintenance Mode Page’ or ‘Edit page’ button.

How to set up maintenance mode in WordPress

The next step is building the page that visitors will see when you enable maintenance mode.

You can either choose a ready-made template or start with a blank design. We’re using ‘Down Maintenance Mode’ in all of our images but you can use any template you want.

To select a template, simply hover your mouse over that design’s thumbnail and then click the ‘checkmark’ icon.

SeedProd's ready-made maintenance templates

After selecting a template, you’ll be taken to the drag-and-drop builder, where you can start customizing the maintenance mode page.

On the left side of the screen, you’ll find blocks and sections that you can add to your design. The right side of the page is the live preview.

A professionally-designed maintenance page

Most templates already have some blocks, which are a core part of all SeedProd designs. However, you can add more blocks to your maintenance page by dragging them from the left-hand menu and then dropping them onto your design.

For example, you might add your own custom logo, videos, contact form, and more.

Adding blocks to a custom page design

The options you see may vary depending on the other plugins you’ve installed on your WordPress website. For example, if you have RafflePress then you’ll be able to run a contest on your maintenance page using the Giveaway block.

To customize a block, simply click to select that block in your layout. You can then change the block using the settings in the left-hand menu.

To start, click to select the ‘Contact Us’ button in the live preview. In the left-hand menu, you’ll see a ‘Link’ field, which shows ‘mailto:john@example.com’ by default.

Customizing the CTA button

This means the button will open the visitor’s default email app with the ‘To’ field already filled in as ‘john@example.com.’

To use your own business email address instead, simply type that address into the ‘Link’ field. Make sure not to delete ‘mailto:’ as this opens the visitor’s default email app.

Capturing leads with SeedProd

You can also make other changes to the button, including using a different alignment, button text, and changing the button’s size.

To remove a block from your design, simply go ahead and click on it. You can then select the trash can icon.

Deleting blocks from a WordPress custom page design

You can now continue customizing the template by adding new blocks, removing any blocks you don’t want, and making changes in the left-hand menu.

When you’re happy with how the maintenance page looks, it’s time to publish it. Go ahead and just click the ‘Save’ button.

Designing a custom maintenance mode page

After that, you can enable maintenance mode at any point and show visitors your custom maintenance page by going to SeedProd » Landing Pages.

Here, click on the switch in the ‘Maintenance Mode’ section so that it shows ‘Active.’

Activating maintenance mode in WordPress

Now, if you visit your website in an incognito browser tab then you’ll see the custom maintenance mode page. The Maintenance Mode won’t show for you because you’re logged into the site.

When you’re ready to relaunch your site, simply go to SeedProd » Landing Pages. Under ‘Maintenance Mode,’ click on the slider to turn it from green (Active) to grey (Inactive).

Removing the under construction page

Now, anyone can access your WordPress website.

Controlling Website Access for Logged-in Users

By default, SeedProd will show the maintenance mode page to all non-logged-in users.

Anyone with an account will still be able to log in. For example, subscribers on your membership site and customers on your WooCommerce store can still access their account.

However, you may want to change who has access to your site while it’s under maintenance. For example, if you’re developing a site for a client then they may still need access so they can monitor your work.

You can change the access controls by upgrading to SeedPro Pro. After upgrading, simply go to SeedProd » Landing Pages and then click ‘Edit Page’ under Maintenance Mode.

Editing the WordPress maintenance mode settings

This will open the SeedProd page builder.

Here, click on ‘Page Settings,’ followed by ‘Access Control.’

Controlling who can access your site in maintenance mode

To start, activating the ‘Exclude Default’ slider is a good idea. This will give visitors access to URLs that have the terms login, admin, dashboard, and account, which will stop people from getting locked out of their accounts.

You might also allow users with specific browser cookies to get past your maintenance page. Just be aware that if you enable the ‘Bypass Cookie’ toggle then it may not work if you’re using a WordPress caching plugin.

With that being said, we recommend selecting the user roles that can access your site while it’s in maintenance mode. To do this, click on ‘Add Role’ and then select any role from the dropdown menu.

Controlling access to your site using SeedProd's access controls

You can also include or exclude user roles created by your WordPress membership plugin or an eCommerce plugin.

When you’re happy with the access controls, don’t forget to click on the ‘Save’ button to store your settings.

Exclude Specific Pages from Maintenance Mode

SeedProd Pro also lets you include or exclude specific pages from maintenance mode. This comes in handy if you need to allow some users to access certain pages.

For example, if you have a custom login page then you would usually want to exclude it from maintenance mode. If you provide customer support via email, then you may want to exclude your contact form page as well.

You can do this in the ‘Include/Exclude URLs’ settings. Simply choose between ‘Include URLs’ or ‘Exclude URLs’ and then enter your links into the box.

Excluding URLs from maintenance mode

When you’re happy with how the maintenance page is setup, don’t forget to click on the ‘Save’ button to store your settings.

Method 2. Setup Maintenance Mode Using WP Maintenance Mode Plugin

Another option is to use the free WP Maintenance Mode plugin. This is a great choice if you want to create a simple maintenance mode page. However, this plugin uses the standard WordPress Page and post editor, which isn’t as powerful as SeedProd’s drag-and-drop builder.

The first thing you need to do is install and activate the WP Maintenance Mode plugin. For more details, see our step-by-step guide on how to install a WordPress plugin.

Upon activation, you can choose between a ‘maintenance’ and a ‘coming soon’ template. Since we want to create a maintenance mode, click on the ‘Website is under maintenance’ template and then select the ‘Continue’ button.

The WP Maintenance Mode WordPress plugin

You will now have the option to join the WP Maintenance Mode email list.

You can simply go ahead and click ‘I’ll skip for now, thanks.’

The WP Maintenance plugin email list

WP Maintenance Mode will now go ahead and create a simple page using its built-in template.

To see this page, simply click on ‘View page.’

Creating a custom 'under construction' page for WordPress

This opens the template in the standard WordPress post editor.

Note: Unhappy with this default template? You can find other WP Maintenance Mode templates by going to Settings » WP Maintenance Mode in the WordPress dashboard. Then, click on the ‘Design’ tab.

You can now make changes to the design in exactly the same way you edit a page or post.

Designing a custom page using the WordPress page and post editor

The template has a few social media placeholders that you’ll want to link to your own pages.

Simply click each of these icons and then type the URL into the little bar that appears.

Adding links to your social media page

When you’re happy with how the maintenance page looks, click on the ‘Update’ button in the content editor to save your changes.

Now you’ve designed your page, it’s time to configure your maintenance mode settings by going to Settings » WP Maintenance Mode in your WordPress dashboard.

You can then click on the ‘General’ tab.

The WP Maintenance Mode plugin's settings

By default, search engine bots can’t see your site while it’s in maintenance mode. This can hurt your WordPress SEO and may affect where your site appears in the search engine rankings, especially if you’re going to be doing maintenance for a while.

That’s why we recommend opening the ‘Bypass for Search Bots’ dropdown and choosing ‘Yes.’ This will allow any search engine crawlers to bypass your maintenance page.

Bypassing the search bots

As the site admin, you can access your WordPress dashboard and website while it’s in maintenance mode. However, you may want to grant access to other user roles.

You can give users access to the WordPress dashboard by opening the ‘Backend’ dropdown and then choosing a user role from the list.

Allowing access to your WordPress dashboard

To give visitors access to your public-facing site, use the ‘Frontend’ dropdown instead.

Similar to SeedProd, you can exclude certain pages from maintenance mode so they’ll always be accessible to visitors. For example, if you have a booking form then you may want to make this page available even when the rest of your site is down for maintenance.

To exclude a page, simply add its slug to the ‘Exclude’ box.

Excluding URLs from 'under construction' mode

If you use Google Analytics to track visitors to your WordPress website, then make sure you click on the ‘Modules’ tab.

You can then open the ‘Use Google Analytics‘ dropdown and select ‘Yes.’

Setting up tracking with Google Analytics

Then, simply add your tracking ID to the ‘Tracking code’ field.

There are lots more settings that are worth looking at, and most are self-explanatory. When you’re happy with how maintenance mode is set up, click on the ‘Save settings’ button to store your changes.

Now, you can activate maintenance mode at any time. Simply select the ‘General’ tab and click on the ‘Activated’ radio button.

Activating maintenance mode in WordPress

You can then scroll to the bottom of the page and click on ‘Save settings.’ Now, if you visit your site while in an incognito browser tab, you’ll see the maintenance page.

When you’re ready to take your site out of maintenance mode, simply go back to the ‘General’ tab and select ‘Deactivated.’ Then, simply click on the ‘Save changes’ button and your website will once be available to anyone who visits it.

How to Add a Chatbot to Your Maintenance Mode Page

Chatbots allow you to interact with visitors, record information about them, and even do lead generation in WordPress.

The WP Maintenance Mode plugin has a simple pre-programmed live chatbot that you can use to ask visitors if they would like to subscribe to your email list and get notified when your site is out of maintenance mode.

A lead generation chatbot

To see how the chatbot is set up, click on the ‘Manage Bot’ tab.

By default, this bot is named Admin but you can change this by typing a new name into the ‘Bot Name’ field.

Customizing the maintenance chatbot

You may also want to add an avatar, which will appear in the chatbot popup.

After that, you can see the pre-programmed conversation under ‘Customize Messages.’

How to create a custom chatbot in WordPress

You can change any of these messages but the default settings should be a good fit for most WordPress websites.

To make the chatbot live, go to the top of the screen and click on the ‘Activated’ button.

Activating the WordPress chatbot

As always, don’t forget to click on ‘Save settings’ to store your changes.

Now if you visit the maintenance page in an incognito tab, you can talk to the chatbot.

A chatbot pop in WordPress

If you’re collecting user information through a chatbot or maintenance page, then it’s important to make sure your site is GDPR compliant.

We hope this article helped you learn how to put your WordPress site in maintenance mode. You may also want to see our guide on how to create custom pages in WordPress, and our comparison of the best business phone services to allow visitors to contact you while your website is under maintenance.

If you liked this article, then please subscribe to our YouTube Channel for WordPress video tutorials. You can also find us on Twitter and Facebook.

The post How to Put Your WordPress Site in Maintenance Mode first appeared on WPBeginner.


November 02, 2022 at 11:58PM