Thursday, November 10, 2022

How to Hide the Title for Selective WordPress Posts and Pages

Do you want to hide the title for selective WordPress posts and pages?

Titles can be helpful for both search engines and visitors, but not every page needs to display a title depending on its design.

In this article, we will show you how to hide the title for specific WordPress posts and pages.

How to Hide Title for Selective WordPress Posts and Pages

Why Hide the Title on Specific WordPress Posts or Pages?

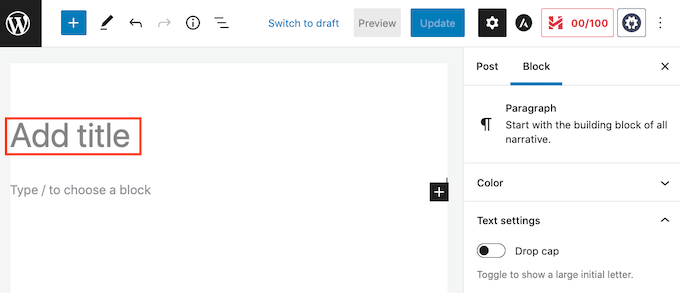
When you create a WordPress page or post the first thing you’ll see is an ‘Add title’ field where you will type your title.

Creating a WordPress page or post title

Most WordPress themes show this title at the top of the page or post. A descriptive, relevant title can let visitors know they’re in the right place and what to expect from this page.

Titles may be helpful, but not every page or post needs a title. Your website’s homepage is one common example.

At other times you may want to show the page’s title in a different area. For example you might start your landing page with an eye-catching banner, and then show the title further down the page. 

In this guide, we’ll be covering three different methods to hide the post or page title in WordPress. Simply click the links below to jump to the method you prefer.

Method 1: Remove Post Title Using Full Site Editor

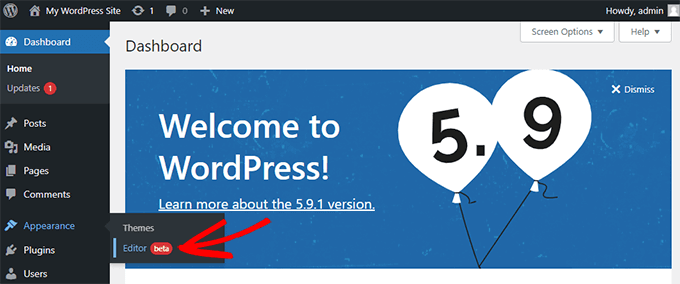
If you’re using WordPress 5.9 or later, and have a WordPress theme that supports full site editing, then you can use this method to remove the title from all posts or all pages.

Not sure if your theme support full site editing?

If it does, then you’ll see the menu option Appearance » Editor available in your WordPress dashboard.

Appearance Editor - full site editing menu

After clicking on ‘Editor’, the full site editor will launch.

From here, you’ll need to select the template you want to edit by clicking on the dropdown at the top of the page, and then clicking on ‘Browse all templates’.

Borwse templates

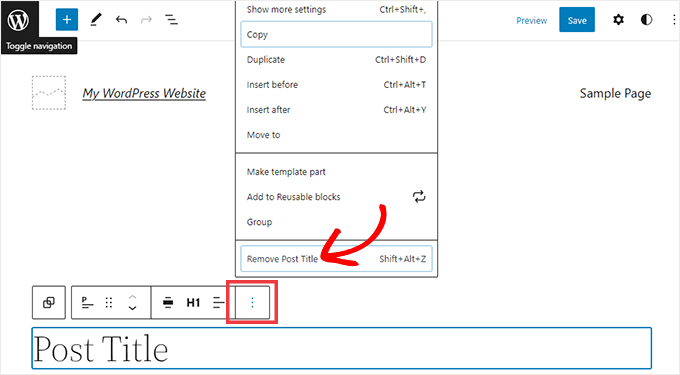
In this example, we’ll edit the Single Post template so that we can hide all our blog post titles.

To hide the title, first you’ll need to click on the blog post title. Then, simply click on the three dots options menu and select the ‘Remove Post Title’ option at the bottom.

Full site editor - remove post title

Don’t forget to click the Save button at the top of the screen after you’re done customizing the template.

That’s it, you’ve hidden the title on all your blog posts.

If you’d like a way to hide the title only on specific posts or pages, the next method should work for you.

Method 2: Hiding Selective WordPress Titles Using CSS

You can hide a page or post’s title by adding custom CSS code to the WordPress Customizer. This method simply hides the title from your visitors, but it still loads in the page’s HTML code.

This means that search engines can still use the title to help them understand your page’s contents, which is good for your WordPress website’s SEO and can help you get more traffic.

We’ll show you how to hide the title on specific posts or pages, or on all your posts and pages.

How to Hide the Title on a Specific WordPress Post or Page With CSS

To hide a page or post’s title using CSS, you just need to know its ID.

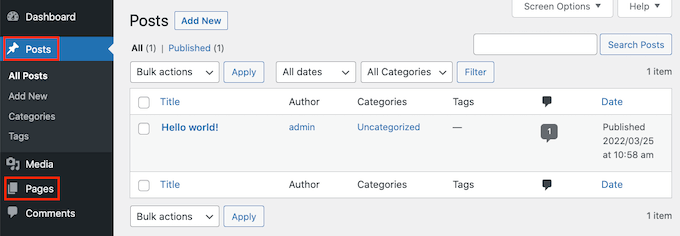
In your WordPress dashboard, either go to Posts » All Posts, or Pages » All Pages. Then find the page or post where you want to hide the title.

You can now open this post or page for editing.

The WordPress page and post editor

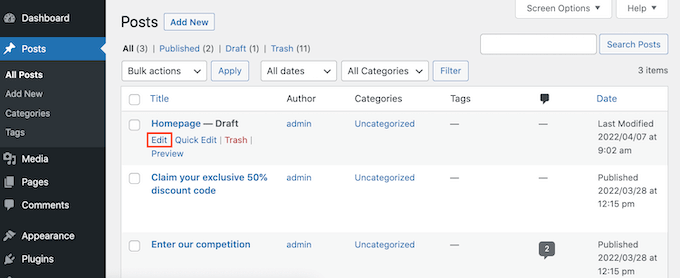
Now simply take a look at the URL in your browser’s address bar.

You should see a ‘post=’ section followed by a number. For example ‘post=100.’

Getting a WordPress post ID

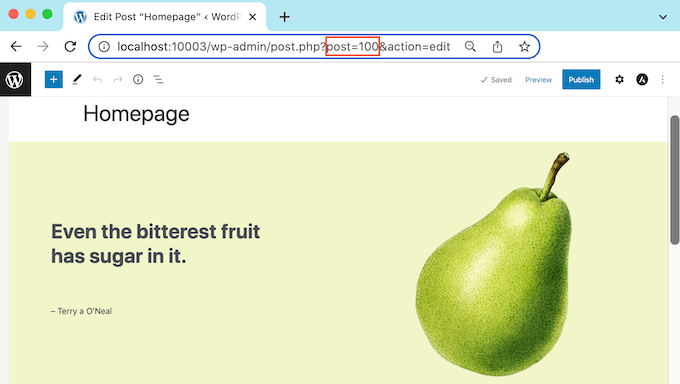
This is your post’s ID. Make a note of this number, as you’ll be using it in your CSS code.

You can now go to Appearance » Customize.

Accessing the WordPress Customizer

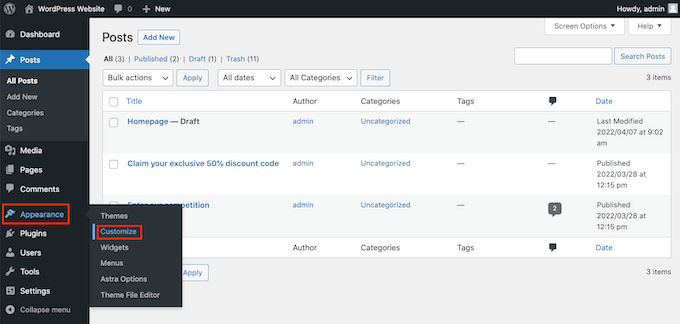
This launches the WordPress Customizer.

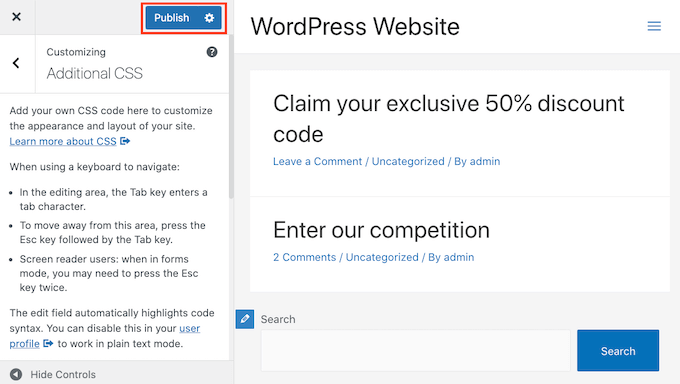
In the sidebar, simply click on Additional CSS.

Adding CSS to your WordPress website

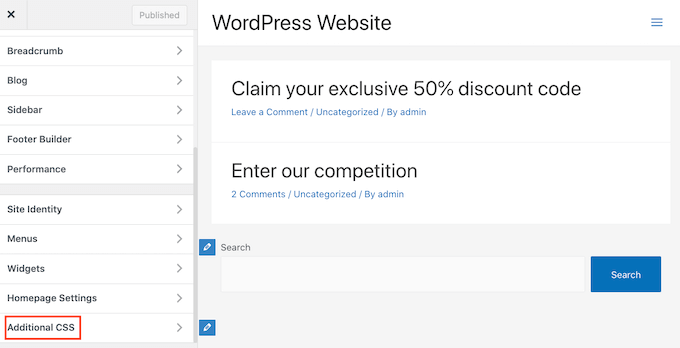
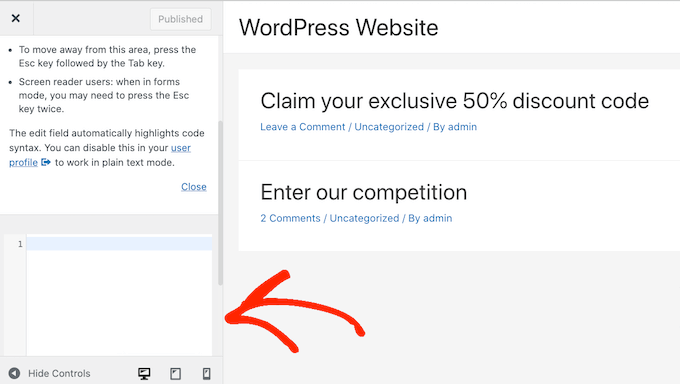
Now scroll to the bottom of the sidebar. 

You should now see a small text editor. This is where you’ll type your CSS code.

The WordPress CSS text editor

If you want to hide the title for a post, you’ll need to use the following code.

Just make sure you replace the ‘100’ with the post ID you got in the previous step.

.postid-100 .entry-title {
display: none;
}

If you want to hide a page’s title, you’ll need to use some slightly different code.

Once again make sure you replace the ‘100’ with your real page ID.

.page-id-100 .entry-title {
display: none;
}

Next, just scroll to the top of the page.

You can then click on the blue Publish button.

Publishing your custom CSS

Now if you check this page or post, the title should have disappeared. 

Is the title still there? 

If this method hasn’t worked for you, your WordPress theme may be using a different CSS class. This means your page or post ID will be different from the number shown in its URL. 

To get the correct ID, you’ll need to use your browser’s developer console. 

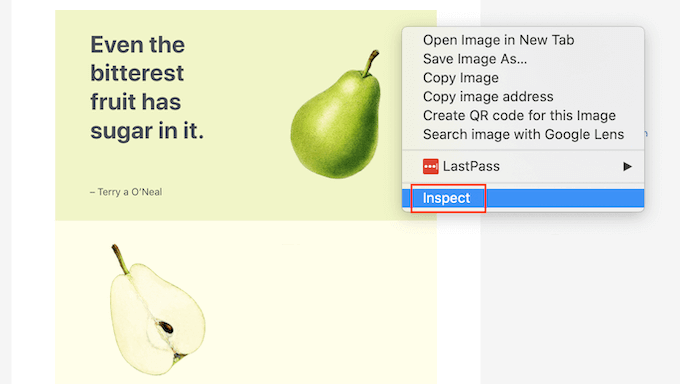
To start, head over to the page or post on your WordPress website. You can then open your browser’s developer console. 

This step will vary depending on which web browser you’re using. For example, if you have Chrome then you can use the Control+Shift+J keyboard shortcut on Windows, or the Command+Option+J shortcut on Mac.

Chrome users can also Control+click anywhere on the page or post, and then select Inspect. 

Chrome's inspection tool

If you’re unsure how to open the developer console, you can always check your browser’s website or official documentation for more information.

In the developer console, click on the three dotted icon. You can then select ‘Search.’

The Chrome developer console

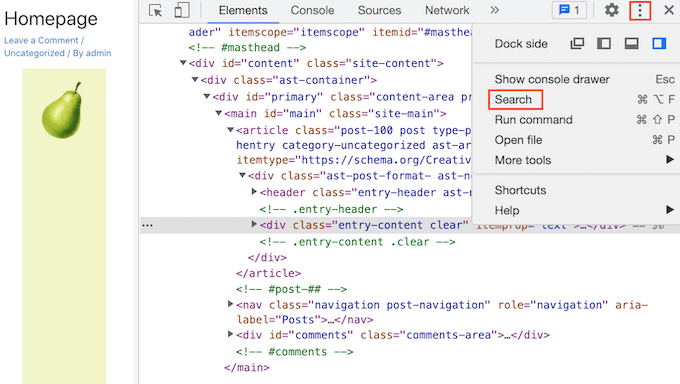
You should now see a search bar towards the bottom of the developer console.

In this bar, type <body class, then simply press the Enter key on your keyboard.

Finding the post id in the body class

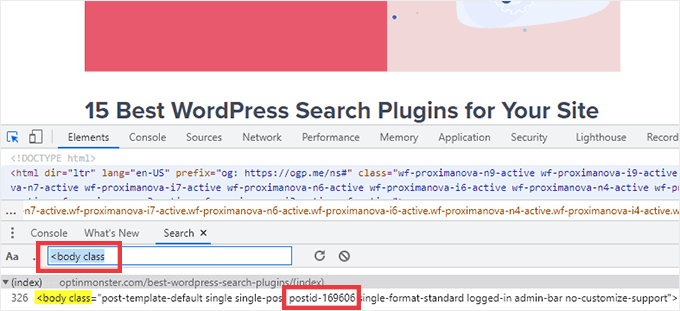
If you’re looking at a WordPress page, you should see something similar to the following.

<body class="page-template-default page page-id-78 logged-in admin-bar 
no-customize-support wp-embed-responsive is-light-theme no-js singular">

In the sample code above, you can see that the ‘page-id’ value is 78.

If you’re inspecting a WordPress post, the console should show something like:

<body class="post-template-default single single-post postid-100 single-format-standard logged-in admin-bar no-customize-support wp-embed-responsive is-light-theme no-js singular">

In that example, the ‘postid’ value is 100. You can now use this value with the CSS code we provided in the previous step.

Simply add this code to your website using the WordPress Customizer, following the process described above.

You can now take a look at the page or post. The title should have vanished.

How to Hide the Title on All Posts or Pages with CSS

To hide the titles for all your pages and posts, copy/paste the following into the text editor.

.entry-title {
display: none;
}

Do you want to hide the titles for all your pages, but not your posts? To hide all the page titles, copy/paste the following into the small text editor.

.page .entry-title {
display: none;
}

Another option is hiding the title for all of your posts. You can do this using the following CSS.

.post .entry-title {
display: none;
}

Sometimes you may want to hide the titles for all your posts and pages.

To do that, add the following.

.entry-title {
display: none;
}

Method 3: Hiding Selective WordPress Titles Using a Plugin

You can easily hide the title for selective posts and posts using Hide Page And Post Title. This free plugin lets you hide the title of any page, post, or even custom posts types.

First you’ll need to install and activate the Hide Page And Post Title plugin. If you need help, you can follow our tutorial on how to install a WordPress plugin.

Upon activation, open the page, post or custom post you want to edit.

The WordPress Posts page

Now simply scroll to the bottom of the right sidebar.

Here you’ll find a new ‘Hide Page and Post Title’ box.

How to hide a WordPress page or post title

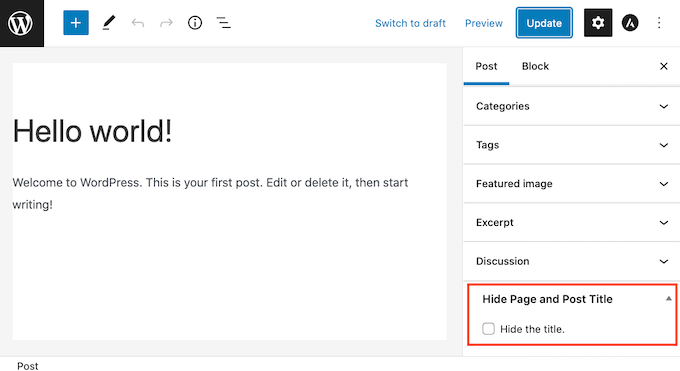
To hide the title, just click to select the ‘Hide the title’ checkbox. You can then update or publish this post as normal.

That’s it! If you visit the page you’ll notice that the title has disappeared.

At some point you may need to restore this page or post’s title.

This is easy. Just open the page or post for editing. Then click to deselect the same ‘Hide the title’ checkbox. 

Don’t forget to click on the Update button at the top of the screen. Now if you visit this page, the title should have reappeared.

Method 4: Hiding Selective WordPress Titles Using SeedProd

Another option is to hide the title using a page builder plugin.

SeedProd is the best WordPress page builder plugin in the market. You can use this plugin to easily creating custom pages or even create your own WordPress theme.

This means you can easily hide the title on a custom page design or your theme.

SeedProd comes with a template library with over 150+ templates you can use as a starting point for your page designs. Let’s see how easy it is to remove the title from one of these theme templates. 

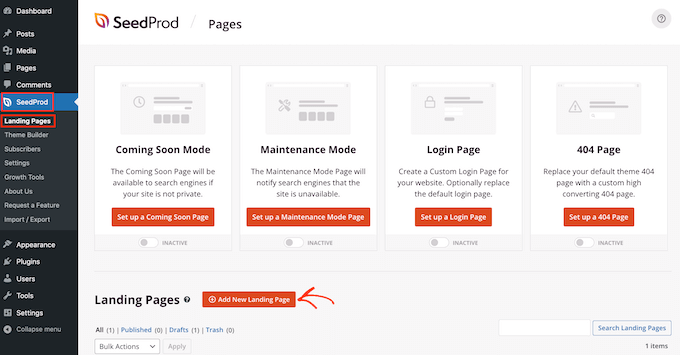
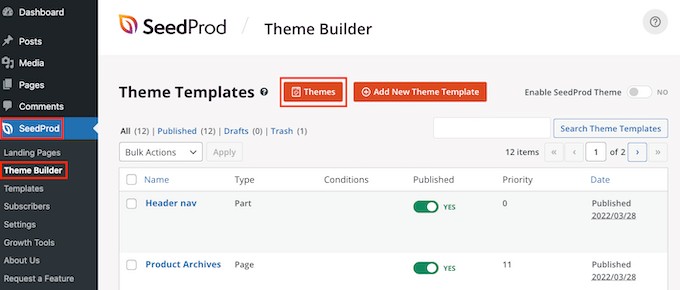
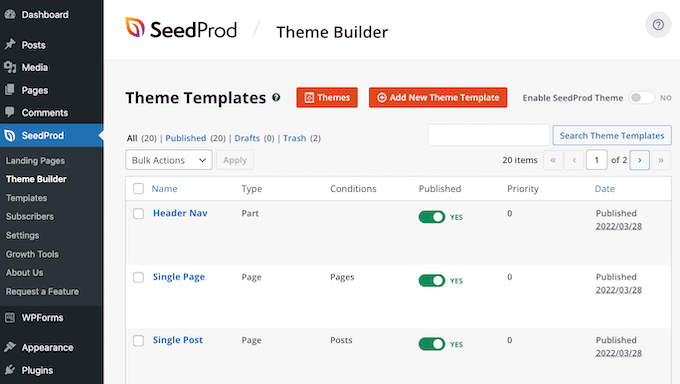
In your WordPress dashboard go to SeedProd » Template Builder. You can then click on the Themes button.

The SeedProd page builder plugin

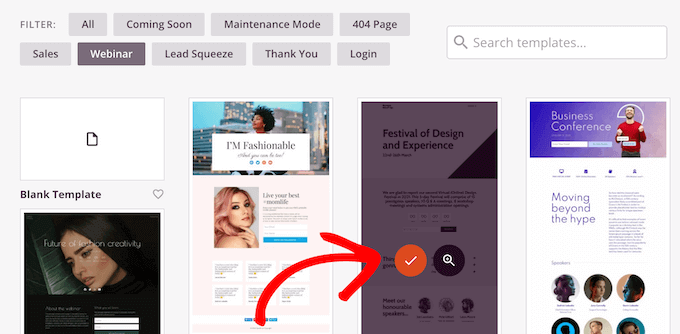
This launches the SeedProd template library. You can now browse through all of the different designs.

To take a closer look at a template simply hover your mouse over it. Then click on the magnifying glass icon. 

The SeedProd template library

This will open the template in a new tab. 

When you find a template that you want to use, hover your mouse over that template. Then simply click on the checkmark icon.

Selecting a SeedProd WordPress template

This adds all of this template’s designs to your WordPress dashboard. 

There are usually different designs for different types of content. 

The SeedProd theme builder

You can use these templates to hide the title for the different content types. For example, many SeedProd templates have a separate design for the homepage.

To hide the title for your homepage, you would simply need to edit the Homepage template.

A SeedProd homepage template

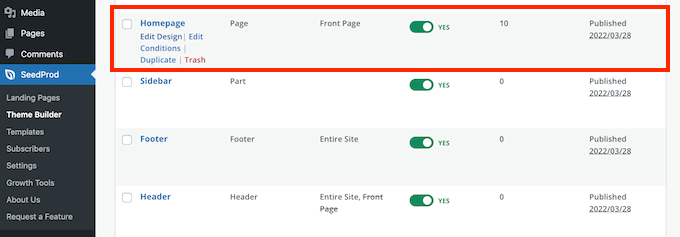
To hide the title for all your posts, you’ll typically need to edit the Single Post template. 

Meanwhile if you want to hide the title from your pages you’ll usually edit SeedProd’s Single Page template.

A SeedProd single post template

To edit a template hover your mouse over it. 

You can then go ahead and click on the Edit Design link.

Editing a SeedProd template design

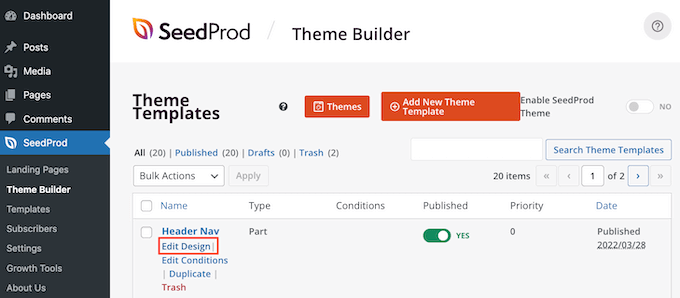
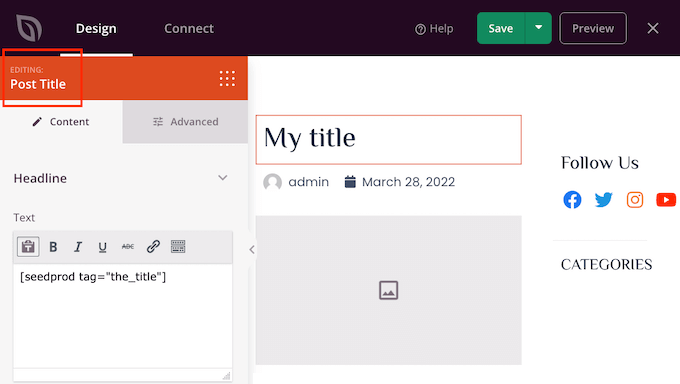
This opens this design in the SeedProd drag and drop editor. To hide the title, find either the Post or Page Title. 

Once you spot this title, give it a click. SeedProd’s sidebar will now show all of the settings for the selected area.

At the top of this panel you should see either Post Title or Page Title.

Removing the post title using SeedProd

After confirming that you’ve selected the right area, hover over the Post Title or Page Title in the main SeedProd editor.

You should now see a row of controls. 

Hiding the post or page title with SeedProd

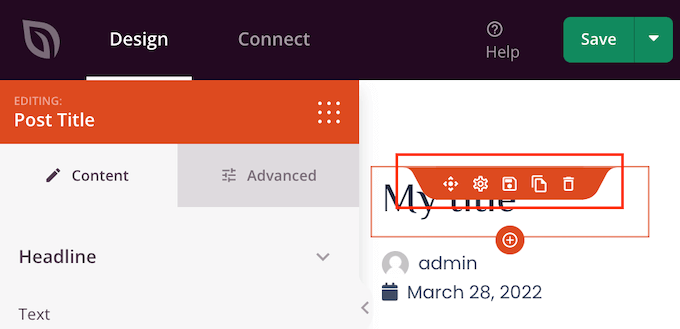
To remove the title from this design just click on the Trash icon.

SeedProd will ask whether you really want to delete the title. To go ahead and remove it, simply click on ‘Yes, delete it!’

Editing your WordPress theme with SeedProd

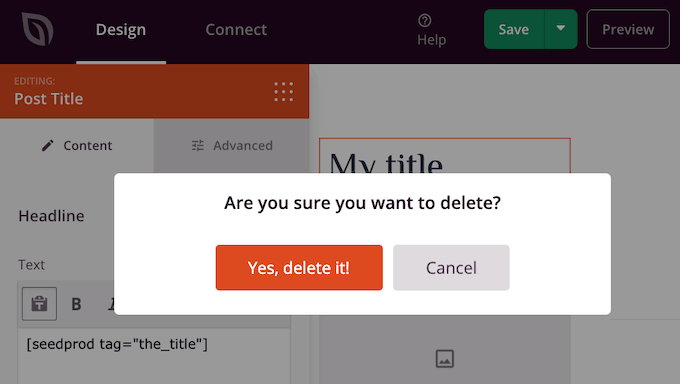
The title will now disappear from your design. 

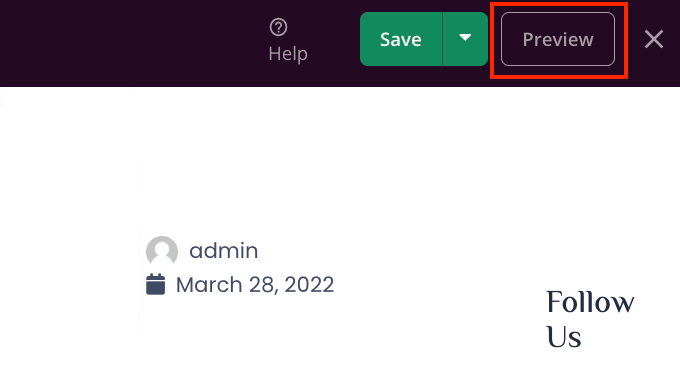
To see how this will look on your website click on the Preview button.

Previewing your custom WordPress theme

When you’re happy with your design click on the Publish button.

Depending on how your site is set up, you may need to remove the title from some additional templates. For example you might want to hide the title for all your posts and pages. In this case, you would typically need to edit both the Single Post and Single Page templates. 

If you’re unsure then it may help to review all the designs that make up your theme. To do this simply go to SeedProd » Theme Builder

The SeedProd theme builder

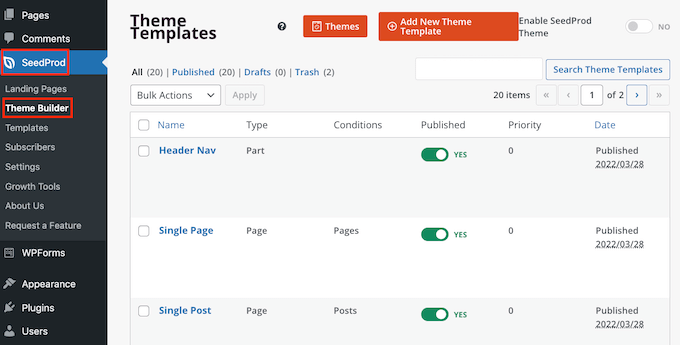
You should now see a list of all your different designs. You can now edit any of these templates following the same process described above. 

FAQs About Hiding the Title for Selective Pages and Posts

Before hiding your page or post titles, there are some effects you should think about, such as the impact this action will have on your website’s SEO.

That being said, here are some of the most frequently asked questions about hiding the page and post title. 

Why can’t I just leave the ‘Add title’ field blank? 

When it comes to hiding the title there seems like an easy fix. As you’re creating your page, just leave the title field blank. 

At first this does seem to fix the problem. WordPress will display this post to visitors without a title. However, there are a few problems.

Firstly, this page or post will appear as ‘(no title)’ in your WordPress dashboard. This makes it more difficult to keep track of your pages. 

If you create lots of different ‘(no title)’ posts, then how do you know which is your contact us page? And which page is your homepage? 

Multiple WordPress pages without a title

WordPress also uses the title to create the page’s URL.

If you don’t provide a title, then by default WordPress uses a number instead, such as ‘www.mywebsite/8.’

Visitors often use the URL to help them understand where they are on your WordPress website, so ‘www.mywebsite/8’ isn’t particularly helpful.

This vague URL is not an SEO-friendly permalink, so search engines may have a harder time understanding what your content is about and including it in the relevant search results.

Will hiding the page or post title affect my SEO?

If you prefer to hide a page or post’s title, you’ll want to spend some extra time fine-tuning the rest of your WordPress SEO, including setting an SEO title. This will help ensure that the search engines understand your page’s content, even without the title.

Here you’ll need a good SEO plugin, since WordPress doesn’t let you do this by default.

We recommend using AIOSEO, the best SEO plugin for WordPress in the market. This beginner friendly SEO toolkit is used by over 3 million websites. 

If you need help getting started, then please refer to our guide on how to properly set up All in One SEO in WordPress.

To make sure your titles are optimized, you can see our guide on how to use the headline analyzer in AIOSEO.

We hope this article helped you learn how to hide the title for selective WordPress posts and pages. You can also go through our guide on how to choose the best web design software, and the best WordPress landing page plugins

If you liked this article, then please subscribe to our YouTube Channel for WordPress video tutorials. You can also find us on Twitter and Facebook.

The post How to Hide the Title for Selective WordPress Posts and Pages first appeared on WPBeginner.


November 11, 2022 at 01:16AM

How to Show a Number Count Animation in WordPress

Are you looking for ways to display an animated number counter on your WordPress site?

Showing a number count helps capture your visitors’ attention and allows you to display milestones, satisfied customers, successful projects completed, and other important statistics on your website.

In this article, we’ll show you how to show a number count animation in WordPress.

How to show a number count animation in WordPress

Why Add a Number Count Animation in WordPress?

Showing a number counter on your WordPress website is a great way to engage users and capture their attention.

You can use it to display important stats on your site, like the number of monthly visitors or the number of articles on a WordPress blog.

Similarly, you can use an animated number count to display completed projects, the number of satisfied customers, the number of clients, milestones achieved by your business, and other crucial information.

For example, OptinMonster uses the number counter to show monthly visitor sessions optimized.

Number counter at OptinMonster

Adding and customizing a number count in WordPress usually requires editing code. This can be tricky for beginners who don’t know how to write code.

That said, let’s see how you can show an animated number counter in WordPress. We’ll cover 2 simple methods using a premium website builder and a free plugin.

You can click the links below to jump ahead to your preferred section.

The best way to add an animated number counter in WordPress is by using SeedProd. It is the best WordPress website builder that offers a drag-and-drop page builder and lots of customization options.

For this tutorial, we’ll use the SeedProd Pro version because it includes advanced blocks and allows you to add a counter. There is also a SeedProd Lite version you can try for free.

The first thing you’ll need to do is install and activate SeedProd. If you need help, then please see our guide on how to install a WordPress plugin.

Upon activation, SeedProd will ask you to enter the license key. You can find the license key in your account area and the purchase confirmation email.

Entering the SeedProd license key

Next, you’ll need to head over to SeedProd » Landing Pages from your WordPress admin panel.

SeedProd lets you create professionally designed custom landing pages, including a coming soon page, maintenance mode page, login page, and 404 page.

Go ahead and click the ‘Add New Landing Page’ button.

Creating a new homepage design with SeedProd

After that, you can select a template for your landing page and show the animated number counter.

Simply hover over a template and click the orange check button.

Select a page template

A popup window will now open. Simply enter a page name and page URL.

After that, click the ‘Save and Start Editing the Page’ button.

Enter a Page Name and Page URL

This will launch the SeedProd drag-and-drop builder.

Next, you can edit your page template by adding different blocks or clicking existing elements on the page.

To add an animated number count, simply drag the ‘Counter’ block from the menu on your left and drop it onto the template.

Add the counter block

After that, you can select the Counter block to customize it further.

For instance, there are options to change the starting and ending number in the counter, enter a number prefix and suffix, and edit the title.

Edit the title of the counter

Next, you can switch to the ‘Advanced’ tab under the Counter block settings on your left.

Here, you’ll find more options to change the style, color, spacing, font, and more for your Counter block.

Edit the color and style of the block

After that, you can head to the ‘Page Settings’ tab at the top.

Now click the ‘Page Status’ toggle and change it to Publish.

Publish your number counter page

Next, you can click the ‘Save’ button at the top and exit the landing page builder.

To see the animated number counter in action, go ahead and visit your website.

Number counter preview

Method 2: Show a Number Count Animation Using Counter Number

Another way you can add number count animation in WordPress is by using the Counter Number plugin.

It is a free WordPress plugin that is easy to use and lets you create simple counter numbers for your site.

First, you’ll need to install and activate the Counter Number plugin. For more details, please see our guide on how to install a WordPress plugin.

Upon activation, you can go to Counter Numbers » All counters from your WordPress dashboard and click the ‘Add New Counter’ button.

Add a new counter

After that, you can enter a title for your counter number.

In the free version, you can only select the plain design template. If you want more templates and customization options, then we suggest using SeedProd.

Enter a name for the counter and select a template

Next, you can add counter number details. There are options to edit the counter title, select an icon, and enter the counter number value.

You can add as many counter numbers as you want by clicking the ‘Add New Counterbox’ button at the bottom.

Add counter details

Besides that, you get more customization options from the panel on your right.

For example, the plugin lets you change the counter title color, number color, icon size, font size, font family, and more.

After making the changes, scroll back to the top and publish your counter.

Publish your counter number

Next, you can head to Counter Numbers » All counters from your WordPress dashboard.

Go ahead and copy the Counter Shortcode. It will look something like this:[COUNTER_NUMBER id=41]

Copy the shortcode for counter

Afterward, you can place your animated number count anywhere on your website, from posts and pages to sidebars.

Simply add a new post or page or edit an existing one. Once you’re in the content editor, simply click the ‘+’ sign and add a Shortcode block.

Adding a shortcode block to WordPress

Next, you can paste the counter number shortcode in the block.

From here, preview and publish your page or post to see the animated number count in action.

Free plugin counter number preview

We hope this article helped you learn how to show a number count animation in WordPress. You can also see our ultimate guide to WordPress security and our expert pick of the best WordPress plugins for small business websites.

If you liked this article, then please subscribe to our YouTube Channel for WordPress video tutorials. You can also find us on Twitter and Facebook.

The post How to Show a Number Count Animation in WordPress first appeared on WPBeginner.


November 10, 2022 at 04:32PM

Wednesday, November 9, 2022

How to Add Facebook Like Button in WordPress

Do you want to add a Facebook Like button in WordPress?

A Facebook Like button on your WordPress website can make it simple and easy for users to like and share your content. You can increase engagement and get more followers.

In this article, we will show you how to add the Facebook Like button in WordPress.

How to add Facebook like button in WordPress

Why Add a Facebook Like Button in WordPress?

Facebook is one of the most popular social media platforms in the world. Many businesses use Facebook to connect with their customers and promote their products.

Adding a Facebook Like button to your WordPress website can help drive more engagement. It also encourages people to share your content on their Facebook profiles and attract new users to your site.

You can use the Facebook Like button to increase your social followers and build a community. It helps raise awareness about your products and services and boosts conversions.

That said, let’s see how you can add a Facebook Like button in WordPress using a plugin or adding custom code.

Method 1: Add Facebook Like Button in WordPress Using a Plugin

In this method, we will be using a WordPress plugin to add Facebook Like button. This method is very easy and recommended for beginners.

The first thing you need to do is install and activate the BestWebSoft’s Like & Share plugin. For more details, see our step-by-step guide on how to install a WordPress plugin.

Upon activation, you can go to Like & Share » Settings from your WordPress admin panel.

Like and share plugin settings

Next, you’ll need to add the Facebook App ID and App Secret. If you don’t have this information, then simply follow the steps below.

How to Create a Facebook App ID and App Secret

Go ahead and click the ‘create a new one’ link under App ID or App Secret field in the Like & Share plugin.

This will take you to the Meta for Developers website. We suggest opening the website in another tab or window because you’ll need to open the Like & Share settings page in your WordPress dashboard to enter the app ID and secret.

From here, you’ll need to select an app type. Go ahead and choose ‘Business’ as the app type and click the ‘Next’ button.

Choose your app type

Next, you’ll need to provide basic information about your app.

You can enter a display name for your app, and be sure that the correct email address appears under the ‘App contact email’ field. Facebook will automatically pick the email address of the account you’re currently logged in as.

There’s also an option setting to choose a business account. You can leave this on ‘No Business Manager account selected’ and click the ‘Create app’ button.

Enter basic information for app

A popup window will now appear where Facebook will ask you to re-enter your password.

This is for security purposes to stop malicious activity on your account. Go ahead and enter your Facebook account password and click the ‘Submit’ button.

Reenter your Facebook password

After that, you’ll see your app dashboard.

From here, you can head to Settings » Basic from the menu on your left.

Go to basic settings page

On the Basic settings page, you will see the ‘App ID’ and ‘App Secret.’

You can now enter this information in the Like & Share plugin settings in your WordPress dashboard.

Copy the app ID and secret

Finish Up Customizing Your Facebook Like Button

First, copy the ‘App ID’ and head back to the tab or window where you have the Like & Share » Settings page opened. Simply enter the ‘App ID’ in the respective fields.

Now repeat the step by copying the ‘App Secret’ data from Meta for Developers page and pasting it into the Like & Share plugin settings.

Customize your Facebook like button

Once you’ve done that, you can choose whether to show the Facebook Like button along with the Profile URL and Share buttons.

There are also settings to edit the Facebook Like button’s size, its position before or after the content, and alignment.

More customization options

If you have enabled the Profile URL button, then you can scroll down to the ‘Profile URL Button’ section and enter your Facebook username or ID.

When you’re done, don’t forget to save your changes.

Now, the plugin will automatically add a Facebook Like button to your WordPress website and position it based on your settings.

You can also use the [fb_button] shortcode to add the Facebook Like button anywhere on your site.

That’s all! You can now visit your site and see the Like button on each post.

Facebook like button preview

Method 2: Manually Add Facebook Like Button in WordPress

Another way to add a Facebook Like button is by using custom code. However, this method requires you to add the code directly in WordPress so we only recommend it for people who are comfortable editing code.

With that in mind, we are going to use the free WPCode plugin to do so, which makes it simple for anyone to add code to their WordPress blog.

First, you need to visit the ‘Like Button’ page on the Meta for Developers website and scroll down to the ‘Like Button Configurator’ section.

Get code from Facebook developer site

Next, you can enter the URL of your Facebook page in the ‘URL to Like’ field. This will be the page you’d like to connect with the Facebook Like button.

After that, simply use the configuration to choose the Like button layout and size. You will also see a preview of the Like button.

Once satisfied with the preview, click on the ‘Get Code’ button.

This will bring up a popup showing you two pieces of code snippets under the ‘JavaScript SDK’ tab.

Copy the SDK code

Please note that if you directly add these code snippets to your WordPress theme, it may break your website. Plus, the code snippets will be overwritten when you update the theme.

An easier way of adding code to your is by using the WPCode plugin. It lets you paste code snippets to your website and easily manage custom code without having to edit the theme files.

First, you’ll need to install and activate the WPCode free plugin. For more details, please see our guide on how to install a WordPress plugin.

Upon activation, you can head to Code Snippets » Header and Footer from your WordPress dashboard. Now, you’ll need to copy the first code snippet and add it to your WordPress theme’s header.php file right after the <body> tag.

Simply copy the code and enter it in the ‘Body’ section. Don’t forget to click the ‘Save Changes’ button.

Add first code to header section

Next, you need to copy the second piece of code and paste it into your WordPress site to display the Like button.

To start, you can go to Code Snippets » + Add Snippet from your WordPress admin panel or click the ‘Add New’ button.

Click 'Add New Snippet' in WPCode

On the next screen, WPCode will allow you to select a snippet from the pre-built library or add a new custom code.

Go ahead and choose the ‘Add Your Custom Code (New Snippet)’ option and click the ‘Use snippet’ button.

Add custom code in WPCode

After that, you can give a name for your custom code and enter the second code snippet under the ‘Code Preview’ section.

Make sure to click the ‘Code Type’ dropdown menu and select ‘HTML Snippet’ as the code type.

Enter second code and select code type

Next, you can scroll down to the ‘Insertion’ section and select where you’d like the Facebook Like button to appear. For example, let’s say you want it to appear before the content.

Simply click the ‘Location’ dropdown menu and choose the Insert Before Content option under Page, Post, Custom Post Types.

Select location of like button

Once you’re done, you can click the ‘Save Snippet’ button.

You’ll also have to click the toggle and switch it from Inactive to Active.

Save and activate code snippet WPCode

That’s it, a Facebook Like button will appear on your website after entering the code.

What is Open Graph Metadata & How to Add it to WordPress?

Open Graph is metadata that helps Facebook collect information about a page or post on your WordPress site. This data includes a thumbnail image, post/page title, description, and author.

Facebook is quite smart in pulling up the title and description fields. However, if your post has more than one image, then it may sometimes show an incorrect thumbnail when shared.

If you are already using the All in One SEO (AIOSEO) plugin, then this can be easily fixed by visiting All in One SEO » Social Networks and clicking on the Facebook tab.

Next, click the ‘Upload or Select Image’ button to set a default post Facebook image if your article doesn’t have an open graph image.

Upload default Facebook image

Besides that, you can also configure an open graph image for each individual post or page.

When you’re editing a post, just scroll down to the AIOSEO Settings section in the content editor. Next, switch to the ‘Social’ tab and see a preview of your thumbnail.

Now scroll down to the ‘Image Source’ option, and you can then choose an open graph image for your post.

For example, you can select the featured image, attached image, the first image in the content, or upload a custom image to be used as an open graph thumbnail.

Image source for open graph

For more details and alternate ways to add open graph metadata, see our guide on how to add Facebook Open Graph metadata in WordPress.

We hope this article helped you learn how to add Facebook Like button in WordPress. You may also want to see our list of how to register a domain name and the best social media plugins for WordPress.

If you liked this article, then please subscribe to our YouTube Channel for WordPress video tutorials. You can also find us on Twitter and Facebook.

The post How to Add Facebook Like Button in WordPress first appeared on WPBeginner.


November 10, 2022 at 12:15AM