Thursday, December 8, 2022

How to Create a Services Section in WordPress

Do you want to add a services section to your WordPress website?

When potential customers arrive at your site, they want to know what services you offer. A services section can communicate this information in a quick and easy way, so visitors can decide whether they want to learn more about your business.

In this article, we’ll show you how to easily create a services section in WordPress. We’ll also share how to get more leads by adding a quote request form to your services section.

How to create a services section in WordPress

Why Create a Services Section in WordPress?

To get more sales, it’s important to give visitors all the information they need to understand what services you offer.

This can include everything from prices and benefits to detailed technical specifications, depending on the services you sell.

That’s a lot of information, so we recommend creating a custom page in WordPress for each service you offer.

You can then add a services section to your homepage or landing page, which will provide a brief overview of all your services, in a compact area.

An example of a services section

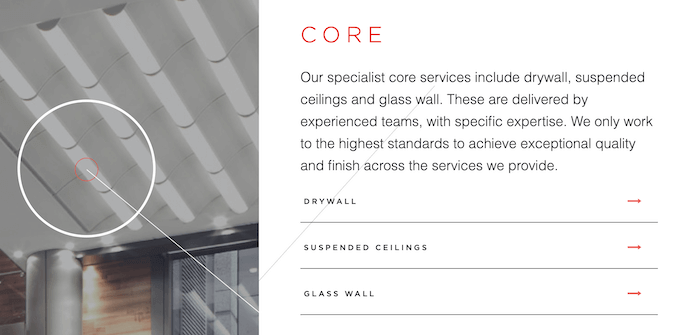
That way, visitors can quickly decide whether they want to learn more about your services.

You can then include links to the different service pages, so visitors can explore each service in more detail.

An example of a services section with CTA buttons

Another option is to include a strong call to action, such as requesting a callback or filling out a form to get a personalized quote.

The following image shows an example of a call to action, which appears directly beneath a services section.

An example of a contact us form

That being said, let’s take a look at how to easily create a services section in WordPress and then add it to any page on your website. Simply use the quick links below to jump to the method you want to use.

Method 1. How to Create a Services Section with SeedProd (Recommended)

The best way to create a services section is by using a page builder.

A good page builder plugin will allow you to add as many services as you want, and arrange those services in a nice layout. You can also encourage visitors to learn more about your services by adding CTAs, links, buttons, and more.

SeedProd is the best drag-and-drop page builder for WordPress. It comes with more than 180 professionally-designed templates and ready-made sections that are perfect for promoting your services.

SeedProd also works with many popular third-party tools that you may already be using to get and manage conversions. This includes top email marketing services, WooCommerce, Google Analytics, and more.

First, you need to install and activate the SeedProd plugin. For more details, see our step-by-step guide on how to install a WordPress plugin.

Note: There’s also a free version of SeedProd but we’ll be using SeedProd Pro since it has more templates and blocks. It also works with all the best email marketing services.

After activating the plugin, SeedProd will ask for your license key.

SeedProd license key

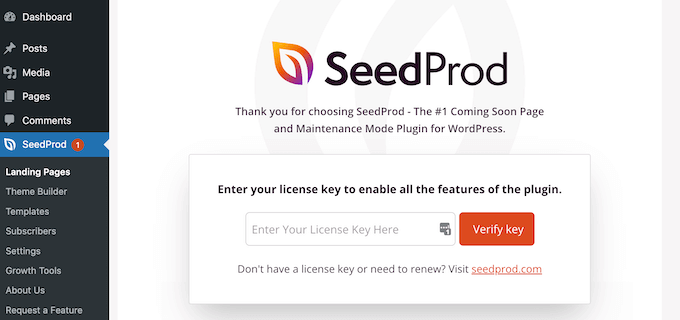
You can find this information under your account on the SeedProd website. After entering the license key, go ahead and click on ‘Verify Key.’

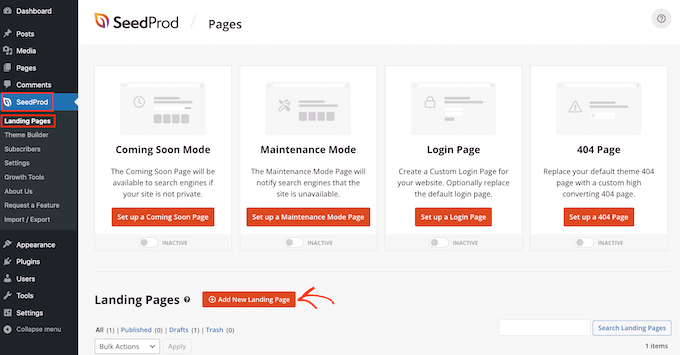
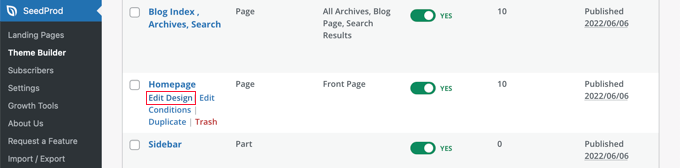
The next step is creating a new page where you will add the services section. To do this, go to SeedProd » Landing Pages in your WordPress dashboard.

Once you’ve done that, click on the ‘Add New Landing Page’ button.

SeedProd's page design templates

You can now choose any of SeedProd’s ready-made templates.

To help you find the perfect template, SeedProd’s designs are organized into different campaign types, such as ‘squeeze,’ ‘ead,’ and ‘coming soon.’

You can click the tabs at the top of the screen to filter the templates based on campaign type.

The SeedProd template library

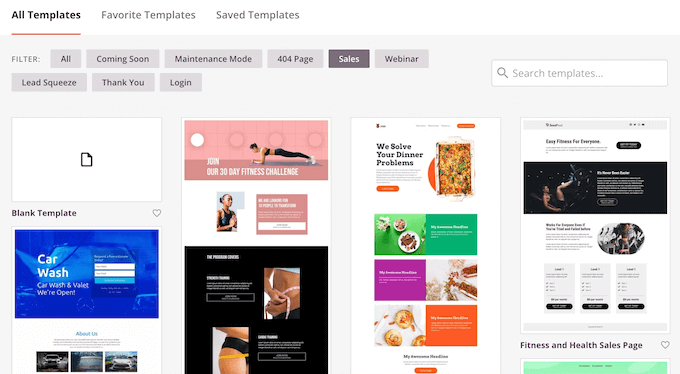
If you prefer to start from scratch, then SeedProd also has a Blank Template, which doesn’t have any default content or design elements.

To take a closer look at a design, simply hover your mouse over the template and then click on the little magnifying glass icon.

Previewing a SeedProd template

When you find a layout that you want to use, click on ‘Choose This Template.’ We’re using the ‘Masterclass Sales Page’ template in all our images, but you can use any template you want.

After choosing a template, type in a name for your custom page. SeedProd will create a URL automatically using the title, but you can change this if you want.

A descriptive URL helps search engines understand what a page is about, so they can deliver that page to people who are searching for content just like yours.

Creating a new page with SeedProd

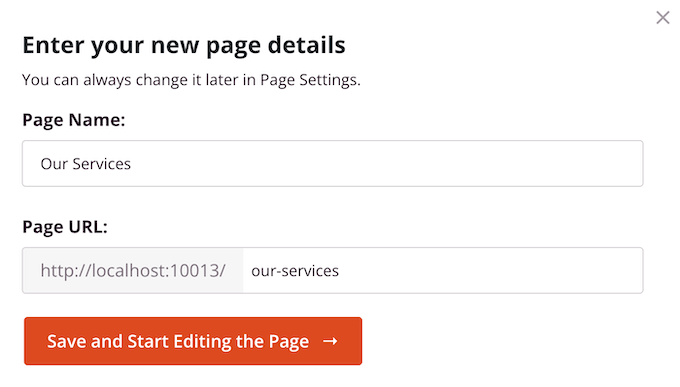
To give your page the best chance of appearing in relevant search results, you may want to add some relevant keywords to the URL. When you’re happy with the information you’ve entered, click on the ‘Save and Start Editing the Page’ button.

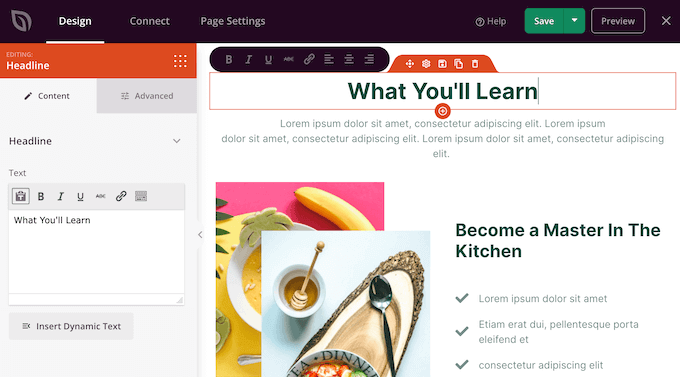
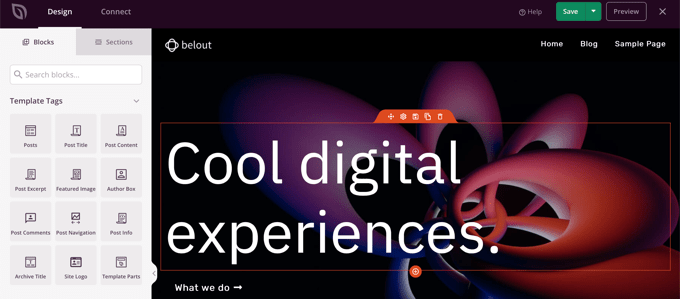
This loads the SeedProd drag-and-drop page builder. It shows a live preview of your page to the right, and some settings on the left.

The SeedProd page builder

Most SeedProd templates already contain some blocks, which are a core part of any SeedProd layout.

To customize any block, simply click to select it. The left-hand menu will then show all the settings you can use to edit the block, such as changing the font size or replacing a stock image.

Customizing a SeedProd block

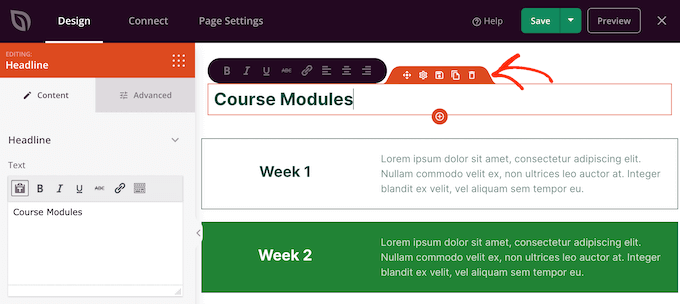
If you want to remove a block from the design, then simply click on that block.

Next, go ahead and click on the small trash icon in the menu bar that appears.

Deleting blocks from a custom layout

To add new blocks to your design, just click on the block in the left-hand menu and drag it onto the editor.

You can then click to select the block and make any changes in the left-hand menu.

You can repeat these steps to create any kind of page, such as a homepage or Google Ad landing page. The possibilities are endless.

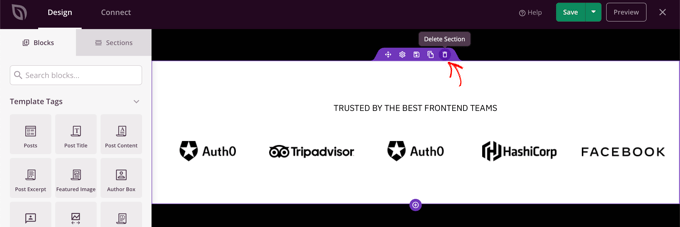
SeedProd also comes with ‘Sections.’ These are rows and block templates for common web design elements. For example, SeedProd has sections for frequently asked questions, footers, and customer testimonials.

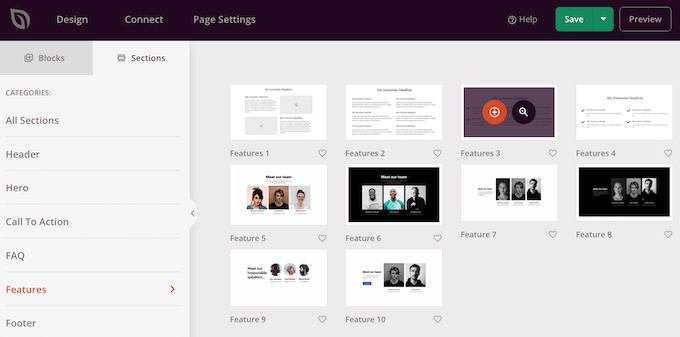
It also has various sections that are perfect for creating a services section in WordPress. To take a look at the different sections, go ahead and click on the ‘Sections’ tab.

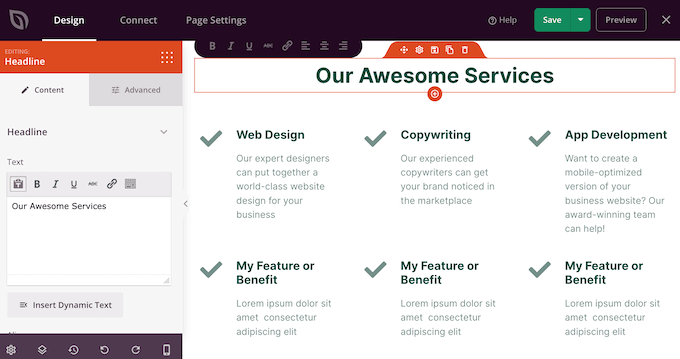
These mini templates are organized into different categories, but since we want to create a services section, we recommend taking a look at the ‘Features’ category.

SeedProd 'Features' sections

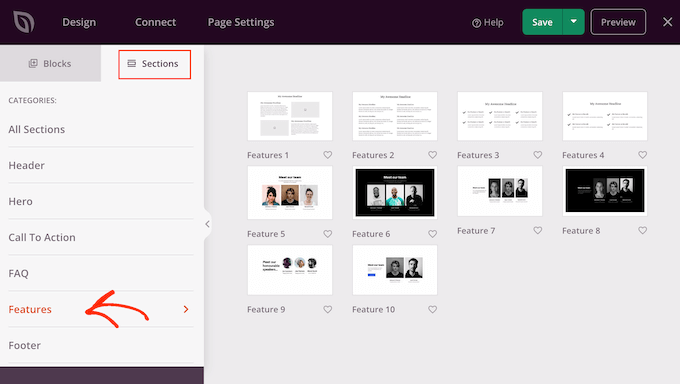
Here, you’ll find sections that use paragraphs, subheadings, and images in a nice layout.

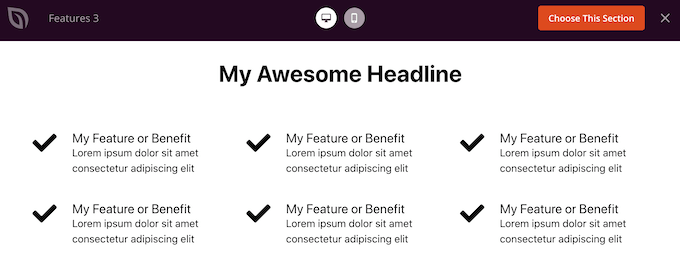
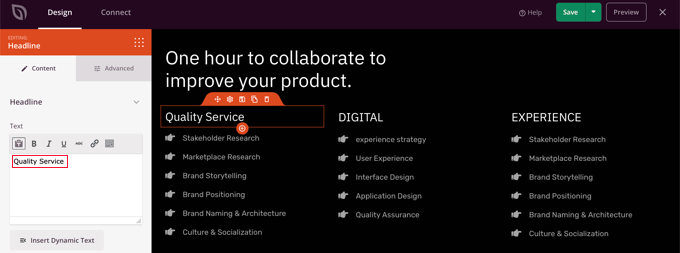
In the following image, you can see the ‘Features 3’ section. To turn this into a services section, you simply need to add your own text and images.

An example section template

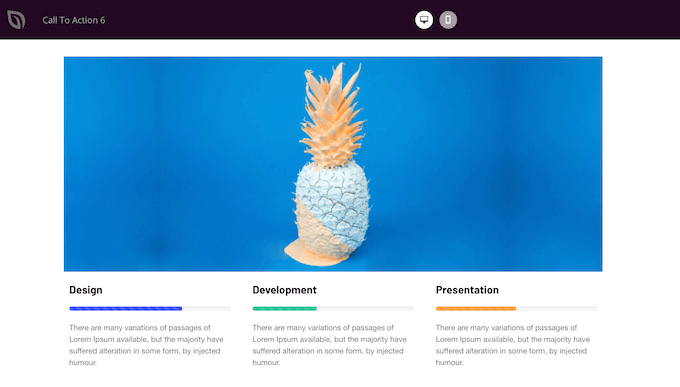
You may also want to look at the ‘Call To Action’ category. This category has lots of different sections, including a few that you can use to advertise your services.

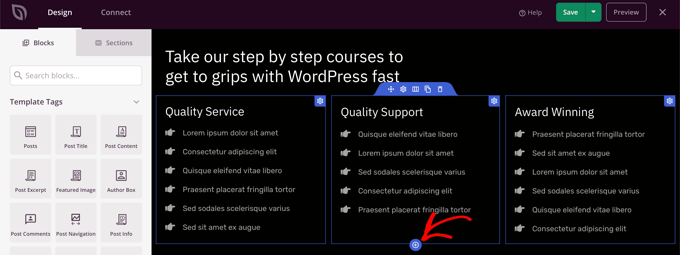
In the following image, you can see the ‘Call To Action 6’ section, which already has space for three services.

An example CTA section template

To preview a section, just hover your mouse over it and then click on the magnifying glass icon that appears.

When you find a section that you want to use, simply move your mouse over that section and click on the little ‘+’ icon.

Adding a services section to your WordPress website

This adds the section to the bottom of your page, but you can move sections and blocks around your design using the drag-and-drop feature.

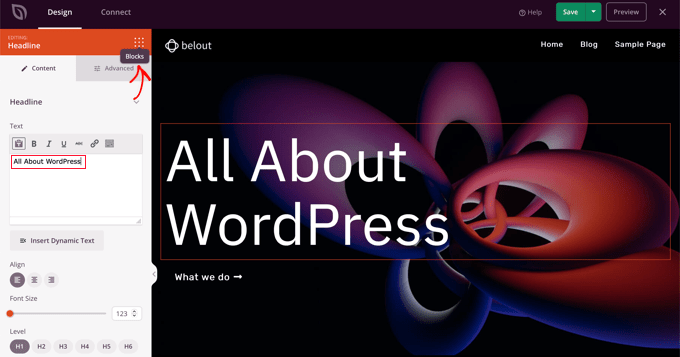
After adding a section, simply can click on any block inside that section to customize it. To start, you’ll typically want to type in some information about your services.

To do this, just click on any ‘Text,’ ‘Headline,’ or similar section. Then type into the text field that appears to the left of the builder.

Editing a services section in WordPress

You can format the text, similar to how you style text in the standard WordPress post editor.

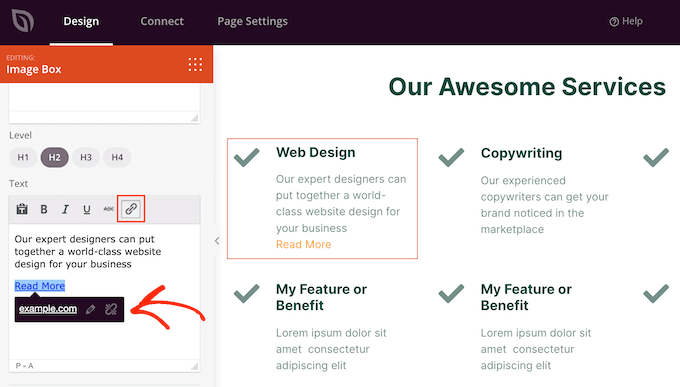
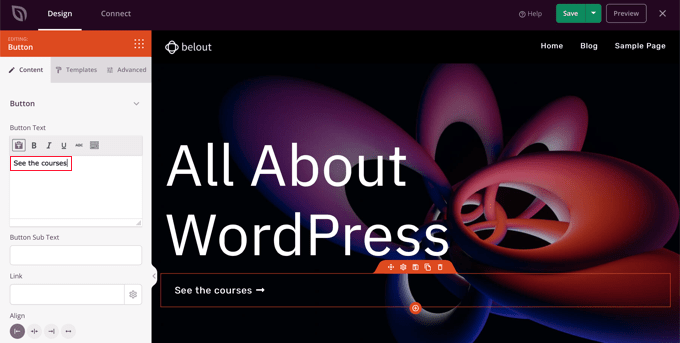
It’s also a good idea to add links to pages where visitors can learn more about each service.

Customizing the services section in WordPress

Another option is to use a ‘Call to Action’ button. Even if the section doesn’t come with buttons, it’s easy to add them.

In the left-hand menu, just click on the ‘Blocks’ icon, which looks like a square of small dots.

How to add blocks to a services section

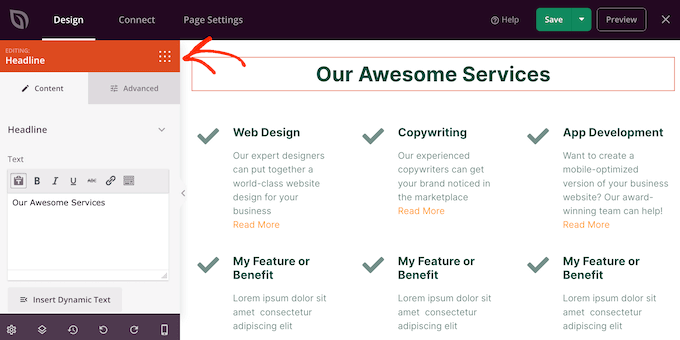
You can then drag and drop a ‘Button’ block into your section.

If you do ‘Button’ blocks, then you can customize them in exactly the same way you edit any block. Just click on it, and then make your changes in the left-hand menu.

Adding a CTA button to a services section with WordPress

You can add more blocks by following the same process described above.

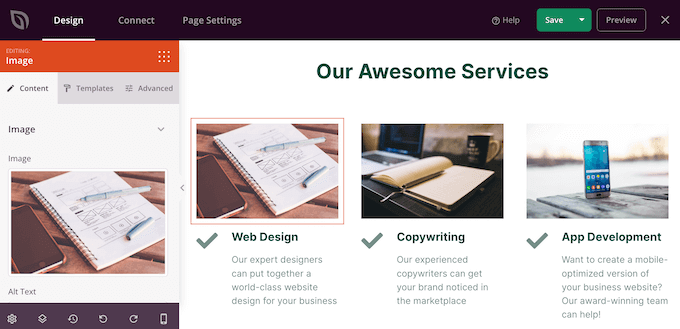
For example, you might add photos showing each service in action using an ‘Image’ block.

Adding images to a services section

When you’re happy with how the page looks, it’s time to publish it by clicking on the dropdown arrow next to the ‘Save’ button.

Then, select the ‘Publish’ option.

Publishing a services section to your WordPress website

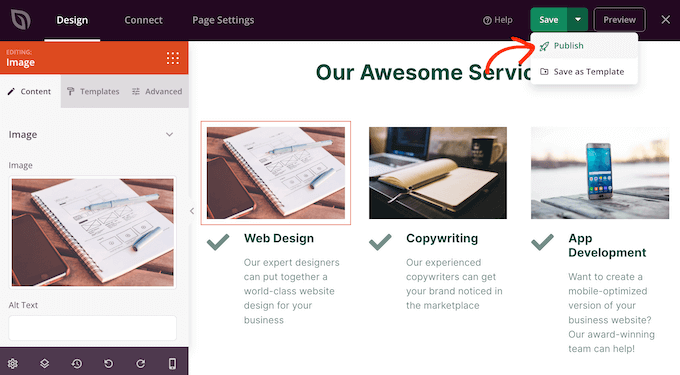
Your page will now go live on your WordPress website and visitors can see all your services at a glance.

Method 2. Creating a Services Section in WordPress using Block Editor

You can also build a services section using the free Service Box Showcase plugin, and then add it to any page or post using shortcode.

You will need to use one of the plugin’s pre-made service section layouts, so this isn’t the most customizable method.

However, the plugin does let you create a service section using the familiar WordPress content editor tools, so it’s quick and easy.

First, you need to install and activate the free Service Box Showcase plugin. For more details, see our step-by-step guide on how to install a WordPress plugin.

Upon activation, head over to Service Box » Add New Service Box in your WordPress admin panel.

The Service Box Showcase plugin

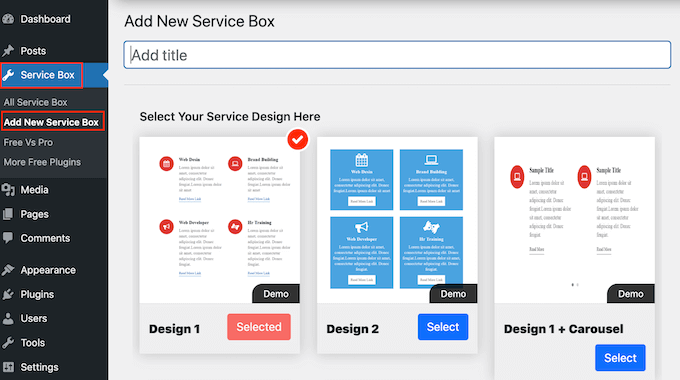
To start, you’ll need to type in a title for your services section. This will only appear in the dashboard and not on your website, so this title is for your reference only.

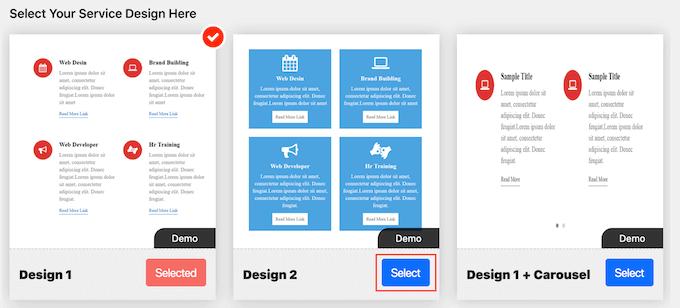
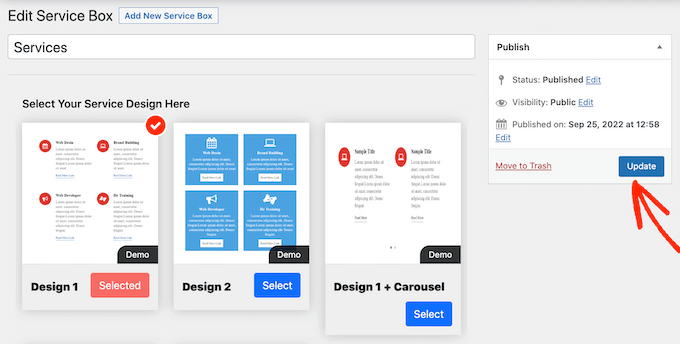
After that, find the layout that you want to use and click on its ‘Select’ button.

Choosing a design for the services section

Next, scroll to ‘Add Service Box,’ which has two services by default.

To add more services to the section, go ahead and click on ‘Add New Service Box.’

How to add more services to the service box

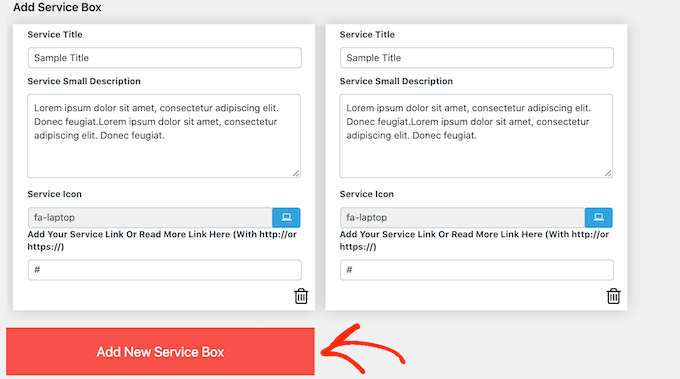
Once you’ve done that, you can type in a title for each service and add a description.

This is the text that will appear on the front end of your site, so make sure you give visitors all the information they need.

Creating a services section using a free WordPress plugin

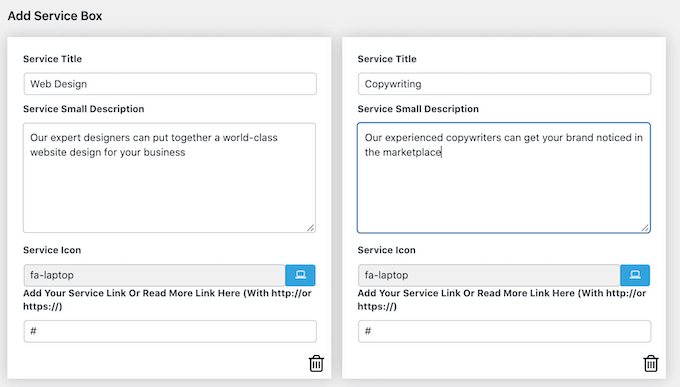
By default, the plugin adds the same icon to each service. It’s a good idea to change these icons to something that’s unique to each service.

To see the different icons that you can use, click on the ‘Service Icon’ field. This opens a popup where you can scroll through the different pictures and click the one you want to use.

Adding a custom icon to each service

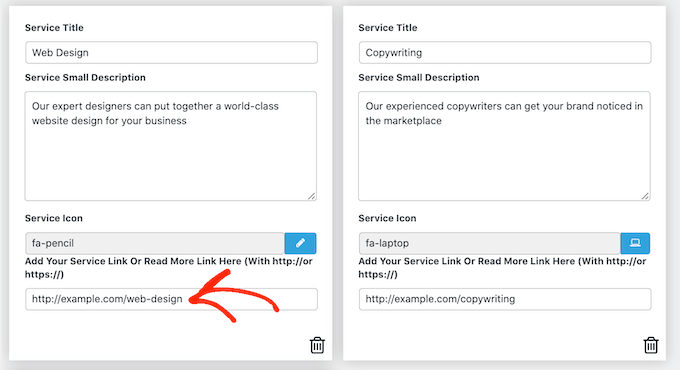
It’s also a good idea to add a link to a page where visitors can learn more about each service, or even a page that has a contact form.

To do this, simply type the link into the ‘Add Your Service Or Read More Link Here’ field.

Adding a link to a services section

After adding all this information, you can change how your service section looks using the ‘Service Box Settings.’

Most of these settings are fairly straightforward. For example, you can change the font size and style. You can also change the link color, plus the color of the title, description, and more.

If you don’t want to use any icons in the services section, then you can remove them by clicking on the ‘Display Icon’ switch.

Hide and show the services icon

There are lots of different settings and what looks good may vary depending on your WordPress theme. With that being said, you can always come back to the ‘Service Box Settings’ and make some changes if you’re unhappy with how the services section looks on your website.

When you’re happy with how the services box is set up, simply click on the ‘Publish’ button at the top of the page to save your changes.

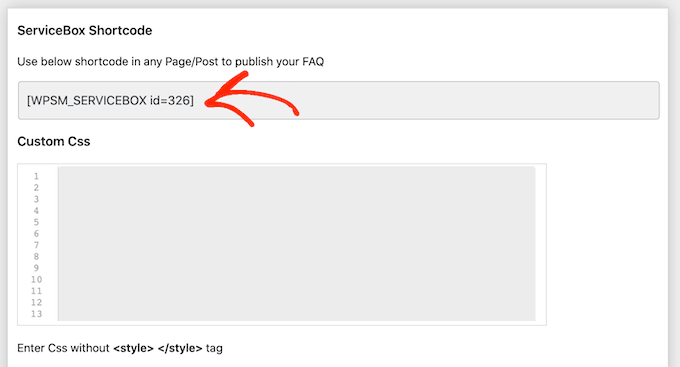
You can now add the services section to your WordPress blog using a shortcode. Simply scroll to ‘ServiceBox Shortcode’ and copy the code.

Adding a services section to your WordPress website using shortcode

You’re now ready to add the services box to any post or page. For more details on how to place the shortcode, you can see our guide on how to add a shortcode in WordPress.

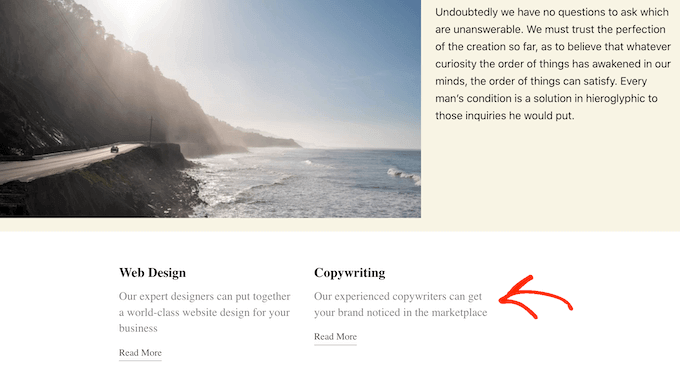
Once you’ve pasted the shortcode, just click ‘Update’ or ‘Publish’ to push changes live. Then, if you visit your site you’ll see the services section in action.

A services section, created using a free plugin

At this point, you may realize that you want to make some changes such as using a different background color or adding more columns.

To make these changes, simply go to Service Box » All Service Box. You can then hover your mouse over the service box and click on the ‘Edit’ link when it appears.

Editing your services using a free plugin

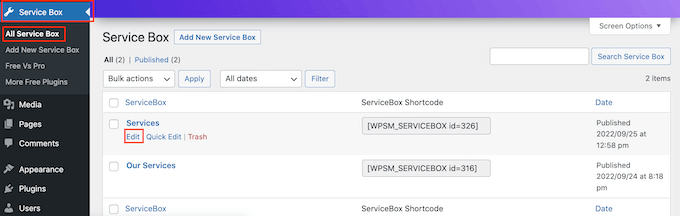
Now, make your changes using the ‘Service Box Settings’ and other sections.

When you’re happy with the changes you’ve made, don’t forget to click on ‘Update.’

Updating the services box

Now, if you visit the page or post where you added the services box, you’ll see your changes on the site.

BONUS: Creating Request a Quote Form For your Services

A services section gives visitors an overview of your company and what you offer, so they can decide whether they want to learn more.

Once you’ve caught the visitor’s attention, the next step is turning them into leads and customers. You can do this by adding a ‘Quote Request Form’ to your site.

This is similar to a contact form, but it has an extra area where visitors can type in some information about themselves or what they’re looking for.

This can help you sell more services. For example, you might recommend a particular service, create a unique package for that customer, or send them a personalized email based on the information they’ve entered.

The easiest way to create a quote request form is by using WPForms. It is the best WordPress forms plugin and allows you to add any type of form to your website using a simple drag-and-drop editor.

WPForms even has a ready-made ‘Request a Quote Form’ that has everything you need to turn visitors into leads.

First, you need to install and activate the WPForms plugin. For more details, see our step-by-step guide on how to install a WordPress plugin.

Note: There is a free version of the WPForms plugin, but we will be using the Pro version because it comes with the ‘Request a Quote’ form template.

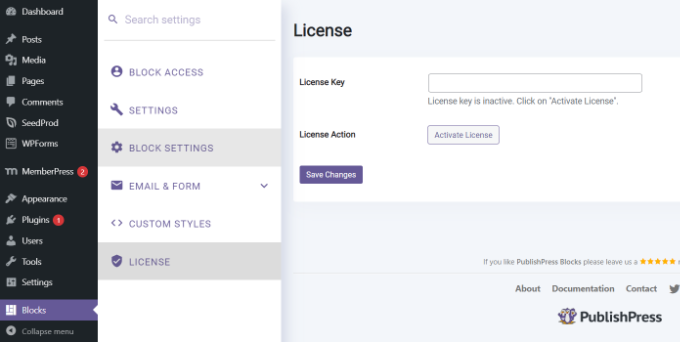
Upon activation, head over to WPForms » Settings and enter your license key.

Entering the WPForms license key

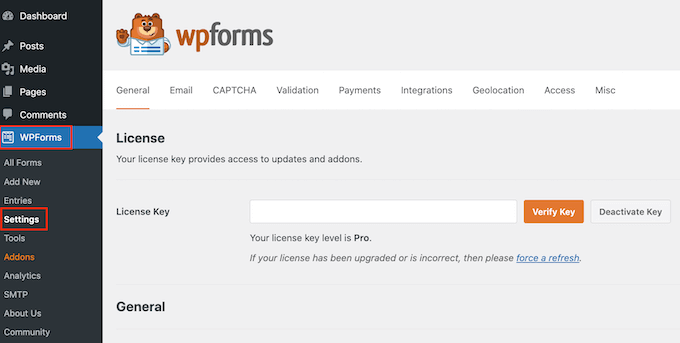
You can find the license key under your account on the WPForms website. It’s also in the email you got when you purchased WPForms.

After entering the license key, click on the ‘Verify Key’ button. After a few moments, you will see a message confirming that you’ve entered the right license key.

Once you’ve done that, go to WPForms » Add New.

Creating a new form using WPForms

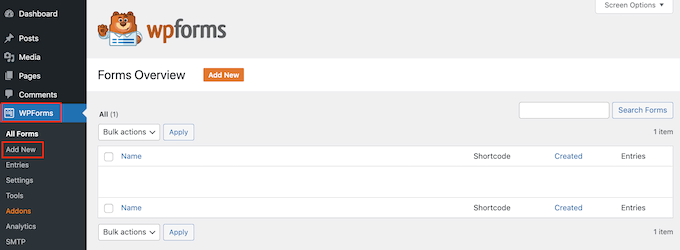
Here, type in a name for your form. This is just for your reference so you can go ahead and use any title you want.

Next, type ‘request a quote’ into the search field. This will bring up the ‘Request a Quote Form’ in the results.

Using a form template

You can now go ahead and click on the ‘Use Template’ button.

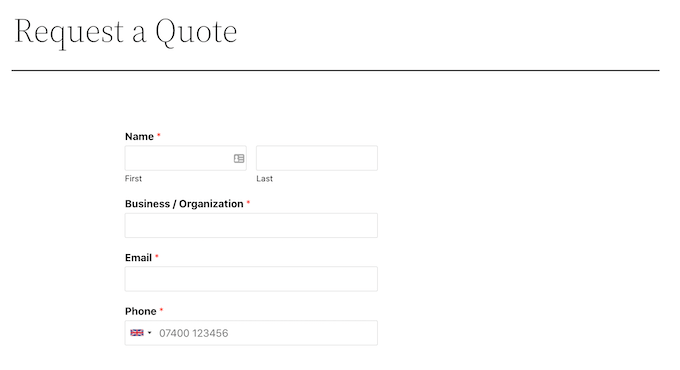
This will load the WPForms editor, with the form on the right and all of the different settings on the left.

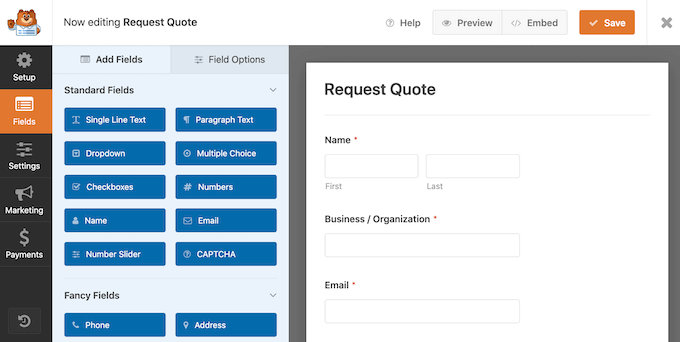
The ‘Request a Quote Form’ template has fields where the visitor can enter their information, such as their name, email address, and phone number.

There’s also a section where they can type in their specific request.

The Request a Quote Form

The default form should work well for most websites, but it’s easy to customize the form if you need to.

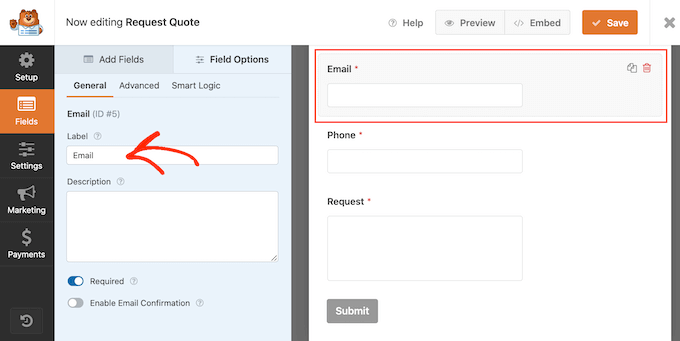
To edit a field, simply click to select it. The left-hand menu will then show all the settings you can use to customize this field.

For example, you can change the text that appears above any field by changing the text in the ‘Label’ field.

Adding a label to a form field

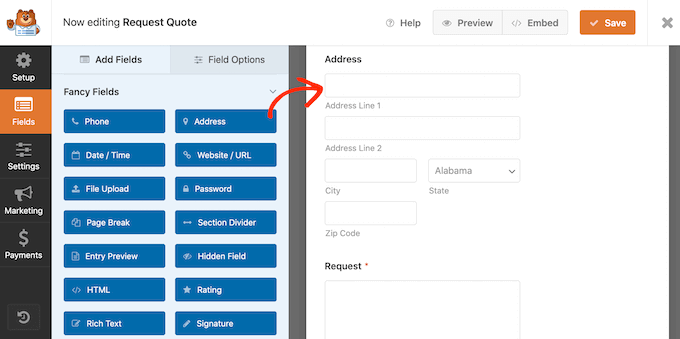
You can also add more fields by selecting the ‘Add Fields’ tab.

Then, simply drag and drop any field block onto the form.

Adding fields to a ready-made from template

You can also change the order that the fields appear in your form using drag and drop.

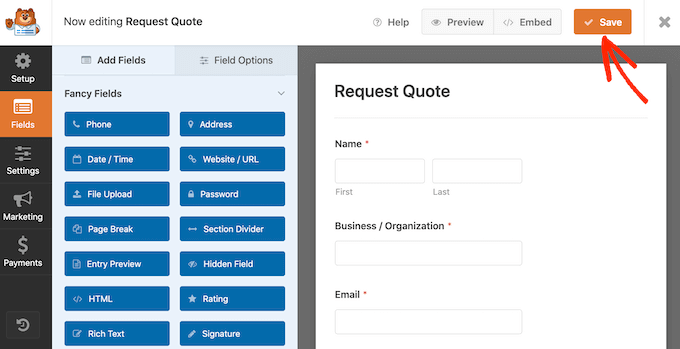
When you’re happy with how the form looks, go ahead and click on the ‘Save’ button.

Saving your quote request form

You can now add this form to any WordPress post or page using the WordPress content editor.

Simply open the page where you want to add the form and then click on the ‘+’ button.

Next, type ‘WPForms’ and click on the block to add it to your page.

The WPForms block

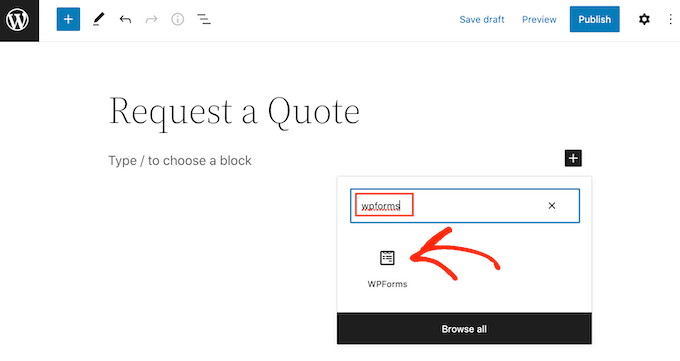
Finally, open the dropdown menu and select the quote request form.

WPForms will show a preview of the form on the screen. If you’re happy with how the form looks, then you can go ahead and save or publish the page.

A quote request form created using WPForms

The quote request form will now be live for your visitors to use.

We hope this article helped you learn how to create a services section in WordPress. You might also like to check out our article on the best live chat software and how to create an email newsletter.

If you liked this article, then please subscribe to our YouTube Channel for WordPress video tutorials. You can also find us on Twitter and Facebook.

The post How to Create a Services Section in WordPress first appeared on WPBeginner.


December 08, 2022 at 11:30PM

How to Hide Blocks from Specific Users in WordPress Editor

Are you looking for a way to hide certain WordPress blocks from a user role?

The WordPress content editor offers a lot of flexibility in creating content using blocks. However, you may want to disable some blocks for different user roles. This is helpful if you run a multi-author website or don’t want others to access specific blocks.

In this article, we’ll show you how to hide blocks from specific users in the WordPress content editor.

How to Hide blocks from specific users in WordPress editor

Why Hide Blocks from Specific Users in the Content Editor?

WordPress blocks are content elements you add to your blog post or page. You can add blocks for images, videos, paragraphs, galleries, and more. Many WordPress plugins also add blocks to the content editor.

Since each block lets you edit your article or landing page, it is a good idea to hide or disable some of the blocks based on WordPress user roles. This way, your website content will remain consistent and won’t have unwanted blocks and layouts.

Let’s say you have a multi-author website. You can hide the tables block in the WordPress content editor for author and contributor user roles. This helps streamline your editorial workflow.

Similarly, you can also prevent different user roles from using blocks added by different plugins.

For instance, WPForms lets you embed forms in the content editor using the WPForms block. Stopping other users from accessing the block can help you stay in control and only display forms where you think is necessary.

That said, let’s see how to hide or disable blocks for specific users in WordPress.

Hiding Blocks for Specific Users in WordPress Editor

The best way to hide blocks based on user roles is by using the PublishPress Blocks plugin. It gives you more control over the WordPress block editor and adds more blocks like an image slider, search bar, pricing table, and more.

First, you’ll need to install and activate the PublishPress Blocks plugin. If you need help, then please see our guide on how to install a WordPress plugin.

Upon activation, you can head to the Blocks item in your WordPress dashboard and click on the ‘License’ tab.

Add PublishPress blocks license key

Next, you can enter your license key and click the ‘Activate License’ button. You can find the license key in your PublishPress account area.

After that, head to the ‘Block Access’ tab in the plugin. Here, you can choose a user profile from the dropdown menu at the top.

Choose user profile to hide blocks

To hide any WordPress block from the selected user role, simply click the toggle to disable it.

For example, in the image below, we’ll disable the ‘table’ and ‘quote’ blocks for any user iwth the Author role.

Click the toggle to disable blocks

Don’t forget to click the ‘Save Block Access’ button when you’re done.

That’s it! You’ve successfully disabled the WordPress block for a user role on your website. Now, you can repeat this to hide blocks for other user roles.

We hope this article helped you learn how to hide blocks from specific users in WordPress editor. You may also want to see our guide on how to increase your blog traffic, and our comparison of the best-managed WordPress hosting.

If you liked this article, then please subscribe to our YouTube Channel for WordPress video tutorials. You can also find us on Twitter and Facebook.

The post How to Hide Blocks from Specific Users in WordPress Editor first appeared on WPBeginner.


December 08, 2022 at 04:31PM

Wednesday, December 7, 2022

How to Edit a WordPress Homepage (Easily & Effectively)

Do you want to create a custom homepage for your WordPress site?

By default, the WordPress homepage displays your blog posts, but you can edit it to show something different. For example, your homepage could be a landing page that highlights your products and services.

In this article, we’ll show you how to easily edit and customize your WordPress homepage.

How to Edit a WordPress Homepage (Easily & Effectively)

What Is the WordPress Homepage?

Your homepage is the ‘front page’ of your WordPress website. It’s the first page that shows up when a user visits your domain name.

For instance, if you type in www.wpbeginner.com into your browser, the page you land on is our website’s homepage, where you can see our latest blog posts:

The WPBeginner Homepage

Why Edit the WordPress Homepage?

If you’ve decided to create a blog, then it makes perfect sense to just show your blog posts on the homepage.

But what if you’re using WordPress to build a small business website or even to run an online store? In those cases, you may prefer to highlight your products or promotions on your homepage.

Here’s a business website homepage example from OptinMonster, the best WordPress popup plugin out there. Their site has a great blog, but that isn’t the focus of their homepage. Instead, they’ve got a really clear call to action.

The OptinMonster Homepage

Perhaps you’ve already tried to set a custom page as the homepage in WordPress, but you’re struggling to make it look right.

If that’s the case, then you’re in the right place.

We’re going to take you step by step through setting up a homepage and customizing it to match your needs. That way, you can make a great first impression and encourage your visitors to take the actions that are most important to your site’s mission.

That might mean buying a digital product from you, signing up to join your membership site, or donating to your fundraising campaign.

We’re going to cover a few different methods that you can use to create your custom WordPress homepage.

You can use these quick links to jump straight to the different parts of the tutorial:

Editing Your Homepage With the Theme Customizer

Some of the best WordPress themes will create a homepage design for you, and provide options so you can easily edit it.

You can find these options by visiting Appearance » Customize on the admin sidebar. This will launch the WordPress theme customizer with a live preview of your theme.

Using WordPress's Theme Customizer

The Theme Customizer will have different options for different themes. Your preview and the available options may look different depending on the theme you are using. We’re using the free Hestia theme in this example.

To edit any part of the homepage, simply click the blue pencil icon next to it. Here, we’re editing the image, text, and button at the top of the homepage.

Editing the Top Section of the Homepage in Hestia
Note: As soon as you make edits, they’ll be shown in the preview of your site. Those changes won’t be live on your site until you publish them.

If you want to remove a section from the homepage, then you just need to click the blue eye icon in the top left corner of that section.

Remove a Section of the Default Hestia Homepage

You can also remove sections and add them back in using the ‘Frontpage Sections’ tab.

Once you’re happy with your homepage, you need to click the ‘Publish’ button to make it live.

Click the Publish Button to Make Your Homepage Live

Here’s how our homepage looks, live on the website:

The Finished Homepage Live on the Website

Using your theme’s built-in options is the quickest way to set up your homepage. However, some themes may not have many options, or you may not be satisfied with how your homepage looks.

Don’t worry, there are plenty of other ways for you to edit your homepage and give it the look you want.

Editing Your Homepage With the Block Editor

The WordPress block editor is a simple way to create a custom homepage, although it’s limited by your theme’s design.

To use the block editor, simply go to the Pages » All Pages screen and edit the ‘Home’ page that you created earlier.

Editing the 'Home' Page With the Block Editor

Now you can start creating the content for your page.

In this part of the tutorial, we’ll be using a few simple blocks to create a basic homepage.

First, we’ll add a welcome message to the page. You can do this by simply clicking on the page to start typing. WordPress will automatically create a paragraph block for you.

Adding Text in the Block Editor

If you want to make the text larger, then it’s easy to do that in the block settings on the right hand side. Just click on one of the preset sizes, or you can click on the ‘Set custom size’ icon and type any size you like.

You can also change the color of your text, using the ‘Color’ options for the text or background.

Changing the Text Size in the Block Editor

Next, we’ll add an image to the page. You can do this by clicking the (+) symbol and then selecting the Image block.

You’ll find it in the Media section, or you can search for it using the search bar.

Adding an Image Block to Your Homepage

You can pick an image from your media library or upload a new one.

Next, we’ve added another paragraph block, with the text ‘Check out our latest posts here’.

We’ve then added a ‘Latest Posts’ block, which we’ve set to show the post excerpt and featured images, as well as the post titles. You can find out more about the Latest Posts block in our tutorial on displaying recent posts in WordPress.

Adding a List of Your Latest Posts to the Homepage

You can add as many blocks as you want to your homepage. You may also want to use a ‘full width’ or ‘no sidebars’ template for your page if your theme has one.

For example, when using the Astra theme, you can customize the layout of the page from the Astra Settings pane. Other themes may provide a section in the Document settings pane.

Removing the Sidebar From the Homepage

Once you’re happy with your homepage, you should click the ‘Update’ or ‘Publish’ button on the top right of the screen to push your changes live.

Here’s how our finished homepage looks:

Homepage Created With the Block Editor Live on the Site

What if you want to go further with your homepage? One option is to try some of these best block plugins for WordPress to add new functionality, such as a contact form, testimonials, reviews, and more.

Another great option is to use a more powerful theme builder or page builder for WordPress to create something that looks gorgeous and professional.

In the next parts of this tutorial, we’ll cover SeedProd, a theme builder, and Divi by Elegant Themes, a page builder.

Editing Your Homepage With a Theme Builder Plugin

The easiest way to edit your homepage is by using SeedProd. It’s the best WordPress theme builder plugin and can create beautiful website layouts and custom templates without writing any code.

You can use SeedProd to create a fully custom WordPress theme, including a custom homepage template.

Note: There is a free version of SeedProd, but you will need the Pro version to access the theme builder and edit the homepage template.

First, you need to install and activate the SeedProd plugin. For more details, see our step by step guide on how to install a WordPress plugin.

Upon activation, you need to enter your license key. You can find this information under your account on the SeedProd website.

SeedProd license key

After that, you can use SeedProd to easily create a WordPress theme, including a completely custom homepage from scratch.

Creating a Custom WordPress Theme

You can create a new theme in SeedProd by navigating to the SeedProd » Theme Builder page. Here, you’ll use one of SeedProd’s ready-made themes as a starting point. This will replace your existing WordPress theme with a new, custom design.

You can do that by clicking the ‘Themes’ button.

Create your custom theme

You will be shown a list of professionally designed themes that are designed for different types of websites. For example, there are templates called ‘Modern Business’, ‘Marketing Agency’, and ‘Mortgage Broker Theme’.

Take a look through the options and select one that best matches your needs by clicking the checkmark icon. For this tutorial, we’ll choose the ‘Digital Strategy’ theme.

Select a Theme That Matches Your Needs

Once you have chosen a theme, SeedProd will generate all the theme templates you need. It will include a template for your static homepage, as well as one for your blog’s index page.

Editing the Homepage Template

SeedProd makes it easy to edit any of these templates using a drag and drop page builder.

Simply click the ‘Edit Design’ link found under the ‘Homepage’ template. This will open the template in SeedProd’s visual editor.

Click the 'Edit Design' Link Under the Homepage Template

This simple drag and drop builder will show a live preview of your page to the right and a toolbar on the left. You can add new blocks by dragging them onto the page, rearrange them by dragging them up and down with your mouse, and customize any block by clicking on it.

Notice that the template has already provided an attractive layout and added plenty of relevant content on the page. Now you just have to edit it to suit the purpose of your website.

When you hover your mouse over a block, a toolbar will appear.

The SeedProd Visual Editor

If you click on the block, then you can adjust its settings in the left pane.

For example, when you click on the headline, you can edit the text, change the alignment, alter the font size, and more.

SeedProd Settings for the 'Headline' Block

When you change a setting, you can immediately see it in the preview on the right.

For example, we’ll change the text to ‘All About WordPress’.

When You Edit a Block's Text, It Is Immediately Updated in the Preview

Once you’ve done this, you can click the ‘Blocks’ icon near the top of the settings page. This will return you to the Blocks view.

Next, we’ll edit the button text. You can click on the button labeled ‘What we do’ and edit the text to say ‘See the courses’.

Change the Button Text

Now we’ll scroll down our homepage until we come to the list of bullet points about the products and services you offer.

You can edit these in the same way, by clicking on a block and editing the text.

Edit List of Benefits

Your homepage should now look something like the screenshot below.

If you need to add more detail, then you can add another row of bullet points by clicking the blue ‘+’ icon at the bottom.

Add a Row by Clicking the + Icon at the Bottom

The SeedProd template may have included more sections than you can use. You can easily delete any blocks or sections you don’t need by simply clicking the trash icon.

For example, you can hover your mouse over the ‘Trusted By’ section of the homepage. Once the toolbar appears, you can click on the Trash icon to delete that section.

Delete a Block or Section by Clicking the Trash Icon

Near the bottom of the homepage there is a FAQ section. This was created using an Accordion block, which makes it simple to customize the questions and answers you want to include on your homepage.

When you click on the block, you are able to edit the text for each question and answer.

Editing the FAQ Section

Once you have finished customizing your homepage, make sure you click the ‘Save’ button at the top of the screen. Then you can return to the list of templates by clicking the ‘X’ icon.

As you can see, SeedProd’s templates, drag and drop interface, and useful blocks make it ideal for editing your website’s homepage. For even more ideas, take a look at our guide on how to create a landing page with WordPress.

Editing the Blog Index Template

You can edit your blog index template in a similar way. You can learn how to do this by visiting our guide on how to create a separate page for blog posts in WordPress.

Using Method 2, you should scroll down to the section on customizing your blog page. Here you’ll learn how to add new blocks using drag and drop, and how to change the settings for each block on the page.

SeedProd's Post Block Settings

We’ll show you how to edit the Posts block to list your posts in multiple columns and display or hide the featured image for your posts.

There are settings for how many posts to display, and whether to show a post excerpt. You can also filter the index by post type, category, tag, or author, and change the sort order.

Enabling the SeedProd Theme

Once you have finished customizing the theme templates, you will need to publish the new custom theme. Simply toggle the ‘Enable SeedProd Theme’ setting to the ‘YES’ position.

Enable the SeedProd Theme

If you haven’t already changed your WordPress Home and Blog page settings, then you’ll see a notification message. When you click the ‘OK’ button these settings will be changed for you.

You can now visit your website to view your new home page.

SeedProd Home Page Preview

Editing Your Homepage With a Page Builder Plugin

Divi is a popular WordPress page builder plugin. It comes with a WordPress theme and a page builder plugin with dozens of gorgeous templates.

You can use the Divi page builder with any theme. For this tutorial, we’re going to use it with the Divi theme.

First, you’ll need to download, install, and activate the Divi theme from Elegant Themes. This includes the Divi builder, so you don’t need to install it separately. You will need to enter your username and API key under Divi » Theme Options » Updates in order to access the layout packs.

If you need help installing the theme, then take a look at our step by step guide on how to install a WordPress theme.

Once you’ve got the Divi theme and page builder up and running, you can set up your homepage. First, go to the Pages menu in your WordPress dashboard and then edit the homepage we created earlier.

Before you start editing your homepage, it’s a good idea to switch to the ‘Blank Page’ template under the ‘Template’ panel on the right. That way, your homepage won’t have a sidebar, title, menu, or any other default elements.

Selecting the Blank Page Template in the Divi Theme

Next, you can click the ‘Use The Divi Builder’ button at the top of the screen.

Now, you’ll need to click the ‘Edit With The Divi Builder’ button in the center of the screen.

Click the Use Divi Builder Button in the Center of the Screen

You should now see the Divi Welcome Screen. It includes a video tutorial on how to use Divi, a brief description of how to get started, and buttons to either start building your page or take a tour of Divi’s features.

We’ll click the ‘Start Building’ button at the bottom of the page.

Divi Welcome Screen

Next, you’ll see a range of options you can use to create your page. We suggest using a premade layout as the basis for your homepage. This makes it really quick and easy to get your homepage set up.

Choose the Browse Layouts Option in Divi

Divi has an impressive range of different layouts to choose from. There are hundreds of different layout packs, and each of these has several different page layouts including homepages.

You can search through these by typing in a search term, or you can check the boxes to view only layouts that fit certain categories.

Just a Few of the Layout Packs Available in Divi

We’re going to use the ‘Travel Blog’ layout pack to create our homepage.

First, click on the pack that you want to use:

The Travel Blog Layout Pack in Divi

Next, you’ll see a description of the layout pack, plus the different page layouts that are available. You’ll probably want to use the ‘Home’ page or ‘Landing’ page for your homepage. We’re going to pick the ‘Home’ option.

Once you’ve chosen your layout, click the ‘Use This Layout’ button at the bottom of the page.

Choose the Layout You Want to Use in Divi

Divi will automatically import the layout for you. You’ll then see it live on your page, exactly as it’ll appear on your site. To edit any part of it, simply click on it.

Divi uses a system of rows (split into columns) and modules to create your page. With text modules, you can click on the text and type in whatever you want straight onto the screen.

Here, we’ve changed the header and the text below it:

Editing the Header Text Using Divi

With other modules, you can bring your mouse cursor over them and click the ‘Module Settings’ icon to edit them.

Here, we’re editing one of the number counters:

Changing the Settings for a Module in the Divi Builder

You can delete modules and rows in the same way, using the trash can icon.

You’ll likely want to use your own images on your homepage. You can change these by editing the module settings.

Note that the image at the top is set as the Background for a Fullwidth Header Module, so you’ll need to change it under Content » Background for that module:

Editing the Background Image of the Fullwidth Header Module

Once you’re happy with the changes you’ve made to your page, you can click ‘Save’ at the bottom of the screen.

Click the Save Button in Divi

Sometimes the bottom row of buttons will be hidden.

If you can’t see them, then you’ll need to click the purple “…” button to open them up.

Click the Icon With Three Dots to Show the Save Button

Here’s how our page looks live on the website:

The Finished Divi Homepage

Setting Your Homepage in WordPress

By default, WordPress displays your blog posts on the homepage.

That means that after creating and customizing your homepage, you’ll need to tell your WordPress site to display that page when someone visits your domain.

Let’s take a look at how to set a separate homepage and blog page in WordPress.

Pro Tip: Do you already have visitors to your site? Then you might want to put your site into maintenance mode while you’re setting up your homepage. Alternatively, you could set up a staging site where you can create your homepage before publishing it live.

First, simply go to Pages » Add New and name your new page Blog. After that, you can go ahead and publish the blank page.

Creating a Blog Page

Once your homepage and blog page are ready, you need to tell WordPress to start using these pages.

You can do this by going to Settings » Reading page in your WordPress admin area. You need to select ‘A static page’ option under the ‘Your homepage displays’ section. After that, go ahead and select your home and blog pages.

Select Your Home Page and Blog Page

Don’t forget to click on the ‘Save Changes’ button to store your settings.

WordPress will automatically display your latest posts on the blog page. For more details, you can see our guide on how to create a separate blog page in WordPress.

That’s it! You’ve created a great looking homepage in WordPress and set it up successfully.

We hope this tutorial helped you learn how to edit a WordPress homepage. You might also want to take a look at our guide on the must have WordPress plugins and our tips on how to improve WordPress SEO.

If you liked this article, then please subscribe to our YouTube Channel for WordPress video tutorials. You can also find us on Twitter and Facebook.

The post How to Edit a WordPress Homepage (Easily & Effectively) first appeared on WPBeginner.


December 08, 2022 at 12:58AM