Monday, March 6, 2023

How to Create a Loyalty Program in WooCommerce

Do you want to create a loyalty program in WooCommerce?

A loyalty program can keep customers coming back to your online store, and keep them away from your competitors. It can also be a great way to reward your best customers and make them feel valued.

In this guide, we’ll show you how to create a loyalty program for your WooCommerce store.

Creating a loyalty program in WooCommerce

Why Create a Loyalty Program in WooCommerce?

Creating a loyalty program can be a great way to get more sales on your online store.

A loyalty program encourages customers to keep coming back to your WordPress website, which is the key to running a successful business over the long term. It can even boost average spend per customer by giving shoppers a reason to add more items to their basket.

Most stores give customers points for buying products and services. However, you can also reward customers for other actions like creating an account, placing their first order, signing up to your email newsletter, or spending over a certain account.

You might even give customer extra points for returning to an abandoned shopping cart and completing their purchase. In this way, a loyalty program can help you recover WooCommerce abandoned cart sales.

With that said, let’s take a look at how to add a loyalty program in WooCommerce.

Setting Up Your WooCommerce Loyalty Program

The easiest way to create a loyalty program is by using Advanced Coupons. It is the best WordPress coupons plugin and lets you create all kinds of coupons, programs, buy one get one free offers, and other rewards.

After creating a loyalty program, Advanced Coupons will show the customer how many points they’ll get for each action, including buying a specific product.

The customer will see a message in their shopping cart to let them know how many points they'll earn

First, you’ll need to install and activate both the free Advanced Coupons plugin and the premium Advanced Coupons Loyalty Program addon. For more information, please see our step-by-step guide on how to install a WordPress plugin.

Note: You can purchase the Advanced Coupons and Loyalty Program plugins together by getting the ‘All-In-One Bundle’.

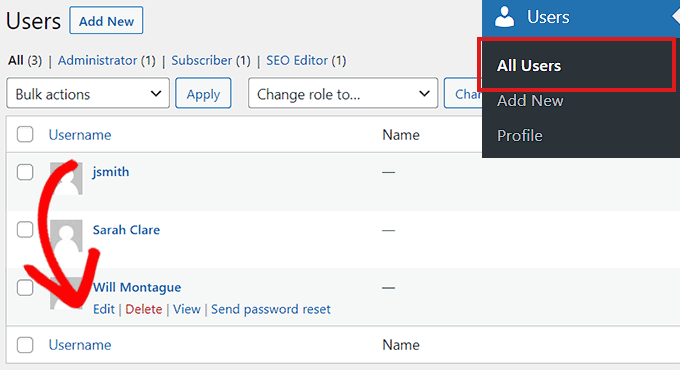
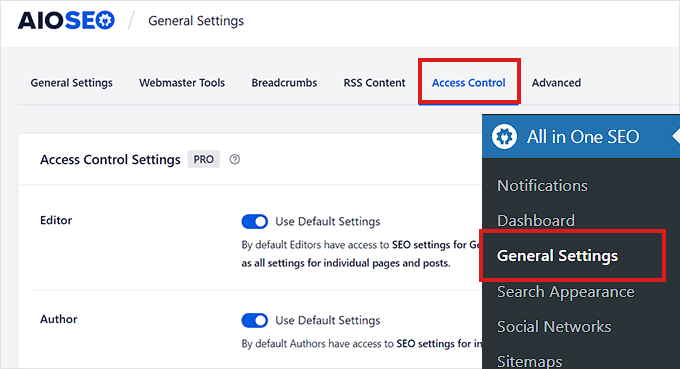
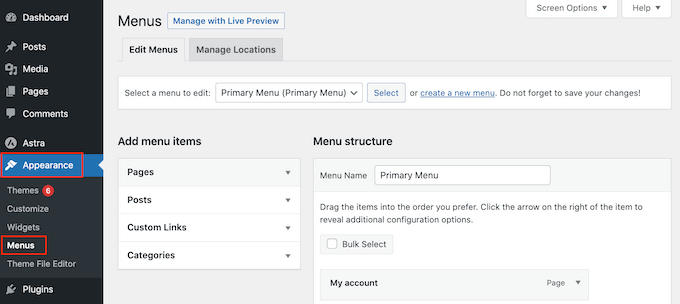
After that, simply go to Coupons » Loyalty Program in your WordPress admin dashboard and click on the ‘License’ tab.

Adding a license to the Loyalty Program WordPress plugin

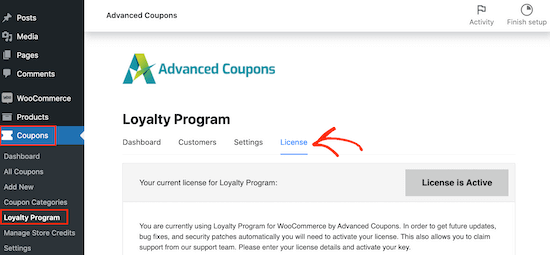
You can now enter your license key and the email address you used to purchase Advanced Coupons. You can find this information by logging into your account on the Advanced Coupons website.

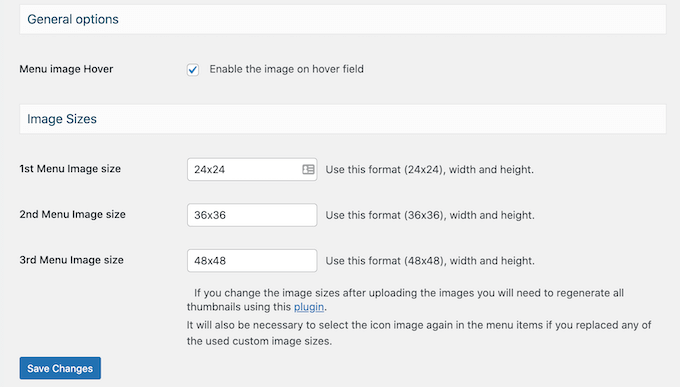
After that, go ahead and click on the ‘Settings’ tab. This brings you to a screen where you can build the loyalty program.

To start, let’s reward members with points when they take certain actions on your website, like leaving a product review, posting a comment, or buying a product.

In the ‘Price to points earned ratio,’ we can see that the Loyalty Program plugin gives customers 1 point for every $1 spent.

The points earned ratio

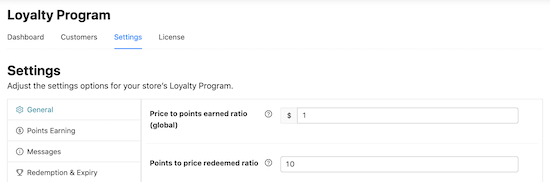
If you want your WooCommerce loyalty program to look more impressive, then you give customers more points. For example, members might earn 2 points or 10 points for every $1 they spend.

‘Points to price redeemed ratio’ is how many points it takes to earn a dollar as part of your loyalty program.

By default, customers earn $1 for every 10 points. That means the customer needs to redeem 10 points to get a $1 discount coupon. You can change these values to anything you want.

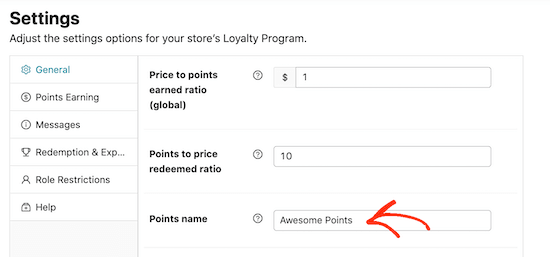
You can also change the name of your loyalty scheme by typing into the ‘Points name’ field. We’ve gone with ‘Awesome Points’ for our loyalty program, but you might want to use something more branded, like Starbucks does with their ‘Stars’.

Changing the name of your WooCommerce loyalty program

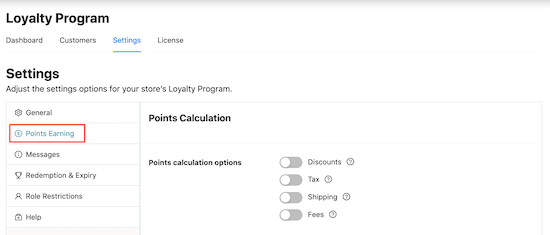
Next, you’ll need to decide how your points are calculated. For instance, you may want to give a customer less points if they use a coupon code, compared to a customer who didn’t use a coupon. In this way, you can give the best rewards to your best customers.

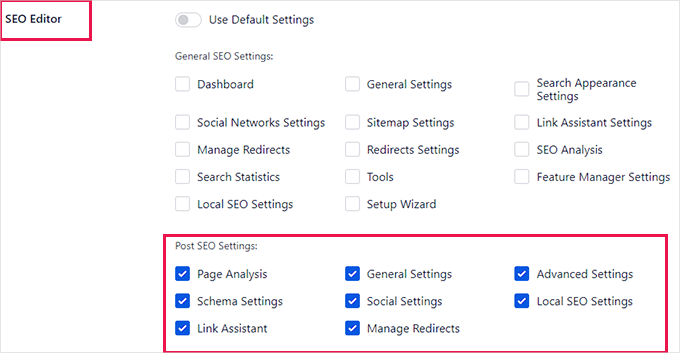
To do this, click on the ‘Points Earning’ tab. Here, you can check the boxes to take any discounts, tax, shipping costs, and any fee amounts into account when awarding points.

Calculating points in a WooCommerce loyalty program

Many online marketplaces and digital stores only reward customers for spending money. However, there may be other actions that benefit you, so it’s a good idea to reward customers for taking these actions.

For example, you might want to reward visitors for registering with your membership site, posting a product review, or even commenting on a blog post.

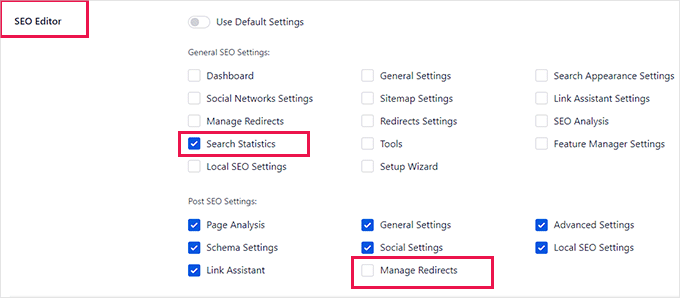
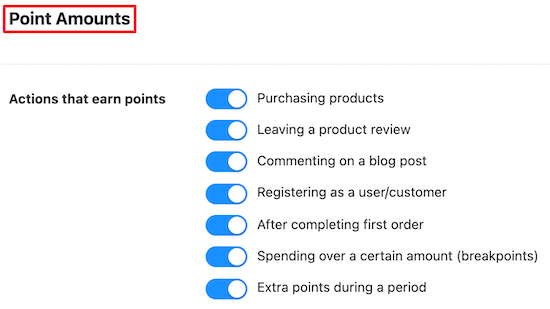
Simply scroll to the ‘Point Amounts’ section and then click the switch for any action that will earn the customer points.

Point amounts toggle

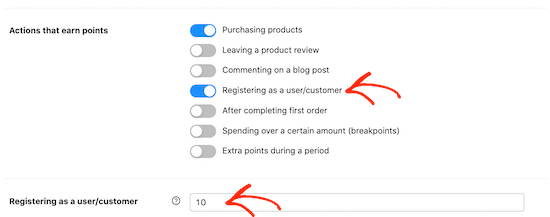
After activating these toggles, check whether there are any new settings to configure.

For example, you’ll need to type in how many points customers will get for registering as a new user.

Awarding points for registering as a new customer

You can also encourage shoppers to spend more by awarding extra points for orders over a certain amount.

To do this, enable the ‘Spending over a certain amount’ switch and then type a value into the ‘Spending over a threshold’ field.

How to create a threshold for your WooCommerce loyalty program

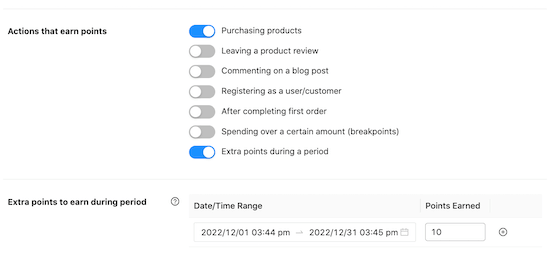
During busy shopping periods you may want to give customers an extra reason to buy from your store. For example you might award extra points during Black Friday, so customers aren’t tempted to shop with a competitor.

You can give customers extra points during a specific period by enabling the ‘Extra Points To Earn During Period’ slider. Then, enter a date and time range into the ‘Extra points to earn during period’ section and type in how many points customers will earn.

Awarding extra points for members of your eCommerce loyalty program

There are some more settings you may want to look at, but this is enough to create a loyalty program in WooCommerce. When you’re happy with how the program is set up, scroll to the bottom of the page and click the ‘Save changes’ button.

Your new WooCommerce loyalty program is now live.

Automatically Creating Accounts for Your Customers

Your customers will need to create an account in order to collect loyalty points.

Already, this encourages people to sign up to your online store. However, you can also create an account automatically when a visitor makes their first purchase. This can improve the shopping experience, and may get you some extra members.

To automatically create an account for a new customer, go to WooCommerce » Settings. Then, click on the ‘Accounts and Privacy’ tab.

Changing your WooCommerce account settings

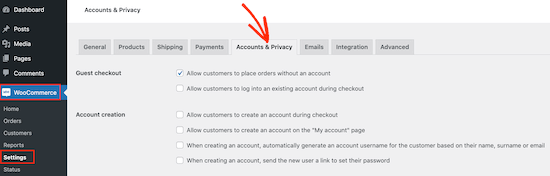
To start, you may want to uncheck ‘Allow customers to place orders without an account’, so that customers can’t checkout as a guest. This will encourage more people to register with your site, but it may cause more shoppers to give up on a purchase and abandon their shopping carts.

With that being said, it’a a good idea to set up WooCommerce conversion tracking and track visitors to your WordPress website. You can then see whether this change hurts your conversion rates.

Next, check the ‘Allow customers to log into an existing account during checkout’ box.

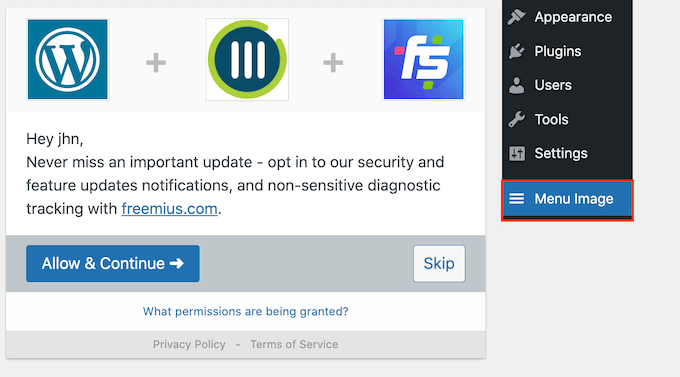
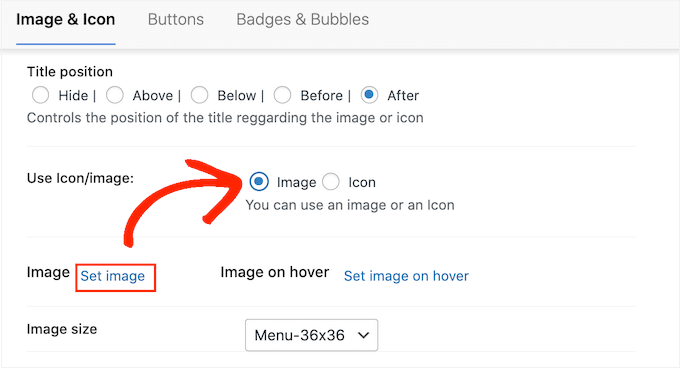
Once you’ve done that, you’ll want to make it as easy as possible for customers to create an account. With that in mind, we recommend checking all the boxes in the ‘Account creation’ section, as you can see in the following image.

Disallowing the option to checkout as a guest in WooCommerce

Now, WooCommerce will automatically send an email to first-time customers with information on how to access their new account.

The WooCommerce Loyalty Program in Action

Your loyalty program is up and running! Once a customer has earned loyalty points, they can turn them into coupons by going to My Account » My Reward Points.

The customer can then simply type in how many points they want to use, and your WordPress blog or website will show how much the coupon is worth.

The customer can go ahead and click ‘Redeem’ to create that coupon.

In the following image, the customer has created a $5 coupon by converting 500 of their points. They still have 550 points left to redeem.

The customer can turn their earned points into coupons in their account

We hope this tutorial helped you learn how to create a loyalty program in WooCommerce. You may also want to check out our guide on how to create a WooCommerce popup and the best virtual business phone number apps.

If you liked this article, then please subscribe to our YouTube Channel for WordPress video tutorials. You can also find us on Twitter and Facebook.

The post How to Create a Loyalty Program in WooCommerce first appeared on WPBeginner.


March 07, 2023 at 08:00AM

How to Add an SEO Editor Role in WordPress

Do you want to add an SEO Editor role in WordPress?

If you have hired an SEO specialist to work on your website, then adding them as an SEO editor is the safest way to give them access to your WordPress website.

In this article, we’ll show you how to easily add an SEO editor role in WordPress.

How to Add an SEO Editor role in WordPress

Why Add an SEO Editor Role in WordPress?

WordPress comes with a user role management system that defines what a user can and cannot do on your website. You can assign different user roles to your team members depending on their job descriptions.

By adding an SEO Editor / Manager role to your WordPress website, you will be providing secure access to the SEO features and tools to some specific members of your team.

An SEO Editor role has access to the SEO settings for all your posts and pages. This allows them to optimize posts for SEO and work on search rankings.

An SEO Manager tends to have access to sitewide SEO settings including sitemaps, redirects, local SEO, and more.

By default, WordPress doesn’t offer either the SEO Editor or SEO manager user roles.

However, you can easily add these roles by using the All in One SEO for WordPress. It is the best WordPress SEO plugin on the market and allows you to easily optimize your WordPress website like a pro.

It also comes with powerful access control features which enable you to safely give your SEO team limited access to your website.

That being said, let’s take a look at how to easily add an SEO editor or manager user role in WordPress.

How to Add SEO Editor / Manager User Roles in WordPress

First, you need to install and activate the All in One SEO for WordPress plugin. For more instructions, please see our step-by-step guide on how to install a WordPress plugin.

Note: You’ll need the Pro version of the All in One SEO plugin to unlock SEO user role features.

Upon activation, the plugin will launch the setup wizard which will walk you through the setup. If you need help, then you can follow our guide on how to set up All In One SEO in WordPress.

Now you can simply add a new user to your WordPress website by visiting Users » Add New page or you can edit an existing user account by visiting the Users » All Users page.

Choose a user for the SEO Manager role

After that, simply click on the Edit link below the user account that you want to change.

On the Edit user screen, scroll down to the Role option and select SEO Editor or SEO Manager user role from the drop down menu.

Choose the SEO Manager from the dropdown menu

Don’t forget to click on the Add / Update User button to save your changes.

These users will now be able to access SEO features based on the user role assigned to them.

For instance, SEO Editor will be able to see and edit SEO Settings for a post or page by simply editing them.

SEO Editor preview

On the other hand, a user with the SEO Manager role will also be able to view the General SEO settings on the WordPress admin sidebar.

They will be able to make changes to site-wide SEO settings that may affect your entire website.

SEO manager dashboard

How to Customize SEO User Roles in WordPress

By default, All in One SEO selects the best access control settings for each SEO user role.

However, sometimes you may want to add or remove permissions from the SEO editor or Manager user roles.

All in One SEO lets you customize SEO user roles so that you can select which options they’ll have access to.

Simply head over to the All in One SEO » General Settings page and switch to the Access Control tab.

Click the Access Control tab on the General Settings page in AIOSEO

Caution: Be very careful when giving a user role access to any option under the General SEO Settings. These options may allow them to apply SEO changes that will affect your entire website.

From here, scroll down to the ‘SEO Editor’ option and toggle the switch next to the ‘Use Default Settings’ option.

This will reveal the Default Settings that All in One SEO has chosen for the SEO Editor role.

Default settings for SEO Editor user role

As you can see that by default the SEO editor user role only has access to Post SEO settings.

From here, you can check or uncheck items that you want to allow the SEO editor to have access to.

For instance, you can remove access to the Manage Redirects option or give them access to the Search Statistics feature.

SEO editor changed settings

Similarly, if you want to change settings for the SEO Manager user role, then you will need to switch off the ‘Use Default Settings’ toggle next to the SEO Manager option.

This will reveal the default settings that All in One SEO has chosen for the SEO manager user role.

SEO manager default settings

By default, the SEO manager user role has access to several options under the General SEO settings as well as all the options under the Post SEO settings.

You can change that by checking the items that you want them to have access to or unchecking to remove access from specific items.

Once you are finished, don’t forget to click on the Save Changes button to store your settings.

We hope this article helped you learn how to add an SEO Editor role in WordPress. You may also want to see our ultimate WordPress SEO guide for beginners and our top picks for the best WordPress plugins for small businesses.

If you liked this article, then please subscribe to our YouTube Channel for WordPress video tutorials. You can also find us on Twitter and Facebook.

The post How to Add an SEO Editor Role in WordPress first appeared on WPBeginner.


March 06, 2023 at 04:05PM

Sunday, March 5, 2023

How to Add Image Icons With Navigation Menus in WordPress

Do you want to add image icons to your WordPress navigation menus?

Images can help visitors understand your site’s navigation at a glance. You can even use icons to highlight the menu’s most important content or call to action.

In this article, we will show you how to add image icons to navigation menus in WordPress. 

How to add image icons to navigation menus in WordPress

Why Add Image Icons With Navigation Menus in WordPress?

Usually, WordPress navigation menus are plain text links. These links work for most websites, but they don’t always look interesting or engaging. 

By adding image icons to the navigation menu, you can encourage visitors to pay attention to the menu and explore more of your site.

An example of image icons in a WordPress navigation menu

If your menu has lots of different options, then image icons can make it easier for visitors to scan the content and find what they’re looking for. This can be an easy way to increase pageviews and reduce bounce rate in WordPress

You might even use an image icon to highlight the most important menu item, such as the Checkout link on your online marketplace

An example of an image icon on an eCommerce site

By highlighting a call to action in the menu bar, you can often get more signups, sales, members, and other conversions.

With that being said, let’s see how you can add image icons to your WordPress navigation menu. Simply use the quick links below to jump straight to the method you want to use.

Method 1: Add Image Icons to Navigation Menus Using a Plugin (Quick and Easy)

The easiest way to add image icons to your WordPress menus is by using the Menu Image plugin. This plugin comes with dashicon icons that you can add with just a few clicks.

An example of a navigation menu, with image icons

If you have added Font Awesome icons to your website, then you can use them with this free plugin. For more information on how to set up Font Awesome, see our guide on how to easily add icon fonts to your WordPress theme.

If you want to use your own icon files, then Menu Image also lets you select an image or icon from the WordPress media library.

The first thing you need to do is to install and activate the Menu Image plugin. For more details, see our step-by-step guide on how to install a WordPress plugin.

Upon activation, click on Menu Image in the WordPress dashboard. On this screen, you can choose whether to get security and feature notifications or click on the ‘Skip’ button.

How to add icons to a WordPress menu using a free plugin

This will take you to a screen where you can configure the plugin’s settings. To start, you’ll see all the different sizes you can use for the image icons.

If you plan to use icons from Font Awesome or dashicons, then Menu Image will resize them automatically. However, if you use images from the media library, then you’ll need to select the size manually.

The plugin supports the default WordPress image sizes, such as thumbnail, image, and large. It also adds three unique sizes that are set to 24×24, 36×36, and 48×48 pixels by default.

Changing the size of image icons in WordPress menus

These settings should work well for most websites, but you can make the icons bigger or smaller by typing in different numbers for 1st, 2nd, or 3rd Menu Image size.

When you’re adding icons to your menu, you’ll see an ‘image on hover’ field by default. This allows you to show a different icon when the visitor hovers over that menu item.

Just be aware this setting is only available when you’re using your own images. You don’t need to worry about the ‘image on hover’ feature if you plan to use dashicons or Font Awesome icons.

Showing a different icon can help visitors see where they are in the navigation menu. This is particularly useful if a menu has lots of different items. For example, you might use different colors or icon sizes to highlight the currently-selected menu item.

If you want to try different hover effects, then make sure you check ‘Enable the image on hover field.’

Adding a hover effect to image icons in a WordPress menu

With that done, click on ‘Save Changes’ to store your settings.

To add icons to the navigation menu, head over to Appearance » Menus. By default, WordPress will show your site’s primary menu.

Editing a WordPress navigation menu

If you want to edit a different menu, then simply open the ‘Select a menu to edit’ dropdown and choose a menu from the list. After that, click on ‘Select.’

Now, find the first menu item where you want to add an icon and give it a click. Then, simply select the new ‘Add Image / Icon’ button.

Adding an image icon to a WordPress navigation menu

You can now decide whether to use your own image or choose an icon.

To use a ready-made icon, click on the radio button next to ‘Icons.’ You can then click to select any dashicon or Font Awesome icon.

Adding a dashicon icon to a WordPress menu

Do you want to use your own images instead?

Then select the radio button next to ‘Image’ and click the ‘Set Image’ link.

Adding WordPress media library images to a navigation menu

You can now either choose an image from the WordPress media library or upload a new file from your computer.

If you checked ‘Enable the image on hover field’ in the plugin’s settings, then you’ll also need to click on ‘Set image on hover.’

Adding an 'on hover' animation a WordPress image icon

Now, choose an image to show when the user hovers over this menu item.

Sometimes, you may want to ignore this setting and show the same icon no matter what. To do this, click on ‘Set image on hover’ and then choose the exact same image.

If you don’t do this, then the icon will disappear when the visitor hovers over it.

How to add image icons with navigation menus in WordPress

After that, open the Image Size dropdown and choose a size from the list. Using the same size for all icons tends to make the menu look more organized.

However, you might make the menu’s most important icon bigger. For example, if you’ve created an online store using a plugin like WooCommerce, then you might use a bigger icon for ‘Checkout’ so it stands out.

When you’re happy with the icon, it’s time to look at the menu item’s label.

By default, the plugin shows the title label after the icon.

Customizing the navigation menus on your website or blog

To change this, select any of the radio buttons in the ‘Title position’ section.

Another option is to remove the navigation label completely, creating an icon-only menu. This can prevent a menu with a lot of items from looking cluttered.

However, you should only hide the labels if it’s obvious what each icon means. If it’s unclear, then visitors will struggle to navigate your WordPress blog or website.

To go ahead and hide the label, select the radio button next to ‘None.’

Hiding the navigation labels on your menu

When you’re happy with how the menu item is set up, click on ‘Save Changes.’

To add an icon to other menu items, simply follow the same process described above.

When you’ve finished, don’t forget to click on the ‘Save Menu’ button. Now, if you visit your website you’ll see the updated navigation menu live.

Method 2: Add Icons to WordPress Menus Using Code (More Customizable)

You can also add image icons to your navigation menus using custom CSS. This gives you more flexibility to control exactly where the icons appear in your menus.

However, it does require you to add custom code in WordPress, so it’s recommended for more intermediate or advanced WordPress users.

An example of a navigation menu with image icons

Before you start, go ahead and upload all your image files to the WordPress media library. For each image, make sure you copy its URL and paste it into a text editor like Notepad. You’ll need to use the links in your code, so this can save you a lot of time.

To find an image’s URL, simply select it in the WordPress media library and then look at the ‘File URL’ field.

Get the URL of an image in the WordPress media library

For more detailed instructions, please see our guide on how to get the URL of images you upload in WordPress.

After that, go to Appearance » Menus.

How to add a WordPress navigation menu to your site or blog

Next, open the ‘Select a menu to edit’ dropdown and choose the menu where you want to add the image icons.

After that, go ahead and click on ‘Select.’

Editing a menu on your website or blog

Next, you need to enable custom CSS classes by clicking on ‘Screen Options.’

In the panel that appears, check the box next to ‘CSS Classes.’

Add custom CSS classes to your website

With that done, you can add custom CSS classes to any item in the navigation menu. This is how you will link each menu item to an image in the WordPress media library.

You can call these classes anything you want, but it’s a good idea to use something that helps you identify the menu item.

To get started, simply click on the first item you want to add an image icon to. In the ‘CSS Classes (optional)’ field, type in the class name you want to use.

Adding custom CSS code to a menu

You’ll use these custom CSS classes in the next step, so make a note of them in your Notepad or similar app.

Simply follow the same process to add a separate class to all your menu items. After that, click on ‘Save Menu’ to store your settings.

Note: Each icon will be tied to its own CSS class, so be sure to label the menu items differently if you want to use separate icons.

Publishing a menu with image icons

Now you’re ready to add image icons to your WordPress navigation menus using CSS.

Often, WordPress tutorials will tell you to add code snippets to your WordPress theme files. However, doing so may cause common WordPress errors and isn’t very beginner-friendly.

That’s why we recommend WPCode.

WPCode is the most popular code snippets plugin used by over 1 million WordPress websites. It allows you to add custom code without editing your theme’s functions.php file.

The first thing you need to do is install and activate the free WPCode plugin. For more details, see our step-by-step guide on how to install a WordPress plugin.

Upon activation, head over to Code Snippets » Add Snippet.

Adding a code snippet to your website using WPCode

Here, simply hover your mouse over ‘Add Your Custom Code.’

When it appears, click on ‘Use snippet.’

How to add custom snippets to a website or blog

To start, type in a title for the custom code snippet. This can be anything that helps you identify the snippet in the WordPress dashboard.

With that done, open the ‘Code Type’ dropdown and select ‘CSS Snippet.’

Adding custom code to WordPress using WPCode

In the code editor, you’ll need to add some code for every icon you want to show.

To help you out, we’ve created a sample snippet below. You can go ahead and change ‘.carticon’ to the custom CSS class you created in the previous step. You’ll also need to replace the URL with a link to the image in your WordPress media library:

.carticon {
background-image: url('http://localhost:10013/wp-content/my-media/cartcheckout.png');
background-repeat: no-repeat;
background-position: left;
padding-left: 5px;
}

Note: You will need to keep the dot ‘.’ in front of the CSS class in the code snippet. That’s what tells WordPress that it’s a class and not another kind of CSS selector.

You will need to adjust the snippet above for each individual menu item you created above. You can simply paste them all into the ‘Code Preview’ field.

When you’re happy with your code, scroll to the ‘Insertion’ section. WPCode can add code to different locations, such as after every post, frontend only, or admin only.

You want to use the custom CSS code across our entire WordPress website, so click on ‘Auto Insert’ if it isn’t already selected.

Then, open the ‘Location’ dropdown menu and choose ‘Site Wide Header.’

Inserting custom code across your website

After that, you’re ready to scroll to the top of the screen and click on the ‘Inactive’ toggle, so it changes to ‘Active.’

Finally, click on ‘Save Snippet’ to make the custom CSS live.

How to add custom CSS code to WordPress easily

Now, if you visit your website you’ll see all the image icons in your navigation menu.

Depending on your theme, you may need to tweak the CSS so it shows the image icons in exactly the right spot. If this is the case, then head to Code Snippets » Code Snippets in the WordPress dashboard.

Then, simply hover over the snippet and click on the ‘Edit’ link when it appears.

Editing a code snippet using WPCode

This opens the code editor, ready for you to make some changes.

We hope this article helped you learn how to add image icons to your WordPress navigation menu. You can also go through our guide on the best drag-and-drop WordPress page builders and how to make money online blogging with WordPress.

If you liked this article, then please subscribe to our YouTube Channel for WordPress video tutorials. You can also find us on Twitter and Facebook.

The post How to Add Image Icons With Navigation Menus in WordPress first appeared on WPBeginner.


March 05, 2023 at 05:53PM