Wednesday, March 8, 2023

Beginner’s Guide to Preventing Blog Content Scraping in WordPress

Are you looking for a way to keep spammers and scammers from stealing your WordPress blog posts using content scrapers?

It is very frustrating as a website owner to see that someone is stealing your content without permission, monetizing it, outranking you in Google, and stealing your audience.

In this article, we’ll cover what blog content scraping is, how you can reduce and prevent content scraping, and even how to take advantage of content scrapers for your own benefit.

Beginner's Guide to Preventing Blog Content Scraping in WordPress

What Is Blog Content Scraping in WordPress?

Blog content scraping is when content is taken from numerous sources and republished on another site. Usually, this is done automatically via your blog’s RSS feed.

Unfortunately, it is very easy and very common to have your WordPress blog content stolen in this way. If it’s happened to you, then you understand how stressful and frustrating it can be.

Sometimes your content will be simply copied and pasted directly to another website, including your formatting, images, videos, and more.

Other times, your content will be reposted with attribution and a link back to your website, but without your permission. Although this can help your SEO, you may want to keep your original content hosted on your site only.

Why Do Content Scrapers Steal Content?

Some of our users have asked us why scrapers are stealing content. Usually, the main motivation for content theft is to profit from your hard work:

  • Affiliate commission: Dishonest affiliate marketers may use your content to bring traffic to their site through search engines in order to promote their niche products.
  • Lead Generation: Lawyers and realtors may pay someone to add content and gain authority in their community, and not realize it is being scraped from other sources.
  • Advertising Revenue: Blog owners may scrape content to create a hub of knowledge in a certain niche ‘for the good of the community’ and then plaster the site with ads.

Is It Possible to Completely Prevent Content Scraping?

In this article, we’ll show you some steps you can take to reduce and prevent content scraping. But unfortunately, there is no way to completely stop a determined thief.

That’s why we finish this article with a section on how you can take advantage of content scrapers. While you can’t always stop a thief, you may be able to gain some traffic and revenue through the content they have stolen from you.

What Should You Do When You Discover Someone Has Scraped Your Content?

Since it’s not possible to completely stop scrapers, you may one day discover that someone is using content they stole from your blog. You may wonder what to do when that happens.

Here are a few approaches that people take when dealing with content scrapers:

  • Do Nothing: You can spend a lot of time fighting scrapers, so some popular bloggers decide to do nothing. Google already sees well-known sites as authorities, but that’s not true of smaller sites. So this approach is not always the best in our opinion.
  • Take Down: Here you contact the scraper and ask them to take the content down. If they refuse, then you submit a takedown notice. You can learn how in our guide on how to easily find and remove stolen content in WordPress.
  • Take Advantage: While we actively work at having content scraped from WPBeginner taken down, we also use a few techniques to get traffic and make money from scrapers. You can learn how in the ‘Take Advantage of Content Scrapers’ section below.

With that being said, let’s take a look at how to prevent blog scraping in WordPress. Since this is a comprehensive guide, we have included a table of contents for easier navigation.

Trademark and copyright laws protect your intellectual property rights, brand, and business against many legal challenges. This includes illegal use of your copyrighted material or your brand’s name and logo.

You should clearly display a copyright notice on your website. While your content is automatically covered by copyright laws, displaying a notice will let you know that your content is copyrighted and that they cannot use your protected properties for business.

Display a Copyright Notice on Your Website

For example, you can add a copyright notice with a dynamic date to your WordPress footer. This will keep your copyright notice up to date.

This may discourage some users from stealing it. It will also help in the case that you do need to send a cease and desist letter or file a DCMA complaint to take down your stolen content.

You can also apply for copyright registration online. This process can be complicated, but luckily there are low-cost legal services that can help small businesses and individuals.

Learn how in our guide on how to trademark and copyright your blog’s name and logo.

2. Make Your RSS Feed More Difficult to Scrape

Since blog content scraping is usually done automatically via your blog’s RSS feed, let’s look at a few helpful changes you can make to your feed.

Don’t Include the Full Post Content in Your WordPress RSS Feed

You can include just a summary of each post in your RSS feed instead of the full content. This includes an excerpt as well as post metadata such as the date, author, and category.

There is certainly debate in the blogging community about whether to have full RSS feeds or summary feeds. We won’t get into that now except to say that one of the pros of having a summary only is that it helps prevent content scraping.

You can change the settings by going to Settings » Reading in your WordPress admin panel. You need to select the ‘Excerpt’ option, and then click the ‘Save Changes’ button.

RSS Feeds Can Contain Full Text or an Excerpt of Each Post

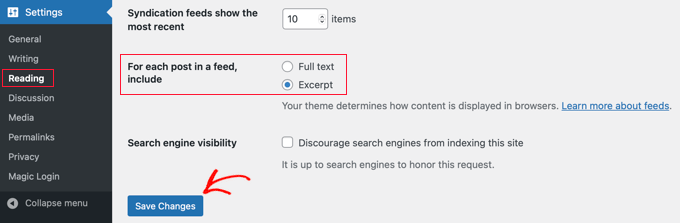
Now the RSS feed will only show an excerpt of your article. If someone is stealing your content through your RSS feed, then they will only get the summary, not the full post.

If you would like to tweak the summary, then you can see our guide on how to customize WordPress excerpts.

Optimize Your RSS Feed to Prevent Scraping

There are other ways you can

optimize your WordPress RSS feed to protect your content, get more backlinks, increase your web traffic, and more. One of the best ways is to delay posts from appearing in the RSS feed.

The benefit is that when you delay posts from appearing in your RSS feed, you give the search engines time to crawl and index your content before it appears elsewhere, such as on scraper’s websites. The search engines will then see your site as the authority.

The safest and easiest way to do this is using WPCode because it has a recipe that automatically adds the correct custom code to WordPress.

Add a snippet using WPCode

For detailed instructions, see our guide on how to delay posts from appearing in your WordPress RSS feed.

3. Disable Trackbacks and Pingbacks

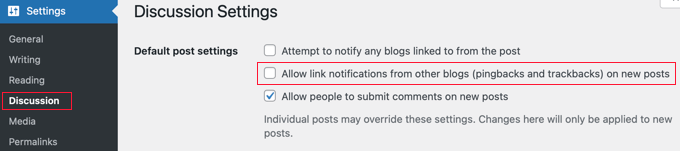
In the early days of blogging, trackbacks and pingbacks were introduced as a way for blogs to notify each other about links. When someone links to a post on your blog, their website will automatically send a ping to yours.

This pingback will then appear in your blog’s comment moderation queue with a link to their website. If you approve it, then they get a backlink and mention from your site.

This gives the spammer an incentive to scrape your site and send trackbacks. Luckily, you can disable trackbacks and pingbacks to give scrapers one less reason to steal your content.

Disabling Trackbacks and Pingbacks in WordPress

For more information, check out our guide on disabling trackbacks on all future posts.

You might also like to learn how to disable trackbacks and pings on existing WordPress posts.

4. Block the Scraper’s Access to Your WordPress Website

One way to stop scrapers from stealing your content is to take away their access to your website. You can do this manually by blocking their IP address, but most users will find it easier to use a security plugin such as a web application firewall.

Block the Scraper Using a Security Plugin (Recommended)

Blocking scrapers manually is tricky and a lot of work. Especially since many hacking attempts and attacks are made using a wide range of random IP addresses from all over the world. It’s almost impossible to keep up with all those random IP addresses.

That’s why you need a Web Application Firewall (WAF) such as WordFence or Securi. These act as a shield between your website and all incoming traffic by monitoring your website traffic and blocking common security threats before they reach your WordPress site.

For the WPBeginner website, we use Sucuri. It is a website security service that protects your website against such attacks using a website application firewall.

Basically, all your website traffic goes through the security service’s servers where it is examined for suspicious activity. They automatically block suspicious IP addresses from reaching your website altogether. See how Sucuri helped us block 450,000 WordPress attacks in 3 months.

Manually Block or Redirect the Scraper’s IP Address

Advanced users may also wish to manually block a scraper’s IP address. This is more work, but you can specifically target the scraper’s address once you learn it. Web developer Jeff Star suggests this approach when he wrote about how he handles content scrapers.

Note: Adding code to website files can be dangerous. Even a small mistake can cause major errors on your site. That’s why we only recommend this method for advanced users.

You can find the scraper’s IP address by visiting ‘Raw Access Logs’ in the cPanel dashboard of your WordPress hosting account. You need to look for IP addresses with an unusually high number of requests and keep a record of them, say by copying them into a separate text file.

Blocking the Scraper's IP Address
Tip: You need to make sure that you don’t end up blocking yourself, legit users, or search engines from accessing your website. Copy a suspicious-looking IP address and use online IP lookup tools to find out more about it.

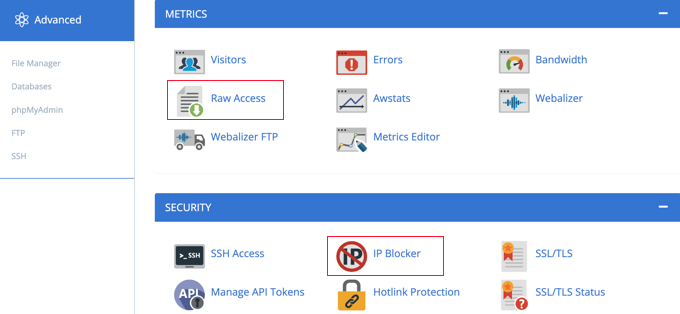
Once you are confident that the IP address belongs to a scraper, you can block it using the cPanel ‘IP Blocker’ tool, or by adding code like this in your root .htaccess file:

Deny from 123.456.789

Make sure you replace the IP address in the code with the one you want to block. You can block multiple IP addresses by entering them on the same line separated by spaces.

For detailed instructions, see our guide on how to block IP addresses in WordPress.

Instead of simply blocking the scrapers, Jeff suggests you could send them dummy RSS feeds instead. You could create feeds full of Lorem Ipsum and annoying images, or even send them right back to their own website, causing an infinite loop and crashing their server.

To redirect them to a dummy feed, you will need to add code like this to your .htaccess file:

RewriteCond %{REMOTE_ADDR} 123\.456\.789\.
RewriteRule .* http://dummyfeed.com/feed [R,L]

5. Prevent Image Theft in WordPress

It’s not just your written content that you need to protect. You should also prevent image theft in WordPress.

Like text, there is no way to completely stop people from stealing your images, but there are plenty of ways to discourage image theft on a WordPress website.

For example, you can disable hotlinking of your WordPress images. This will mean that if someone scrapes your content, their images will not load on their site.

It will also reduce your server load and bandwidth usage, boosting your WordPress speed and performance.

Alternatively, you can add a watermark to your images that gives you credit. This will make it clear that the scraper has stolen your content.

You can learn these two techniques as well as other ways to protect your images in our guide on 4 ways to prevent image theft in WordPress.

6. Discourage Manual Copying of Your Content

While most scrapers use automatic tools, some content thieves may try to manually copy all or part of your content.

One way to make this more difficult is to prevent them from copying and pasting your text. You can do this by making it harder for them to select the text on your website.

To learn how to stop manual copying of your content, then see our step-by-step guide on how to prevent text selection and copy/paste in WordPress.

However, this will not completely protect your content. Remember, tech-savvy users can still view the source code or use the Inspect tool to copy anything they want. Also, this method will not work with all web browsers.

Also, keep in mind that not everyone copying your text will be a content thief. For instance, some people may want to copy the title to share your post on social media.

That’s why we recommend you only use this method if you feel it’s truly needed for your site.

7. Take Advantage of Content Scrapers

As your blog gets larger, it is almost impossible to stop or keep track of all content scrapers. We still send out DMCA complaints. However, we know that there are tons of other sites that are stealing our content that we just cannot keep up with.

Instead, our approach is to try to take advantage of content scapers. It’s not so bad when you see that you’re making money from your stolen content, or receiving a lot of traffic from a scraper’s website.

Make Internal Linking a Habit to Gain Traffic and Backlinks from Scrapers

In our ultimate guide on SEO, we recommend that you make internal linking a habit. By placing links to your other content in your blog posts, you can increase pageviews and reduce the bounce rate on your own site.

But there is a second benefit when it comes to scraping. Internal links will get you valuable backlinks from the people who are stealing your content. Search engines like Google use backlinks as a ranking signal, so the additional backlinks are good for your SEO.

Lastly, these internal links allow you to steal the scraper’s audience. Talented bloggers place links on interesting keywords, making it tempting for users to click. Visitors to the scraper’s website will also click the links, which will lead them straight back to your own website.

Auto Link Keywords With Affiliate Links to Make Money from Scrapers

If you make money on your website from affiliate marketing, then we recommend enabling auto-linking in your RSS feeds. This will help you maximize your earnings from readers who only read your website via RSS readers.

Even better, it will help you make money from the sites that are stealing your content.

Simply use a plugin like ThirstyAffiliates that will automatically replace assigned keywords with affiliate links. We show you how in our guide on how to automatically link keywords with affiliate links in WordPress.

Promote Your Website in Your RSS Footer

You can use the All in One SEO plugin to add custom items to your RSS footer. For example, you can add a banner that promotes your own products, services, or content.

AIOSEO RSS feed footer save

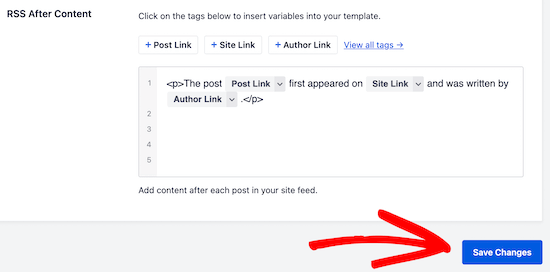
The best part is that those banners will appear on the scraper’s website as well.

In our case, we always add a little disclaimer at the bottom of posts in our RSS feeds. By doing this, we get a backlink to the original article from the scraper’s site.

This lets Google and other search engines know we are the authority. It also lets their users know that the site is stealing our content.

For more tips, check out our guide on how to control your RSS feed footer in WordPress.

We hope this tutorial helped you learn how to prevent blog content scraping in WordPress. You may also want to see our ultimate WordPress security guide, or check out our list of the best analytics solutions for WordPress.

If you liked this article, then please subscribe to our YouTube Channel for WordPress video tutorials. You can also find us on Twitter and Facebook.

The post Beginner’s Guide to Preventing Blog Content Scraping in WordPress first appeared on WPBeginner.


March 09, 2023 at 12:41AM

Should You Start a Blog or a YouTube Channel? (Beginner’s Guide)

Are you wondering whether you should start a blog or YouTube channel?

Blogging and vlogging are good ways to engage with your audience and grow your brand’s credibility. We are often asked by readers which they should start first blog vs YouTube?

In this article, we’ll explain our pick on blog vs YouTube and which you should start first with detailed explanation of our take.

Should You Start a Blog or a YouTube Channel?

TLDR: we recommend you start with a blog and add a YouTube channel later if needed

This is a comprehensive guide, so we’ve included a table of contents for easier navigation:

What Is a Blog?

A blog is a type of website where articles, called ‘blog posts’, are presented in reverse chronological order with newer content appearing first. Blog posts are a great way to share your expert knowledge with your audience, build credibility, and attract visitors to your site.

If you want to start an online business, or communicate better with your existing customers or audience, then you should think about starting a blog.

Blogs typically present information in a conversational style and are run by individuals or a small group of people. However, there are now tons of corporate blogs that produce a great deal of useful informational and thought-leadership content.

Typical blog posts also have a comments section where users can respond to the article by making comments or asking questions.

Blogging has been around since 1993 and has become an essential marketing tool for many businesses. But is it still relevant in the age of YouTube and social media?

Why Starting a Blog Is so Important Today

There are currently 1.9 billion websites in the world, and over 600 million are blogs. That means that blogs make up a third of the web.

Blogging has become an important marketing strategy for businesses due to its benefits. You or your business can use a blog to promote ideas, brands, stories, products, and more.

Here are some of the more important benefits of blogging and why you should consider starting a blog.

1. A Blog Will Bring More Traffic to Your Website

A typical business website consists of a few important pages. For example, you may have a homepage, landing pages for your products and services, and a contact page.

Unfortunately, search engines may often decide that your website is less important than thousands of other websites in the same industry, especially if they have been around longer.

Adding a blog allows you to publish additional content which over time will help you bring more traffic to your website.

That’s a major reason to start with a blog rather than a YouTube channel because YouTube videos will attract traffic to the YouTube platform instead of your own website. You own and control your blog, while the YouTube platform is owned by Google and will benefit them.

2. A Blog Will Help Strengthen Brand Recognition and Build Authority

A blog helps you strengthen your brand identity. It gives you more opportunities to use your custom logo across your website, your social profiles, search results, and more.

This brand recognition when combined with customer trust and authority adds enormous value to your digital assets.

Adding a blog allows you to establish authority by regularly publishing content on topics related to your industry.

If you are consistently publishing new content, you’ll become the go-to place for your users and other businesses interested in those topics.

3. A Blog Will Help You Generate More Leads and Conversions

More than 70% of people visiting your website today, will never find it again. That’s because there is so much content and information on the internet.

Starting a blog will help you convert website traffic into potential leads, subscribers, and social media followers.

For example, you can use tools like OptinMonster to build an email list and grow a social media following. And with push notifications, you can send targeted messages to your blog visitors and bring them back to your website.

4. A Blog Will Help You Build an Engaging Audience

A static website doesn’t leave much room for a conversation. Why not add a blog to your site where users can engage by leaving a comment and sharing your posts on social media?

This helps you build a community around your business which is extremely useful.

It will help your visitors develop an affinity with your brand which pays off when they are looking to make a purchase or recommend your products and services to friends and family.

5. A Blog Will Let You Educate Customers and Share News

Blog posts allow you to educate customers about different ways they can use your products. This will allow you to compare your product with competitors, showcase product features, inform users about benefits, and more.

They’re also the best place to share your business news, announcements, and sales events.

For instance, if you are launching a Black Friday sale, you can promote it with a blog post. And then promote that blog post across your website with a floating header or footer banner.

6. A Blog Will Let You Build Additional Revenue Streams for Your Business

Blogs provide many opportunities to generate additional revenue and make money online. For instance, you can display ads in your blog posts using Google AdSense.

You can also promote affiliate products and make money with affiliate marketing or use your blog to sell premium content using MemberPress or Easy Digital Downloads.

7. A Blog Helps You Repurpose Content for Other Marketing Channels

Adding a blog to your website allows you to actively use blog content across your other marketing channels, such as making YouTube videos based on blog post content.

For example, we use our written WPBeginner tutorials as a helpful starting point for creating YouTube videos. This makes our video producers’ jobs easier and saves time. Then we embed the YouTube videos into the tutorial so our visitors can choose to read or watch the content.

Still not convinced? You can learn even more reasons to start a blog by taking a look at our article on the benefits of blogging.

Starting a Blog vs Starting a YouTube Channel

Now that you know about some of the benefits of blogging, you can see why we recommend that you start a blog first, and then add a YouTube channel in the future if you need.

Let’s summarize the most important points. When you build a blog, you are creating a platform that you own and control. The content you create will attract visitors to your website where they can learn more about your products and services.

On the other hand, the YouTube platform will always be owned by Google. The search traffic generated by your content will take people to the YouTube website, not your own.

Creating blog posts first also makes it easier to create other types of content, such as YouTube videos. Usually, the first step in creating a video is to write a script. Because you have already created written content on your blog, a lot of the work is already done.

Besides that, creating YouTube videos requires expensive equipment such as a camera and lighting, and you’ll also need to purchase video editing software and learn how to use it.

Finally, your blog is the perfect place for your visitors to watch your YouTube videos. You can easily embed YouTube videos in a blog post, giving your visitors the choice of watching or reading your content. That’s a great user experience.

What You Need to Start a Blog

We know that starting a blog can be a terrifying thought specially when you are not geeky. Guess what – you are not alone.

If you want to start a blog, then WordPress is the most popular blogging platform recommended by experts.

Although WordPress is free, there are some costs involved in creating a self-hosted blog. You will need to choose and register a domain name and decide on a web hosting provider.

You may also want to pay someone to design your website and purchase premium plugins to add features. The total cost will depend on your needs and goals.

The good news is that you can build a fully functional WordPress website for yourself and keep your costs under $100. Bluehost, an official WordPress-recommended hosting provider, has agreed to offer our users a free domain name and over 60% off on web hosting.

You can learn the details and options in our guide on how much it really costs to build a WordPress website.

Even better, when you signup with Bluehost using our link, they will automatically install WordPress for you, so you can start building your blog right away.

All you need to do is log in to your Bluehost account, and then click the ’Log in to WordPress’ button to get started.

Bluehost Dashboard - log in to WordPress

After that, you will need to set up your WordPress install, choose a theme and some plugins, then get started on your first blog post.

We take you through the entire process step by step in our beginner’s guide on how to start a WordPress blog. We’ll summarize the main steps below.

The end result will be an attractive and functional blog that you own.

Selecting a Theme to Customize Your Blog’s Appearance

Customizing the look and feel of your blog is by far one of the most exciting and rewarding parts of the journey of creating your WordPress blog.

WordPress comes with a powerful templating engine that allows you to change the appearance of your website by installing themes.

There are thousands of free and paid WordPress themes available. You can choose one that looks closer to what you have in mind for your website.

WordPress Theme Stats

You can look for themes under the Appearance » Themes page. It will show you a bunch of default themes that come with your WordPress install.

For more themes, click on the ‘Add New’ button at the top to find more free themes.

Add new theme

For premium or paid WordPress themes, you can try trusted WordPress theme shops like SeedProdThrive ThemesAstraElegant Themes, and more.

However, there is such an abundance of WordPress themes that it may become difficult for beginners to decide which theme they want to use.

We recommend choosing a minimalist design with plenty of white space. This provides you plenty of room to customize the theme and make it your own.

For more details, see our guide on how to choose the perfect theme for your website as well as our list of the best free WordPress blog themes.

Creating Your First Blog Post

Once you have selected your WordPress theme, you are now ready to create your first blog post. You just need to click on the Posts » Add New menu in your WordPress dashboard.

You will see an editor area where you can write your first blog post.

Writing Your First Blog Post

WordPress uses a block-based editor that allows you to create beautiful content layouts for your blog posts.

To familiarize yourself with the editor, see our WordPress block editor tutorial.

Once you’re done writing, go ahead and click on the Publish button on the top-right corner of the screen to make your blog post publicly available.

Publishing Your First Blog Post

On the posts screen, you will notice several other sections such as Categories and Tags. You can use these to organize your blog posts into sections. We have a great write-up on the difference between categories vs tags, which we highly recommend that you read.

To utilize all the features on the posts screen, you should read our article on how to add a new post in WordPress (video included).

We also offer some helpful resources to help you brainstorm new post ideas to write about:

A lot of pro bloggers choose their specific topics strategically by doing keyword research. This helps their content rank higher in Google searches and get more traffic.

We have a step-by-step guide on how to do keyword research for beginners using the exact same method that we use on WPBeginner.

Extending and Growing Your Blog With Plugins

Once you publish your first blog post, you’ll probably want to get started with adding other usual elements on your website such as a contact page, galleries, sliders, and an email list. To add all these additional features, you need to use plugins.

Plugins are like apps for your WordPress website. They allow you to add new features and extend the functionality of WordPress without writing any code.

There are more than 60,000 free plugins available in the WordPress.org plugin directory alone. Plus, there are premium WordPress plugins sold by third-party developers with priority support and guaranteed updates.

WordPress plugins

However, you also need to consider which plugins you need to use to keep your WordPress website secure, private, and anonymous.

Here are our top picks of the best plugins to grow your blog.

  • All in One SEO is the best WordPress SEO plugin on the market and helps your anonymous website get more traffic from search engines.
  • SeedProd is a powerful WordPress page builder that allows you to use a drag-and-drop interface to create any type of page for your website.
  • MonsterInsights is the best WordPress Google Analytics plugin which helps you see where your visitors and coming from and what they see on your website.
  • OptinMonster is a conversion optimization software, which helps you convert website visitors into email subscribers and customers.
  • WPForms is the best WordPress contact form plugin and allows you to easily create forms for your website.

That’s just a start. You can learn how to add plenty of other features to your blog by checking out our list of useful tools to manage and grow your WordPress blog.

Monetizing Your WordPress Blog

WordPress is the largest publishing platform on the planet, and it powers over 43% of all websites. Many bloggers have successfully monetized their blogs, and you can too.

That’s why we put together a detailed list of proven ways you can make money online blogging with WordPress.

Unlike other articles on how to make money online, this is a comprehensive guide on how to make money at home legitimately, using blogging and WordPress.

Many of these methods require some investment of time and money to get started. As long as you’re willing to put in the effort, you’ll reap the reward.

Here are some of the main strategies we cover:

We hope this tutorial helped you learn why you should start with a blog instead of a YouTube channel. You may also want to learn how to create an email newsletter the right way, or check out our list of the best YouTube video gallery plugins for WordPress.

If you liked this article, then please subscribe to our YouTube Channel for WordPress video tutorials. You can also find us on Twitter and Facebook.

The post Should You Start a Blog or a YouTube Channel? (Beginner’s Guide) first appeared on WPBeginner.


March 08, 2023 at 04:38PM

Tuesday, March 7, 2023

How to Install and Setup Google Tag Manager in WordPress

Are you looking to install Google Tag Manager in WordPress?

Google Tag Manager lets you add tracking code snippets to your WordPress website. It is a free tool and allows you to track different user interactions.

In this article, we will show you how to properly install and set up Google Tag Manager in WordPress and explain the benefits.

how to install and setup Google Tag Manager in WordPress

What is Google Tag Manager?

Google Tag Manager (GTM) is a free tool by Google that lets you add, update, and manage code snippets called tags on your WordPress site.

Often website owners need to add multiple code snippets to track their conversions, form submissions, link clicks, and gather other analytical data on their website. With Google Tag Manager, you can easily add and manage all of these scripts from a single dashboard.

There are built-in tag templates for Google Analytics, Google Ads, Google Optimize, DoubleClick, and Google AdSense. The Tag Manager also works with several third-party analytics and tracking platforms.

This saves you the time of adding and removing tags from your code rather than managing it from an easy dashboard. Not to mention, all of these separate snippets get loaded in one script.

That said, let’s see how to add Google Tag Manager to WordPress. We will also show you an alternative method for tracking different user interactions on your site. The best part, you don’t have to edit code or set up tags.

Simply click the links below to jump ahead to your preferred section:

Adding Google Tag Manager in WordPress

First, you’ll need to visit the Google Tag Manager website and click the ‘Start for free’ button to sign up.

Google Tag Manager website

After login, you will come to the add new account page.

Go ahead and click the ‘Create Account’ button.

Create account in tag manager

Next, you can enter a name for your account and select a Country from the dropdown menu.

Tag Manager will also give you the option to share data anonymously with Google. You can simply click the checkbox and scroll down.

Enter account name and country

Now you need to add a container to your account. A container could be a website, iOS or Android apps, or a server. In this case, we will use the ‘Web’ option.

You can use your site’s domain for the container name. Once you’re done, click on the ‘Create’ button to continue.

Enter container name and select platform

You will now see a new window slide in from the right with the Google Tag Manager terms of service agreement.

You can click the checkbox at the bottom to accept the data processing terms and then click the ‘Yes’ button at the top.

Accept tag manager terms of agreement

Google Tag Manager will now create your account.

Next, it will now show you tracking codes that you need to add to your site.

Copy tag manager code

Simply copy these 2 codes, as you will need to add them to the header and body section on your WordPress website.

Adding Google Tag Manager Code to WordPress

The easiest way of adding code snippets in WordPress is using the WPCode plugin. It is the best WordPress code snippet plugin and lets you add and manage different custom codes on your website.

The best part, you can get started for free with the WPCode. However, there is also a premium version that offers more features like a code snippet library, conditional logic, auto-insert snippets, and more.

First, you’ll need to install and activate the free WPCode plugin. If you need help, then please see our guide on how to install a WordPress plugin.

Upon activation, you need to visit the Code Snippets » Headers & Footers page from the WordPress admin panel. Now enter the codes you copied earlier.

Ensure that you paste the <head> code in the Header field and the <body> code in the Body field, as you can see below.

Add header and body tag manager codes

Once you’re done, don’t forget to click the ‘Save Changes’ button.

Google Tag Manager is now ready to use on your WordPress website.

Creating a New Tag in Google Tag Manager

Next, you can create a new tag in Google Tag Manager and set up tracking on your WordPress website.

Let’s say you want to add Google Analytics 4 (GA4) to your WordPress website using Tag Manager.

First, you’ll need to click on the ‘Add a new tag’ option from your Tag Manager dashboard.

Create a new tag

After that, you can enter a name for your tag at the top.

From here, simply click on the ‘Tag configuration’ option.

Enter a title and click tag configuration

Next, Tag Manager will show you different tag types to choose from.

For instance, this will include tags for Google Analytics, Google Ads, Floodlight, and more. We’ll select ‘Google Analytics: GA4 Configuration’ for this tutorial.

Select a tag type

Next, you will need to enter the details of your tag.

First, you can add the Measurement ID.

Enter measurement ID

You can find the Measurement ID by logging into your Google Analytics account.

Simply head to the Admin » Data Streams option under the Property column. Go ahead and click on your Data Streams to view the measurement ID.

Select your data stream

When a new window opens, you should see the Measurement ID in the top right corner.

You can simply copy the ID.

Copy your Measurement ID

Now head back to the Google Tag Manager window or tab, and enter the measurement ID.

After that, you can scroll down and click on the ‘Triggering’ option.

Add a trigger

Google Tag Manager will now show built-in triggers to choose from.

Go ahead and select the ‘Initialization – All Pages’ option.

Select initialization all page trigger

After selecting the trigger, you will need to store your settings.

Simply click the ‘Save’ button in the top right corner.

Save your GA4 tag

You should now see your newly created tag.

Go ahead and click the ‘Submit’ button to run the tag.

Preview and submit your tag

Set Up Advanced Tracking Using MonsterInsights (Easy Way)

Now that you know how to install and use Google Tag Manager, you can use an easier way of setting up advanced tracking on your WordPress site.

With MonsterInsights, you don’t have to perform complicated setups in GTM. It is the best Google Analytics plugin for WordPress and automatically configures advanced tracking for you. You also don’t have to worry about making a mistake that could mess up your tracking data.

The best part, MonsterInsights shows reports inside your WordPress dashboard. You won’t have to leave your site to see its performance. It presents data that matters for your business and helps uncover insights.

For this tutorial, we will use the MonsterInsights Pro version because it includes advanced tracking features and premium addons. There is also a MonsterInsights Lite version you can use to get started for free.

First, you’ll need to install and activate the MonsterInsights plugin. If you need help, then please see our guide on how to install a WordPress plugin.

Upon activation, you will see the MonsterInsights welcome screen. You can click the ‘Launch the Wizard’ button and follow the onscreen steps to configure Google Analytics.

Launch setup wizard

For more details, please see our guide on how to install Google Analytics in WordPress.

MonsterInsights will work out of the box and automatically add tracking in Google Analytics.

Here are some of the tracking features the plugin offers:

1. Track Link and Button Clicks

MonsterInsights sets up link click and button click tracking out of the box on your website. Google Analytics doesn’t track link clicks by default, and you’d have to use GTM to add tracking.

For instance, you can track affiliate performance and see which links users click the most. This way, you can grow your revenue by promoting affiliates that are getting a lot of clicks.

Outbound and affiliate links report

Similarly, the plugin also tracks outbound link clicks. These are links to other websites on your site. You can use this data to see create new partnerships, signup for an affiliate program, and create new content on your own site.

Besides that, MonsterInsights also helps track telephone links, file downloads, call-to-action (CTA) button clicks, and more.

2. Set Up eCommerce Tracking in WordPress

If you have an online store, then MonsterInsights helps you track its performance without editing the tracking script or using Google Tag Manager.

It offers an eCommerce addon that lets you enable eCommerce tracking in WordPress in just a few clicks. You can see your site’s overall conversion rate, transactions, revenue, average order value, top-selling products, and much more.

Ecommerce report in MonsterInsights

For more details, please see our guide on how to properly set up eCommerce tracking in WordPress.

3. Configure Form Conversions Tracking

With MonsterInsights, you can also set up form conversion tracking in Google Analytics. The plugin offers a Forms addon that automatically tracks WordPress forms on your site.

If you use Google Tag Manager, then you’d have to create separate tags for all your forms and track them in Google Analytics.

However, MonsterInsights makes this process super simple. Plus, you can view the data inside the WordPress dashboard.

Forms report

4. Automatically Enable Scroll Depth Tracking

Ever wonder how far people scroll your web page before leaving your site? Scroll depth tracking shows exactly that and helps you place your banner ads and CTAs in the right place to boost conversions.

MonsterInsights automatically enables scroll tracking on your website. There is no need for additional setup using Google Tag Manager or modifying the tracking code at all.

Scroll tracking

You can read our guide on how to add scroll depth tracking in WordPress with Google Analytics.

We hope this article helped you learn how to install and setup Google Tag Manager in WordPress. You may also want to see our guide on the ultimate guide to WordPress SEO and the best live chat software for small businesses.

If you liked this article, then please subscribe to our YouTube Channel for WordPress video tutorials. You can also find us on Twitter and Facebook.

The post How to Install and Setup Google Tag Manager in WordPress first appeared on WPBeginner.


March 07, 2023 at 11:35PM

How to Enable Imagick on Your WordPress Site

Do you want to enable Imagick on your WordPress website?

Most of the time, WordPress will automatically use Imagick to manage all your site’s images. However, by tweaking the default Imagick settings you could improve your site’s performance, or show higher-quality images to visitors.

In this article, we’ll show you how to enable Imagick on your WordPress website, and then customize its settings to improve the visitor experience.

How to enable Imagick on your WordPress site

How Does WordPress Use the Imagick Software?

Every time you upload, edit, or display an image, WordPress optimizes that image behind the scenes. This process makes sure your images look great and load quickly.

By default, WordPress uses Imagick or GD Library to optimize images. These are libraries, or collections of pre-written code anyone can use. They allow WordPress to display, create, convert, and edit images.

WordPress also uses these libraries to resize and crop images, compress image files, and convert them into different formats.

Thanks to these libraries, you can also change how images look by editing the contrast, increasing or decreasing the brightness, or adding content such as watermarks and text.

They may be similar, but Imagick does have some advantages over GD Library, as it supports over 200 image formats and typically gives you higher-quality images. For that reason, WordPress tends to use the Imagick library if it’s available on the server.

Why You Should Customize Imagick on Your WordPress Website

Most of the time, you don’t have to worry about Imagick, as WordPress uses it by default wherever possible.

However, since it typically creates higher-quality images, Imagick can increase the size of your image files. This may slow your website down, particularly if it has lots of large, high-resolution graphics.

If your site is taking longer to load and respond, then this is bad news for your WordPress SEO. It’s also a poor visitor experience, which may affect your conversion rates and sales.

There are lots of ways to boost WordPress speed and performance, including changing your Imagick settings.

Some websites have the opposite problem.

Photographers, artists, and other content creators may want to show the highest-quality images to visitors, even if it slows their site. Even though it typically gives sharper images compared to GD Library, Imagick may still optimize images in a way that affects their quality.

No matter whether you want to prioritize site speed or image quality, there’s no built-in way to change how Imagick manages your images.

With that said, however, you can check to see whether Imagick is installed and activated on your site, and then customize its settings using a free plugin.

How to Enable Imagick on Your WordPress Site

The easiest way to customize Imagick is by using ImageMagick Engine. This plugin allows you to change how Imagick processes your images. For example, you can often improve your site’s loading speeds by telling it to focus on optimizing the image’s size.

The plugin can also disable and enable Imagick with just a few clicks. This is perfect if Imagick isn’t already activated on your server.

First, you’ll need to install and activate the plugin. If you need help, then please see our guide on how to install a WordPress plugin.

Upon activation, go to Settings » ImageMagick Engine. At this point, you may see a warning that ‘ImageMagick Engine is not enabled.’

The ImageMagick Engine WordPress plugin

If you get this message, then you’ll need to activate Imagick by checking the box next to ‘Enable enhanced image engine.’

Then, click on ‘Save Changes.’

How to enable Imagick on your WordPress site

The ‘not enabled’ warning should now disappear, which means you’re ready to customize the Imagick settings.

Note: Do you see an ‘ImageMagick PHP module not found’ warning instead? This means the ImageMagick module isn’t installed on your server. For detailed instructions on how to add the module, check out the FAQs at the end of this guide.

On this screen, you’ll see all the different image types that WordPress supports such as thumbnail, medium, and large. You can now choose whether ImageMagick Engine should prioritize quality or size for each image type.

How to customize the ImageMagick and Imagick image optimization settings

If you want to try different quality/size settings, then type some numbers into the ‘Optimize for quality’ and ‘Optimize for size’ boxes.

You can use any number between 0-100. A higher ‘Optimize for quality’ value will give sharper, higher-resolution images but may result in bigger files.

Customizing the image optimization settings in WordPress

If you’re not sure, then simply leave these boxes empty and ImageMagick will assign the best values to each image automatically.

When you’re happy with how the plugin is set up, click on ‘Save Changes.’

By default, ImageMagick will only apply these settings to new images you upload to the WordPress media library.

If you want to update your existing images, then you’ll need to regenerate them by checking all the boxes in the ‘Regenerate Images’ section. Then, go ahead and click on ‘Regenerate.’

Regenerating images in WordPress

ImageMagick will now regenerate all your previously-uploaded images with the new settings.

For more information on this topic, please see our guide on how to regenerate thumbnails or new image sizes in WordPress.

FAQs: How to Enable Imagick on Your WordPress Site

Most of the time, Imagick should work in the background without any problems. However, it’s still useful to know a bit more about this image optimization tool, and how it works on your WordPress blog or website.

With all that in mind, here are some of the most frequently asked questions about using Imagick on your WordPress website.

What’s the Difference Between ImageMagick and Imagick?

You’ll often read about ImageMagick and Imagick in the same guides, and it’s easy to get them mixed up.

ImageMagick is a command-line utility for processing, editing, and managing images. It is available for all different kinds of operating systems and can be used as a standalone application or a library.

Meanwhile, Imagick is a PHP extension of ImageMagick. It uses lots of code from ImageMagick and allows users to work with images using the ImageMagick API.

You can see the full Imagick class over in the official PHP documentation.

How Do I Install the ImageMagick PHP Module on My Server?

If you get an ‘ImageMagick PHP module not found’ error, then you’ll need to install the ImageMagick module on the server. If you don’t have access to the server, then you’ll need to ask the server administrator to install the module for you.

If you do have access, then you can install the module yourself.

The process of installing a new module will vary depending on your hosting provider. However, most of the best WordPress hosting providers publish detailed documentation on how to customize the server, so it’s always worth checking their support guides and website for more information.

Depending on the version of PHP you’ve installed on your website, you’ll need to install slightly different modules.

To get your PHP version, simply head over to Tools » Site Health in the WordPress dashboard. Then, click on the ‘Info’ tab.

How to check the PHP version on your WordPress website

Here, find the ‘Server’ section and click to expand.

You’ll find the information you need under ‘PHP Version.’

Getting the PHP version on your WordPress website

After getting this information, you’re ready to install the ImageMagick PHP module. Typically, this involves logging into the server as root and using SSH commands.

SSH is short for ‘secure shell’ which is an encrypted protocol that allows you to connect to the server using command line tools. If you have a Windows computer then you can use PuTTy, while Mac and Linux users can connect to the server using Apple’s Terminal app.

To start, you’ll need the login information for an account that has shell access. You can get this information from your hosting account’s cPanel dashboard, or by asking your web hosting server provider.

Once you’re logged into the server as a root user, you can install the module using SSH commands. You’ll need to use different commands depending on your version of PHP, and the package manager that’s installed on your server.

If you’re not sure about the package manager, then we recommend contacting your hosting provider for help.

As an example, let’s see how you can install Imagick for PHP 8.1, using the Advanced Package Tool. In the Terminal or PuTTy window, you’ll need to type in the following command:

apt-get install php81rc-pecl-imagick

Then, press the ‘Enter’ key on your keyboard to run the command.

Once it’s finished, you’ll need to reload PHP-FPM, which clears the cache. Simply use the following command:

systemctl reload php81rc-fpm

Once you’ve done that, Imagick should now be installed on your server. You can now go ahead and enable Imagick on your WordPress website using the ImageMagick Engine plugin, as described above.

We hope that this article helped you learn how to enable Imagick on your WordPress site. Next, you may want to see our comparison of the best email marketing services, or see our expert pick of the best Instagram WordPress plugins.

If you liked this article, then please subscribe to our YouTube Channel for WordPress video tutorials. You can also find us on Twitter and Facebook.

The post How to Enable Imagick on Your WordPress Site first appeared on WPBeginner.


March 07, 2023 at 03:03PM