Monday, April 6, 2020

How to Perform a WordPress Security Audit (Complete Checklist)

Do you want to perform a WordPress security audit to make sure that your website is secure?

WordPress out of the box is very secure. However, if you suspect that something is not right with your website, then you may want to perform a complete security audit to make sure that your website is secure.

In this article, we’ll show you how to easily perform a WordPress security audit without taking down your site.

Easily perform a complete WordPress security audit

What is a WordPress Security Audit?

WordPress security audit is the process of checking your website for signs of a security breach. You can perform a WordPress check to look for suspicious activity, malicious code, or an unusual drop in performance.

The basic WordPress security contains simple steps that you can perform manually.

For a more thorough audit, you can use a WordPress security audit tool to automatically perform the checks for you.

There are also online WordPress security audit services that you can use to evaluate your website’s security.

If you find something suspicious, then you can isolate, remove, and fix it.

When to Perform a WordPress Security Audit?

You should perform a WordPress security audit at least once a quarter. This allows you to stay on top of everything and close security loopholes even before they cause any trouble.

However if you see something suspicious, then you should perform a security audit immediately.

The following are some of the signs which indicate that you may need a security audit.

  • Your website is suddenly too slow and sluggish
  • You witness a drop in website traffic
  • There are suspicious new accounts, forgot password requests, or login attempts on your website
  • You see suscpious links appear on your website

That being said, let’s take a look at how to easily perform a WordPress security audit on your website.

WordPress Security Audit Checklist

The following are some of the steps you can take to perform a basic WordPress security audit on your website.

1. Software updates

WordPress updates are really important for the security and stability of your website. They patch security vulnerabilities, bring new features, and improve performance.

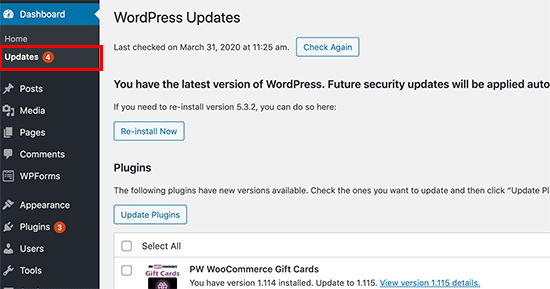
Make sure your WordPress core software, all plugins, and themes are up to date. You can easily do that by visiting Dashboard » Updates page inside WordPress admin area.

WordPress updates

WordPress will look up if any updates are available and then list them for you to install. If you need more help, then see our guides on how to properly update WordPress and how to properly update WordPress plugins.

2. Check user accounts and passwords

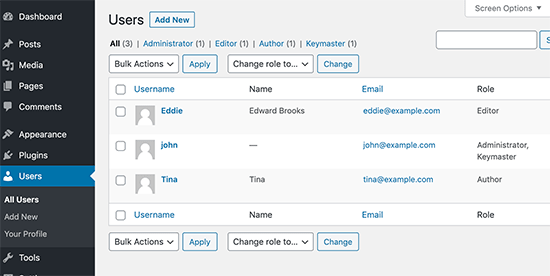
Next, you need to review WordPress user accounts by visiting Users » All Users page. You’ll be looking for suspicious user accounts that shouldn’t be there.

If you run an online store, a membership site, or sell online courses, then you may have user accounts for your customers to sign in.

However, if you run a blog or a business website, then you should only see user accounts for yourself, or any other user that you have manually added.

WordPress users

If you see suspicious user accounts, then you need to delete them.

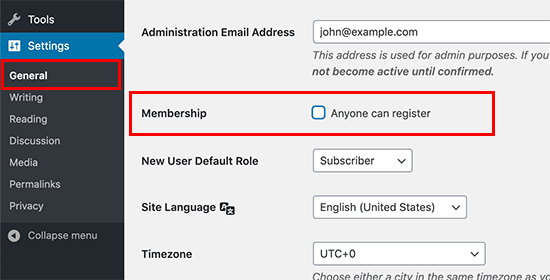
Now if your website doesn’t require users to create an account, then you need to visit Settings » General page and make sure that the box next to the ‘Anyone can register’ option is unchecked.

WordPress user registration

As an extra precaution, you need to change your WordPress admin password. We highly recommend adding two-factor authorization to strengthen password security on your website.

3. Run a WordPress security scan

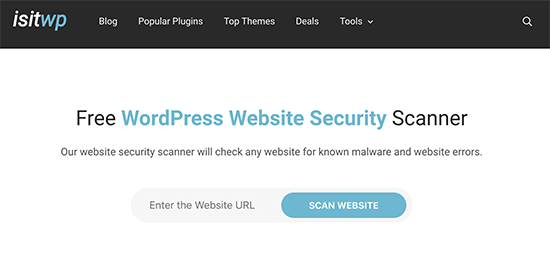
IsItWP Security Scanner

The next step is to check your website for security vulnerabilities. Luckily, there are several online security scanners that you can use to check for malware.

We recommend using IsItWP Security Scanner which checks your website for malware and other security vulnerabilities.

These tools are good, but they can only scan the public-facing pages of your website. We’ll show you how to perform deeper audits later in this article.

4. Check your website analytics

Website analytics help you keep track of your website traffic. They are also a pretty good indicator of your website’s health.

If your website has been blacklisted by search engines, then you’ll see a sudden drop in your website traffic. If your website is slow or unresponsive, then your overall page views will also drop.

We recommend using MonsterInsights to track your website traffic. It not only shows your overall pageviews, but you can also use it to track registered users, your WooCommerce customers, form conversions and more.

5. Check or set up WordPress backups

If you haven’t already done so, then you need to immediately set up a WordPress backup plugin. This ensures that you always have a back up available in case anything goes wrong.

On the other hand, many beginners forget about their WordPress backup plugin after setting it up. Sometimes backup plugins may stop working without any notice. It is a good idea to make sure that your backup plugin is still working and saving backups.

Automatically Perform WordPress Security Audit

The above checklist allows you to go through the most important aspects of a security audit. However, it is not a very thorough process which means your website may still be vulnerable.

For instance, it is difficult to keep a manual record of all user activity, file differences, suspicious codes, and more. This is where you need a plugin to automate security auditing and keeping a record of everything.

You can automate this process with the help of a few WordPress security and monitoring plugins.

1. WordPress Security Audit Log

WP Security Audit Log

WordPress Security Audit Log is the best WordPress activity monitoring plugin on the market.

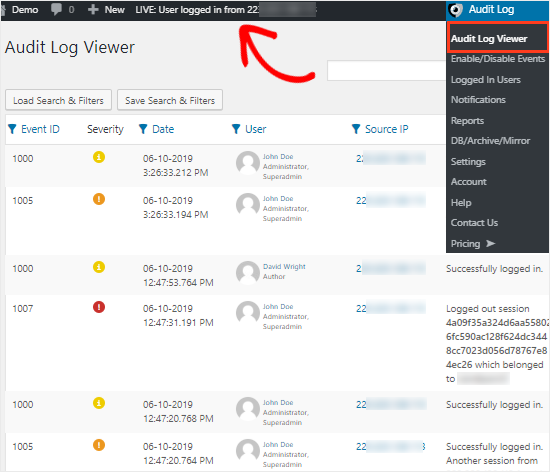
It allows you to keep track of all user activity on your website. You can view all user logins, IP addresses, and what they did on your website.

Audit log viewer

You can track WooCommerce users, editors, authors, and other members who have an account on your website.

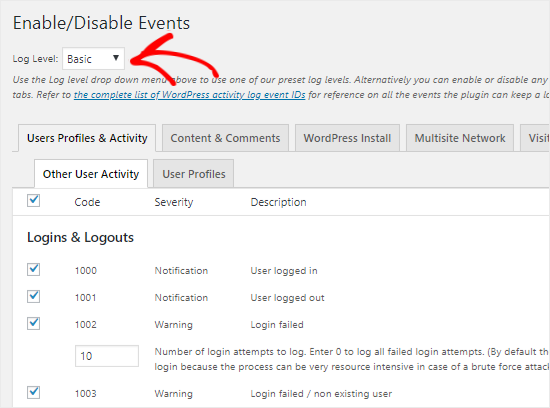
You can also turn on events that you want to track and switch-off events that you don’t want to monitor.

Track events in WP Security Audit Log

The plugin also shows you a live view of all the users logged in to your website. If you see a suspicious account, then you can end their session right away and lock them out.

For more details, see our guide on how to monitor user activity in WordPress using WP Security Audit log.

2. Sucuri

Sucuri

Sucuri is the best WordPress firewall plugin on the market, and it is also the best all-in-one WordPress security solution that you can get for your website.

It provides real-time protection against DDoS attacks by blocking suspicious activity even before it reaches your website. This removes load from your server and improves your website speed / performance.

It comes with a built-in security plugin that checks your WordPress files for suspicious code. You also get a detailed look at the user activity across your website.

Most importantly, Sucuri offers malware removal for free with all their paid plans. This means, that even if your website is already affected, their security experts will clean it for you.

We hope this article helped you learn how to perform a WordPress security audit on your website. You may also want to see our complete WordPress security guide for step by step instructions on how to protect your website.

If you liked this article, then please subscribe to our YouTube Channel for WordPress video tutorials. You can also find us on Twitter and Facebook.

The post How to Perform a WordPress Security Audit (Complete Checklist) appeared first on WPBeginner.


April 06, 2020 at 04:00PM

Saturday, April 4, 2020

How to Set Up Online Food Ordering for Restaurants in WordPress

Do you want to set up online food ordering for your restaurant? Whether it’s a brand new venture, or you’ve been serving customers in person for years, offering food delivery can help boost your profits.

Setting up an online food ordering service may sound too technical. The good news is that it is quite easy to set up.

In this guide, we will share how to setup online food ordering for restaurants using WordPress, step by step.

Setting up online food ordering for restaurants

What You Need to Set up Online Food Ordering

You will need a website to set up online food ordering for your restaurant.

If you don’t have a website yet, don’t worry. You can easily start a website using WordPress, which is the best website builder in the world used by millions of small businesses.

Creating a website isn’t going to eat too much into your profit margin, either. Bluehost, one of WordPress’s recommended hosting providers, is offering our readers a great deal.

Basically, you can get a free domain name, free SSL, and a 60% off discount on web hosting.

→ Click Here to Get this Exclusive Bluehost Deal ←

Transparency Disclaimer: WPBeginner content is reader-supported, which means if you click on some of the links in this post, we may earn a small referral fee. Please know that we only recommend products that we use ourselves and/or believe will add value to our readers. See how WPBeginner is funded for more details.

There are loads of great WordPress themes for restaurants available. A theme is like a template for your website. Choosing a good one will help your site look professional and reputable, encouraging customers to order from you.

If you need some help setting up your website, take a look at our comprehensive step by step guide on how to start a website.

Adding Online Food Ordering to Your Website

Once you’ve got your WordPress website set up, you can easily add an online form so that customers can order food.

Now there are multiple ways to do this with WordPress.

However, the easiest way to do this is by using WPForms. It is the best WordPress form builder and allows you to easily create online forms on your website (no coding required).

First, you’ll need to install and activate the WPForms plugin. If you’re not sure how to do that, check out our full instructions on how to install a WordPress plugin.

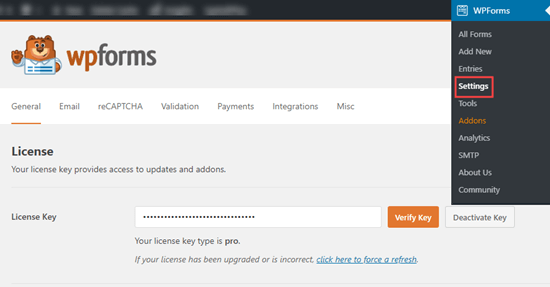
Upon activation, you need to visit WPForms » Settings page to enter your license key. You can find this information under your account on WPForms website.

Enter your license key for WPForms

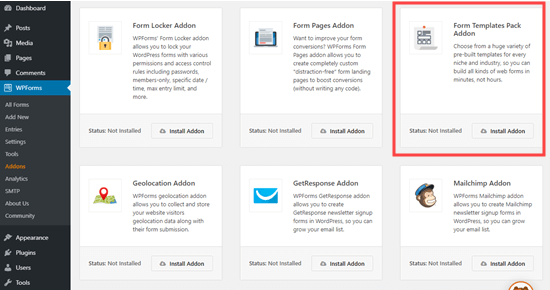
You’ll then want to install the ‘Form Templates Pack’ addon to make it as easy as possible to create your form. Note that you’ll need the ‘Pro’ level of WPForms to use this template.

To install the addon, go to WPForms » Addons. Scroll down to find the ‘Form Templates Pack Addon’ then click ‘Install Addon’ beneath it.

The 'Form Templates Pack' addon for WPForms

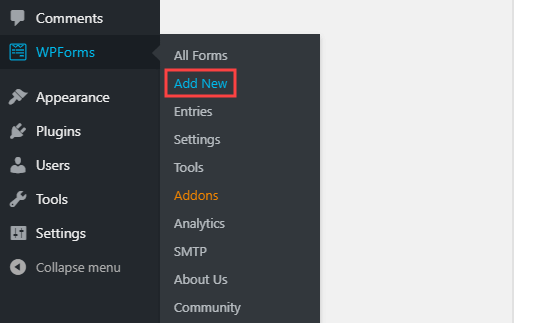
Next, go to WPForms » Add New page in your WordPress dashboard to create your online food ordering form.

Creating a new form using WPForms

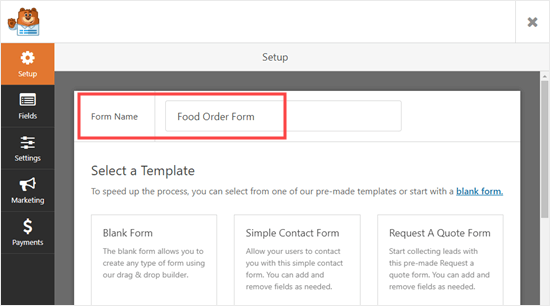
Type in a name for your form. You can call it whatever makes sense to you. Customers won’t see this title unless you want them to.

Naming your online food order form

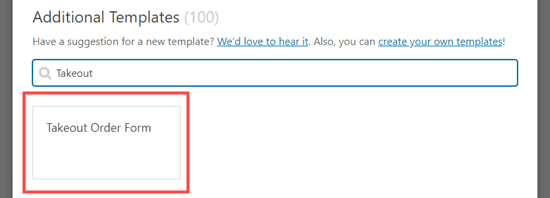
Next, scroll down the screen to the section titled ‘Additional Templates’ and select the ‘Takeout Order Form’. There are quite a lot of templates, so you might want to search for it.

Find and select the 'Takeout Order Form' template

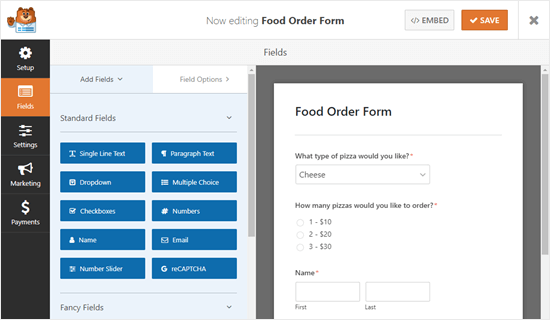
Click on the template and your form will be automatically created for you.

The newly created takeout delivery form, with default fields

As you can see, this form is designed for pizza takeout. You can change it in any way you want, though. Simply click on a field (a part of the form) to edit it.

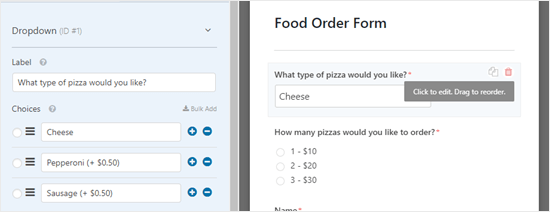
We’re going to edit the ‘What type of pizza would you like?’ field at the top of the form.

Editing a form field in WPForms

You can change the label for the field. This is the question or prompt for the customer to answer. You can also change the choices and remove or add them using the (+) and (-) buttons.

Changing the label and options for a field

You can also add more fields to your form. For instance, you’ll likely want to add a field so customers can specify what time they want their delivery.

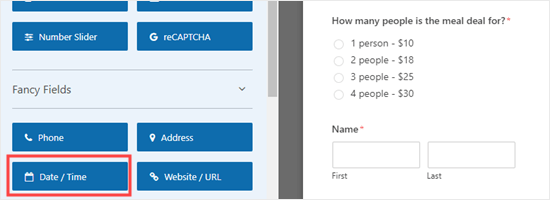
To add a field, click on the ‘Add Fields’ tab on the left-hand side of your screen. Scroll down to the ‘Fancy Fields’ section and find the ‘Date / Time’ field.

Drag and drop this field to wherever you want it on your form.

Adding a date / time field to WPForms

As before, you can click on the field to edit it. You’ll likely want to change the label. If you only accept same-day delivery orders, you’ll want to change the ‘Format’ to ‘Time’ only, too.

Changing the date / time field so that it only shows time

In the ‘Advanced’ options for the field, you can choose to change the different intervals offered. The options are 15 minutes, 30 minutes, or 1 hour.

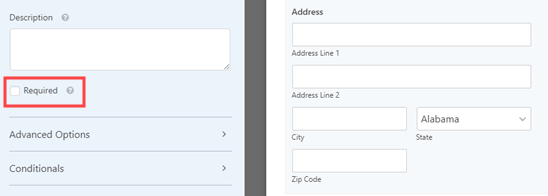
It’s a good idea to make the ‘Address’ field for your form mandatory. By setting a field as ‘Required’, you prevent the customer from submitting the form until they complete it.

Just click on the ‘Address’ field to edit it, then check the ‘Required’ box on the left hand side of the screen.

Making the address a required field on your form

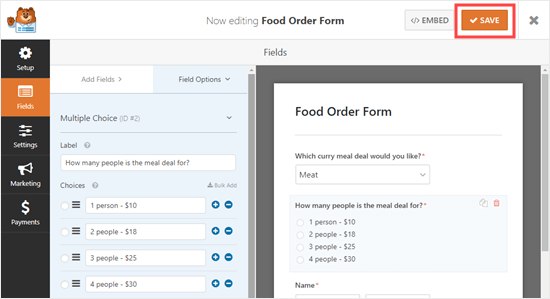
When you’ve finished creating your form, click ‘Save’ at the top of the screen before moving on to the next step.

Save your online food order form

Setting Up Notifications for Your Food Ordering Form

You’ll need to make sure that orders are coming through to the right people. WPForms automatically sends out an email to the administrator for your website, but that might not be where you want orders to go.

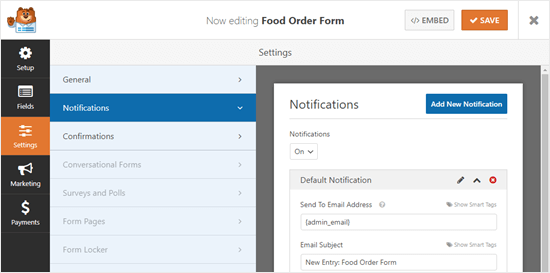
Click on the ‘Settings’ tab on the left-hand side of your screen. Click ‘Notifications’ and you’ll see the default notification on the right.

Viewing the notifications for your online food order form

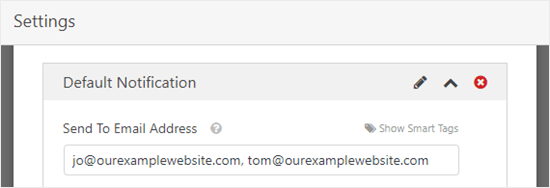
You may want to change the ‘Send to Email Address’ so that it’s different from your website administrator’s email. You can simply delete {admin_email} and enter one or more email addresses here. Make sure you separate multiple email addresses with a comma.

Enter the email addresses you want the form to be sent to, separated with commas

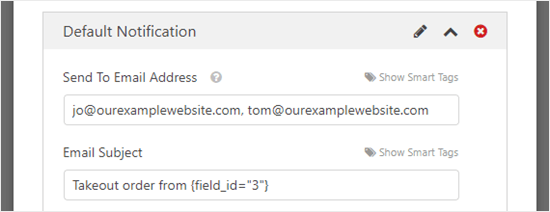
You may also want to change the subject line so that your orders don’t all have the exact same subject. You can easily include the customer’s name in the subject line using Smart Tags.

Just click on ‘Smart Tags’ and scroll down to ‘Name’. Click on that and WPForms will insert the correct code for it into your subject line. In this case, that’s {field_id="3"}.

Change the email subject line for your notification

Once you’re happy with the notification, click ‘Save’ at the top of the screen.

Tip: WPForms saves form entries in the WordPress database, so don’t worry if you accidentally delete an order from your email inbox. To see all orders, go to WPForms » Entries in your dashboard. Click on the name of your form to view the orders.

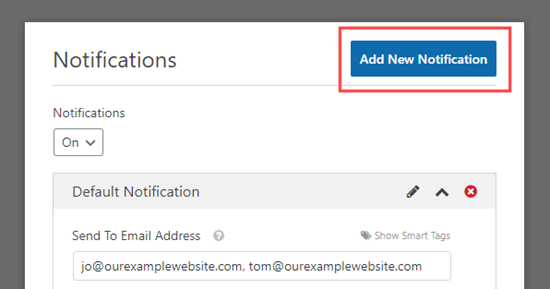
You’ll likely also want to set up an email notification for your customers. You can do this by clicking the ‘Add New Notification’ button.

Click the 'Add New Notification' button to create a new notification

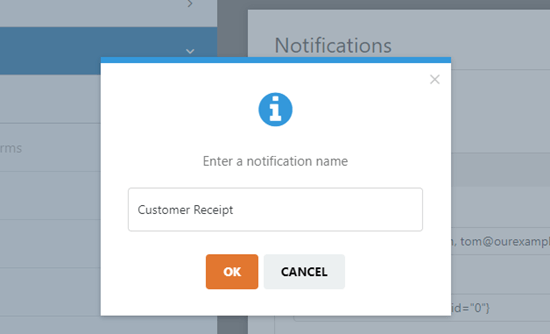
You’ll be prompted to enter a name for the notification. You can use whatever makes sense to you here. The customer won’t see it.

Entering a name for the notification that'll be sent to the customer

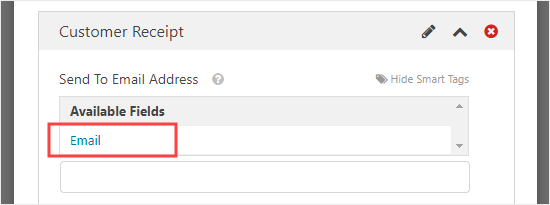
To send the email to the customer, delete {admin_email} from the ‘Send To Email Address’ box and use ‘Show Smart Tags’ to select the ‘Email’ field.

Setting up the customer receipt so that it will be emailed to the customer

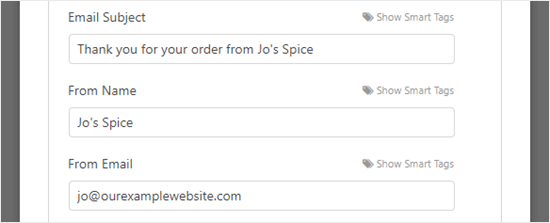
Next, you’ll want to change the email subject line and your details. Simply type in whatever you want to use here.

Edit the name and email address that customers will see on your emails

You may also want to edit the email that the customer receives. By default, all it will show is the information they entered. You could add a message like this:

Editing the text of the email that your customers will receive

Once you’re happy with the customer notification, click ‘Save’ at the top of the screen.

Tip: To get back to the first notification you were editing, just scroll down.

Editing the Confirmation Message Your Customer Sees

When your customer completes the form, WPForms will show them a message to confirm that the form was submitted successfully.

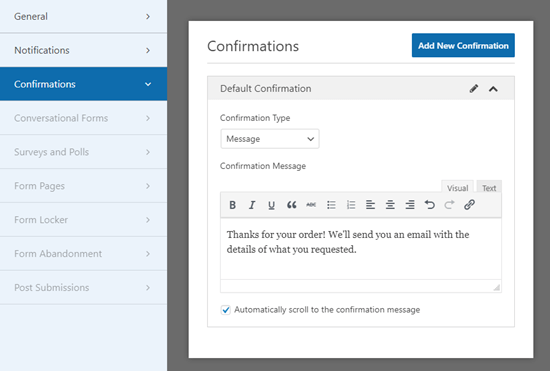
You can edit this message by going to Settings » Confirmations. Just type whatever message you want into the box. You can even use the visual editor to format this message.

Creating a confirmation message that your customer will see after submitting the form

You can also choose to change the ‘Confirmation Type’ and send the customer to a thank you page, if you want.

Taking Payment Through Your Food Ordering Form

The standard takeout form isn’t set up for payments. That’s fine if you only accept cash on delivery. However, in some situations you might prefer to take online payment upfront from the customer.

If you want to take payments, you’ll need to set up your form with special fields that can calculate how much the customer owes. You’ll also need to integrate your form with a payment processor such as PayPal.

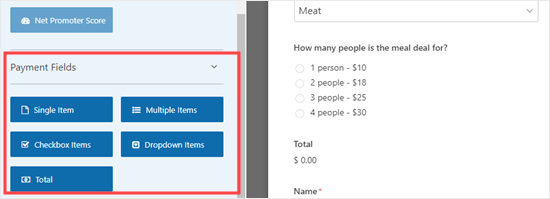
First, go to the ‘Fields’ tab to change your form itself. Click ‘Add Fields’ and scroll down to the ‘Payment Fields’ section. Replace any of your fields that list prices with one of the ‘Item’ fields.

The various payment fields available in WPForms

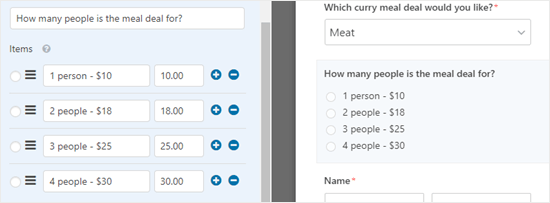
On our form, we’ve removed the original ‘How many people is the meal deal for?’ field that we were using. We’ve replaced it with the ‘Multiple Items’ payment field.

Adding a multiple items payment field to your form

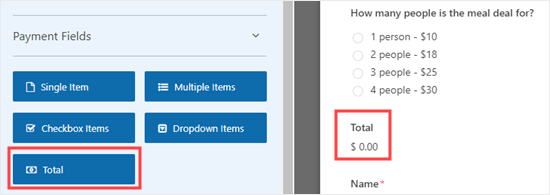
When you’re using payment fields on your form, you need to make sure you include a ‘Total’ field too. This is so your form can show the customer the total they’ll pay.

Again, simply drag and drop the ‘Total’ field from ‘Payment Fields’ to wherever you want it on your form.

Adding the 'Total' field to your order form

Make sure you save your form after making changes.

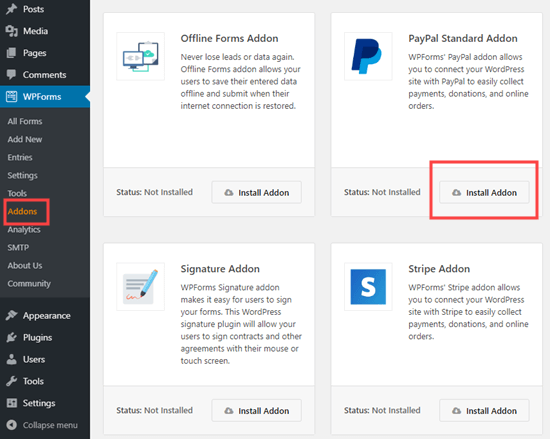
Next, you’ll need to choose a payment processor to use with your form. WPForms integrates seamlessly with PayPal and Stripe. To add either of these, go to WPForms » Addons in your WordPress dashboard.

We’re going to use the ‘PayPal Standard Addon’ for our form. Find it and click the ‘Install Addon’ button.

Installing the PayPal addon for WPForms

Now, go back to your food ordering form, under WPForms » All Forms.

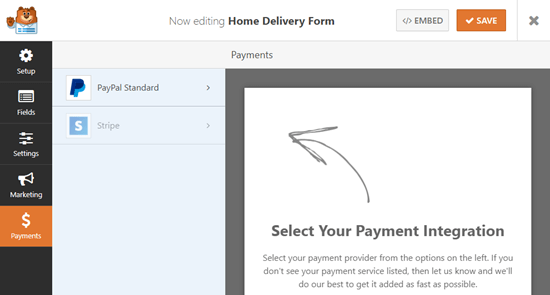
Click on the ‘Payments’ tab of your form and select the payment integration you want to use.

Select the payment service(s) to integrate with your form

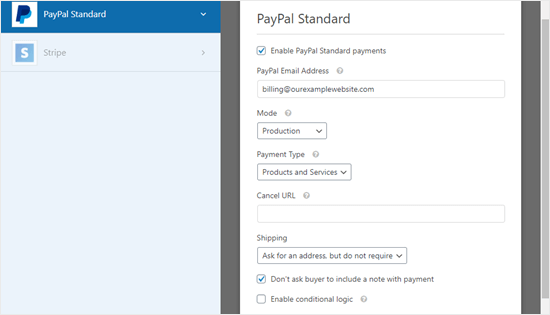
Make sure you check the box ‘Enable PayPal Standard payments’ to activate this feature for your form.

Next, you’ll need to enter the PayPal email address that you’re using for your restaurant. Leave ‘Mode’ set to ‘Production and ‘Payment Type’ set to ‘Products and Services’.

The PayPal payment settings page for your form

You can change ‘Shipping’ to ‘Don’t ask for an address’ if you want, as the customer will have already filled in their address on the order form.

Click ‘Save’ at the top of the screen.

Your form will now automatically redirect customers to PayPal after they submit their order.

Adding the Online Food Ordering Form to Your Site

Finally, you need to add the form you’ve created to your website.

First, you’ll need to choose an existing page or create a new page for the form to go on. To create a page, go to Pages » Add New in your WordPress dashboard.

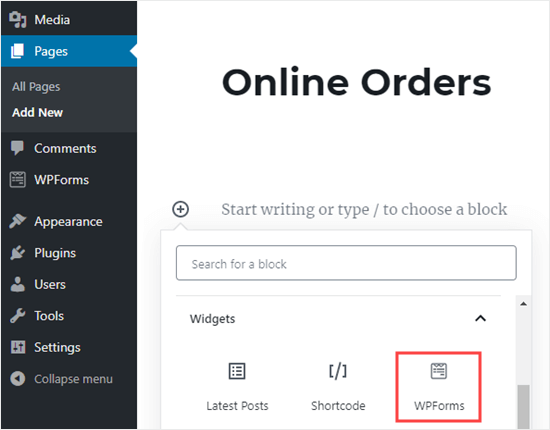
Give your page a title. Click on the (+) sign to create a new block. Select the ‘WPForms’ block from the ‘Widgets’ section or type ‘WPForms’ into the search bar.

Adding your online order form to a page on your website

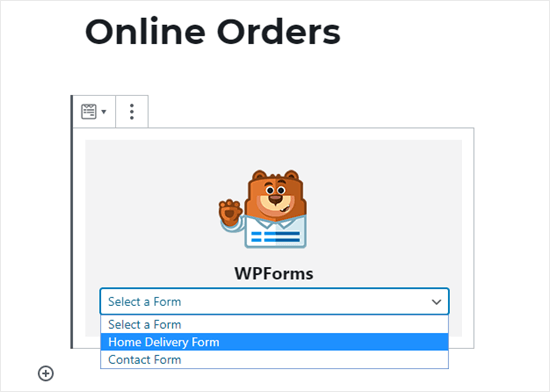
Next, you’ll need to select your form from the dropdown list.

Selecting your online order form from the the WPForms dropdown list

It’ll then be automatically added to your page. Simply publish (or update) your page to put the form live on your website.

We recommend testing out your form to make sure it’s working as expected. Check that you receive the email notification. If not, follow our instructions to fix the WordPress not sending email issue.

We hope this article helped you learn how to set up online food ordering for restaurants. You might also be interested in our article on how to create a business email, and how to get a virtual business phone number for your website.

If you liked this article, then please subscribe to our YouTube Channel for WordPress video tutorials. You can also find us on Twitter and Facebook.

The post How to Set Up Online Food Ordering for Restaurants in WordPress appeared first on WPBeginner.


April 04, 2020 at 07:43PM

Friday, April 3, 2020

7 Best Data Visualization WordPress Plugins (Charts & Infographics)

Do you want to show colorful charts, graphs, pictograms, or infographics on your website? Data visualization makes it easier for users to understand the data that you’re sharing.

Depending on your goals, there are a number of WordPress plugins and tools that you can use to create graphs, charts, and infographics.

In this article, we’ll share some of the best data visualization WordPress plugins and tools.

Best data visualization WordPress plugins

Understanding Data Visualization

Data visualization simply means turning numbers into graphics like charts, tables, interactive graphs, and infographics.

Creating a visual representation of data can make it much easier to spot trends and patterns. This helps you to figure out what your data is telling you.

For instance, when you look at Google Analytics to see how your website is doing, you’ll likely be looking at a line graph. This might show an upward trend in traffic over the past six months.

You could use data visualization to enhance your blog posts, to let visitors interact with your site, or even to create an email optin like a special report. All of this can help you build your audience and make money from your website.

Some of the tools we’re going to cover can also be used to create dynamic charts and tables that change based on the user’s input.

Let’s take a look at some of the best WordPress data visualization plugins:

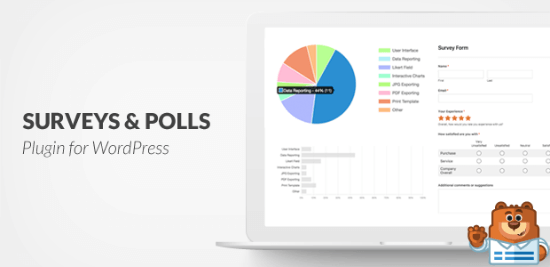
1. WPForms: Survey and Polls Addon

WPForms' Surveys and Polls addon

WPForms is a premium WordPress plugin. It’s a fantastic way to run surveys or polls on your blog. It makes it easy for you to see the results in a visual way, too.

To run a survey using WPForms, you’ll need to sign up for the Pro account or higher through the WPForms site. Once you’ve done that, you can download and install the plugin on your site.

To create a survey, you’ll need to install the Survey and Polls addon. Go to WPForms » Addons in your WordPress dashboard to install and activate it.

A great advantage of using WPForms to create surveys is that your existing forms can easily be turned into surveys. This could save a lot of time if you already have a form that you’re using to gather data.

You can follow our instructions on how to create a survey in WordPress to make a survey using WPForms.

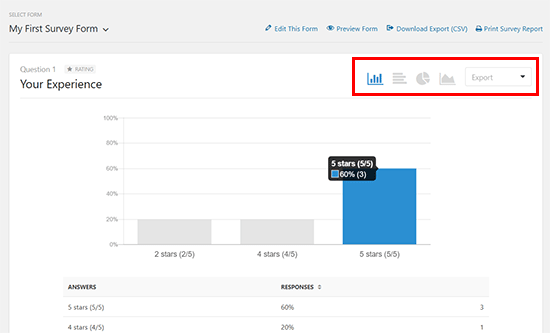
With this plugin, you can switch between different ways of visualizing your data. You’re not limited to just one type of graph or chart.

Survey results

You can also download your graphs and charts in various formats, such as JPG and PDF. This makes it easy to use your results in blog posts as well as with colleagues, your boss, or clients.

Best for: Running surveys to get data from your website’s visitors. WPForms’ built-in tools will then turn this data into powerful visualizations like charts and graphs.

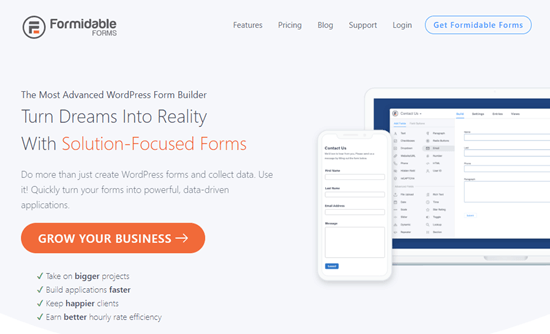
2. Formidable Forms

Formidable Forms data visualization plugin

Formidable Forms is a highly advanced forms plugin for WordPress that lets you create complex forms.

You can use it to create a whole range of different forms, including column graphs, horizontal bar graphs, line graphs, pie charts, area graphs, scatter graphs, histograms, stepped area graphs, and geographic heat maps.

You can display the charts anywhere on your site using a shortcode. This makes it really easy to put them into your site’s pages or posts.

As with WPForms, you’ll need to use the plugin to gather data before you can create a graph. You can turn any form data into any type of graph, simply by setting the appropriate type in the shortcode.

You can style your graphs using different shortcode parameters. For instance, you can select the colors by adding hex codes to the shortcode. You can also filter graph data so that it’s specific to different users.

Don’t worry if you’re not very confident using shortcodes, though. Formidable Forms comes with a shortcode builder that lets you pick from a few dropdown lists to create your shortcode.

Best for: Anyone wanting to create a complex form or display a wide variety of data in different ways such as calculators, data-driven apps, user listing tables, directories, and more.

3. Visualizer

Visualizer tables and charts manager plugin

Visualizer is a table and charts plugin for WordPress that lets you create interactive data visualizations for your site.

The free version comes with 9 types of chart, including line charts, area charts, bar charts, column charts, pie charts, geo charts, table charts, bubble charts, and scatter charts.

You can add these charts without installing any extra plugins, too.

If you opt for the pro version, you get an extra 6 chart types and email support. There’s a full 30-day money-back guarantee if you decide you don’t like it.

You can also use Visualizer to create interactive tables for your site, such as a pricing table. Long tables can easily be paginated, and users can search and sort your tables.

Best for: Creating graphs and charts for free. If you’re just getting started with data visualization, the free version of Visualizer could be a great place to begin.

4. wpDataTables

The wpDataTables data visualization plugin

The wpDataTables plugin might sound a bit complicated from its name, but it’s actually just as easy to use as Excel.

It lets you add data and easily create charts and graphs that look great on both websites and mobile devices.

You can provide your data by uploading a file or simply by typing it in. You can even create tables that your user can edit. This will change the charts for them in real time.

You can create filters for your data so that it’s easy to show only results that are from particular dates, locations, and so on.

There’s lots of documentation and a “wizard” that takes you step by step through the process of creating a table of data.

There’s a lite version of the plugin available if you don’t want to pay for the premium version. Note that this has some limitations. For instance, your users can’t edit tables if you’re using the lite version.

Best for: Complex data, or tables and graphs where you want your users to be able to input values.

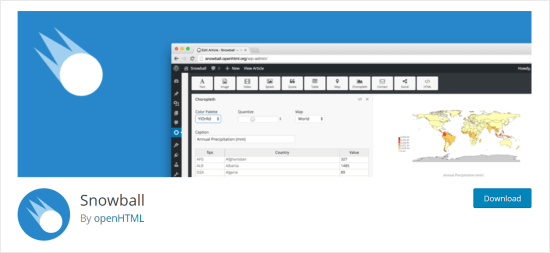
5. Snowball

The Snowball journalism and data visualization plugin

Snowball isn’t just a data visualization plugin. It’s a block post/page creation plugin that’s designed for journalists to create immersive articles.

One key feature of Snowball is the ability to make charts and graphs. You can use it to create bar charts and scatterplots as well as tables of data and maps.

You can use the graphical interface to make some changes to how your blocks of content look. If you want, you can go further and edit the CSS and HTML code.

Snowball is completely free and it’s maintained by the openHTML research team at Drexel University.

It should work with your existing theme. However, Snowball’s creators recommend enabling its built-in single column theme for your Snowball articles.

Best for: Including data visualization in long-form content, particularly if you want to also include maps or videos.

6. Easy Charts

Easy Charts data visualization plugin

Easy Charts is a free plugin that you can use to create a whole range of different charts. These include several types of bar chart and area chart, plus line charts, pie charts, donut charts, polar area charts, and waterfall charts.

Once you’ve put in your data, you can use it to create any type of chart. It’s easy to switch between the different charts and to preview how they’re going to look on your site.

Because it’s a free plugin, it doesn’t offer some of the advanced functionality you get with other plugins. For instance, you can’t create responsive tables of data that users can edit.

Best for: Creating a range of straightforward, free charts or graphs to display data on your website.

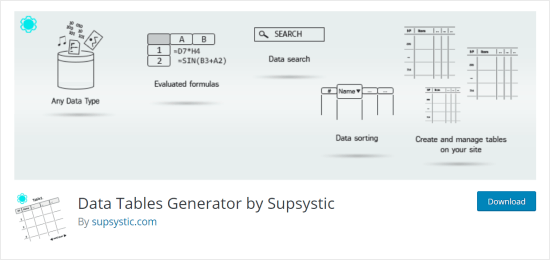
7. Data Tables Generator

Data Tables Generator plugin for WordPress

The Data Tables Generator plugin, from WordPress plugin creator Supsystic, lets you create responsive tables.

You’ll need the Pro version in order to create charts and graphs. These are provided through Google Chart’s technology. You can create all the standard types of chart that you’d expect, like bar charts, pie charts, donut charts, and more.

You can also use data that you’ve got in a spreadsheet elsewhere. The plugin supports importing from CSV, Excel, PDF, and Google Sheets.

One particularly handy feature is that Data Table Generator integrates with WooCommerce. You can use it to create product tables that users can easily search.

Best for: Creating tables of products in your WooCommerce store. These can be filtered and sorted by the user.

Bonus: Canva Infographics Maker Pro

Canva Pro

Canva is a powerful design tool that lets you make beautiful infographics, blog visuals, and other graphics with a completely drag & drop interface. Although it’s not a WordPress plugin, it’s a tool that many bloggers use to create compelling visual content.

They also have pre-made templates for social media graphics for all platforms, posters, banners, flyers, powerpoint presentations, and so much more.

It’s basically a top web design software for non-designers because how easy it is to create something beautiful.

We hope this article helped you learn more about the best data visualization WordPress plugins. You may also want to check out our list of the must have WordPress plugins for all websites, and our comparison of the best WordPress page builder plugins.

If you liked this article, then please subscribe to our YouTube Channel for WordPress video tutorials. You can also find us on Twitter and Facebook.

The post 7 Best Data Visualization WordPress Plugins (Charts & Infographics) appeared first on WPBeginner.


April 03, 2020 at 06:04PM

Thursday, April 2, 2020

How to Run a Virtual Classroom Online with WordPress (Tools)

Do you want to run a virtual class online? Creating an online virtual classroom may sound too technical or expensive. Or maybe you just can’t imagine it working at all.

But you’d be surprised to hear how many types of classes could go virtual. You can run a yoga class, tutor maths, show people how to cook, or almost anything else you can think of.

Luckily, there are easy tools that allow you to run a virtual classroom online without any special technical skills. In this article, we’ll be showing you how to setup a virtual classroom and teach an online class with WordPress.

Running a virtual class with WordPress for free

Can I Create a Virtual Classroom for My Business?

Almost anything can be taught online. Just type your class’s topic into YouTube’s search bar, and you’ll likely find hundreds or thousands of videos of people teaching that skill.

One great advantage of virtual classes is that you don’t have to teach them live. You can record videos in advance if you want. That way, it doesn’t matter if it takes you several attempts to explain or show something.

In the past few weeks, we’ve seen loads of formerly in-person classes go virtual. From a one-off virtual writing retreat to a Saturday morning kids’ soccer class, instructors have been getting online.

Taking your class online could be the best thing you’ve ever done for your business. It’ll let you reach people all around the world, and you won’t be limited by how many people can fit in your classroom or fitness studio.

This isn’t just for large classes, either. You might offer a one-to-one service, like math tutoring or career counseling. Much of what we cover will work for you, too.

You can create an online classroom without a lot of tech skills or expensive tools. Here’s what you’ll need.

What You’ll Need to Run Your Class Online (Virtual Classroom)

So where do you even begin to set up a virtual class? There are a few key things you need to get into place.

To run a class online, you’ll need these 3 things:

  • A website or online platform for your class. This is a place where students can find and access the class content.
  • A way for students to sign up for your class.
  • A way to frequently communicate with your students by email.

You’ll also likely want some of these 4 things:

  • A way for students to talk and interact with each other, such as an online group or forum.
  • Members-only recorded content (such as video or audio seminars) that students can work through at their own pace.
  • Live video content with features like interactive polls, audience feedback, screen sharing, and audience questions.
  • An LMS or membership site plugin for managing repeat payments, creating members-only content, and creating different levels of your class.

Don’t worry if that sounds like a lot. We’ll help you decide the right tools and platforms for your virtual classroom. Here’s a quick outline that you can click to jump straight to a particular section in this article.

Transparency Disclaimer: WPBeginner content is reader-supported, which means if you click on some of the links in this post, we may earn a small referral fee. Please know that we only recommend products that we use ourselves and/or believe will add value to our readers. See how WPBeginner is funded for more details.

Creating an Online Platform for Your Class

It’s possible to run an online class through a private Facebook group or an email list where you link to videos you’ve posted on YouTube.

However, these aren’t great options. Not everyone uses Facebook, for instance. Also, Facebook or YouTube could decide to ban you without any fault of your own.

An alternative is to sign up for a site like Teachable. This is a popular option, but it’s definitely not free. The most basic Teachable package costs $29/month, and you’ll pay a 5% transaction fee for each student on top of that.

Instead of third-party platforms, we recommend that you create a website for your class. There are lots of ways you can do this, but the #1 website builder in the world is WordPress. Over 35% of the websites on the internet is powered by WordPress.

The best part about WordPress software is that it’s completely free. However, you’ll need a domain name and web hosting to build a website. This is required for making any type of website.

Bluehost, one of WordPress’s recommended hosting providers, is offering our readers a great deal. You can get a free domain name and web hosting for just $2.75/month for your first year. That’s over 60% off.

→ Click Here to Get This Exclusive Bluehost Deal ←

Note: If you are looking for a Bluehost alterantive, then you can also try SiteGround, another popular WordPress hosting company that’s offering a great discount for small business owners.

Once you have signed up, you will need to install WordPress. Bluehost does it automatically for you, and other hosting companies make it super easy with just a few clicks.

After you have installed WordPress, you will need to install few WordPress plugins to get your online classroom ready. Plugins are like apps for your WordPress site that lets you add essential features like contact forms, membership restrictions, etc.

We’re going to take a look at some important plugins to help you run your online class.

Getting Students to Sign Up for Your Class

You’ll need a way for students to register for your class. Even if you’re not charging for the class, you’ll want to know how many people are planning to attend. You may also want to get some information from them beforehand.

We recommend using the WPForms plugin for WordPress. It lets you create registration forms simply and easily. The lite version of WPForms is totally free, but you may want to pay for the Pro version of WPForms, so you can integrate payments with your form.

Once you’ve installed and activated either version of the WPForms plugin, you can follow WPForms’ instructions to create an event registration form.

You can modify the event registration form template as much as you want. Here’s how a very simple registration form for a free class could look:
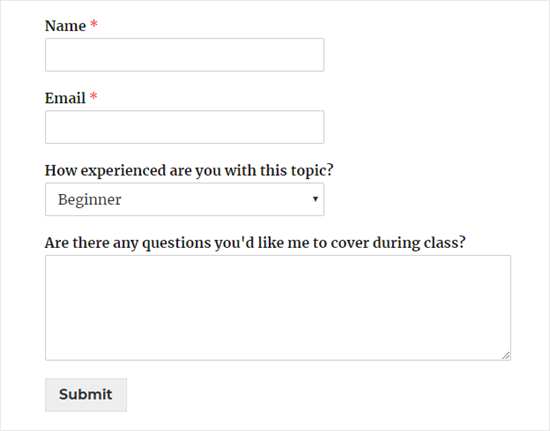
A simple registration form for an online class, showing name, email, a dropdown asking for level of experience, and a comment box

Communicating With Your Students in a Virtual Classroom

Whatever type of online class you’re running, you’ll need a way to communicate with your students.

Even if you’re just running a one-off class, you’ll still want to be able to remind students that it’s happening. You’ll also want a way to follow up, so you can let them know if you create another class.

There are lots of possible ways you could communicate with your students. You could send them messages on Facebook or WhatsApp, for instance. However, we strongly recommend using email.

Why? Because virtually everyone has email. Also, most people are used to giving out their email address when signing up for things online. Asking them for their mobile number or Facebook details will put many students off from registering.

It’s important to use a reputable email marketing service to communicate with your students. That way, you can be confident that your messages will get through to them. Also, you won’t fall foul of any anti-spam laws.

We recommend using Constant Contact. They offer a free trial and excellent support.

If you’re creating a membership site, we recommend using either ConvertKit or Drip for your email service. These tools have advanced marketing automation features that you will likely find helpful.

If you’re on a very tight budget and need a free email marketing service, that’s possible too. We recommend looking at SendinBlue or MailerLite.

All of these options are good, reliable solutions for sending bulk personalized emails to your students.

If you’re using WPForms to take class sign-ups, you can even integrate your form with your email marketing service. This means that students will be automatically added to your chosen email list when they sign up.

WPForms Lite works with Constant Contact, and if you pay for WPForms Pro, then you can choose from many other email marketing integrations as well.
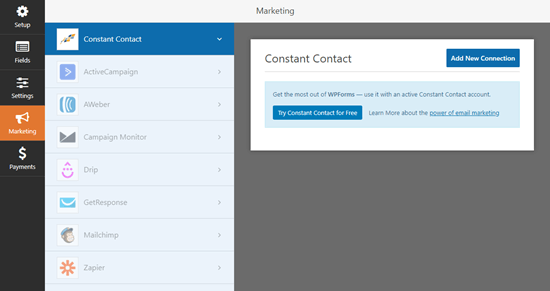
Integrating WPForms with an email marketing service

Student Collaboration and Group Interactions in Virtual Classroom

Do you want your students to be able to interact with one another? If so, you’ll need to provide a straightforward and accessible way for them to do so.

There are lots of possible options here. If most or all of your students are on Facebook, then a private Facebook group could be a good option. Alternatively, you might want to create a forum on your website. We recommend using the bbPress plugin for this.

Another option is to create a private Slack channel for your students.

If you’d like students to be able to interact with one another live, you’ll want to look at how you deliver your classes. Zoom, which we’ll cover in a moment, is a great tool for interactive live video classes.

Important: If you’re running a class aimed at children, it’s definitely not a good idea to allow them to contact one another. This could create serious legal issues. You could, however, provide a space where parents of your students can interact.

Offering Pre-Recorded Content for Online Classrooms

One way to run an online class is to record content ahead of time and add it to your site. This is a good option if you’re feeling nervous or unsure about the technology involved.

You’ll need a webcam if you’re recording a video of yourself. You’ll also need a microphone. You can find our microphone recommendations in our article about how to start a podcast.

If you’re on a really tight budget, you could use your computer’s built-in microphone and webcam. However, higher quality equipment will definitely help you produce a more professional class recording.

You may also want to record your screen, perhaps to show PowerPoint slides. You can do this using specialist screen recorder software, or you could run a Zoom call and record it. We’ll cover more on Zoom in a moment.

Pre-recorded content is a great option for a class that you want to run over and over again. You can create it once and sell it an unlimited number of times. Students can easily take the course at their own pace.

When you put your content on your website, it’s very important not to host your videos yourself. If hundreds of students want to watch it at once, then this might slow down or even crash your website.

Instead, you should use one of our recommended free video hosting sites. That way, you can simply embed the video on your site, so students can watch it there without taking up your site’s valuable resources.

If you want to password protect your content or restrict it to members only, then we recommend creating a membership site. This also lets you charge different amounts for different levels of access.

Offering Live Content in Online Classrooms

You may want to teach your class live. This could work really well for a class that you used to teach in-person and are now taking online.

For live classes, we strongly recommend Zoom. It’s a tool that lets you host video calls with as many people as you want. The free plan gives you access to loads of features, with the one key restriction that your calls can’t be longer than 40 minutes.

You can schedule meetings in advance and send out an invite to your students. They can click a special link to sign in on their computer, or they can use the Zoom app on their phone.
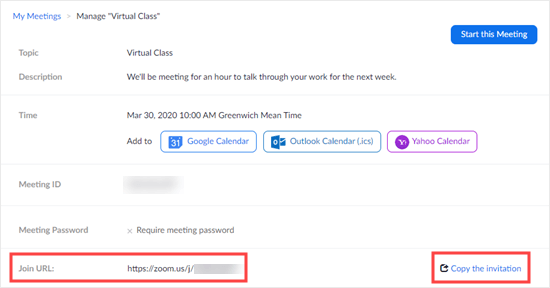
The special URL that allows students to join your class meeting

Zoom has lots of useful options. For instance, you can use it to share your screen with students. This means you can show PowerPoint slides or demonstrate an online process.

You can even use Zoom to present using an iPad, and then you can combine with the Notability app to create visual notes as you go along.

Zoom lets you see your students, too. They can dial in with their cameras on, if you want. They can also talk to you live, though you can mute them!

We recommend that you mute everyone by default while you’re teaching your class. You can let students ask questions at the end.

There’s also a text chat feature in Zoom, which students can use to interact with one another while you’re teaching. You can even poll your students to find out what key topics they most want you to cover.

You can also record Zoom calls. This means you can run a live class plus recordings that you offer for students who can’t attend live.

The paid version of Zoom lets you run webinars, too. You can integrate your WPForms registration form and Zoom using Zapier. This lets you automatically sign people up for the webinar when they register for your class.
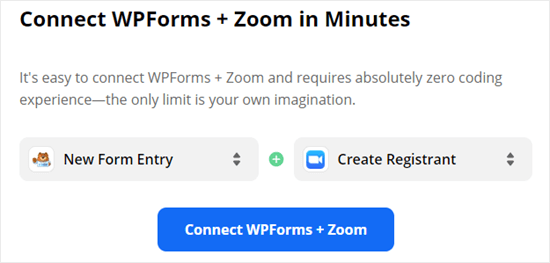
Using Zapier to connect WPForms and Zoom

Using an LMS or Membership Site Plugin

Do you want to turn your website into a virtual classroom? Or perhaps you want to lock content to make sure that only paid-up members can access it?

You’ll need to pay for this functionality, but it could well be worth it if you’re running a series of classes. Using your site as a learning platform works well for classes that last more than a few weeks.

For instance, you might be running a 12 week class. Students need an easy way to refer back to the earlier weeks’ material, and that will be tricky if you simply send out all the content by email.

With an LMS (Learning Management System) solution, you can even offer quizzes and grade students’ performance. You’ll need an LMS plugin for WordPress.

Our top recommendation here is LearnDash. It lets you create as many different courses as you like, with lessons, topics, quizzes, and categories. You can schedule lessons to be released over time, if you want.

With LearnDash, you can also offer quizzes and tests for your students. You can even set assignments that you can approve and comment on. It also lets you create course-specific forums where your students can interact.

For more details, see our guide on how to create an online course with WordPress.

What if you don’t want a whole learning environment, but instead you want to lock content on your site? You can do that with a membership site plugin.

We recommend using MemberPress as your membership site plugin. It’s easy to set up and has powerful access controls. You can restrict access not only to posts and pages but also to specific categories, tags, files, and more.

The MemberPress deal's front page

You can use MemberPress to “drip” content to your students. This means they only get access to certain content after they’ve been a member for a specified period of time. You can even integrate it with LearnDash if you want.

For more details, see our ultimate guide on how to create a membership site.

Final Thoughts and Best Practices

We know there’s a lot to consider when setting up a virtual class. You can set up a simple class for free on your WordPress site. You’ll only need to pay for your website domain name and web hosting, which doesn’t need to cost much.

Make sure you use a reputable email marketing service to contact your students. We recommend Constant Contact, which has a free trial. If you want a fully free solution, try SendinBlue or MailerLite. You can even use email as a simple way to deliver class content.

If you want to teach on live video or through screen sharing, then Zoom is a great option. The free level offers a really generous set of features.

To run an ongoing class through your website, you’ll want an LMS or membership site plugin. We recommend LearnDash as the best LMS plugin, and MemberPress as the best membership site plugin.

We hope this article helped you learn how to run a virtual classroom with WordPress. You may also want to see our guide on the must have WordPress plugins for all websites.

If you liked this article, then please subscribe to our YouTube Channel for WordPress video tutorials. You can also find us on Twitter and Facebook.

The post How to Run a Virtual Classroom Online with WordPress (Tools) appeared first on WPBeginner.


April 02, 2020 at 03:00PM