Friday, June 19, 2020

6 Best WooCommerce Payment Gateways for WordPress

Are you looking for the best WooCommerce payment gateways for your online store?

Choosing the right WooCommerce gateway for payments is a very important decision. It will have long term effects on the success and sustainability of your online business.

In this article, we will compare the top WooCommerce payment gateways for WordPress, so you can choose the right option for your business.

Comparing the best WooCommerce payment gateways

How to Choose The Best WooCommerce Payment Gateway

If you have just started your WooCommerce store, then you will be faced with the decision to select and set up a payment gateway.

Payment gateways are third-party service providers that enable you to accept online payments on your eCommerce store.

However, not all of them have the same polices, processing rates, and features. Choosing an unsuitable payment gateway will increase your costs and hurt your business long-term.

Following are a few important aspects you should consider when choosing your WooCommerce payment gateway.

1. Transacion Fees

Most WooCommerce payment gateways charge a fee for each transaction that takes place on your store. This fee can be vary based on your business location, customers’ card type, the payment gateway you choose, etc..

You can try to remedy this by passing the burden to your customers. However, this also means you will have to increase product prices, and your customers may find the same products elsewhere at lower costs.

Alternatively, you can compare transaction fees with other providers and try to find the right balance between transaction fees and other features.

2. Other Charges

Apart from the transaction fees, some WooCommerce payment service providers may also charge you additional fees. This could be set up fees, account maintenance fees, or charges for bank withdrawals.

These charges can be a nuisance particularly for businesses that are just starting out.

3. Recurring Payments

Many businesses sell subscription-based products, like membership plans, or an online course. In that case, you may also want to look for recurring payments feature.

Some payment gateways require customers to manually complete each transaction and don’t support recurring payments. Make sure you check for this option if your business requires automatic renewals.

4. Availability in Your Target Region

Next, you need to make sure that the payment service you choose is available in your country and in your customers’ country.

For instance, if most of your customers are based in Europe, then you may want to look for a payment service that is widely available and popular in that region.

You’ll find this information on each payment gateway’s website under ‘Supported Countries’. If you cannot find this information, then email them to be certain.

These are just the most important items to look for. You may also want to see other features that your business may need. For instance, easy refunds, extra security, verification, and regulatory compliance based on your region.

That being said, now let’s take a look at some of the best WooCommerce payment gateways for WordPress, and see how they stack up on these requirements.

Top WooCommerce Payment Gateways for WordPress

WooCommerce supports a ton of payment gateways through extensions. These extensions are WooCommerce plugins that integrate those payment services into your WooCommerce checkout process.

The following are the most popular WooCommerce payment gateways trusted by thousands of businesses around the world.

1. Stripe

Stripe

Stripe is the most popular payment gateway to accept credit card payments on your website. WooCommerce comes with built-in support to select Stripe as your payment gateway.

It supports all top credit and debit cards. Your customers can also pay using Apple Pay, Google Pay, and Alipay.

Stripe is available in 40+ countries and supports 135+ currencies. There are no setup or annual fees for Stripe, but they do charge 2.9% + 30¢ per transaction.

It also offers a better checkout experience. Your customers stay on your website during checkout, and it works smoothly on mobile as well as desktop.

Stripe supports recurring payments and can be used with any subscription or WordPress membership plugin.

Note: If you’re just looking to create a simple payment form for donations or online orders without the headache of managing a full eCommerce system, then look at WPForms which offers Stripe forms for WordPress.

2. PayPal Standard

PayPal

PayPal is one of the most popular payment services available for eCommerce stores. WooCommerce comes with built-in support for using PayPal on your online store.

As one of the pioneers in the payment industry, PayPal offers a variety of services suitable for personal, business, and eCommerce.

It is available in dozens of countries, but there are different restrictions on some countries. Make sure that it is supported in your country as well as your target customers.

The Standard PayPal extension for WooCommerce requires a PayPal business account. It does not offer an on-site checkout experience which means your customers will be redirected to PayPal website to complete the purchase.

PayPal charges are based on your account type, and the number/volume of sales you make. This makes a significant impact on your business, and you would want to review them beforehand.

Note: If all you need is a PayPal payment form for your business, then check out WPForms. It allows you to easily accept payments and donations via PayPal.

3. WooCommerce PayPal Pro

PayPal Pro

PayPal Pro for WooCommerce is a paid extension developed by the folks behind WooCommerce. It enables you to use PayPal with a better checkout experience allowing customers to complete the purchase without leaving your website.

It is available in UK, US, and Canada, but you’ll need a PayPal merchant account to use it. If your business is based in Australia, then you can use it with a PayPal Pro Payflow account.

It does not support recurring payments, which means it will not work for a membership website selling subscription-based products.

PayPal pro requires a monthly payment and transaction fees vary depending on the country. This makes it more expensive for a new business.

4. Square

Square

Square is another excellent payment gateway for WooCommerce stores. Particularly, for stores with physical locations, delivery, and other selling options.

Square is available in the U.S., Canada, Australia, Japan, and the UK. The transaction fee varies for each country, but it offers a fixed transaction rate.

The WooCommerce Square Extension syncs product between your website and your Square account. You can also add products to your Square account, and they will be added to your WooCommerce store.

Additionally, it supports recurring payments when used alongside the WooCommerce Subscriptions extension.

5. Authorize.Net

Authorize.Net

Authorize.Net is a popular payment gateway used by thousands of businesses. It is available for merchants located in United States, Canada, United Kingdom, Europe or Australia,

Authorize.Net for WooCommerce extension provides a seamless checkout process to your customers using credit cards. Customers don’t leave your website while transaction is securely processed in the background on Authorize.Net servers.

The extension also supports recurring payments for WooCommerce Subscriptions. It is user friendly and allows users to save their payment method and reuse it.

Note: You can create an Authorize.Net payment form with WPForms. This is perfect for websites that don’t need a full-fledged eCommerce platform.

6. WooCommerce Payments

WooCommerce Payments

WooCommerce Payments is a payment solution provided by the folks behind WooCommerce. It offers a better checkout experience and a deeply integrated payment gateway for your store.

Currently, WooCommerce Payments is only available to US-based merchants selling products in US Dollars.

It offers a pay as you go fee structure set at 2.9% + $0.30 per transaction for U.S.-issued cards. Additional 1% fee for cards issued outside the United States. This makes it slightly expensive than other solutions.

This solution is simply a white-label version of Stripe.

You’ll also need a WordPress.com account and install the JetPack plugin on your store.

Which is The Best WooCommerce Payment Gateway?

The best WooCommerce payment gateway is the one that provides you the best transaction fees, is available in your target region, and offers a better user experience for your customers.

Considering these factors, we would recommend Stripe as the best payment gateway for WooCommerce. It provides good checkout experience, competitive transaction, and is available in 40 countries.

Both PayPal Standard and Authorize.Net offer similar features. However, PayPal Standard does not provide a better checkout experience which may result in more abandoned cart sales.

Typically store owners offer multiple payment options to their users. For example, on our WooCommerce store for All in One SEO, we accept credit cards with Stripe and PayPal.

In our experience, this has proven to increase online store conversions. You can also add live chat software and an email marketing service to further boost your sales conversion.

We hope this article helped you find the best WooCcommerce payment gateway for your business. You may also want to see our comparison of the best business phone services for small businesses and online store owners.

If you liked this article, then please subscribe to our YouTube Channel for WordPress video tutorials. You can also find us on Twitter and Facebook.

The post 6 Best WooCommerce Payment Gateways for WordPress appeared first on WPBeginner.


June 19, 2020 at 05:12PM

Thursday, June 18, 2020

How to Add Facebook Open Graph Meta Data in WordPress Themes

Do you want to add Facebook Open Graph meta data to your WordPress themes?

Open Graph metadata helps Facebook and other social media websites get meta data about your posts pages. It also allows you to control how your content appears when shared on Facebook.

In this article, we will show you how to easily add Facebook open graph metadata in WordPress themes. We’ll share three different methods, so you can choose one that works best for you.

Add Facebook open graph meta data in any WordPress theme

Method 1. Adding Facebook Open Graph Meta Data with All in One SEO

All in One SEO is a popular WordPress SEO plugin used by over 2 million websites. It allows you to easily optimize your website for search engines as well as social platforms like Facebook and Twitter.

First, you need to install and activate the All in One SEO plugin. For more details, see our step by step guide on how to install a WordPress plugin.

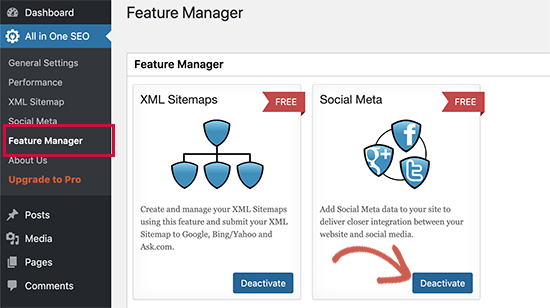
Upon activation, you need to visit All in One SEO » Feature Manager page. From here you need to activate the ‘Social Meta’ feature.

Enable Social Meta feature in All in One SEO

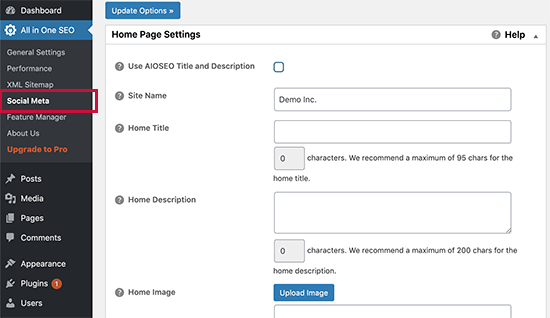
Next, you need to visit All in One SEO » Social Meta page. From here, you can simply fill in the fields to enter your Facebook meta data.

Social meta page allows you to enter Facebook Open Graph meta data

You can start by providing title, image, and description for your homepage.

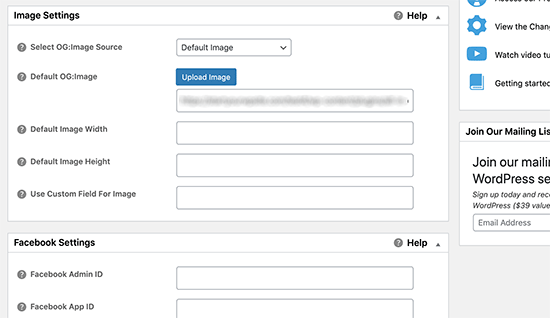
Below that you can set a default image to be used if an article doesn’t have an open graph image. You can also provide the width and height of the image.

Set default Open Graph image

Need help choosing image sizes? See our complete social media cheat sheet for ideal image sizes that you can use on all social media platforms including Facebook.

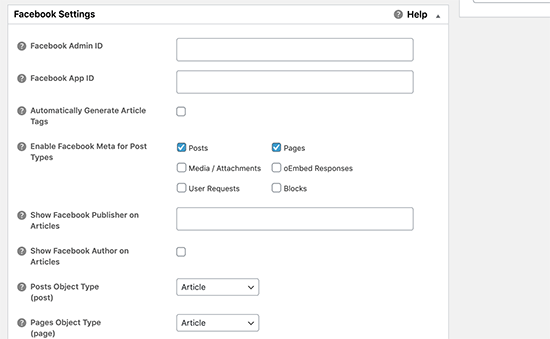
If your website is using a Facebook App or has a Facebook page, then you can provide your Facebook app ID in the next section. This allows you to get data for Facebook insights.

Facebook app settings

Optionally, you can also adjust settings for Twitter and run a scan to avoid duplicate Open Graph tags on your site.

Once you are done, don’t forget to click on the ‘Update Options’ button to store your changes.

Now that you have set site-wide open graph meta tags, the next step is to add open graph meta data for individual posts and pages.

By default, All in One SEO will use your post title and description for open graph title and description. You can also manually set the Facebook thumbnail for each page and post.

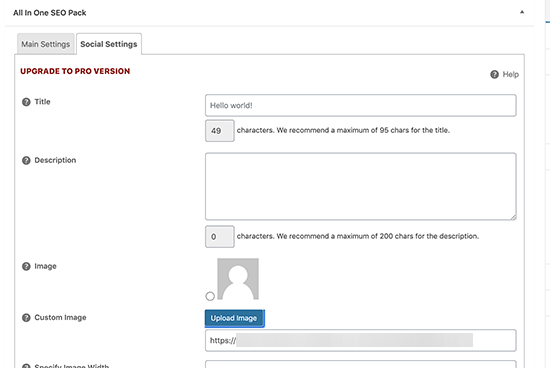
Simply edit the post or page and scroll down to the All in One SEO section below the editor. From here, switch to the Social tab and fill out open graph meta data. You can set the social media image here as well as title and description.

Open graph settings for posts and pages

Method 2. Set Facebook Open Graph Meta Data using Yoast SEO

Yoast SEO is another excellent WordPress SEO plugin that you can use to add Facebook open graph meta data into any WordPress site.

First thing you need to do is install and activate, the Yoast SEO plugin. For more details, see our step by step guide on how to install a WordPress plugin.

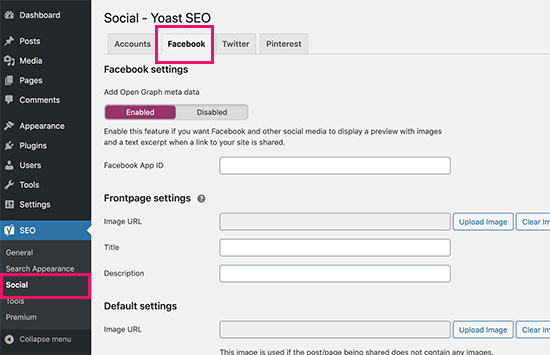
Once activated, you need to go to SEO » Social and simply check the box next to Add Open Graph meta data.

Enable Facebook Open Graph

You can save your settings or continue and configure other Facebook social options on the screen.

You can provide a Facebook app ID if you use one for your Facebook page and insights. You can also change your homepage Open Graph meta title, description, and image.

Lastly, you can set a default image to be used when no image is set for a post or page.

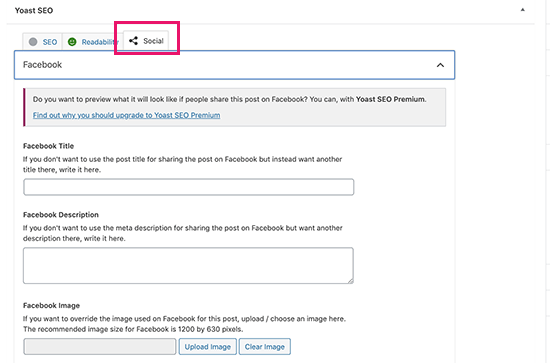
Yoast SEO also allows you to set Open Graph metadata for individual posts and pages. Simply edit a post or page and scroll down to the SEO section below the editor.

Set open graph meta data for post and pages

From here, you can set Facebook thumbnail for that particular post or page. If you don’t set a post title or description, then the plugin will use your SEO meta title and description.

You can now save your post or page and the plugin will store your Facebook open graph meta data.

Method 3. Manually Add Facebook Open Graph Meta Data into Your WordPress Theme

This method requires you to edit your theme files, so make sure that you back up your theme files before making any changes.

After that simply copy and paste this code in your theme’s functions.php file, or in a site-specific plugin.

//Adding the Open Graph in the Language Attributes
function add_opengraph_doctype( $output ) {
                return $output . ' xmlns:og="http://opengraphprotocol.org/schema/" xmlns:fb="http://www.facebook.com/2008/fbml"';
        }
add_filter('language_attributes', 'add_opengraph_doctype');

//Lets add Open Graph Meta Info

function insert_fb_in_head() {
        global $post;
        if ( !is_singular()) //if it is not a post or a page
                return;
        echo '<meta property="fb:app_id" content="Your Facebook App ID" />';
        echo '<meta property="og:title" content="' . get_the_title() . '"/>';
        echo '<meta property="og:type" content="article"/>';
        echo '<meta property="og:url" content="' . get_permalink() . '"/>';
        echo '<meta property="og:site_name" content="Your Site NAME Goes HERE"/>';
        if(!has_post_thumbnail( $post->ID )) { //the post does not have featured image, use a default image
                $default_image="http://example.com/image.jpg"; //replace this with a default image on your server or an image in your media library
                echo '<meta property="og:image" content="' . $default_image . '"/>';
        }
        else{
                $thumbnail_src = wp_get_attachment_image_src( get_post_thumbnail_id( $post->ID ), 'medium' );
                echo '<meta property="og:image" content="' . esc_attr( $thumbnail_src[0] ) . '"/>';
        }
        echo "
";
}
add_action( 'wp_head', 'insert_fb_in_head', 5 );

Note: Remember to change the Site Name where it says “Your Site Name Goes Here”. After that, change the default image URL with the image of yours. You also need to add your own Facebook app ID, If you don’t have a Facebook app, then you can remove the Facebook app ID line from the code.

We would recommend putting an image with your logo there, so if your post does not have a thumbnail, then it pulls your site’s logo.

That’s all you need to do. As soon as you save your functions.php file (or site-specific plugin) it will start showing Facebook open graph metadata in the WordPress header.

We hope this article helped you add Facebook open graph meta data in WordPress. You may also want to see our pick of the best social media plugins for WordPress to grow your social following, and our troubleshooting guide on how to fix the Facebook incorrect thumbnail issue in WordPress.

If you liked this article, then please subscribe to our YouTube Channel for more WordPress video tutorials. You can also find us on Twitter and Facebook.

The post How to Add Facebook Open Graph Meta Data in WordPress Themes appeared first on WPBeginner.


June 18, 2020 at 05:54PM

Wednesday, June 17, 2020

7 Best WordPress Download Manager Plugins Compared (2020)

Do you want to manage and control file downloads in WordPress? Perhaps you’d like to keep track of how many times a file is downloaded.

Or maybe you need to protect content so only registered users or customers can access it.

In this article, we’ll compare some of the best WordPress download manager plugins to track and manage your file downloads.

The best download manager plugins for WordPress

What to Look For in a WordPress Download Manager Plugin

There are several different reasons why you might want to use a WordPress download manager plugin. You may need to do some or all of the following:

  • Lock a file so only registered users with a specific role can access it
  • Lock a file so only paying customers can access it
  • Offer a limited number of copies of a digital file
  • Reorganize and tag files in WordPress
  • Prevent bots or spammers from repeatedly downloading your files
  • Track how many times a specific file is downloaded
  • Track how many times a type or group of files is downloaded
  • Provide downloadable files as part of a larger product, like an online course

It’s hard to find a single plugin that can do all the above, but depending on the use case, you may not need all these features.

In our comparison, we’ve picked the best WordPress download manager plugins to cover all the various scenarios and use-cases.

1. MemberPress

The MemberPress website

MemberPress is the best WordPress membership plugin on the market. It lets you easily sell digital downloads. You can also use it to sell subscriptions, lock content on your site so that only members can access it, and much more.

The MemberPress Downloads addon gives you advanced download management capabilities. It lets you upload multiple files, tag or categorize them, and list them using a shortcode.

You can use MemberPress to protect files as well as posts and pages. You can lock files, so that only users with the right level of access can view them.

One great feature is that you can protect files by category and tag, too. You can set up a rule to protect all files that you’ve assigned to a specific category or tag. This makes it easy to restrict files based on user’s subscription level.

You can also list your files by their category and tag, using MemberPress’ shortcodes system. If you’re offering a lot of different downloads, then this makes it really easy to organize them for your users.

MemberPress gives you plenty of flexibility, too. It lets you go way beyond just selling downloads to create a full membership site. It even integrates with email marketing services like Constant Contact, ConvertKit, and AWeber.

For detailed instructions, see our guide on how to easily create a WordPress membership website.

2. LearnDash

LearnDash - Best WordPress LMS Plugin

LearnDash is a very popular LMS (learning management system) plugin for WordPress. It’s easy to use and comes with many powerful features.

LearnDash lets you charge a one-time fee for your product or set up a recurring subscription. You can easily insert video and audio files into your course, making it a great way to sell these types of files.

Aside from using LearnDash to lock the content on your site, you can use it to accept payments, create online courses, make assignments and quizzes, and more. There are also dynamic forums built into LearnDash where your users can interact with one another.

LearnDash works well on its own for taking payments and offering protected content. You can also integrate it with several of the other tools on this list, including MemberPress, WordPress Download Manager, and WooCommerce.

3. MonsterInsights

MonsterInsights

MonsterInsights, the best Google Analytics plugin for WordPress. It’s the best option if you want to track which files on your site are being downloaded the most. This is crucial if you offer a lot of free downloads and need to know which ones are proving popular with your users.

You can choose which types of files to track, such as images, zip files, PDFs, and so on.

You can also label your different files so MonsterInsights can show which categories are being downloaded the most. For instance, you could track “Free Reports” separately from “Printable Worksheets” in MonsterInsights.

You can see the file downloads report in your WordPress dashboard along with MonsterInsight’s other user analytics report.

For detailed instructions, see our tutorial on how to use MonsterInsighs to track file downloads.

MonsterInsights seamlessly integrate with all the plugins mentioned in this list, and we recommend installing it alongside any file download manager plugin that you use. The free version of MonsterInsights also comes with file tracking, but you can upgrade to the Pro version to unlock other powerful features.

Alternatively, you can use MonsterInsights by itself too. Simply upload your files in the WordPress media library, embed the link to the files anywhere in your posts, pages, menus, etc. After that MonsterInsights will start tracking the download stats for you.

4. WooCommerce

WooCommerce

WooCommerce is a popular eCommerce plugin for WordPress. You can use it to sell both physical and digital products.

If you want to sell digital downloads, you can simply designate your download as a product in WooCommerce, so the customer only receives access after paying for it.

You can also use WooCommerce plugins to add more features to your online store. For instance, you can use smart coupons features to run sales and promotions more easily.

WooCommerce offers several different download methods and types of protection for your files. You can choose which suits your situation best. Just like regular WooCommerce products, your downloads can have variations, too.

You can also use WooCommerce to create a product that has both a downloadable and a physical component. For instance, you might provide an online video course that comes with a physical workbook.

For more details, see our complete WooCommerce guide for beginners.

5. Easy Digital Downloads

Easy Digital Downloads

As the name suggests, Easy Digital Downloads makes it easy for you sell digital products on your website. You can also use it to provide and track free downloads.

Your files will be automatically protected by Easy Digital Downloads plugin. You can track the date, time, and IP address of all purchases and free downloads.

You can restrict how many times a customer can download their files. You can also set the download link to expire after a certain period of time. These are both good ways to prevent customers from sharing their files with others.

You can integrate Easy Digital Downloads with lots of other services, including email marketing services like ConvertKit and AWeber. You can even integrate it with AffiliateWP to create a referral program.

Easy Digital Downloads has a built-in shopping cart system that lets customers buy several digital products at once. You can easily create a customer account page where logged-in customers can see a list of everything they’ve purchased.

6. File Manager

File Manager - downloads manager plugin for WordPress

File Manager is a really useful FTP like file manager. You can use it to edit files through your WordPress dashboard, rather than using FTP to move them between locations.

We always recommend using an FTP client or your WordPress hosting file manager where possible. However, there may be times when you want to quickly manage files through your WordPress dashboard.

File Manager lets you put your files into the WordPress media library, too. It creates thumbnails for all types of image files. It also has search functionality, making it easy to find your files.

With the Pro Edition of File Manager, you can also create private folders. You can set these so specific user roles or even specific users have access.

You can also use the Pro Edition to control what types of files can be uploaded and downloaded. You can even set up email notifications so that you get an email whenever a file is downloaded.

7. WordPress Download Manager

WordPress Download Manager plugin

WordPress Download Manager is a great simple option. You can use it to manage free and paid file downloads.

You can set a password per file, or you can specify user roles that can have access to your files.

If you’re looking for a WordPress download manager to stop bots or spammers, then you can set a Captcha Lock or IP Block feature. You can also control downloads by putting a download limit on each user. This can help improve WordPress speed and performance.

You’ll also get download logs, so you can see the date, time, and location of the user that’s downloading your files.

When a user downloads a free file, they won’t need to go through the whole checkout process. With PDF and image files, WordPress Download Manager will give the user the option to open the file in their browser or download it.

You can easily give files a price by using the free “Premium Package – Complete Digital Store Solution” addon.

There are also a number of paid addons for WordPress Download Manager. These include BuddyPress integration, a User Review addon, a Download Limit addon, and more.

Final Thoughts: Best Download Manager Plugin for WordPress

Choosing the right download manager plugin can be tricky. All of the plugins on this list are great options, depending on how you want to manage your downloads.

If you’re going to sell downloads and want to restrict access to members, then MemberPress is best download manager plugin for you. It’s comes with all the powerful features like protecting files by categories and tag, email marketing integrations, payment gateways, etc.

If you simply want to track downloads, then MonsterInsights is the best plugin for you. It’ll provide you with all the stats you need. Simply upload the files in your WordPress file manager, embed it in a post, and MonsterInsights will show you the download stats.

We hope this article helped you learn about the best download manager plugins for WordPress. We also recommend going through our experts’ list of must have plugins for business websites.

If you liked this article, then please subscribe to our YouTube Channel for WordPress video tutorials. You can also find us on Twitter and Facebook.

The post 7 Best WordPress Download Manager Plugins Compared (2020) appeared first on WPBeginner.


June 17, 2020 at 05:30PM
Tuesday, June 16, 2020

How to Organize Media Uploads by Users in WordPress

Have you ever wanted to keep media files uploaded by users separate from other users?

When running a multi-author website, you might want your authors to only have access to the media files they’ve uploaded. This can be helpful for organization and productivity purposes.

In this article, we’ll show you how to organize media uploads by users in WordPress.

How to organize media uploads by users in WordPress

Why Restrict Author Access to Media Uploads?

Managing a proper editorial workflow is one of the biggest challenges for multi-author WordPress sites.

One thing that bothers many site owners is that authors can see the media uploads of other authors and contributors.

This becomes a privacy concern for some site owners. For instance, if an administrator is working on a new product or idea, other authors can see it before it goes public.

That being said, let’s take a look at how to restrict who can see media uploads inside your WordPress admin area.

Organizing Media Uploads by Users in WordPress

The first thing you need to do is install and activate the WP Users Media plugin. For more details, see our guide on how to install a WordPress plugin.

Upon activation, the plugin automatically restricts each user’s access to their own media uploads while allowing site administrator to view all uploads.

However, you do have the option to customize settings and allow custom user roles to access all media uploads. For instance, you may want to allow Editors to view all media uploads while restricting Authors to their own uploads.

To fine-tune these settings, you need to head over to Settings » WP Users Media page to configure which attachments the user can access.

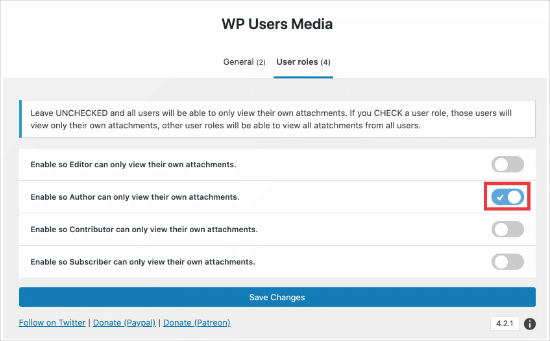
In this case, we want to select the the following option: ‘Enable so Author can only view their own attachments.’ Here’s what you’ll see:

Enable authors to see attachments

Now, to view this in action, you can create two new user accounts and give them the ‘Author‘ role. Next, log in to WordPress with each of the two accounts and upload some images.

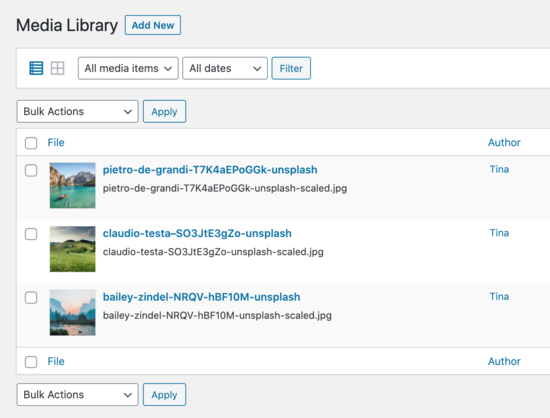
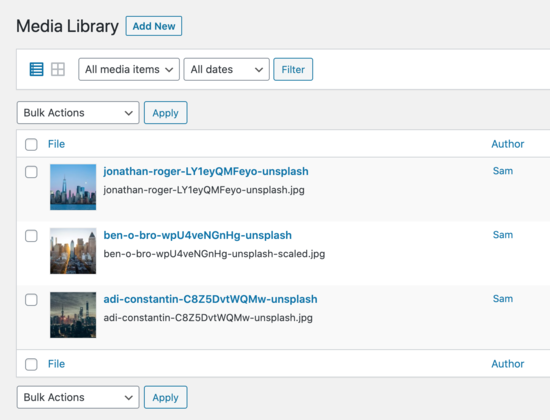
You’ll notice that the media library will only show you the images uploaded by that particular user. For example, we created two users named Sam and Tina.

We uploaded three images using Sam’s account, and three images using Tina’s account.

This is how Tina’s account shows the media library:

Tina's media library

This is how Sam’s account shows the media library:

Sam's media library

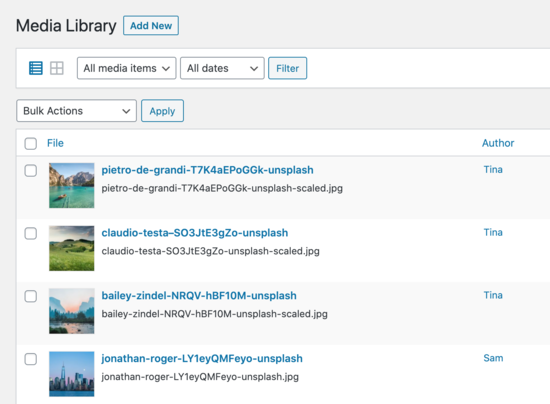
And lastly, this is how a site administrator sees the media library.

Admin's; library view

When uploading new images, your users will only be able to select their own uploaded images from the Media Library.

Insert media into a post

We hope this article helped you better organize media uploads by users on your WordPress site. If you come across any issues while uploading images, then check out our ultimate guide on fixing common image issues in WordPress.

You may also want to see our comprehensive list of must have WordPress plugins for all websites.

If you liked this article, then please subscribe to our YouTube Channel for WordPress video tutorials. You can also find us on Twitter and Facebook.

The post How to Organize Media Uploads by Users in WordPress appeared first on WPBeginner.


June 16, 2020 at 06:00PM

Monday, June 15, 2020

How to Put Images Side by Side in WordPress (Easily)

Do you want to put images side by side in your WordPress content?

Often beginners struggle to find how to put two pictures next to each other in their WordPress posts and pages.

In this step by step guide, we will show how to easily put images side by side in WordPress (without writing any code).

Putting images side by side in WordPress

Using the Block Editor to Put Images Side by Side

The easiest way to get your images side by side is to use the WordPress block editor.

The block editor has a special ‘Gallery’ block that lets you display images in rows and columns.

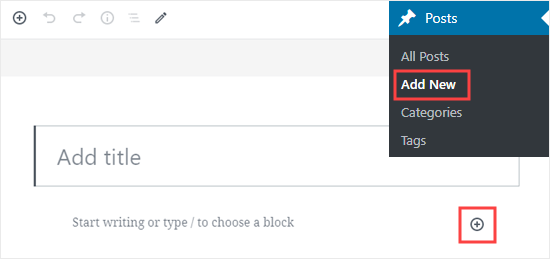
First, you’ll need to create a new post / page or edit an existing one to open the content editor. Once inside, click the (+) symbol to add a new block.

Creating a post and adding a block to it

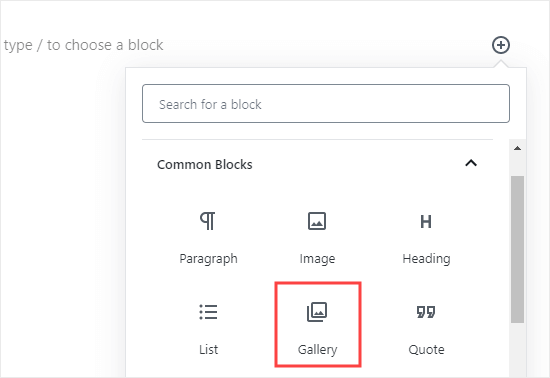
Next, you need to select the Gallery block and add it to your page. You can find the Gallery block in the Common Blocks section, or you can use the search bar to quickly locate it.

Selecting the Gallery block to add to your post

Now, you can easily add images to your gallery block, by dragging them into it or by using the Upload button. You can also select images from your WordPress media library.

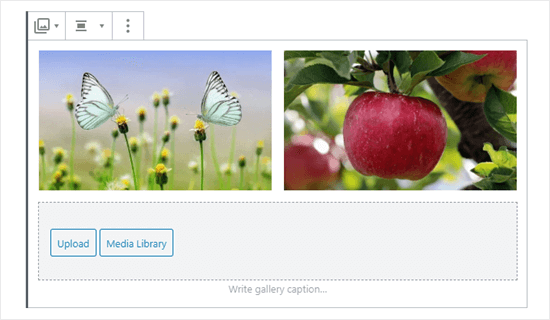
As you can see, we’ve added 2 images to our Gallery block. WordPress has automatically positioned them side by side.

Two images in the gallery (butterflies and apple)

What if you want 3 images side by side? Here’s what happens if we add a third image. WordPress simply resizes the others to fit all 3 side by side:

Three images in the gallery (butterflies, apple, and blue flowers)

If you upload a fourth image, then WordPress will place it beneath the others.

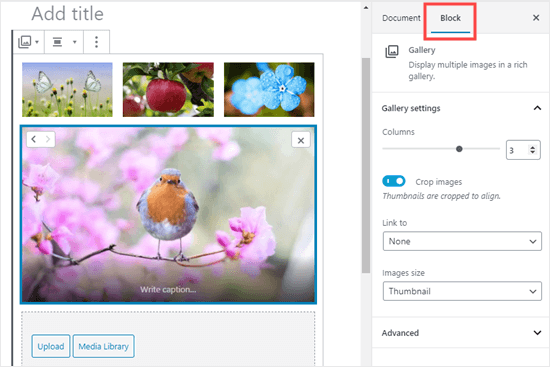
Four images in the gallery (butterflies, apple, blue flowers, and robin)

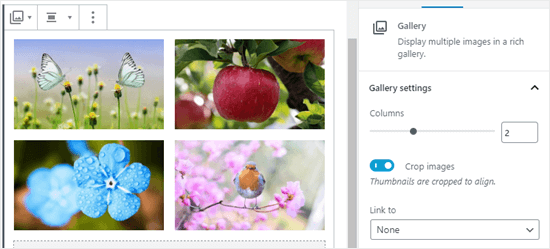
You can change the number of images WordPress should include side by side in a single column.

First, click on the Gallery block, if it’s not already selected. On the right hand side of the screen, you’ll see the Gallery’s block settings.

Changing the settings for the gallery block

You can adjust the number of columns here to any number between 1 and 4. For instance, if you want two images side by side, and two more beneath them, you can set the Columns to 2.

Setting the gallery to have 2 columns rather than 3

It’s as simple as that!

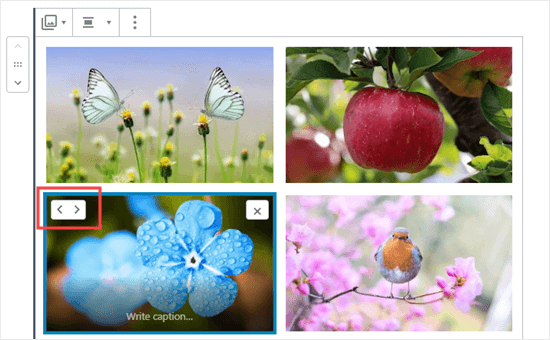
If you want to change where an image is positioned in your gallery, just click on it. You’ll then see arrows that you can use to move it forward or backward in the gallery.

Moving an image forward or backward in the gallery

Here’s a finished gallery demo from our sample post:

The 2 column gallery in a live post

Using a Plugin to Put Images Side by Side in WordPress

If you’re using the old classic WordPress editor, or if you want to create more complex galleries than the default Gallery block, then you will need a WordPress gallery plugin.

We recommend using Envira Gallery because it is the best WordPress gallery plugin

For the sake of this tutorial, we will be using the free version of Envira, but you may want to get the Pro version to get powerful features like albums, image slideshows, etc.

First, you’ll need to install and activate the Envira Gallery plugin. If you’re not sure how, just check out our step by step guide on how to install a WordPress plugin.

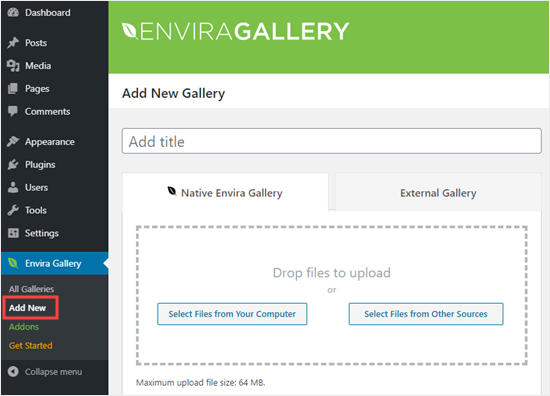
Next, you can go to Envira Gallery » Add New in your WordPress dashboard.

Add a new gallery in Envira Gallery

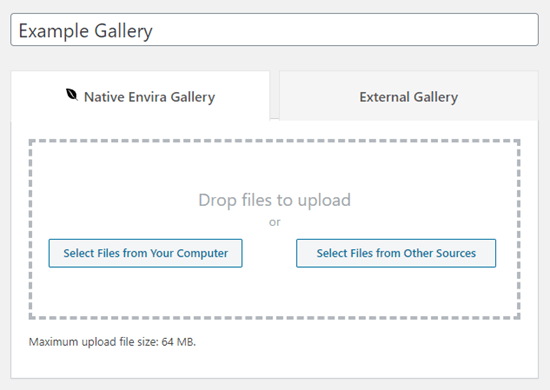
You’ll need to give your gallery a title. We’ve called ours ‘Example Gallery’. Next, upload the images you want to use.

You can either drag and drop them into the upload box, or you can use one of the ‘Select Files’ buttons.

Give your new gallery a name

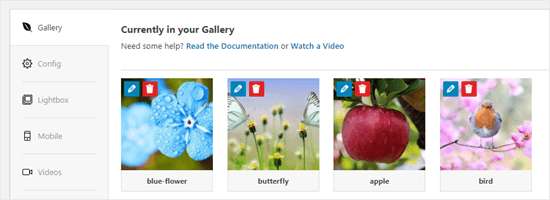
Here’s how the images look once they’ve been uploaded:

Images uploaded to Envira Gallery

You may want to give your images a title and alt text here. The title appears below your image when the user brings their mouse cursor over it.

The title also appears below the image in the lightbox popup mode, which we’ll take a look at in a moment.

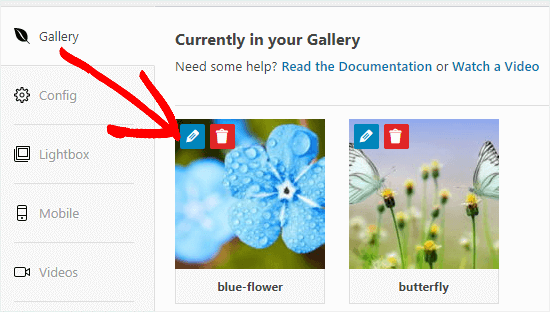
To edit the title and alt text, click the Edit button on an image in the gallery.

Click the Edit button to edit an image in your gallery

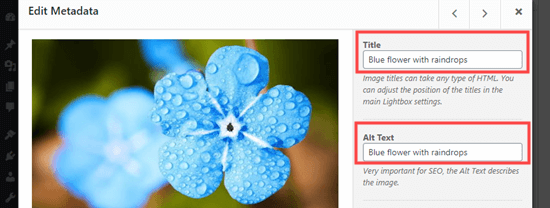
You can then change the title for your image. It defaults to the image’s filename.

You should also enter alt text, as this is helpful for your WordPress site’s SEO. If your title describes the image, then you can simply repeat it for the alt text.

Setting the title and the alt text for the image

Once you’re done, please make sure you click the ‘Save Metadata’ button before clicking the X to close the window.

Click the Save Metadata button to save your changes

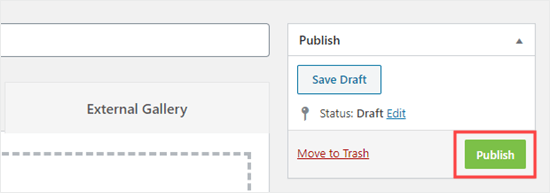
To add your gallery on the site, you’ll first need to publish it. Go ahead and click the Publish button on the right hand side of the screen.

Click the Publish button to publish your gallery, so you can use it on your site

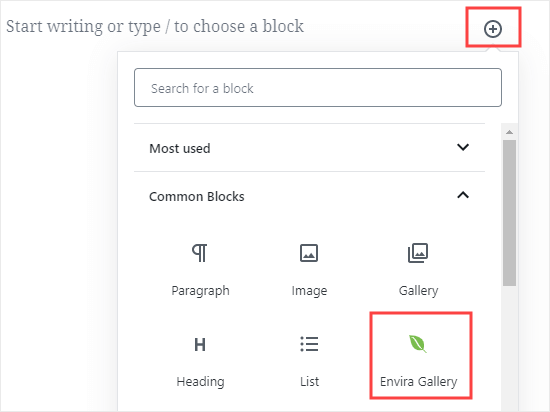
Now, edit a post or page, or create a new one. Inside the content editor, click (+) to add a block to your post, and select the Envira Gallery block. You can find it in the Common Blocks section, or you can use the search bar.

Add the Envira Gallery block to your post or page

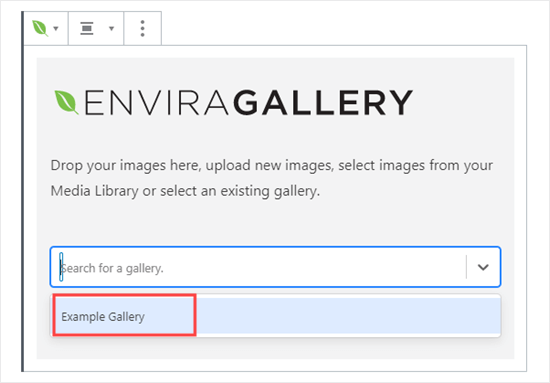
You’ll then need to click on the dropdown to select your gallery.

Select your gallery from the Envira Gallery block

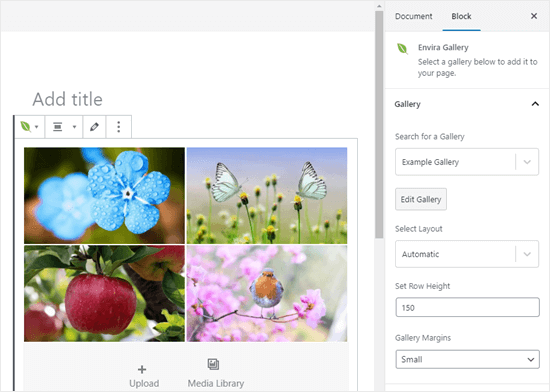
You should see your gallery in place in your post.

You can adjust the settings on the right-hand side of the screen. For instance, you might want to change the column layout, or the size of the margin between images.

The Envira Gallery shown in the post editor

We decided to set our gallery to always display in two columns. We also added a wider margin between the images.

The user can click on an image to see the full-sized version in a lightbox. They can scroll through the images using the lightbox, too.

Viewing an image from the Envira gallery in a lightbox

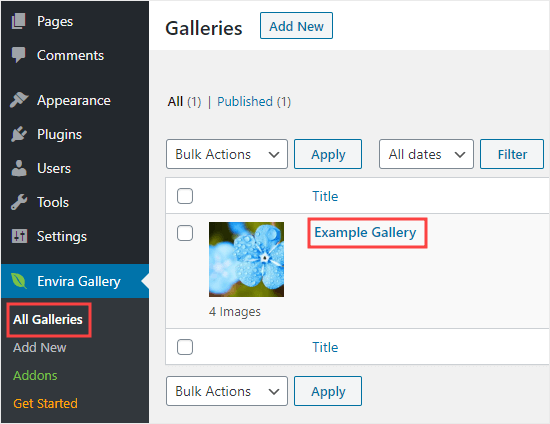
If you want to add more images to your gallery, then you can go back to it by visiting Envira Gallery » All Galleries in your WordPress dashboard. Simply click on the name of your gallery to edit it.

Editing a gallery you've already created in Envira Gallery

Any changes you make to your gallery will appear wherever you’ve placed it in your posts, pages, or sidebars. You don’t need to add it to these again.

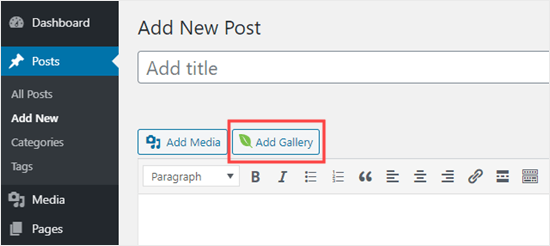
Tip: If you’re using the classic editor instead of the block editor, you can still use Envira Gallery.

You’ll see an ‘Add Gallery’ button above the classic editor that you can use to add an existing gallery to your post.

Adding an Envira gallery in the classic editor

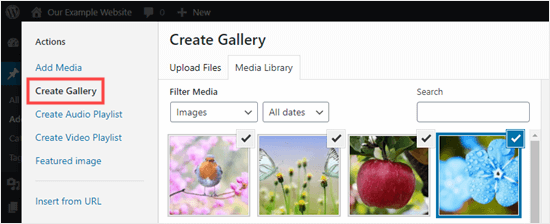
You can also create a new gallery by clicking the ‘Add Media’ button then ‘Create Gallery’.

Creating a new gallery using the Media Library in the Classic Editor

We hope this tutorial helped you learn how to put images side by side in WordPress. You might also want to go through our guide on how to align images in the WordPress block editor, and our comprehensive list of the must have WordPress plugins (expert pick).

If you liked this article, then please subscribe to our YouTube Channel for WordPress video tutorials. You can also find us on Twitter and Facebook.

The post How to Put Images Side by Side in WordPress (Easily) appeared first on WPBeginner.


June 15, 2020 at 04:00PM