Thursday, July 23, 2020

How to Organize WordPress Files in Media Library Folders

Do you want to organize WordPress files in the media library folders?

By default, WordPress automatically creates folders in the media library based on year and months. However, some users may want to create their own custom folders for different media files.

In this article, we’ll show you how to easily organize WordPress files in custom media library folders.

Organizing your media library folders in WordPress

Why Organize Your Files in Media Library Folders?

Normally, WordPress stores all your images and other media files in the /wp-content/uploads/ folder. To keep it structured, all files are stored in folders organized by year and month.

https://example.com/wp-content/uploads/2020/07/
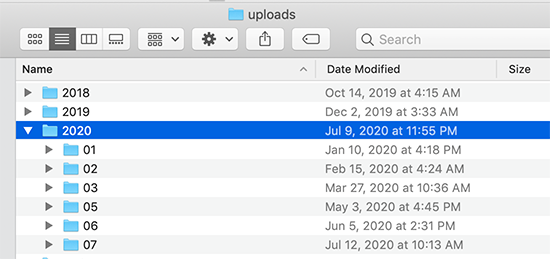
This works perfectly for most websites. However, some users may want to get better control on how WordPress stores media files.

For instance, a photography website may want to organize WordPress images by topic, location, or event folders. Similarly, a portfolio website may want to organize their media uploads by type, client, industry, and more.

This allows them to easily browse their media files. At the same time, it improves image SEO, as you can now add keywords in your image file URLs which makes URLs more meaningful.

Having said that, let’s take a look at how to easily create folders to organize your WordPress media files.

How to Organize Your WordPress Files in Media Library Folders

First, you need to install and activate the Media Library Folders plugin. For more details, see our step by step guide on how to install a WordPress plugin.

Note: The free version of the plugin only lets you create up to 10 folders. You will need to upgrade to the pro version if you want to make more.

Upon activation, the plugin will add a new menu item labeled ‘Media Library Folders’ in your WordPress admin sidebar. Clicking on it will open plugin’s folder view showing all the folders inside your WordPress upload directory.
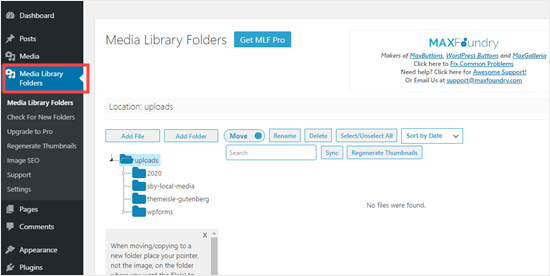
The Media Library Folders page within your WordPress dashboard

From here, you can create new folders and add files to them. You can also move, copy, rename, or delete your files.

We’re going to create some new folders and add images to them.

To create a new folder, simply click the ‘Add Folder’ button and then type in the name you want to use for that folder.

Tip: You cannot use spaces in folder names. Instead, use hyphen or underscore to separate words if needed.
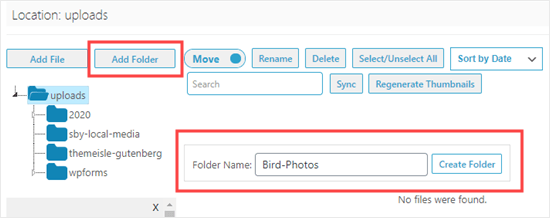
Adding a new folder using the Media Library Folders plugin

It’s also possible to make subfolders within folders, if needed. To create subfolders, simply click on the parent folder to select it, and then click on the ‘Add Folder’ button.
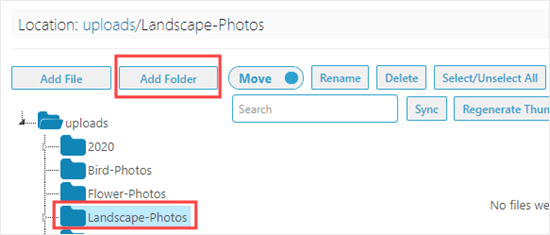
Adding a subfolder using Media Library Folders

We created two subfolders for our ‘Landscape-Photos’ folder. They are ‘Forests’ and ‘Mountains’. To view a subfolder, you need to click on the small arrow to the left of the main folder:
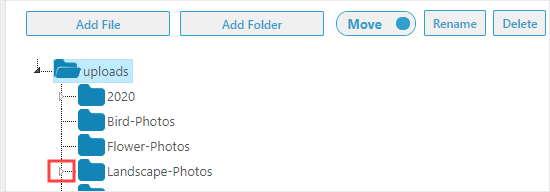
Click the small arrow to expand a folder to see the subfolders

To add files to your folders, simply click on the folder then click the ‘Add File’ button. After that, go ahead and upload as many files as you want.
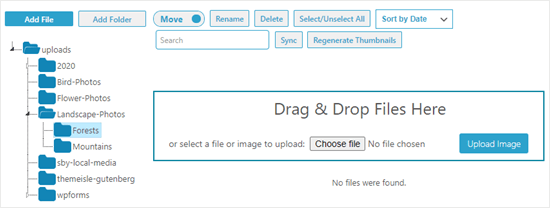
Uploading files using the Media Library Folders plugin

Once you’re done uploading files, you’ll see them on the screen as thumbnails with the filename below:
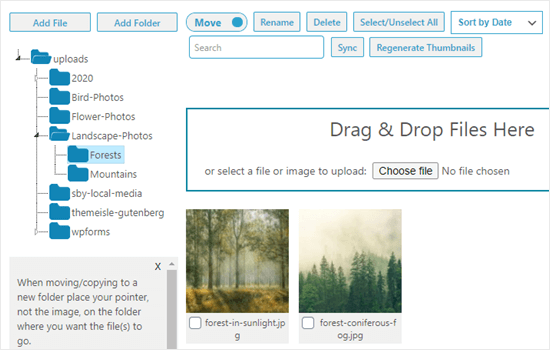
The uploaded images showing in the Forests folder

It’s easy to add your uploaded files to your posts or pages. You can add them just like any other files that you’ve uploaded to the media library:

Viewing the uploaded images in the Windows Media Library

Moving and Copying Your Files in Media Library Folders

What if you need to move a file to a different WordPress media library folder? It’s easy to move it or copy it using Media Library Folders.

Moving an Image to a New Folder in the Media Library

To move an image or any other file, simply check that the move/copy toggle is set to ‘Move’ and then drag the image to the correct folder.

Tip: Your mouse pointer should be on the new folder, as shown below. The small thumbnail of the image is just showing you what you’re moving, not where you’re moving it to.

In this example, a mountain image was incorrectly placed in the Forests folder. We are moving it to the Mountains folder.
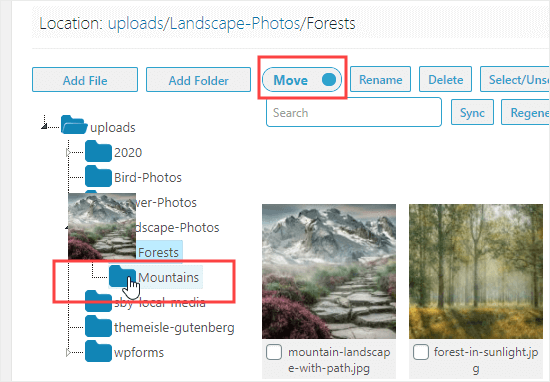
Moving an image into the Mountains folder

Copying an Image to a Different Folder in the Media Library

To copy an image, set the move/copy toggle to ‘Copy’, then go ahead and drag the image as before. Here, we are copying an image of a bird and flower, so that it’s in both the ‘Bird-Photos’ and the ‘Flower-Photos’ folders.
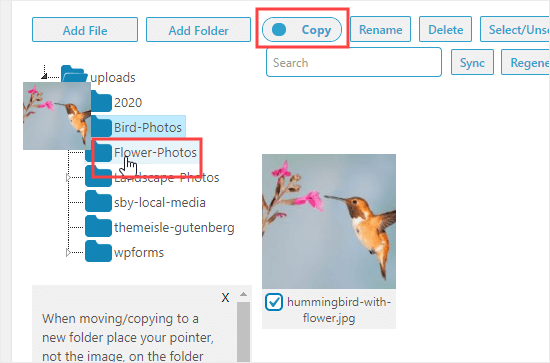
Copying a photo so that you have it in two folders

This time, your original image will stay in place. Your image will be duplicated so that it can be present in both folders.

Renaming Files and Folders in Media Library Folders

You can easily change the filename with the Media Library Folders plugin. First, find the file you want to change and click the checkbox below it. Next, click the ‘Rename’ button at the top of the screen.

After that, type in the filename you want to use. Image filenames can have a small impact on your WordPress SEO, so it’s recommended to use keywords within them. Here, we’ve changed the file name for a post on inspiring forest images:
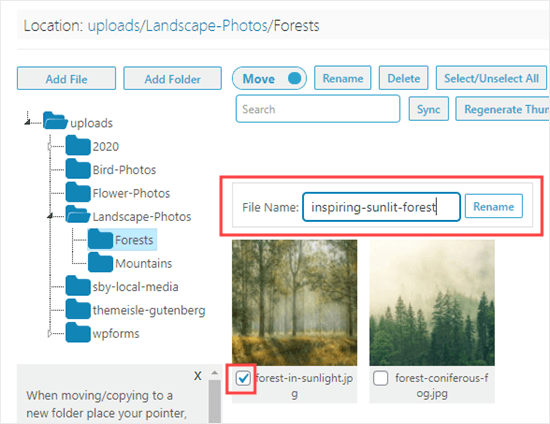
Changing the file name of an image using the Media Library Folders plugin

You cannot rename or move a folder in Media Library Folders. However, it’s possible to create a new folder, move all the images into it, then delete the old folder.

To delete a folder, right click on it, and then click ‘Delete this folder?’ button. Here, we’ve moved the forest images into a new folder called Woodlands, and we’re deleting the Forests folder:
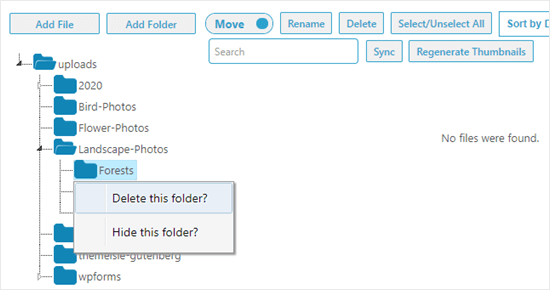
Deleting a folder using the Media Library Folders plugin

You’ll then see a message prompting you to confirm. Click ‘OK’ to continue and the folder will be deleted. You’ll no longer see it in the list:
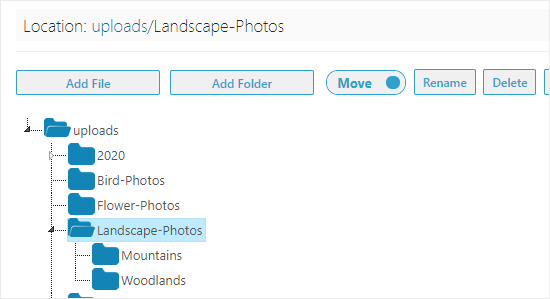
The Forest folder has now been deleted

Tip: You may see the message ‘This folder is not empty and could not be deleted’ even though the folder looks empty. Simply click the ‘Sync’ button. WordPress may have created additional versions of your images that need deleting. After syncing, you’ll be able to review and delete those images.

Click the Sync button to check for other files in the folder

We hope this article helped you learn how to organize WordPress files in media library folders. You might also want to check out our articles on fixing common image issues in WordPress and other must have WordPress plugins for business websites.

If you liked this article, then please subscribe to our YouTube Channel for WordPress video tutorials. You can also find us on Twitter and Facebook.

The post How to Organize WordPress Files in Media Library Folders appeared first on WPBeginner.


July 23, 2020 at 05:36PM
Wednesday, July 22, 2020

How to Create a Custom Airtable Form in WordPress

Do you want to make a custom Airtable form for your WordPress site?

Airtable is a data management tool that lets you create your own custom data-driven apps. Basically, you can collect data using a form on your website and use it to make spreadsheets, contacts list, booking calendars, and more.

In this article, we will show you how to create a custom Airtable form in WordPress.

Creating a custom Airtable form in WordPress

Why Create a Custom Airtable Form in WordPress?

Airtable is a data management tool that allows you to create custom data-driven apps. You can use it to better visualize the data collected on your website using WordPress forms.

For instance, you can use your WordPress contact form data in Airtable as a CRM (Customer Relationship Management) tool.

It can also be used to manage leads captured by your WordPress forms. You can also use it to store data from user surveys on your website.

Basically, you can use data collected from your WordPress contact forms in Airtable to create custom apps, workflows, and tools for your business.

That being said, let’s take a look at how to easily a custom Airtable form in WordPress.

Creating a Custom Airtable Form in WordPress

To create our custom Airtable form in WordPress. we’ll first create a contact form using WPForms.

It is the best WordPress form builder plugin on the market and allows you to easily create any kind of form using a simple drag and drop interface.

After that, we’ll connect our form to Airtable by using a service called Zapier.

Zapier works as a bridge to connect two different apps without any code. You can use it with dozens of online apps, including WPForms and Airtable.

Ready? Let’s get started.

Creating Your Form in WPForms

First, you need to install and activate the WPForms plugin. For more details, see our step by step guide on how to install a WordPress plugin.

Note: that you’ll need the Pro version or higher to access the Zapier addon for WPForms.

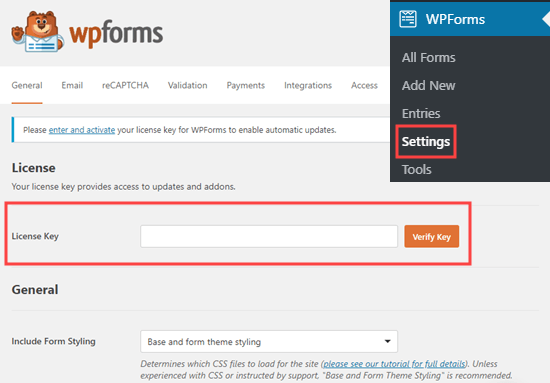
Upon activation, go to the WPForms » Settings page to enter your license key. You’ll find the license key under your account on the WPForms website.

Entering your license key for WPForms

Next, you need to visit the WPForms » Add New page in your WordPress dashboard. This will launch the WPForms builder interface.

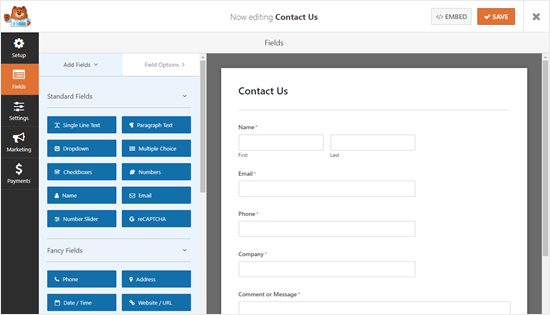
We’re going to use a simple contact form template with two additional fields for ‘Company’ and ‘Phone Number’.

The Contact Us form with the extra fields, in the WPForms form builder

Once you’ve set up your form, you need to add it to your WordPress website. Simply edit the post or page where you want to add the form.

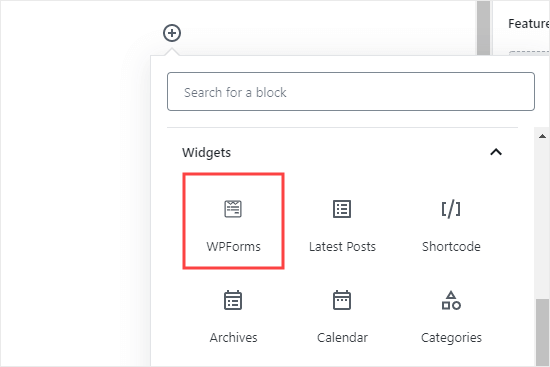
On the post edit screen, click on the (+) button to add a new block. After that, search for WPForms block and add it to your content area.

Adding the WPForms block to your page or post

For detailed instructions see our step by step guide on creating a contact form in WordPress.

After you have added your form to your website, go ahead and create a test entry. This will be used to set up and check the connection between WPForms and Airtable.

Here’s our test entry, with name, email, phone, company name, and a message:

Sending a test entry through the contact form

Preparing to Connect WPForms and Zapier

We’ll be using Zapier to build a bridge between WPForms and Airtable. To do that, you need to install and activate the WPForms Zapier Addon.

In your WordPress dashboard, go to the WPForms » Addons page and find the Zapier addon. Then, go ahead and install and activate it.

Installing the Zapier addon for WPForms

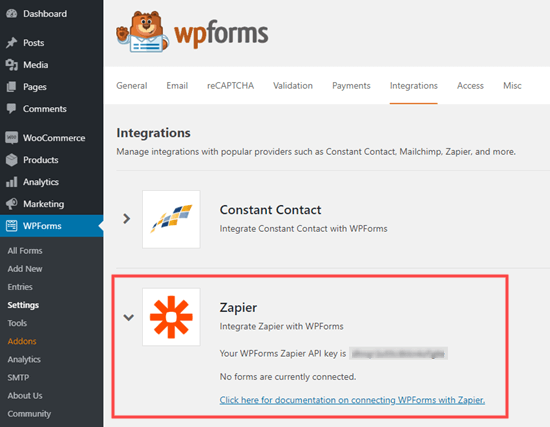
Now, you need to go to the WPForms » Settings » Integrations page. Simply click on the Zapier logo here, and you will get your Zapier API key. You need this to connect Zapier to your WPForms account.

Get your API key from WPForms to use with Zapier

Copy the API key somewhere safe or keep this tab open, as you will need it in the later step.

Preparing to Connect Airtable and Zapier

Now you need to prepare Airtable to connect with WPForms via Zapier. To do that, You need an API key for Airtable. This lets you connect Airtable with Zapier.

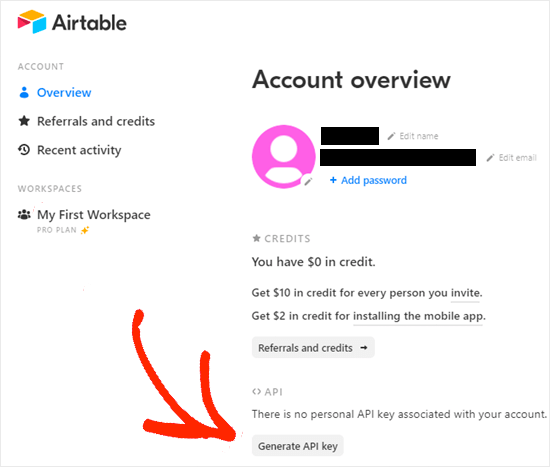
Simply create an Airtable account or log into your existing account. Then, click the Account button in the top right. You will be taken to your Account page, where you just need to click the ‘Generate API Key’ button

Generate Airtable API Key

Once you’ve generated your key, you need to copy and paste it somewhere safe for later on.

Creating Your Zap to Send Data From Your Website Form to Airtable

Next, go to the Zapier website. Here, you need to create a free account or sign in to your existing account.

In your Zapier dashboard, click the ‘Make a Zap’ button on the top-left to start the configuration wizard.

Click the button to start making your zap

Note: In Zapier, a ‘zap’ is a process with a trigger and an action. Our trigger will be someone filling in the form, and our action will be to create a record in Airtable.

At the top of the screen, you need to give your zap a name, and then you can set up the trigger.

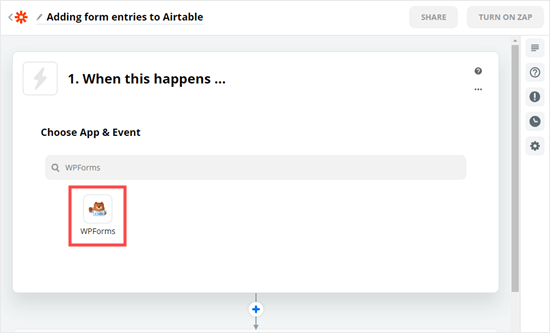
First, in the ‘Choose App & Event’ box, type ‘WPForms’ into the search bar. After that, simply click on the WPForms icon that comes up:

Choose WPForms as your trigger app

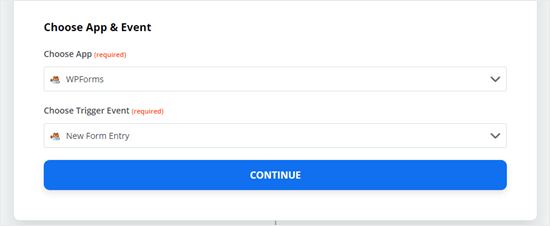
Now, you will be prompted to choose a trigger event. Leave this set to ‘New Form Entry’ and click the Continue button.

Choose 'New Form Entry' as the trigger event

Zapier will ask you to sign in to WPForms. Just click the ‘Sign in to WPForms’ button here:

Click the button to sign into WPForms

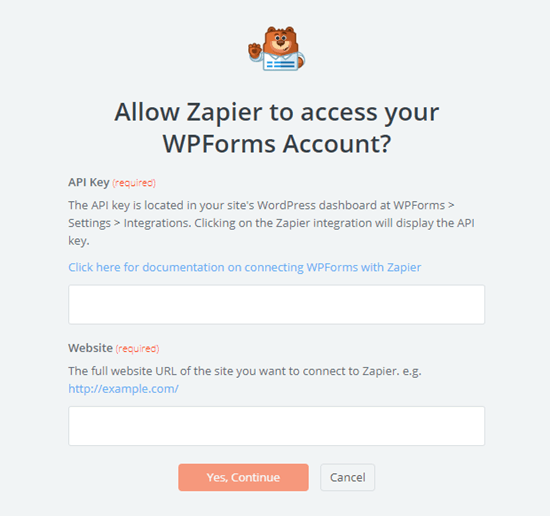
Now, you should see a popup window. You will need to enter your API key that you found earlier plus the URL (domain name) of your website:

Enter your API key from WPForms and the URL of your website

Once you’ve done that, click on the ‘Yes, Continue’ button to move on.

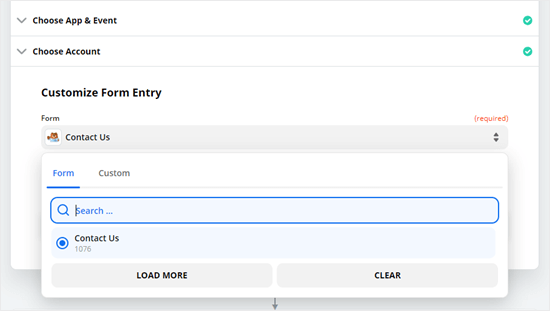
Next, you will be asked to select the form you created earlier from the drop-down list.

Choose the form you want to use from the dropdown list

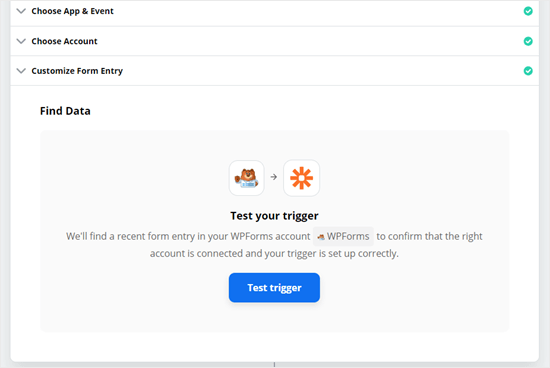
Once you’ve selected the correct form, click on the ‘Test trigger’ button.

Click the button to test your zap's trigger is working

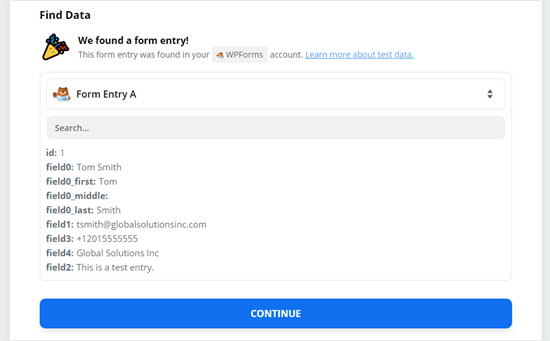
You should then see a message telling you that Zapier found a test entry. The data from this will be shown on the screen:

Zapier should find your test entry and show it on the screen

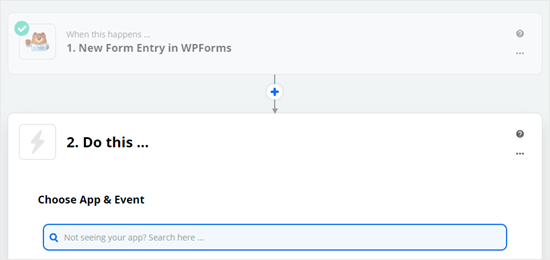
Click the ‘Continue’ button to carry on. You are now onto the Action part of the Zap, where you need to choose your second app.

Starting the Do This action step for your zap

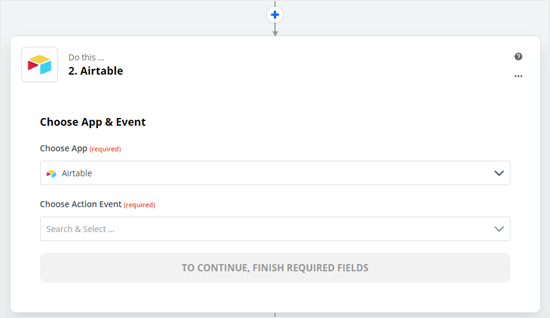
Simply type Airtable into the dropdown and select it. Then, you will see the dropdown for choosing an action event:

Selecting Airtable as the app for your action event

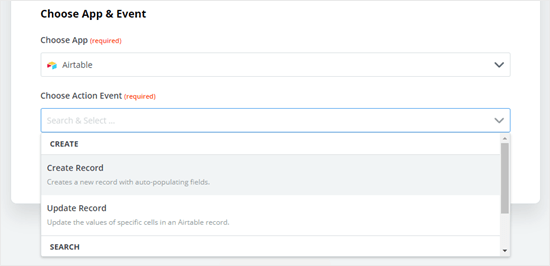
The action event is simply what you want to happen when someone completes the form on your site. You need to select ‘Create Record’ here:

Choose an action event (create record) from the dropdown list

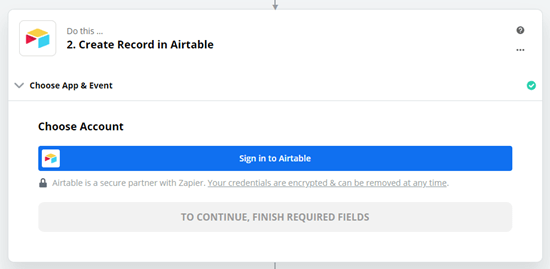
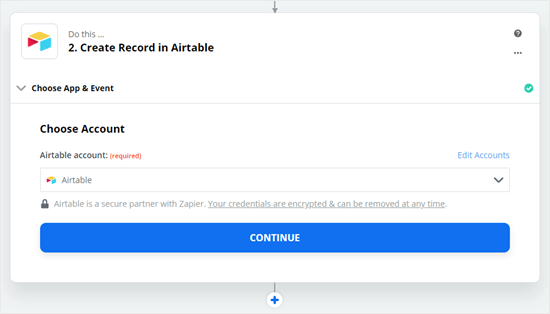
Now, Zapier will prompt you to sign into Airtable. Simply click the ‘Sign into Airtable’ button and then login.

Click the button to sign into your Airtable account

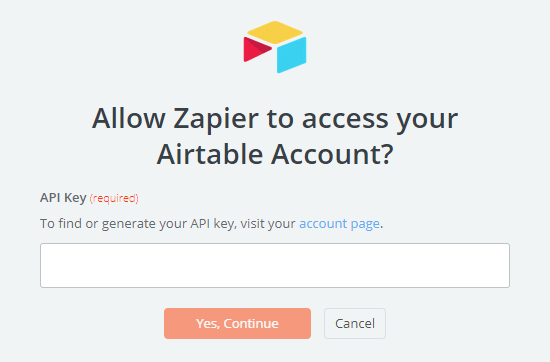
You now need to enter the Airtable API key that you got earlier:

Enter your Airtable API key

Now, you will see a Continue button. Just click this to carry on making your zap.

Click to continue once you've connected your Zapier account to Airtable

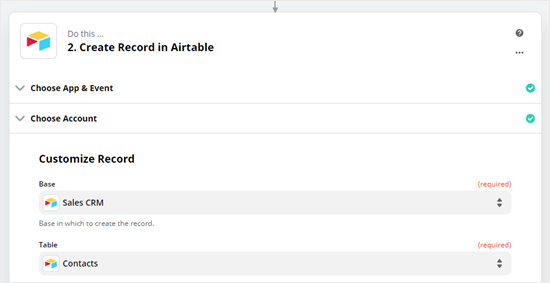
Next, you need to select your Base, which is short for ‘database’. You also need to choose your Table. We’re going to use our Sales CRM as the base and add our new contacts to the Contacts table:

Select your Base then your Table from the dropdown lists

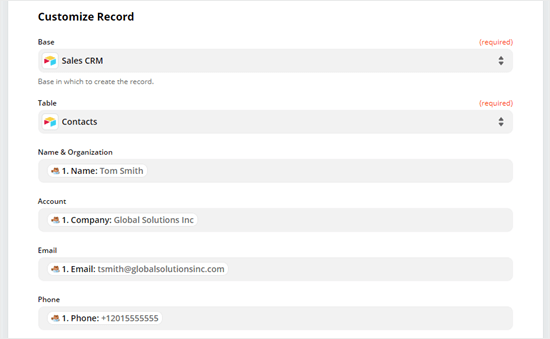
You now need to tell Zapier which fields from your WPForms form should correspond to which columns in your Airtable table.

For all the applicable fields, simply select the correct field using your test data:

Customize your record by selecting what data should populate which column of your Airtable table

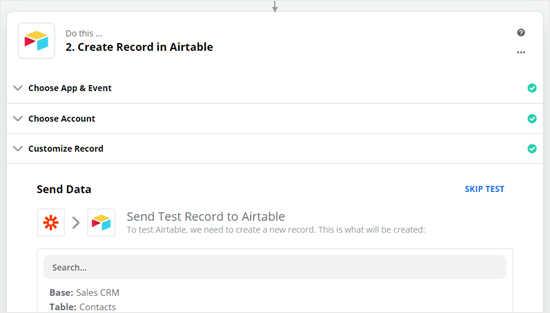
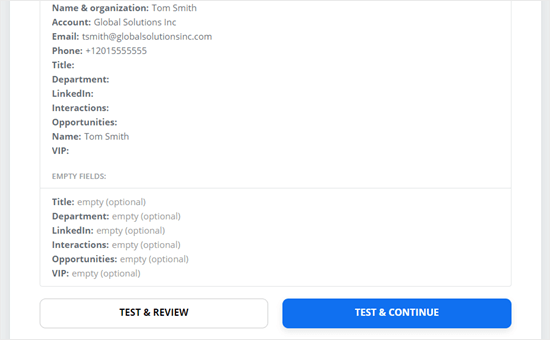
Once you’re done, click the ‘Continue’ button to carry on. Zapier will now prompt you to send a test record to Airtable, using your test data. You will see a preview of the data.

Send test data to Airtable

Click the ‘Test & Continue’ button. This will send the test data to your chosen table in Airtable, creating a new record:

Click to test & review or test & continue

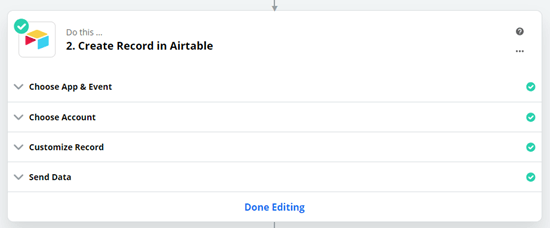
Now, you simply need to click the ‘Done Editing’ button to finish creating your zap.

Click the 'Done Editing' button to finish creating your zap

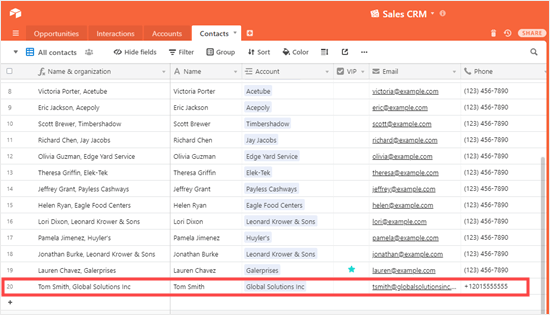
You may want to double check that the record has been correctly added to Airtable. To do this, simply go to your Airtable account, open the Sales CRM base then the Contacts table, and check for your test data.

Checking the record added to the Airtable table

If you need to change anything, just go back to the ‘Customize Record’ step and change which data goes into which column in your table.

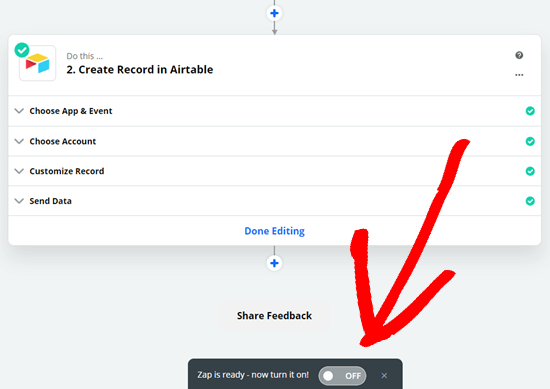
The final step is to switch your Zap on by clicking the slider at the bottom of your screen.

Turn your zap on

Your zap is now running. All form entries through your connected form will be added to the Airtable table that you selected.

We hope this article helped you learn how to create a custom Airtable form in WordPress. To go further with growing your business, check out our guides to the best business phone services and the best plugins for business websites.

If you liked this article, then please subscribe to our YouTube Channel for WordPress video tutorials. You can also find us on Twitter and Facebook.

The post How to Create a Custom Airtable Form in WordPress appeared first on WPBeginner.


July 22, 2020 at 06:00PM

Tuesday, July 21, 2020

How to Display Breadcrumb Navigation Links in WordPress

Do you want to display breadcrumb navigation links on your WordPress site?

Breadcrumb navigation is a secondary navigation system that tells users where they are on a website relative to the homepage.

In this article, we’ll show you how to display breadcrumb navigation links in WordPress.

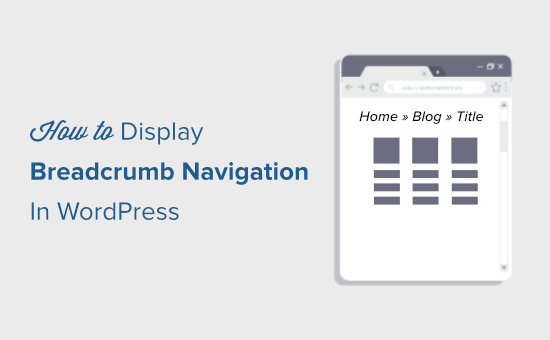
How to display breadcrumb navigation links in WordPress

What is Breadcrumb Navigation and Why Do You Need it?

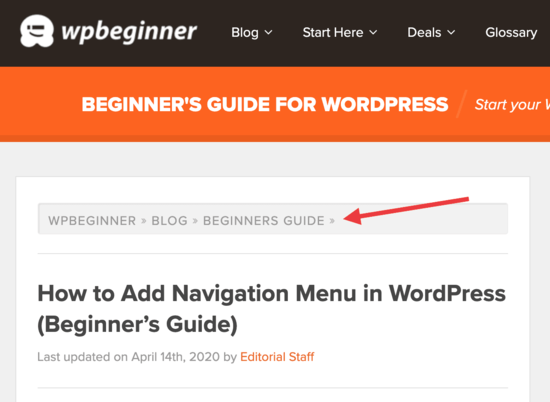
Breadcrumb navigation is a term used to describe a hierarchical navigation menu presented as a trail of links. It’s often used as a secondary navigation that allows users to go up in the website’s hierarchy of pages.

Breadcrumbs displayed on WPBeginner website

Breadcrumb navigation links are different than the default navigation menu system in WordPress.

The purpose of breadcrumb navigation is to help users navigate around your website. It also helps search engines understand the structure and hierarchy of links on a web page.

Search engines like Google have started displaying breadcrumbs along with the page title in search results. This gives your website more visibility in the search results and increases your click-through rate.

Breadcrumb navigation in search results

Having said that, let’s take a look at how to add breadcrumb navigation links in WordPress.

Add Breadcrumb Navigation with Breadcrumb NavXT Plugin

This is by far the easiest way to add breadcrumb navigation to your WordPress site. It’s flexible, easy to use, and has more options than you can imagine. See why we use Breadcrumb NavXT on WPBeginner.

First thing you need to do is install and activate the Breadcrumb NavXT plugin. For more details, see our step by step guide on how to install a WordPress plugin.

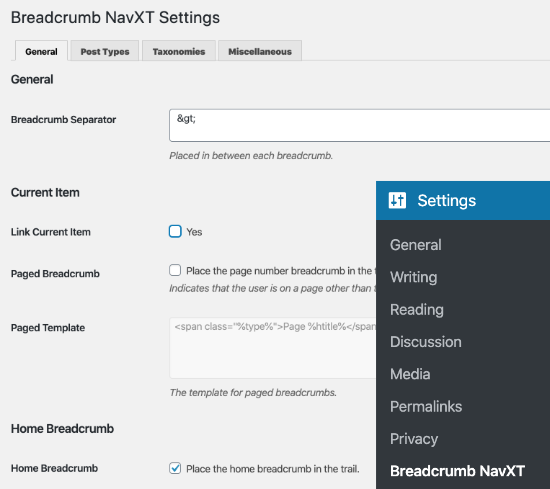
Upon activation, you need to visit the Settings » Breadcrumb NavXT page to configure the plugin settings.

Settings page for Breadcrumb NavXT plugin

The default settings should work for most websites. However, you can customize the settings as needed.

The settings page is divided into different sections. On the general settings tab, you can define how the plugin behaves globally on your site.

It allows you to modify the breadcrumb navigation links template. You will also notice that these link templates use Schema.org parameters in the link tag.

The post types tab under plugin settings allows you to set up breadcrumb links for posts, pages, and any custom post types.

You can choose how you want to display your post hierarchy. By default the plugin will use Site Title > Category > Post Title. You can replace categories with tags, dates, or post parent.

The taxonomies and authors tabs have the similar templates for your breadcrumb navigation links.

Don’t forget to click on the save changes button to store your changes.

Showing Breadcrumb NavXT on Your Website

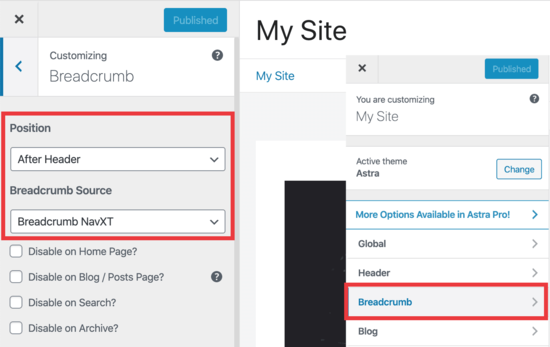
To display your breadcrumbs on your site, you first need to go to Appearance » Customize. From there, you’ll choose where you want your breadcrumbs to be displayed in the Position dropdown.

In the Breadcrumb Source, you’ll need to choose ‘Breadcrumb NavXT’.

Breadcrumb NavXT settings

That’s all for this step. You can now visit your website and see the breadcrumb navigation links by visiting any post or page.

Adding Breadcrumb Navigation Links Using Yoast SEO Plugin

If you’re already using Yoast SEO plugin, then you can use their built-in Breadcrumb navigation feature, although it’s limited in features compared to BreadcrumbNavXT plugin.

The first thing you need to do is install and activate the Yoast SEO plugin. We have a complete step-by-step guide on how to install and set up Yoast SEO plugin for WordPress.

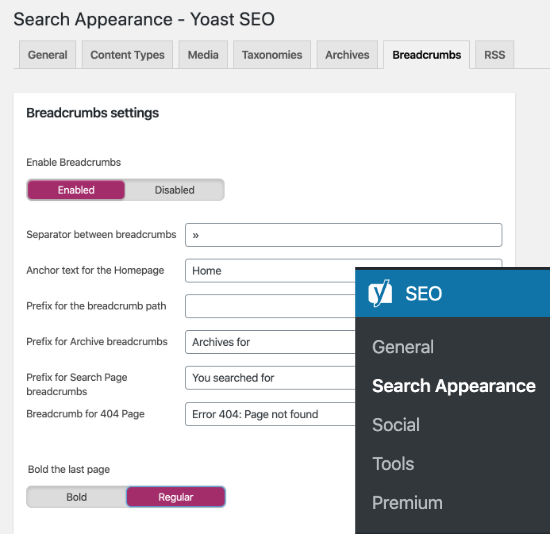
Upon activation, you need to go to the SEO » Search Appearance » Breadcrumbs page and check the ‘Enable Breadcrumbs’ option.

Yoast breadcrumb settings

Once checked, you will find several options to change how breadcrumbs would display on your site. Default settings should work for most, however, feel free to change anything you like.

Once you are done, click on the save changes button to store your settings.

Showing Yoast’s Breadcrumb Navigation on Your Site

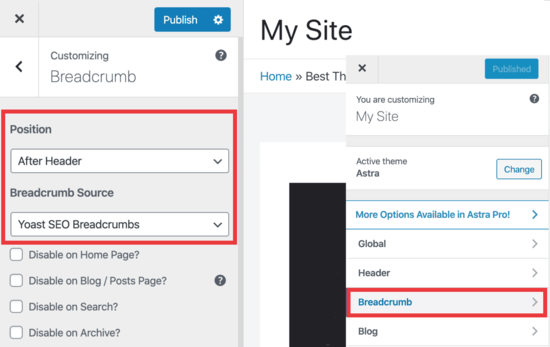
To display your breadcrumbs on your site, you first go to Appearance » Customize. From there, you’ll choose where you want your breadcrumbs to be displayed in the Position dropdown.

In the Breadcrumb Source, you’ll choose ‘Yoast SEO Breadcrumbs’.

Yoast SEO beadcrumbs settings

That’s all. You can now visit your website to see your breadcrumb navigation in action.

We hope this article helped you learn how to display breadcrumb navigation links in WordPress. You may also want to see our ultimate WordPress SEO guide to improve rankings, and our step by step guide on how to create an email newsletter to grow your traffic.

If you liked this article, then please subscribe to our YouTube Channel for WordPress video tutorials. You can also find us on Twitter and Facebook.

The post How to Display Breadcrumb Navigation Links in WordPress appeared first on WPBeginner.


July 21, 2020 at 04:24PM

Monday, July 20, 2020

Which WordPress Plan Should You Use? (Expert Answer)

Are you looking at WordPress plans and can’t figure out which one to use?

There are so many companies offering different WordPress plans that it becomes difficult to choose the right option for your website.

In this guide, we’ll help you decide which WordPress plan you should use, and how to compare different plans for your own requirements.

Choosing the best WordPress plan for your website

Most Common Types of WordPress Plans

WordPress is the most popular website builder in the world. Many different companies offer WordPress hosting plans with different types of services and features.

When we say WordPress, we are talking about the popular WordPress.org software and not just WordPress.com which is actually one of the more expensive blog hosting services.

Please see our guide on the difference between self hosted WordPress.org vs free WordPress.com blog.

To easily explain all the different types of WordPress hosting solutions, we have categorized them into the most commonly used WordPress plans:

  1. Shared Self-Hosted WordPress Plans – Good for small websites & blogs.
  2. Managed Hosting WordPress Plans – Good for larger websites.
  3. Fully Hosted WordPress Plans – Very expensive – not recommended.

Now, each one of these WordPress plans can be further categorized.

That’s because individual WordPress hosting companies try to create their own plans with different features and levels of service. Later in this article, we will discuss those options as well.

Let’s take a look at the most common WordPress plans available and what types of websites you can build with them (at the lowest costs).

Shared Self-Hosted WordPress Plans

Shared WordPress plans

Shared self-hosted WordPress plans are the most popular hosting solution for beginners. They are affordable, flexible, and easy to manage, which is why they can also be called WordPress starter plans.

The reason behind their low costs is quite simple. These plans allow you to share hosting resources with other small business / individual users.

Most websites when first starting out do not need more expensive WordPress plans. If you are just starting a blog or setting up a small business website, then shared hosting plans are quite adequate to get started.

You can even use these plans to start an online store.

Downsides of a Shared Self-Hosted WordPress Plan

There are two big downsides of using a shared self-hosted WordPress plan.

First, you have limited server resources because these plans are built for start-up websites. These plans keep the cost of building a website lower, so you can spend that money to grow your business.

Once you start making money online, you can easily upgrade to a more powerful WordPress plan.

Most shared hosting companies offer multiple levels of upgrades with more resources, so you can also upgrade to their VPS hosting plans if needed. Or jump to a managed WordPress plan, which we will discuss in a moment.

The other downside is website maintenance. You will be responsible for installing WordPress updates, making backups, etc.

However, WordPress is incredibly easy to use, and millions of non-techy beginner users easily manage their own websites without any technical skills (using point-and-click tools).

Which Shared WordPress Plan is Right for Me?

There are hundreds of companies offering shared WordPress plans. The competition in this industry is fierce which means that available choices can easily overwhelm a beginner user.

That’s why we did the research for you.

We signed up for all the top WordPress hosting companies and thoroughly tested their service and performance.

Check out our complete guide on choosing the best WordPress hosting plan for your website for the full breakdown.

If you are just starting out, then we recommend Bluehost. They are one of the biggest hosting companies in the world and an officially recommended WordPress hosting provider.

They are also offering WPBeginner users a generous discount on hosting with a free domain name + free SSL certificate. Basically, you can get started for just $2.75 per month.

→ Click Here to Claim This Exclusive Bluehost Offer ←

Bluehost

The other top contenders in this category, are HostGator and SiteGround.

HostGator is better if you have a small budget. SiteGround costs a little more but offers premium value for your money with absolute top-notch support and industry leading technology.

You can start with their lowest priced plans and get all the powerful WordPress features without paying the high prices of a fully-hosted WordPress plan.

This is a great value that many beginners don’t discover until they’ve overpaid for the more premium plans.

Bonus: Need help with setting up a blog? Our expert team can help setup your blog for free. See the details on our free WordPress blog setup service.

Now, what happens when your business grows, and your website starts getting large traffic, over 100,000 visitors per month?

Then the next type of WordPress plans are best suited to match those requirements.

Managed WordPress Plans

Managed WordPress plans

Managed WordPress plans are like a concierge service where all technical aspects of running WordPress is managed by the host.

They handle WordPress security, website speed, installing updates, keep backups, and scalability.

These plans include premium support from more knowledgable WordPress engineers. It is like having your own small team of developers to take care of your website maintenance.

When and Who Needs Managed WordPress Plan?

Most starter websites and businesses do not make any money in the beginning. They may find it harder to justify the cost associated with the managed WordPress plans.

However, if you started out on a shared plan and now your website is bringing in enough revenue and traffic, then upgrading to a managed WordPress plan can be a good idea.

Cons of Choosing a Managed WordPress Plan

One obvious downside is pricing. Managed WordPress plans are expensive.

The base plan usually starts around $29 per month. However, if you compare it to hiring a full-time developer or website admin, then it would still be a bit cheaper.

The other disadvantage is the limits and control. The managed WordPress hosting providers need tighter control on what you can install on the platform to ensure its stability.

This means you can only use WordPress on your site which is not an issue for most users who build their sties with WordPress.

They may also disallow certain WordPress= plugins that are known to slowdown websites.

Which Managed WordPress Plan is Right for Me?

Managed WordPress industry has grown a lot in the last several years. There are many companies offering managed WordPress plans with similar features.

We decided to put them through tests and signed up for the most popular managed WordPress companies.

You can read about it in our guide on choosing the best managed WordPress hosting plan for a side by side comparison.

We recommend using WP Engine as the best managed WordPress hosting provider. They are one of the pioneers in managed WordPress hosting space and offer a robust platform with excellent support options.

Alternatives: SiteGround and Liquid Web both offer excellent managed WordPress plans.

Fully Hosted WordPress Plans

Fully hosted WordPress plans

These hosting plans provide you with a slightly customized version of the WordPress platform, so you can create specific types of websites.

You don’t get to use WordPress the way you would normally use on a self-hosted platform. You are limited to the features provided by the platform which vary based on the plan you choose.

Who Needs Fully Hosted WordPress Plan

If you need to quickly make a website, and you are not super-concerned about making money with it, then fully hosted WordPress plan could be a good option for you.

You can also get started for free without even buying a domain name. This is a good option for personal journals, family websites, travel photos, and more.

Disadvantages of a Fully Hosted WordPress Plan

You have limited control over your website. You can only use the features available for your plan and cannot extend them on your own.

You also have fewer options to monetize your content. Even if you pay for a business account, your options to grow your business will be less flexible than a self-hosted WordPress plan.

Which Fully Hosted WordPress Plan is Right for Me?

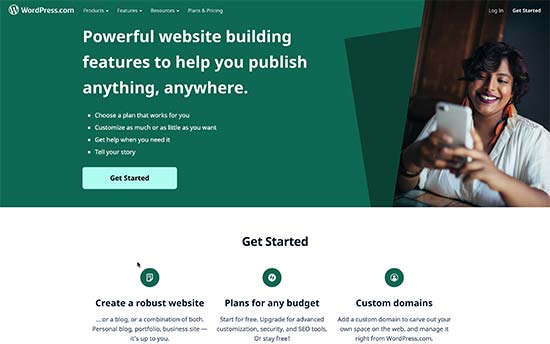
WordPress.com is the largest such company. They offer a basic free WordPress plan and allows you to create a website using the wordpress.com subdomain.

Paid plans start from $4 per month billed annually. Their business plan is $25 per month and eCommerce plan at $45 per month, both billed annually.

You don’t get the ability to install WordPress plugins until you pay for the business plan ($25 per month).

You can’t start your online store until you pay the $45 per month eCommerce plan.

You can do both of these things on the lowest costing $2.75 per month shared WordPress hosting plans that we mentioned above while enjoying the full freedoms of WordPress.

How Do I Choose a WordPress Plan for My Website?

Choosing the right WordPress plan for your website depends on your business goals and budget.

If you are just starting out, then we recommend going with Bluehost. Their self-hosted WordPress plan gives you powerful WordPress hosting features a long with a free domain for only $2.75 per month.

You can use it to start a blog, create an online store, make a small business website, and so much more.

As your website grows, you can upgrade to a managed WordPress hosting account with WP Engine or SiteGround. This allows you to focus on growing your business and easily scale to match your needs.

If you already have an established business or a large website, then we recommend skipping the starter step and going straight to managed WordPress hosting plans for the best experience.

We hope this article helped you learn which WordPress plan you should use. You may also want to see our guide on easy to start online business ideas that actually make money, and our comparison of the best email marketing services to grow your website traffic.

Bonus: Need help with setting up a blog? You can use our free blog setup service with any of the shared hosting service.

If you liked this article, then please subscribe to our YouTube Channel for WordPress video tutorials. You can also find us on Twitter and Facebook.

The post Which WordPress Plan Should You Use? (Expert Answer) appeared first on WPBeginner.


July 20, 2020 at 05:48PM