Wednesday, July 29, 2020

How to Create an Alert Bar in WordPress (3 Easy Ways)

Do you want to add an alert bar to your WordPress site?

An alert bar or notification bar is a great way to let visitors know about important updates, special offers, new product launch, etc.

In this article, we’ll show you how to create an alert bar in WordPress with 3 easy solutions.
Creating an alert bar for your WordPress site

Why Create an Alert Bar in WordPress?

An alert bar is a great way to let your visitors know about anything important. That could be an ongoing sales event, update about your opening times, or changes to your services.

You can also use an alert bar to tell visitors about a special deal, such as a buy one get one free offer. This is a great option if you run an online store.

Using an alert bar is better than just putting an announcement on your homepage. Your alert bar can appear prominently right at the top of every page across your whole site.

It’s easy to create an alert bar in WordPress. We will cover the 2 best notification bar plugins plus a manual method using HTML and CSS code. Simply click the links below to jump straight to each option:

Method 1: Creating an Alert Bar Using OptinMonster

OptinMonster is the best conversion optimization software on the market. It helps you convert more website visitors into subscribers and customers.

It comes with beautiful lightbox popups, welcome mats, countdown timers, and other dynamic overlays that help you increase subscribers and sales for your website.

You can also use OptinMonster to make an alert bar for your website. Here’s the one we’re going to create:

Alert bar created in OptinMonster

There are lots of pre-built templates inside OptinMonster. This makes it really easy to create an alert bar that looks great within minutes.

First, you need to visit the OptinMonster website and sign up for an account.

Next, you need to install and activate the OptinMonster WordPress plugin. For more details, see our step by step guide on how to install a WordPress plugin.

This plugin connects your WordPress site to the OptinMonster app.

Upon activation, you need to enter your license key. You can find this in your account area on the OptinMonster website.

In your WordPress dashboard, click the OptinMonster menu. You then need to click the ‘Connect Your Account’ button. Just follow the on-screen prompts to connect your WordPress site to your OptinMonster account.
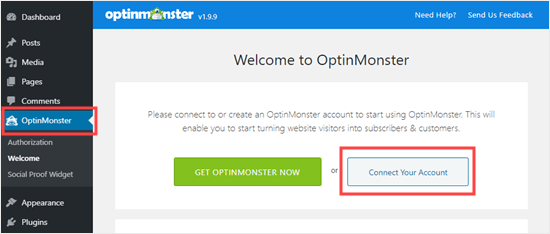
Connect your WordPress site to your OptinMonster account

After connecting OptinMonster, simply go to OptinMonster » Campaigns in your WordPress dashboard. Go ahead and click the ‘Create New Campaign’ button:

Create a new campaign in OptinMonster

You will be taken into the OptinMonster campaign creation tool. From here, you need to select ‘Floating Bar’ as your Campaign Type.
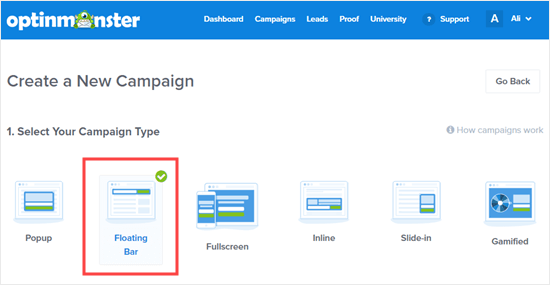
Pick the Floating Bar campaign type for your alert bar

Next, you will see a choice of campaign templates. Simply choose a template that you want to use. You just need to bring your mouse over it and click the ‘Use Template’ button to select it.

We’re going to use the ‘Promo’ template for our alert bar:
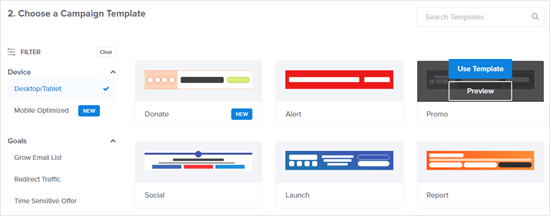
Using the promo template for the alert bar

Next, you will be prompted to give your template a name and choose what site you’re going to use it on. OptinMonster should have already filled in the name and URL of your site here.
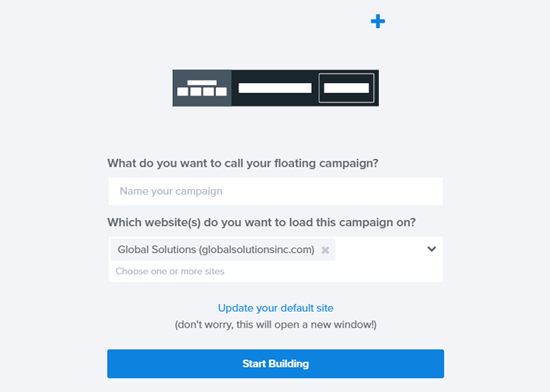
Name your OptinMonster campaign

Once you’ve named your campaign, click the ‘Start Building’ button.

Now, you will see the campaign editor. This is where you can design your campaign.

You will see that your alert bar appears at the bottom of your screen by default. To move it to the top of the screen, click ‘Floating Settings’ on the left hand side.
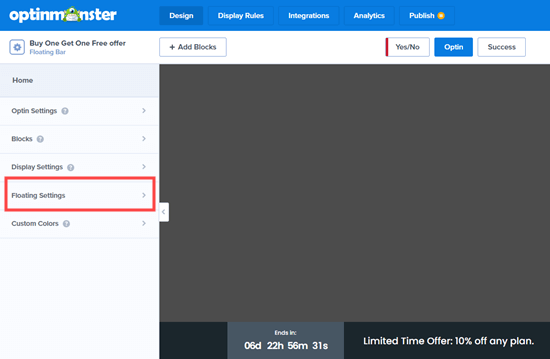
Changing the floating settings for your alert bar

Next, just click the slider to move the floating bar to the top of the page:
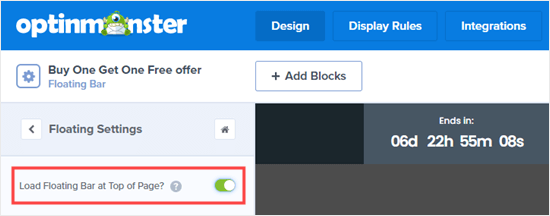
The floating bar is now positioned at the top of the page

To change the text on the floating bar, simply click on the area you want to change. The editor will open up on the left hand side. Just type any text you want here.
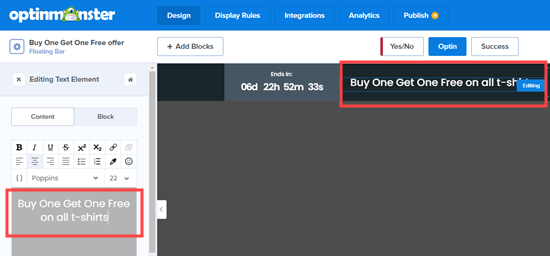
Editing the text for your alert bar

You can also change the font, the size and color of the text, and more.

To change the countdown timer, simply click on it then click the Countdown tab. Then go ahead and enter your desired end date and time.
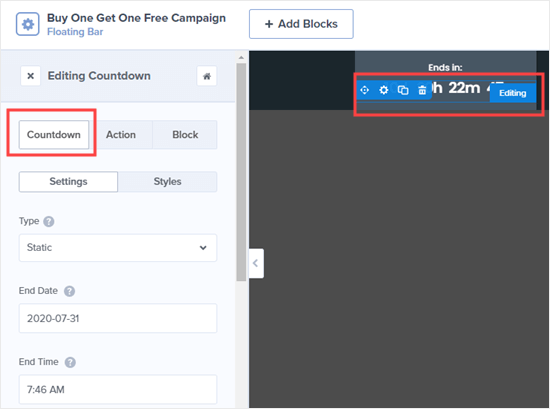
Editing the countdown timer for your alert bar

You can also set the timer to act as an evergreen countdown instead of a static countdown, if you prefer. An evergreen countdown is set separately for each visitor to your site.

Go ahead and make as many changes to your alert bar as you want. Once you’re happy with it, don’t forget to click the Save button at the top of your screen.
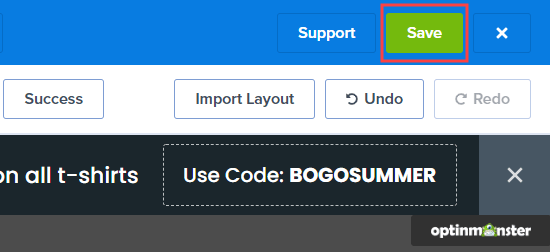
Saving your OptinMonster campaign

Next, you need to go to the ‘Display Rules’ tab to select when and where your alert bar will display on your site. The default rule is for your alert bar to display after the visitor has been on the page for 5 seconds.

We’re going to change this to 0 seconds, so the alert bar appears instantly. Just change the ‘sec’ countdown to 0:
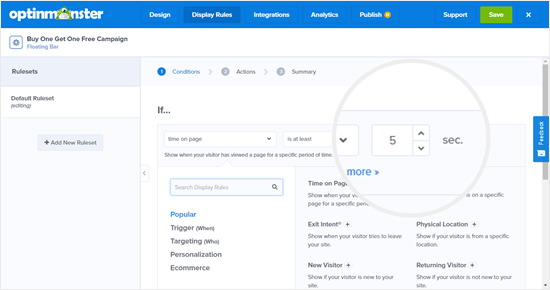
Changing the display rule for your alert bar

Then, click the ‘Next Step’ button, and leave the action as ‘show the campaign view: Optin’ on the next screen. Click ‘Next Step’ once more and you will see a summary.
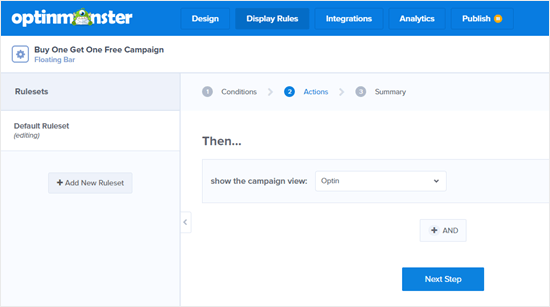
Summary of the display rules for your alert bar

Once you’re happy, simply click the ‘Save’ button at the top of the screen, then click the ‘Publish’ tab. Click the ‘Status’ slider to set it to Active.
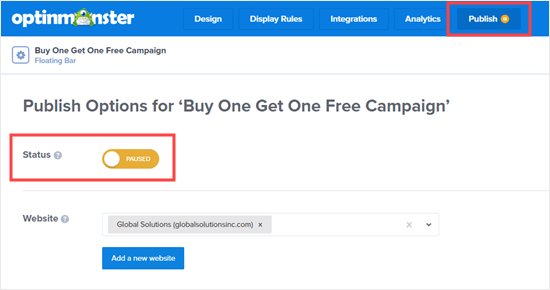
Switching on your alert bar in the OptinMonster interface

The final step is to activate the campaign on your website itself. Click on the OptinMonster tab in your WordPress dashboard, then click the ‘Refresh Campaigns’ button
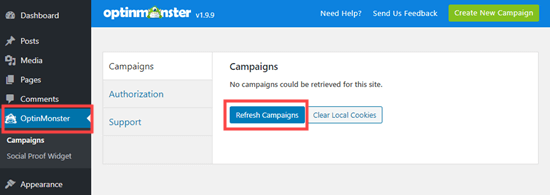
Click the button to refresh your OptinMonster campaigns

You will then see your campaign listed here.
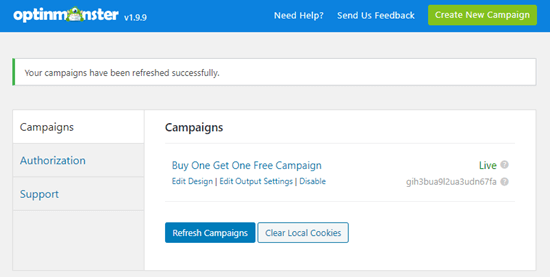
Your OptinMonster campaign should be listed in your WordPress dashboard

Simply visit any page on your website, and you will see your campaign in action:

Alert bar created in OptinMonster

Method 2: Creating an Alert bar using SeedProd

Another way to make an alert bar is to use the SeedProd WordPress plugin. SeedProd is best known for its ‘coming soon’ and maintenance mode pages for WordPress.

SeedProd also has a Notification Bar plugin that you can get when you sign up for any paid package.

First, you need to visit the SeedProd website and sign up for an account. Next, go to the ‘Downloads’ page within your account and download the Notification Bar Pro plugin:
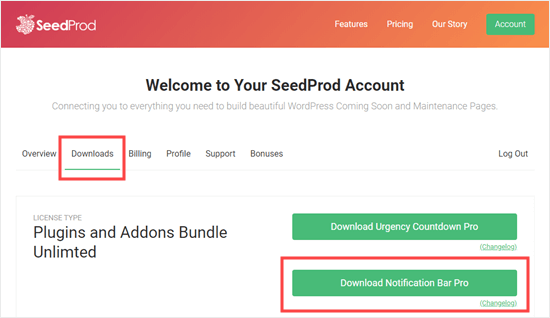
Downloading Notification Bar Pro from SeedProd

Then, you need to install and activate the Notification Bar Pro plugin on your site. For more details, see our step by step guide on how to install a WordPress plugin.

Upon installation, you will see a page where you need to enter your license key. You can find this in your SeedProd account.
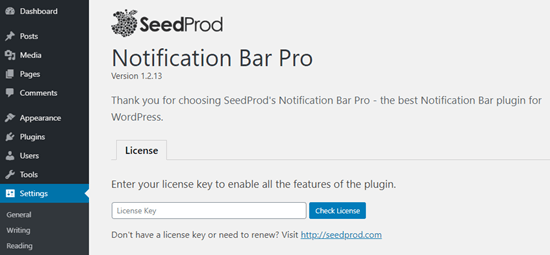
Entering your license key for Notification Bar Pro

Next, go to Settings » Notification Bar Pro where you will start creating your notification bar. Simply enter a name for it and click the ‘Create Bar’ button.
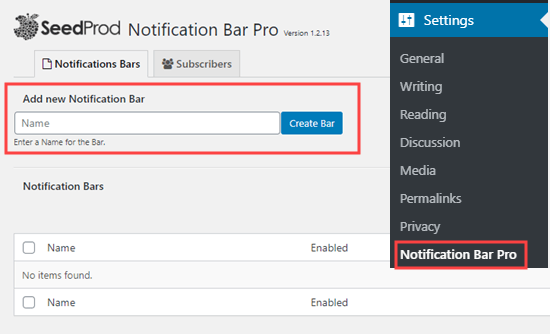
Creating a notification bar in SeedProd

You will now see the SeedProd notification bar editor. To begin with, the notification bar will show as an orange strip at the top of the screen:
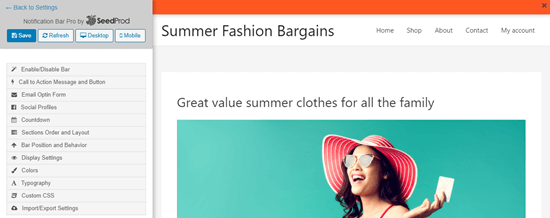
The editing interface for your notification bar

To add text to the notification bar, click the ‘Call to Action Message and Button’ tab on the left hand side. Simply enter the text you want to use. If you want to add a call to action button, you can enter the text and the link for the button:
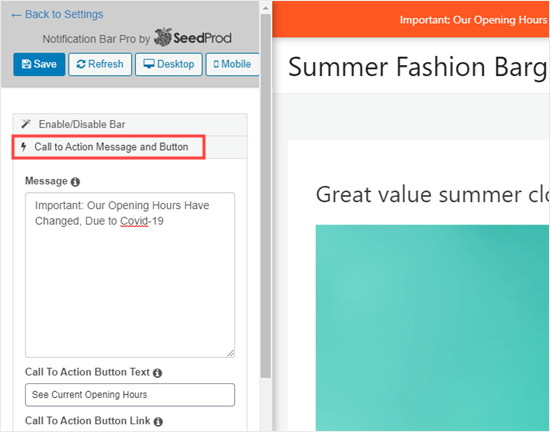
Editing the text for your notification bar

By default, the text will have the same font and size as the main text in your WordPress theme. To make it larger, just click on the ‘Typography’ tab.

Here, you can set any font and size you want for both the text of the bar itself and the button text.
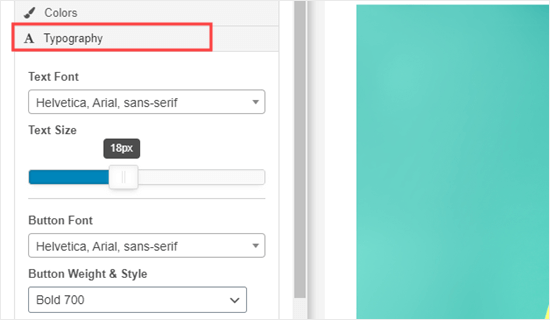
Changing the typography settings for your notification bar

If you want, you can change the color of your bar and button in the ‘Colors’ tab.

You can even add other elements to your notification bar, such as an email optin, a countdown timer, click to call button, and even links to your social profiles.

When you’re happy with your notification bar, click the ‘Enable/Disable Bar’ tab then switch to the ‘Enable Bar’ option. Finally, click the ‘Save’ button at the top of the screen.
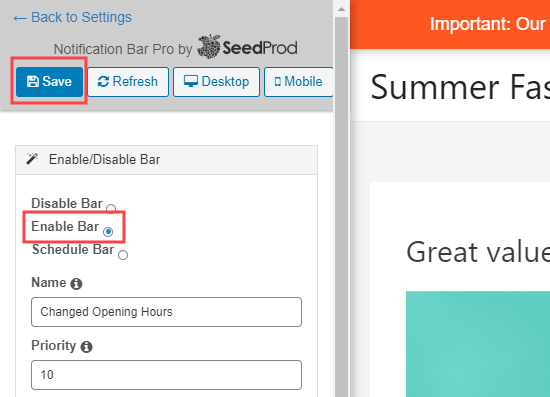
Enable your notification bar to put it live
Your notification bar will now appear on your site:
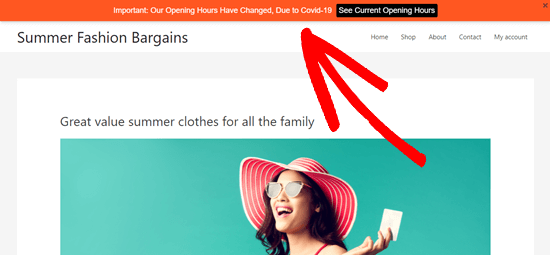
The notification bar displaying live on our website

Method 3: Manually Create an Alert Bar Using Custom HTML/CSS

What if you don’t want to use OptinMonster or Notification Bar Pro? In this method, we’ll show you how to create a notification bar using HTML and CSS code.

Note: We don’t recommend this method for beginners. If you’re new to WordPress or don’t feel confident adding code to your site, then we suggest using one of the plugin methods above instead.

First, you will need to copy and paste some custom CSS code for the alert bar. Simply go to Appearance » Customizer page in your dashboard, then click the ‘Additional CSS’ tab at the bottom.
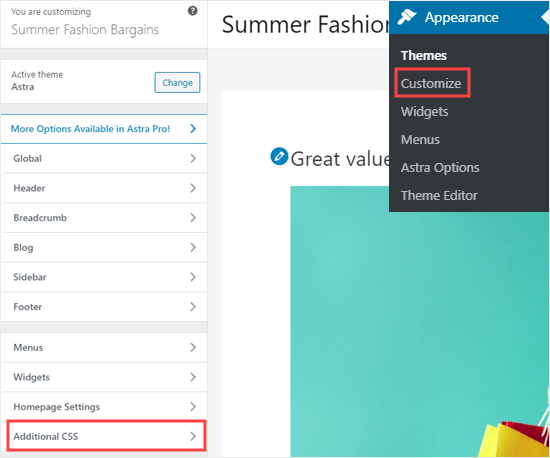
Entering additional CSS in the theme customizer

Now, go ahead and copy and paste this CSS code into that box:

.alertbar { 
    background-color: #ff0000; 
    color: #FFFFFF; 
    display: block; 
    line-height: 45px;
    height: 50px; 
    position: relative; 
    text-align: center; 
    text-decoration: none; 
    top: 0px; 
    width: 100%;
    z-index: 100;
}

After you’ve copied that code, it should look like this. Simply click the Publish button at the top of the page to save your CSS code.
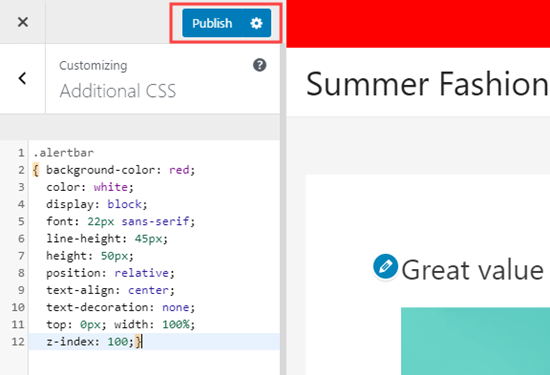
The additional CSS as displayed in the theme customizer

Next, you need to add the HTML code for the alert bar text to your site.

The best way to do this is to install and activate the free Insert Headers and Footers plugin.

Note: Insert Headers and Footers is one of WPBeginner’s own plugins. We created it to make it really easy to add scripts, HTML code, and more to your website pages.

After activating the plugin, go to Settings » Insert Headers and Footers in your WordPress admin. Just copy and paste the following line of HTML code into the ‘Scripts in Body’ box:

<div class="alertbar">We are currently closed due to Covid-19.</div>

Here’s how that code should look in the ‘Scripts in Body’ box of Insert Headers and Footers:
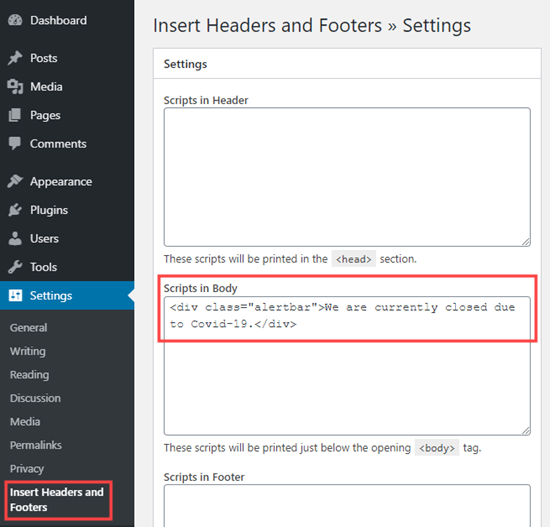
Adding the HTML code using the Insert Headers and Footers plugin

Of course, you can change the alert text to anything else you like. Don’t forget to click the ‘Save’ button at the bottom of the page once you’re done.

Now, you can visit your site to see the alert bar. It should appear at the top of every page, like this:
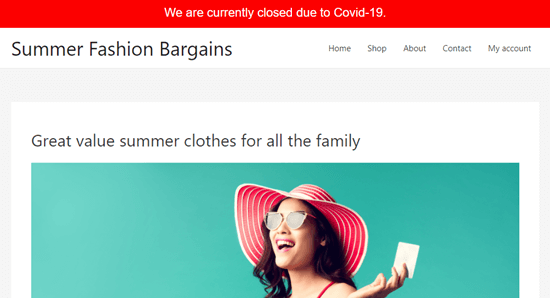
The CSS alert bar live on the website

Tip: In a few WordPress themes, your alert bar may overlap your menu. You could alter the height of the bar to 40px or 30px to avoid this. You will also need to reduce the line height accordingly, so that your text stays centered vertically in the bar.

We hope this article helped you learn how to create an alert bar in WordPress. You might also like our comparison of the best WordPress drag & drop page builders to help you further customize your site without writing any code, and our list of the best WooCommerce plugins to grow your store sales.

If you liked this article, then please subscribe to our YouTube Channel for WordPress video tutorials. You can also find us on Twitter and Facebook.

The post How to Create an Alert Bar in WordPress (3 Easy Ways) appeared first on WPBeginner.


July 29, 2020 at 04:03PM

Tuesday, July 28, 2020

How to Add Text to Speech in WordPress

Do you want to add text to speech feature in WordPress?

Text to speech feature allows you to add an audio version of your articles using artificial intelligence. This is particularly useful for long reads and helping users who prefer audio content while exercising or traveling.

In this article, we’ll show you how to easily add text to speech in WordPress.

Adding text to speech in WordPress

What is Text to Speech in WordPress?

Text to speech is a technology that uses artificial intelligence to convert any text into natural-sounding speech. It is provided as a cloud-based service by several companies including Google Cloud and Amazon AWS.

You can add it to your WordPress website and allow users to listen to your articles. This is helpful for the visually impaired as well as many others who may find it easier to listen to a longer article instead of reading it on a smaller screen. Here’s an example of what it looks like:

Preview of a text to speech audio player

For this tutorial, we will be using Amazon’s AWS Polly TTS (text to speech) service.

It offers a free-tier for 12 months with a very generous limit of up to 5 million characters per month for the first year. After that, the pricing begins at $4.00 per 1 million characters.

You’ll also have the option to save audio files to your website or Amazon S3 storage. This means you will not be reusing the API for every request.

If you are running a WordPress blog or a small business website, then you are less likely to run out of free credits.

With that said, let’s get started.

Setting up AWS Account for Text to Speech in WordPress

For this tutorial, you’ll need an Amazon Web Services account. Amazon offers a basic free plan for a year with generous limits. After that, you’ll be charged according to your usage.

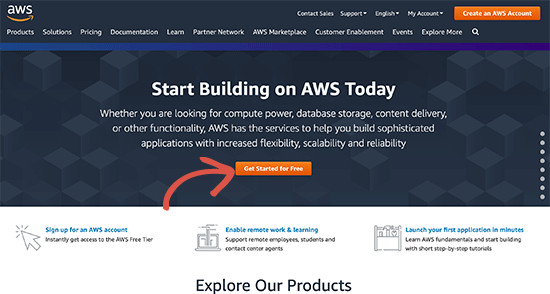
First, you need to visit the Amazon Web Services website and sign up for a free account.

AWS signup

During the signup, you’ll be asked to verify your phone number and enter credit card information.

After that, login to your account dashboard called AWS console. From here, you need to create an IAM user and policy. This will be the user account with permission to make API calls from your WordPress website.

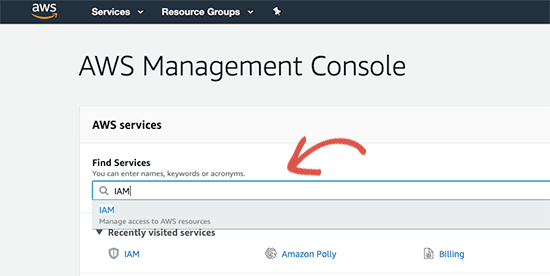
Simply search for IAM in the services search box and then select it.

Managing IAM

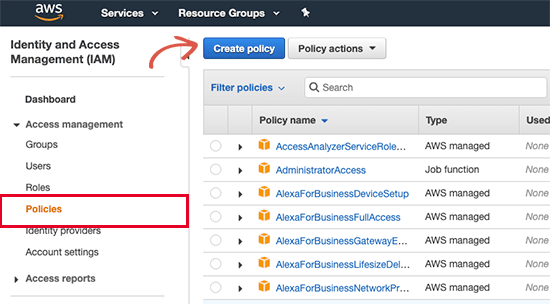
This will launch the IAM (Identity and Access Management) interface. From here, you need to switch to the ‘Policies’ tab and then click on the ‘Create Policy’ button at the top.

Create IAM policy

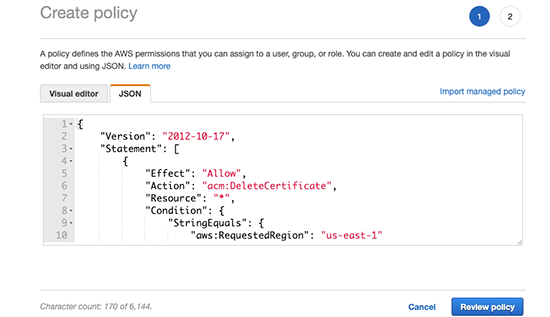
On the next screen, switch to the JSON tab and delete everything inside the text box. After that, copy and paste the following code inside the JSON box.

{
    "Version": "2012-10-17",
    "Statement": [
        {
            "Effect": "Allow",
            "Action": "acm:DeleteCertificate",
            "Resource": "*",
            "Condition": {
                "StringEquals": {
                    "aws:RequestedRegion": "us-east-1"
                }
            }
        }
    ]
}

It should look like this:

Copy and paste the policy rules in JSON format

Next, click on the ‘Review Policy’ button to continue.

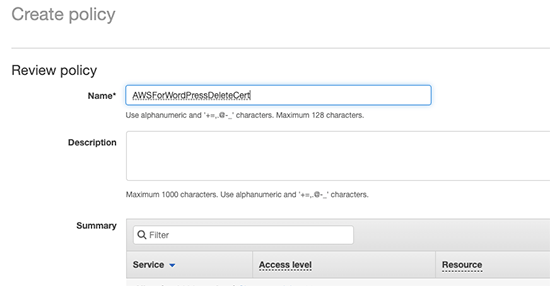
On the next step, you need to enter ‘AWSForWordPressDeleteCert’ in the Name field and click on the ‘Create Policy’ button to save your changes.

Naming the IAM policy

IAM will now save this policy in your AWS account.

Next, you need to create an IAM user account that will be used for your WordPress website.

From the IAM screen, switch to the ‘Users’ tab and then click on the ‘Add User’ button at the top.

Add new user to IAM

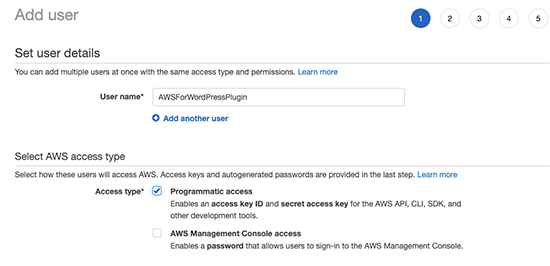
On the next screen, you need to enter ‘AWSForWordPressPlugin’ as the user name and select ‘Programmatic Access’ under the access type.

User name and access type

Click on the ‘Next: Permissions’ button to continue.

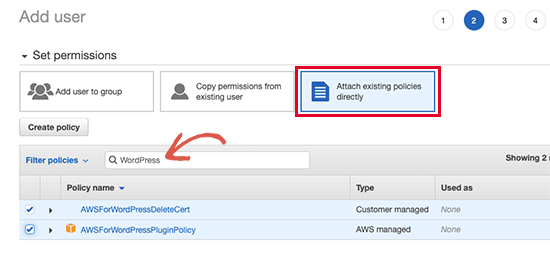
On the Set permissions page, select the ‘Choose Attach existing policies directly’ option and then type WordPress in the search bar.

Make sure to check the box next to AWSForWordPressPolicy and AWSForWordPressDeleteCert options.

Attach policies to the user account

Click on the ‘Next:Tags’ button to continue.

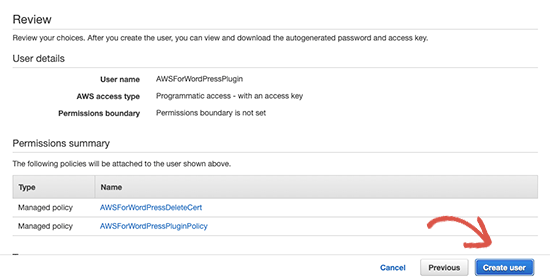
You don’t need to add any tags here, go ahead and click on the ‘Next:Review’ button. You’ll now see user details and policies attached to the user account. Go ahead and click on the ‘Create User’ button to save your changes.

Create user

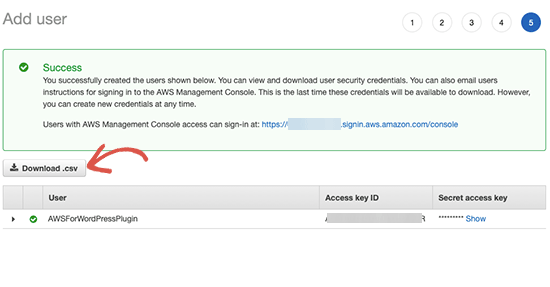
On the next screen, you’ll see your IAM user account details with Access and Secret Keys. You need to click on the Download.csv button to store these credentials on your computer.

Download Access Keys

You can later open the CSV file in a spreadsheet app like Google Sheets or Microsoft Excel. You can also open it in a plain text editor like Notepad.

Setting up Amazong Polly Text to Speech in WordPress

Now that you have set up your AWS account, you can use it to connect your WordPress site to Amazon’s cloud platform.

First, you need to install and activate the AWS for WordPress plugin. For more details, see our step by step guide on how to install a WordPress plugin.

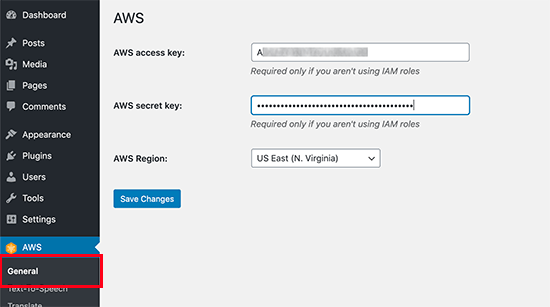
Upon activation, you need to visit AWS » General page and enter your AWS access and secret keys. You can find them inside the CSV file you downloaded earlier.

Connect your website to AWS

Don’t forget to click on the ‘Save Changes’ button to save your credentials.

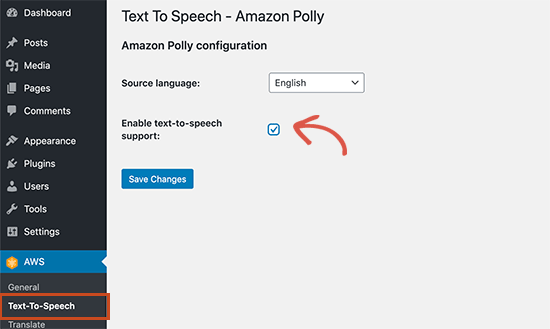
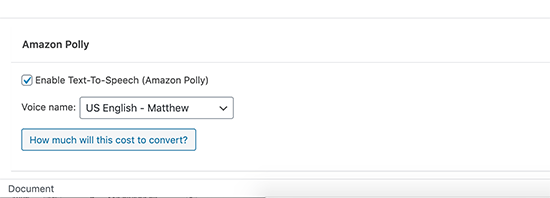
Next, you need to visit AWS » Text-to-Speech page. From here, you can select the language of your content and then check the box next to ‘Enable text-to-speech support’ option.

Enable text to speech

Don’t forget to click on the ‘Save Changes’ button to store your settings.

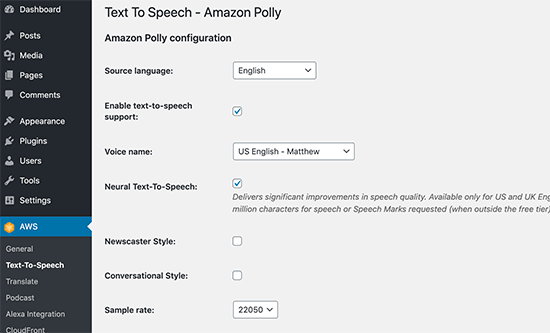
The plugin will now reload the text-to-speech settings page. You’ll now be able to see options to set up Amazong Polly text to speech on your WordPress site.

Text to speech settings

You can select the language, voice type, audio quality, narration style, and more.

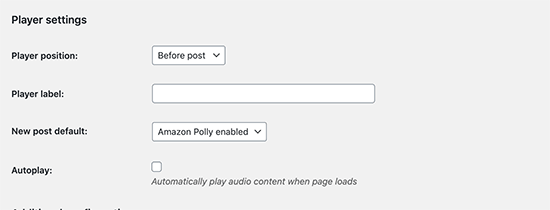
Below that, you can select how you want to display the audio player. You can show it before or after the content.

Text to speech player settings

Additionally, you can tell the plugin to automatically enable text-to-speech for newer articles. If you disable this option, then you will have to manually enable it for posts where you want to display text to speech option.

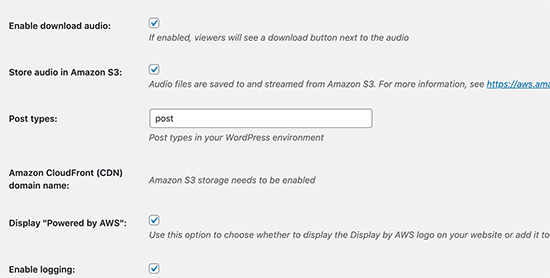
Scroll down further and you can choose where you would like to store the audio files. The plugin allows you to automatically store audio files on the Amazon S3 cloud storage (your free account gives you 5 GB of storage).

Choose file storage options

You can also store them on your WordPress hosting account, but this would slow down your website and also increase your WordPress backup size.

Once you are finished, don’t forget to click on the ‘Save Changes’ button to store your settings.

Displaying Text to Speech Player in WordPress Posts

Depending on your settings, the plugin will automatically display a text-to-speech audio player for newer articles.

Preview of a text to speech audio player

For your older articles, you’ll have to edit the post / page and enable text to speech option located below the post editor.

Enable text to speech for individual posts

Don’t forget to save / update your post and clear WordPress cache after enabling text to speech manually.

We hope this article helped you learn how to easily add text to speech to your WordPress site. You may also want to see our guide how to create an email newsletter to grow your traffic, and how to get a virtual business phone number for your website.

If you liked this article, then please subscribe to our YouTube Channel for WordPress video tutorials. You can also find us on Twitter and Facebook.

The post How to Add Text to Speech in WordPress appeared first on WPBeginner.


July 28, 2020 at 05:46PM

Monday, July 27, 2020

How to Sell Group Memberships in WordPress for Corporate Teams

Do you want to sell group memberships for corporate teams?

Normally, membership websites allow you to sell single user subscriptions. But what if you wanted to sell group memberships for businesses, so that they can add their team members?

In this article, we will show you how to easily sell group memberships in WordPress for corporate teams.

Selling group memberships in WordPress

Why Create Group Memberships in WordPress?

Creating group memberships in WordPress makes it easier for companies to purchase your product licenses in bulk for their team. It also allows for account administrator to easily add or remove licenses as needed.

This type of account doesn’t just apply to corporate teams. It could also be used for volunteer groups, church groups, or even for family memberships.

You could also create this type of account to give teachers access to a virtual classroom for a group of students.

That being said, let’s take a look at how to sell group memberships in a WordPress website.

Setting Up Group Memberships in WordPress for Corporate Teams

For this tutorial, we will be using MemberPress. It is the best WordPress membership plugin on the market and allows you to easily sell online subscriptions on your website.

First, you need to install and activate the MemberPress plugin on your site. For more details, see our step by step guide on how to install a WordPress plugin.

Note: you will need a Plus account or higher in order to use the team accounts feature.

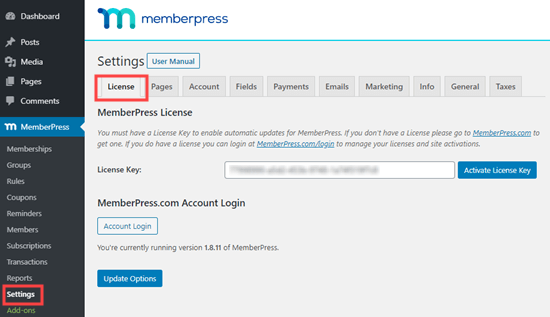
Upon activation, you need to visit the MemberPress » Settings » License page in WordPress admin area to enter your license key. You can find this information under your account on the MemberPress website.

Enter your MemberPress license key

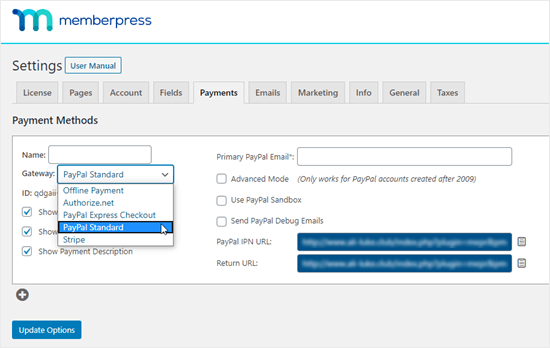
You also need to set up at least one payment gateway for your membership site. You can do this under the ‘Payments’ tab. Simply click the (+) button then select your chosen gateway from the dropdown list and fill in the appropriate details:

Add a new payment gateway in MemberPress

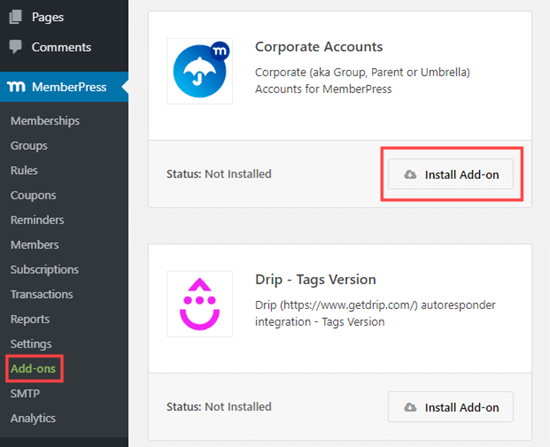
Now, it’s time to enable the corporate membership features. To do that, go to the MemberPress » Add-ons page and click on the ‘Install Add-on’ button next the Corporate Accounts add-on.

Install the MemberPress Corporate Accounts add-on

Now you can create and sell corporate membership accounts for teams.

Let’s create a new membership subscription.

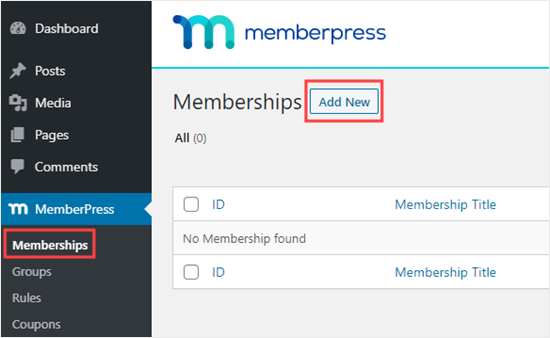
Simply go to the MemberPress » Memberships page and click on the ‘Add New’ button:

Adding a new membership in MemberPress

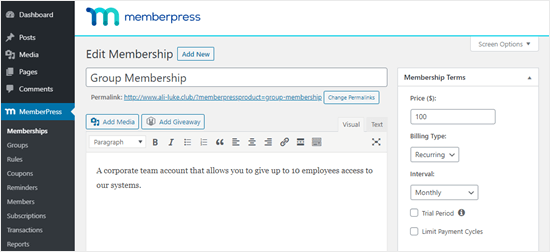
You will see the membership creation screen. You should enter a title (name) for your membership plan and set a price for it. You can create a recurring subscription and choose a billing cycle, such as monthly or annually.

Here, we’re charging $100/month for the membership:

Give your group membership a name and a price

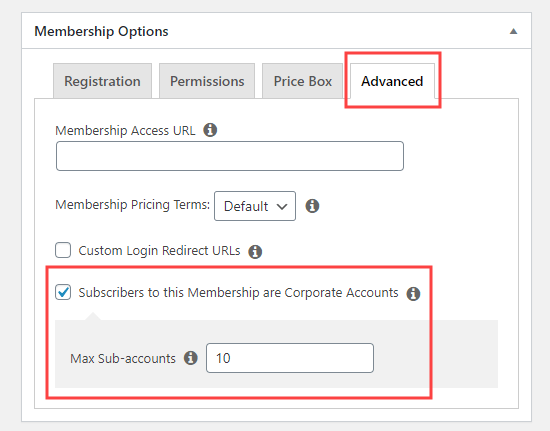
Next, you need to scroll down to the Membership Options area and switch to the Advanced tab. From here, you need to check the box next to the ‘Subscribers to this Membership are Corporate Acccounts’ option.

After that, you need to set a maximum number of sub-accounts to allow for each corporate team membership.

Check the box to create a Corporate Account membership and enter the number of sub-accounts permitted

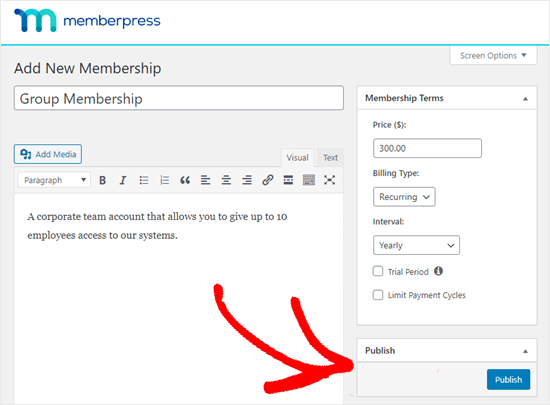
When you’re happy with your settings, go ahead and click the Publish button to save your membership plan.

Publish the new membership when you're ready

Restricting Content for the Corporate Team Members to Access

The next step is to restrict the content that you only want corporate team accounts to have access to.

You can do this by creating a membership rule. For example, you might choose to lock all pages that are a child pages of a ‘Corporate Membership’ page.

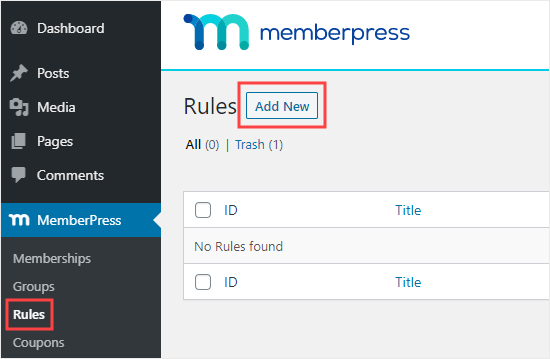
To create a rule, you need to go to MemberPress » Rules in your WordPress dashboard. Then, simply click the ‘Add New’ button to start creating a new rule:

Click the Add New button to create a new rule

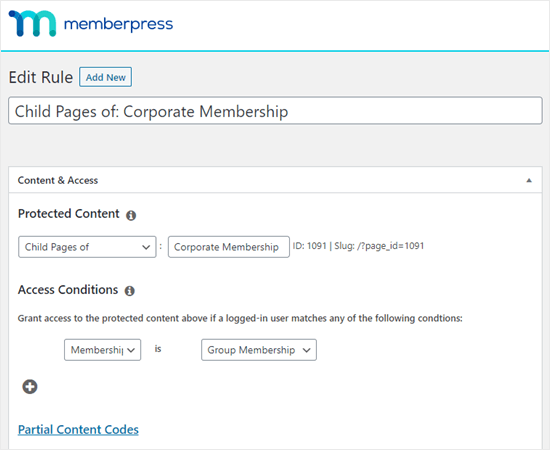
For your rule, select ‘Child Pages of’ from the ‘Protected Content’ dropdown. Then, type in the name of the parent page and select it.

From the ‘Access Conditions’ dropdown, you should select ‘Membership’ then the name of your membership level.

Select 'Child Pages' and then enter the name of the parent page

Note that you’ll also need to protect the parent page separately if you also want to make that only accessible to members.

Check out our detailed guide on creating a WordPress membership site for more help on creating membership rules.

How the Corporate Membership Account Looks for Users

When someone signs up for the corporate membership account, they can then create sub-accounts at any time. However, the number of sub-accounts can be limited by their plan type.

For instance, let’s say you run a membership site with healthy eating plans and online yoga classes.

Personal trainers or health and fitness experts could sign up for a corporate membership. They could then sell this to their own clients as part of their services, creating an account for each of their clients.

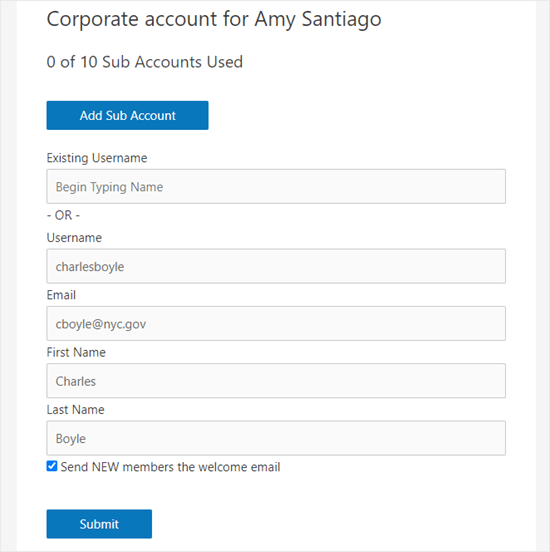
After the account owner signs up, they can easily add new members by entering a username, email address, and name:

Adding sub-accounts to the corporate account

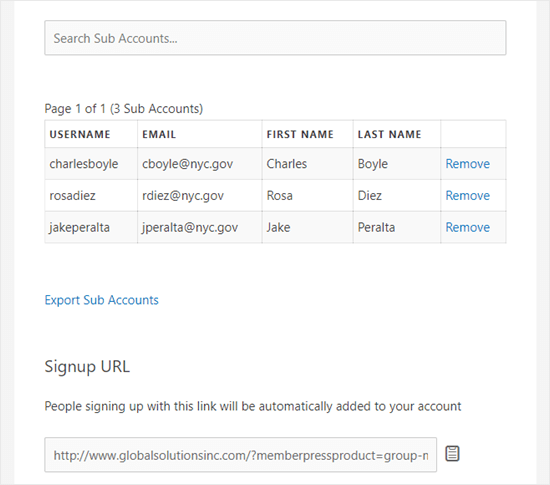
The account owner can remove sub-accounts, too. They can also give their coworkers or clients a link where they can sign themselves up to be added to the account:

The user's list of subaccounts plus the signup link

We hope this article helped you learn how to sell group memberships in WordPress for corporate teams. You may also want to see our guide on how to create an email newsletter to engage your users, and our list of the best WordPress plugins for all sites.

If you liked this article, then please subscribe to our YouTube Channel for WordPress video tutorials. You can also find us on Twitter and Facebook.

The post How to Sell Group Memberships in WordPress for Corporate Teams appeared first on WPBeginner.


July 27, 2020 at 03:52PM

Friday, July 24, 2020

6 Best Authorize.Net WordPress Plugins (Compared)

Are you looking for the best Authorize.net plugin for WordPress?

Authorize.net is a popular payment gateway that allows you to easily accept credit card payments on your website.

In this article, we’ll compare the best Authorize.Net WordPress plugins that you can use to accept online payments on your website.

The Best Authorize.Net plugins for WordPress

Why Use Authorize.Net WordPress Plugins to Take Payments?

Authorize.Net lets you easily accept payments on your website. It’s a seamless process for your customers because they can pay through credit or debit card directly on your website.

Since Authorize.Net works with your normal merchant bank account, it often have lower fees compared with popular online payment gateways like Stripe and PayPal.

With that said, let’s take a look at the best Authorize.Net plugins for WordPress that lets you easily accept online payments (without writing any code).

1. WPForms

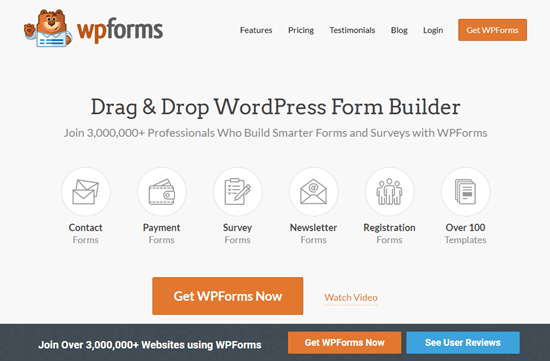
The WPForms website

WPForms is the best WordPress form builder on the market. It comes with an easy to use drag and drop interface with pre-made form templates to easily make any type of form including payment forms.

You’ll need at least their Elite plan to access the Authorize.net addon. This also gives you access to WPForms’s all other addons including Stripe and PayPal payment gateways.

Simply create an online payment form and install the WPForms ‘Authorize.Net’ addon.

WPForms lets you easily configure your form to send an email notification to more than one person. For instance, you could send a receipt to the customer and send order details to your team members.

You can use WPForms for all types of forms, like contact forms and even surveys and polls.

2. MemberPress

The MemberPress website

MemberPress is the best WordPress membership plugin out there. It allows you to easily build a membership website and restrict any content to paid subscribers and members.

If you want, you can even protect just part of a post or page by using a shortcode. This can be a great way to provide an introduction or teaser for your content, before encouraging your site’s visitors to subscribe.

With MemberPress, you can charge a one-off fee or set up a recurring subscription. Plus, you can set up a cheap or free trial period to encourage new users to join.

MemberPress also gives you content dripping features. These let you restrict content, so it’s only shown once someone has been a member for a certain period of time. This makes MemberPress a great tool for running online courses.

With the ‘Developer’ plan, you can use Authorize.Net as your payment gateway for MemberPress. This is a great option if you process a lot of credit card transactions.

3. WooCommerce

WooCommerce

WooCommerce is the most popular eCommerce plugin for WordPress that lets you build a complete online store.

Along with Stripe and PayPal, WooCommerce also has payment gateway integrations for Authorize.Net and many other payment gateway solutions.

To accept payments on your online store using Authorize.Net, you will need to use an extension like WooCcommerce Authorize.net or YITH’s WooCommerce Authorize.Net.

If you’re looking to build a complete eCommerce store with all the powerful features like shipping, taxes, inventory management, etc, then we recommend using WooCommerce.

For simple order forms or payment forms, WPForms is the best option.

Related: See our guide on how to start an online store and our comparison of the best eCommerce plugins.

4. GiveWP

GiveWP website

GiveWP is the best donations plugin for charities and nonprofits who want to raise money online. It’s really easy to use and has lots of powerful features to help you reach your fundraising goals.

With GiveWP, you can tweak every aspect of the donation process. You can accept multi-level donations, set campaign level donation goals, offer different currency options, provide tax-deductible donation receipts, and much more.

You also get detailed reports in GiveWP, where you can view how your different campaigns are performing. You can easily see who your top donors are and you can even add notes about them for internal use by your team.

GiveWP integrates with Authorize.Net, even on the ‘Basic’ plan. This makes it really affordable for you to take credit and debit cards directly from your site.

5. Restrict Content Pro

The Restrict Content Pro website

Restrict Content Pro is another great option if you want to create members-only content on your site. It works really well with the WordPress interface, and beginners find it easy to get started with.

You can easily send welcome emails to your members, create different subscription packages with multiple levels, offer discount codes, and much more. Restrict Content Pro is a fully-featured plugin that lets you do everything you need to run a membership site.

It’s got built-in integration with Easy Digital Downloads, too, making it a great option if you’re already using that. You can also hide content within a post or page using shortcodes, as with MemberPress.

You can use Authorize.Net with Restrict Content Pro’s cheapest ‘Personal’ license as the Authorize.Net addon itself is free. This makes it a good alternative to MemberPress if you’re on a tight budget.

Note: There’s also a free version called Restrict Content. However, this doesn’t let you use Authorize.Net.

6. WP Invoicing

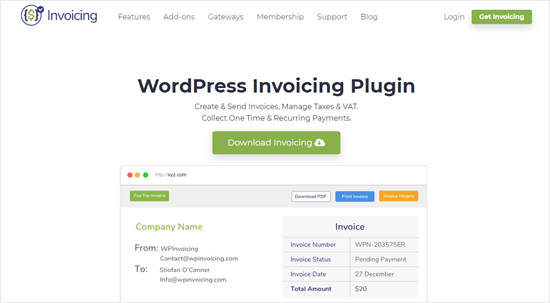
The WP Invoicing website

WP Invoicing is a great invoicing plugin for anyone who needs to create and send invoices. It has a lot of other useful features, too.

For instance, WP Invoicing lets you manage taxes and VAT for European countries. It also gives your customers the opportunity to settle your invoices directly on your website through various payment gateways, including Authorize.Net.

You can set up automatic email reminders using WP Invoicing, saving you time on chasing up payments. This is particularly useful for freelancers who may not have any administrative support. You can also set up recurring payments.

WP Invoicing integrates with a number of other apps, so that you can make invoices automatically. You can even create an invoice or quote when a specific contact form is submitted.

Final Thoughts: Which is the Best Auhorize.Net plugin for WordPress?

We believe that the best Authorize.Net WordPress plugin will vary based on your exact needs, but for the wide-variety of use-cases: WPForms is the best Authorize.Net plugin for WordPress.

If you’re looking to create a membership site or online course, then MemberPress is the best solution.

If you’re looking to create a full-featured eCommerce store, then WooCommerce is the best solution.

We hope this article helped you find the best Authorize.Net WordPress plugins. You may also want to see our comparisons of the best business phone services, and the best email marketing services for growing your small business.

If you liked this article, then please subscribe to our YouTube Channel for WordPress video tutorials. You can also find us on Twitter and Facebook.

The post 6 Best Authorize.Net WordPress Plugins (Compared) appeared first on WPBeginner.


July 24, 2020 at 05:10PM