Monday, August 3, 2020

How to Get Slack Notifications From Your WordPress Site

Do you want to get Slack notifications based on certain activity on your WordPress site?

Slack has become a central communication platform for many online businesses. Having activity notifications like new sales, new leads, new blog posts, etc. inside Slack can be helpful in streamlining your business workflows.

In this article, we’re going to show you how to easily get Slack notifications from your WordPress site.
Getting Slack notifications from your WordPress site

Why Get Slack Notifications From Your WordPress Site?

Getting Slack notifications for key events on your WordPress site lets you keep everyone informed and even respond to certain things quickly.

For instance, you might want to get a Slack notification when your site’s contact form is completed. Or you may want a notification if a product in your online store is low on stock.

We’re going to take you through several different ways to set up Slack notifications from your WordPress site.

You can simply use the navigation links to jump straight to the section you want.

Get a Slack Notification When a New Post is Published

If you run many WordPress blogs like we do, then you may want to keep your team informed on all the new article updates that are going live.

Alternatively, you may want to keep your team briefed on all the new things happening in your industry (competitor updates, thought leaders, etc).

This is where Slack notifications can help. You can simply create a new channel that gets RSS feed updates from your favorite sites.

First, go to the RSS app page in Slack’s App Directory then click the ‘Add to Slack’ button.
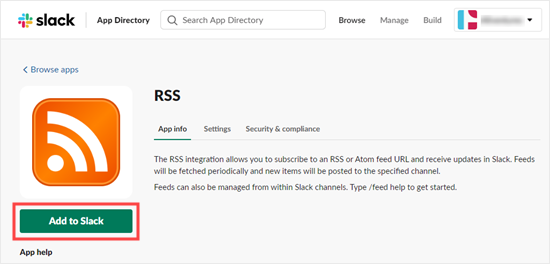
Adding the RSS app to your Slack workspace

Next, click the ‘Add RSS integration’ button.

Click the button to continue setting up the RSS integration

Now, you need to enter the URL of the feed you want to add and choose which Slack channel you want to post notifications to. Once you’ve entered these details, click the ‘Subscribe to this feed’ button.
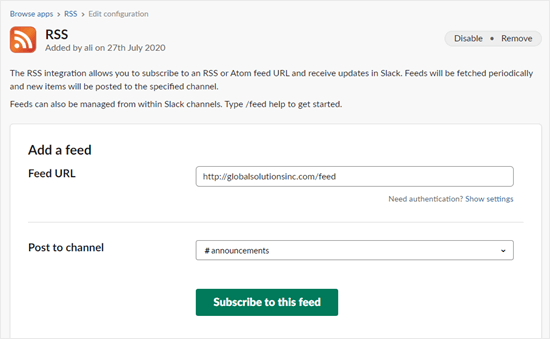
Adding your RSS feed's URL to the Slack RSS app

The app will then fetch and display your RSS feed title on screen.
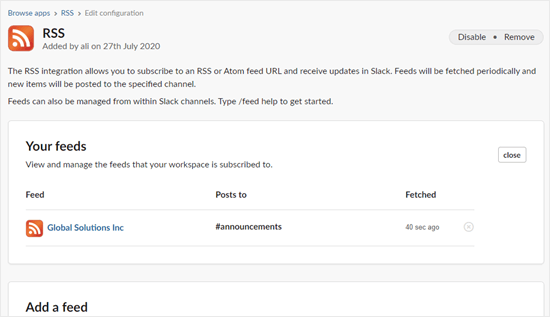
The RSS feed has now been added to your list of feeds

If you run multiple WordPress sites, then you can add more feeds as needed.

Tip: You don’t have to own the RSS feed. You could use the RSS app to keep an eye on your competitors’ sites or stay on top of news from other blogs in your industry.

You will now automatically get a notification in your chosen Slack channel when a new post is published. The app checks for new items every few minutes, which means these notifications may not appear instantly.
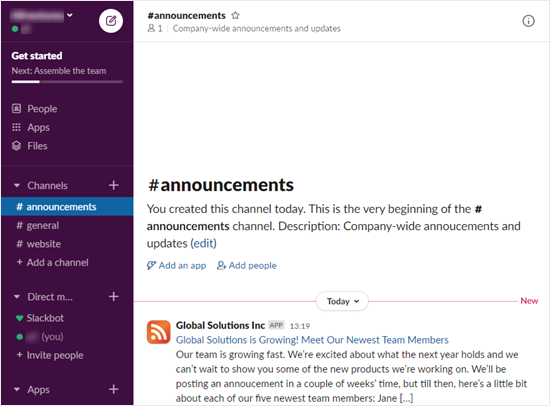
A new blog post notification shown in Slack

Setting Up the Slack Notifications WordPress Plugin

If you want Slack to notify you about new posts, comments, WooCommerce orders, and other activity on your site, then you need to use the Slack Notifications plugin.

First, you need to do install and activate the Slack Notifications plugin. For more details, see our step by step guide on how to install a WordPress plugin.

Upon activation, click the Slack Notifications link at the bottom of your WordPress admin sidebar. You will see the Slack Integration page.
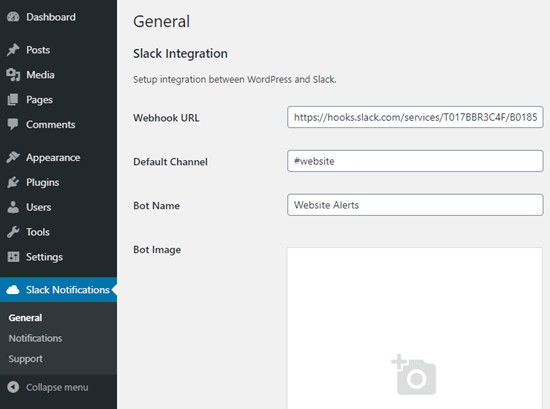
Setting up the Slack Notification plugin's integration with Slackapps page on Slack and click the ‘Create an App’ button:
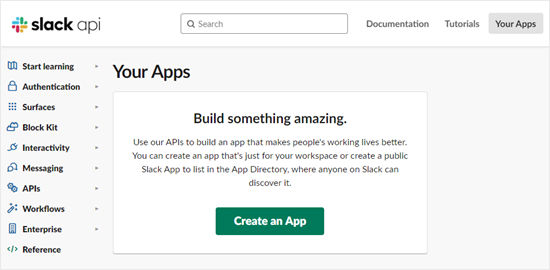
Creating a new app in Slack

Next, enter a name for your app and choose your workspace from the drop-down list. Then, go ahead and click the ‘Create App’ button:
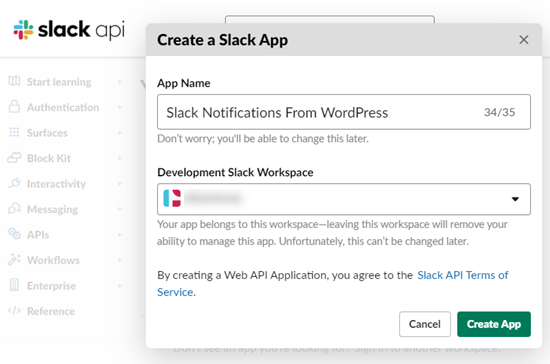
Name your app and select a workspace

You’ll now see a page titled Basic Information. Here, you need to click on the ‘Incoming Webhooks’ section.
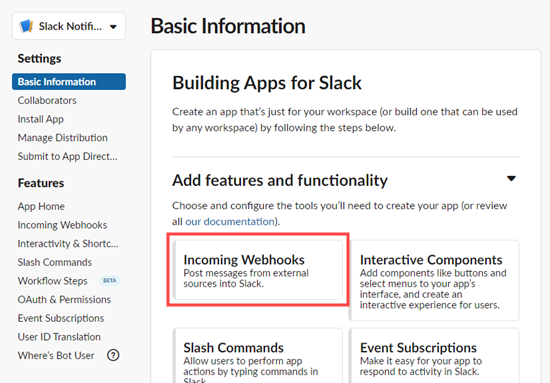
Click on the 'Incoming Webhooks' feature

On the next screen, switch the ‘Activate Incoming Webhooks’ slider to the ‘On’ position:
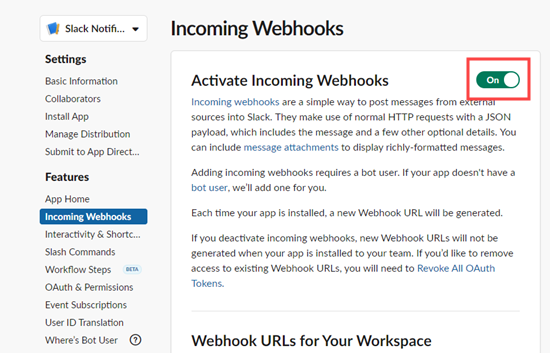
Switch the toggle on to activate incoming webhooks

After that, you need to scroll down the page and click on the ‘Add New Webhook to Workspace’ button:
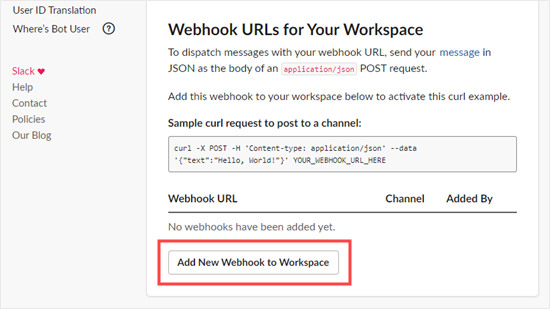
Click the button to add a new webhook to your workspace

Slack will now prompt you to select the channel from a drop-down list. You need to click the ‘Allow’ button to give the app permission to post to it:
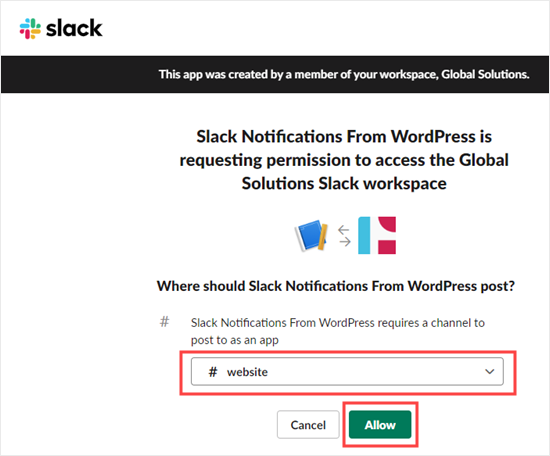
Select a channel and give your webhook permission to post to it

You will now see the previous page again, with your webhook in place. Simply copy this or leave the tab open, as we will need it in a moment.
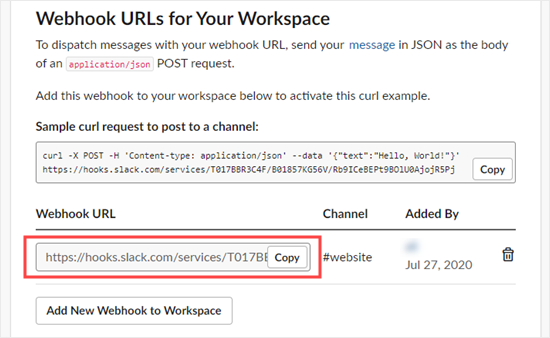
Getting the URL for your webhook

Now you need to switch back to your WordPress site’s Slack Notifications settings page. On this page, go ahead and copy / paste the webhook URL you created earlier, enter the default channel, and the bot name that you want to use.

Setting up the Slack Notification plugin's integration with Slack

After that, you need to scroll down the page and click on the ‘Run Test’ button at the bottom.
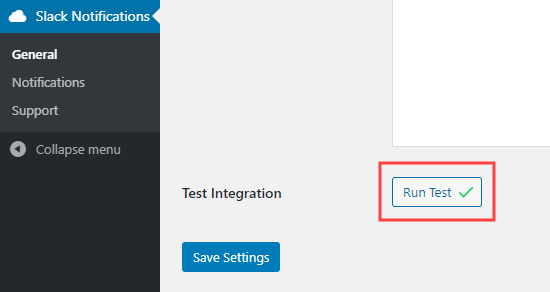
Run a test of the Slack Notifications plugin to make sure the integration is working

You should get a notification into your Slack channel like this. The app will have the name you gave it when setting it up in Slack.
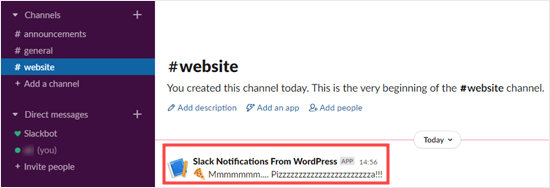
The test message, successfully received in Slack

Don’t forget to click the ‘Save Settings’ button at the bottom of the page, too.

The Slack Notifications plugin is correctly connected. The next step is to set up notifications from your WordPress site.

To set up any notification, you need to go to Slack Notifications » Notifications in your WordPress admin. Click the ‘Add New’ button at the top of the screen:
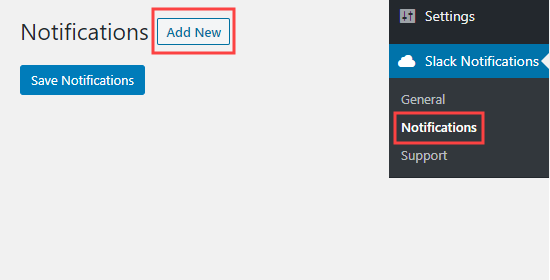
Adding a new notification using the Slack Notifications WordPress plugin

We will go through several different useful options that you may want to use.

Get a WooCommerce Sales Notification in Slack

Are you running an online store with WooCommerce? Typically you can setup new sale notifications via email, but did you know that you can setup WooCommerce sales notification in Slack too?

With the Slack Notifications plugin, you can get a message to your chosen channel whenever a new WooCommerce order comes in.

First, make sure you’ve followed the instructions above to set up Slack Notifications correctly.

Then, simply set up WooCommerce notifications by going to Slack Notifications » Notifications and clicking on the ‘Add New’.

You’ll see several drop-downs. Go ahead and set ‘Notification Type’ to ‘WooCommerce’ and leave ‘Notification Options’ set to ‘New Order’. After that, click the ‘Save Notifications’ button.
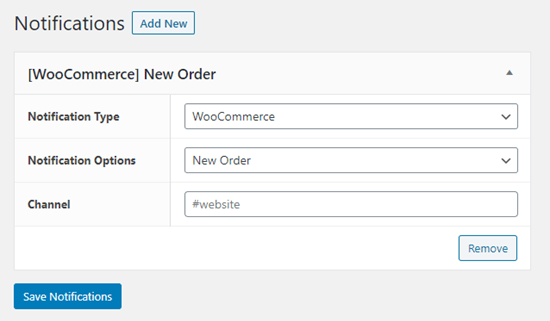
Setting up a new WooCommerce order notification for Slack

You should now get a notification in Slack whenever a new order comes in. This will include the order ID, status, total, and payment method. It will also include the item(s) purchased.

Note: The notification will not include any personal details such as the customer’s name or address.
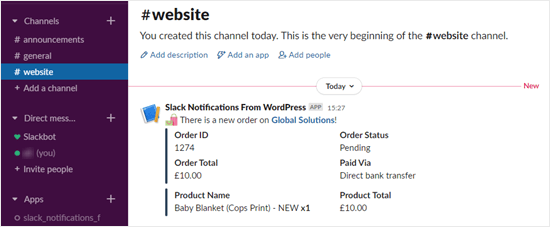
The Slack notification for a new order in WooCommerce

Get a Slack Notification for Plugin Updates

Outdated plugins can be a serious risk to the security of your WordPress site. As a business owner, sometimes you might get busy and forget to update plugins, especially if you run multiple websites.

The Slack Notifications plugin lets you get a notification whenever a plugin needs updating.

First, you need to install, activate, and set up the plugin, as shown above. Then, go to Slack Notifications » Notifications in your WordPress admin and click the ‘Add New’ button.

For the ‘Notification Type’ select ‘System’ and for the ‘Notification Options’ select ‘Plugin Update Available’. After that click, Save Notifications button.
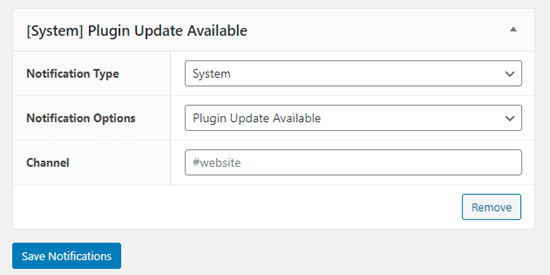
Setting up a Slack notification for when a plugin update is available

You’ll receive a notification in Slack whenever a plugin needs updating:

A plugin update notification in Slack

Note: You can also set up an alert for theme updates and core WordPress updates in the same way.

Get New Comment Notifications in Slack

The Slack Notification plugin also lets you easily get notified of new comments on your WordPress site.

Simply install, activate, and set up the plugin, as shown above. Then, go to Slack Notifications » Notifications in your WordPress admin and click the ‘Add New’ button.

Next, you need to set the Notification Type to ‘Comments’. The Notification Options drop-down should default to ‘New Comment’. After that, simply click the ‘Save Notifications’ button at the bottom.
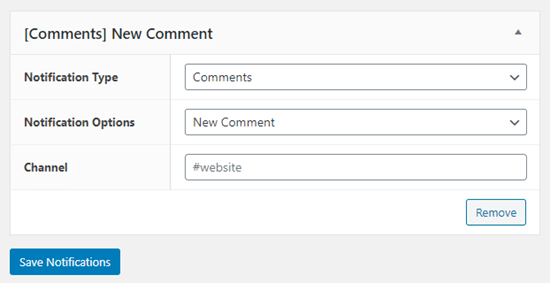
Setting up new comment notifications into Slack from WordPress

You’ll now receive a notification in Slack for each new comment on your site. This will include a link to the post being commented on, the commenter’s name and email address, and the text of their comment:
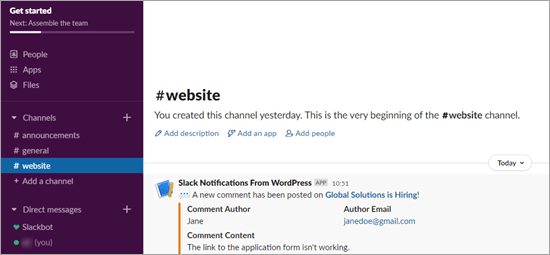
The new comment notification in Slack

There are lots of other ways you could use the Slack Notification plugin to stay aware of what’s happening on your WordPress site.

For instance, you could get a notification every time a page is updated, every time a new post is scheduled, and so much more.

Get a Slack Notification When a WordPress Contact Form / Lead Form is Submitted

Often business owners want to immediately respond to new sales / lead form inquiries. You can connect just about every WordPress contact form to Slack using a tool called Zapier.

Zapier is like a bridge that lets you connect two apps, such as WPForms and Slack. It works with over 2,000 different apps. For the sake of this example, we’ll use WPForms which is the #1 rated WordPress form plugin.

First, you’ll need to install and activate the WPForms plugin. For more details, see our step by step guide on how to install a WordPress plugin.

Note: you’ll need at least the Pro version of WPForms to use the Zapier addon.

Upon activation, go to the WPForms » Settings page to enter your license key. You will find the license key in your account section on the WPForms website.
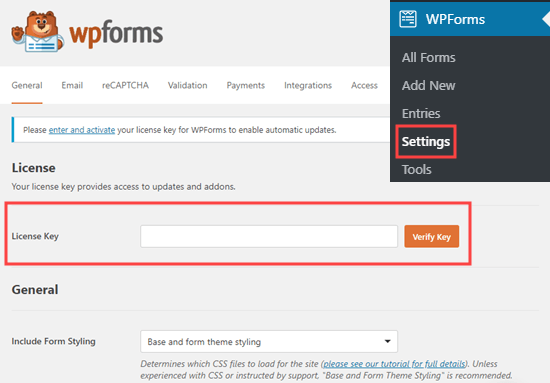
Entering your license key for WPForms

Next, go to the WPForms » Addon page. Find the Zapier addon, then go ahead and install and activate it.

Installing the Zapier addon for WPForms

Once you’ve installed that addon, go to the WPForms » Settings » Integrations page. Simply click on the Zapier logo here, and you’ll see your Zapier API key.
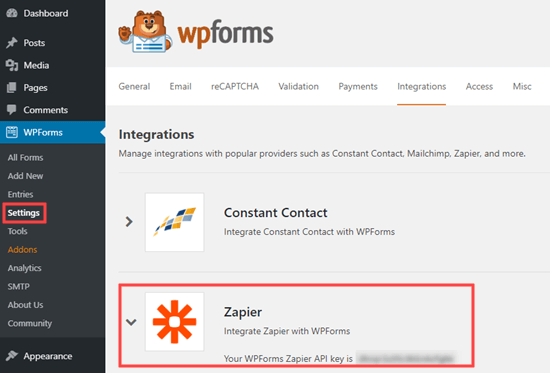
Get your API key from WPForms to use with Zapier

You need this to connect Zapier and WPForms, so copy it somewhere safe or keep this tab open in your browser.

You then need to set up a form and submit a test entry. We’re going to use the ‘Suggestion Form’ template as the basis of our form.

You can follow our instructions on creating a form in WPForms for help getting your form set up.

You will also need an account with both Zapier and Slack. In your Slack workspace, you need to add the Zapier app.

Then, you can create your Zap. Login to Zapier and click the ‘Make a Zap’ button on the top-left to start the configuration wizard.

Click on the button to start making your Zap

In Zapier, a ‘zap’ is a process with a trigger and an action. Our trigger will be someone completing the form, and our action will be to send a Slack message.

At the top of the screen, go ahead and give your zap a name. After that, we need to set up the trigger.

In the ‘Choose App & Event’ box, simply type ‘WPForms’ into the search bar and click on the WPForms icon that appears.
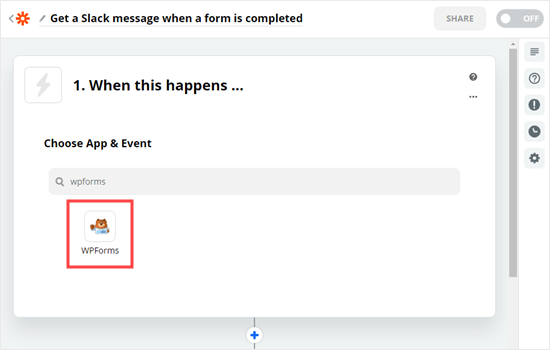
Choose the WPForms app to start off your Zap

Zapier should automatically fill in the trigger event ‘New Form Entry’, so you just need to click the ‘Continue’ button.
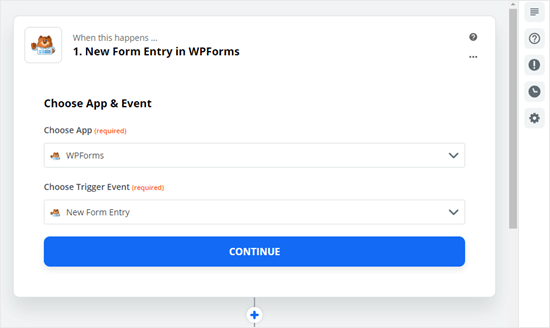
Triggering the zap when the form is submitted

You’ll then be asked to log in to your WPForms account. Simply click on the ‘Sign in to WPForms’ button:

Click the button to sign into WPForms

Next, you’ll see a popup window. Here, you need to copy the API key from WPForms that you found earlier. You also need to enter the URL (domain name) of your website. Once you’ve entered these, click the ‘Yes, Continue’ button.
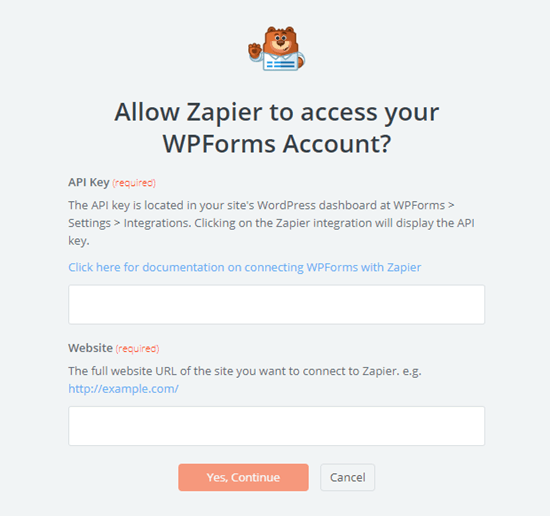
Enter your API key from WPForms and the URL of your website

On the next step, Zapier will ask you to choose your form from a drop-down list. Just click on the form that you want to use, then click the ‘Continue’ button.
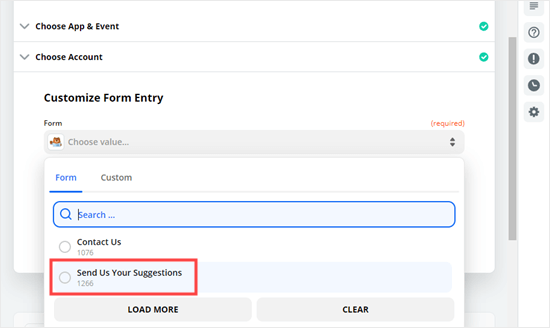
Select the form that you want to receive Zap notifications from

You will now be prompted to test your trigger. Click the ‘Test trigger’ button so that Zapier can look for your test entry.
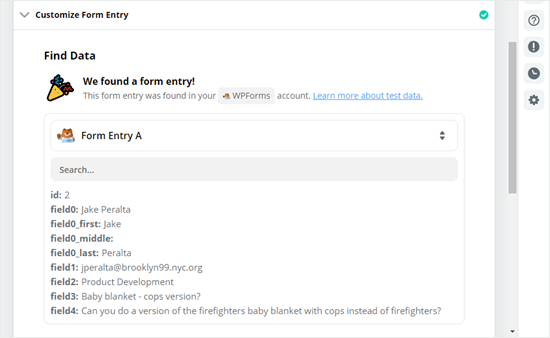
Test your trigger to make sure Zapier has found your test WPForms entry

Once Zapier has found your test data, go ahead and click the ‘Continue’ button.

For the ‘Do this’ action part of the Zap, you need to choose Slack as your app. Simply type ‘Slack’ into the search bar and then click on the Slack app:
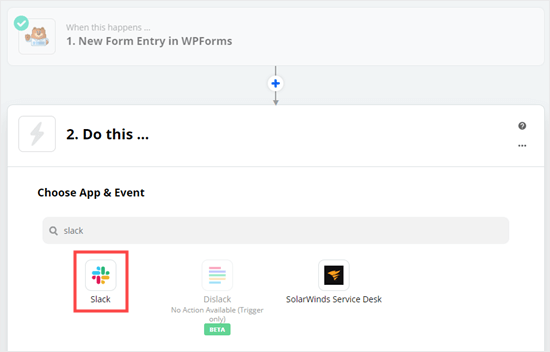
Select Slack as the app for the "Do This" part of the zap

Next, you need to choose your Action Event. We’re going to choose ‘Send Channel Message’ here.
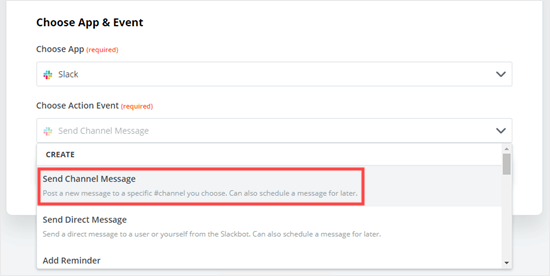
Select "Send Channel Message" from the drop-down list to get the notification to a channel in Slack

Tip: There are several other actions you could choose instead. For instance, you could trigger a direct message or a reminder.

Now, click the ‘Continue’ button. You will then be prompted to sign in to Slack. Simply follow the on-screen prompts to sign in and give Zapier permission to access your Slack workspace.

Once you’ve connected your Slack account, click the Continue button again to move on.

You’ll then be prompted to pick a channel from the drop-down list. We’ve chosen ‘website’ for ours.
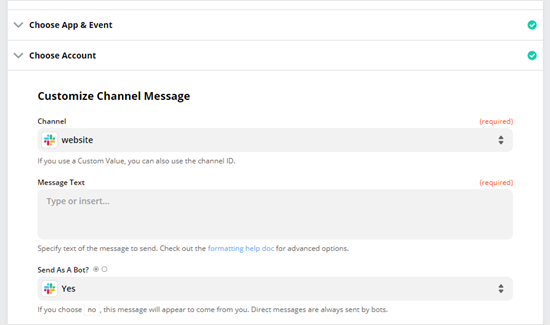
Choose the Slack channel that you want to receive form notifications to

Next, you’ll need to enter the text for the notification.

You can include the details of the form submission, as we’ve done here. When you click on the box, you’ll see your form fields in a drop-down below. Go ahead and add whichever fields you want to the message.

Tip: The name of the fields will not be included in the Slack notification. We have added some text before each field to help make the message clear.
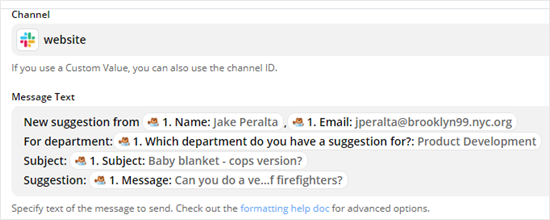
Setting up the message for your Slack notification

Now, you need to give your bot a name. You may also want to choose an emoji. You can leave the other options as their defaults.
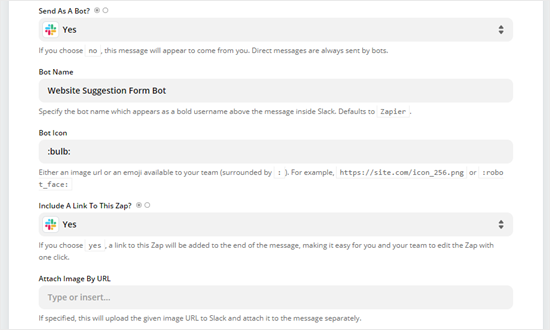
The different options you can choose from in Zapier for your Slack notification

Once you are ready, click the ‘Continue’ button to move on.

It’s time to try out your app. Go ahead and click the ‘Test & Review’ button.
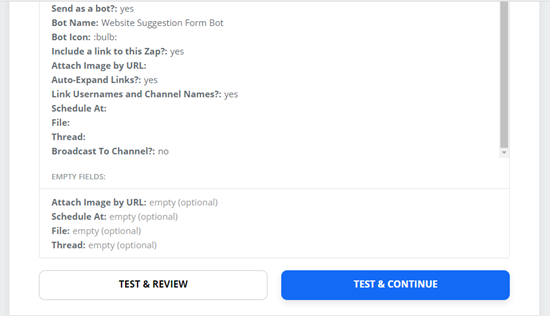
Reviewing the details of your zap and testing it out

Zapier will send your test data to Slack. Go ahead and check Slack to see if your message came through as expected. If there is anything you want to change, you can go back and do so.

Once you’re happy with the Zap, simply click the ‘Turn on Zap’ button.
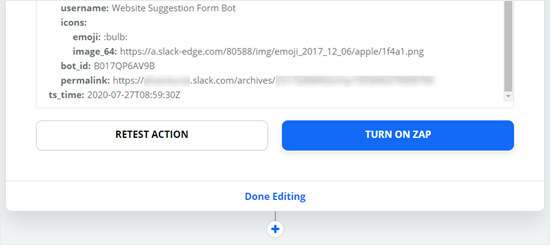
Turn on your Zap once you've tested it to make sure it's working

You may also want to send a new test entry through your form to ensure it appears correctly in Slack. Here is our Slack channel with our first test message plus a second one submitted after the Zap was turned on:
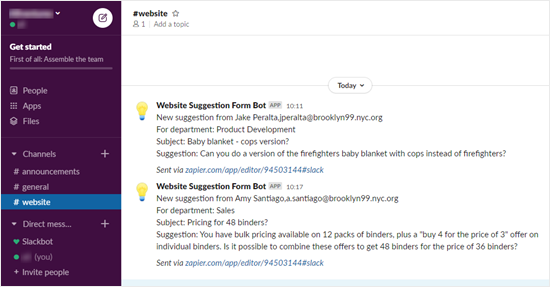
Examples of Slack notifications that have come through the WPForms suggestion form on the WordPress site

You can use Zapier to connect just about every email marketing service, marketing automation tool, and other business tools with each other as well as Slack.

The process is roughly similar to what we have demonstrated above with WPForms.

When used properly, Slack Notifications can significantly streamline your workflow by centralizing all the important things inside the central communication platform for your business.

We hope this article helped you learn how to get Slack notifications from your WordPress site. You might also be interested in our articles on the best business phone services for small business, and the best live chat software to get more sales / improve support.

If you liked this article, then please subscribe to our YouTube Channel for WordPress video tutorials. You can also find us on Twitter and Facebook.

The post How to Get Slack Notifications From Your WordPress Site appeared first on WPBeginner.


August 03, 2020 at 06:00PM

Friday, July 31, 2020

23 Best Marketing Automation Tools for Small Businesses

Are you looking for the best marketing automation tools for your small business?

Whether it’s email marketing, content marketing, social media, or sales, there are now marketing automation tools available that can help you get better results, faster.

In this article, we will share the best marketing automation tools for your small business, so you can grow your business, reach more customers, and save time.

The best marketing automation tools for small businesses

Why Your Small Business Needs Marketing Automation Tools

Marketing automation helps make your workflow more efficient, so you can grow your business faster and smarter.

Basically, you can create specific content or process, and then the tool keeps working for you without you needing to do anything.

For instance, you might set up an email autoresponder series, create a smart chatbot for your site, or set up a sales CRM that organizes your leads for you.

To help you find the best marketing automation tools, we have organized them in the following categories (simply click on the link to jump to specific sections):

Best Email Marketing Automation Tools

Even if you have an email newsletter, you may not be taking advantage of all the automation tools available.

These tools let you set up autoresponders to market consistently to every new prospect who joins your list.

1. Constant Contact

The Constant Contact website

Constant Contact is the best email marketing service for small businesses. You can use it to set up a sequence of emails that will go out automatically to new subscribers. You can even send messages based on what actions your subscribers take, or don’t take.

It’s easy to create emails using Constant Contact’s simple drag and drop interface. There’s a 60 day free trial of Constant Contact available, letting you try out this tool before committing to a payment plan.

The Constant Contact support team is available through live chat, phone, and email.

Price:

Constant Contact’s ‘Email’ plan costs from $20/month. This only has basic automation features. For the advanced automation features, get the ‘Email Plus’ plan, which starts at $45/month.

2. Sendinblue

The Sendinblue website

Sendinblue is one of the best WordPress email newsletter plugins. It’s also a great tool for SMS marketing. There’s a range of templates to create your emails.

Sendinblue lets you build custom workflows that send out emails automatically. You can even use your contact’s behavior on your website to trigger emails. For instance, you could send an automated email if a customer adds an item to their basket but fails to check out.

Price:

Sendinblue offers a completely free account for up to 300 emails per day. You get unlimited contacts. If you want to send more emails than that, paid plans start at $25/month.

3. Drip

The Drip website

Drip is a powerful email marketing platform, with great WooCommerce integration. It’s an especially good option if you run an eCommerce website. It has intelligent marketing automation tools and smart email segmenting.

Drip also provides plenty of support, through live chat as well as with webinars, detailed online courses, and excellent documentation. It isn’t the cheapest option, but it’s well worth the money if you want to maximize your marketing efforts.

Price:

Drip offers a 14-day free trial. After that, their plans start from $19/month, but that only gives you 500 subscribers. For $39/month, you can have up to 2,500 subscribers.

4. ConvertKit

The Convertkit website

ConvertKit is an easy-to-use and robust email marketing platform. It has some great features for creators and bloggers, but it’s also a popular option for small businesses.

ConvertKit makes it easy to segment your contacts in leads and existing customers, you can then send different emails to each. It has a simple email builder to create emails that will look great on all devices. You can even create clickable CTA buttons and track conversions when users click on them.

Price:

ConvertKit costs from $25/month (paid annually) for up to 1,000 subscribers. This includes all their features, such as automated funnels and email sequences. There’s a 14-day free trial, which doesn’t need a credit card.

5. OptinMonster

The OptinMonster website

OptinMonster is the best conversion optimization software on the market. It allows you to easily convert website visitors into subscribers and customers.

It comes with easy to integrate lightbox popups, slide-ins forms, welcome mats, coupon wheels, and more.

OptinMonster works with all popular email marketing services and helps you quickly get more subscribers for your email list.

It is packed with many features that help you automatically target users and show them personalized campaigns. For instance, you can show targetted messages for different pages on your site. You can also show campaigns based on user activity and geographic location.

Price:

OptinMonster costs from $9/month (billed annually). However, you will get 10% off if you use our OptinMonster coupon.

Onsite Marketing Automation (WordPress)

Onsite marketing automation tools are ones that you use directly on your website. They let you market to your website visitors automatically and effectively.

6. ChatBot

The ChatBot website

ChatBot is a smart automated bot that can engage with users in a similar way to a live chat agent. It’s like having a virtual assistant for your website who’s available 24/7 and can answer instantly.

You can use ChatBot to take bookings, schedule calls, or even to sell products directly from the chat window. It integrates seamlessly with LiveChat. This means a live agent can jump into the conversation if the user needs a little extra help.

Price:

ChatBot costs from $50/month, which gives you up to 1000 chats. There’s also a 14 day free trial.

7. OptinMonster (OnSite Retargeting)

The OptinMonster website

OptinMonster‘s OnSite Retargeting® feature helps you make the most of your advertising budget. It lets you customize your promotions for visitors who are returning to your site. That way, you will not be showing them the exact same campaigns they’ve already seen.

You can use the OnSite Retargeting® in conjunction with OptinMonster’s other features. These include powerful display rules that let you easily target people based on the page(s) they’re viewing, what device they’re using, how they have interacted with your website in the past, new vs returning visitors, and much more.

Price:

You will need OptinMonster’s ‘Growth’ plan ($49/month, billed annually) to use the OnSite Retargeting® feature. You can get 10% off by using our OptinMonster coupon.

8. Intercom

The Intercom website

Intercom is often seen as a live chat tool, but it does much more than that. It lets you use chatbots and integrate your chats with other elements of your marketing workflow too.

Intercom lets you send automated in-app messages that go far beyond just text. You can use images, videos, emojis, and even apps to help with your marketing. It’s easy to choose from lots of different message styles, without needing to get a developer involved.

Intercom also has several optional add-ons available. These include product tours, advanced lead generation, and advanced customer engagement.

Price:

Intercom costs starts from $39/month. The optional add-ons are priced separately. The cost will grow as you get more subscribers, and it can easily go into thousands per month.

9. Smash Balloon

The Smash Balloon website

Smash Balloon offers 4 different WordPress plugins that let you add social feeds to your website. These cover Facebook, Instagram, Twitter, and YouTube. They are a great way to make the most of the time you spend on social media. You can automatically include posts from your account – or even posts with a specific hashtag, where applicable.

You can customize your social feeds in multiple ways. For instance, you could create a shoppable Instagram feed so clickable Instagram photos of your products are automatically added to your site.

Price:

Smash Balloon’s plugins are available both separately and as a bundle. The best value option is the ‘All Access Bundle’ at $299/year. This gives you all 4 plugins plus priority support.

If you just want one plugin, they’re each priced from $49/year.

10. RafflePress

The RafflePress website

RafflePress is the best WordPress contest and giveaway plugin which allows you to incentivize user interactions on your site.

These might include visiting a page on your site, taking part in a poll or survey, watching a video, and more. You can even create your own actions, such as prompting readers to leave a comment.

By creating a competition for your readers, you can dramatically increase how engaged they are with your content. You are also able to set actions that prompt readers to share your content on social media.

Price:

RafflePress costs from $49/year.

Content Marketing

Is creating content taking up a lot of your time? Here are some great tools to help you get more from your content.

11. Outbrain

The Outbrain website

Outbrain lets you showcase your content on popular online publications. They have partnerships with sites including CNN, US Weekly, MSN, the Wall Street Journal, The Guardian, BuzzFeed, and many more.

Instead of republishing your full articles on those publications, readers will see a thumbnail, title, and the name of your brand. This will link directly to your own website.

Price:

Outbrain charges a CPC (cost-per-click) rate. You get charged for the number of clicks your content receives. You can set a budget cap for each campaign.

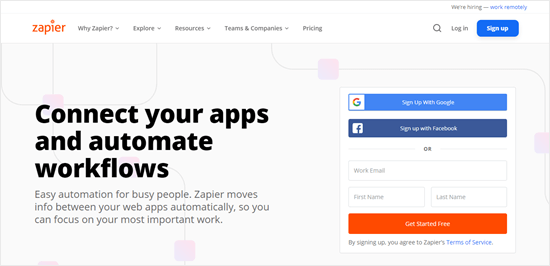
12. Zapier

The Zapier website

Zapier is a tool that lets you connect other apps together, with a huge range available. It’s a great way to move content from one place to another. For instance, you could set up a ‘Zap’ to automatically create a new story in Medium whenever you publish a new post in WordPress.

You can also automate lots of other tasks, like sharing new content on social media, adding new leads to a spreadsheet or database, or creating a Trello card when a new WooCommerce order comes in.

Price:

Zapier has a free plan that gives you up to 5 Zaps and 100 tasks/month. Paid plans start from $19.99/month (billed annually).

13. Google My Business Auto Publish

Google My Business Auto Publish plugin

Google My Business Auto Publish is a simple but very useful WordPress plugin. It lets you automatically publish content to your ‘My Business’ Google account. This means your posts will instantly appear on your Google business profile.

You can publish posts or pages and even set up a default share message to save time. If you don’t want to publish a particular post, you can simply check a box or set the plugin to not automatically publish new posts.

Price:

Google My Business Auto Publish is free.

Social Media Marketing Automation

Social media marketing can be incredibly powerful but it can also take up a lot of time. You need automated systems in place to ensure you make the most of these opportunities and track what’s most effective.

14. ManyChat

The ManyChat website

ManyChat lets you send automated Facebook messages so that customers can purchase directly from Facebook Messenger. The bot can help customers select a suitable product and take payment within Messenger itself.

You can even use the conversations and customer’s responses to tailor which products are recommended. ManyChat can send a customer a coupon to prompt them to buy. It also integrates with popular payment gateways like PayPal and Stripe, and can be used with over 2,000 apps by connecting with Zapier.

Price:

ManyChat has a free plan which offers basic features. Their Pro plan starts from $10/month, for up to 500 subscribers.

15. Tailwind

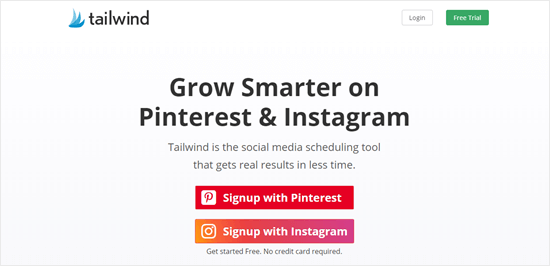
The Tailwind website

Tailwind has Pinterest and Instagram scheduling tools that let you schedule posts ahead of time. It will give you hashtag suggestions for Instagram. With Pinterest, you can schedule 10 pins with a single click. You can use Tailwind’s analytic tools to see what’s working and to schedule your content at the best times to get more engagement.

Tailwind also offers Power-up features that let you do even more with your social media accounts. The SmartLoop Power-up lets you reshare pins, including resharing seasonal content at the right time.

Price:

Tailwind has a free trial (no credit card required). After that, it’s $9.99/month for each social media profile. You need to pay for Pinterest and Instagram separately. PowerUps cost from $4.99/month for each social media profile.

16. HootSuite

The Hootsuite website

HootSuite is a popular social media management platform that lets you bring together all your social content in one app. You can automatically schedule posts ahead of time, monitor public channels and private messages, and much more.

If your small business has a social media team, then HootSuite is really helpful as it gives you robust team management and permissions. You can use HootSuite’s analytics to get detailed reports about how your posts are performing across different networks, too.

Price:

HootSuite has a limited free plan that covers 3 social profiles and 1 user. Paid plans start from $29/month. There’s a 30 day free trial of the ‘Professional’ and ‘Team’ plans (credit card required).

17. AgoraPulse

The Agorapulse website

AgoraPulse is a social media management tool. It gives you lots of flexible scheduling options to queue up social media posts ahead of time. You can also reschedule and even bulk upload your posts. There’s a social inbox within the tool that lets you manage all your mentions, ad comments, and other important messages.

With AgoraPulse, you get unlimited reports that let you figure out the ROI of your social media efforts. It’s easy to assign draft posts, comments, and messages to different teammates. There’s also a built-in CRM where you can label and group your audience into segments. AgoraPulse also lets you add internal notes to each user and view their conversation history, too.

Price:

AgoraPulse costs from $79/month (paid annually). There’s a 28 day free trial available, with no credit card required.

18. Buffer

The Buffer website

Buffer is a long-running social media scheduling tool. It lets you schedule content ahead of time for multiple different social networks, including Instagram, Facebook, Twitter, LinkedIn, and Pinterest.

You can also use Buffer to plan and organize hashtags for Instagram, to measure the performance of your content, and more. Buffer offers both ‘Publish’ and ‘Analyze’ tools (billed separately). If you have a social media team, you can assign different access and permissions to different people.

Price:

Buffer costs from $12/month (billed annually), with a 14 day free trial available. There’s also a basic free plan, which gives you 3 social accounts and 10 scheduled posts at a time.

19. Mention

The Mention website

Mention has a ‘listen’ feature that lets you monitor social media, plus review sites, blogs, and the whole of the web. That way, you don’t need to spend a lot of time monitoring social media for mentions of your brand.

You can even monitor what’s being said about your competition. Mention can also provide you with audience insights about your key topics. It’s easy to use it to organize and schedule multi-channel social media content.

Price:

Mention offers a free plan that lets you create a single alert. Their paid plans cost from $25/month (billed annually).

Sales Automation (CRM)

Is your sales team closing as many deals as you’d like? Or are little details getting missed despite lots of the team’s time being spent on admin? There are many powerful sales automation tools out there to help keep track of everything.

20. HubSpot

The HubSpot website

HubSpot offers a suite of all-in-one marketing software. This includes the HubSpot CRM (customer relationship management) tool that allows you to organize your content and view your entire sales funnel in a straightforward visual dashboard. You can sort your contacts based on deals won or lost, appointments, specific time periods, and more.

You can use the HubSpot CRM to schedule automated emails, for live chat, and much more. HubSpot also lets you include chatbots to automate your live chat marketing. It’s possible to integrate HubSpot with many other popular services, such as the business phone service RingCentral.

Price:

You can use HubSpot CRM or a basic HubSpot plan for free. To get the most out of HubSpot, you will want to use all their tools. Their paid plans start from $33.60/month (billed annually).

If your business is a startup, you may be eligible for the ‘HubSpot for Startups’ program, which gives you up to 90% off.

21. Pipedrive

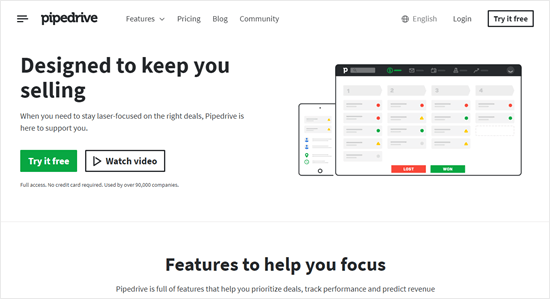
The Pipedrive website

Pipedrive is a sales CRM that helps you to manage leads, prioritize deals, track communication, and much more. You can automate repetitive tasks using both Pipedrive’s features and app integrations. It integrates with lots of tools, including Chatbot and LiveChat.

Pipedrive also gives you activity reminders to help you keep on top of work, automatically syncs your activities with Google Calendar, and can even automatically create follow-up tasks for you. With the reporting tools, you will see the conversion rates of your deals and can work out which activities are leading to the best conversion rate.

Price:

Pipedrive costs from $12.50/month (billed annually). There’s a a 14 day free trial, which doesn’t require credit card details.

22. Freshsales

The Freshworks website

Freshsales is another great CRM with a sales-oriented approach. It uses AI-powered lead scoring, which lets you automatically prioritize leads based on which ones are more likely to convert. Plus, Freshsales will automatically include extra details on your leads, contacts, and accounts based on social and publicly listed information, so there’s no need to put this in manually.

Freshsales lets you create smart email campaigns based on your leads’ activities. You can also automate follow-up activities and create workflows to improve productivity in your team. You can even use Freshsales to automatically detect how users interact with your website and product, through activity tracking.

Price:

Freshsales costs from $12/month, billed annually. There’s a a 21 day free trial, too (no credit card required). There’s also a free plan but this doesn’t offer many features.

23. MonsterInsights

MonsterInsights

MonsterInsights is the best Google Analytics plugin for WordPress. It helps you understand where your users are coming from and what they do on your website.

To use any marketing automation tool effectively, you’ll need easy to understand reports that tell you exactly what’s working for your business and what’s not.

MonsterInsights helps you track user activity on your website. It comes with WooCommerce conversion tracking, form submissions, outbound link tracking, and user tracking.

Basically, you get a clear picture of what’s happening on your site and what you can do to bring in more sales and conversions. For more details see our ultimate guide on conversion tracking in WordPress.

We hope this article helped you learn about the best marketing automation tools for small businesses. You might also like our articles on the best phone services for small businesses and the best live chat software for small businesses.

If you liked this article, then please subscribe to our YouTube Channel for WordPress video tutorials. You can also find us on Twitter and Facebook.

The post 23 Best Marketing Automation Tools for Small Businesses appeared first on WPBeginner.


July 31, 2020 at 04:43PM