Friday, February 19, 2021

26 Best WordPress Magazine Themes of 2021 [FREE + PAID]

Are you looking for the best WordPress magazine themes for your website?

Content-rich websites need different layouts that can help them show both new and important content prominently. WordPress magazine themes are designed to do just that.

In this article, we’ll share some of the best WordPress magazine themes that will help your content shine.

Best WordPress magazine themes

Getting Started with a WordPress Magazine Website

WordPress is the best website builder for building a magazine site. It currently powers over 39% of all websites on the internet.

If you want to make a magazine website with WordPress, then you will need web hosting and a domain name. A domain name is your site’s address on the web, like wpbeginner.com or google.com. Web hosting is the storage for all your website files.

Magazine websites often have a lot of content, including images and videos. This is why you need to choose a WordPress hosting company that offers you enough space to upload all your files while also handling your traffic efficiently.

If you are just starting out, then we recommend Bluehost. They are the most popular hosting company and an official WordPress.org recommended hosting provider.

They are offering WPBeginner readers a huge discount on hosting, plus a free domain name and free SSL certificate.

The Bluehost special offer for WPBeginner readers

For complete step by step instructions, see our guide on how to start a WordPress blog.

If you have high traffic, then we would recommend going with WP Engine. It’s a managed WordPress hosting service, which means they will handle everything for you.

If you already have a WordPress site, you may simply want to switch to a magazine theme. Just take a look at our guide on how to install a WordPress theme for help getting your theme set up.

With that said, let’s take a look at some of the best WordPress magazine themes that you can use on your site.

1. Divi

Divi

Divi is a popular WordPress theme designed to create any website. It comes with a built-in page builder and dozens of ready-made layouts, including multiple templates for online magazines.

It features custom design elements, color schemes, background options, and more. It also includes SEO optimization to help rank your website in search engines.

2. Astra

Astra Travel Blog

Astra is one of the best WordPress multipurpose themes on the market. It comes with several ready-to-launch starter websites that you can install and customize to suit you.

Astra works great with any WordPress page builder plugin and comes with tons of flexible options. You can customize your theme using the live customizer or by simply editing a page in the default WordPress editor.

3. Magazine Pro

Magazine Pro

Magazine Pro is a powerful modern WordPress magazine theme from StudioPress. It features customizable headers and comes ready for WooCommerce.

It also includes an easy-to-set-up widgetized homepage, multiple page layouts, and additional options in the live theme customizer.

StudioPress is now part of WP Engine, the most popular managed WordPress hosting company. You can get this theme and all 35+ other StudioPress themes when you sign up for WP Engine hosting to build your website.

Bonus: WPBeginner users also get an additional 20% OFF. Get started with WP Engine today!

4. OceanWP

OceanWP

OceanWP is a free WordPress multipurpose theme. It ships with dozens of pre-built sites and a 1-click content importer to get started quickly.

With eCommerce integration, it allows you to sell merchandise and make money online. The theme is translation ready and supports RTL languages out of the box.

5. Ultra

Ultra

Ultra is a stunning WordPress theme with a multipurpose approach to easily make a magazine or newspaper website. It offers fully customizable demo sites and a built-in page builder for customization.

Ultra’s other notable features include premium addons, color schemes, layout options, parallax scrolling, and more. It has image filters to make a great first impression on your users.

6. Guten Theme

Guten Theme

Guten Theme is a stylish WordPress magazine theme designed for the WordPress block editor. It comes with multiple built-in layouts for header, footer, and blog.

Guten Theme supports additional Gutenberg blocks, allowing you to create impressive content layouts for your posts and pages easily. It has custom colors and font settings with flexible templates.

7. Tribune

Tribune

Tribune is a powerful WordPress news and magazine theme with an elegant layout featuring your most important content. It has a featured posts area at the top and a carousel slider at the bottom of the page.

Among other features, it offers a slider, a video widget, WordPress live customizer settings, tabbed widgets, infinite scroll, social media integration, and quick setup.

8. Hestia Pro

Hestia Pro

Hestia Pro is an excellent WordPress multi-purpose theme for news and magazine websites. It comes with a fully customizable homepage with a featured content slider, a dynamic homepage builder, featured categories, and a 1-click demo content installer.

It has multiple page templates, custom colors, fonts, logo, and background options. The theme also comes with several custom widgets and multiple widget-ready areas.

9. Wonderwall

Wonderwall

Wonderwall is a beautifully designed WordPress magazine theme. It includes 9 pre-made homepage layouts that allow you to choose from different grids, featured posts, single lists, and more.

Inside, you’ll also find custom widgets for social media profiles, Instagram, and content discovery features. It also offers dedicated positions to display banner ads across your website.

10. Felt

Felt

Felt is an elegant WordPress magazine theme with a ton of awesome features. It’s designed to beautifully display content in a magazine layout.

Felt pays special attention to readability across devices and looks equally great on mobile and desktop. It has a fullscreen featured content slider to showcase your content categories beautifully.

11. HitMag

HitMag

HitMag is a free WordPress news and magazine theme. It comes with a featured content slider on top with a right sidebar and dual navigation menu.

HitMag has a featured categories section, an ad placement area, a trending widget, and more. The theme set up is easy with a 1-click demo content importer, which you can then replace with your own content.

12. The Essence

The Essence

The Essence is an elegant WordPress magazine theme suitable for lifestyle, fashion, entertainment, and similar websites. It includes 4 different layout choices for your article pages, and a built-in social sharing feature with a floating sidebar to easily share articles from your website.

Inside you will also find custom widgets for Instagram and social profiles. The Essence comes with a pain-free setup process allowing you to easily get started using the live customizer.

13. News Pro

News Pro

News Pro is designed for WordPress news and magazine websites. It’s a fast, high-performing theme that gives you a solid foundation to build content-rich websites.

It comes with 2 sidebars, a footer widget area, a customizable header, a simple navigation menu, and beautiful typography.

14. Hueman

Hueman

Hueman is a classic WordPress magazine theme designed to showcase your content with elegance. It comes with a featured content slider, dual navigation, left and right sidebars, a featured categories area, and multiple ad spaces.

Other notable features include a custom logo, social media icons, page layouts, and several widget-ready areas. You can use the WordPress live customizer to easily make changes on your website.

15. Public Opinion

Public Opinion

Public Opinion is a sleek and modern WordPress magazine theme. It comes in a light color scheme and a flexible homepage layout that you can easily customize using widgets.

It has content sliders, featured categories, advertising space, multiple category layouts, and more. It’s optimized for speed and performance and looks equally great on mobile devices.

16. NewsCard

NewsCard

NewsCard is a stylish WordPress magazine theme suitable for technology, gaming, fashion, travel, health, and other niches. It comes with bold colors that make your content more readable.

The theme has a top story ticker to showcase trending stories on the top. It also allows you to organize your content by categories and create a more engaging layout.

17. OriginMag

OriginMag

OriginMag is a magazine WordPress theme with eCommerce support. It’s fully compatible with WooCommerce and perfect for news and magazine sites that sell merchandise.

OriginMag takes a minimalist approach to design and focuses more on the readability of your content. The homepage is dynamically built with featured content, featured categories, and your latest articles.

18. Metro Magazine

Metro Magazine

Metro Magazine is a free WordPress theme designed for online news and magazine websites. It has multiple color schemes, color labels for categories, custom widgets, social media integration, and multiple page templates.

The theme has 2 navigation menus, widget areas, ad placement, and live customizer support. It offers a very modern user interface with a focus on images and typography.

19. Patch

Patch

Patch is a masonry-style WordPress blogging and magazine theme featuring a minimalist layout that makes your content pop out. It comes with multiple layout choices, including a grid layout for your homepage.

It’s easy to use and quick to set up, with lots of flexible options to customize every aspect of your website. It’s also translation-ready using a plugin such as WPML.

20. ColorMag

ColorMag

ColorMag is a sophisticated WordPress magazine theme. It comes with a featured content slider, custom widgets, and custom header support.

With color choices and custom backgrounds, ColorMag lets you fully change the look and feel of your magazine website. It also supports WooCommerce straight out of the box.

Related: BigCommerce vs WooCommerce – Which one is better?

21. Domino Magazine

Domino Magazine

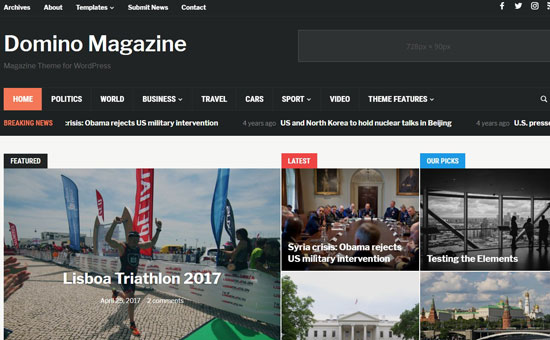
Domino Magazine is a highly customizable WordPress magazine theme. The homepage features multiple widgetized areas and a dynamic page builder.

It comes with a built-in news ticker, weather widget, and a tabbed widget. The theme also allows you to easily add a custom background, headers, sliders, and your logo.

22. Responz

Responz

Responz is a 3-column news and magazine theme for WordPress. It features an elegant design with great typography and a fully responsive layout.

It comes with multiple layout options like 2 sidebars, 1 sidebar, or a full-width homepage. You can also choose from the list view or grid view post layouts.

23. Metro Pro

Metro Pro

Metro Pro is a powerful WordPress magazine theme that features a custom background with large featured images.

It comes with an easy-to-set-up homepage with sections for your featured stories. It also includes built-in social media integration, custom menus, custom widgets, and a theme options panel.

24. News Portal

News Portal

News Portal is a beautifully designed WordPress magazine and news theme. It comes with multiple color schemes and options to choose colors for your category pages.

For easier customization, it includes dozens of theme options. These are all accessible through the live customizer. News Portal is tested with all popular WordPress plugins and optimized for better speed, performance, and SEO.

25. Royal Magazine

Royal Magazine

Royal Magazine is a beautiful free WordPress magazine theme suitable for newspapers, magazines, and personal blogs. It comes with a magazine-style homepage layout, which is easy to set up using the live theme customizer.

This responsive theme comes with multiple navigation menus, sidebars, color options, and page templates. It also works great with popular page builders and top WordPress plugins.

26. Magazine

Magazine

Magazine is a powerful WordPress theme with tons of amazing features. It comes with 42 layout choices, a layout builder, a featured content slider, sliding menus, a mega menu on top, social sharing, related posts, and many more features.

It also features six color schemes, multiple sidebars, custom widgets, icon fonts, and lots of shortcodes.

We hope this article helped you find the best WordPress magazine themes for your website. You may also want to see our guide on the best email marketing services to stay in touch with readers and grow your magazine’s readership.

If you liked this article, then please subscribe to our YouTube Channel for WordPress video tutorials. You can also find us on Twitter and Facebook.

The post 26 Best WordPress Magazine Themes of 2021 [FREE + PAID] appeared first on WPBeginner.


February 19, 2021 at 04:00PM

Thursday, February 18, 2021

9 Tips to Find Hidden WordPress User Data to Grow Your Business

A lot of beginners don’t know that your website has hidden WordPress user insights that you can use to grow your business.

Finding hidden user data can help you better understand your audience, follow up on leads, improve conversions, and boost sales. Marketing professionals track this user data to make data-driven decisions.

In this guide, we’ll share some easy to implement hacks to find hidden WordPress user data, so you can improve your conversions and sales.

Finding hidden user data in WordPress

Why Find Hidden WordPress User Data?

If you run a small business website, then knowing your customers is essential in making business growth decisions.

Finding hidden WordPress user data helps you make data-driven decisions to offer a better customer experience and improve your sales funnels.

For instance, if you have a WordPress registration form, then you may want to know the user’s geographic location, which page or platform they came from, their IP address, and more.

Similarly, if you run an online store, you may want to track customers to see which products they added to the cart but didn’t finish the checkout. You can then follow up with an email to nudge them into making a purchase.

There are many other scenarios where you can easily find the hidden user data and use it to grow your business.

That being said, let’s take a look at some of the hacks that you can use to locate the hidden WordPress user data.

Here is a quick list of hacks we’ll cover in this guide.

1. Unlock User Data Tracking with MonsterInsights

MonsterInsights is the best Google Analytics plugin for WordPress. It allows you to see where your users are coming from, what pages they view, and how they use your website.

Simply put, it helps you see the stats that matter.

First, you need to install and activate the MonsterInsights plugin. For more details, see our step by step guide on how to install a WordPress plugin.

For more details, see our guide on how to install Google Analytics in WordPress.

After setting up MonsterInsights, you can view important website traffic data by visiting Insights » Reports page.

MonsterInsights reporting dashboard

By default, MonsterInsights helps you unlock a wealth of information about your users and how they interact with your website.

It is also the best tool for conversion tracking in WordPress. You can use it to track conversions on your eCommerce platform, any form submissions on your website, track categories, authors, Ads, and more.

For more details, see our complete conversion tracking guide for WordPress users.

2. Enable Demographics and Interest Tracking in Google Analytics

MonsterInsights allows you to easily tack user’s demographics and interest information for retargeting campaigns.

Note: Demographics and interest based tracking is subject to privacy and cookie laws in different regions. Please check your target region laws and requirements before using this feature.

First, you need to visit Insights » Settings page in your WordPress admin area. From here, you need to switch to the Engagement tab and turn on the Demographics and interest reports option.

Enable demographics and interest tracking in WordPress

Next, you need to visit your Google Analytics account dashboard and switch to the Audience » Demographics » Overview tab from the left column.

Turn on demographics reporting in Google Analytics

From here, you need to click on the blue ‘Enable’ button to turn on this feature.

After that, you can view this data inside your WordPress dashboard by visiting Insights » Reports page and switching to the ‘Publisher’ tab. Scroll down to the bottom and you will see Age, Gender, and Interest reports.

Demographic data in MonsterInsights

3. Track GeoLocation in WordPress Lead Forms

Geolocation data allows you to see a user’s geographic region when they submit a form. This allows you to offer a personalized user experience, target users in that particular region, and make other important decisions.

To track Geolocation data, you need to use WPForms plugin. It is the best WordPress form builder plugin that allows you to create any type of WordPress forms using a simple drag and drop tool.

First, you need to install and activate the WPForms plugin. For more details, see our step by step guide on how to install a WordPress plugin.

Note: You will need at least the PRO plan of the plugin to access GeoLocation data

Upon activation, you need to visit the WPForms » Settings page to enter your license key. You can find this information under your account on the WPForms website.

Entering your WPForms license key on your site

Next, you need to visit WPForms » Addons page. From here, you need to locate the GeoLocation Addon and click on the Install Addon button to activate it.

Geo Location Addon in WPForms

WPForms will install and activate the addon for you.

You can now go ahead and create your first form by visiting WPForms » Add New page. You’ll be asked to provide a name for your form and choose a form template.

Creating a new form in WPForms

WPForm comes with several templates, and you can install even more with their template pack addons. A template is just a pre-built form that makes it easier to create new forms more quickly.

Choosing your template will launch the WPForms’ form builder interface. On the right, you’ll see pre-loaded form fields based on the template you choose. You can add new fields from the column on your left side.

WordPress form builder

You can also just click on any field to edit it, drag and drop to move it, or delete any form field.

Once you are done, you can click on the Save button at the top to publish your form.

Next, you need to add it to your website. WPForms makes it super easy to add your forms anywhere on your website.

Simply edit the post or page where you want to add the form and click on the (+) add new block button. Locate the WPForms block and add it to your post.

WPForms block

From block settings, simply select the form you created earlier. You can now save your post or page and view your form in action.

For more details, see our guide on how to add a contact form in WordPress.

Once you have added a form to your website, you can view form entries by visiting WPForms » Entries page and click on your form name to view entries. On the Entries page, click on the View link next to any entry to view its details.

View an entry in WPForms

On the entry details page, you will see a box with user’s Geographic location marked on the map.

Geolocation pointed on Google map for your WordPress lead form

4. Find User IP Address in WordPress Forms

Another important user data is the IP address. Each user visiting your website has a unique IP address assigned to them by their internet service provider.

You can use IP address information to match them to a real user, prevent spam, block suspicious activities, and more.

WPForms comes with a hidden field feature that allows you to add information to WordPress forms and store them when a user hits the submit button.

Simply, create a new form or edit an existing form and then add the ‘Hidden Field’ to your form.

Adding a hidden field to your WordPress form

Next, you need to click on the Hidden Field in the form preview to edit it and click on the Smart Tags option next to the Default value setting.

IP Address smart tags

Smart tags allow you to embed data as the default value for form fields. You need to select User IP Address here and then save your changes.

You can now save and add your form to a post or page. From now on when a user submits this form it will automatically store their IP address as the hidden field and you can view it in your form entries.

You can also see user IP addresses in IP logs of your WordPress hosting provider, on your WordPress firewall plugin, and in several other plugins as well.

5. Track Logged in User Data in WordPress Forms

Another common scenario is when you want to associate a form entry to real users on your website. This comes in handy if you are running a survey on a membership website.

Another example, could be a form on an eCommerce store like a request a quote form.

The Smart Tags feature in WPForms allow you to automatically add logged in user data to your form. This includes, user ID, user name, business email address, and more.

You can use hidden fields feature in WPForms to associate any user data to a hidden field.

Track logged in user data in WPForms

You can now save and add your form to a post or page. From now on when a user submits this form, it will automatically store selected logged in user data as hidden field(s), and you can view it in your form entries.

This data can also be helpful in streamlining your customer support workflows, so your team has user insights without asking the user to fill it out the same information every time.

6. Track Form Page or Post in WordPress

Many business owners have multiple landing pages for different campaigns, products, and services.

WPForms allows you to use the same form for different pages and yet easily track which post or page brought you a lead or signup.

Simply add a hidden field to your form and select from the ‘Embeded Post/Page’ values. You can add post/page name, URL, or ID.

Track post or page where form is embedded

Now you can see which page or post generated a form submission while using the same form on multiple pages.

However, this does not tell you the steps user took to reach that page, which brings us to our next hack.

7. Track User Journey in WordPress Sign up Forms

Wouldn’t it be nice if you can see the steps users take on your website before they actually fill out a form?

Once you find out what compels users to fill out forms on your website, then you can replicate it to generate more leads and grow your business.

WPForms makes it super-easy to track this user data with their User Joruney Addon. Simply go to the WPForms » Addons page and install and activate the User Journey Addon.

Install user journey addon in WordPress

After activating the addon, WPForms will start tracking user journey on for your forms. You can view it by visiting the Entries page and viewing a form submission.

User journey report

For more details, see our guide on how to track user journey for your WordPress forms.

8. Find Partially Filled WordPress Form Data

A lot of folks who visit your website may not fill in a form on your website and some of them may fill it but may decide not to submit it.

This causes you to lose business.

Wouldn’t it be great if you could reach out to those users and see what prevented them from signing up or filling a form?

WPForms allows you to track those entries with their Form Abandonment addon. Simply go to the WPForms » Addons page and install the Form Abandonment Addon.

Form Abandonment Addon

After that, you can create a new form or edit an existing form on your website. On the form builder screen, switch to the Settings tab from the left column and then select ‘Form Abandonment’ option.

Form abandonment settings

From here, you can turn on the form abandonment feature for this particular form. Once done, you can save your form and exit the builder interface.

You can now add this form to a post or page and it will start collecting abandoned form data for you.

You can view the form entries page and you’ll notice ‘Abadoned’ status next to the entries that were partially filled but not submitted. You can click on the View link to see the data that was captured.

Abandoned form entries in WPForms

For more details, see our guide on how to track and reduce form abandonment in WordPress.

9. Track Outgoing WordPress Email Log

Your WordPress website needs to send email notifications for different things. For example, when a new user signs up, a user requests password reset, a customer places a new order, and so on.

Wouldn’t it be nice to have a record of emails sent by your WordPress site? This can help you track user activity and may unlock hidden WordPress data that you didn’t have access to.

For this you’ll need the WP Mail SMTP plugin. It is the best WordPress SMTP plugin that allows you to use any SMTP service to improve deliverability of your WordPress emails.

For more details, see our guide on how to install and set up WP Mail SMTP in WordPress.

Once you have set up the plugin you can turn on the email logs functionality by visiting WP Mail SMTP » Settings page and switching to the ‘Email Log’ tab.

Enable email log

To view the emails, you can simply go to WP Mail SMTP &raquo Email Log page. You’ll see a list of emails the plugin has logged since you enabled the logs.

Email log entries

You can click on any email to view the email details and data you choose to kept depending on your settings.

For more information, see our article on how to set up WordPress email logs.

Bonus Tips: Taking User Insights Further

The above methods are just scratching the surface. For membership sites, online stores, and other user driven websites, the possibilities are endless.

You can use dynamic field population feature that comes with many form solutions that you use to add helpful insights to streamline your workflow.

You can also use Smart Tags and APIs in solutions like OptinMonster to show personalized content to different users.

If you’re using a smart email marketing software like Drip, or push notification software like PushEngage, then they come with automated segmentation features using hidden user data.

For example, you can automatically create user segments based on specific pages they visit and start a drip automation push messages.

PushEngage User Segmentation

Lastly, you can connect various WordPress plugins to talk to each other by using Uncanny Automator. This will help you further streamline your workflows by utilizing the hidden user insights.

We hope this article provided you with some useful hacks to find hidden WordPress user data on your website. You may also want to see our tips on how to create an email newsletter, and how to add web push notification to communicate with users after they leave your website.

If you liked this article, then please subscribe to our YouTube Channel for WordPress video tutorials. You can also find us on Twitter and Facebook.

The post 9 Tips to Find Hidden WordPress User Data to Grow Your Business appeared first on WPBeginner.


February 18, 2021 at 06:00PM

Wednesday, February 17, 2021

How to Create Flipbox Overlays and Hovers in WordPress

Want to add flipbox overlays and image hover effects to your WordPress site?

Even if you’re using a high-quality WordPress theme, you might feel limited by customization options. Flipboxes and image hovers add eye-catching animated effects to your site.

In this article, we’ll show you how to add flip box overlays and image hovers to your WordPress site.

How to create flipbox overlays and hovers in WordPress

What is a Flipbox?

A flip box is a box that flips over when you bring your mouse over it. You can add this hover animation effect to specific sections of your website including text boxes and images.

Flipbox Demo Animation

The term comes from the unique “flip” feature that happens when the mouse hovers over the image. You can control how the image flips, along with the information and design of both sides of the image.

If your website is relatively static, then you can use a flipbox effect to make it feel more interactive.

For example, you can add an image hover flipbox to a product pricing page. That way when users hover over your pricing tiers, the price will show up.

Or, if you’re a freelancer, you can add logos of company’s you’ve worked with that flip and link to each project.

While these animated effects can enhance your website’s user experience, it’s important not to go overboard.

Think of the flipbox effect like adding seasoning to a meal. It’s there to enhance the existing flavors and ingredients, but too much and it’ll ruin the dish.

That being said, let’s take a look at how you can add flipbox overlays and image hover effects to your WordPress blog or website.

How to Create Flipbox Overlays and Hover Effects in WordPress

You can add flipboxes and hover effects to your WordPress site using many methods such as the Elementor page builder, or adding custom CSS.

However, the approach we recommend is using the Flipbox – Awesomes Flip Boxes Image Overlay plugin. This plugin is flexible and easy to use. It’s the best flipbox and image hover WordPress plugin.

The free version of the plugin offers you speed and simplicity. Once the plugin is installed, you can quickly add good-looking flip boxes to your site.

If you need more customization options, then you may want to upgrade to the premium version of the plugin. This lets you to control the colors of your flipboxes and add custom CSS.

You may find that existing templates already look great when added to your site, in this case, there’s no need to upgrade.

The first thing you’ll need to do is install and activate the Flipbox – Awesomes Flip Boxes Image Overlay plugin. For more details, see our step-by-step guide on how to install a WordPress plugin.

Once the plugin is installed and activated, you can create your first flipbox by going to Flip Box » Create New.

Create a new flipbox

This brings up the entire selection of templates.

If those aren’t enough, then you can click the ‘Import Templates’ menu option for even more templates you can use.

Import a flipbox template

With the free version of the plugin, there are 5 different templates to choose from, plus another 10 templates that you can import.

To import a new customizable template, click the ‘Import’ button next to the Style number.

Flipbox click import button

Now, it’s time to select and start customizing your template.

You need to click on ‘Create Style’ to load your first flipbox design.

This will bring up a pop-up menu where you can name your flipbox, and choose which layout want to customize.

Choose what flipbox to customize

The 1st, 2nd, 3rd ‘Layouts’ options match the individual flipboxes in the layout. Click ‘Save’ once you’ve made your choices.

It’s important to mention that your final design will closely match the flipbox template, so it’s best to pick a template that resembles how you want it to look on your website.

There are three main tabs you will use to change the look of your flipbox, ‘General’, ‘Front’, and ‘Backend’.

Flipbox general settings menu

On each of these tabs, you can change the fonts, padding, and margins. But, we think the default options already look great.

Next, we’ll change the text on both sides of the flipbox.

Hover over the flipbox at the bottom of the screen and click ‘Edit’.

Flipbox preview edit text

This will bring up a pop-up window that lets you change the front text, back text, and background image.

To change the title, edit the ‘Front Title’ text box and the ‘Font Icon:’ box if you want a different icon to display.

Change flipbox front title and icon

If you want to add a background image, then click ‘Upload Image’ to the right of the ‘Front Image’ option.

Next, upload a new image or select an image from your existing Media library.

Upload front background image for flipbox

After that, you’ll follow the same series of steps for the back of the flipbox under the ‘Backend Settings’.

Here you can change the title and text that displays when the card flips.

Change backend flipbox text

You can also change the ‘Backend Button text’ and ‘Link’ fields.

These change the button text and where your users will go when it’s clicked.

Add backend flipbox button and link

Finally, click ‘Upload Now’ to change the background image on the back of the flipbox.

Same as above, you can either upload an image, or select one from your Media library.

Upload backend background image

Once you’re done editing, make sure to click the ‘Submit’ button to save your changes.

You’ll notice that your new changes will show up in the ‘Preview’ window right away.

If you want to create an entire row of flipboxes, then click the ‘+’ icon in the ‘Add New Flip Boxes’ meta box.

Add a row of flipboxes

This will bring up a pop-up box similar to the one above that lets you customize your second flipbox.

By now you’ve created and customized your flipboxes, so it’s time to add them to your WordPress site.

The easiest way to do this is using the included shortcode. On the right-hand side of your screen, there’s a meta box labeled ‘Shortcode’, copy the shortcode that resembles the image below.

Copy flipbox shortcode

Next, navigate to a page or post where you’d like to add the flipbox and paste your shortcode.

Then, click ‘Publish’ or ‘Update’ if your post is already live.

Paste flipbox shortcode

Your new flipboxes will now be live on your site.

Notice that as you resize your browser window, the flipboxes adjust since they are 100% responsive.

Flipbox live WordPress display

This plugin also includes a flipbox widget that you can add to any widget area supported by your theme.

To do this navigate to Appearance » Widgets and find the widget titled ‘Flipbox – Awesomes Flip Boxes Image Overlay’.

Add flipbox widget

Then you can drag and drop the widget to your preferred location.

Finally, input the style id, which can be found in the main Flipbox plugin menu, and click ‘Save’.

Flipbox widget id

We hoped this article helped you learn how to add flipbox overlays and hovers to your WordPress site. You may also want to see our guide on optimizing images for SEO, and our troubleshooting guide on fixing common WordPress image issues.

If you liked this article, then please subscribe to our YouTube Channel for WordPress video tutorials. You can also find us on Twitter and Facebook.

The post How to Create Flipbox Overlays and Hovers in WordPress appeared first on WPBeginner.


February 17, 2021 at 05:00PM