Tuesday, June 22, 2021

How to Connect Microsoft Outlook to WordPress (Step by Step)

Are you looking for a way to use your Microsoft Outlook account to send emails from your WordPress website?

Connecting Microsoft Outlook with WordPress helps improve email deliverability by making sure that your emails reach your subscriber’s inbox, even if you’re sending a lot of them.

In this article, we’ll show you step by step how to connect Microsoft Outlook to WordPress.

Connect Microsoft Outlook to WordPress

Why Use Microsoft Outlook to Send WordPress Emails?

Using Microsoft Outlook is a great option for business owners who regularly use Office 365. You can use your existing account to send emails to your subscribers from your WordPress website.

The best part about using Outlook is that it allows you to send a lot of emails at once. You can send up to 10,000 emails per minute, which is a much higher limit than other mailing services.

If you have a busy online store, then this will help you with sending receipts, tracking info, and abandoned cart emails to all your customers.

Another benefit that Microsoft Outlook provides is that you don’t have to use the default WordPress PHP mail() function to send emails.

There are many issues with the default mailing method. Many WordPress hosting services don’t have PHP mail properly configured, which leads to email deliverability problems.

Your emails can end up in the spam folder because email service providers like Gmail can’t detect where the email is coming from.

However, you can easily overcome this issue by using an SMTP service provider to send emails in WordPress through your Outlook account.

What is SMTP?

SMTP or Simple Mail Transfer Protocol is an industry-standard technology for sending emails.

It uses proper authentication, ensuring that your emails reach the inbox of your users and don’t end up in the spam folder.

You can connect popular services like Microsoft Office 365, G Suite (Gmail), SMTP.com, SendinBlue, or Amazon SES to send your emails.

That being said, let’s see how you can connect your Microsoft Outlook account to WordPress.

Connect Outlook to Your WordPress Site

The easiest way to add Microsoft Outlook to WordPress is by using the WP Mail SMTP plugin. It lets you securely use the Microsoft API to authenticate your site’s email.

For this tutorial, we will be using the WP Mail SMTP Pro version because it includes Office 365 / Outlook.com integration.

There is also a free version of WP Mail SMTP that has 6 integrations, but it doesn’t have the feature to connect your Outlook account with WordPress.

First, you will need to install and activate the WP Mail SMTP plugin on your WordPress website. You can refer to our step-by-step guide on how to install a WordPress plugin.

Note: An important thing to remember is that the Outlook mailer will only work if you have an SSL certificate on your website. You can check out our guide on how to set up SSL on a WordPress site.

Upon activation, you can connect your Outlook account by going to WP Mail SMTP » Settings from your WordPress admin area.

On the settings page, you’ll see the ‘From Email’ and ‘From Name’ settings options. You can skip these settings as your Outlook account’s settings will override them.
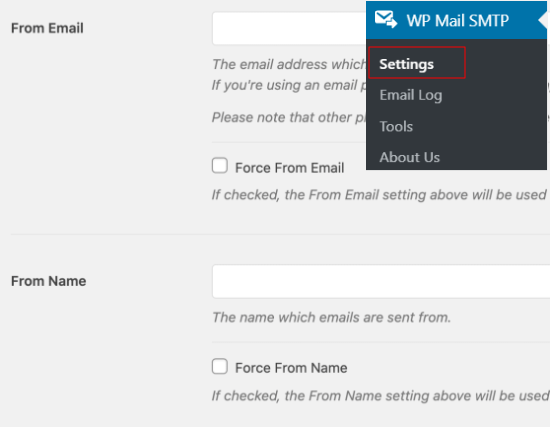
From Email and Name in WP Mail SMTP settings

Below that, you’ll see different options next to the Mailer settings. Go ahead and select ‘Outlook’ as your Mailer option.
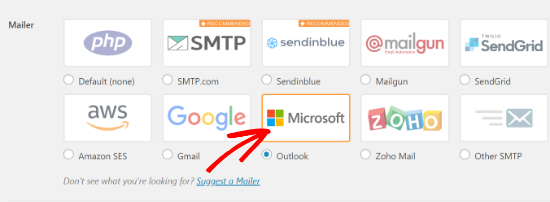
Select the Outlook Mailer Option

Next, WP Mail SMTP will show a new section with settings for your Outlook account.
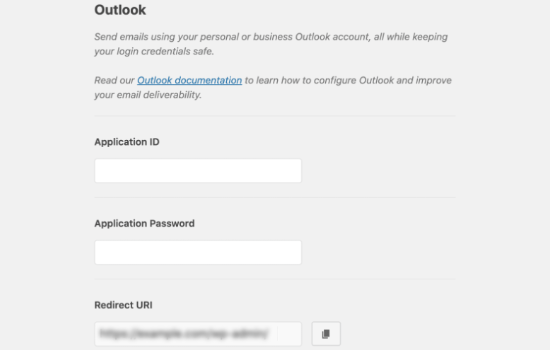
Outlook Settings in WP Mail SMTP

To find the Application ID, Application Password, and Redirect URI, you’ll need to create a web application within a Microsoft Azure account. Don’t worry, we’ll walk you through how to do this step by step.

We recommend that you keep the WP Mail SMTP Outlook settings open in a separate tab or window, as you’ll need to return to this page to enter the information.

You can use your existing Microsoft email account (Live, Outlook, Hotmail, Office 365, etc.) to log into Microsoft Azure. Keep in mind that if you do so, then all your WordPress emails will be sent from that email address.

If you don’t have a Microsoft Outlook account, or if you prefer to send from a different email address, then you can go to the Microsoft Azure website and create your account. Just make sure that the account you create includes the permissions to send emails.

The account is free to create, and you don’t need any paid services to set up the mailer. However, Microsoft will ask you to enter your credit card information to reduce spam signups.

After that, you can log into the Microsoft Azure Portal using the email address you want to use.

Create an Application ID

Once you have opened the Azure Portal, go ahead and click the ‘All Services’ option from the sidebar on your left.
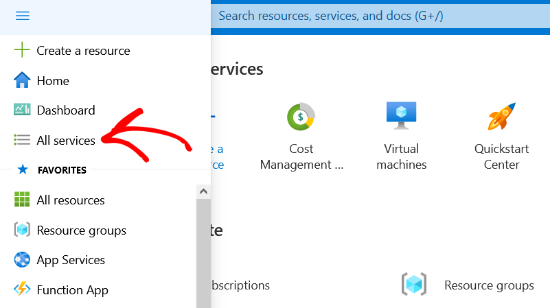
Click All Services option in Azure Portal

On the next screen, you’ll see different services offered by Microsoft Azure. You can scroll down to the ‘Other’ section and click on the ‘App registrations’ option.
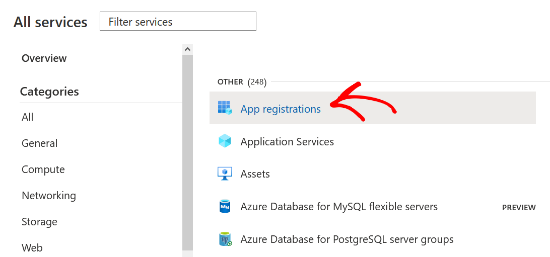
Select App Registrations

After that, you’ll need to click the ‘+ New Registration’ button to create your application.

Create a new registration

Now, enter a name for your application. This is for your own use, so you can change the name whenever you want. For example, you can name it something like ‘WP Mail SMTP: yourdomain.com.’

As for the ‘Supported account types’ section below, it is a best practice to select the ‘Accounts in any organizational directory (Any Azure AD directory – Multitenant) and personal Microsoft accounts (e.g. Skype, Xbox)’ option.

However, if you don’t see this option under your account types, then you can also select the ‘Accounts in any organizational directory (Any Azure AD directory – Multitenant)’ option.
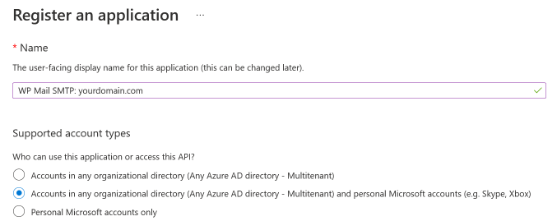
Enter a name and select supported account types

After that, scroll down to the Redirect URI settings. You can leave the dropdown settings to Web for the first field in the form.

Keep Redirect Settings to Web

For the second field, you will have to enter the redirect URI address given in the WP Mail SMTP Outlook settings.

To find the Redirect URI, simply return to the WP Mail SMTP settings tab or window from your browser. Then copy the web address that is given in the Redirect URI field.
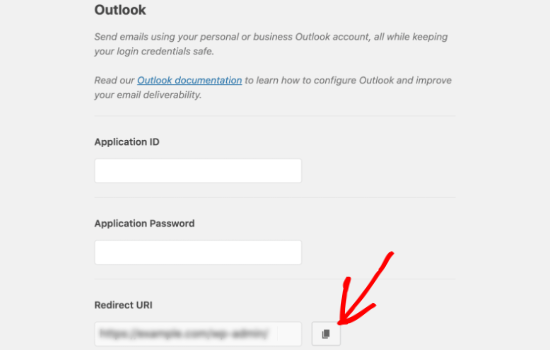
Copy the Redirect URI

Next, you can paste the URL into the Microsoft Azure app registration form and click the Register button.

Redirect URI Settings

Microsoft Azure will now take you to another screen where you’ll see the Application (client) ID. Simply click the ‘Copy to clipboard’ button to copy your application ID.
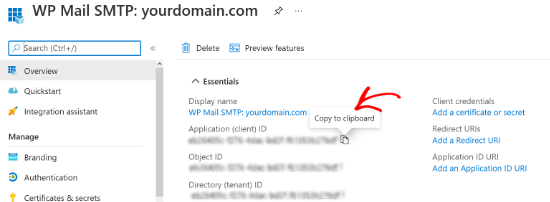
Copy the Application ID

After that, you can enter the copied application ID in the WP Mail SMTP settings. To do that, simply head over to your WP Mail SMTP settings window and paste the value in the Application ID field.
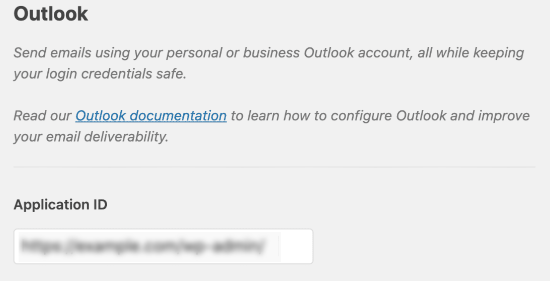
Paste the copied Application ID in WP Mail SMTP settings

Create an Application Password

Once you have entered the application ID, the next thing to do is create an application password.

You can start by clicking the ‘Certificates & secrets’ option in the sidebar on your left.
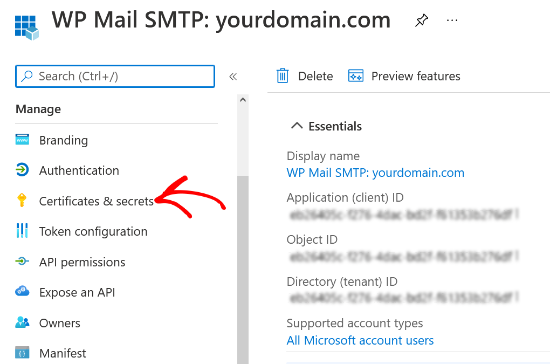
Click the Certificates and Secrets option

On the next screen, you can skip the Certificates section and scroll down to the Client Secrets section. Then click the ‘+ New client secret’ option to add a client secret.

Select the New client secret option

You’ll now see a new overlay window slide in from the right. In this window, you can enter a description and select a time period for the app password to expire.

Microsoft Azure lets you select a preset expiry time (3 months, 6 months, 12 months, etc.), or you can set a custom timeframe.

We recommend selecting one of the preset settings when you are first starting out. You can always change the password expiry time to custom settings in the future.
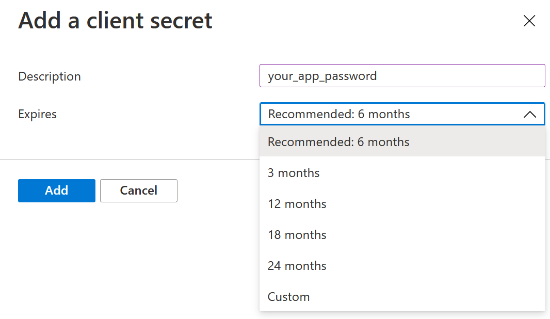
Enter a description and set password expiry time

When you are satisfied with the settings, click the Add button.

As soon as you click the Add button, Microsoft Azure will generate an application password. You can go ahead and click the ‘Copy to clipboard’ button to copy the password that is given under the Value column.

Copy the application password under the Value column

Next, you’ll need to enter this password in your WP Mail SMTP settings. To do that, return to the WP Mail SMTP settings and then paste the password under the Application Password field.
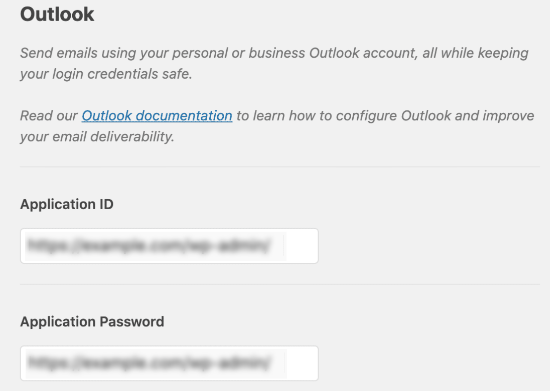
Paste the value in the Application Password field

Set Up API Permissions

After setting up the Application ID and Application Password in WP Mail SMTP, the next step is to add API permissions.

To get started, you can click on the API permissions option from the menu on your left.
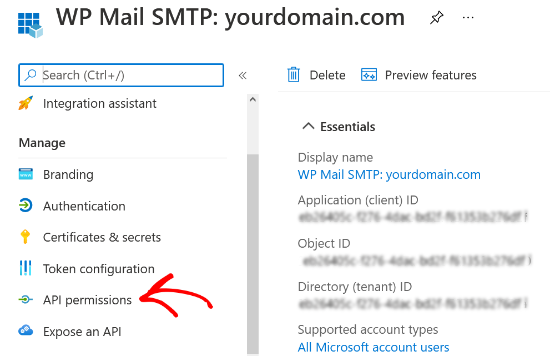
Click the App Permissions option

Next, go ahead and click the ‘Add a permission’ button.

Select the Add a permission option

When you click the button, a new window will slide in from the right to request API permissions. You’ll have to select the Microsoft Graph option to set up API permissions.
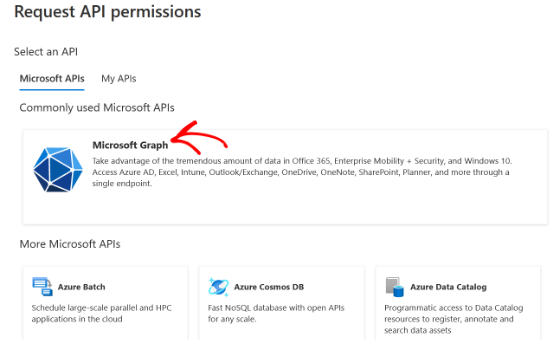
Select the Microsoft Graph option

On the next screen, Microsoft Azure will ask what type of permissions does your application requires. You can select the ‘Delegate permissions’ option.

Select delegate permissions

Next, you’ll see multiple options to select permissions. However, an easier way to find the right settings is by entering the term ‘send’ in the search bar located under the ‘Select permissions’ heading.

After that, you’ll have to select the Mai’ tab from the options that appear and then click the checkbox for Mail.Send.Shared.
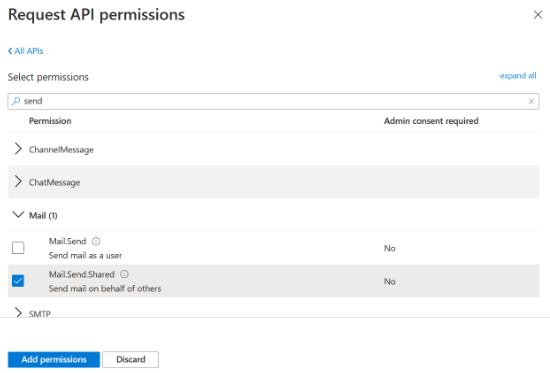
Search send in the search bar and go to the Mail tab

When you are ready with the settings, click the ‘Add permissions’ button at the bottom.

You’ll have to repeat the API permission steps again by clicking on the ‘+ Add a permission’ button and again selecting ‘Microsoft Graph.’ However, this time select the ‘Application permissions’ option.

Select application permissions

Now, you can enter the same search term ‘send’ in the Select permissions search bar. When you see the Mail tab, click on it and then select the checkbox for Mail.Send.

Search for send and select mail send option

Next, go ahead and click the ‘Add permissions’ button.

After setting up the API permissions, you’ll have to go back to the WP Mail SMTP settings and then click the Save Settings button to finish up the Outlook mailer configuration.
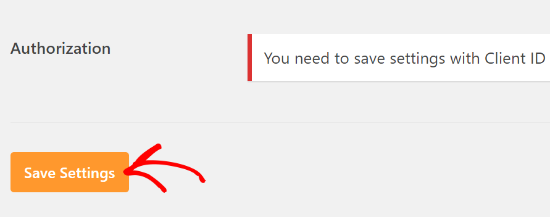
Save settings in WP Mail SMTP

When you save the settings, you’ll have to scroll down to the Authorization section in the WP Mail SMTP settings and click the ‘Allow plugin to send emails using your Microsoft account’ button.

Allow the plugin to send emails using your Microsoft account

As soon as you click the button, you’ll be redirected to the Microsoft permissions form. All you have to do is click the Yes button at the bottom. This will allow WP Mail SMTP to connect to your Microsoft account.
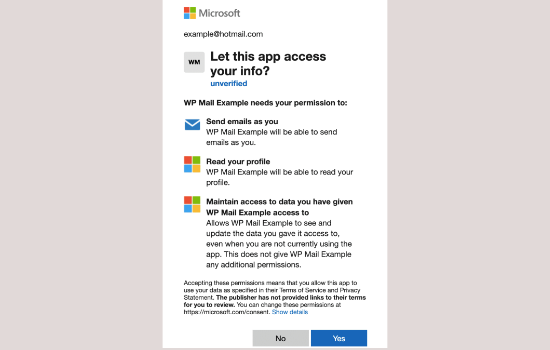
Give permission to connect to your Microsoft account

After that, you will be redirected back to the WP Mail SMTP settings page, and a notice will appear at the top showing that you are ready to send emails through Outlook.

Notice for successfully adding Microsoft API

You can now send a test email to check if everything is working properly.

To send a test email, simply go to WP Mail SMTP » Settings and then click on the Email Test tab at the top. When you are satisfied with the settings, just click the Send Email button at the bottom.

Go to the Email Test tab

After sending the email, you can go to your inbox and check whether you received the test email.
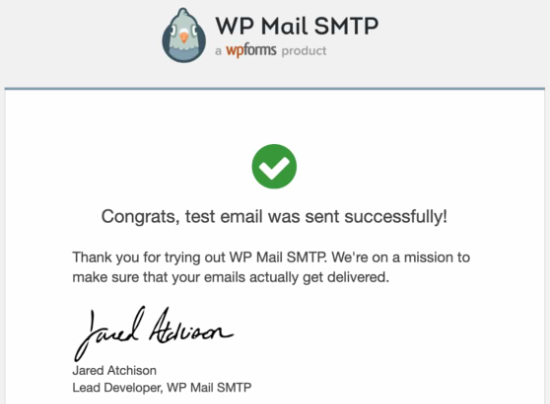
Test email from WP Mail SMTP

We hope this article helped you learn how to connect Microsoft Outlook to WordPress. You may also want to check out our comparison of the best email marketing services for small businesses, and our complete guide on how to add web push notifications in WordPress.

If you liked this article, then please subscribe to our YouTube Channel for WordPress video tutorials. You can also find us on Twitter and Facebook.

The post How to Connect Microsoft Outlook to WordPress (Step by Step) appeared first on WPBeginner.


June 22, 2021 at 04:00PM
Monday, June 21, 2021

What’s Coming in WordPress 5.8 (Features and Screenshots)

WordPress 5.8 beta is out with an expected release date of July 20th, 2021. It will be the second major release of the year and comes with lots of new features and improvements.

We’ve been following the development closely and trying out the new features on our test sites.

In this article, we’ll show you what’s coming in WordPress 5.8 with features and screenshots.

A sneak peak into upcoming WordPress 5.8 release

Note: You can try out the beta version on your computer or on a staging environment by using the WordPress Beta Tester plugin.

Introducing Template Editor

WordPress 5.8 will ship with the new template editor. It is a step towards creating a full site editing tool using the block editor, which means you can expect it to get better with future releases.

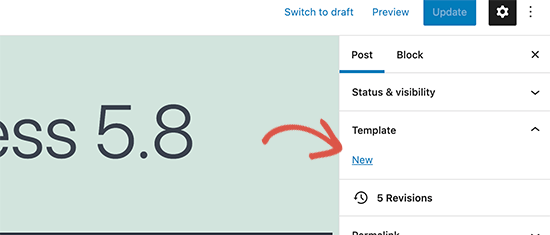
The template editor allows you to create and save templates for your WordPress website and use them later for any post or page.

Create a new template

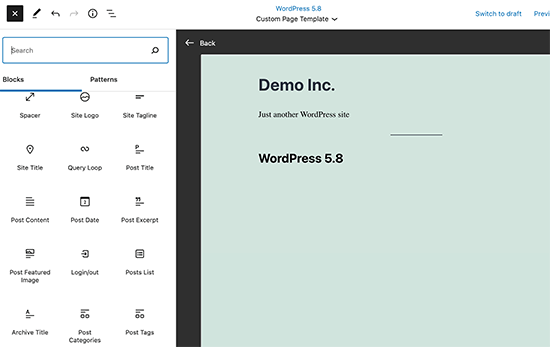
Switching to the template editor will allow you to add Site Editing blocks. A number of essential blocks are available including:

  • Site Logo
  • Site Tagline
  • Site Title
  • Query Loop
  • Post Title
  • Post Content
  • Post Date
  • Post Excerpt
  • Post Featured Image
  • Post Categories
  • Post Tags
  • Login/out
  • Page List

Several site wide editor blocks are introduced in WordPress 5.8

The feature is optional, theme developers and users will be able to easily disable it.

The template editor still relies on your WordPress theme and inherits its styles.

For a more flexible approach, you can try SeedProd which allows you to create custom landing pages regardless of which WordPress theme you are using.

Blocks As Widgets

Another big step towards full-site editor experience is the new blocks as widgets interface.

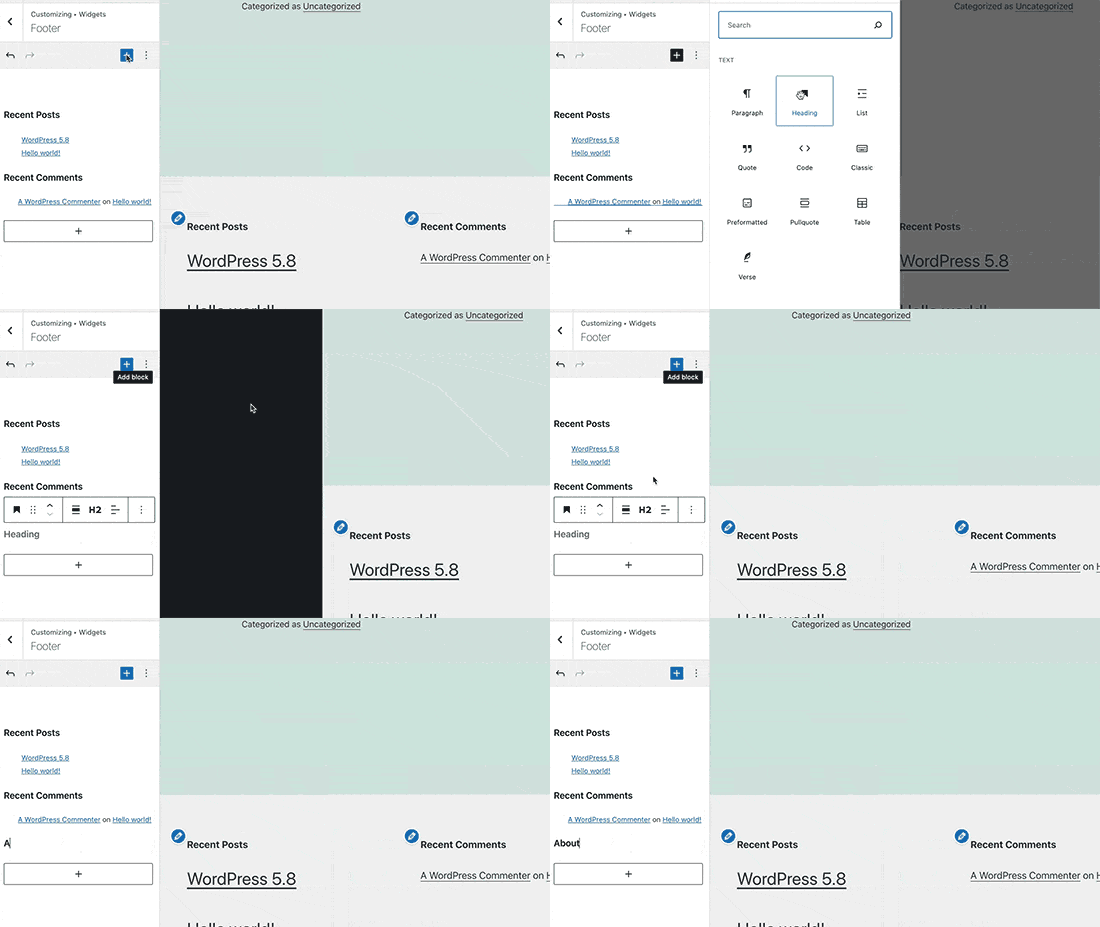
Users will be able to access the new widget experience by using the Customizer or by visiting the Appearance » Widgets page.

Adding blocks as widgets in WordPress 5.8

Blocks as widgets will bring the flexibility of the block editor to your WordPress sidebar widgets. You’ll be able to use colors, spacing, typography, and other design tools without installing any plugins.

New widgets page

There is even a Widgets block that will let you use the classic widgets that are not available as blocks yet.

Not ready to make the move yet?

Don’t worry, you can turn off this new feature by using the Classic Widgets plugin. Simply install and activate the plugin and it will disable the new Widget Blocks feature.

WebP Images Are Coming to WordPress

WebP is a new file format for images to be used on the web. By using the WebP image format, your images will be 25-34% smaller in file size than PNG and JPEG without losing quality.

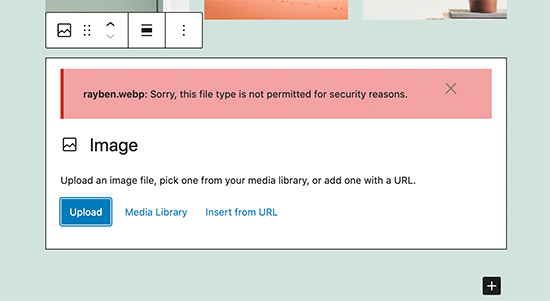
Currently, WordPress doesn’t support WebP images and users see an error when they try to upload a WebP image.

WebP image upload error

With WordPress 5.8, you’ll be able to upload WebP images to your WordPress website without using any plugins.

However, one downside is that it will not automatically replace the image with JPEG or PNG if a user is on an unsupported browser.

If majority of your users are using an unsupported browser, then you may still want to use an image compression plugin.

For more details, see our article on how to properly add WebP images in WordPress.

Editor Improvements in WordPress 5.8

The block editor screen is where users spend most of their time creating content. Each WordPress release comes with many improvements, bug fixes, and new features to improve the editing experience.

Following are some of the editor improvements coming in WordPress 5.8.

Easily Select Parent Block in Nested Blocks

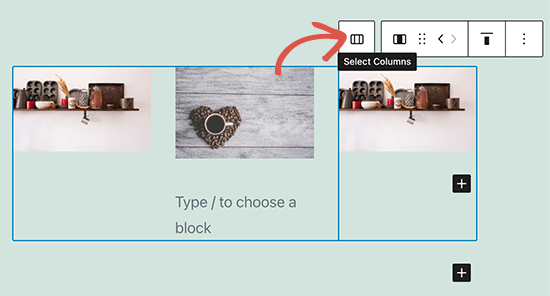
Nested blocks like columns and groups allow you to easily group blocks. However, it sometimes becomes difficult to select the parent block inside a nested block.

WordPress 5.8 will now show an always visible parent block button in the toolbar.

Parent block button in the toolbar

Improved List View

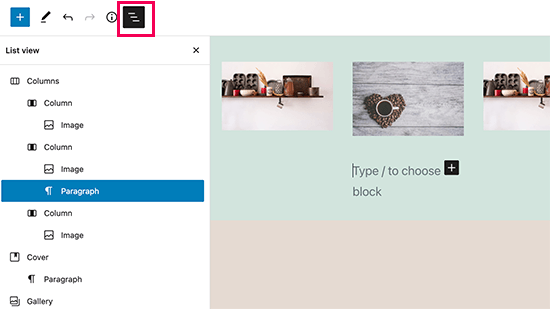
WordPress 5.8 will come with an improved list view panel. It will show you the complete list of blocks in your post or page.

This would make it easier for users to move to a specific block in more complex layouts. For instance, if you have multiple paragraphs in a specific column then you can navigate using the list panel.

Improved list view panel in WordPress 5.8

Improved Select Tool with Block Handles

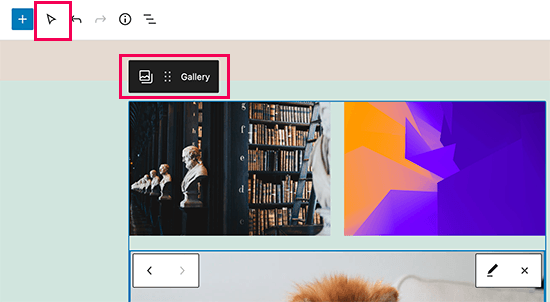
The select tool will now show a better block outline with a handle to move blocks up and down.

Better Select tool with block handles

In WordPress 5.8, you’ll also notice better block highlighting as you move your mouse around different blocks.

New Duotone Filters for Images and Media Blocks

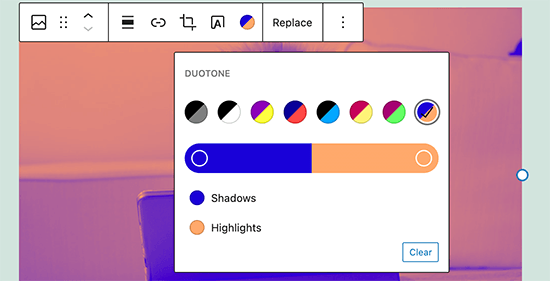
Another exciting upcoming feature in WordPress 5.8 is the Duotone filters. You’ll be able to use these filters over your media blocks like images, galleries, and cover images.

Using duotone filters in WordPress 5.8

It comes with a few presets and you can create your own presets as well by choosing the colors you want to apply.

Duotone filters applied on an image in WordPress 5.8

WordPress themes will also be able to add their own presets to match theme color schemes.

Pattern Suggestions in Add Block Panel

Using the add block panel if you search for a block, the editor will also suggest patterns that you can instantly add. There are some new patterns available and initial work has been laid for integration with the WordPress.org pattern directory.

Pattern suggestions

Improvements to Existing Blocks

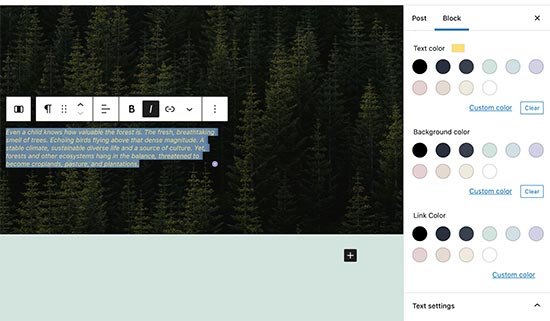
There are several improvements to existing blocks. For instance, more color options to choose text, background, and link colors.

More color options

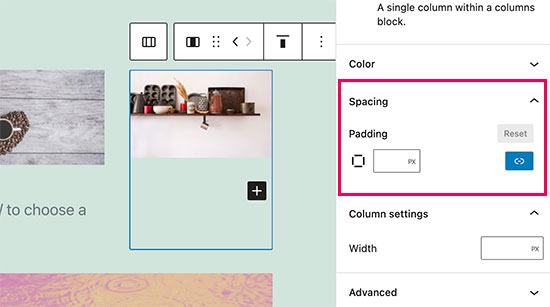
There is a new option to adjust padding among columns.

Adjust column spacing

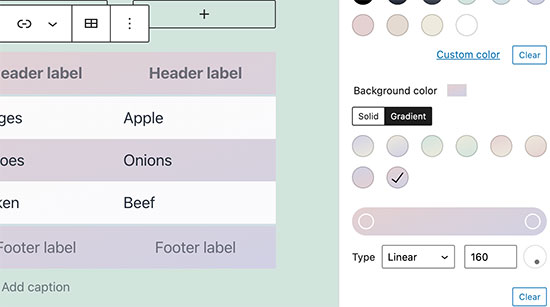
You can also choose gradient background for table block.

Gradient background color option for tables

Under The Hood Changes

WordPress 5.8 will also bring many changes for developers to explore and use in their own themes, plugins, and projects.

Following are some of these under the hood changes.

WordPress will end support for Internet Explorer by the end of this year. 5.8 has merged most of the changes needed for that. (See details)

Context aware filters to use block editor APIs on multiple WordPress admin screens. (#52920)

WordPress recovery mode email message will now only be shown when email can be sent. (#52560)

We hope this article gave you a glimpse into what’s coming in WordPress 5.8. Let us know what features you find interesting and what you’d look to see in a future WordPress release.

If you liked this article, then please subscribe to our YouTube Channel for WordPress video tutorials. You can also find us on Twitter and Facebook.

The post What’s Coming in WordPress 5.8 (Features and Screenshots) appeared first on WPBeginner.


June 21, 2021 at 04:00PM
Friday, June 18, 2021

9 Best Customer Service Software for Business in 2021 (Compared)

Are you looking for the best customer service software for your business?

Using the right customer service software can streamline your customer support workflow and help you create better customer relationships.

In this article, we’ve hand picked some of the best customer service software that you can use along with your WordPress site. We’re using these tools in our various businesses to help deliver top-notch customer support.

9 best customer service software for business in 2021 (compared)

Why Use Customer Service Software?

Customer service software makes it easy for your business to provide a great customer experience. This leads to improved customer retention, which means more revenue for your business over the long run.

As your WordPress website or online store grows, it can be hard to maintain high customer satisfaction, but the customer service software makes this easy.

Since customers will make or break your success, investing in the right support software stack can give you a competitive advantage.

The best customer service software:

  • Enables you to deliver a faster and more consistent support experience
  • Lets you gather customer insights and data to improve your business
  • Allows you to scale up your customer support easily as your business grows
  • Helps you build a more efficient customer service team

That being said, let’s take a look at the top customer support software that you can use along with your small business website.

1. Help Scout

Help Scout

Help Scout is one of the best all in one customer support tools. It’s packed with nearly every feature you need to streamline your customer support processes.

Note: we use Help Scout here at WPBeginner and across all of our other businesses for our email support needs.

It lets you simply manage your email and chat support from a single tool. This lets your customers contact you from where they feel the most comfortable, and your team can work from a single support queue.

Your customer support team can create saved replies, so they can quickly respond to common questions and save time.

There’s a knowledge base feature that lets you build your own help center. This makes it easy for your customers to find the answers they need on their own while reducing the number of support requests.

Help Scout also provides detailed reporting data and metrics, so you can quickly get an overview of what’s working and where your team can improve. Their time tracking report helps you see where your agents are spending the most time, so you can improve your product workflows to improve time to resolution.

For business owners who want to add more support channels, there’s a live chat feature available. It’s not as powerful as other market leading live chat software, but it can be a good solution for many businesses.

Help Scout Live chat feature also known as Beacon has a self-service answer feature that recommends articles to your users. If they can’t find an answer, then they can quickly start chatting with your team.

Plus, there are over 40 integrations with tools your business is using like HubSpot, Slack, Google Apps, WooCommerce, and more.

Pricing: An affordable Basic plan starts at $20 per user per month. This provides 3 mailboxes, live chat, and more. Bigger teams can opt for the Plus plan that starts at $35 per user per month.

2. LiveChat

LiveChat

LiveChat is the best live chat software in the market today. It’s very flexible and feature rich, plus there’s a WordPress plugin that makes it easy to integrate with your website.

The LiveChat apps are very easy to use and work across mobile, desktop, and tablet devices. So, you don’t have to be logged in to WordPress to access your customer service hub.

You can set up LiveChat to work during your team’s off hours so that live chat requests will go directly to your support ticket management system.

Note: we use LiveChat across all of our eCommerce businesses to support our pre-sales staff. Their customization options make it easy to match the chat window to our company branding.

One stand out feature of this service is speed. The chat window loads much faster, has a better user experience, and works across every device. A lot of other live chat providers can’t match this.

When it comes to customer support, speed is essential, and this tool shines.

It integrates with nearly all the marketing services you’re already using, like Google Analytics, HelpDesk, and HubSpot.

You’ll find many additional tools to elevate support quality like visitor tracking, smart API that integrates with your knowledge base, and proactive chat.

The thing that we absolutely love about Live Chat is that they focus on sales conversion. They have built-in conversion tracking, and they have additional tools to help you get more leads / sales.

Pricing: You’ll find different plans for all businesses sizes. The starter plan begins at $16 per agent per month for a yearly plan, or $19 monthly. Every plan has a 14 day free trial to test out the service.

Deal: WPBeginner readers can get 30% off the first payment by using our LiveChat coupon code.

3. Nextiva

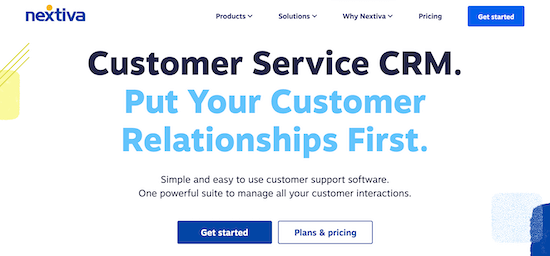
Nextiva

Nextiva is the best business phone service provider in the market today. They also offer a customer service CRM that’s very simple and easy to use.

It offers your business multichannel support including, email, phone, live chat, social media, and SMS messaging. You can view customer data from every source in a single dashboard.

Plus, you can respond to inquiries from one place, no matter how your customers reach you.

If you’re using other Nextiva services like Nextiva business VoIP or the Sales CRM, then these can integrate instantly.

You’ll find other features like call routing, a self-service knowledge base, canned responses, and a mobile app.

Note: we use Nextiva at WPBeginner for all of our phone support needs. If you need to offer phone support, then it’s the best option available.

There are a ton of other powerful features to help your phone support team as well, like call forwarding, call routing, custom greetings, call analytics, virtual business phone number, and a lot more.

Nextiva is a perfect platform for both small businesses as well as large call centers who’re looking for a customizable solution to help automate their sales and support contact center.

Pricing: The plans start at $18.95 per month for between 20-99 users. If you want support for SMS and additional integrations, then the Pro plan starts at $22.95 per month.

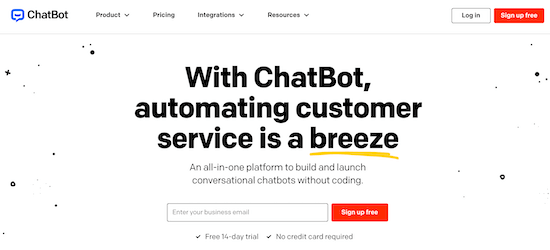
4. ChatBot.com

Chatbot.com

ChatBot.com is the best chatbot software in the market today. It make it easy for small business owners to unlock the power of AI chatbots to improve customer service.

It’s effortless to create your customer service chatbot with the drag and drop interface.

You can also use one of their pre built templates created specifically for your industry. You can use these conversation templates to develop your unique chatbot based on common questions and scenarios.

In the past, making a chatbot was very difficult, but this tool makes it very easy.

Adding a chatbot to your customer service workflow can make your customer support system more effective.

Your chatbot can handle simple requests and ask your users preliminary questions, then forward this to your team for a more detailed response.

Note: we use ChatBot.com in several of our SaaS businesses. It lets us automate portion of our pre-sales questions while seamlessly forwarding our support requests to our live support teams when needed.

ChatBot also integrates easily with both WordPress and WooCommerce. Plus, it integrates with your live chat software of choice, along with dozens of other popular apps.

Pricing: The starter plan is $50 per month and gives you up to 1,000 chats per month. Pricing and the number of chats scale up from here. Every plan has a 14 day free trial, so you can see if it’s right for your business.

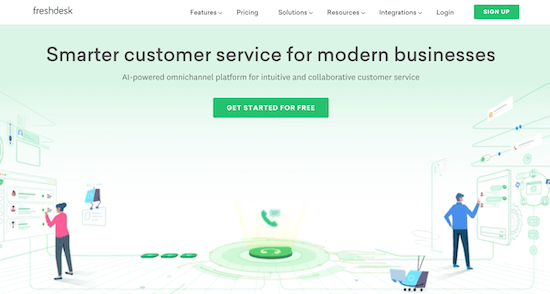
5. FreshDesk

Freshdesk

FreshDesk is another very popular customer service solution. It’s packed with features while still being intuitive and easy to use.

It’s an all-in-one tool and can bring all of your support channels together in one place. You’ll find live chat support, chatbots, modern messaging, omnichannel support, automation features, and more.

The ticketing system has features like a team inbox for fast and easy collaboration and problem solving. You can also route support tasks based on team member availability.

You’ll find a wealth of reporting data to help refine your support service over multiple channels, including social media.

There are plenty of additional customer self service tools like a chatbot, help widget, forum support, and more.

For business owners and startups on a budget, a free version of the tool that supports an unlimited number of agents is available. However, it only offers basic ticketing and knowledge base functionality.

Pricing: The basic version of the help desk software starts at $15 per month. Full omnichannel plans start at $79 when billed annually, or $99 when billed monthly.

Note: We have used Freshdesk in the past for few of our businesses, but over time have switched everything to Help Scout, so we can centralize our processes.

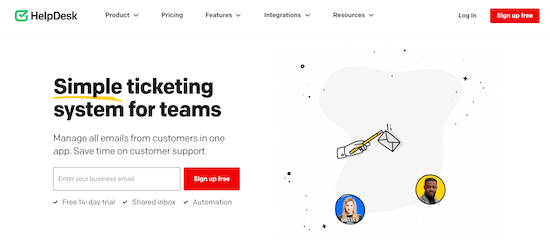
6. HelpDesk.com

HelpDesk

HelpDesk is a very easy to use customer support software. The interface is incredibly clean and intuitive.

It can help you and your team manage tickets simply. You can manage emails, customer requests from contact forms, and more, all in one place.

Plus, there are advanced ticketing, sorting, and tagging features to prioritize what’s most important.

The team collaboration features let you create multiple mailboxes, add private notes to ticket threads, and create agent groups.

There are automation features available, like canned responses, automated task assignments, and fully automated workflows.

You can also integrate HelpDesk with LiveChat, so you can solve support tickets and talk to customers in chat from one app.

Beyond that, there are various other integrations like Slack, Zapier, HubSpot, Salesforce, and more that you can use to improve your workflow.

Pricing: The Starter plan is $5 per month per user, while the Team plan is $24 per month and adds the ticketing system and support for larger teams. There’s also a 14 day free trial for you to test out the service.

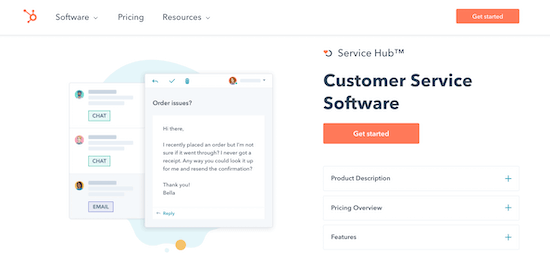
7. HubSpot

HubSpot

HubSpot offers small business owners a wide range of tools to grow and improve customer interactions. They have one of the best CRMs for small businesses and offer an excellent customer support software solution.

The support software is an all-in-one solution and has a ton of different tools. You’ll find help desk software and a ticketing system to keep track of long-term support requests.

There’s also knowledge base software to help your customers quickly resolve their problems.

On top of that, there’s live chat and chatbot functionality for real-time communication with your customers.

The free plan is free forever and has all the features you need to help your customer support staff.

Plus, everything integrates with the HubSpot CRM, so it’s easy to start using this software if you’re already using the CRM software for managing customer relationships.

Pricing: The entry level plan is free forever. The Starter plan begins at $45 per month and gives you access to more automation tools and support for a bigger team.

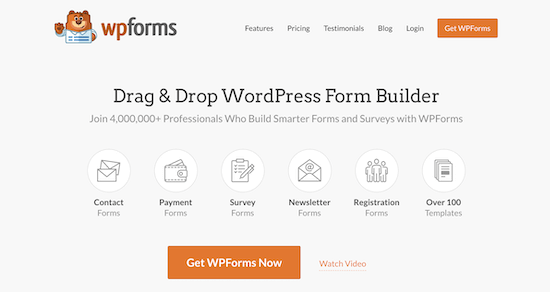
8. WPForms

WPForms

WPForms is the best contact form plugin for WordPress used by over 4 million websites. Not only is it the most beginner friendly form plugin, but it’s very powerful and packed with features.

Note: we use WPForms on WPBeginner and all of our other websites.

You can use the drag and drop builder to simply create a contact form for your users to submit a support request.

The free version has basic contact form features, including basic form fields, spam protection, email notifications, and more.

The pro version extends these features and makes it a more helpful customer service tool. You can create forms with conditional logic, geo-location, form abandonment, and much more.

You can see all of your form submissions directly in your WordPress dashboard, making it easy to manage requests. You can even have these requests sent to the right team member in charge of support.

There’s also instant form notification, which will automatically email you when a user submits a form. You can choose to notify yourself or your entire team.

The user journey reports addon lets you see what your visitors did on your site before submitting a request. This can help you resolve their issue faster and see where they got confused.

WPForms lets you connect your forms with over 3000+ other software integrations including most marketing automation tools, project management software, service desk, human resources (HR software), and more. This makes it easy for you to streamline your workflow and save time.

Pricing: For simple form creation, the Basic plan starts at $39.50 per year, however, to get access to advanced integrations, user journey reports, and more the Pro plan is $199.50 per year.

9. Slack

Slack

Slack is a popular communication and team collaboration tool for remote teams, businesses, and bloggers. However, it also can be used as a unique customer service management solution and support channel.

It can be a great way to offer VIP support for your enterprise customers and clients. It provides a very open and collaborative environment, which can help you resolve the issue quickly and move forward on big projects.

Note: we offer VIP support through private Slack channels and receive enterprise support the same way. It’s one of the most effective remote communication tools.

With various integrations available, you can also pair this tool with another support software on this list. You can drop support team issues into Slack to have team members collaborate easily.

You can also integrate Slack with WordPress to receive website notifications, like form entries, directly in Slack. For more details, see our beginner’s guide on how to integrate Slack with WordPress.

There’s an advanced AI powered search feature to find documents and past conversations quickly. You can also bring in team members from different departments all in one place.

Best of all, it’s very cost effective. You can create communication channels for your important clients and customers and add them as guests, which is entirely free.

Pricing: The free plan should be enough for most businesses. The Pro plan is $8 per month and offers more secure outside collaboration. Businesses that require enhanced communication security can opt for the Business plan for $15 per month.

What is the Best Customer Service Software (Expert Pick)?

In our expert opinion, there are a several services that can qualify for the best customer support software title, but it depends entirely on your needs.

If you need the best email support software, then Help Scout is the best option.

If you want a live chat tool to provide instant customer support, then LiveChat is the best choice.

If you are looking for a customer support phone system with addon features like live chat, then Nextiva is perfect.

If you like the idea of live chat support, but would prefer to automate with a chatbot, then ChatBot.com is a great choice.

If you were going to choose just one customer service software to support your business, then we recommend using Help Scout.

Besides the stand out email tools, you can also add live chat, create a knowledge base, plus integrate with popular tools like Slack, WooCommerce, and more.

Aside from the top customer service software on our list, we also looked at other providers like Zendesk, Salesforce, Zoho Desk, LiveAgent, and more.

However, we decided not to list them, so you can avoid choice paralysis and quickly find the best customer service software for your business.

We hoped this article helped you find the best customer service software for your business. You may also want to see our list of the best SEO tools to increase your traffic and our expert picks of the must have WordPress plugins for business websites.

If you liked this article, then please subscribe to our YouTube Channel for WordPress video tutorials. You can also find us on Twitter and Facebook.

The post 9 Best Customer Service Software for Business in 2021 (Compared) appeared first on WPBeginner.


June 18, 2021 at 04:00PM