Tuesday, June 29, 2021

How to Connect Any WordPress Forms to Google Sheets (Easy Way)

Do you want to connect your WordPress forms to Google Sheets?

Google Sheets makes it easy for you manage your form data inside a spreadsheet, and they have built-in collaboration tools to improve workflows.

In this article, we’ll show you how to easily connect any WordPress forms to Google Sheets, so you can automatically send WordPress form data to Google sheets.

How to connect any WordPress forms to Google Sheets (the easy way)

Why Connect WordPress Forms to Google Sheets?

Google Sheets is a popular free spreadsheet software from Google. Connecting your WordPress forms to Google Sheets makes it easier to manage and sort your form data.

No matter if you’re creating a questionnaire, gathering testimonials, building a survey form, or something else, you can connect your WordPress forms to Google Sheets with just a few clicks.

Integrating your form entries with Google Sheets can help your WordPress website in a lot of ways.

  • Makes it easy to give your team access to form data without creating a new WordPress login
  • Makes it easier to interpret and analyze your form / survey data
  • Set up automatic data collection and reduce errors from manual data entry

With that said, let’s take a look at how you can connect any WordPress forms to Google Sheets, the easy way.

Step 1. Create a WordPress Form Using WPForms

First thing, you need is to have an active contact form on your WordPress site which will act as the data collection source.

For the sake of this tutorial, we’ll be using the WPForms plugin. It’s the best contact form plugin for WordPress used by over 4 million websites.

Their beginner friendly form builder can be used to create nearly any kind of WordPress form. You can start with one of their 150+ form templates or simply use the drag and drop builder to add form fields and customize them to your liking.
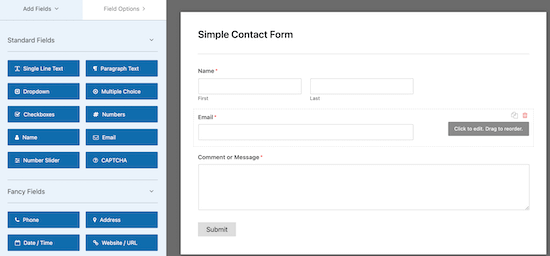
For more details, see our step by step guide on how to create a contact form in WordPress.

If you haven’t created a Google Sheets spreadsheet, then you’ll need to do that now.

Head over to the Google Sheets website and click ‘Blank’ to add a new spreadsheet.

New Google spreadsheet

Then, when you’re adding spreadsheet columns, you want these to match your WordPress form fields.

In this case, we’ll have three columns for the ‘Name’, ‘Email’, and ‘Message’.
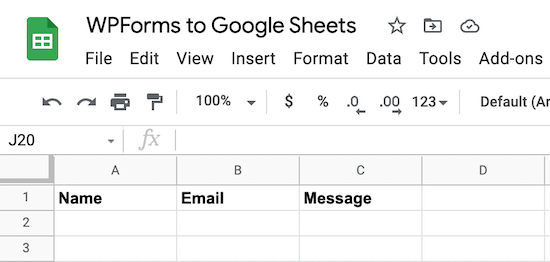
Google Sheets spreadsheet

Step 2. Install and Activate the Uncanny Automator WordPress Plugin

To connect your WordPress forms to Google Sheets, we’re going to be using an automation plugin.

The best WordPress automation plugin is Uncanny Automator. It acts as a connecter between WordPress plugins and other third-party apps, so they can easily talk to each other.

It’s the most powerful way to automate your WordPress blog processes without any code.

The best part about Uncanny Automator is that it doesn’t charge you a tax on each data transfer like other SaaS providers such as Zapier.

Uncanny Automator also works with all major form solutions including, WPForms, Formidable Forms, Gravity Forms, Ninja Forms, WooCommerce, and more.

However, the focus of this tutorial will be on the integration with WPForms.

Note: there is a free version of the plugin available, but we’ll use the Pro version for this tutorial since it has the Google Sheets integration we need.

Uncanny Automator

For more details, see our guide on how to create automated workflows in WordPress with Uncanny Automator.

Step 3. Connect Your Google Account to Uncanny Automator

After Uncanny Automator is activated and set up, you need to connect the plugin to your Google account.

To do this, navigate to Automator » Settings and then click the ‘Google’ menu item.
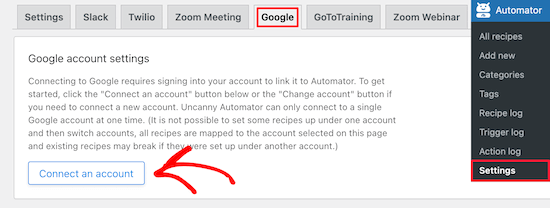
Connect Google account

After that, click the ‘Connect an account’ button.

This will bring you to a screen where you need to authorize your Google account.

Simply select the Google account you want to use and then click the ‘Allow’ button.

Grant Google account permission

Then, you’ll need to click ‘Allow’ one more time to confirm your choices.

Once your account is successfully connected, you’ll be taken back to the plugin settings screen in your WordPress dashboard.
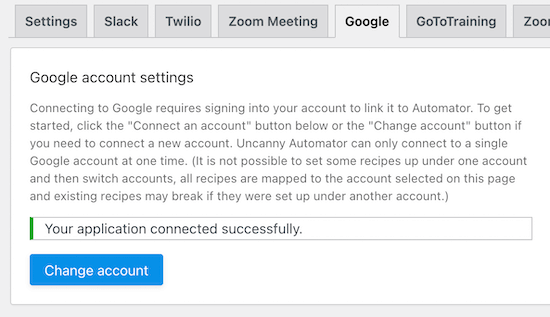
Google account integration success

Step 4. Connect Your WordPress Form to Google Sheets with Uncanny Automator

Now, it’s time to connect your WordPress form to the Google Sheet you created earlier.

Uncanny Automator uses what are called “recipes” to connect different apps and plugins.

To create one, go to Automator » Add new, click the ‘Anonymous’ option and then click ‘Confirm’.

You want to choose Anonymous because most of the time it will be new anonymous visitors filling out the forms on your website.
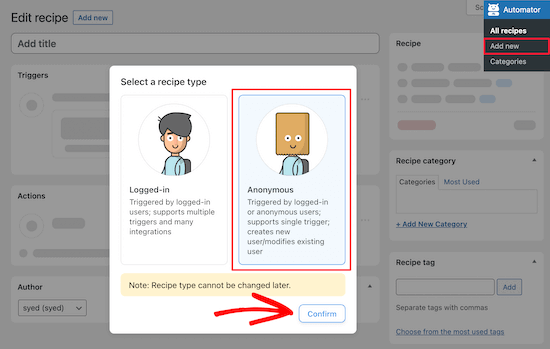
Select anonymous recipe

Next, you can give your recipe a name.

After that, select ‘WPForms’ in the ‘Anonymous trigger’ meta box.
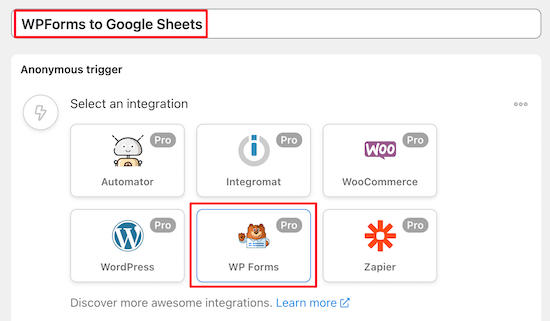
Select WPForms trigger

Then, you’ll have two different options to choose from.

We’ll select the ‘A form is submitted’ option since this will send all form submissions to Google Sheets.
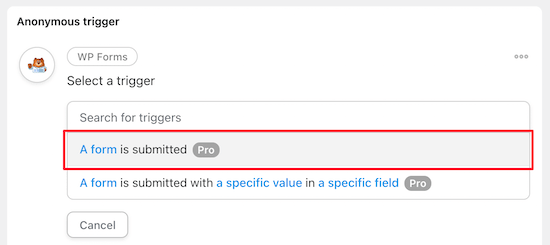
Select form submitted trigger

Then, select your form from the drop down list.

After that, click the ‘Save’ button.
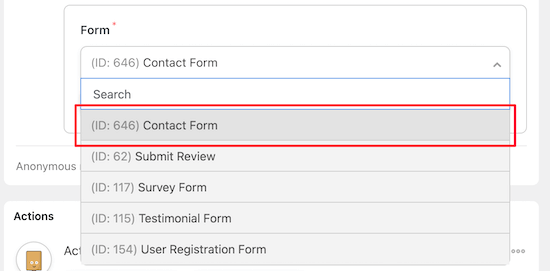
Choose WPForms form

Since you chose an Anonymous recipe above, you need to create a new ‘Subscriber’ user in WordPress. This new Subscriber role will be used to send the form data through.

For more details, see our guide on how to add new users and authors to your WordPress blog.

Then, choose the ‘Existing user’ option in the ‘Actions’ meta box.

Select existing user option

This will bring up a popup where you can choose the new user account.

Select the ‘ID’ field and enter the ID number from the new user you created.

Enter user ID

To find this go to Users » All Users in your WordPress dashboard.

Then, open up the new user and locate the ID in the URL for the page.
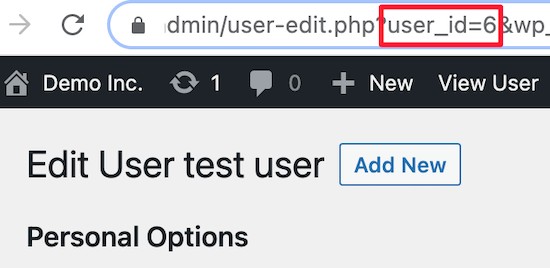
Find user ID

Once you’ve done that, select ‘Do nothing’.

Make sure to click ‘Save’ to save the recipe so far.
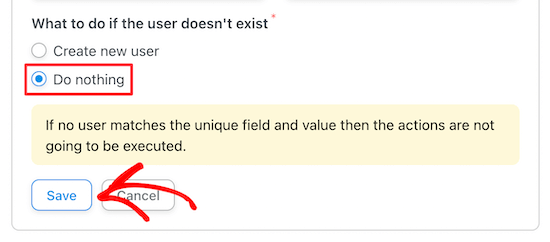
Select do nothing and save

After that, click the ‘Add action’ button.

Next, you need to select ‘Google Sheets’ from the list of integrations.
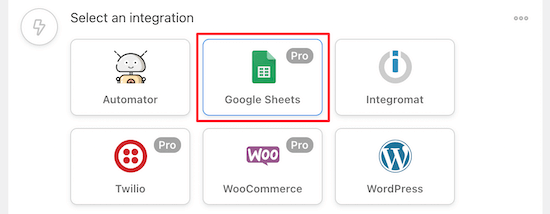
Select Google Sheets

Then, choose the ‘Create a row in a Google Sheet’ option under the ‘Select an action’ section.

Create a row in Google Sheet

This will bring up a menu to select the spreadsheet that you created earlier.

You can search for the name of your spreadsheet, and it will bring up a list of options.

Select the right spreadsheet

After you’ve selected the spreadsheet, click the ‘Get columns’ button in the ‘Row’ section.

This will bring up a list of columns from the spreadsheet.
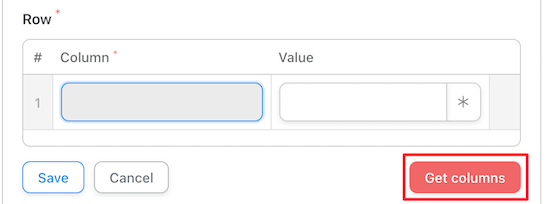
Select get columns

You’ll want to map the form fields to your spreadsheet columns.

Next to each form column, find the matching spreadsheet field. The ‘Column’ name should be the same as the ‘Value’ name.
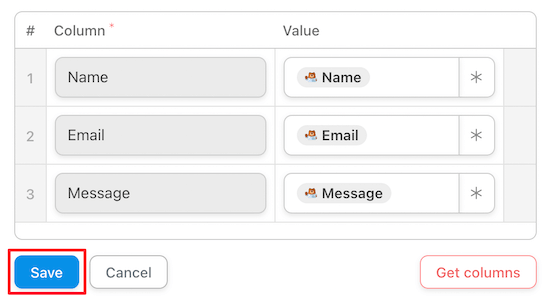
Match column and value

Once you’ve matched up all the fields, it will look similar to the settings above.

Make sure you click ‘Save’ once you’re done creating the recipe.

After that, you need to publish your new recipe. This will make sure that form entries will automatically be sent to your Google Sheets spreadsheet.

To publish the recipe, all you have to do is switch the recipe toggle to ‘Live’.

Make recipe live

Now, whenever a visitor fills out your form, the information will instantly appear in Google Sheets.

There are many other no-code integrations and automations that you can create with this plugin like integrating Slack with WordPress, and even setting up SMS notifications in WooCommerce.

We hoped this article helped you connect any WordPress forms to Google Sheets the easy way. You may also want to see our expert picks of the best no-code drag and drop WordPress page builders, and our list of the must have WordPress plugins for businesses.

If you liked this article, then please subscribe to our YouTube Channel for WordPress video tutorials. You can also find us on Twitter and Facebook.

The post How to Connect Any WordPress Forms to Google Sheets (Easy Way) appeared first on WPBeginner.


June 29, 2021 at 02:00PM

Monday, June 28, 2021

How to Add Schema Markup in WordPress and WooCommerce

Do you want to easily add schema markup in WordPress?

Schema markup helps you provide important information to search engines that they can use to enhance your listing in the search results.

In this article, we’ll show you how to easily add schema markup in WordPress and bring in more free SEO traffic from search engines to your website.

Adding schema markup to a WordPress website

Here is a quick overview of the topics we’ll cover in this article:

What is Schema Markup?

Schema markup is a special type of HTML code that you can add to your WordPress website to tell search engines more about your content.

For instance, you can tell the search engines that a particular page is a blog post, a recipe, FAQ, news article, or product page in your online store. Search engines can then use this data to display rich results.

Rich results in Google Search

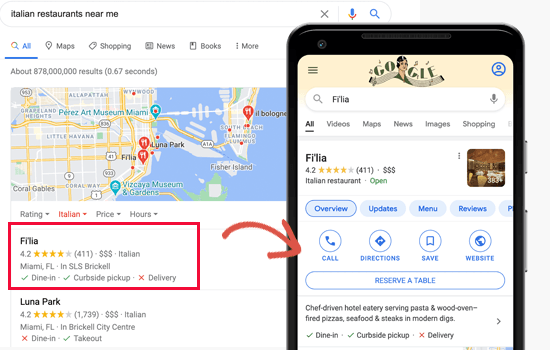
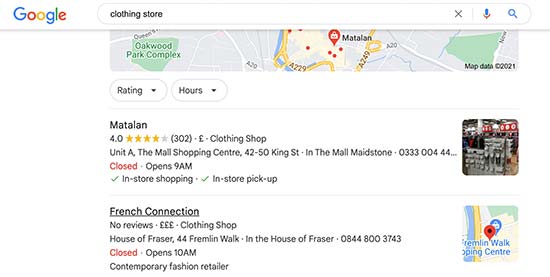
Search engines like Google also use schema markup to display information in other searches. For instance, in Google Maps your listing would appear with directions, open hours, business phone number, and more.

Local search results preview

These enhanced search listings are called rich results or rich snippets. They make your site stand out in SERPs which improves your organic click through rate and brings you more free traffic.

That being said, let’s take a look at how to easily add schema markup in WordPress without writing any code.

How to Add Schema Markup in WordPress

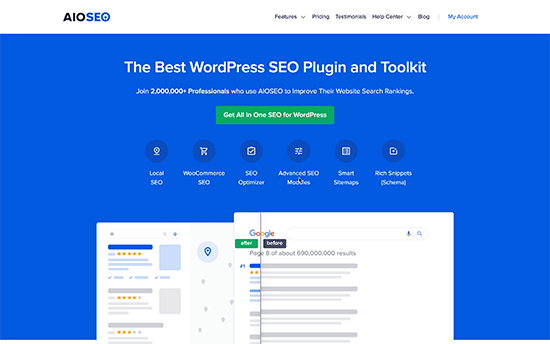
The easiest way to add schema markup in WordPress is by using All in One SEO for WordPress. It is the best WordPress SEO plugin on the market and allows you to easily add schema markup to your WordPress site.

All in One SEO for WordPress

The first thing you need to do is install and activate All in One SEO for WordPress. For more details, see our step by step guide on how to install a WordPress plugin.

Upon activation, the plugin will launch a setup wizard that will walk you through the setup. If you need help, then follow our article on how to set up All in One SEO for WordPress.

Now if you completed the setup, then the plugin will automatically set up the correct schema markup and apply it across your website.

However, we’ll walk you through all the schema markup settings manually so that you can change the settings if needed.

Setting Site Wide Schema Markup in WordPress

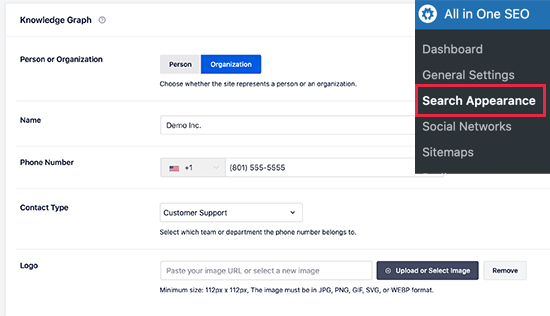
First, we’ll start by telling search engines some basic information about your WordPress website. Go to All in One SEO » Search Appearance page and scroll down to the Knowledge Graph section.

Provide your website information for Knowledge Graph

From here, you need to choose whether your website is about a person or an organization. For an organization, you can provide a name, business phone number, contact type, and a business logo.

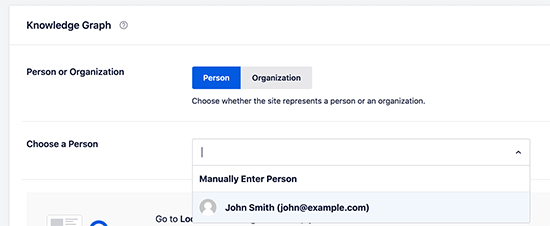
If your website is about a person (such as a personal blog, resume website, or a portfolio website), then you can select the person’s user account from the drop-down list or enter their information manually.

Person meta data

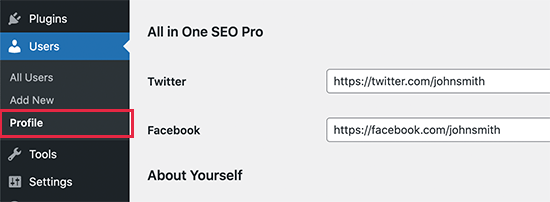
If you choose an existing WordPress user, then you can edit the selected user’s profile by visiting Users » Profile page.

Here you can provide the user’s Twitter and Facebook profile URLs.

Edit user profile

Also, make sure that you have entered the user’s first and last name correctly and have chosen the correct name to be displayed publicly.

Lastly, you’ll need to set up the user’s profile photo as a Gravatar.

Don’t forget to click on the ‘Update Profile’ button to save your changes.

Setting up Default Schema Markup in WordPress

The next step is to choose default settings to use for generating schema markup for all your WordPress posts and pages.

This will ensure there is schema markup correctly set up for all your WordPress posts, pages, products, or any other content types.

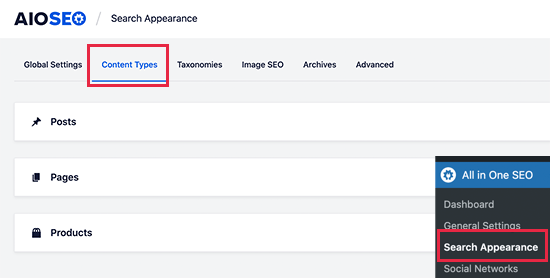
Simply go to the All in One SEO » Search Appearance page and switch to the Content Types tab. From here you will see all your post types listed.

Search Appearance content types

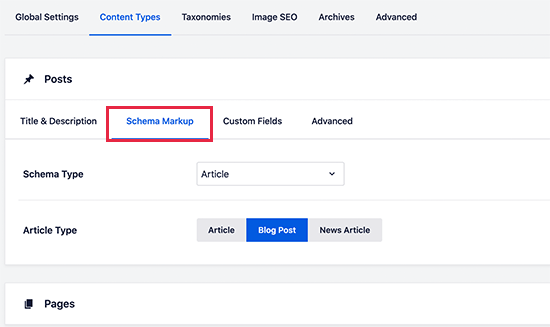
For each post type, you’ll notice a Schema Markup tab. Switching to it will allow you to choose the default schema type for that particular post type.

Choosing default Schema markup for content types in WordPress

From here you can review the settings and change them if needed. For instance, if you run a news website that uses WordPress posts as news articles, then you may want to change the Article Type to News Article schema.

Changing Schema Markup for Individual Posts and Pages in WordPress

Since you’ve already set up default schema settings, you won’t need to manually change your schema markup for most of your content.

However, there are a few cases where you may want to adjust the schema settings for an individual post or page.

For example, if you’re using custom WordPress landing pages as product pages, then you would want search engines to know that. Similarly, some blogs may be using WordPress posts to publish recipes, news articles, or reviews.

In these scenarios, you may need to change the schema markup for that particular post or page.

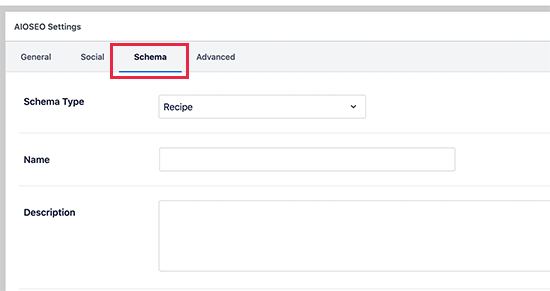
Simply edit the post or page that you want to modify. On the post edit screen, scroll down to the AIOSEO Settings box below the editor and switch to the Schema tab.

Change a single post or page's schema markup

From here you can change that post’s schema markup settings. There are different types of schema to choose from, and each one comes with its own microdata.

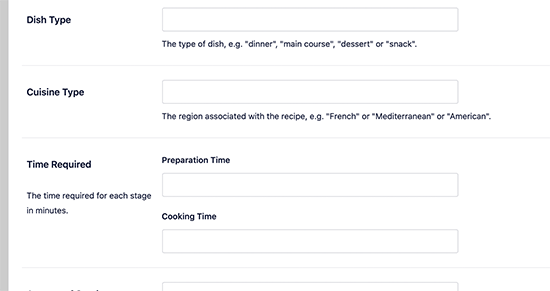
For instance, if you change a post to Recipe, then you can provide a recipe description, cuisine type, preparation time, instructions, and more.

Recipe schema meta data

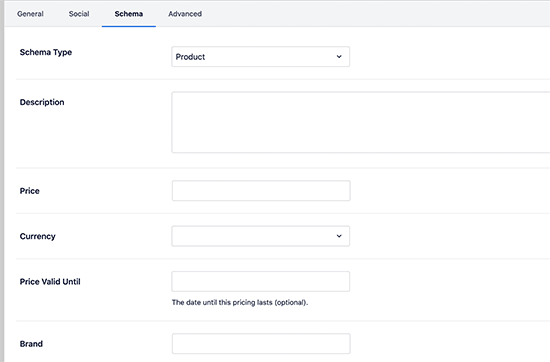
Similarly, if you change a page to a Product schema type, then you can provide price, brand, currency, availability, and more.

Product schema markup

This is such a handy tool for websites that are selling products using a simple online payment form instead of an eCommerce platform.

Setting up Schema Markup for WooCommerce

All in One SEO is the most comprehensive WooCommerce SEO plugin on the market. Apart from the usual SEO settings, it also correctly selects product schema markup for all your products.

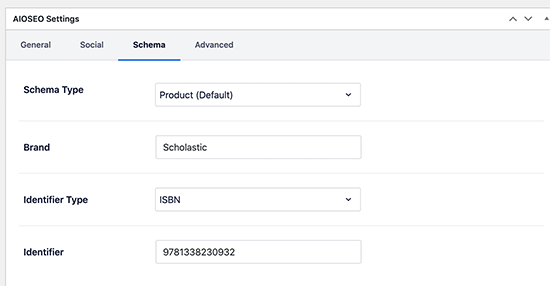
It will fetch all the necessary metadata from your WooCommerce product listing like pricing, currency, availability, reviews, star ratings, and more. Additionally, you can provide brand, identifier type, and identifier number under the Schema tab for each product.

Product schema metadata

This comes in handy if your store is selling products from other brands with a standardized identifier.

Adding Schema Markup for Local SEO

Nearly 36% of all searches on Google have local intent. That means those users are looking for local businesses and services nearby.

Most local searches lead to a purchasing decision, which makes them highly lucrative for small businesses.

Local SEO helps you put your business on the map for users to easily find. This allows your store or business to appear in local Google search results.

Local search results

It also makes your business appear in other Google products like Google Maps, which brings more walk-in customers to your physical location.

Local search results preview

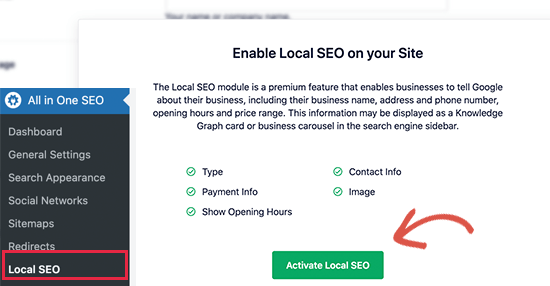
All in One SEO comes with a Local SEO addon that allows you to easily optimize your website for local search results.

Simply go to the All in One SEO » Local SEO page and click the Activate Local SEO button.

Enable Local SEO

Upon activation, if your business has multiple locations, then you’ll want to turn that option on. You’ll then be able to add individual locations and set them up.

Multiple or single location business

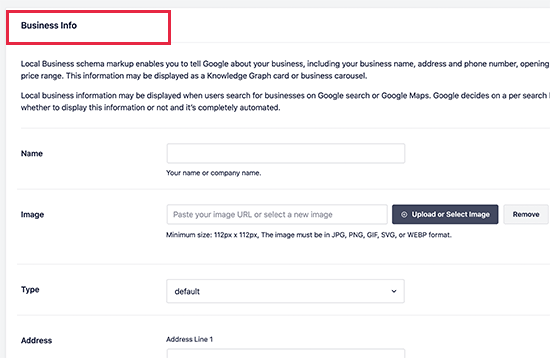
Below that, you can provide your information including business name, logo, phone number, business type, payment options, and more.

Business information

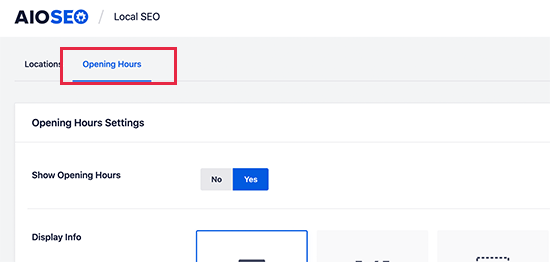
After that, you can switch to the Opening Hours tab to enter your business hours.

Opening hours

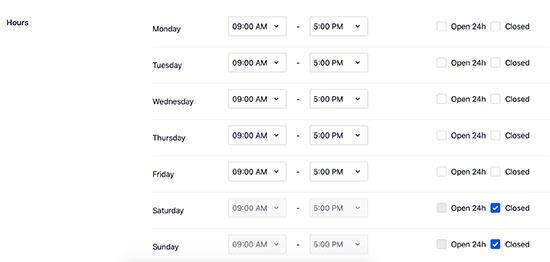
Simply enter working hours for each day and mark the days when your business is closed.

Working hours

Don’t forget to click on the Save Changes button to store your settings.

For more details, take a look at our guide on how to add business hours in WordPress.

Once you have set up local SEO on your WordPress website, you can also sign up for a Google My Business account to claim your business.

Testing Your Schema Markup for Rich Snippets

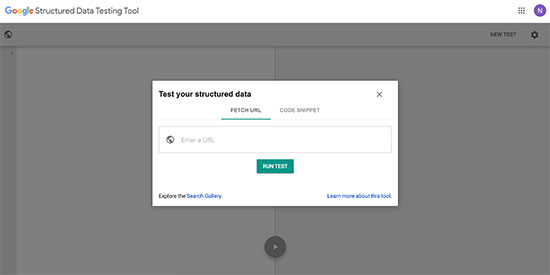
You can test the schema markup on your WordPress website using Google’s Structured Data Testing tool. Simply enter the URL of your website and it will fetch the structured data markup found on that URL.

Structured data testing tool

If there is an error or warning, then you can troubleshoot it by revisiting the schema markup settings on your website.

Google also provides a newer Rich Snippets testing tool. It not only checks Schema markup on your website for rich snippets, but will also show you if some data is missing.

Rich snippets testing tool

We hope this article helped you learn how to easily add schema markup to your WordPress website. You may also want to see our expert pick of the must-have WordPress plugins and our comparison of the best email marketing services for small business.

If you liked this article, then please subscribe to our YouTube Channel for WordPress video tutorials. You can also find us on Twitter and Facebook.

The post How to Add Schema Markup in WordPress and WooCommerce appeared first on WPBeginner.


June 28, 2021 at 03:00PM

Saturday, June 26, 2021

How to Redirect your 404 page to the Home Page in WordPress

Do you want to redirect your 404 page to your home page in WordPress?

Redirecting your 404 not found pages to your website’s home page can help reduce bounce rate and give your users a chance to discover other useful content on your website.

In this article, we’ll show you how to redirect your 404 page to your home page in WordPress, step by step.

How to redirect your 404 page to the home page in WordPress

Why Redirect Your 404 Page to Your WordPress Home Page?

If you haven’t had the time to create a custom 404 page, then redirecting visitors to your home page can be a great solution.

When a user requests a page that doesn’t exist on your WordPress website, then WordPress will show them a 404 error page instead.

Default WordPress 404 page

Most users who land on the default 404 page will leave your site quickly. This can increase your overall bounce rate and negatively impact your search engine rankings.

One way to keep your users engaged is by redirecting them to another more relevant page. Some website owners choose to take the shortcut and redirect users to homepage.

In the perfect world, you’ll redirect specific 404 error requests to a more relevant page.

That being said, we’ll show you two ways you can redirect your 404 pages to your home page as well as custom pages in WordPress.

Method 1: Redirect All 404 Pages to Home Page in WordPress

This method uses a simple code snippet to redirect all 404 pages to homepage. If you want to see how to redirect individual 404 pages to more relevant pages, see method 2 in this article.

In this method, you need to add code to your WordPress files. If you haven’t done this before, then see our beginner’s guide on pasting snippets from the web into WordPress.

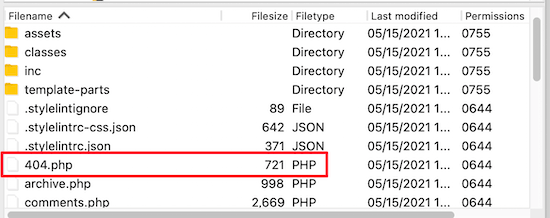
First, you’ll need to create a new file in your WordPress theme folder and name it 404.php. If your theme already has a 404.php file, then you’ll need to edit that file instead.

To edit this file, you need to connect to your WordPress hosting account with an FTP client or their file manager tool.

FTP 404 php file

Once you’re connected to your website, you will be able to see your 404.php file in your WordPress themes folder.

You need to add the following code as the first line in your 404.php file:

<?php
header("HTTP/1.1 301 Moved Permanently");
header("Location: ".get_bloginfo('url'));
exit();
?>

Next, you need to save the 404.php file and reupload it to your theme directory using FTP or your hosting control panel.

Now, when a page is not found, instead of showing a 404 page, they will be redirected to your WordPress home page.

Method 2: Use AIOSEO to Set up Custom 404 Page Redirects in WordPress

The best and most SEO friendly way of handling 404 errors is to redirect them to the most relevant page, not just your homepage.

This is where All in One SEO plugin comes in. It’s the best SEO plugin for WordPress used by over 2 million websites.

Their Redirects feature track all 404 page errors and lets you set up smart 404 page redirects in WordPress.

First thing you need to do is install and activate AIOSEO. For more details, see our step by step guide on how to install a WordPress plugin.

Note: there is a free version of All in One SEO, but we’ll be using the pro version since Redirect is a Pro addon.

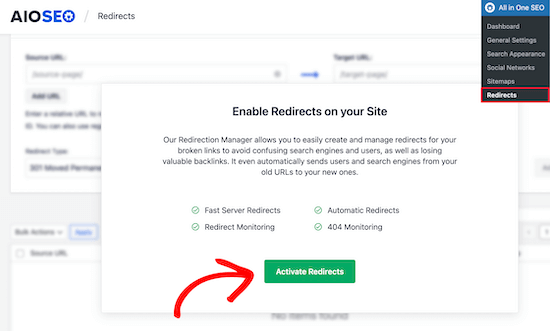
Once the plugin is activated, you need to go to All in One SEO » Redirects. If you haven’t set up redirects yet, then you need to click the ‘Activate Redirects’ button.

Activate AIOSEO redirects

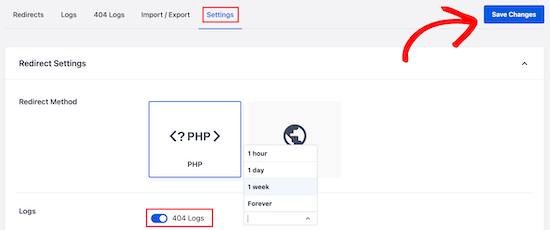
Once you’ve done that, you need to click on the ‘Settings’ menu item and enable 404 logs.

Next, scroll down until you see the ‘Logs’ section and then click the ‘404 Logs’ toggle, so it turns blue.

Enable 404 logs

Your 404 logs are a record of URLs that your visitors have tried to use to visit pages that no longer exist on your site.

You can choose how long you want the plugin to record your logs by selecting the time period from the drop down menu.

Make sure you click ‘Save Changes’ before moving on.

After that, click on the ‘404 Logs’ menu option to see the last accessed 404 page. Remember, since you just enabled logging, it may not display anything right away. Give it up to 24 hours to see more useful insights there.

Click 404 logs menu option

The ‘URL’ column will show you the 404 page the user tried to visit. You need to click the ‘Add Redirect’ link in the ‘Redirect’ column.

This will create a drop down where you can enter your redirect information.

For best results, you need to enter the most relevant page to the original query in the ‘Target URL’ box and then click ‘Add Redirect’.

Add home page redirect

For example, if you had a tutorial on how to start a WordPress blog that you deleted and updated with a new one, then it’d be best to redirect that old URL to the new blog post rather than your homepage.

To add multiple 404 page redirects, simply follow the same steps as above.

Remember, generally you don’t want to redirect your 404 page to your home page forever. It’s a great temporary solution, until you create a custom 404 page that will convert better or simply redirect users to a more relevant page.

We hope this article helped you learn how to redirect your 404 page in WordPress. You may also want to see our guide on the best drag and drop WordPress page builders to create custom 404 pages and our expert picks of the must have WordPress plugins for businesses.

If you liked this article, then please subscribe to our YouTube Channel for WordPress video tutorials. You can also find us on Twitter and Facebook.

The post How to Redirect your 404 page to the Home Page in WordPress appeared first on WPBeginner.


June 26, 2021 at 02:00PM