Monday, July 19, 2021

How to Change Background Color in WordPress (Beginner’s Guide)

Are you looking for an easy way to change the background color of your WordPress website?

The background color of your website plays an important role in your design and branding, and in making your content more readable.

In this article, we will show you how to easily change the background color of your WordPress site.

How to Change Background Color in WordPress

Why Change the Background Color in WordPress?

A WordPress theme comes with a default background color. Changing the background color can help personalize your website design and improve readability.

For instance, you can make a specific section of a page prominent using a different background color. This helps in highlighting your call to action (CTA) and increase conversions.

You can use different background colors for different posts on your WordPress blog based on authors, comments, or categories. This helps in differentiating articles from other content on your website.

There is also a way to add videos backgrounds to instantly capture your visitors’ attention and boost engagement.

That being said, let’s take a look at how to change background color in WordPress. We’ll show you different ways to customize the background color, so you can jump ahead to any section you prefer:

Change Background Color using WordPress Theme Customizer

Depending on your theme, you may be able to change the background color using the WordPress Theme Customizer. It lets you edit the appearance of your site in real-time and without the need to edit code.

To access the WordPress Theme Customizer, you can log in to your website and then go to Appearance » Customize.

This will open the Theme Customizer, where you’ll find multiple options to modify your theme. This includes the menus, colors, homepage, widgets, background image, and more.

The specific options available will depend on which WordPress theme your site is using. For this tutorial, we’re using the default Twenty Twenty-One theme.

To change the background color of your website, go ahead and click on the ‘Colors & Dark Mode’ settings tab from the menu on your left.
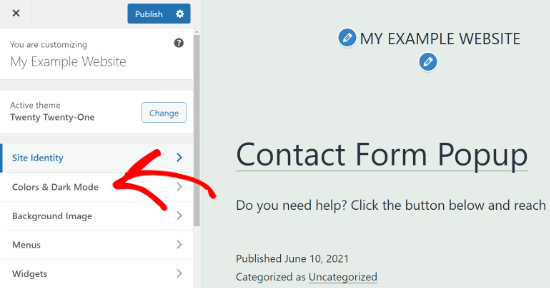
Go to Colors and Dark Mode settings

Next, you’ll need to click the ‘Background Color’ option and choose a color for your website. You can use the color picker tool or enter a Hex color code for your background.
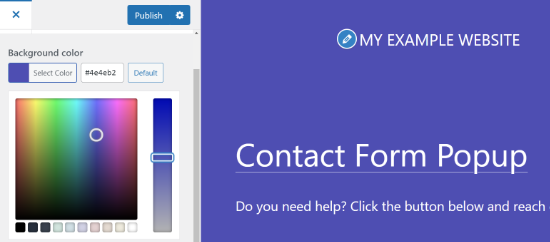
Choose a background color

When you’re done with the changes, don’t forget to click the ‘Publish’ button. You can now visit your website to see the new background color in action.
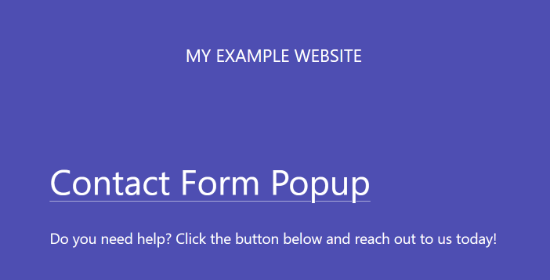
New background color example

Your theme may not have this option available in the Theme Customizer. In that case, you can try one of the methods below.

Change Background Color by Adding Custom CSS

Another way you can change the background color of your WordPress website is by adding custom CSS in the WordPress Theme Customizer.

To start, head over to Appearance » Customize and then go to ‘Additional CSS’ tab.
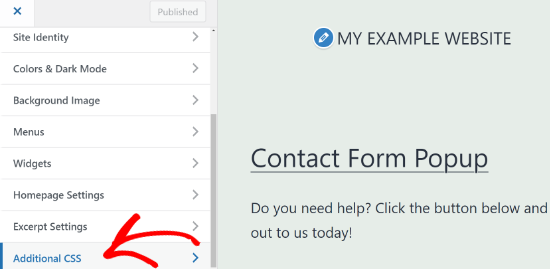
Add custom CSS in WordPress Theme Customizer

Next, you can enter the following code:

body {
 background-color: #FFFFFF;
}

All you have to do is replace the background color code with the color code that you want to use on your website. Next, go ahead and enter the code in the Additional CSS tab.
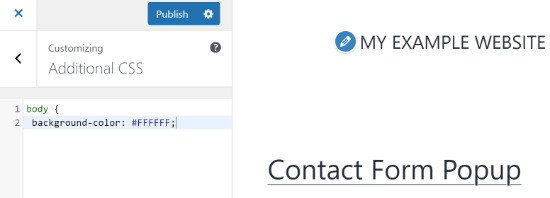
Enter background color custom CSS

When you’re done, don’t forget to click the ‘Publish’ button. You can now visit your website to view the new background color.

For more details, please refer to our guide on how to easily add custom CSS to your WordPress site.

Randomly Change Background Colors in WordPress

Now, are you looking for a way to randomly change the background color in WordPress?

You can add a smooth background color change effect to transition between different background colors automatically. The effect goes through multiple colors until it reaches the final color.

To add the effect, you’ll need to add code to your WordPress website. We’ll walk you through the process below.

The first thing you’ll need to do is find out the CSS class of the area where you’d like to add the smooth background color change effect.

You can do this by using the Inspect tool in your browser. All you have to do is take your mouse to the area you want to change the color and right-click to select the Inspect tool.
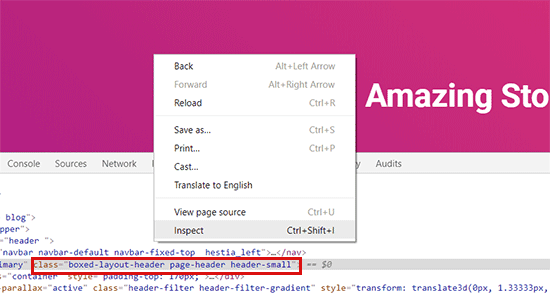
Find CSS class

After that, you’ll need to write down the CSS class you want to target. For example, in the screenshot above, we want to target the area with a CSS class ‘page-header.’

Next, you need to open a plain text editor on your computer like a notepad and create a new file. You’ll have to save the file as ‘wpb-background-tutorial.js’ on your desktop.

Once that’s done, you can add the following code to the JS file you just created:

jQuery(function($){
        $('.page-header').each(function(){
            var $this = $(this),
            colors = ['#ec008c', '#00bcc3', '#5fb26a', '#fc7331'];
 
            setInterval(function(){
                var color = colors.shift();
                colors.push(color);
                $this.animate({backgroundColor: color}, 2000);
            },4000);
        });
        }); 

If you study the code, then you’ll notice that we used the ‘page-header’ CSS class as it’s the area we want to target on our website.

You’ll also see that we used four colors using the hex color code. You can add as many colors as you want for your background. All you have to do is enter the color codes in the snippet and separate them using a comma and single quotes, like the other colors.

Now that your JS file is ready, you’ll need to upload it to your WordPress theme’s JS folder using a file transfer protocol (FTP) service.

For this tutorial, we’re using FileZilla. It’s a free FTP client for Windows, Mac, and Linux, and it’s very easy to use.

To start, you’ll need to log in to your website’s FTP server. You can find the login credentials in the email from your host provider or in your hosting account’s cPanel dashboard.

After you’re logged in, you’ll see a list of folders and files of your website under the ‘Remote site’ column. Go ahead and navigate to the JS folder in your site’s theme.
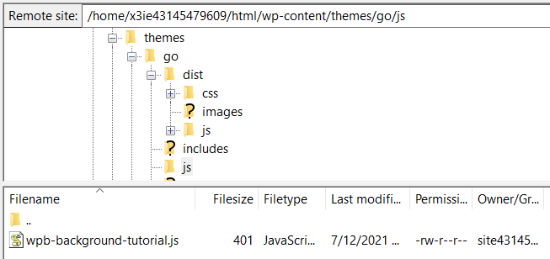
Upload JS file using a FTP service

If your theme doesn’t have a js folder, then you can create one. Simply right-click your theme’s folder in the FTP client and click the ‘Create directory’ option.
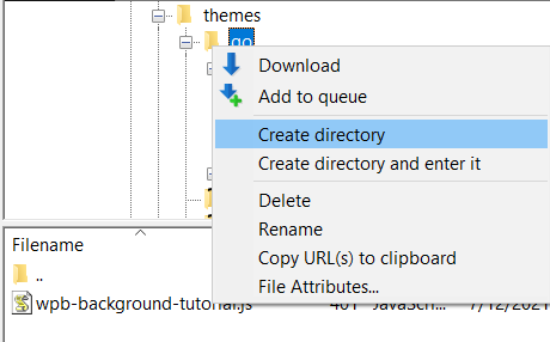
Create a directory and name it

Next, you’ll need to open the location of your JS file under the ‘Local site’ column. Then right-click the file and click the ‘Upload’ option to add the file to your theme.
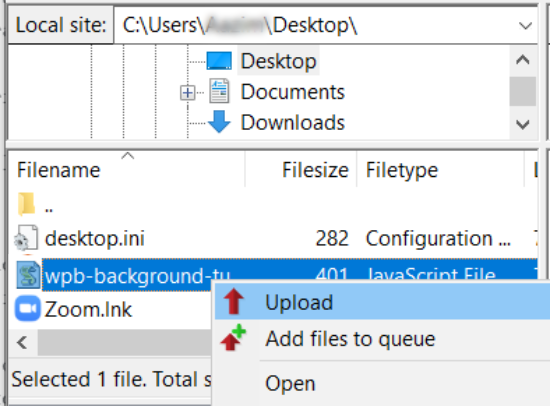
Click the Upload option

For more details, you can follow our tutorial on how to use FTP to upload files to WordPress.

Next, you’ll need to enter the following code into your theme’s funtions.php file. This code properly loads the JavaScript file and the dependent jQuery script that you need for this code to work.

function wpb_bg_color_scripts() {    
wp_enqueue_script( 'wpb-background-tutorial',  get_stylesheet_directory_uri() . '/js/wpb-background-tutorial.js', array( 'jquery-color' ), '1.0.0', true ); 
 } 
add_action( 'wp_enqueue_scripts', 'wpb_bg_color_scripts' ); 

We recommend using the Code Snippets plugin to safely add the code to your site. For more details, see our guide on how to paste snippets from the web into WordPress.

You can now visit your website to see the randomly changing colors in action in the area you targeted.

Color change effect animation

Change Background Color for Individual Posts

You can also change the background color of each individual blog post in WordPress instead of using a single color throughout your website using custom CSS.

It allows you to change the appearance of specific posts and personalize their backgrounds. For example, you can customize the style of each post based on authors or show a different background color for your most commented post.

You can even change the background color for posts in a particular category. For example, news posts can have different background colors compared to tutorials.

The first thing you’ll need to do is find the post ID class in your theme’s CSS. You can do that by viewing any blog post and then right-click to use the Inspect tool in your browser.
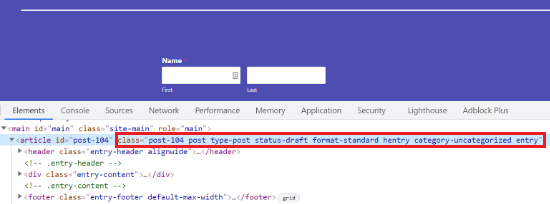
Default CSS for specific post in WordPress

Here is an example of what it would look like:

<article id="post-104" class="post-104 post type-post status-publish format-standard hentry category-uncategorized"> 

Once you have your post ID, you can change the background color of an individual post by using the following custom CSS. Just replace the post ID to match your own and the background color code that you want.

.post-104 { 
background-color: #D7DEB5;
color:#FFFFFF; 
} 

To add the custom CSS, you can use the WordPress Theme Customizer. First, make sure that you’re logged in to your WordPress website. Then, visit your blog post and click the ‘Customize’ option at the top.

After that, head over to the Additional CSS tab from the menu on your left.
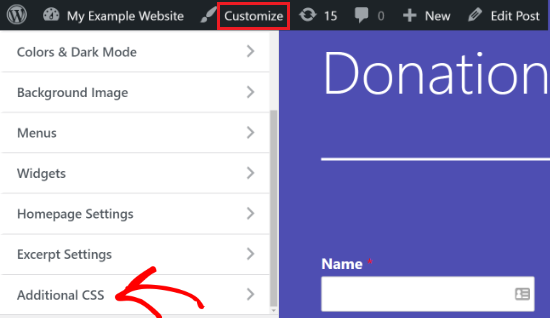
Go to Additional CSS option

Next, enter the custom CSS and then click the ‘Publish’ button.
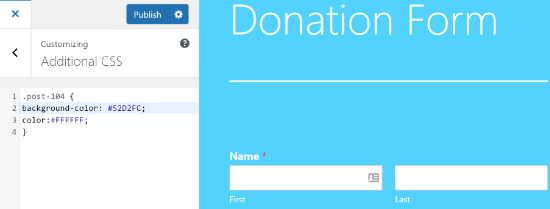
Enter custom CSS for individual post color

You can now visit your blog post to see the new background color.

If you want to change the background color based on author, comments, or category, then check out our detailed tutorial on how to style each WordPress post differently.

Use a Video in the Background

Using videos as your website background is a great way to capture your visitors’ attention and increase user engagement.

The easiest way to add a video in the background is by using a WordPress plugin. For this tutorial, we’ll use mb.YTPlayer for background videos.

It’s a free plugin that lets you play YouTube videos in the background of your WordPress website. There is also a premium version available that lets you remove the mb.YTPlayer watermark and offers more customization features.

First, you’ll need to install and activate the plugin on your website. For more details, you can follow our tutorial on how to install a WordPress plugin.

Upon activation, you can head over to mb.ideas » YTPlayer from your WordPress admin area.

On the next screen, you’ll need to enter the URL of your YouTube video and activate the background video.
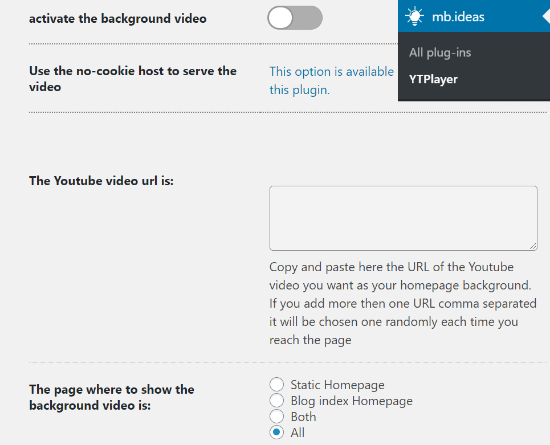
Enter your YouTube video URL

Besides that, the plugin lets you select the location to show your background video. You can choose a static homepage, blog index homepage, or both. There is also an option to show the video on your entire site if you select ‘All.’

Once you’ve entered the video URL and activated the background, go ahead and visit your website to see the video background in action.
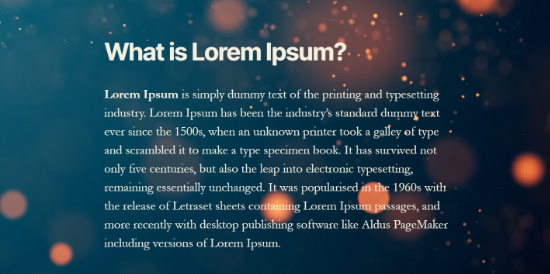
Video background preview

Create a Custom Landing Page

Creating custom landing pages in WordPress allows you to generate leads and boost sales for your business. You have complete control over the background color and design of the page.

The easiest way to create a highly engaging custom landing page is by using SeedProd. It’s the best landing page plugin for WordPress and offers an easy-to-use drag and drop page builder to create pages without editing code.

The first thing you’ll need to do is install and activate SeedProd on your website. You can refer to our guide on how to install a WordPress plugin.

Note: We’ll be using the SeedProd Pro version as it offers more powerful features, templates, and customization options. However, there is also a free version available on WordPress.org.

Once the plugin is active, you’ll be asked to enter your license key. You can find the key in your SeedProd account area. After entering the key, click the ‘Verify Key’ button.

SeedProd license key

Next, you can head over to SeedProd » Pages and click on the ‘Add New Landing Page’ button.

Add new SeedProd landing page

After that, you’ll need to select a theme for your landing page. SeedProd offers lots of beautiful landing page templates to get started.

You can also use a blank template to start from scratch. However, we suggest using a template as it’s an easier and faster way to create a landing page.
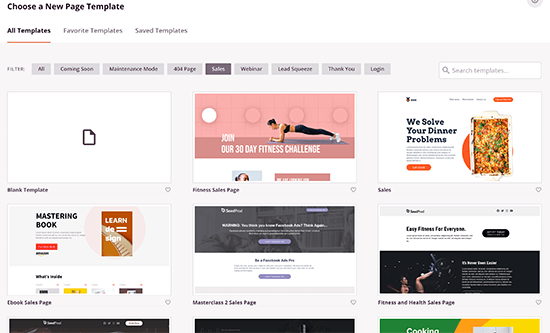
Choose a template for your page

When you select a template, you’ll be asked to enter a Page Name and choose a URL.
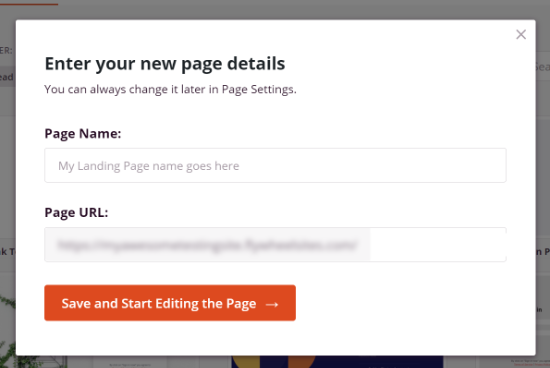
Enter a Page Name and Page URL

On the next screen, you’ll see the SeedProd page builder. Here you can use the drag and drop builder to add blocks from the menu on your left. You can add a headline, video, image, button, etc.

When you scroll down, there are more blocks under the Advanced section. For example, you can add a countdown timer to create urgency, show social profiles to increase followers, add an option form to collect leads, and more.
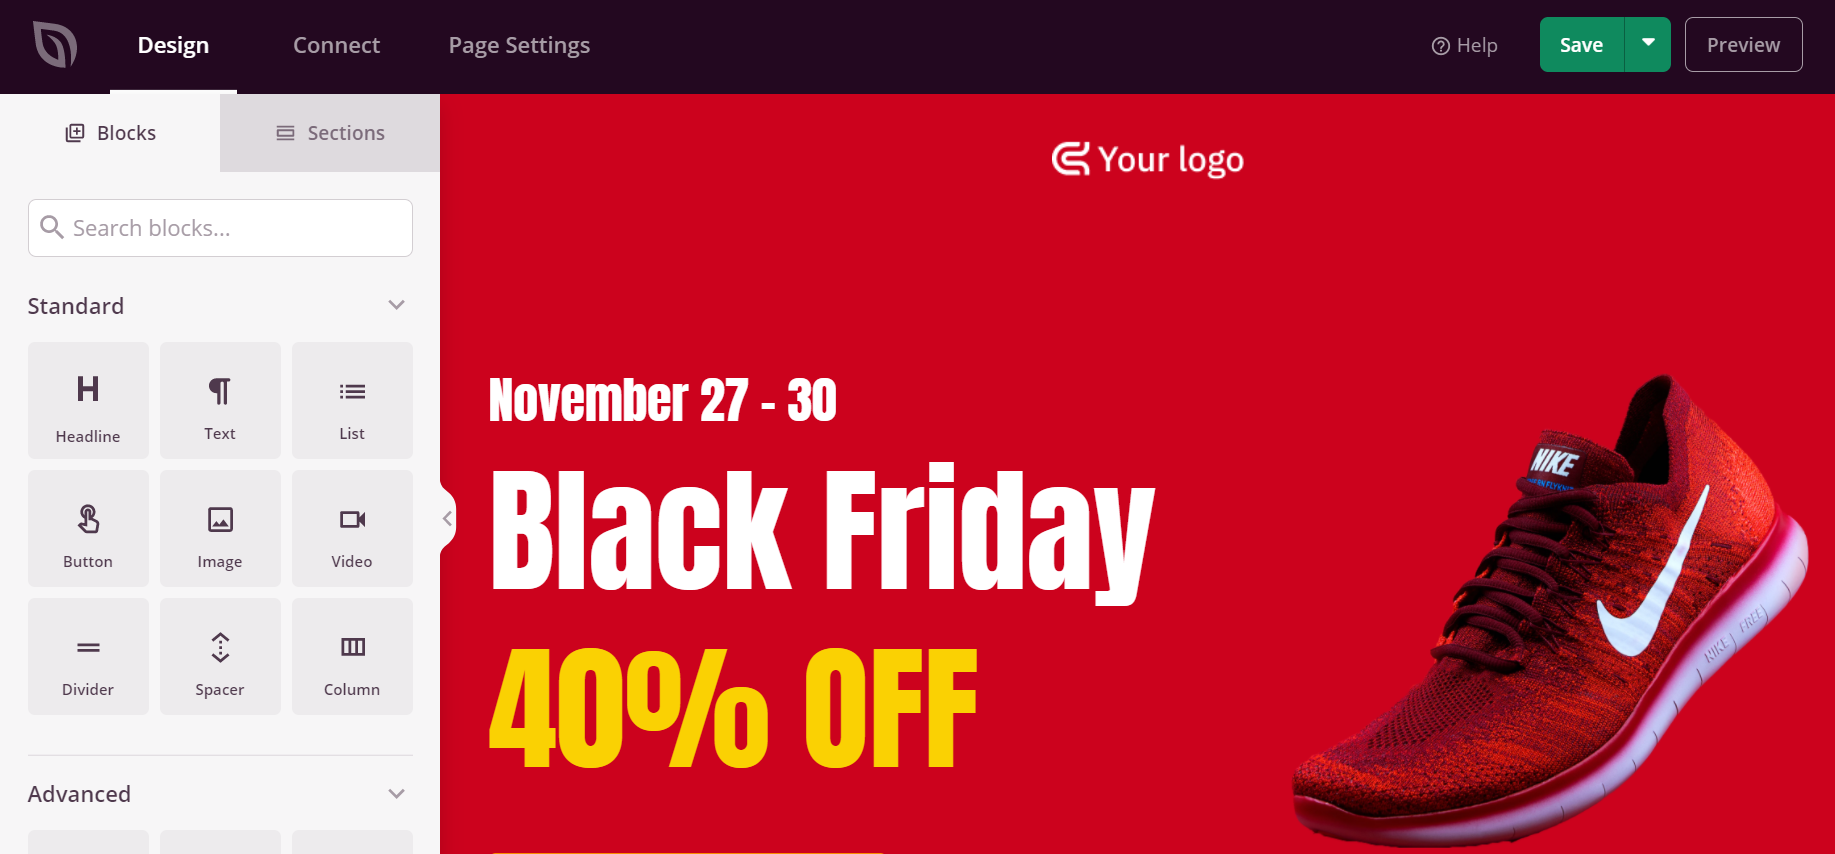
SeedProd landing page builder

Using the drag and drop builder, it’s effortless to change the position of each block on your landing page. You can even change the layout, size, color, and font of the text.

To change the background color of your landing page, simply select any section of the page. You’ll now see options in the menu on your left to edit the background style, color, and add an image.
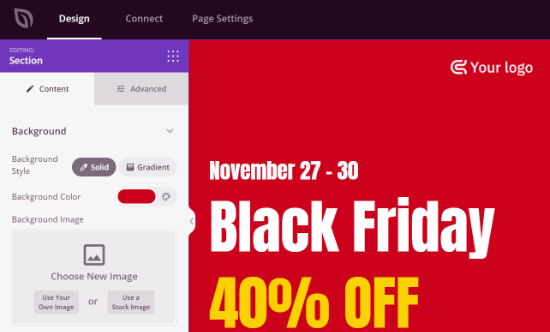
Change background color of landing page

After you’re done editing your landing page, don’t forget to click the ‘Save’ button at the top.

Next, you can head over to the ‘Connect’ tab and integrate the page with different email marketing services. For example, you can connect to Constant Contact, SendinBlue, and others.
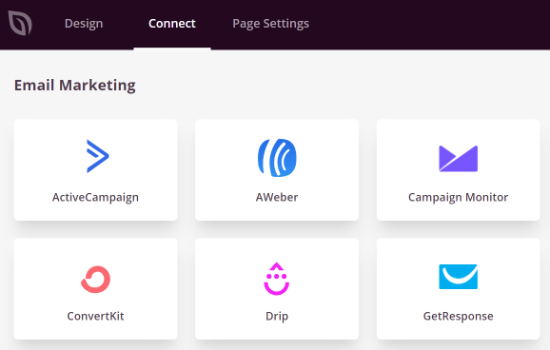
Connect email marketing services

After that, go ahead and click on the ‘Page Settings’ tab. Here you can change the Page Status from Draft to Publish to take your page live.
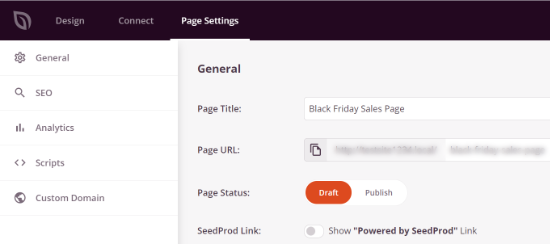
SeedProd page settings

Other than that, you can also change the SEO settings of the page, view the analytics, add custom code under Scripts, and enter a custom domain.

Once you’re done, you can exit the SeedProd page builder and visit your custom landing page.

Custom landing page preview

We hope this article helped you learn how to change the background color in WordPress. You may also want to check out our guide on how to choose the best website builder, or our comparison of the best web design software.

If you liked this article, then please subscribe to our YouTube Channel for WordPress video tutorials. You can also find us on Twitter and Facebook.

The post How to Change Background Color in WordPress (Beginner’s Guide) appeared first on WPBeginner.


July 19, 2021 at 05:28PM

Friday, July 16, 2021

7 Best WordPress Real Estate Plugins Compared (2021)

Are you looking for the best WordPress real estate plugins?

WordPress is used by many real estate websites to showcase listings and get new customers.

In this article, we have hand-picked the best WordPress real estate plugins that you can use to grow your business.

7 best WordPress real estate plugins compared (2021)

How to Make a Real Estate Website Using WordPress?

WordPress is the most popular website builder in the world. It’s widely used by real estate companies, realtors, and property management companies to showcase their listings and make more sales.

There are two different types of WordPress that often confuse beginners. First, there is WordPress.com which is a hosted solution. Second, you have WordPress.org, also known as self-hosted WordPress.

For more details, see our comparison on WordPress.com vs WordPress.org.

We recommend using WordPress.org because it allows you to use all WordPress features out of the box without any restrictions.

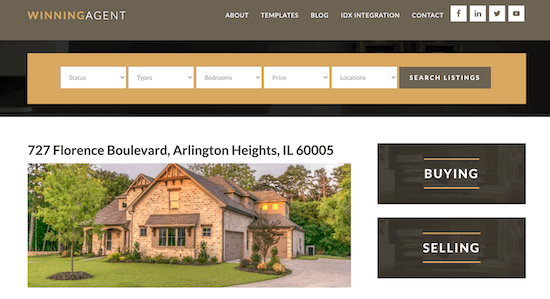
WordPress real estate website

You will need the following things to build your own real estate website using WordPress:

First you need to get a domain name and web hosting.

We recommend using Bluehost for your web hosting. Their hosting plans are officially recommended by WordPress.

Bluehost special offer for WPBeginner readers

WPBeginner readers can currently get a big 60% discount on hosting, plus a free domain name and SSL certificate.

Simply click on the Bluehost button below, and the discount will automatically be applied.

→ Click Here to Claim This Exclusive Bluehost Offer ←

Once you have purchased hosting, make sure to check out our ultimate guide on how to make a website.

That being said, let’s take a look at the best WordPress real estate plugins that you can use. These plugins will allow you to easily add your real estate listings and attract more customers.

1. IMPress for IDX Broker

IMPress IDX Broker Plugin

IMPress for IDX Broker is one of the best WordPress real estate plugins. It is easy for beginners to get started, and flexible for advanced users to create powerful real estate websites.

You can add as many details for each listing as you want with images and video support. Listings are beautifully displayed in a grid layout, and a single listing page allows users to get all the information they need including maps.

There’s also support for automated social media posts, email capture and lead management features, a real estate agent directory, and more.

It also allows you to import listings from your MLS database and supports IDX integration. It comes equipped with contact forms so that interested buyers can directly contact you.

2. Formidable Forms

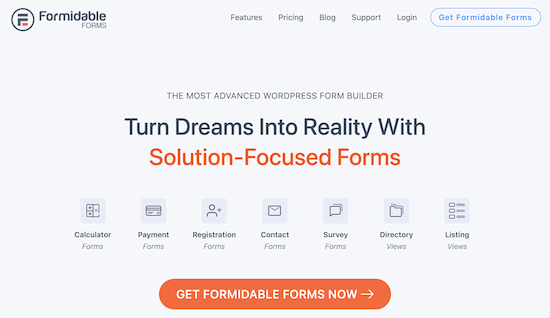
Formidable Forms

Formidable Forms is the most advanced WordPress form builder plugin in the market.

It has a simple but advanced drag and drop form builder that helps you create forms that go beyond simple contact forms.

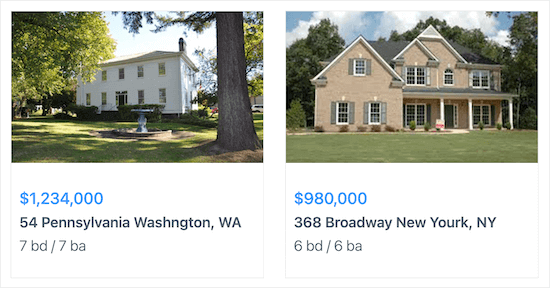
Formidable Forms comes with a real estate listings form template so you can allow your website visitors to submit listings to your website, and then display them in a grid.

Formidable Forms listings

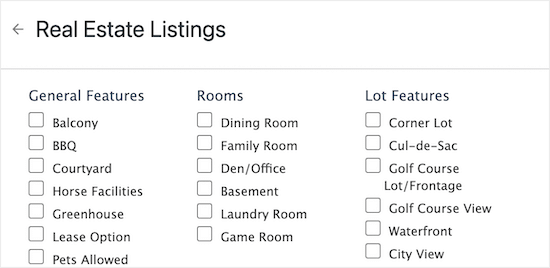
There are all kinds of form fields for you to customize and add information about your real estate listings.

Formidable Forms real estate listing form

Note: You’ll need at least the ‘Plus’ plan to get access to the real estate listing form template.

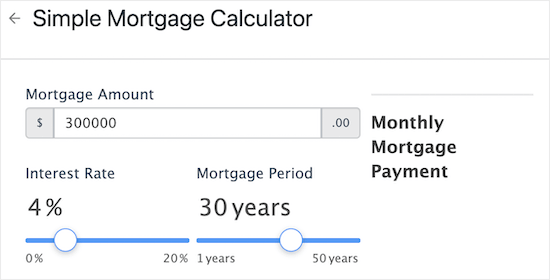
You’ll also find other helpful real estate tools you can use to enhance your website. For example, there are templates for mortgage calculators, mortgage application forms, rental applications forms, and more.

Formidable Forms mortgage calculator

For more details, see our step by step guide on how to add a mortgage calculator in WordPress.

3. WP-Property

WP-Property

WP-Property is another all-in-one WordPress real estate management plugin. It includes an easy to use interface to add and manage all your listings.

You can add detailed information with tons of fields to add rooms, bathrooms, location, features, and more.

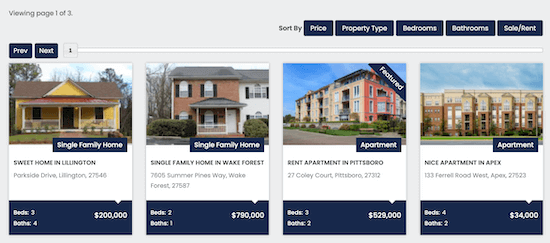
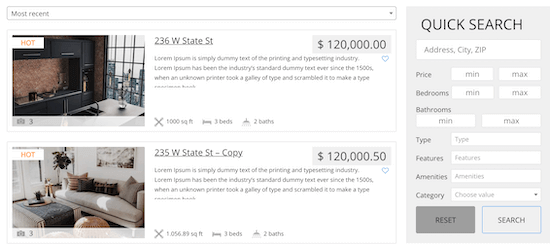
WP-Property listings

Listings are beautifully displayed on your website, and there are also free themes and addons that you can use to customize the design.

WP-Property includes Google Maps support, a powerful search feature with filters, SEO friendly URLs, featured listings, and more.

You can even add a neighborhood walkscore to your listings, and downloadable PDFs.

It is available in multiple languages and can be easily translated into any other language. It also comes with sidebar widgets and shortcodes that allow you to display listings throughout your website.

4. Estatik

Estatik

Estatik is another excellent plugin to manage your real estate listings in WordPress. This powerful plugin comes with an easy to use property management system allowing you to easily add listings to your website.

It includes photo gallery, property search widget, Google Maps support, built-in social sharing, and multilingual support. It also includes a custom fields builder which allows you to easily add new fields to your listings.

Estatik listings

It has an ajax powered search feature with auto-complete. Users can also sort listings by price, date, popularity, and more.

There’s a pro version of the plugin available that has even more features like saved search, email notifications, and much more.

5. Easy Property Listings

Easy Property Listings

Easy Property Listings is another powerful and highly customizable WordPress real estate plugin. It allows you to easily build a real estate website without touching code and without changing WordPress themes.

The beginner friendly listing management interface makes it super easy to manage your properties. It also comes with mobile-friendly listing templates to display your properties in a grid layout or a single listing page.

Advanced features include support for REAXML, JUPIX, worldwide MLS systems, translations / multilingual support, advanced maps, and more.

Paid addons and extensions allow you to add many other features including a real estate agent directory and management system, agent ratings, and more.

6. WP Real Estate

WP Real Estate

WP Real Estate is an easy to use real estate plugin for WordPress with tons of cool features. It can be used for buying, selling, and rental properties as well.

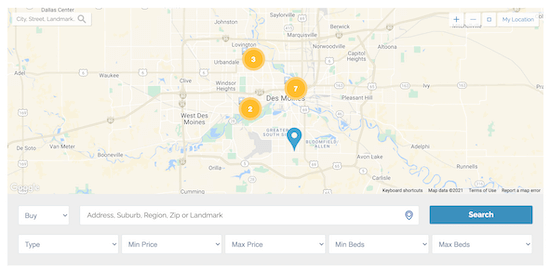
It includes an advanced search feature, Google Maps, IDX/MLS integration, contact forms, custom fields, and list or grid layout views.

WP Real Estate map view

It also comes with shortcodes and widgets so that you can display different real estate listings throughout your website or create your own landing pages for different properties.

7. Realtyna WPL

Realtyna WPL

Realtyna WPL is flexible and powerful WordPress real estate management plugin. You can easily add your listings with a filterable search feature for the front-end.

It has real estate agent profiles, Google Maps, different listing views, and a powerful custom fields feature to add property features.

The pro version of the plugin can also be integrated with MLS/IDX services.

Plus, it works well with some of the best WordPress themes in the market.

We hope this article helped you find the best WordPress real estate plugins for your website. You may also want to see our expert picks of the best business phone services for small business and our must have WordPress plugins for business websites.

If you liked this article, then please subscribe to our YouTube Channel for WordPress video tutorials. You can also find us on Twitter and Facebook.

The post 7 Best WordPress Real Estate Plugins Compared (2021) appeared first on WPBeginner.


July 16, 2021 at 05:00PM
Thursday, July 15, 2021

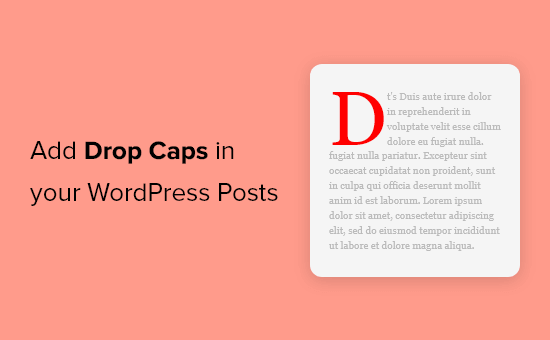
How to Add Drop Caps in WordPress Posts

Are you looking for a way to add drop caps in WordPress?

Drop caps are a great way to start a paragraph. They help you to capture your reader’s attention and get them interested in reading your content.

In this article, we will show you how to add drop caps in WordPress posts without writing any CSS code.

Add Drop Caps in a WordPress Post

What is a Drop Cap?

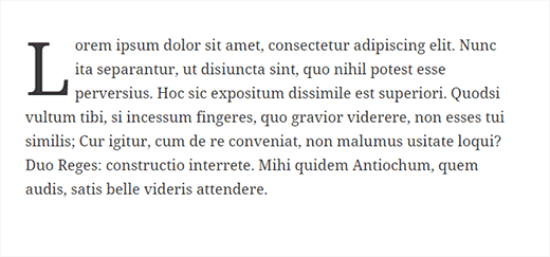
A drop cap is a styling technique commonly used in print books and magazines that feature longer reads. The first letter of the starting paragraph in each chapter uses a large font size.

Normally the large capital letter extends downwards to drop below the first few lines, which is why it’s called a “drop cap”.

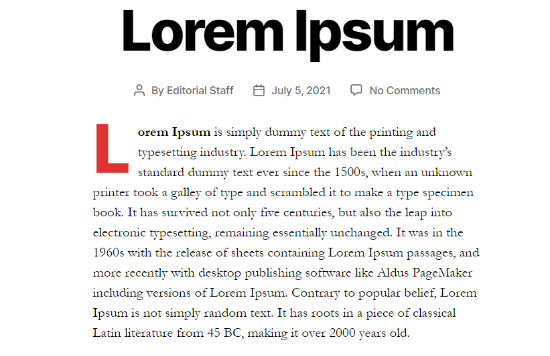
Floating drop caps example

Adding drop caps helps your content to stand out and catch your visitor’s attention. They add a more formal and traditional touch to your site’s design.

There are several ways to add drop caps to a WordPress website. You can use the built-in option in the WordPress block editor or use a plugin.

We’ll show you how to use drop caps in the WordPress block editor (Gutenberg) and the classic editor. You can click the link below to jump ahead to your preferred section:

Add Drop Caps in WordPress Block Editor (Gutenberg)

The WordPress block editor has a built-in option to enable drop caps for the initial letter in the paragraph.

With a click of a button, you can increase the font size and wrap text under the first letter to create a drop caps effect.

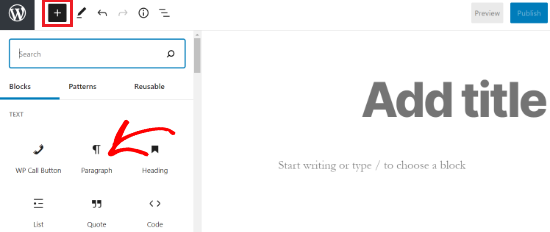
To start, you can create a new post or edit an existing one. After that, click the plus (+) sign to add a paragraph block to your article.

Add a paragraph block

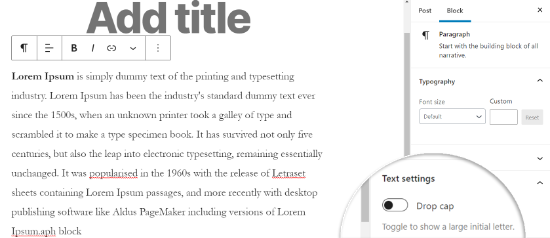
Next, you can enable the drop cap option from the menu on your right. Simply click the toggle for Drop cap under ‘Text settings’ to show a larger initial letter.

Enable the drop cap option in the block editor

Once you’ve enabled the option, the first letter in your paragraph will be larger than the rest of the text and drop underneath the first few lines.

You can now publish your WordPress blog post to see the drop caps in action.

Drop caps example in WordPress

You will notice that the built-in drop caps option will use your WordPress theme’s styling for the color, font, and size of the first letter.

If you want to change the style of your drop caps in the WordPress block editor, then you’d have to enter custom CSS code or use a plugin.

Since writing CSS code requires technical knowledge, you may want to use the Initial Letter WordPress plugin to edit the styling of your drop caps in the block editor, instead of using the built-in option.

In the next section, we’ll show you how to use the Initial Letter plugin to create customized drop caps.

Add Drop Caps in WordPress Classic Editor

The easiest way to add drop caps in the classic editor is by using a WordPress plugin.

If you want to add drop caps to the classic editor without a plugin, then you’d have to write CSS code and add it to your Theme Editor. This can be tricky for beginners, and making a mistake could break your WordPress website.

For this tutorial, we will be using the Initial Letter plugin as it’s easy to use and is absolutely free. The plugin offers multiple options to customize your drop caps and it also works with the WordPress block editor.

First, you will need to install and activate the Initial Letter plugin on your website. For more details, you can refer to our guide on how to install a WordPress plugin.

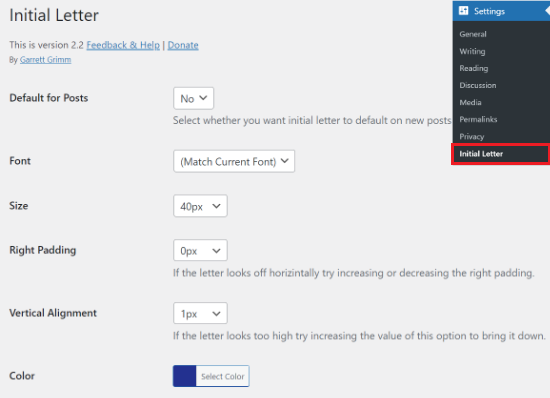
Once the plugin is active, you can go to Settings » Initial Letter from your WordPress dashboard and change the settings of your drop caps.

Initial Letter settings

The plugin allows you to edit the font, size, color, alignment, and padding of your drop caps. You can also select the options to show drop caps in the excerpt and only have the first paragraph to have a large initial letter.

After you’re done with the settings, don’t forget to click the ‘Save Changes’ button at the bottom.

If you don’t want to show drop caps on some posts or pages, then you can disable Initial Letter inside the WordPress classic editor.

Just edit your existing post, scroll down to the Initial Letter metabox, and change the option from Yes to No.

Change Initial Letter settings in the classic editor

Next, you can preview and publish your article to see the drop caps in action.

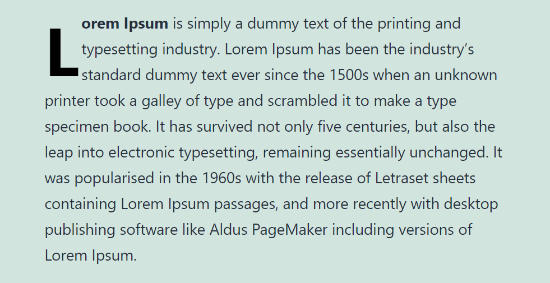
Drop caps example for classic editor

We hope this article helped you add drop caps in WordPress posts. You may also want to check out how to choose the best web design software and best email marketing services for small businesses.

If you liked this article, then please subscribe to our YouTube Channel for WordPress video tutorials. You can also find us on Twitter and Facebook.

The post How to Add Drop Caps in WordPress Posts appeared first on WPBeginner.


July 15, 2021 at 04:00PM

Wednesday, July 14, 2021

How to Easily Fix Leverage Browser Caching Warning in WordPress

Do you want to learn how to easily fix leverage browser caching warning in WordPress?

By fixing the leverage browser caching warning, you’ll quickly speed up your WordPress site and deliver a better experience to your website visitors.

In this article, we’ll show you how to easily fix leverage browser caching warning in WordPress.

How to fix leverage browser caching warning in WordPress

What is Browser Caching in WordPress?

Browser caching is a way to improve your website loading speeds. When a web page loads, all of the files will be loaded separately.

This creates multiple requests between the browser and your WordPress hosting server, which increases the web page loading time.

When browser caching is enabled, your web browser stores a copy of your web page locally. This allows browsers to load common files like stylesheets, logo, images, etc faster when the user visits a second page on your site.

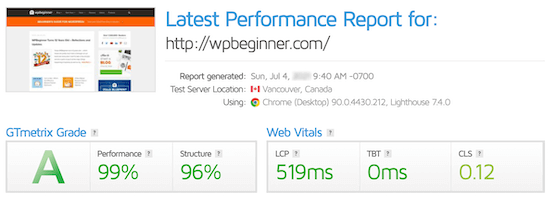
Site speed test results

This reduces the overall server load because fewer requests will be made to the actual server, and your website performance will improve as a result.

Where will You See the Leverage Browser Caching Warning for WordPress?

The leverage browser caching warning means that you don’t have browser caching enabled, or your caching could be set up the wrong way.

When you’re running a website speed test, you’ll get a report that shows you what you can fix to speed up WordPress.

If your website isn’t currently using browser caching, then you’ll get a warning to enable browser caching.

This is how it can look when looking at your results from a page speed insights tool.

Leverage browser caching warning

Sometimes you’ll get a warning that says your efficient cache policy isn’t working.

Both of these warning refers to an error with your browser caching set up.

Efficient cache policy warning

Leveraging browser caching means activating and customizing the caching rules to speed up your site.

That being said, let’s take a look at how to easily fix leverage browser caching warning in WordPress using two different methods.

Simply use the quick links below to choose how you want to fix the leverage browser caching warning in WordPress.

Method 1. Fix Leverage Browser Caching Warning with WP Rocket WordPress Plugin

WP Rocket is the best WordPress caching plugin in the market. It’s very beginner friendly and can help you optimize your site for speed, even without knowing complex caching and speed terms.

WP Rocket

Right out of the box, all of the recommended caching settings will really speed up your WordPress website.

To fix the leverage browser caching warning with WP Rocket, all you have to do is install and activate the plugin.

That’s it.

For more details, see our guide on how to properly install and setup WP Rocket in WordPress.

WP Rocket will automatically enable browser caching and modify your .htaccess file with the right rules.

Note: if you’re using SiteGround web hosting, then you can use the free SiteGround Optimizer plugin instead.

It has nearly the same features as WP Rocket, and it will automatically enable browser caching for you.

Method 2. Fix Leverage Browser Caching Warning by Adding Code to WordPress

The second method involves adding code to your WordPress files. If you haven’t done this before, then see our beginner’s guide to pasting snippets from the web into WordPress.

This method is not as beginner friendly, so please only follow this if you know exactly what you’re doing. For most business owners, we recommend using Method 1.

With that said, let’s take a look at how to fix leverage browser caching warning by adding code to WordPress.

Note: before you customize your WordPress code, we recommend backing up your WordPress site. For more details, see our guide on how to backup and restore your WordPress site.

Determine if Your Website is Running Apache or Nginx?

First, you need to figure out if your website is using Apache or Nginx servers.

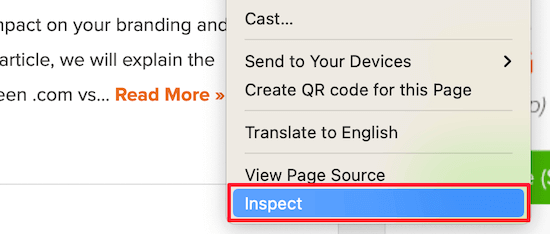
To do this, open up your website in a new tab or window. Then, right click and select the ‘Inspect’ option.

Right click and inspect

Next, click the ‘Network’ tab at the top of the page.

You may need to refresh the page for the results to load.

Click network

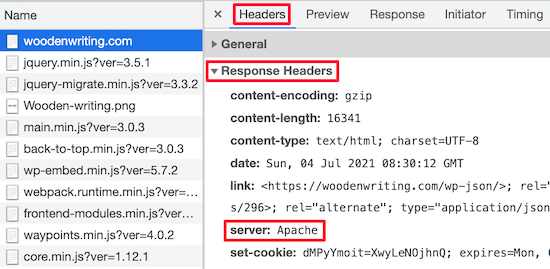
After that, click your domain name in the ‘Name’ column.

It should be at the top of the page.

Click website URL

Then, in the ‘Response Headers’ section, you’ll see an item called ‘server’ where the type of server is displayed. In this case, the site is running on an Apache server.

Find type of server

Add Cache-Control and Expire Headers in Apache

To fix the leverage browser caching warning with an Apache server, you’re going to be adding code to your .htaccess file.

To edit this file, you need to connect to your WordPress hosting account with an FTP client or your host’s file manager tool.

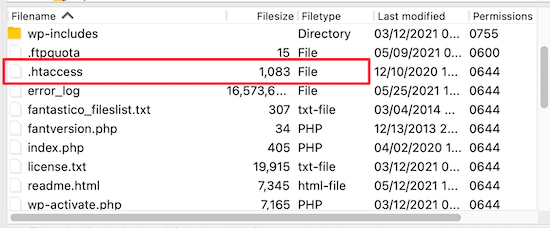
After you’re connected, you can see your .htaccess file in your website’s root folder.

htaccess FTP

If you can’t find it, then don’t worry. Sometimes this file can be hidden. For more details, see our guide on why you can’t find .htaccess file on your WordPress site.

Next, you need to add cache-control and/or expire headers to turn on browser caching. This tells the web browser how long it should store your website resources before they are deleted.

The cache-control header gives specific details to the web browser about how caching should be done.

The expires header enables caching and tells the web browser how long it should store specific files before being deleted.

You can add the following code to your .htaccess file to add expire headers:

## EXPIRES HEADER CACHING ##
<IfModule mod_expires.c>
ExpiresActive On
ExpiresByType image/jpg "access 1 year"
ExpiresByType image/jpeg "access 1 year"
ExpiresByType image/gif "access 1 year"
ExpiresByType image/png "access 1 year"
ExpiresByType image/svg "access 1 year"
ExpiresByType text/css "access 1 month"
ExpiresByType application/pdf "access 1 month"
ExpiresByType application/javascript "access 1 month"
ExpiresByType application/x-javascript "access 1 month"
ExpiresByType application/x-shockwave-flash "access 1 month"
ExpiresByType image/x-icon "access 1 year"
ExpiresDefault "access 3 days"
</IfModule>
## EXPIRES HEADER CACHING ##

This code set different cache expiration dates based on the type of file.

After that, you can add the following code to enable cache-control:

<filesMatch ".(ico|pdf|flv|jpg|jpeg|png|gif|svg|js|css|swf)$">
    Header set Cache-Control "max-age=96000, public"
</filesMatch>

This code sets the time for when the cache will expire. In the example above, the cache will expire in 90,000 seconds.

After that, the web browser will request new versions of the files.

Add Cache-Control and Expire Headers in Nginx

If you’re using an Nginx web server to host your WordPress blog, then you can edit the server configuration file to fix the browser caching error.

How you edit and access this file depends on your host, so you can reach out to your hosting provider if you need help accessing the file.

Then, you need to add the following code to add expire headers:

  location ~* \.(jpg|jpeg|gif|png|svg)$ {
    expires 365d;
  }

  location ~* \.(pdf|css|html|js|swf)$ {
    expires 3d;
  }

This code will set the expiration times for the different file types. Notice that images are cached longer than HTML, CSS, JS, and other file types since images usually stay the same.

After that, you can add the following code to add cache-control headers:

location ~* \.(js|css|png|jpg|jpeg|gif|svg|ico)$ {
 expires 14d;
 add_header Cache-Control "public, no-transform";
}

This code sets the time for when the cache will expire. It tells your server that the file types above won’t change for 14 days.

If you’re looking to speed up WordPress even more, then make sure to check out our guide on how to boost WordPress speed and performance.

We hope this article helped you learn how to easily fix leverage browser caching warning in WordPress. You may also want to see our ultimate list of the most common WordPress errors and how to fix them, and our expert picks of the best SEO tools and plugins to get more traffic.

If you liked this article, then please subscribe to our YouTube Channel for WordPress video tutorials. You can also find us on Twitter and Facebook.

The post How to Easily Fix Leverage Browser Caching Warning in WordPress appeared first on WPBeginner.


July 14, 2021 at 03:50PM

Tuesday, July 13, 2021

How to Add a Custom Login URL in WordPress (Step by Step)

Do you want to add a custom login URL in WordPress?

Adding a custom login URL in WordPress can help improve your WordPress security and offer your visitors a better experience.

In this article, we’ll show you how to add a custom login URL in WordPress, step by step.

How to add a custom login URL in WordPress (step by step)

Why Add a Custom Login URL in WordPress?

WordPress is the most popular CMS platform and powers over 40% of websites. Because it’s so popular, it’s often a target of hackers who use techniques like brute force attacks to try to log in to your dashboard.

Bots and hackers trying to get into your site know the common login URLs like wp-admin and wp-login and will try to get access to your site using these URLs first.

By changing the WordPress login page URL, you improve your site’s security and make it more difficult for hackers to get access to your WordPress website.

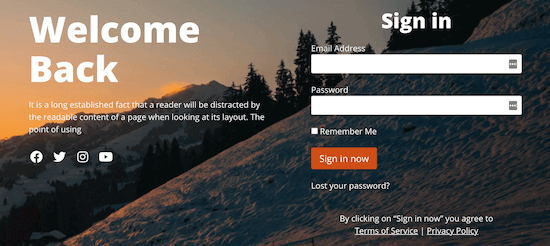
Sample login page

Another reason to add a custom login link in WordPress is to offer a better user experience. You can customize the URL and design of your login page so it matches your branding and existing WordPress theme.

With that said, let’s show you how to add a custom login URL in WordPress in just a few simple steps.

How to Add a Custom Login URL in WordPress Using SeedProd

The simplest way to add a custom login URL in WordPress is by using a WordPress plugin. This lets you simply change your WordPress login URL without editing any core WordPress files.

We recommend using the SeedProd plugin. It’s the best drag and drop WordPress page builder used by over 1 million sites. With this plugin, you can easily customize your SeedProd login page and change the URL.

The first thing you need to do is install and activate the plugin. For more details, see our step by step guide on how to install a WordPress plugin.

Note: There is a free version of SeedProd, but we’ll be using the premium version for this tutorial since it has the login page templates we need.

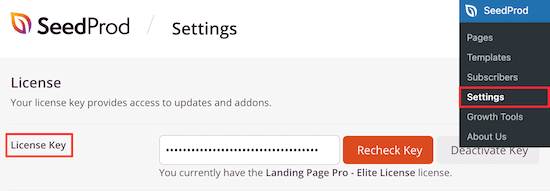
Upon activation, first you’ll need to go to SeedProd » Settings and enter your product license key.

Enter SeedProd license key

You can find your product license key under your account information on the SeedProd website.

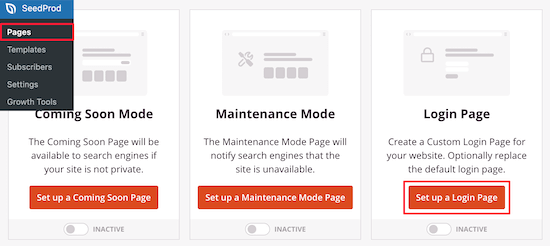
After that, navigate to SeedProd » Pages and click the ‘Set up a Login Page’ button.

Setup SeedProd login page

Then, you’ll be taken to a screen that has all of the login page templates.

You can choose one of the pre-made professional templates or select the ‘Blank’ template to build a login page from scratch.

Login page templates

For this tutorial, we’ll choose the ‘Geo Login Page’ template.

Simply hover over the template you want to use and click the check icon.

Select login page template

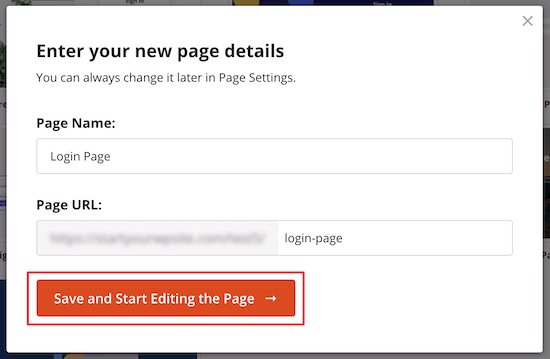
This brings up a popup where you can name your new login page and enter a custom login page URL.

Next, click the ‘Save and Start Editing the Page’ button.

Name login page and URL

This will take you to the page editor screen.

You can customize every element of the page with the drag and drop builder.

SeedProd page editor example

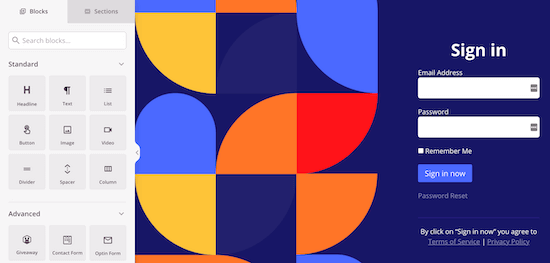
The left side has blocks and sections you can add to the page, and the right side shows a real time preview of what it looks like.

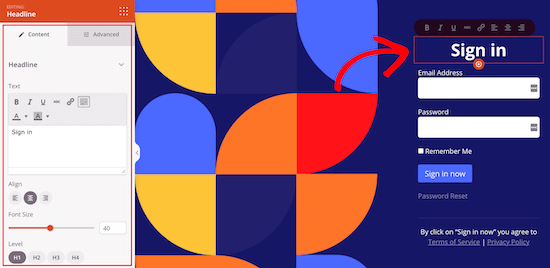
When you click on any page element, it will bring up a menu to customize it further.

Customize login page

You can customize your login page as much as you want, but we’ll leave the default settings for this tutorial.

For more details on all the customization options, see our ultimate guide on how to create a custom WordPress login page.

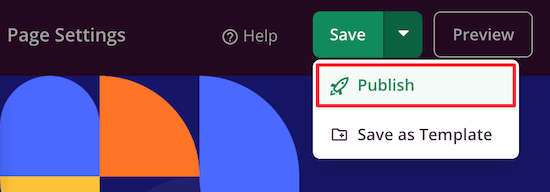
Next, you need to click the arrow next to the ‘Save’ box and select ‘Publish’ from the drop down.

Publish login page

Now, it’s time to change the default login URL to your new login page.

First, click the ‘Page Settings’ menu option at the top of the page.

Then, scroll down the page until you see the ‘Redirect the Default Login Page’ option. Simply click the ‘Enable’ toggle, and you’ll see it turn orange.

Enable login redirect

This will redirect the default WordPress login page to the new page you just created.

Don’t forget to click the ‘Save’ button again to make sure all of your changes are now live.

Change WordPress Login Page URL with a Free Plugin

We recommend using the SeedProd plugin above because it also lets you easily customize your login page to match the design of your site.

However, some users will want to keep the default WordPress login page and only change the login page URL.

To do this, you can use the free plugin called WPS Hide Login. This plugin lets you simply change the login URL without customizing the page.

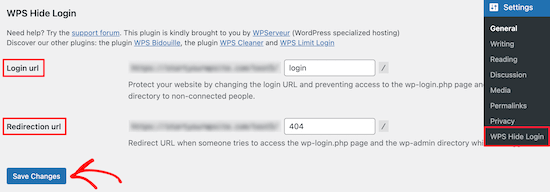
Once the plugin is installed and activated, navigate to Settings » WPS Hide Login.

Then, add your new login page URL in the ‘Login url’ box.

WPS Hide Login add redirect

You can also add a redirect URL in the ’Redirection url’ box.

This will redirect people to another page on your WordPress blog when they try to access the default wp-login.php page, and they aren’t logged in.

After that, click ‘Save Changes’.

Now, all visitors will automatically be sent to your new login page URL.

We hope this article helped you learn how to add a custom login URL in WordPress. You may also want to see our guide on how to choose the best web design software, and our list of the best email marketing services for small businesses.

If you liked this article, then please subscribe to our YouTube Channel for WordPress video tutorials. You can also find us on Twitter and Facebook.

The post How to Add a Custom Login URL in WordPress (Step by Step) appeared first on WPBeginner.


July 13, 2021 at 04:00PM