Tuesday, November 16, 2021

How to Add a PDF Viewer in WordPress

Do you want to add a PDF viewer in WordPress?

PDF format is good to use when you want your files to always have the same layout, no matter what device they’re viewed on. By embedding PDF files in WordPress, you can share your files while keeping visitors on your website.

In this article, we will show you how to add a PDF viewer in WordPress.

How to Add a PDF Viewer in WordPress

Why Do You Need a PDF Viewer in WordPress?

By default, WordPress doesn’t embed PDF files into blog posts as it does with audio, video, tweets, and other media formats. It just adds the file as a downloadable link.

By Default, PDFs are Added as Download Links

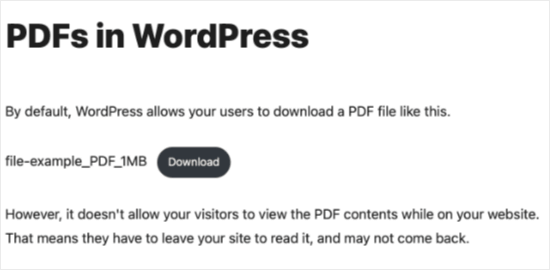
That means your visitors will have to leave your post to view the PDF file. Many of these users don’t come back to your site, and this reduces your site’s pageviews as well as user engagement.

One way to deal with this is to offer PDF files as content upgrades. This way, you can ask users to join your email list to get the bonus content.

However, if you just want users to view PDF files without leaving your website, then you will need to add a PDF viewer to your WordPress site.

How to Install and Set Up PDF Embedder

We’ll be using PDF Embedder, one of the best PDF plugins for WordPress.

It uses JavaScript to embed files with a fully functional toolbar that allows users to zoom in and navigate the PDF file. It’s also fully responsive, so the embedded PDF will be viewable on any size screen.

First, you need to install and activate the PDF Embedder plugin. For detailed instructions, see our step by step guide on how to install a WordPress plugin.

Upon activation, you can visit Settings » PDF Embedder to configure the plugin settings. The default settings are suitable for most websites, so this step is optional.

PDF Embedder Settings

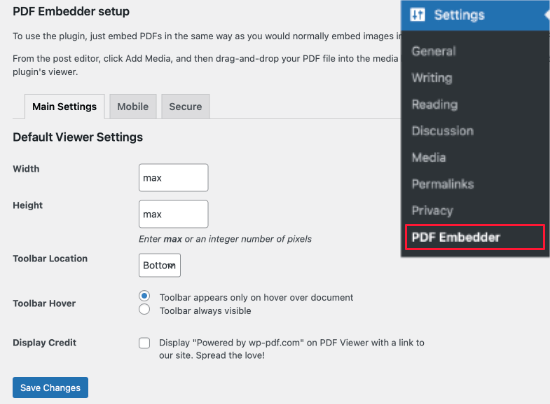
The settings allow you to control the height and width of the PDF viewer. You can change this if you feel that the PDF viewer is too wide or narrow.

You can also choose whether to display the toolbar at the top or bottom of the viewer, and whether to hide it until the user hovers their mouse over the document.

The premium version adds options for a download button, continuous page scrolling, clickable links, and tracking file downloads. It also offers a number of mobile and security settings.

When you’ve finished customizing your settings, don’t forget to click on the ‘Save Changes’ button to store them.

Now we’re ready to embed a PDF in a WordPress post or page. The way you do that depends on whether you use the block editor or classic editor. You can use the links below to jump to your preferred section:

How to Add a PDF Viewer in the Block Editor

Adding PDF files to your WordPress posts and pages is quite simple. We’ll start by adding a new post or editing an existing one.

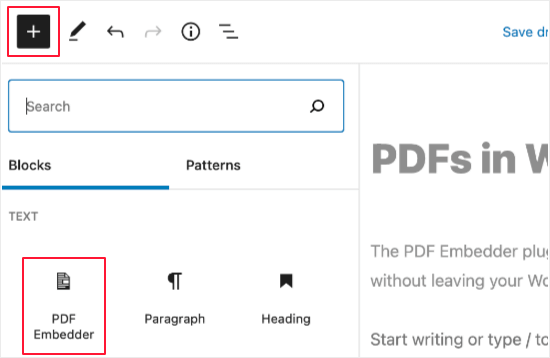
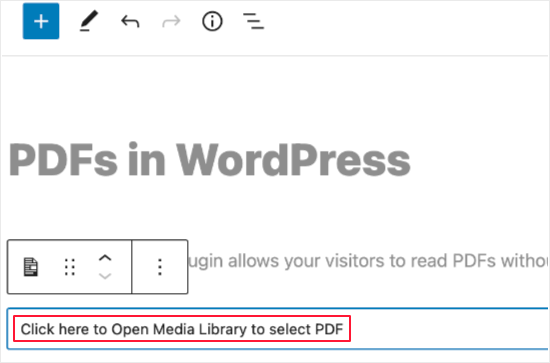
First, place your cursor where you want to embed the PDF document. Then you’ll need to add a new block by clicking the Add Block + button at the top left of the WordPress edit screen.

Next, you should click on the ‘PDF Embedder’ button under the Text section.

Add a PDF Embedder Block

Once you’ve done that, you’ll need to upload a new PDF file to your post or select one from your media library. You can do that by clicking the link that says ‘Click here to Open Media Library to select PDF’.

Click to Select a PDF File

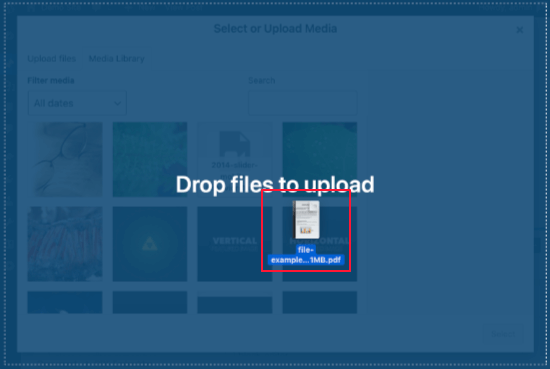
You’ll be taken to the WordPress media library. If you haven’t already added the PDF, then do that now. Just drag the file into the library, and when you see the ‘Drop files to upload’ message you can let go of your mouse button.

Drop Files to Upload

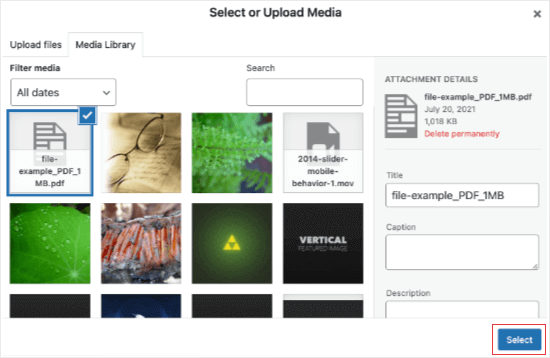
The PDF will be automatically uploaded and selected. All you need to do is click the ‘Select’ button.

Select or Upload Media

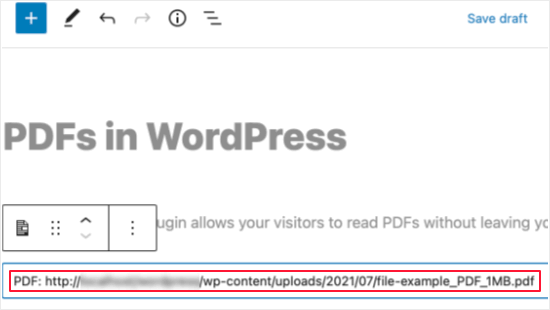
The PDF will be added to your document. You won’t see a preview of the PDF while you’re editing the post. Instead, the block contains the file’s URL.

The PDF is Embedded

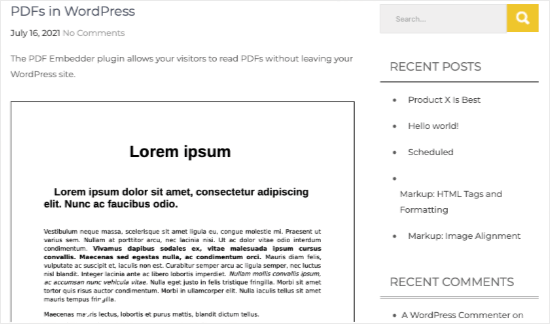
To view the PDF, you’ll need to save your post and preview it on your live website. Here’s how it looks on our demo website.

Preview the PDF Viewer

How to Add a PDF Viewer in the Classic Editor

Embedding a PDF in the classic editor is just as easy. Start by adding a new post or opening the one you’re working on.

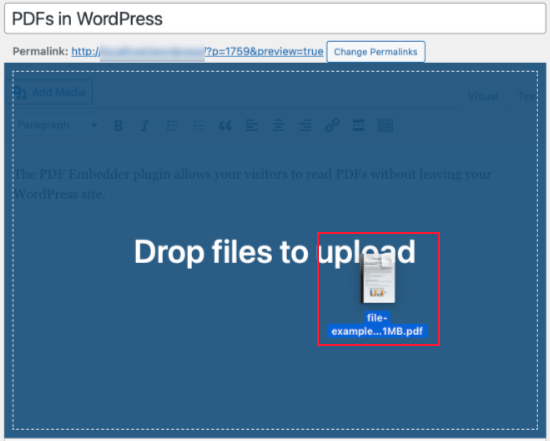
After that, you should place the cursor where you want to display the PDF, and then you need to drag the PDF onto the page. When you see the ‘Drop files to upload’ message you can let go of your mouse button.

Drag the PDF onto the Page

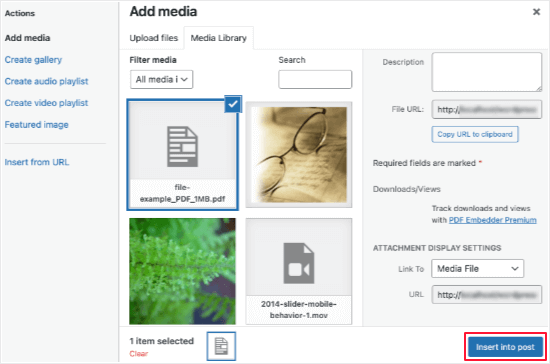
The PDF will be automatically uploaded to your media library and selected. All you need to do now is click the ‘Insert into post’ button.

Insert the PDF into the Page

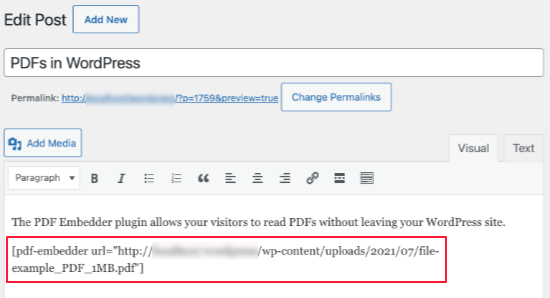
PDF Embedder will add a shortcode to your post or page. It will look like [pdf-embedder url="PDFURL"]. This will display the PDF when you preview or publish the file.

PDF Embedder's Shortcode

To view the PDF, simply save your post and preview it on your live website. Here’s how it appeared on our demo website.

Preview the PDF Viewer

We hope this article helped you add a PDF Viewer in WordPress. You may also want to take a look at our guide on how to create an email newsletter or check out our list of must have WordPress plugins to grow your site.

If you liked this article, then please subscribe to our YouTube Channel for WordPress video tutorials. You can also find us on Twitter and Facebook.

The post How to Add a PDF Viewer in WordPress first appeared on WPBeginner.


November 16, 2021 at 05:00PM

Monday, November 15, 2021

How to Use Headline Analyzer in WordPress to Improve SEO Titles

Did you know that a higher click-through-rate on your SEO titles can help improve your SEO rankings?

Your title is the first thing that people will see in search engine results, and they’ll decide whether to click on your link based on that title. A headline analyzer helps you create engaging titles that get more clicks.

In this article, we’ll show you how to use a headline analyzer in WordPress to improve SEO titles.

Improving SEO titles with Headline Analyzer tool

What Is a Headline Analyzer Tool & Why Do You Need It?

The title of your blog post or landing page is extremely important for search engine optimization (SEO). A powerful title can get people to click on the link to visit your WordPress site.

Of course, the more people click on your search result, the more traffic you get. But a higher click-through rate (CTR) can also improve your search engines rankings as well, getting you even more visitors.

However, for beginners it can be tricky to come up with a headline that instantly captures your users’ attention and gets them to click your website link. This is where you can use the headline analyzer tool.

A headline analyzer is a tool that helps you evaluate your headlines and improve the copy to make it more engaging and click-worthy. It provides data-driven insights and suggestions for creating irresistible SEO titles.

That being said, let’s look at how you can use a headline analyzer tool to improve your SEO titles.

How to Use a Headline Analyzer Tool in WordPress

The easiest way to analyze your headlines in WordPress is by using the All in One SEO (AIOSEO) plugin. It’s the best SEO plugin for WordPress on the market and is used by over 3 million websites.

AIOSEO helps you optimize your website for search engines without any technical knowledge or the need to hire an SEO expert. The plugin offers a headline analyzer inside your WordPress editor so that you can create powerful titles.

Note: We’re using the AIOSEO Lite version as it includes the headline analyzer tool for WordPress. There is also a premium version that we use on WPBeginner site because it offers powerful features like local SEO, smart schema, XML sitemaps, and more.

The first thing you’ll need to do is install and activate the AIOSEO plugin on your website. If you need help, then you can follow our step-by-step guide on how to install a WordPress plugin.

Upon activation, the plugin will automatically launch its setup wizard. You can go ahead and click the ‘Let’s Get Started’ button to configure the AIOSEO plugin on your website.

All in One SEO set up wizard

For more details, you can refer to our guide on how to setup All in One SEO for WordPress correctly.

After you’ve completed the setup wizard, go ahead and edit or add a new post. Once you’re in the WordPress editor, you can add your blog post title at the top.

Add a post title in WordPress

An important thing to remember is that there is a difference between your post title and SEO title. The post title will simply appear on the page, usually in an <h1> heading tag, depending on your WordPress theme.

SEO plugins like AIOSEO allow you to add an SEO title for your articles using an HTML <title> tag.

The SEO title doesn’t appear on the page itself. Instead, it’s a suggestion to search engines like Google on how you’d like your title displayed in search results. It also displays in the browser’s title bar.

SEO title example

By default, WordPress doesn’t let you enter an SEO title. But with AIOSEO, you can easily add an SEO title.

To add the SEO title, simply scroll down to the ‘AIOSEO Settings’ meta box in your WordPress editor and then enter a headline under ‘Post Title.’

AIOSEO post title meta box

The plugin also offers smart tags, so you can automatically add information to your titles like the current year, author name, categories, site tagline, and more.

After adding a headline for your article, you can analyze it using AIOSEO. All you have to do is click the ‘SEO Headline Analyzer’ button at the top right.

Click the SEO headline analyzer button

AIOSEO will show you a score ranging from 1 to 100 about your headline. A score of 70 or more shows that you’ve written a powerful headline.

If your score is below 70, then don’t worry. The headline analyzer will show you suggestions on how to improve the score and make your title more engaging, so you can get more clicks and traffic.

Now you can scroll down and look at the word balance of your copy. The plugin will look for common words, uncommon words, emotional words, and power words.

These are words that help trigger a psychological or emotional response from your audience. When creating headlines, you can use such words to improve your headline score and boost their click-through rate (CTR).

Check the word balance in the copy

Next you can check the sentiment of your headline. Titles that have a positive feeling tend to get better engagement and more clicks than neutral or negative ones.

Besides that, the plugin will also show you the headline type. For example, you can see whether your headline type is a how-to post, list post, resource post, or more.

These types of titles tend to get more clicks than generic titles.

Analyze the sentiment of your headline

After that, you can scroll down and check the character count and word count for your title in the headline analyzer tool.

It’s recommended to write headlines that are under 55 characters, so that search engines can fully show the text in the search results.

If your titles exceed 55 characters, then search engines might cut off the text at the end. This can lower your click-through rate if important words are cut off and the meaning of your title isn’t clear.

Check the character count and word count

Next, you can analyze the beginning and ending 3 words of your headline. Most readers usually glance at the headline and look at the opening and ending 3 words in the title before deciding to click.

Using this information, you can place your target keyword and most important information in the beginning to capture the reader’s attention.

The AIOSEO headline analyzer also shows a preview of how your headline will appear in the search engine page results.

Check the beginning and ending words with preview

If your headline doesn’t get a good score, then you can easily try new headlines and analyze them before changing it.

All you have to do is switch to the ‘Try New Headline’ tab in the tool, enter your new headline, and click the ‘Analyze Headline’ button.

Try new headlines in AIOSEO

AIOSEO will show you a score of your new headline and compare it with the current SEO title.

You can try multiple headlines for your WordPress blog post and analyze their scores to see which one works the best.

Before you hit publish, check out our blog post optimization checklist to make sure it’s fully optimized to get the most traffic possible.

Pro Tips: Search Console + Headline Analyzer

You can take this even further like the Pros do, and combine the headline analyzer with the insights from Google Search Console.

If you look at our ultimate Google Search Console guide to grow traffic, you’ll see there is a section about finding low-hanging keywords where you can easily rank.

Filter by position
Then you can tweak the title of those blog posts using the headline analyzer to make it more catchy.

As your click-through rate increases, your SEO rankings will go up as well.

We hope this article helped you learn how to use headline analyzer in WordPress to improve SEO titles. You can also go through our guide on how to get a free SSL certificate for your WordPress site and the best WooCommerce plugins for your store.

If you liked this article, then please subscribe to our YouTube Channel for WordPress video tutorials. You can also find us on Twitter and Facebook.

The post How to Use Headline Analyzer in WordPress to Improve SEO Titles first appeared on WPBeginner.


November 15, 2021 at 03:31PM

Saturday, November 13, 2021

How to Add Captions to Featured Images in WordPress

Do you need to add captions to your featured images in WordPress?

Captions are helpful because they add context and background information about the images you use. However, many WordPress themes don’t display captions for a post’s featured image.

In this article, we’ll show you how to display captions for your featured images in WordPress.

How to Add Captions to Featured Images in WordPress

Why Add Captions to Featured Images in WordPress?

Featured images are a WordPress theme feature. Almost all WordPress themes come with built-in support for featured images and display them beautifully across different areas of your WordPress website.

Adding a featured image to your post will make it look more appealing and build user engagement. To learn more, check our guide on how to add featured images or post thumbnails in WordPress.

When you upload a featured image, you have the option to add a caption and description, along with other fields.

When You Add a Featured Image You Are Asked to Add a Caption and Description

But when the image is displayed on your website, it may only show the image.

This depends on the theme you are using. For example, the Twenty Twenty and Twenty Twenty-One themes do show featured image captions by default. The Twenty Sixteen and Twenty Nineteen themes do not.

If your WordPress theme does not display featured image captions, then we’ll show you how to add them by using a plugin.

Adding Captions to Featured Images in WordPress

The first thing you need to do is install and activate the FSM Custom Featured Image Caption plugin. For more details, see our step by step guide on how to install a WordPress plugin.

Upon activation, you need to visit the Settings » FSM Custom Featured Image Caption page to configure the plugin.

The default settings will work for many users, however, if you want the featured image captions to be displayed on the front page of your WordPress website, then make sure you click the ‘Show image captions in lists’ checkbox.

FSM Custom Featured Image Caption Settings

For this tutorial, we’ll leave the ‘Default Class’ option selected. However, if you would like to style the caption using your own custom CSS, then you should select one of the other two options.

Once you have finished selecting those options, make sure you click the Save Changes button to store your settings.

You’re finished! When you visit your WordPress website, you should see any captions that you have added to your feature images.

Here are before and after screenshots from our demonstration website. We are using the Twenty Sixteen theme that does not show featured image captions by default.

Featured Image Caption Preview

We hope this tutorial helped you learn how to add captions to your featured images in WordPress.

You may also want to learn how to choose the best web design software , or check out list of must have plugins to grow your site.

If you liked this article, then please subscribe to our YouTube Channel for WordPress video tutorials. You can also find us on Twitter and Facebook.

The post How to Add Captions to Featured Images in WordPress first appeared on WPBeginner.


November 13, 2021 at 03:46PM

Friday, November 12, 2021

13 Best WordPress Footer Design Examples (+ Best Practices)

Are you looking for the best footer design examples to help you get inspired?

The footer is the area at the bottom of your website, and it’s often overlooked by website owners. By checking out great website footers, you can get design inspiration and improve your footer.

In this article, we’ll show you some of the best footer design examples and offer best practices and tips to help you take action.

12 best WordPress footer design examples (+ best practices)

Why Is a Good WordPress Footer Design Important?

The footer is the area of your website that appears at the very bottom of the page. It will normally be on every page of your WordPress website.

Here’s an example of our footer on WPBeginner that millions of readers see every month.

WPBeginner footer

Since it’s located at the bottom of the website, most beginners forget to optimize this area.

However, your website footer is a very important area of your website. It lets you show important details and final takeaways in one place.

By customizing your footer, you can improve the overall user experience of your website and even optimize your site for WordPress SEO.

Plus, visitors who scroll to the bottom of the page are very engaged, so you can capture their attention with a call to action, email subscribe box, or send them to the most important pages on your website.

That being said, let’s show you some of the best footer design examples and best practices to optimize your footer.

Best WordPress Footer Design Examples

We’ve rounded up some of the top footer design examples to help you get design inspiration for your own footer area.

1. WPForms

WPForms footer

WPForms has a footer with all kinds of useful links. You’ll find links that go to the most helpful company pages, top features of the plugin, and useful WordPress links.

This ensures that when the reader gets to the bottom of the page and still has questions, they’ll find the exact resources they need. There’s also a floating alert bar at the bottom of the page with a call to action.

2. OptinMonster

OptinMonster footer

OptinMonster has a footer that offers readers links to important company pages, top features, helpful product links, and much more.

It also has simple social media icons, trust icons, and a company logo for branding purposes.

3. Neil Patel

Neil Patel footer

Neil Patel has a compact and straightforward footer that offers readers quick navigation links. The footer menu is the same as the navigation menu at the top of the site.

Plus, readers have the option to follow Neil Patel on social media as well.

4. Michael Hyatt

Michael Hyatt footer

Michael Hyatt has another simple and compact footer. It highlights the copyright date, easy social sharing buttons, and links to pages like terms of service and privacy policy.

Directly above the footer, you’ll see a call to action to download a free guide, which can convert a lot of visitors that make it to the bottom of the page.

5. ReddBar

Reddbar footer

ReddBar is a WooCommerce store with a footer that encourages email sign ups. Directly above the footer links, there’s a massive sign up box for readers.

Some of the helpful links include a link to their FAQ page, contact page, wholesale pricing page, and more.

6. Reader’s Digest

Reader's Digest footer

The Reader’s Digest footer contains a lot of information for visitors. You’ll find links to their category pages, other company brands, social media sharing buttons, and more.

Plus, there’s an eye catching email sign up box to encourage visitors to join their email list.

7. IsItWP

IsItWP footer

IsItWP footer has a quick section on what the website is about and links to other sites and company pages.

It also has a very unique site links drop down that lets readers click to find the exact type of content they’re looking for.

8. Born Fitness

Born Fitness footer

Born Fitness has a very minimalist footer that focuses on helping readers find the information they need. There are links to their premium services, free resources, and company pages.

Plus, there’s a search bar to help visitors find what they’re looking for, along with social sharing buttons.

9. Printing New York

Printing New York footer

Printing New York is an online store that ships worldwide. The footer highlights their address, services, and popular products.

They use the structure of their links to help boost their local SEO and search engine rankings.

10. Nalgene

Nalgene footer

Nalgene has a clean and well organized footer section. Directly above the footer, there’s a simple email sign up box.

After that, there are well organized links to help visitors find the exact products they’re looking for, along with company related links.

11. ProBlogger

ProBlogger footer

The ProBlogger footer has links to their most popular posts, top resources, and new jobs posted on their job board.

There’s also a big email sign up form directly above the footer, and a small footer navigation menu with the same menu options as the header navigation.

12. Custom Seafoods

Custom Seafoods footer

Custom Seafoods is a popular eCommerce brand that has a very different footer. Instead of including navigation or page links, they only feature an email newsletter sign up box.

Although it’s different from most other brands, a minimalist footer like this can convert well, since there are no other distractions or actions the visitor can take.

13. The Next Web

The Next Web footer

The Next Web has a footer that stands out from the rest of the website. It has social media sharing buttons, links to important pages, and more.

You’ll see a social proof section directly above the footer where they feature logos from popular brands and websites they’ve been mentioned or featured.

WordPress Footer Design – Tips and Best Practices

There are a lot of ways you can improve your user experience and create a better footer for your WordPress blog.

Let’s take a quick look at some of the best practices to keep in mind as you edit your website footer.

Include Your Business Contact Information

Having contact information listed on your site is essential. You should have a separate contact form page on your website, so your visitors can get in touch.

However, the footer is also a good place to include your contact information, especially if you have local customers who will be looking for your physical address.

Business contact information example

For local businesses, the more you ways you can feature your contact information, address, and even business hours, the better.

Add Links to Important Website Pages

It’s important to have clear navigation across your entire website. That’s why it’s so common for websites to include links in their footers.

You can add links for your most important product pages, top blog posts, about page, and more.

Footer links example

Think about the most valuable pages on your website and what your visitors will find the most useful.

Adding and optimizing your links can also give you an SEO benefit and boost in your search engine rankings.

Add Social Proof to Improve Conversions

One thing you may have seen certain websites do in their footer is add social proof. This can help to earn your customer’s trust and position you as an expert in your space.

It can be as simple as a customer testimonial or logos of popular websites you’ve been featured on.

Here at WPBeginner, we highlight logos of popular websites where we’ve been featured directly above the website footer.

Footer social proof example

Add a Call to Action

When your visitors get to the bottom of your website, you’ll want to tell them the exact action they should take and how they should do it.

For some websites, this will be a call to action to sign up for their email newsletter. For others, it will be links to explore popular product features, or even a call to action button.

Call to action button footer example

Your footer is the last chance to get your visitors attention and encourage them to become a subscriber, customer, or simply spend more time on your website.

For more optimization tips, see our checklist on ten things to add to your website footer.

We hope this article helped you find some of the best footer examples to help you optimize your website footer. You may also want to see our guide on how to choose the best blogging platform and our picks on the best virtual business phone number apps for small businesses.

If you liked this article, then please subscribe to our YouTube Channel for WordPress video tutorials. You can also find us on Twitter and Facebook.

The post 13 Best WordPress Footer Design Examples (+ Best Practices) appeared first on WPBeginner.


November 12, 2021 at 03:00PM

Thursday, November 11, 2021

How to Easily Update URLs When Moving Your WordPress Site

Do you want to update URLs after moving your WordPress site?

It can be pretty time-consuming to manually edit each post or page just to replace old URLs. Luckily, there are WordPress plugin that help you automate the process of updating old URLs.

In this article, we will show you how to easily update URLs when moving your WordPress site.

How to Update URLs when Moving your WordPress Site

When and Why Do You Need to Update URLs?

Let’s suppose you moved a WordPress site to a new domain name. You can then change the WordPress address and site URL by visiting the Settings » General page from your WordPress dashboard.

Changing WordPress and site URLs

However, this doesn’t change the URLs that you have previously added in your posts and pages. It also does not change the URLs of images you have added to your WordPress site.

Changing all these URLs manually in every blog post and page can be time-consuming. Plus, there will always be a chance that you’ll miss some URLs, which can lead to broken links on your website.

That’s why it’s important to update your URLs when moving your WordPress website.

It helps in providing a smooth user experience for your users, as they’ll easily find the page they’re looking for. Updating URLs also improves your WordPress SEO and allows search engines to find new content for indexing.

Last but not least, you also want to ensure there are proper 301 redirects setup from your old domain to the new domain, so users are always redirected to the right place.

This is extremely important because there are likely other websites that are linking to your old domain including social media posts, Google, and more.

With that said, let’s see how you can quickly and easily update URLs when migrating your WordPress site.

Update URLs After Moving a WordPress Site

The easiest way to update old links on your website is by using the Go Live Update Urls plugin for WordPress. It’s a free WordPress plugin and lets you update URLs in your posts, pages, images, excerpts, widgets, and more.

However, make sure that you have a complete backup of your WordPress site before updating all the links. This will allow you to easily revert back in case something goes wrong during the update process.

Next, you’ll need to install and active the Go Live Update Urls on your site. For more details, see our step-by-step guide on how to install a WordPress plugin.

Upon activation, you can navigate to Tools » Go Live from your WordPress admin panel.

Select core tables to update

After that, you can update URLs in your posts, comments, options, user data, and other areas of your site by checking the WordPress core tables options in the plugin.

WordPress core tables are where all your website data is organized and stored. For example, a wp_comments table will have all the information about comments on your site along with data about the person commenting.

Besides that, Go Live Update Urls also lets you update old URLs in the data used by different plugins on your website. However, this is an optional step and you can skip it.

Update URLs in plugin data

Next, you’ll need to scroll down to the section for updating the old links to the new URLs. Go ahead and enter the ‘Old URL’ and ‘New URL’ in the respective fields.

Enter old and new URL

Once that’s done, simply click the ‘Update Urls’ button. The plugin will now update all the URLs on your site to the new domain.

Redirect Posts & Pages After Updating URLs

After you’ve updated all the URLs on your website, you’ll now need to set up 301 redirects for your entire site to the new domain. This will preserve links from sites that were linking to your old domain and prevent 404 errors.

The easiest way of performing a full site redirect is by using the All in One SEO (AIOSEO) plugin. It’s the best SEO WordPress plugin and is trusted by over 3 million professionals.

AIOSEO offers a powerful redirection manager that lets you redirect old URLs to new ones in just a few clicks. The plugin also helps track 404 errors on your site, so you can quickly find and fix any broken link.

For this tutorial, we’ll be using the AIOSEO Pro version because it includes the redirection manager and other features like sitemaps, custom breadcrumbs, and schema markup. You can also try the free version of AIOSEO to get started.

The first thing you’ll need to do is install and activate the AIOSEO plugin on your site. If you need help, then please refer to our guide on how to install a WordPress plugin.

Upon activation, you will need to go to All in One SEO » Dashboard from your WordPress admin panel. Now click the ‘Launch the Setup Wizard’ button to configure the plugin.

Launch setup wizard from AIOSEO dashboard

All you have to do is follow the steps in the setup wizard. For more information, see our detailed tutorial on how to setup All in One SEO for WordPress.

1. Setting up Full Site Redirects

This method is super useful when you’re merging two separate WordPress sites into one, or if you’re going to setup a new WordPress install for the new domain because it’ll handle a full site redirect without adding any code.

Simply head over to All in One SEO » Redirects from your WordPress admin area and click the ‘Activate Redirects’ button.

Activate AIOSEO redirects

Upon activation, you’ll need to navigate to the ‘Full Site Redirect’ tab and enable the ‘Relocate Site’ toggle. Next, you can enter your new domain name in the ‘Relocate to domain’ option.

Full site redirect

After entering your new domain URL, don’t forget to click the ‘Save Changes’ button to store your settings. AIOSEO will now redirect all the links on your site to the new URL.

2. Setting up Individual Post / Page Redirects

AIOSEO also offers different types of redirection methods that you can use to setup individual post / page redirects. We recommend selecting the ‘301 Moved Permanently’ redirection type, as it tells your browser that the page is moved to a new destination permanently and you don’t wish to move it back.

Add redirection for old links

Once you’ve filled out these details, simply click the ‘Add Redirect’ button.

If you want to see the different redirects you’ve created, then simply scroll down and view the logs.

Redirection logs in AIOSEO

You can see the URLs, number of people that visited the link, the type of redirection you’ve set, and also choose whether to enable or disable the redirect.

In the ‘Settings’ tab under Redirects , you can choose to setup server level redirects as well which are way faster. The default method is set to PHP which is the easiest way to redirect old URLs, and it doesn’t require any server-side configuration.

But you can select ‘Web Server’ as the redirection method, and then choose either Apache or NGINX as your web server. We won’t recommend this method for beginners as it requires technical knowledge.

Select the Redirect Method

Bonus: Track Broken Links on Your Website

When you update your URLs to a new domain, it’s also essential to keep an eye on any broken links. These are links that no longer exist and show a 404 error page. They can occur if any URL didn’t get updated properly.

With AIOSEO, it’s very easy to track and fix 404 error pages using the Redirection Manager.

To begin, you can head over to All in One SEO » Redirects from your WordPress dashboard.

Next, go ahead and click the ‘Settings’ tab under Redirects and then click on the toggle to enable the ‘404 Logs’ and ‘Redirect Logs’ options.

Enable 404 logs

Using AIOSEO, you can choose the time period to keep your 404 error logs. We recommend that you select no longer than one month for smooth and optimal WordPress performance.

Once you’ve enabled these options, click the ‘Save Changes’ button at the top to store your settings.

You should now see a new ‘404 Logs’ tab appear under Redirects in AIOSEO. It’s under this tab where the plugin will track and show 404 error pages on your website.

An important thing to note is that you won’t see any data under the 404 Logs tab at first. The plugin will only start to record broken links after you’ve enabled the settings.

However, once the setting is active, go ahead and click on the ‘404 Logs’ tab. You’ll see a list of broken links under the URL column, the number of visits under the Hits column, and the last accessed date.

Click 404 logs menu option

To fix any broken link, simply click the ‘Add Redirect’ button for the respective URL. AIOSEO will now show options to set up redirection for the 404 error URL.

Go ahead and enter the new link under the ‘Target URL’ field and select ‘301 Moved Permanently’ as the Redirection Type from the dropdown menu.

Add redirect for your broken link

Next, you’ll need to click the ‘Add Redirect’ button to fix the broken link on your website.

To check if the redirection is working, simply visit the old URL. If you’re redirected to the new URL, then it means you’ve successfully fixed 404 error pages.

We hope this article helped you learn how to update URLs when moving your WordPress site. You may also want to see our comparison of the best email marketing services for small businesses, and best push notification software to grow your traffic.

If you liked this article, then please subscribe to our YouTube Channel for WordPress video tutorials. You can also find us on Twitter and Facebook.

The post How to Easily Update URLs When Moving Your WordPress Site appeared first on WPBeginner.


November 11, 2021 at 05:30PM