Wednesday, January 5, 2022

How to Create a Video Membership Site in WordPress

Do you want to make a video membership site?

A video membership website allows you to create subscription plans for your video content. Instead of relying on ads, you can let your users pay directly to watch your video content.

In this article, we’ll show you how to create a video membership site in WordPress with step by step instructions.

Making a video membership website in WordPress

What Do You Need to Start a Video Membership Website?

Making a video membership website these days is quite easy.

Using WordPress as your website platform gives you access to all the tools you’ll need to make a custom video membership website.

Here is what you’ll need to get started:

  1. A domain name. This will be your website’s address (e.g. wpbeginner.com).
  2. A website hosting account. This where all your website files will be stored.
  3. A membership addon to create subscription plans and restrict access to paid content.
  4. A video hosting platform so that you can securely deliver videos only to paid subscribers.

Basically, you can create a fully functional video membership website in less than 60 minutes, and we’ll walk you through every step of the way.

Below are the steps that we will cover to help you make a powerful membership website with WordPress.

  1. Getting Started with a Video Membership Website
  2. Choosing a Video Membership Addon
  3. Setting Up Your Video Membership Website
  4. Adding Payment Methods
  5. Creating Subscription Plans
  6. Creating Access Rules
  7. Creating Members Only Content
  8. Uploading Your Members-Only Videos
  9. Create a Pricing Page for Video Subscriptions
  10. Create Sign up and Login Forms
  11. Edit Outgoing Email Templates
  12. Growth Hacking a Video Membership Website

Ready? Let’s get started.

Step 1. Getting Started with a Video Membership Website

The easiest way to build a video membership website is by using WordPress. It is the best website builder on the market and allows you to create any kind of website imaginable.

Before you get started, you’ll need to make sure you are using the right type of WordPress. There are two kind of WordPress on the market.

First, there is WordPress.com which is a website hosting service. Then, there is WordPress.org also known as self-hosted WordPress. For details, see our comparison of WordPress.com vs WordPress.org.

We’ll be using self-hosted WordPress.org as it gives you complete freedom and instant access to all WordPress features out of the box.

For a self-hosted WordPress website you’ll need a domain name and a website hosting account.

A domain name typically costs about $14.99 per year and web hosting plans start from $7.99 per month.

If you are just starting out, then you would want to cut costs whenever possible without compromising your business.

Luckily, Bluehost has agreed to offer WPBeginner users a generous discount on hosting with a free domain. Basically, you can get started for $2.75 per month.

Bluehost is one of the largest hosting companies on the market and they are an officially recommended WordPress hosting provider.

Once you have signed up for your hosting account, Bluehost will automatically install WordPress for you. You can simply login to your WordPress dashboard directly from your hosting account.

Login to your WordPress dashboard

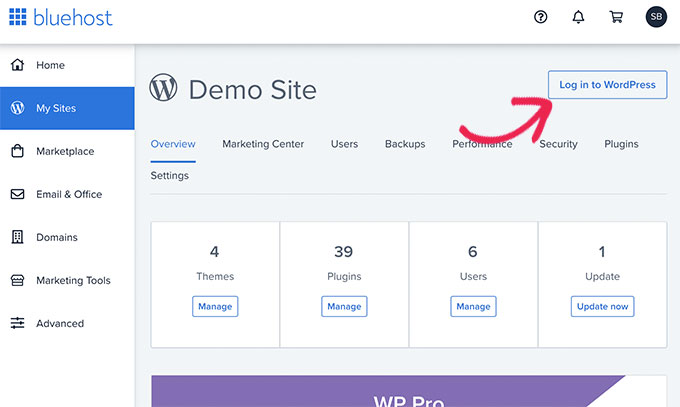
If you need more help, see our WordPress installation tutorial or follow our step by step guide on how to start a blog.

Step 2. Choosing a WordPress Video Membership Addon

There are several WordPress membership addons that allow you to create a membership website. However, each one of them has their own pros and cons.

For more details, see our full comparison of the best WordPress membership plugins.

Before you choose a membership addon, first, you need to choose what kind of video membership site you want to make.

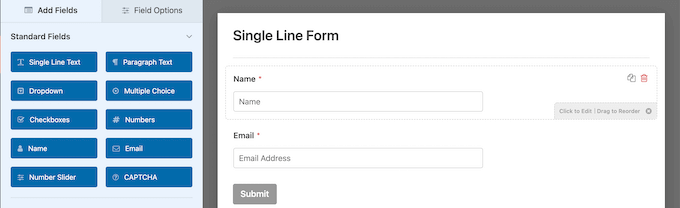
For instance, if you just want users to register and be able to download a few small videos, then you can do that with WPForms. It comes with support for popular payment gateways like PayPal and Stripe.

Plus, you can redirect users to download a file or to any URL once they have submitted a form.

However, if you want proper access control, subscription plans, multi-level subscriptions, and more, then you’ll need a complete WordPress video membership addon like MemberPress.

MemberPress website

MemberPress is the best WordPress membership plugin on the market. It allows you to accept payments, create membership levels, restrict access to video pages based on levels, and more.

You can also use it to sell courses online. Plus, if you choose to host your videos on AWS (more on this later), then MemberPress comes with an extension to host your video files on the cloud.

Basically, it has all the features you’ll need to run a video membership website and integrates with all the tools that you may want to use to grow your business.

Step 3. Setting Up Your WordPress Video Membership Website

We’ll be using MemberPress to set up a video membership website in WordPress.

First, you need to install and activate the MemberPress plugin. For more details, see our step by step guide on how to install a WordPress plugin.

Upon activation, you need to visit the MemberPress » Settings page to configure the plugin settings.

MemberPress settings

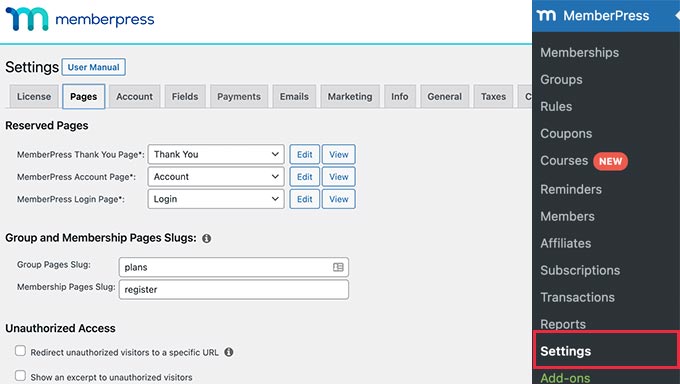
We’ll walk you through the most important settings to configure in the next few steps.

Step 4. Adding Payment Methods

The settings page is divided into different tabs. The first thing you need to set up is a payment gateway, because it allows you to accept payments on your membership site.

Setup payments method

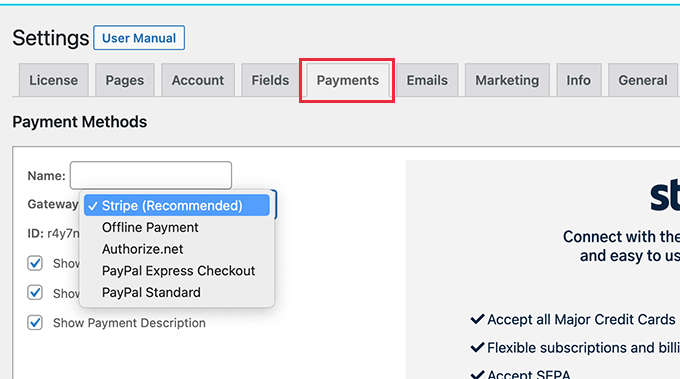
Out of the box, MemberPress supports PayPal (Standard, Express, and Pro), Stripe, and Authorize.net. You simply need to select the payment method you want to set up and provide the required credentials.

Optionally, you can also choose to add multiple payment methods. For instance, you can add Stripe and then add PayPal for users who prefer not to share their credit card details.

After adding payment methods, don’t forget to click on the Update Options button to save your settings before moving on to the next step.

Step 5. Creating Subscription Plans for Video Membership Site

Next, you need to create different subscription levels that users can subscribe to.

For instance, you can create plans with different perks, access levels, and features. You can even create a free membership plan where users can watch demo videos and access free content.

To create a new membership plan, simply go to the MemberPress » Memberships page and click on the ‘Add New’ button at the top.

New membership plan

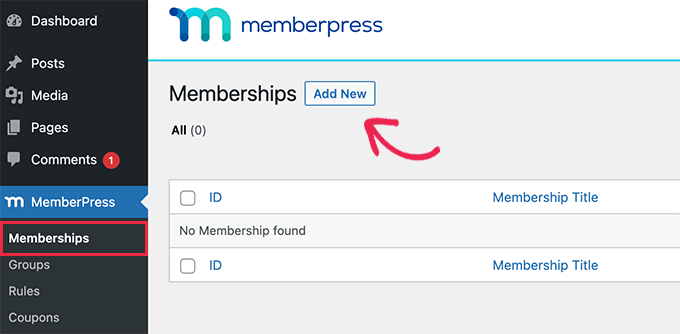
On the next screen, you need to provide a title for the membership plan and then add details in the post editor.

Next, you need to set the pricing, billing type, interval, and expiration for this plan under the ‘Membership Terms’ section in the right column.

Enter membership plan details

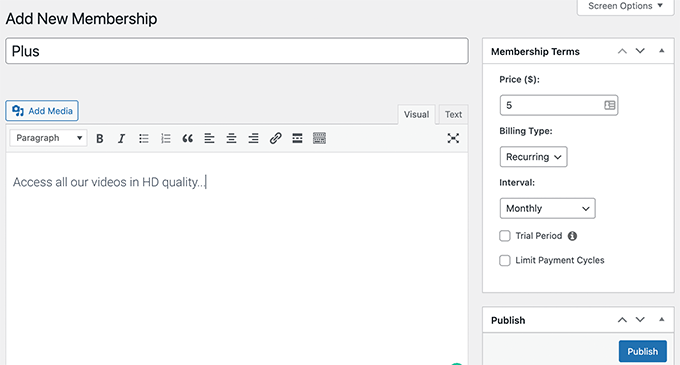
For instance, in the above screenshot, we created a video membership plan with recurring monthly payments.

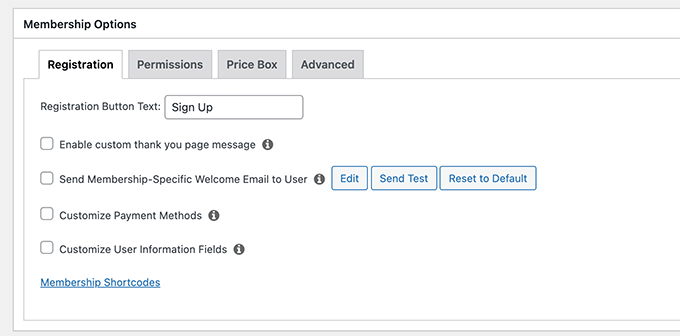
Now, you need to scroll down to the Membership Options box below the editor. From here, you can customize plan permissions and membership options.

Configure plan options

After you are satisfied with the plan, you can go ahead and publish it.

If you want to create more membership levels, then simply repeat the process to create other membership plans as needed.

Step 6. Create Access Rules for Video Membership Plans

Now that you have set up membership levels, the next step is to set up access rules.

MemberPress comes with powerful access control rules, which allow you to restrict access to any content on your website based on a user’s membership plan.

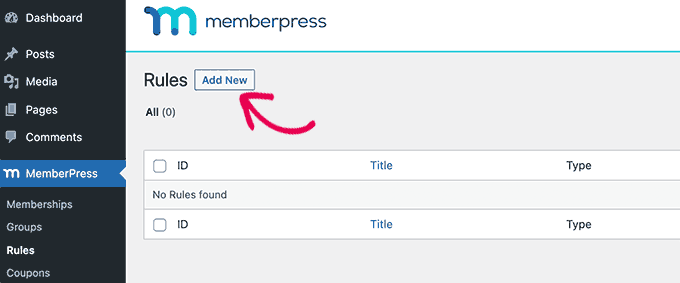
To set up rules, simply head over to the MemberPress » Rules page and click on the Add New button to create a new rule.

Add new rule

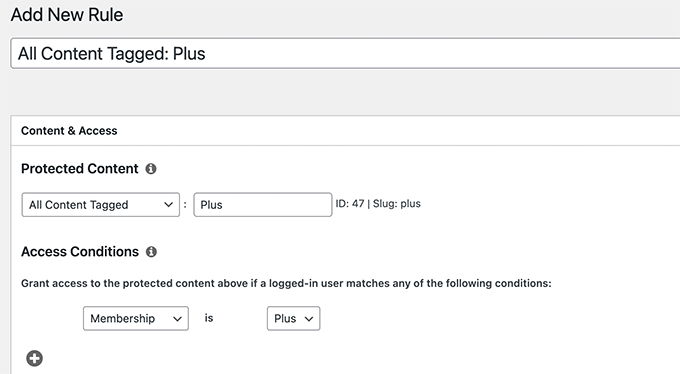
The rule edit page allows you to select different conditions and associate them to any membership plan.

For instance, you can select all content that matches a particular tag or category to be available only to members with the Plus plan.

Setting up access rules

You can also target specific posts and pages, a specific URL, and more.

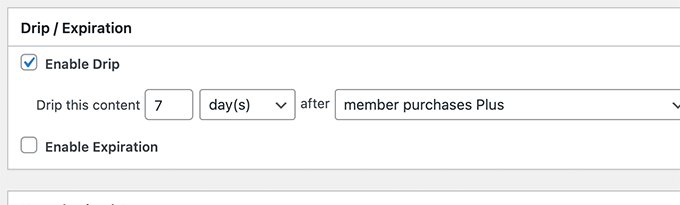
Setting Up Drip Content Rules

MemberPress also comes with a drip content feature. This allows you to automatically give users access to your videos on a schedule, instead of giving them access to all premium content as soon as they sign up.

The drip content feature allows you to keep users engaged for longer, which provides you opportunities to upsell more products or simply offer users a better experience.

For instance, you can create a separate rule for posts with a specific tag to be available one week after a user registers.

Drip content

Once you are satisfied with the Rules settings, you can go ahead and click on the Save Rule button to apply it.

Feel free to create more rules for your video membership plans as needed.

Step 7. Adding Members-Only Content in MemberPress

MemberPress makes it very easy to add members-only content to your website.

First, you will need to create a post or page where you will be adding your video and restrict access to that page as needed.

After that, we will show you how to embed members-only videos with privacy and security, so that they are not easily stolen from your website.

To get started, simply create a new post or page in WordPress and then add the tag or category that you previously added as a rule in Step 6.

Restrict content in MemberPress

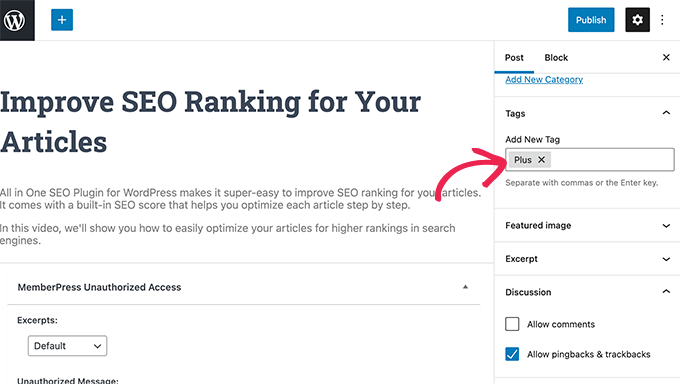
When it’s ready, you can simply go ahead and publish your restricted post or page.

Step 8. Uploading Members-Only Videos in MemberPress

One of the major challenges that video subscription websites face is how to offer the best viewing experience with full control on who has access to paid videos.

We strongly recommend that you do not just upload videos to your WordPress media library and add them to your posts and pages.

First, it is not secure or private. Secondly, video files take a lot of bandwidth, storage, and server resources, which will slow down or even crash your website.

For more on this topic, see our article on why you should never upload videos in WordPress.

We recommend two possible solutions that will work reliably for your video membership website: Vimeo or AWS.

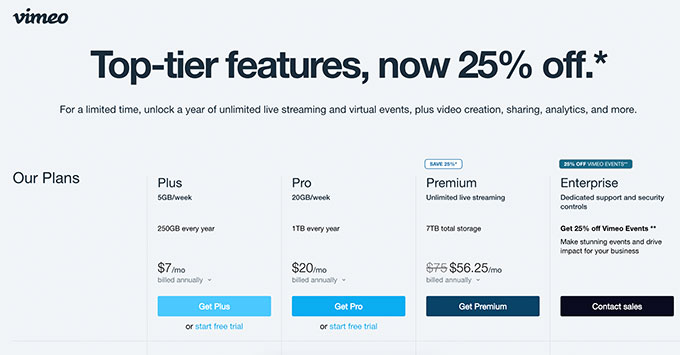
Method 1. Embedding Members-Only Videos via Vimeo

The first one is Vimeo. Their paid plans give you greater privacy controls to easily embed videos on your membership website.

With Vimeo Plus you can:

  • Make your videos private
  • Make videos unavailable on Vimeo itself. You can still upload and manage videos from your Vimeo dashboard, but others cannot view them on Vimeo.
  • Set domain level restriction so your members-only videos can only be embedded and played on your own website.
  • Password protect videos
  • and more.
Vimeo pricing

Apart from privacy and security features, Vimeo also offers a much better streaming experience for your users.

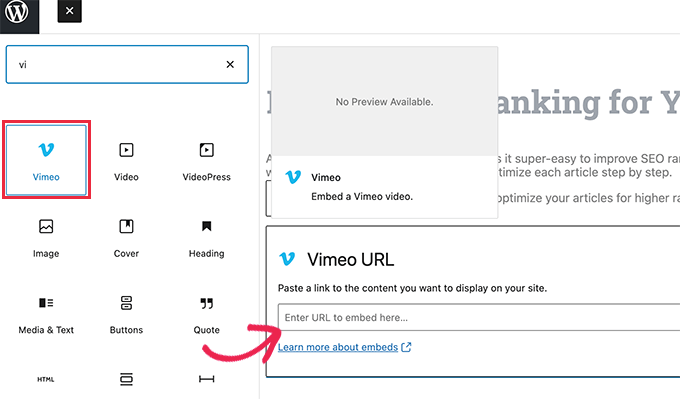
Embedding Vimeo videos in your members-only website is super easy. You only need to copy and paste the video URL in your content and WordPress will automatically fetch and embed it.

Embedding Vimeo video in WordPress

Method 2. Upload Members-Only Videos via AWS

For this method, you’ll be hosting your videos on Amazon’s AWS platform. This allows you to only programmatically give MemberPress access to your video files which are stored on Amazon cloud servers.

Note: Amazon Web Services is a pay-as-you-go service. They have a limited free tier, then after that, you’ll be charged for bandwidth and storage used by your videos.

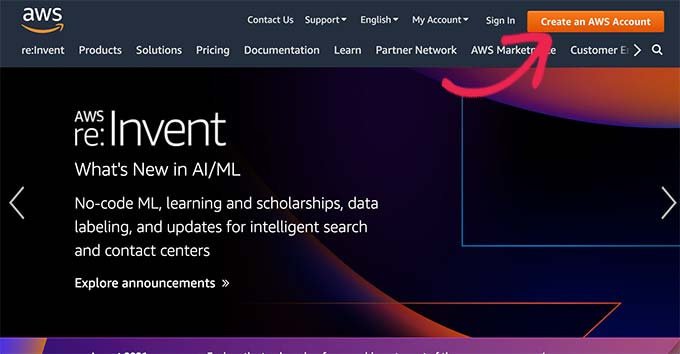
First, you need to visit the Amazon Web Services (AWS) website and sign up for an account.

Sign up for AWS account

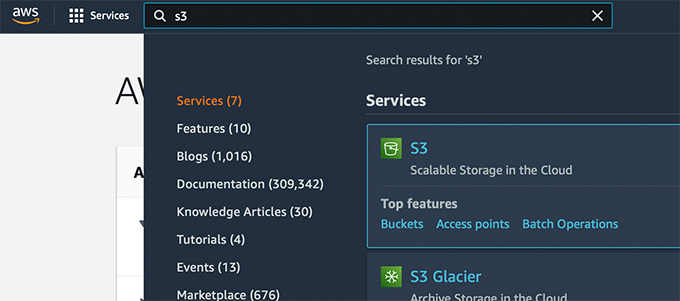
AWS comes with a bunch of cloud services that you can use. For a video membership website, we’ll be using Amazon S3 cloud storage to host our video files.

Simply click on the Services menu at the top and then look for S3.

Add Amazon S3 service to your account

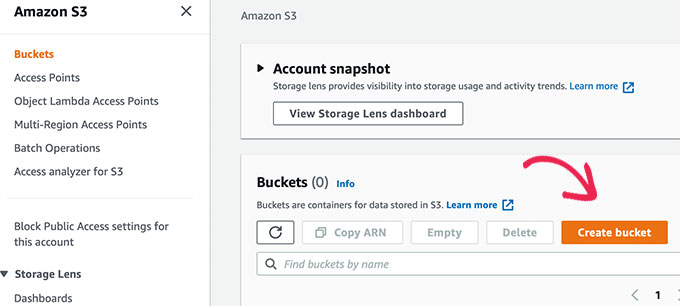
This will bring you to the S3 cloud storage dashboard. S3 cloud storage is organized in buckets. You can create multiple buckets for each of your websites or projects.

Let’s create a bucket to store our members-only video files.

Create bucket for your video files

On the next screen, you need to provide a name for your bucket and choose a region.

Make sure that your bucket name is in lowercase only and that you use a region close to most of your users.

Bucket settings

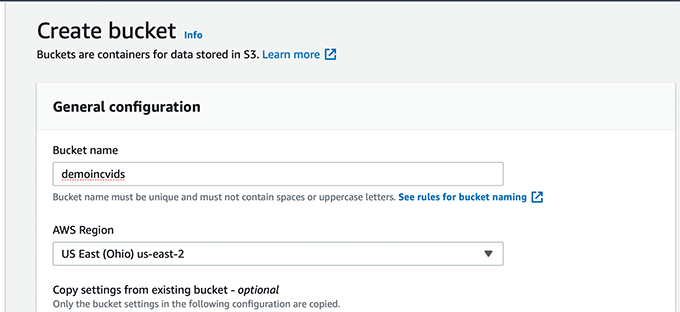
You can leave the rest of the settings as they are and click on the ‘Create Bucket’ button to continue.

AWS will now create a bucket where you can upload files. Simply click on your bucket name to open it and click on the Upload button to add your first video.

Upload your video files

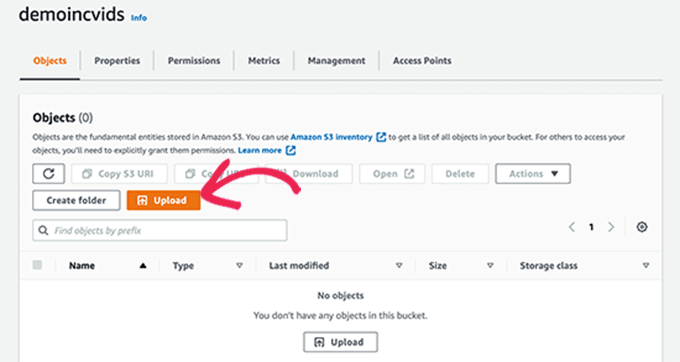
Repeat the process if you need to upload more files right now or later in the future.

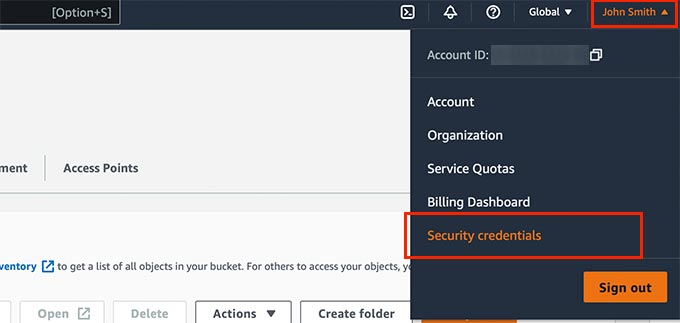
Once you have uploaded video files to AWS, they are not publicly visible. To do that, you will need to generate security credentials first.

Simply click on your Account title at the top right corner of the screen and then select ‘Security Credentials’.

Generating security credentials

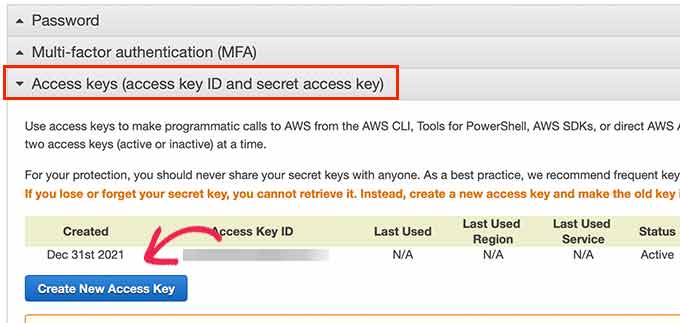
On the next screen, click on the Access Keys tab to expand it. From here, you need to click on the ‘Create New Access Key’ button to generate new keys.

Generate new access keys

This will bring up a popup where you need to click on the Show Access Keys link and then copy your Access Key ID and Secret Access Key.

Copy your access keys

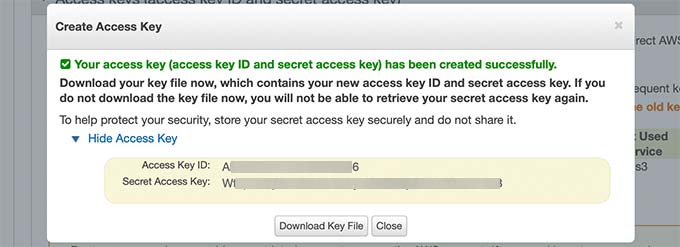
Copy and paste both keys to a text file as you’ll need them later.

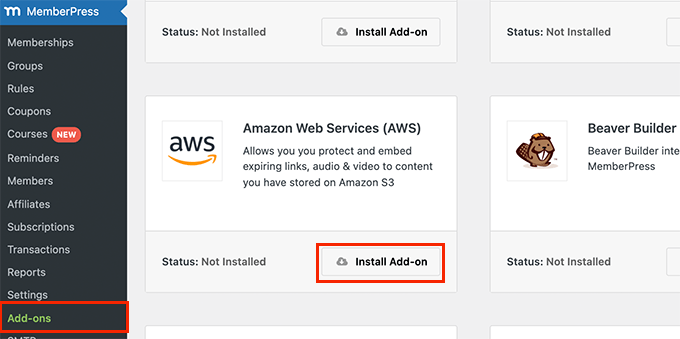
Next, switch to the admin area of your WordPress website and go to the MemberPress » Add-ons page.

From here, you need to scroll down to Amazon Web Services (AWS) and click on the Install Add-on button.

MemberPress AWS Add-on

After that, you need to connect MemberPress to your AWS account.

Simply go to the MemberPress » Settings page and switch to the AWS tab.

Configure AWS

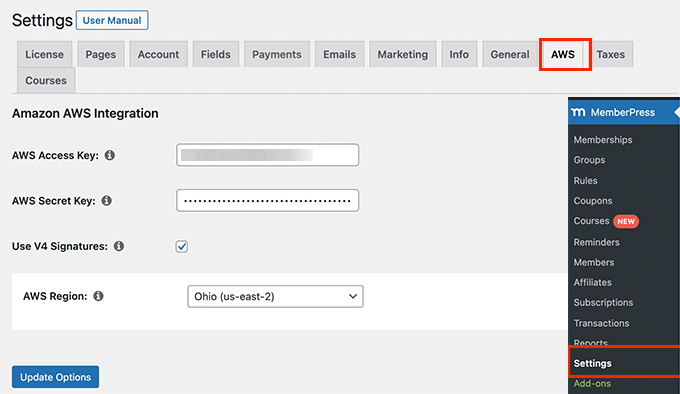
Here, you need to copy paste the Access and Secret Keys you copied earlier.

Below that, check the box next to the V4 Signature option and then select your AWS region. This is the same region that you choose when setting up your S3 Bucket.

Don’t forget to click on the Update Options button to save your settings.

Adding AWS Hosted Videos to Your WordPress Site

Now that you have connected MemberPress to your AWS account, you can go ahead and add your videos to your members-only posts and pages.

You will need to embed video using a shortcode like this:

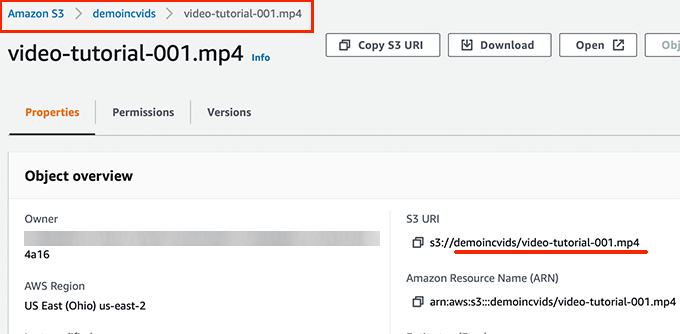
[mepr-s3-video src=”demoincvids/video-tutorial-001.mp4″]

You’ll simply need to replace the part in quotes, which is the video’s location.

You can find your video’s location in the S3 dashboard for your Amazon AWS account. Simply click on your bucket and then the file name and you’ll see file location.

File location in your S3 storage

After adding the shortcode, you can save your post or page and preview it to see your video embed in action.

AWS video embed preview

Repeat the process to add more members-only videos to your website.

Step 9. Create a Pricing Page for Your Membership Plans

Now if you have multiple plans, then you may want to create a pricing page where users can compare and choose a plan.

Users who try to access the restricted or paid areas of your website will also be redirected to your pricing page.

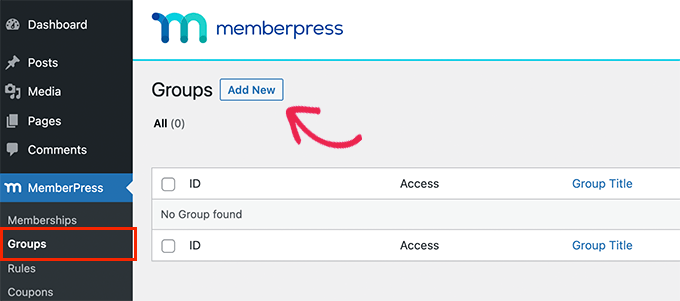
You can configure this by going to MemberPress » Groups page and clicking on the Add New button at the top.

MemberPress groups

On the next screen, you need to provide a title for your pricing page. It will also be used in your group pricing page URL.

Below that, you need to choose which plans you want to include.

Add memberships to your pricing group

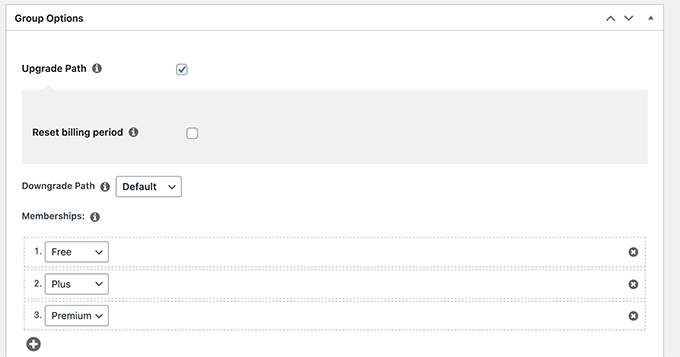
You can also select a theme for the pricing table. MemberPress comes with few ready-made templates for that.

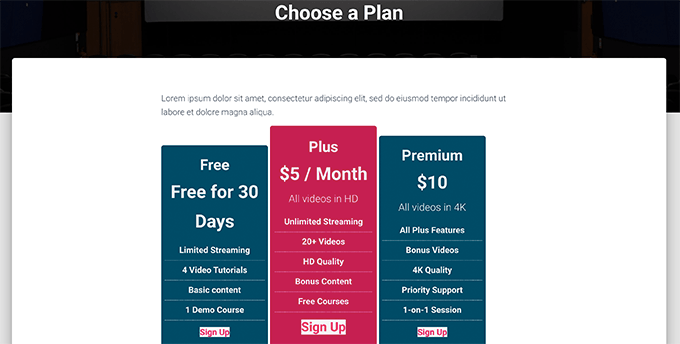
Once satisfied, click on the ‘Publish’ button to make your plan publicly visible.

To preview your pricing page, click on the ‘View Group’ link after publishing it.

Pricing page example

Redirecing Users to Your Membership Plans Page

Now that you have created a pricing page, you would want to automatically redirect users to compare plans and make a purchase.

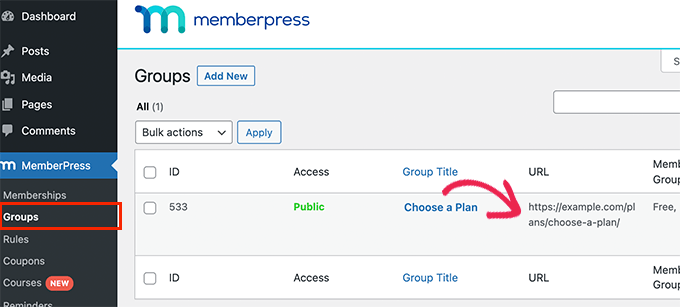
To do that, first you need to visit MemberPress » Groups page and copy the URL next to the group you created earlier.

Copy your plan URL

After that, go to MemberPress » Settings page and switch to the Pages tab. From here, you need to scroll down to the ‘Unauthorized Access’ section.

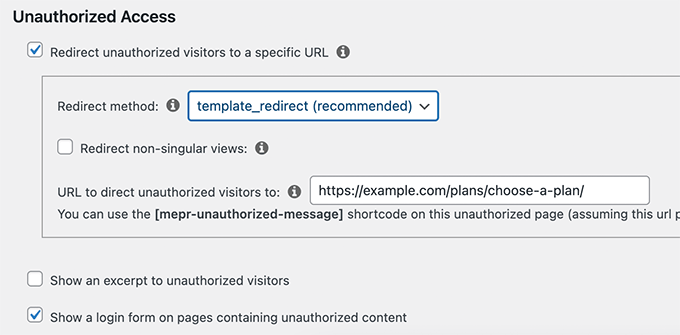
You need to check the box next to ‘Redirect unauthorized visitors to a specific URL’ option and then paste the group URL you copied earlier.

Don’t forget to click on the ‘Update Options’ button to save your settings.

Now unauthorized users will be redirected to the pricing plans page when they try to access your members-only content or videos.

Step 10. Create Login and Sign Up Forms for Your Video Membership Site

Now that everything is set up, let’s allow users to easily login to their accounts or signup.

MemberPress makes it very easy to add login forms to your website. Simply go to the Appearance » Widgets page and add the ‘MemberPress login’ widget to a sidebar.

MemberPress login widget

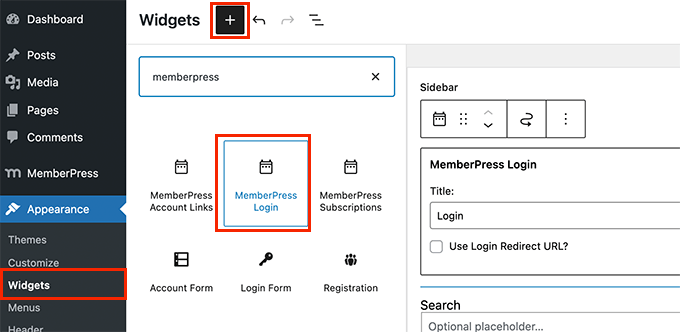
Don’t forget to click on the Update button to save your widget settings.

Next, let’s add a link to the pricing page to your website’s navigation menu.

Simply go to the Appearance » Menus page and click on the Groups tab to expand it. Select your pricing plan group you created earlier and then click on the Add to Menu button.

Link to Pricing page

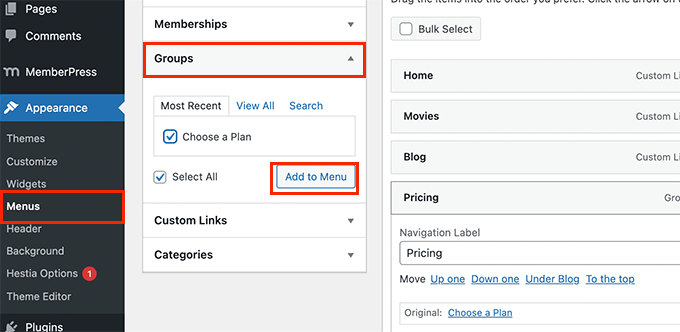
Don’t forget to click on the Save button to store your changes.

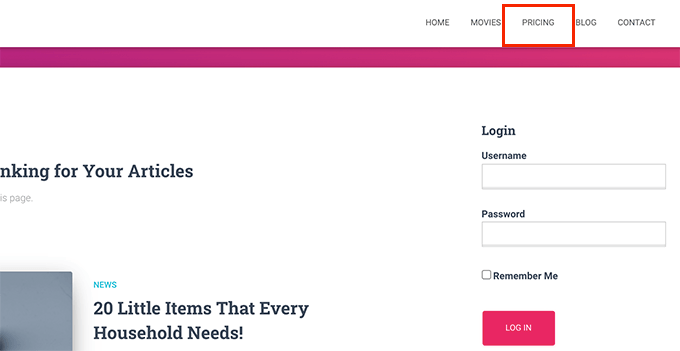
You can now log out of the admin area and visit your website to see everything in action.

Video membership site preview

Step 11. Customizing Email Templates for Your Membership Site

Your video membership website will send users emails when they sign up or forget a password, when their membership is about to expire, and so on.

You can customize these email templates in MemberPress.

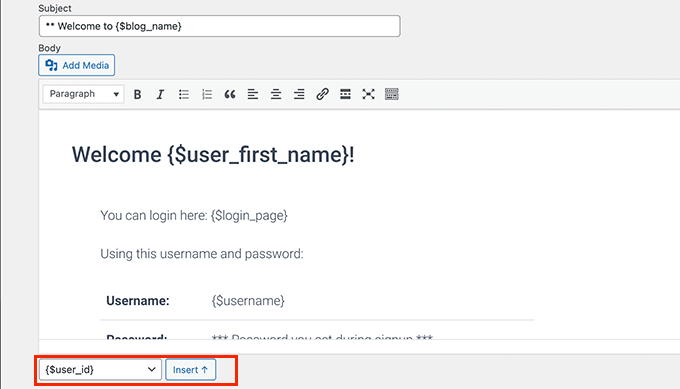
Simply go to the MemberPress » Settings page and switch to the Emails tab. From here, you’ll see the list of emails your video membership site will send, and you can edit any of them.

Edit emails

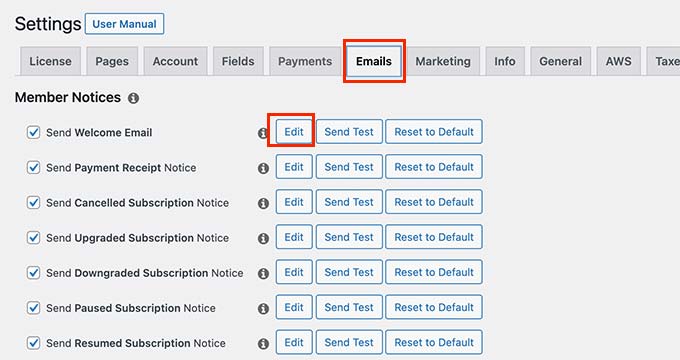
This will open the email template in a plain text editor. You can use smart tags below to personalize messages and match them to your own brand’s tone and messaging.

Email template

Important: Don’t forget to send test emails to make sure they are working. For more help, see our guide on how to fix WordPress not sending email issue.

Step 12. Growing Your Video Membership Website

Now that your video membership site is ready, let’s talk about how to get more users to visit your website and sign up.

Luckily, using MemberPress and WordPress gives you access to incredibly powerful tools to grow your business.

  1. OptinMonster – It is the best lead generation and conversion optimization tool on the market and allows you to easily convert website visitors into paid subscribers.
  2. All in One SEO – It is the best WordPress SEO plugin that allows you to optimize your videos and entire website for search engines without any technical skills.
  3. SeedProd – The best WordPress page builder plugin to easily create beautiful custom landing pages for your video membership website.
  4. WPForms – It is the best WordPress form builder on the market and allows you to create contact forms, login and sign up forms, user registration forms, and more.
  5. MonsterInsights – Allows you to easily track your website performance using Google Analytics. It shows beginner friendly reports to see your top content and track conversions to boost sales.

Need more recommendations? See our list of the must-have WordPress plugins for all websites.

We hope this article helped you build a video membership website in WordPress. You may also want to see these tips on improving WordPress speed and our tested hacks to grow an online business.

If you liked this article, then please subscribe to our YouTube Channel for WordPress video tutorials. You can also find us on Twitter and Facebook.

The post How to Create a Video Membership Site in WordPress first appeared on WPBeginner.


January 05, 2022 at 04:49PM

Tuesday, January 4, 2022

How to Fix ‘Comments Are Closed’ in WordPress (Beginner’s Guide)

Are you seeing the ‘Comments are closed’ message on your WordPress posts?

This message is displayed when comments have been disabled on a post. However, some users report seeing the message unexpectedly.

In this article, we’ll show you how to fix ‘Comments are closed’ in WordPress.

How to Fix 'Comments Are Closed' in WordPress (Beginner's Guide)

What Is the ‘Comments Are Closed’ in WordPress Error?

The comment area of your WordPress blog allows your website visitors to give feedback, ask questions, offer their own point of view on the topic, and respond to other comments.

Comments are disabled on all WordPress pages by default, and you won’t see the ‘Comments are Closed’ message on pages. However, you can still follow the steps below to open comments on your pages as well as posts.

For blog posts, you can disable comments on specific posts or on your entire WordPress website. For example, you may wish to disable comments on an announcement post.

When you disable comments on a post that has at least one comment, you will see the message ‘Comments are closed.’ This explains to your visitors that even though there are comments on the post, no further comments can be left.

The 'Comments are closed' Message

If you disable comments on a post that has no comments, then you won’t see the ‘Comments are closed’ message. WordPress will simply not display the comment form.

Perhaps you’re seeing the ‘Comments are closed’ message on your website unexpectedly. While WordPress is easy to use, some error messages can be hard to troubleshoot for beginners. That’s why we put together a list of the 50 most common WordPress errors and how to fix them.

This message is most likely being shown because of a WordPress setting that’s not configured correctly. That’s because WordPress has comments settings in multiple areas, which can make it hard for beginners to find the right settings to fix the problem.

In this post, we’ll walk you through all the settings you should check in order to reopen the comments on your blog posts.

With that being said, let’s look at how to fix ‘Comments are closed’ in WordPress.

Enable Comments on Future Posts

Comments are often closed on a WordPress site because at some time in the past a setting was checked was that disables comments on new posts by default.

You can check this setting by navigating to Settings » Discussion. Here you’ll find a set of checkboxes that control how comments are handled on new posts.

Enable Comments for Future Posts from Settings » Discussion

The first setting to look at is ‘Allow people to post comments on new articles’. This box should be checked so that the default setting for future posts is to allow comments.

Next, look at ‘Automatically close comments on articles older than XX days’. This setting is useful if you don’t want users to be able to comment on older posts. However, if you want to allow comments on all posts, then you should make sure this box is unchecked.

Once you’re happy with the discussion settings, make sure you click the ‘Save Changes’ button at the bottom of the screen to store the settings.

This will make sure comments are open on all new posts you create. But it will not enable them on posts that have already been created.

That’s what we’ll do in the next step.

Enable Comments on a Specific Post

This method will show you how to enable comments on existing posts one at a time. However, if you wish to enable comments on many posts, then you should follow the ‘Enable Comments in Bulk’ method that we cover below.

If you use the block editor on your WordPress site, then you need to scroll down the settings pane on the right of the screen until you come to the Discussion panel.

Now you should click on ‘Discussion’ to expand the options, and then make sure the ‘Allow comments’ box is checked.

Allow Comments on a Post or Page

Once you click the Update button at the top of the screen to save the setting, comments will be enabled for this post.

You should repeat these steps to enable comments on other blog posts. You can also follow the same process to enable comments on WordPress pages.

How to Display the Discussions Panel if It Is Hidden

While the Discussions panel is displayed by default, it may be hidden on your website. If you can’t find it, then you will need to click the Options icon at the top right of the screen. This icon looks like 3 vertical dots.

Post Preferences

You then need to click on ‘Preferences’ and navigate to the ‘Panels’ tab. Once there, you can toggle the ‘Discussions’ switch on so that the panel is displayed.

Toggle the Discussions Panel On

Enable Comments on a Specific Post (Classic Editor)

If you are using the classic editor, then the steps for enabling comments on a post are a little different. Here, the Discussion meta box is hidden by default. To display it, you will need to click on ‘Screen Options‘ at the top right of the screen.

Edit the Post and Click Screen Options

Next, you should check the Discussion box under ‘Screen elements’. After that, simply click ‘Screen Options’ again to return to your post.

Make Sure the Discussions Screen Element is Checked

You can now scroll down to the bottom of your post where you will find the Discussion meta box. You should make sure the ‘Allow comments’ box is checked.

Make Sure Allow Comments Is Checked

After you click the Update button to save the setting, comments will be enabled for this post.

Enable Comments on Posts in Bulk

If you need to enable comments on multiple posts, then you can update them in bulk. To do that, navigate to the Posts » All Posts page where you will find a list of all of your posts.

You need to select the posts that have comments disabled by clicking the checkbox next to each post.

After that, you should choose ‘Edit’ from the Bulk Actions dropdown box and then click the ‘Apply’ button. This will open the bulk edit screen.

Edit Multiple Posts at Once With Bulk Actions

Here you need to click the ‘Comments’ drop down menu and then select ‘Allow’.

Don’t forget to click the ‘Update’ button to change the setting for all selected posts.

Allow Comments for Multiple Posts at Once

How to Select All Posts At Once

If you want to enable comments for every post on your website at once, then following the steps above would take a lot of time if you have hundreds of blog posts on your site.

To do it faster, there are a few extra steps you should take. First, you will need to make sure that all posts are displayed on a single page.

You can see a count of all the posts on your website under the ‘Posts’ title at the top of the screen. If you have 20 posts or less, then they are already displayed on one page. If you have more than 20 posts, then you will have to increase the number of items per page.

To do that, you should click ‘Screen Options’ at the top of the page. Then, under Pagination, find the ‘Number of items per page’ setting. Here you will need to type a number larger than the total number of posts on your site.

Ensure All Your Posts Are Displayed on a Single Page

For example, if you have 65 posts on your website, then you could type the number 70.

After that, you need to click the ‘Apply’ button and all of your posts will be displayed on one page. You can now click ‘Screen Options again to hide the settings.

You can now select every post on your site by simply clicking the checkbox next to ‘Title’.

Click the Checkbox Next to Title to Select All Posts

To enable comments on all of these posts, you should click ‘Bulk Actions’ then ‘Edit’, and follow the steps we covered earlier in this section to change the Comments setting to ‘Allow’.

Note: We don’t recommend trying to update hundreds of blog posts at once if you have slow web hosting, since your site may time out or freeze up before completing all the updates.

Check for Incompatible Themes or Plugins

If you have tried all of the steps above and comments are still disabled on your site, then it may be because of an incompatibility with your theme or one of your plugins.

Sometimes poorly coded WordPress themes may wrongly display the ‘Comments are closed’ message even when comments are open.

To check if your theme is the problem, you should navigate to Appearance » Themes and temporarily activate some other theme.

Enable a Different Theme to See if the Issue Is Resolved

If the ‘Comments are closed’ message is now fixed, then your theme is the problem. You can ask the theme developer to fix the issue. For more details, see our guide on how to properly ask for WordPress support and get it.

Alternatively, if you’re an advanced user, then you can try to fix the issue yourself. You need to refer to our guide on how to disable comments in WordPress, and then follow the instructions under ‘Remove “Comments Are Closed” in WordPress’.

If you think a plugin may be causing the issue, then you can head over to Plugins » Installed Plugins and make sure you haven’t installed a plugin designed to disable comments, such as Disable Comments. If you have, then simply disable that plugin and test to see if comments are now working.

If comments are still closed, then you need to test for incompatible plugins. You’ll need to temporarily deactivate one plugin at a time by clicking its ‘Deactivate’ link.

Deactivate Plugins One at a Time to See if the Issue Is Resolved

Now test to see if comments are enabled on your site. If they are still not working, then this plugin is not the problem. Simply click its ‘Enable’ link and move on to the next plugin.

We hope this tutorial helped you learn how to fix ‘Comments are closed’ in WordPress. You may also want to learn how to increase your blog traffic, or check out our list of the best social media plugins for WordPress.

If you liked this article, then please subscribe to our YouTube Channel for WordPress video tutorials. You can also find us on Twitter and Facebook.

The post How to Fix ‘Comments Are Closed’ in WordPress (Beginner’s Guide) first appeared on WPBeginner.


January 04, 2022 at 05:30PM

Monday, January 3, 2022

How to Display Your Form in a Single Line in WordPress (Easy Way)

Do you want to display your form in a single line?

Single line forms give you more flexibility with form placement. This means you can easily add forms to high traffic areas of your site and improve your conversions.

In this article, we’ll show you how to display your form in a single line in WordPress easily.

How to display your form in a single line in WordPress (easy way)

Why Display a Single Line Form in WordPress?

Single line forms give you more flexibility when choosing where to place your forms. Since this style of form is only a single line, they don’t take up much space and can easily be integrated with your existing content. 

Email newsletter sign up forms are often displayed in a single line above or below blog post content. Single-line forms also work well on landing pages, contact pages, and other important pages on your website.

Beyond generating more subscribers and leads, you can turn any kind of form into a single line form. For example, it might make sense to display your contact form in a single line to save space on the page. 

That being said, let’s show you how to display a single line form on your WordPress website.

Creating Your Single Line Form in WordPress

For this tutorial, we’ll be using the WPForms plugin to create a single line form. It’s the best lead generation plugin for WordPress used by over 5 million websites.

WPForms

You can use the drag and drop builder to quickly create any form for your site. Plus, it integrates with popular email marketing tools so you can easily grow your email list.

There is a premium version of the plugin with many more features, but we’ll use the lite version for this tutorial since it lets you create a simple form and connect it to Constant Contact for lead generation.

First thing you need to do is install and activate the plugin. For more details, see our beginner’s guide on how to install a WordPress plugin

After that, go to WPForms » Add New in your WordPress admin panel and give your form a name. Then, you need to choose your form template.

We’ll select the ‘Opt-In Form’ template. Simply hover over the template and click the ‘Use Template’ button.

Select form template

This brings up the drag and drop form builder.

You’ll see that the template we chose automatically includes the name and email fields and a submit button.

WPForms drag and drop form builder

Every field can be edited by clicking on them and making changes in the left hand column.

You can also drag and drop the fields to change their order.

WPForms form editor panel

Once you’re done customizing the fields, you can display your form in a single line.

To do this, go to Settings » General and then click on the ‘Advanced’ drop down tab.

Go to form advanced settings

Next, type ‘inline-fields’ in the ‘Form CSS Class’ box (without quotes).

This will apply that CSS class to the form. Since WPForms includes styling for the ‘inline-fields’ class, it will automatically make your entire form display nicely on a single line.

Add inline CSS class

After that, you can make your form even smaller by hiding the field labels.

Simply click on the ‘Fields’ navigation option, then select the ‘Advanced’ menu option, and click the ‘Hide Label’ toggle to turn it on.

Hide form labels toggle

Then, you need to do the same thing for all of the form field labels.

After that, in the same ‘Advanced’ section, you can enter text into the ‘Placeholder’ box. 

This tells your users what each form field is for. 

Add form placeholder text

Once you’re done customizing your form, make sure to click the ‘Save’ button to save your changes.  

If you’re using your form to generate leads, then you can connect your form to your email marketing provider. For more details, see our guide on how to create an email newsletter the right way. 

Adding Your Single Line Form to Your WordPress Website

Now, it’s time to add your single line form to your website. You can add it to any page, post, or widget area.

We’re going to add it to an existing page, but the process will be similar if you’re adding it to another area of your WordPress blog.

Simply open up the page where you want the single line form to display, click the ‘Plus’ add block icon, and search for ‘WPForms’.

Add WPForms block

Then, click on the ‘WPForms’ block to add it to your site.

This brings up a drop down box to choose the single line form you created earlier.

Select single line form from drop down

Once you choose your form, the plugin will load a preview of your form inside the content editor. Then, click the ‘Update’ or ‘Publish’ button to make your new form live.

Now, you can visit your website to see your new form in action. 

Single line form example

We hope this article helped you learn how to display your form in a single line in WordPress. You may also want to see our guide on how to get a free email domain, and our expert picks of the best virtual business phone number apps with free options.

If you liked this article, then please subscribe to our YouTube Channel for WordPress video tutorials. You can also find us on Twitter and Facebook.

The post How to Display Your Form in a Single Line in WordPress (Easy Way) first appeared on WPBeginner.


January 03, 2022 at 04:00PM

Friday, December 31, 2021

Best of Best WordPress Tutorials of 2021 on WPBeginner

2021 is about to come to an end, and it has been an unprecedented year.

Many people started new businesses to tackle the challenges caused by the previous year’s circumtances. A record number of users took advantage of WPBeginner’s free resources to launch their businesses online.

We are ever more grateful for your continued support, which provides us inspiration and energy to move forward.

To keep up with our tradition, in this article we’ll share our staff-pick of the best of best WordPress tutorials on WPBeginner.

We’ll also share an overview of 2021 from our CEO to gain some perspective and reflect upon the progress.

Best WordPress tutorials on WPBeginner - 2021

WPBeginner Recap 2021 by Syed Balkhi

If I had one word to describe 2021, it would be perseverance.

It was an incredibly hard year for many people, including me, but as the year comes to an end, I am proud of all that we achieved.

The most important personal lesson for me this year is that Family is the best gift of life. None of my success would be possible without the support of my beautiful wife, Amanda, and my family.

Balkhi Family 2021

2021 has been a very productive year for our businesses. We accomplished a lot, and I learned a ton.

WPBeginner turned 12 years old, and after five years we now have a brand new website design that’s focused on content discoverability.

WPBeginner New Theme (v6)

As part of the site design, we switched our WordPress SEO plugin from Yoast to AIOSEO, we added a brand new mega menu, improved our site search, saw massive site speed improvements, and more.

See the full case study of our website redesign process.

Our WPBeginner Engage community on Facebook passed 81,000 members, and it’s now the largest WordPress facebook group (it’s free to join).

WPBeginner YouTube Channel passed 262,000 subscribers, and we passed 27 million video views.

WPBeginner – Fun Fact:

Our team has now grown to over 200+ people across 39 different countries. We’re hiring for full-time remote positions. If you’re interested, check out our Careers page.

Our growth is a direct result of the incredible growth WordPress has seen. It is the world’s most popular website builder and is now powering over 43.2% of all websites on the internet.

Overall, our plugins are now being used by more than 19 million websites (compared to 15 million from last year). That’s a growth of over 333,000 new websites every month.

Since we have over two dozen premium WordPress plugins, I will only share notable highlights from a select few.

WPForms

WPForms is the most beginner-friendly WordPress form builder in the market.

This year, we became only the 9th plugin in the history of WordPress to pass the 5 million active installs milestone, and only the second plugin to reach 10,000+ five-star ratings!

Our growth is proof that WPForms is hands down the best online form builder in the market (both WordPress and SaaS).

This year we added over 300+ form templates, a new Square payments integration, Save & Resume addon for secure multi-page forms, dozens of workflow improvements including keyboard shortcuts, automation tools for process automation, and more.

SeedProd

SeedProd is our drag & drop website builder for WordPress used by over 1 million websites.

It started out as a simple coming soon page plugin, but last year we completely revamped it to add a powerful landing page builder that was not just easy … but also FAST.

This year we took another major leap forward, and SeedProd has become a full no-code website builder for WordPress.

Now you can use it to create completely custom WordPress themes using our easy drag & drop interface (no coding needed).

We re-built our custom RafflePress website theme using SeedProd website builder.

SeedProd Custom Theme Builder

Our team also added content personalization features that allows you to dynamically replace any text on page to offer a more personalized user experience.

SeedProd already comes with over 150+ Pro templates, 2 million stock photos, and every feature you need to quickly build a custom website using WordPress.

2022 is going to be a HUGE year for SeedProd. If you haven’t tried it yet, then you probably should take a look.

AIOSEO

AIOSEO is the original all-in-one WordPress SEO plugin that we acquired last year.

Our team completely revamped the plugin, and this year we passed the 3 million active installs milestone.

We added several really powerful features that no other WordPress SEO plugin has including the most powerful Redirection manager (including full site redirects for easy site migration), an easy headline analyzer to help you boost CTR / improve rankings, a robust WordPress breadcrumbs solution for both SEO & themes, advanced local SEO for WordPress module, HTML + RSS sitemaps, granular schema / priority settings control for SEO professionals, and dozens of other powerful features.

AIOSEO

With all the changes we have made, I truly believe that using AIOSEO will give you a competitive advantage and help you get higher SEO rankings in 2022.

This is why all of our businesses have started switching away from Yoast to AIOSEO, including most recently WPBeginner.

I believe our biggest advantage over competitor SEO plugins is that we’re actually practitioners. Our content sites get over 100 million pageviews per year, so we are prioritizing items that actually get results!

Not to mention our prices are fair for small businesses, agencies and web pros.

Sometimes it’s easy to get complacent with the legacy tools we use in our businesses, but as you go into 2022, I highly recommend giving AIOSEO a try if your goal is to improve your SEO rankings (here’s a link to the free version).

MonsterInsights

MonsterInsights is the most popular Google Analytics plugin for WordPress. This year we passed the 3 million active websites milestone.

The biggest news in the Google Analytics world this year was GA v4, and it received mix reactions from marketers. That’s because Google removed several important features in the new version that existed in the classic version.

As the largest Google analytics integration plugin in the world, this made it tricky for us to navigate our product updates.

We worked closely with the team at Google to launch our GA4 integration with improved onboarding while also allowing the Dual Tracking mode for our users, so you can take advantage of new GA4 features while also keeping the data points from Universal Analytics that GA4 doesn’t yet support.

MonsterInsights Dual Tracking GA v4

As far as I know, we’re the ONLY solution in market that lets you do dual tracking.

We also launched our brand new Media tracking addon that lets you track video engagement inside Google Analytics with just two clicks, a no-code Google Ad conversion tracking for tracking paid ad performance, and integrations with AIOSEO focus keyword tracking, AffiliateWP, EasyAffiliate, and more.

Other Notable Plugin Highlights

OptinMonster, our flagship lead generation & conversion optimization toolkit, launched a custom domains feature that helps you bypass ad-blockers and improve website speed. Also the new campaign builder improvements are really solid!

WP Mail SMTP, the most popular SMTP plugin for WordPress, now lets you track open and click data from default WordPress / website emails. Crazy to think something this critical was NOT possible until 2021!

Smash Balloon, the most popular social feeds plugin, launched a new feed customizer with built-in templates for Facebook feeds. Similar updates are coming for the popular Instagram plugin in 2022.

Acquisitions & Investments

This year, we added several premium WordPress plugins to our family of products.

SearchWP is the most powerful WordPress search plugin that lets you fully customize the WordPress search algorithm without any code. We have exciting plans for it in 2022 (see the full story).

A portfolio of premium plugins from Pippin Williamson including Easy Digital Downloads (popular eCommerce plugin for selling digital products), WP Simple Pay (easy plugin for accepting credit card payments), Sugar Calendar (simple event calendar plugin for WordPress), and AffiliateWP (affiliate management plugin for WordPress).

This was very special for me personally because we use these plugins to power our business. I wrote a background story here.

In 2018, I created the WPBeginner Growth fund to invest and advise other WordPress focused companies.

All of our portfolio companies did really well this year.

MemberPress is the most popular membership and course platform for WordPress. We passed $1 billion in creator earnings of which $600 million was generated in 2021. It’s mind-blowing to see the impact we’re making.

Uncanny Automator is a no-code workflow automation plugin for WordPress. It’s basically Zapier for WordPress without the high costs. This year the team made major improvements and added integrations with Google sheets, Slack, Facebook, Instagram, and more.

Advanced Coupons team launched a loyalty program solution for WooCommerce. This plugin is a must have for all WooCommerce store owners because it lets you add features like Loyalty program, BOGO deals, Scheduled coupons, shipping coupons, and more.

We’re also in the process of wrapping up few more growth fund investments that will be announced in the new year.

Want us to acquire or invest in your business? Learn more about the WPBeginner Growth fund where I invest in WordPress companies.

With that said, let’s take a look at 2021’s best WordPress tutorials on WPBeginner.

January

How to fix cURL error 28: Connection timed out after X milliseconds – In this article, we showed how to troubleshoot and fix the cURL error 28 in WordPress.

How to Add Keywords and Meta Descriptions in WordPress – Meta description and keywords help you improve WordPress SEO. In this article, we showed you how to properly add meta keywords and description in WordPress.

How to Make a Smart WooCommerce Product Search – A faster search on an eCommerce store boosts sales and conversions. In this article, we showed you how to add a smart WooCommerce product search to your online store.

Best Google Forms Alternatives in 2021 (Better Features + Free) – Google Forms is an easier and free forms builder but it is not very flexible. In this article, we shared our pick of the best Google Forms alternatives with better features.

February

How to Add a Custom Domain Alias for Your WordPress Landing Page – In this tutorial we showed how to use a single WordPress install to create landing pages for multiple domain names.

How to Setup All in One SEO for WordPress Correctly (Ultimate Guide) – In this beginner’s guide, we walked users through complete setup of All in One SEO for WordPress plugin.

How to Require an Email Address to Download a File in WordPress – Want to capture more leads on your website? In this tutorial we showed how to require email address to download a file in WordPress. This file could be lead magnet like ebook, PDF reports, music, software, or more.

March

How to Prevent Invalid AdSense Clicks in WordPress (Step by Step) – In this guide, we showed how to detect and prevent invalid AdSense clicks and impressions generated by spam bots.

SiteGround vs Bluehost vs WP Engine (Honest Comparison) – Our users often asked us about which one of our top hosting recommendations is best? In this article, we compared SiteGround vs Bluehost vs WP Engine with pros and cons of each provider.

How to Optimize Your WordPress Robots.txt for SEO – Robots.txt file plays an important role in SEO. In this tutorial, we showed how to properly optimize your WordPress robots.txt file for better SEO.

Ultimate Guide to Geolocation Targeting in WordPress – Geolocation targeting allows you to show personalized content to users. In this tutorial, we showed how to apply Geolocation targeting in WordPress for better user experience on your website.

April

How to Display Announcements in Your WordPress Blog – Want to promote a limited-time deal or a sale event on your site? In this article, we showed you how to easily display highly effective announcements on your WordPress website.

How to Add Business Hours in WordPress – With location search on the rise, adding business hours to your website helps more customers discover your business in search. In this article, we showed how to easily add business hours to your WordPress website.

How to Improve Organic Click Through Rate (CTR) in WordPress – Organic click-through rate is the average clicks a page gets when displayed in search results. In this article, we showed how to improve organic CTR for your WordPress website to get more free traffic from search engines.

How to Easily Embed Instagram in WordPress – Want to promote your Instagram account on your website? In this tutorial, we showed how to easily embed Instagram in WordPress and get more Instagram followers from your website.

May

How to Display Popular Products on WooCommerce Product Pages – In this article, we showed two methods to easily display your top products on individual WooCommerce product pages.

How to Add FAQ Schema in WordPress – FAQ schema allows your frequently asked questions to be more SEO friendly. In this tutorial we showed how to easily add FAQ schema in WordPress.

How to Create a Landing Page in WordPress – Landing pages are the perfect tool to boost conversions for your sales and marketing campaigns. In this beginner’s guide we showed how to easily create a landing page with WordPress.

How to Check if Your Website is SEO Optimized – Want to see if your website is properly optimized for SEO? In this guide, we showed how to easily check if your website is optimized for SEO.

June

How to Create a Referral Program in WordPress – Referral programs or affiliate programs are a great way to get more people to promote your products online. In this article, we showed how to easily create a referral program in WordPress.

How to Create a Custom WooCommerce Cart Page – The default WooCommerce cart page is not optimized for conversions. In this guide, we showed you how to create a custom cart page in WooCommerce without writing any code.

How to Add Schema Markup in WordPress and WooCommerce – Schema markup helps search engines display your listings more prominently. In this article, we showed how to easily add Schema markup to your WordPress site or WooCommerce store.

How to Easily Create a Coupon Site in WordPress – Coupon sites are a popular way to make money online. In this tutorial, we showed how to easily create a coupon website in WordPress.

July

How to Customize WooCommerce Checkout Page – The default WooCommerce checkout experience is quite limited. In this tutorial, we showed how to customize WooCommerce checkout page for more sales and conversions.

How to Easily Integrate Zoom Meetings & Webinars in WordPress – Do you want to embed a Zoom meeting or webninar in your WordPress site? Learn how to easily integrate Zoom mettings and webinars in WordPress.

How to Add Front-End Login Page and Widgets in WordPress – Want to create custom front-end login pages in WordPress? In this article, we showed three ways to add front-end login page or sidebar widgets in WordPress.

How to Display Breadcrumb Navigation Links in WordPress – Breadcrumb navigation tells users where they are on a website. They also appear in search results which make your listing more prominent. In this article, we showed how to display breadcrumbe navigation links in WordPress.

August

How to Update Your PHP Version in WordPress – Using latest version of PHP can significantly improve performance and security of your WordPress site. In this article, we showed how to easily update PHP version for your WordPress website.

Instapage vs Leadpages vs Unbounce vs SeedProd – In this guide, we compared the top landing page and lead generation tools on the market. See our detailed breakdown of Instapage vs Leadpages vs Unbounce vs SeedProd.

How to Generate More Leads with Free Online Calculators – Many famous bloggers now use free online calculators as a tool to capture more leads. In this guide, we showed how to easily generate more leads with free online calculators.

September

How to Make a High Converting Sales Funnel in WordPress – A sales funnel is the path a user takes on your website to become a customer. Optimizing this path can lead to higher conversions and more sales. In this tutorial, we walked you through creating a high converting sales funnel in WordPress.

How to Improve WordPress Search with SearchWP – The default WordPress search feature is not very effective. In this tutorial, we showed how to improve WordPress search with SearchWP.

How to Properly Move from Shopify to WooCommerce – We created a free Shopify to WooCommerce exporter to provide an easier way to migrate from Shopify. In this step-by-step guide, we showed how to easily move your online store from Shopify to WooCommerce.

How to Add a CRM on Your WordPress Site and Get More Leads – integrating WordPress with CRM software allows you to manage customer interactions on your website and follow up with leads. In this article, we showed how to add a CRM to WordPress site and get more leads.

October

How to Create a Paid Newsletter in WordPress – Paid newsletters are an incredibly popular way to make money online from your email subscribers, but using a platform like Substack can get expensive. In this guide, we walked through creating a paid newsletter in WordPress.

How to Properly Move from Ghost to WordPress (Free Tool) – Want to move your website from Ghost to WordPress? In this article, we showed how to easily move away from Ghost to WordPress using a free tool.

How to Find the Most Important Page of Your WordPress Site – Want to find out which page on your site is bringing you the most engagement, conversions, and sales? In this article, we showed how to easily find the most important page on your WordPress site.

How to Fix The Critical Error in WordPress – WordPress may sometimes show you a message that ‘There has been a critical error on this website. In this article, we showed how to easily troubleshoot and fix the critical error in WordPress.

November

How to Use Headline Analyzer in WordPress to Improve SEO Titles – Headlines are the most effective way to get more people to click on your articles. In this tutorial, we showed how to use a headline analyzer in WordPress to improve SEO titles.

How to Offer a Shipping Discount in WooCommerce – Do you want to offer a shipping discount to your customers? In this guide, we showed how to easily add a shipping discount offer to your WooCommerce store.

How to Set Up Business Call Forwarding From Your Website – Properly setting up call forwarding for your business phone number helps you offer better customer satisfaction. In this tutorial, we showed how to easily setup business call forwarding from your WordPress website

Substack vs WordPress: Which One is Better? – Substack and WordPress both allow you to easily publish content online and sell membership subscriptions.

December

How to Add Product Tags, Attributes, and Categories to WooCommerce – Adding metadata to your WooCommerce products helps customers find what they’re looking for and improves SEO. In this guide, we explained how to add product tags, attributes, and categories in WooCommerce.

How to Submit your WordPress Site to Google News – If you run a news website, then adding your site to Google News can boost traffic. In this tutorial, we showed how to easily submit your WordPress site to Google News.

How to Do an SEO Competitor Analysis in WordPress – Want to see how your competitors are doing with their SEO? In this article, we showed how to easily do an SEO competitor analysis directly from your WordPress dashboard.

How to Properly Rename Categories in WordPress – As your site grows you may need to rename categories, merge them, or delete some categories. In this article, we showed you how to properly rename categories in WordPress.

10 Important Metrics to Measure on your WordPress site – a beginner’s guide on the top 10 things you must track on your website to make data-drive ndecisions.

These were some of the best WordPress tutorials on WPBeginner in 2021. We hope that you found them helpful.

We want to thank all WPBeginner users, who visited our website, offered feedback, left comments, and shared it with others. We truly appreciate you.

We look forward to adding even more useful WordPress tutorials in 2022. Have a Happy New Year.

If you liked this article, then please subscribe to our YouTube Channel for WordPress video tutorials. You can also find us on Twitter and Facebook.

The post Best of Best WordPress Tutorials of 2021 on WPBeginner first appeared on WPBeginner.


December 31, 2021 at 06:49PM

Thursday, December 30, 2021

How to Find and Access WordPress Error Logs (Step by Step)

Do you need to access the WordPress error logs to troubleshoot a problem on your site?

WordPress comes with a debugging system that can log any error messages displayed on your site. This can help you discover and fix problems on your website.

In this article, we’ll show you how to find and access your WordPress error logs.

How to Find and Access WordPress Error Logs

How and When Can WordPress Error Logs Help?

Are you having problems with your WordPress website? Checking your WordPress error logs can help you find the source of problems such as slow website performance, plugins that aren’t working properly, and website crashes.

What is an Error Log?

An error log is a list of error messages generated by your website and the dates and times they occurred. Once WordPress debug mode is turned on, these messages are collected in a file, so that you can review them later.

Your WordPress error log is a troubleshooting tool that can help you identify the plugins, themes, or code that are causing problems. You can then go ahead and find a fix for those WordPress errors.

For example, checking the error logs can help troubleshoot errors like the WordPress white screen of death, PHP errors, the invalid JSON error, and the “Sorry, you are not allowed to access this page” error.

That being said, let’s have a look at how to find and access your WordPress error logs. The first step is to enable WordPress debug mode, which you can do using either a plugin or code.

Enabling WordPress Debug Mode With a Plugin

WordPress debugging is turned off by default, so WordPress will not be logging any errors. If you can still log into your WordPress site, then you can enable debug mode using a plugin.

The first thing you need to do is install the WP Debugging plugin. For more details, see our step by step guide on how to install a WordPress plugin.

WP Debugging plugin

Upon activation, the plugin automatically activates WordPress debug mode, and error messages on your site will now be logged.

Enabling WordPress Debug Mode Using Code

You can also turn on WordPress debug mode using code. This is suitable for more advanced users, or if you can’t log in to your WordPress admin area.

You will need to edit your wp-config.php file using an FTP client or the file manager option in your WordPress hosting control panel.

Edit Your Website's wp-config.php File

Once you have the file open, you need to find the text where it says ‘That’s all, stop editing! Happy blogging.’

Just before this line, go ahead and add the following code:

define( 'WP_DEBUG', true );
define( 'WP_DEBUG_LOG', true );

For step by step instructions, see our guide on how to set up WordPress error logs in wp-config with code.

How to Find and Access WordPress Error Logs

Now that you have enabled WordPress debug mode, any future error messages on your website will be stored in the WordPress error logs.

That means that your logs will be empty at first. You will need to try to recreate the problem on your site, so the error messages can be saved to the log file. For example, you should revisit any posts or pages that are causing an error.

Next, you need to connect to your website using an FTP client or the file manager option in your WordPress hosting control panel. If you haven’t used FTP before, then you may want to see our guide on how to use FTP to upload files to WordPress.

Once connected, you should navigate to the /wp-content/ folder. Inside the folder, you will find a file called debug.log. This file contains every WordPress error message, warning, and notice that has been logged.

Download, View, or Edit the debug.log File

To see the contents of this file you will need to download, view, or edit it. You can then inspect the error messages along with the date and time they occurred. This information can help you find a solution to the problems you are encountering on your website.

Debug.log Contains Error Messages and Time Stamps

How to Fix Issues Found in WordPress Error Logs

Once you’ve accessed your WordPress error logs, you can find the error message that was logged at the time the problem on your website occurred. Keep in mind that the times displayed are UTC, not your own local time.

While most users won’t understand what the error messages mean, they’re a good place to start troubleshooting. Once you note the error message and code, you may find a solution to your problem in our guide on the 50 most common WordPress errors and how to fix them.

If you can’t find the solution on your own, then you can reach out for help on our free WPBeginner Engage Facebook Group where you can get help from our WordPress experts and over 80,000 users. Make sure you quote the error code or message you found in the WordPress error logs.

Other places you can turn for help are the official WordPress forums, your WordPress web hosting company’s support team, or the designated support area for the plugin or theme you are having trouble with.

When asking for support, check our guide on how to properly ask for WordPress support and get it to learn the right way to ask questions and the best places to find support.

Disabling WordPress Debug Mode

Once you have fixed the issue on your WordPress site, we recommend you disable debug mode.  Leaving it on may slow down your website and can potentially leak unwanted information which is a security risk.

If you enabled debug mode with a plugin, then simply navigate to Plugins » Installed Plugins and deactivate the WP Debugging plugin.

Deactivate the WP Debugging Plugin

If you enabled debug mode with code, then simply edit the wp-config file as you did before.

You need to change the WP_DEBUG and WP_DEBUG_LOG lines to ‘false’.

Deactivate WordPress Debug Mode

We hope this tutorial helped you learn how to find and access your WordPress error logs. You may also want to learn how to get a free SSL certificate for your website, or check out our tips on how to speed up WordPress performance.

If you liked this article, then please subscribe to our YouTube Channel for WordPress video tutorials. You can also find us on Twitter and Facebook.

The post How to Find and Access WordPress Error Logs (Step by Step) first appeared on WPBeginner.


December 30, 2021 at 05:00PM