However, WordPress site search is quite limited and will only search the contents of the WordPress database.
This means that if your visitors use the search bar on your website, only the title and description of your PDFs and other documents will be included in the search results, not their contents.
As a result, your visitors may be missing out on valuable information.
The good news is that you can use a custom search plugin to improve the default WordPress search experience. If your PDFs are unencrypted, then the right search plugin will index the contents and metadata of your PDFs and add them to your search results.
With that being said, let’s take a look at how to add PDF indexing and searching in WordPress.
SearchWP is one of the best premium search plugins for WordPress. It’s easy to use and lets you search the contents of PDFs and other files in your WordPress media library.
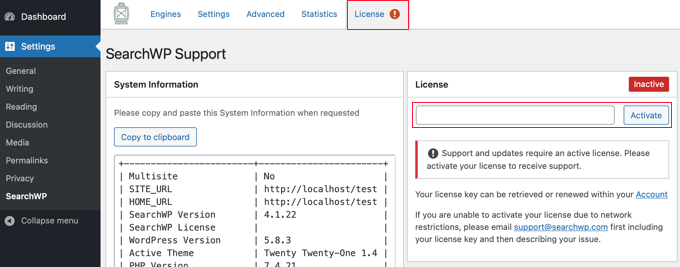
Upon activation, you will need to visit the Settings » SearchWP page and then click on the ‘License’ menu tab.
Here you need to enter your license key in the ‘License’ box. You can find this information in your account on the SearchWP site. Once you’re done, make sure to click the ‘Activate’ button.
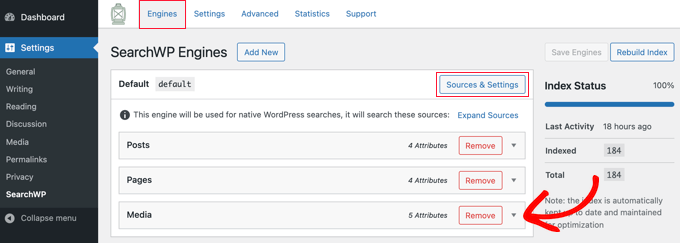
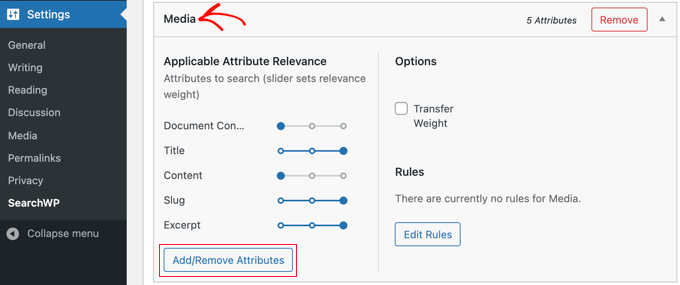
The next step is to add the contents of your PDF documents to the WordPress search results. To do that, you need to click on the SearchWP ‘Engines’ menu tab. This brings you to a screen where you can determine what is included in your WordPress search results.
You’ll notice that by default, posts, pages and media files will be included in the search results.
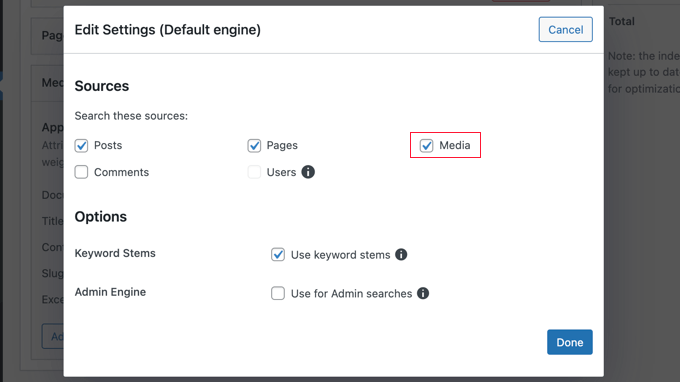
If the ‘Media’ section is missing, then you will need to add it by clicking the ‘Sources & Settings’ button then clicking the ‘Media’ checkbox.
Don’t forget to click the ‘Done’ button to store the new settings.
You can adjust your search engine settings by clicking on the ‘Posts’, ‘Pages’, ‘Media’, or other available drop downs. To make sure that PDFs are included in the search results, you will need to configure the Media settings by clicking the ‘Add/Remove Attributes’ button in that section.
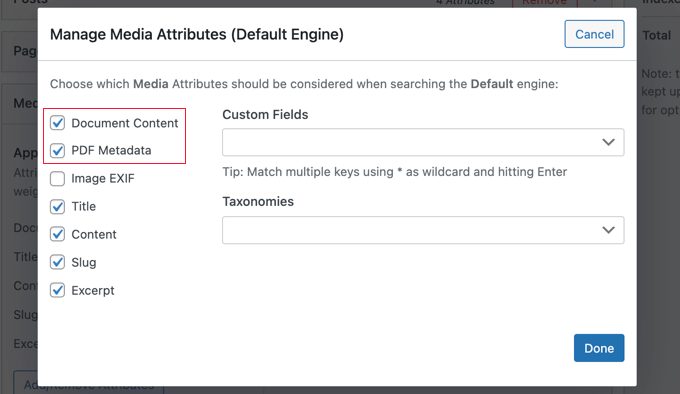
Make sure that the ‘Document Content’ box is checked.
This means that the contents of your PDFs, Microsoft Office files, text files, and other documents in your WordPress media library will be indexed and included in search results.
You should also check the ‘PDF Metadata’ box. This will index PDF metadata that isn’t part of the file’s contents. Depending on the PDF file, this may include the document title, author, subject, keywords, and more.
Make sure you click the ‘Done’ button when both of these boxes are checked.
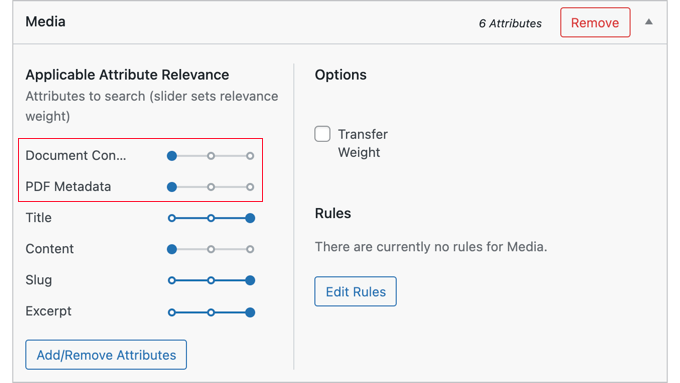
Next, you need to decide how much weight to give to PDF content and metadata in the search results. In other words, how high do you want PDFs to appear in your site’s search results?
By default, the sliders for Document Contents and PDF Metadata are all the way to the left, so they will not be given much weight. If you want them to appear higher in the search results, then you can move the slider to the middle or right positions.
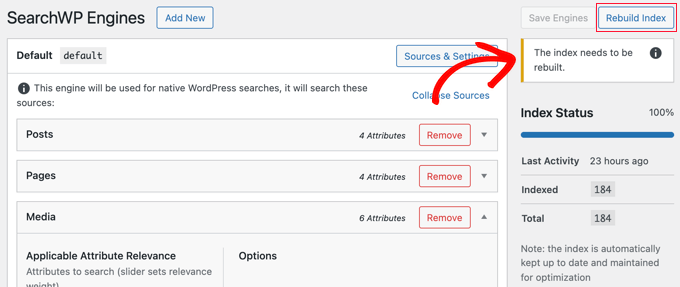
Finally, you need to click the ‘Save Engines’ button at the top right of the screen to save your new search settings.
If you’re then shown the message ‘The index needs to be rebuilt’, then you should click the ‘Rebuild Index’ button so that the PDF content and metadata are added to the search index.
Congratulations! Your WordPress website can now index and search PDF files.
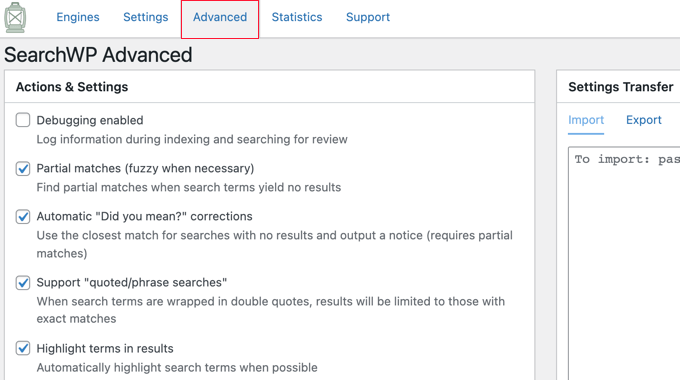
Next, you may like to enable some advanced settings that will make it easier for your users to find what they are looking for.
To do that, you should navigate to Settings » SearchWP and click on the ‘Advanced’ tab.
You can now activate any of these options that you would like:
Partial matches will also display results that don’t quite match the term that is being searched for.
Automatic ‘Did you mean?’ corrections will suggest a slightly different search term that will match some posts on your website.
Support ‘quoted/phrase searches’ will allow your users to use quotes when searching for exact phases.
Highlight terms in results will make it easier to find what they are looking for in the search results.
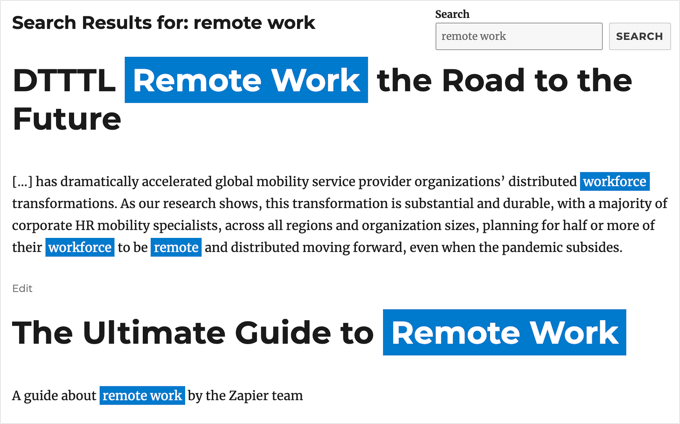
Now when your website visitors search for a word or phrase, all relevant PDF files will be included in the search results.
However, if you update a post or page that’s already live, then it will immediately overwrite the content that’s already there.
What if you want to draft an update, and save that draft without publishing it? This can be useful if you need more time to edit your draft, or if you’re running a multi-author blog and want to approve any changes before they go live.
The only default way to do this is to switch it back to a draft and then republish the content again when the changes are ready. But when you switch a published post to a draft, it creates a 404 error which can hurt your SEO.
An alternative is to simply create a new draft and copy and paste the content, but this doesn’t transfer over the categories and tags, your featured image, and more.
Luckily, you can use a WordPress plugin to create a cloned version of any page or post on your WordPress website and save the draft without making it live. Then when you’re ready, you can merge the changes and update the published post.
That being said, let’s show you how to save your changes in WordPress without publishing.
Saving Changes Without Publishing in WordPress
The easiest way to save changes without publishing them live is by using the Duplicate Post plugin.
This plugin temporarily duplicates any page or post in WordPress with a single click, including all of the original settings. Then, when you’re ready, you can merge your changes and update the original post.
First thing you need to do is install and activate the plugin. For more details, see our step by step guide on how to install a WordPress plugin.
Upon activation, navigate to Posts » All Posts in your WordPress admin panel.
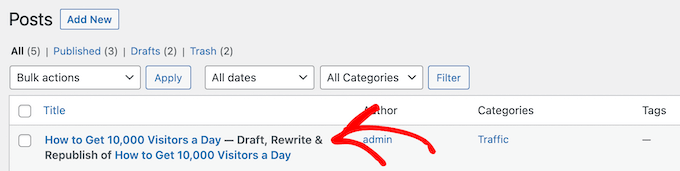
Then, hover over a post, and you’ll notice the plugin adds three new options, ‘Clone’, ‘New Draft’, and ‘Rewrite & Republish’.
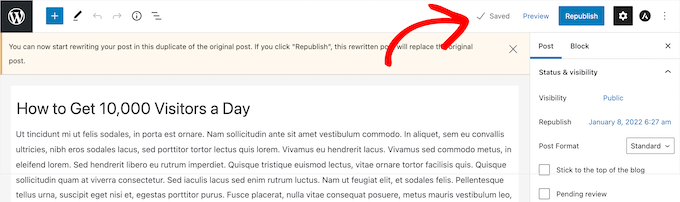
First, you can click the ‘Rewrite & Republish’ link.
This will automatically create a duplicate version of the post and open it in the post editor screen.
You can make as many changes as you want to this post and save it without publishing live. To save the post, simply click the ‘Save’ link in the right hand corner of the page. It will also save automatically as you make changes.
The post will also get saved as a draft in your WordPress post dashboard that you can access later on.
It will say, ‘Draft, Rewrite & Republish’ next to the post name.
When you are ready to publish, click the ‘Republish’ button.
It will ask you if you are ready to republish the post and merge your new changes to the live post. If you are ready, then click the ‘Republish’ button again.
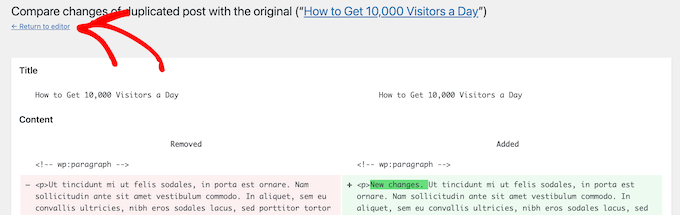
If you want to review your changes, then click the ‘Save changes and compare’ button.
This brings up a side-by-side revision screen where you can see the changes made with the differences highlighted in green.
If you are happy with the changes, then click the ‘Return to editor’ link at the top of the screen.
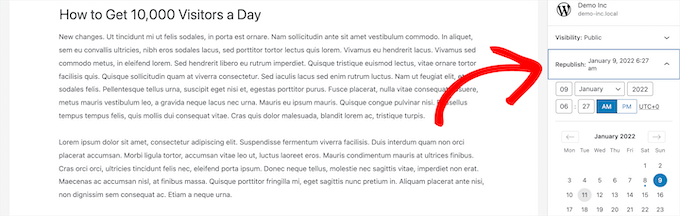
You can also change the date when you want your edited post to go live. If you want the changes to publish instantly, then don’t change the date.
If you want to publish in the future, then simply click the ‘Republish:’ option and change the date to a time in the future.
Then, click the ‘Republish’ button again.
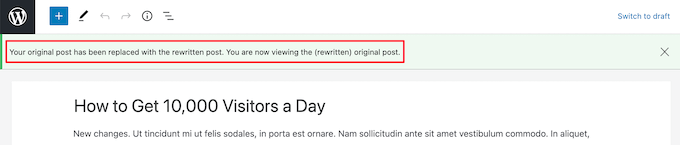
You’ll get a notification at the top of the page that says the original post has been replaced with the rewritten post.
Now, the changes you made to the cloned post will replace the original version of the post on that date.
We hope this article helped you learn how to save changes without publishing in WordPress. You may also want to see our detailed guide on why WordPress is free and our picks of the best business phone services for small businesses.
If you liked this article, then please subscribe to our YouTube Channel for WordPress video tutorials. You can also find us on Twitter and Facebook.
Do you want to show related articles on your WordPress website?
By adding related posts in WordPress, you can help your visitors find new content, keep them engaged, decrease your bounce rate, and increase the pageviews.
In this article, we will show you how you can display related posts in WordPress.
Why Show Related Posts in WordPress?
When you start a new WordPress website, your readers will have no problem finding all your content easily. However, as your site grows, so will the number of articles. This makes it difficult for visitors to find your most important posts.
A simple way to help people find new content on your site is by displaying related posts. You can show off your best content, keeping your readers engaged on your site and lowering your bounce rate.
In this article, we’ll share 2 methods of displaying related posts, so you can choose whichever way you prefer.
Show Popular Posts in WordPress Using MonsterInsights
We believe that showing the most popular posts instead of related posts lead to higher clicks and user engagement. This is why a lot of popular publishers now show popular posts or trending posts instead of related posts.
The easiest way to show popular posts in WordPress is by using MonsterInsights, the best WordPress Analytics plugin. MonsterInsights makes it very easy to use Google Analytics and get helpful reports in your WordPress dashboard.
With MonsterInsights, you can show your best blog posts anywhere on your website using the Popular Posts feature. You can get started with the MonsterInsights Lite version.
However, if you want to unlock the popular posts addon, advanced tracking features, dashboard reports, and more options to customize your related posts, then you can use the MonsterInsights Pro version.
First, you’ll need to install and activate the MonsterInsights plugin. For more details, see our tutorial on how to install a WordPress plugin.
Upon activation, you’ll be directed to Insights from your WordPress admin panel. Simply click on the ‘Launch the Wizard’ button to configure the plugin on your website.
After that, you can head over to Insights » Popular Posts from your WordPress dashboard. MonsterInsights gives you multiple options to display related posts on your website.
You can select the ‘Inline Popular Posts’ option to show articles within your content or use the ‘Popular Posts Widget’ to display related posts at the end of a blog post or in the sidebar. There’s also an option to show popular products for your online store.
For this tutorial, we’ll use the Popular Posts Widget option and display related posts at the end of an article.
MonsterInsights offers pre-built templates to choose from for showing related posts. If you upgrade to the Pro version, then you can unlock more themes and design options for displaying your popular posts.
It also shows a preview of how your related posts will look like on the website in the ‘Theme Preview’ section.
After selecting a theme, go ahead and scroll down to customize the design. You can change the color and size of the title and background, change the layout, and choose how many posts to show in the widget.
Next, you can scroll down to the ‘Behavior’ section and change the Widget Styling. You can use the default styling or add custom CSS to edit the appearance of your popular posts widget.
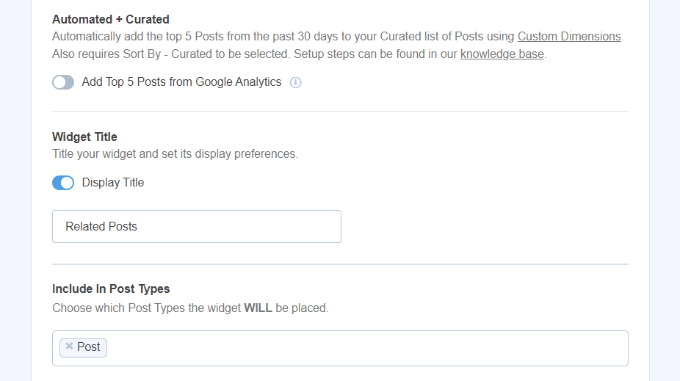
Once you’ve finished styling the widget, you can choose how to determine which related posts to display. MonsterInsights will sort popular posts based on comments, share count, or show a custom list of posts.
The Comments options will randomly rotate the most commented posts from the past 30 days. Alternatively, you can connect your SharedCount account and show posts with the most shares.
Another option is to choose which specific posts to show in the widget using the Curated option. Simply add the posts and pages to the list, and the plugin will randomly rotate them in the widget.
If you’re using the MonsterInsights Pro version, then you also get an option to automatically display the top 5 posts from the last 30 days based on your website traffic.
Next, you have an option to show the widget title by enabling the ‘Display Title’ toggle. Simply click the toggle to enable the option and enter a title that will appear above your related posts.
After that, you can select ‘Posts’ as the post type to include in the widget. There is also an option to exclude specific posts from showing in the related posts widget and show posts from particular categories.
Now, you can choose how to embed your popular posts widget in WordPress. MonsterInsights offers different options, and you can select manual or automatic placement.
If you select ‘Automatic Placement,’ then the plugin will display your related posts after the last paragraph of your blog posts.
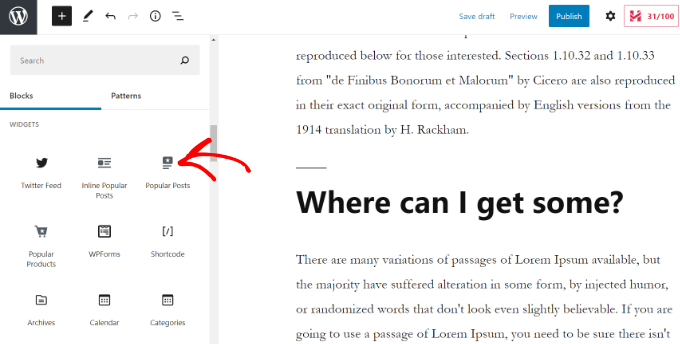
Another option is to display the related posts widget manually on any post or page using a shortcode or a Popular Posts block.
To do that, simply edit any existing post or add a new one. Once you’re in the WordPress editor, go ahead and click the ‘+’ icon and add a ‘Popular Posts’ block where you want it to appear in your content.
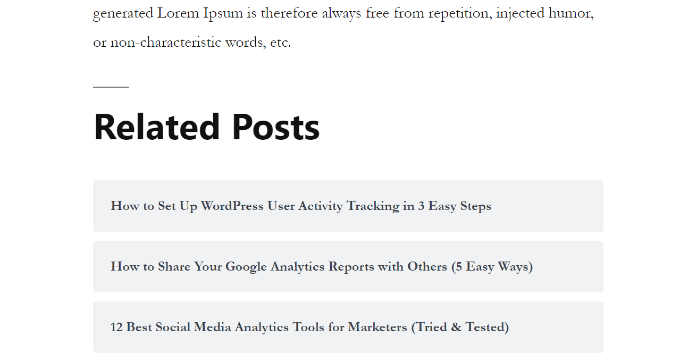
The plugin will automatically add your most popular articles and display them as related posts. You can now visit your website to see them in action.
Using a customizable algorithm considering post titles, content, tags, and categories, YARPP calculates a score for each pair of posts on your blog.
The downside is that YARPP may slow down your website, especially if you have a lot of content. Make sure to run a website speed test before and after setting it up, and follow WordPress performance best practices to keep your site loading fast.
First, you’ll need to install and activate the YARP plugin on your website. For more details, please see our guide on how to install a WordPress plugin.
Once the plugin is active, you can go to Settings » YARPP from your WordPress dashboard and configure the plugin settings.
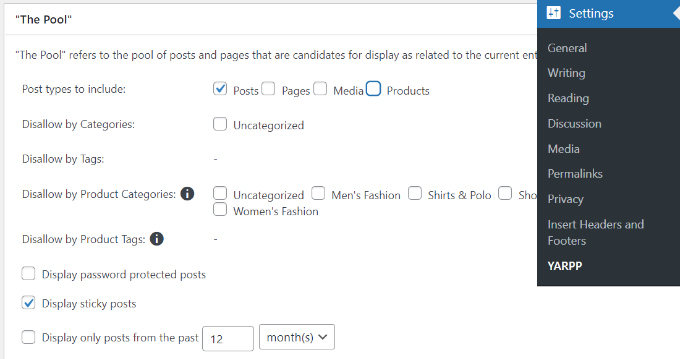
Under ‘The Pool’ section, you can choose which post types to include in related posts. These include posts, pages, media, and products.
Other than that, there are options to disallow content from categories and tags, choose the time period for determining related posts, and more.
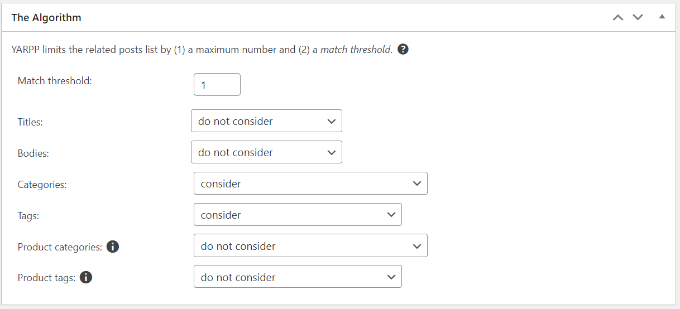
After that, simply scroll down and edit the algorithm settings.
You can set how strict the algorithm should be when selecting related posts by changing the ‘Match threshold’ number. If you want the algorithm to be strict, then increase the Match threshold number.
By default, the Match threshold will be set to 1, which means the algorithm will be less strict in finding related posts. We recommend using the default settings when you’re starting out and then adjusting the settings as your site grows.
There are also settings to consider for matching titles, content, categories, tags, and more to find related posts.
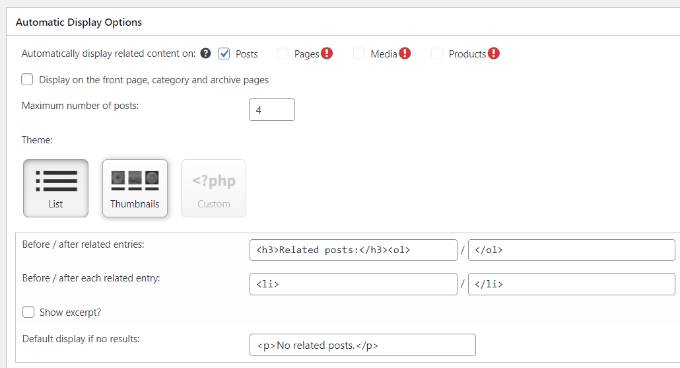
Now, you can scroll down and choose the display options for your related posts under the ‘Automatic Display Options’ section. The plugin offers 3 options including List, Thumbnails, or adding a custom theme.
You can also select the maximum number of posts to include in the related posts section and choose where to automatically display related content.
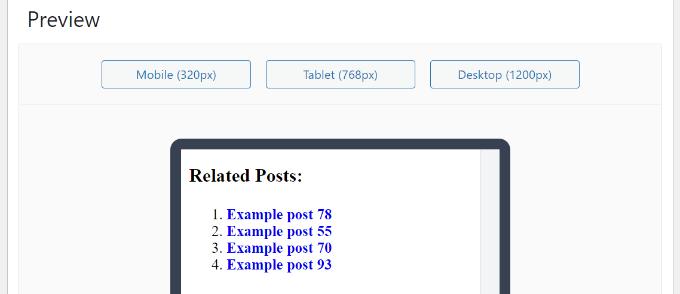
After customizing your display settings, you can scroll down to see a preview of how your related posts will appear.
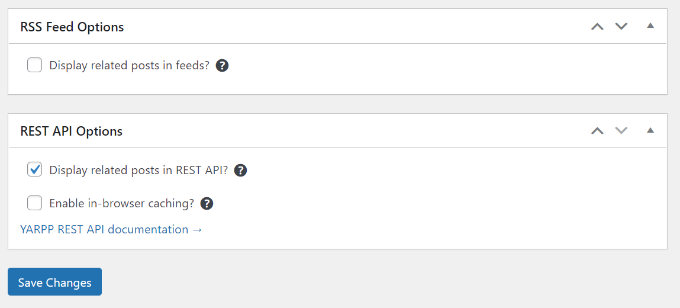
Lastly, you can now scroll down to the bottom and enable the RSS Feeds and REST API options.
Once you’ve made the changes, simply click the ‘Save Changes’ button.
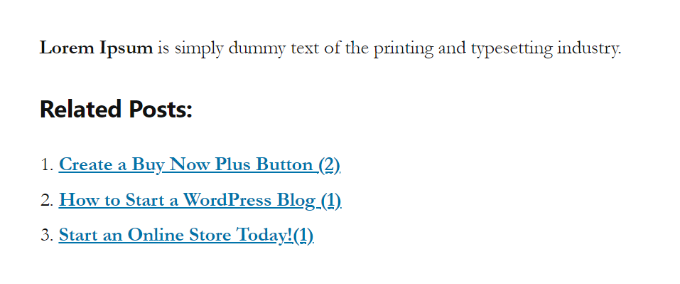
You can now visit your website and see the related posts in action.
Are you looking for the best social media plugins for your WordPress site?
There are so many social media plugins available for WordPress that it becomes overwhelming for beginners to choose the best plugin.
In this article, we will share our expert pick of the best social media plugins for WordPress that you can install right away.
What to Look for in a WordPress Social Media Plugin?
The main problem with most social media plugins for WordPress is performance. Since these plugins have to load additional stylesheets and scripts, they often slow down your website. For more on this topic, see our article on how WordPress plugins affect your site’s load time.
You need to find a balance between features and performance of your WordPress site. A social media plugin with lots of features can become less useful if it’s slowing down your website and affecting user experience.
Next, you need to decide which social networks will be more prominently displayed on your website. Adding fewer options can reduce clutter and offer a better user experience.
Many social media plugins allow you to show social icons in sidebar, below article, before article, and so on. You need to decide how you would like to display them on your site and if the plugin supports that option.
Unlike other best WordPress social media plugin lists, we’ll only share the plugins that are built with performance in mind. Each of these plugins will cover various different social media use-cases, so there won’t be too many plugins that have duplicate functionality.
Having said that, let’s take a look at some of the best social media plugins for WordPress.
Want to display your Instagram photos in WordPress? Smash Balloon Social Photo Feed allows you to beautifully display your recent Instagram photos in WordPress. It’s the most popular social feed plugin used by over 1 million websites.
It’s highly customizable, and you can select from one of the many feed layouts including hashtag feeds, shoppable feed, Instagram stories, and more. You can even selectively display user-generated content on your site with the built-in moderation system.
Smash Balloon has all the advanced features you can think of such as ability to highlight specific Instagram posts, display items you’re tagged in, combine multiple Instagram account content in one feed, and more.
The best part is that that all images are cached, so your site will be blazing fast. You can also embed the feed anywhere on your site including blog posts, pages, sidebar, product pages, and more.
Note: There’s also a free version of Instagram Feed for WordPress by Smash Balloon that comes with basic features that you can use to get started with.
Shared Counts is a fast and easy to use social media plugin for WordPress. It comes with a limited number of the most popular social networks: Facebook, Twitter, Google+, Stumbleupon, Pinterest, Yummly, and LinkedIn.
There are multiple button styles, and you can choose where to show the button (before or after the content or manually). You can also enable it for custom post types.
The plugin tries to get social share count for each network. You can also choose to just show the total number of shares on all networks.
We’re using Shared Counts for WPBeginner social share buttons.
Uncanny Automator is the best WordPress automation plugin. It helps you connect your WordPress site with your favorite apps, so you can automate routine tasks and save time.
For example, you can use it to setup a workflow that automatically share your new blog posts on Facebook, Twitter, and Instagram.
The best part is that you can setup automations without any coding skills. It’s a point-and-click set up.
If you’re running an online store, then you can setup smart automations like asking users to share a testimonial after they make a purchase. If you’re selling online courses, then you can ask users to share their certificate photo on Instagram to get additional rewards.
Uncanny Automator also lets you connect your WordPress site with dozens of other popular apps like Google Sheet, Slack, MailChimp, Zoom, and more.
Want to display custom Facebook feed in WordPress? Smash Balloon Facebook Feed allows you to seamlessly integrate your Facebook content in WordPress. It’s the most popular social feed plugin used by over 200,000 websites.
You can use it to display your Facebook page content, photos, videos, albums, and events. There’s also a feed template to showcase your Facebook group content.
All Facebook feeds can be customized with an easy to use custom feed builder that allows you to filter posts, show comments & reactions, and more.
Smash Balloon has all the advanced features you can think of such as ability to display live video, filter posts by word or hashtag, combine multiple Facebook account content in one feed, and more.
The best part is that that all images are cached, so your site will be blazing fast. You can also embed the feed anywhere on your site including blog posts, pages, sidebar, product pages, and more.
All in One SEO is the best WordPress SEO plugin used by over 3 million websites. Aside from helping you optimize your WordPress site for higher SEO rankings, it also helps you optimize your website for social media.
All social media networks rely on meta data to display the right images and content when someone shares a page from your site.
It also lets you set up Twitter cards for WordPress, so you can get rich snippets on Twitter. The best part is that you get a full social preview for each post and page inside the WordPress block editor, so you can control exactly how your content will look on social media platforms.
AIOSEO also lets you enter social profiles for your website and author for SEO knowledge panels inside Google which can help boost your rankings.
Last but not least, it has the ability to enter social media ownership verification code that you’re often asked to add to claim ownership of your page and unlock additional analytics on platforms like Facebook and Pinterest.
For all these reasons, we use AIOSEO on WPBeginner to improve our SEO and social rankings.
Note: There’s a free version of AIOSEO available that comes with basic features that you can use to get started with.
Want to display custom Twitter feeds in WordPress? Smash Balloon, the leading social feed plugin for WordPress, has a custom Twitter feed plugin that lets you
seamlessly integrate Twitter content into their WordPress site. It’s trusted by over 100,000 website owners.
Smash Balloon Twitter plugin comes with 6 different feed types including user tweets timeline, mentions timeline, home timeline, twitter hashtag feed, twitter search terms, and more.
All feed layouts are highly customizable, so you can use it to match your brand colors and styles. You can use multi-column masonry layout, display tweets in rotating carousel sliders, add infinite scroll for tweets, and show Tweet engagement stats including Like, Retweet, and replies.
You can combine multiple Twitter account feeds into one, moderate which tweet shows up on your site from a specific hashtag (great for user reviews), enable Twitter card view, and more.
Smash Balloon Twitter Card plugin has built-in post caching, so it always loads fast, and the best part is that it’s GDPR compliant.
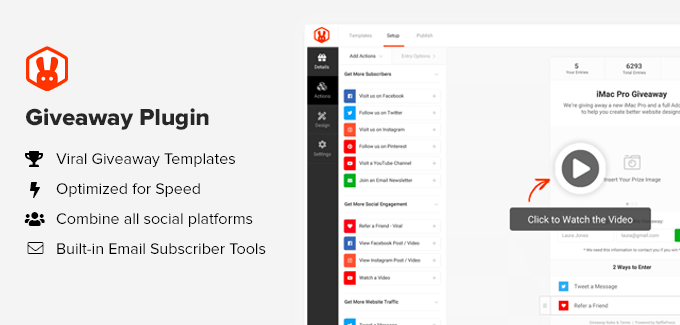
It comes with a drag & drop giveaway builder and tons of pre-built viral giveaway templates that are designed to help you get more subscribers, improve social engagement, and increase your traffic.
RafflePress seamlessly integrates with Facebook, Instagram, YouTube, and Twitter. Their viral refer-a-friend feature is really powerful and can truly supercharge your growth.
You can use giveaway actions to get more video views, get more followers on Instagram, get more likes on Facebook, increase twitter followers, get more blog comments, and more.
Users can get more entries in the giveaway by completing giveaway actions. RafflePress lets you combine multiple entries, so you can get maximum benefits. Since it integrates with all the best email marketing services, you can use the giveaway to also get more email subscribers.
We use RafflePress to run giveaways on WPBeginner site, and it’s a must have WordPress plugin if you want to grow faster.
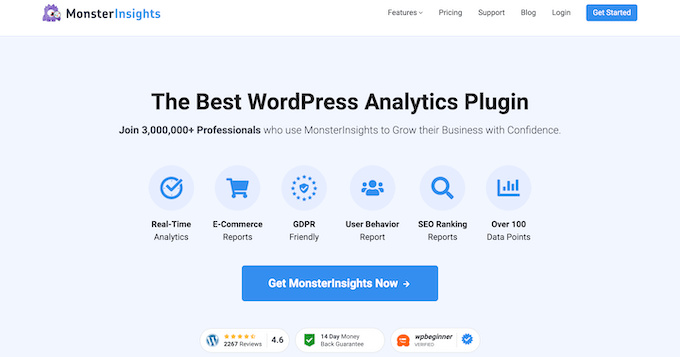
MonsterInsights is the best WordPress analytics plugin used by over 3 million websites. It helps you properly setup Google Analytics and see the stats that matter right inside your WordPress dashboard.
We believe you can’t improve what you can’t measure. It’s a lot easier to double your traffic and sales when you know exactly how people find and use your website.
MonsterInsights helps you identify which social media networks and campaigns are working the best, so you can double down on what works and stop wasting time on what doesn’t.
You can use it to unlock easy-win opportunities, improve conversions, and grow your revenue.
The best part is that it’s user-friendly so you don’t have to be a data-nerd to see how your social media efforts are performing.
It also comes with other powerful features like the Headline Analyzer which helps you write more click-worthy headlines to boost your social media traffic. There is also a popular posts addon that lets you showcase your most popular content in your WordPress homepage, sidebar, and other areas.
We use MonsterInsights to power our website analytics on WPBeginner.
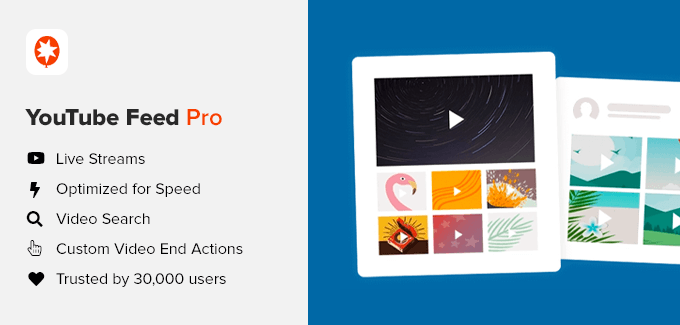
Want to display custom YouTube feed in WordPress? Smash Balloon YouTube Feed allows you to seamlessly integrate your YouTube content in WordPress. It’s the most popular YouTube feed plugin used by over 30,000 websites.
You can use it to display your latest YouTube videos from your channel, display playlists, embed YouTube live streams, and more. It comes with multiple layout options, so you can display the content how you want without any restrictions.
It comes with multiple YouTube feed layouts including grid, gallery, list, and carousel slider.
You can also use this YouTube plugin to curate content from your favorite channels, selectively show videos with certain keywords in title, convert videos into new posts on your website, and even build custom YouTube feeds using tailored search queries.
Smash Balloon has all the advanced features you can think of such as ability to have custom pause and end actions for product placements, smart loading of YouTube players to boost website speed, Gutenberg block editor support, and more.
Pretty Links is one of the best affiliate and link shortening plugin for WordPress used by over 300,000 websites.
It makes it easy to share brandable short links on your social media profiles. This is great for sharing affiliate links or product links on your Instagram stories, reels, YouTube videos, podcasts, and more.
The benefit of Pretty Links is that it lets you create links that are memorable and easy to type for your users.
You can easily track all the link clicks and manage them from a central place inside your WordPress dashboard.
Aside from the social media benefits, it also comes with smart content marketing features to boost affiliate revenue such as automatic keyword replacement, advanced redirect types, and more.
Note: There’s also a free version of Pretty Links that comes with basic features that you can use to get started with.
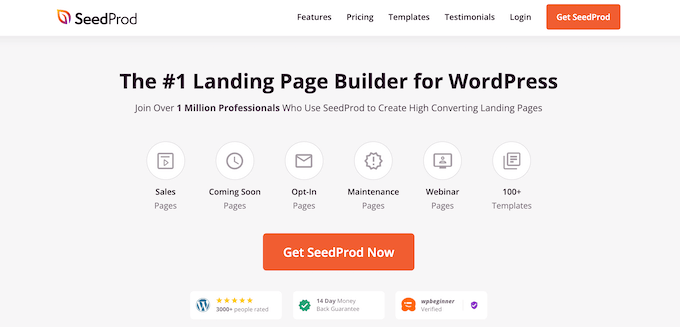
SeedProd is the best WordPress page builder plugin used by over 1 million websites. It comes with a drag & drop page builder that you can use to create custom landing pages and even completely custom WordPress themes (no coding needed).
The best part is that it comes with social media integration that you can use to create a link in bio page for your Instagram profile.
SeedProd comes with over 150+ pre-made page layouts that you can use to create custom sales pages, webinar landing page, and just about every type of landing page that you can imagine.
A lot of bloggers and website owners use SeedProd to create custom landing pages for social media campaigns.
It seamlessly integrates with popular email marketing services and other third-party platforms.
Note: There’s also a free version of SeedProd that comes with essential features that you can use to get started with.
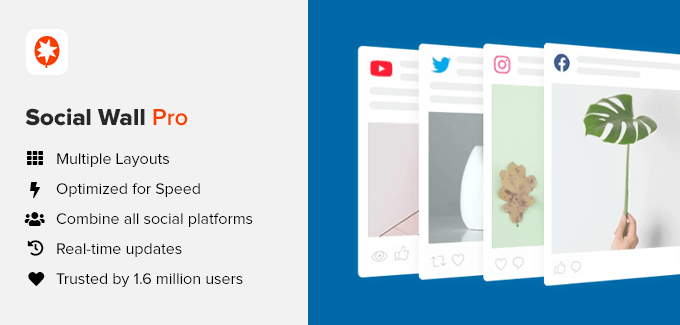
Smash Balloon Social Wall plugin lets you create a smart community page on your website that combines the social media content from your Instagram, Facebook, Twitter, and YouTube channel.
It’s super simple to set up and is one of the easiest ways to increase social engagement. You can choose from the Grid, List, or Carousel layout to highlight your best social media posts.
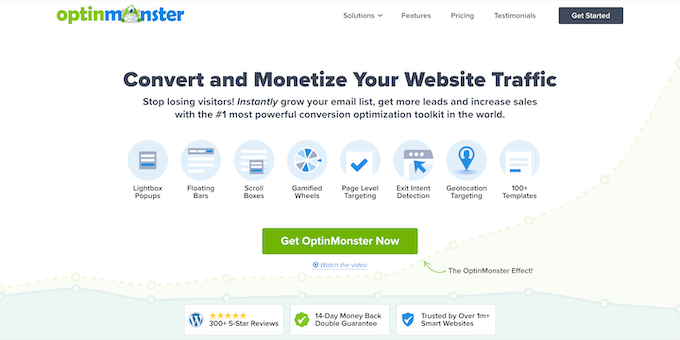
OptinMonster is the best WordPress popup plugin in the market used by over 1 million websites. It helps you convert your abandoning website visitors into social media followers and email subscribers.
You can use it to create dynamic popups, floating bars, scroll boxes, or even gamified spin to win campaigns to grow your social media followers. All social media popups are fully responsive and work on all devices.
OptinMonster comes with a chatbot integration for ManyChat that helps you grow your business with Facebook messenger.
Since the popup builder is fully drag & drop and comes with tons of personalization features, you can really use it to promote anything you like. It comes with powerful features like A/B testing, geolocation targeting, exit-intent detection, page level targeting, and more.
This is why it’s consistently rated the #1 most powerful conversion optimization toolkit in the world, and we use it on WPBeginner.
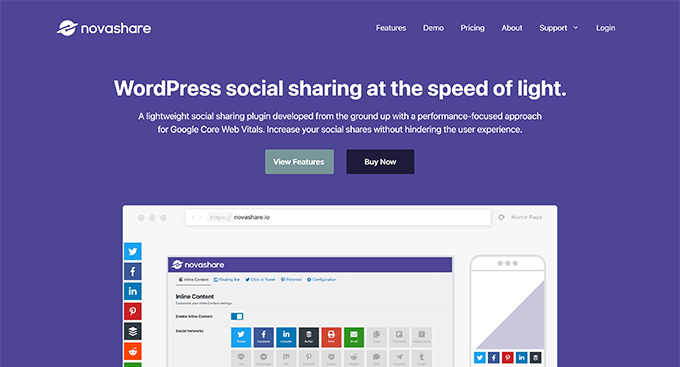
Novashare is another popular WordPress social sharing plugin that’s built with performance in mind. It lets you add social sharing buttons on your site without slowing down your site or hindering user experience.
This social media plugin integrates with all the top social platforms, so you can add share buttons for Twitter, Facebook, LinkedIn, Buffer, WhatsApp, SMS, Reddit, Telegram, Pinterest, and more.
It also comes with other powerful features like the ability to add floating social bar in WordPress posts, show total share count, embed click to tweet blocks inside your post, add Pinterest image hover pins, show follow buttons in your sidebar or footer, and even add UTM tracking to social links.
The best part is that it’s fully responsive and GDPR friendly.
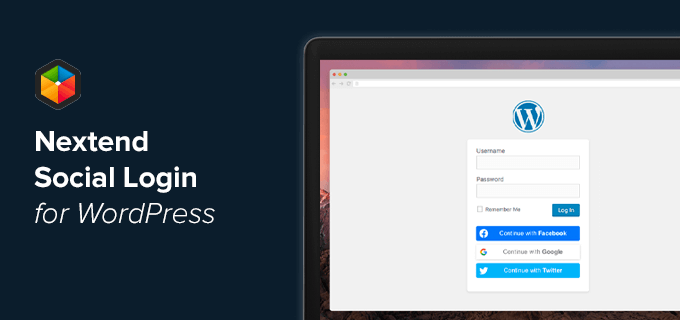
Nextend Social Login is the most popular social login plugin for WordPress. It lets your visitors register and login to your website using their social profiles.
It comes with built-in support for Login with Facebook, Login with Google, Twitter connect, and even has support for login with other popular platforms like Apple, LinkedIn, Microsoft, Github, Amazon, PayPal, Slack, Discord, and more.
Several studies have shown that adding social login to your eCommerce store or WordPress membership site can help boost conversions since it reduces the extra steps needed to create a profile.
It comes with several other powerful features like letting users link their WordPress profile on your site with their social profile, request custom username, connect social login with WordPress comments, and more.
Nextend social login plugin works with all major WordPress registration & eCommerce plugins like WooCommerce, Easy Digital Downloads, BuddyPress, and even the default WordPress login & registration forms.
Note: There’s also a free version of Nextend social, but it doesn’t support all the popular login methods.
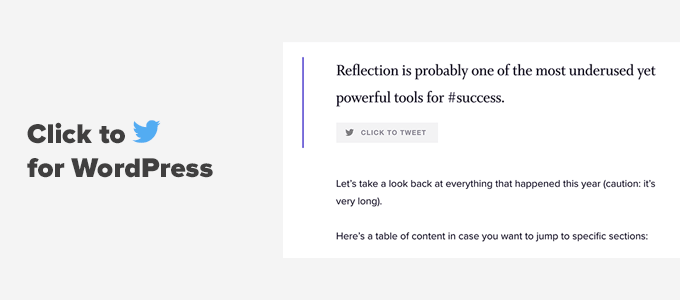
Better Click to Tweet is a free plugin that lets you add click to tweet blocks in WordPress. This is a great standalone social media plugin for WordPress that does one thing, and does it really well.
It’s fully compatible with the WordPress block editor as well as the classic editor. You can add beautiful quotable tweets that match your brand styles.
Our founder Syed Balkhi uses this plugin on his personal blog.
Final Thoughts on Best WordPress Social Plugins
Generally, when you see the list of the best social media plugins, it contains only the social sharing plugins which all offer duplicate functionality, and most of them will slow down your site.
This is why we have only listed the absolute best WordPress social media plugins for the various use cases.
If you’re looking for the best social sharing plugin for WordPress that is also fast, then go with Shared Count (free) or Novashare (premium).
If you’re looking for the best social media feed plugin to display your social media content from Facebook, Twitter, Instagram, or YouTube, then go with Smash Balloon. They offer the best social feeds plugin for WordPress, and over 1.6 million websites use their plugin.
Frequently Asked Questions (FAQs)
Having helped millions of readers with WordPress, we have answered quite a lot of questions. Below are the answers to the most frequently asked questions about WordPress social media plugins.
Are there other WordPress sharing plugins in the market?
Yes, there are literally dozens of other WordPress social media plugins in the market. We did not include them in our article to help our readers avoid choice paralysis.
Also, you might be surprised to see that we haven’t included several popular social media plugins like AddThis, ShareThis, AddToAny, Sumo, Shareaholic, and others because they all load external scripts that significantly slow down your sites. Furthermore, some of these free social sharing plugin companies are also selling your user data.
Aside from that, there are other social plugins like Monarch, Social Snap, Ultimately Social, Jetpack, etc that we believe are not as performance optimized as the sharing plugins we mentioned above.
How can I automatically share my WordPress content on social media?
There are several WordPress plugins and SaaS tools that can help you automate your social media sharing including Uncanny Automator, Revive Social, Buffer, Jetpack Social, and more.
We believe that Uncanny Automator is the best solution since it also lets you build many other automated workflows to save you time.
Which WordPress plugins can help me get more social media followers?
The easiest and fastest way to increase your social media followers is by running a viral giveaway. RafflePress is the best social media giveaway plugin for WordPress.
We regularly use that across our websites to help us grow our social media followers. It’s refer-a-friend and other viral features help you leverage the word of mouth advertising to get more social followers.
The other tool we use is OptinMonster. We created custom slide-in popups that has helped us grow our Facebook group to over 80,000+ members.
Can I create paywall to hide my WordPress content?
Yes, you can absolutely use WordPress to create a paywall to hide your premium content. We recommend using the MemberPress plugin which has this functionality.
It lets you control the number of free views after which you can require readers to pay to join your site similar to popular sites like NY Times, and others.
We hope this article helped you find the best social media plugin for your WordPress site. You may also want to see our ultimate step by step WordPress SEO guide for beginners, and our comparison of the best push notification software.
If you liked this article, then please subscribe to our YouTube Channel for WordPress video tutorials. You can also find us on Twitter and Facebook.