Monday, May 2, 2022

How to Customize WooCommerce Product Search Results Page

Would you like to customize your WooCommerce product search results page?

By default, WordPress and WooCommerce have limited search capabilities. By customizing your product search results, you’ll be able to increase sales and grow your business.

In this article, we’ll show a few easy ways you can customize your WooCommerce product search results page to provide a better user experience.

How to Customize WooCommerce Product Search Results Page

Why Customize WooCommerce Product Search Results Page?

By default, WooCommerce comes with a built in product search feature. However, it has serious limitations. This could mean that your customers won’t be able to find the products they’re looking for.

As a result, you may be losing potential sales. If your customers can’t find what they’re looking for, then they may not come back to your online store.

How does this happen? The default WooCommerce search only indexes the title, content, and excerpt of posts and pages. It doesn’t consider any content within custom fields while performing a search.

That’s a problem because a great deal of your WooCommerce product data is stored in custom fields. As a result, none of your WooCommerce product categories, tags, reviews, and other special attributes will be indexed.

Luckily, you can solve this problem using a WooCommerce product search plugin.

That being said, let’s take a look at some examples of how you might improve your WooCommerce product search results page.

Here is what you will learn from this guide. You can click the link to skip ahead to the section you’re interested in.

Making WooCommerce Product Data Searchable

The first thing you need to do is install and activate the SearchWP plugin. For more details, see our step by step guide on how to install a WordPress plugin.

SearchWP is the best custom search plugin for WordPress, and is used by over 30,000 websites. It’s also one of the best plugins for WooCommerce because it delivers more relevant product results to your customers.

Note: You’ll need at least the Pro plan to access WooCommerce integration.

Upon activation, you need to visit the SearchWP » Settings page and switch to the ‘Support’ tab to enter your license key. You can find it in your account area on the SearchWP site.
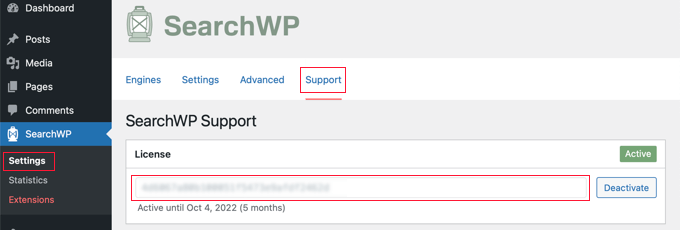
Paste Your SearchWP License Key

Next, you need to install and activate the WooCommerce Integration extension.

You can download it from your account area on the SearchWP website and install it as you would install any other WordPress plugin.
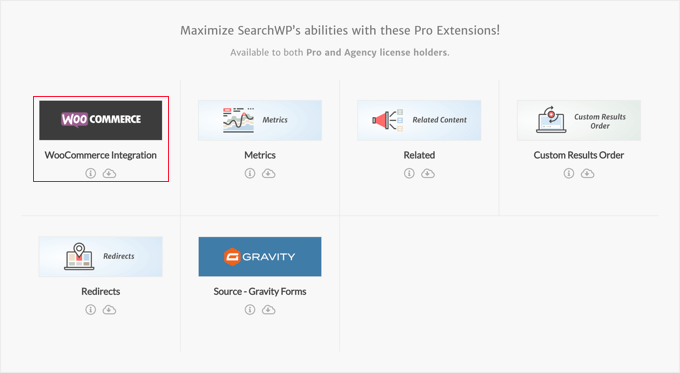
Install the WooCommerce Integration Extension

Now you are ready to set up your SearchWP custom search engine.

Simply go to the SearchWP » Settings page and make sure you’re on the ‘Engines’ tab. Once there, you need to click the ‘Sources & Settings’ button.
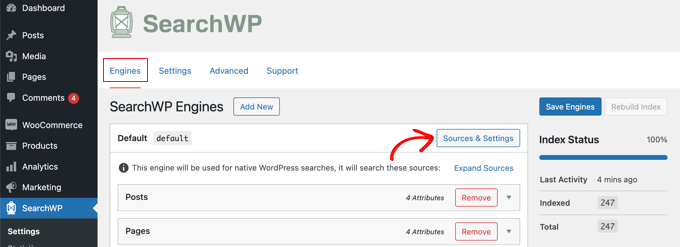
Click on the 'Sources & Settings' Button

This will bring up a popup where you should make sure the checkbox next to ‘Products’ is checked. This will allow SearchWP to index your WooCommerce products.

WooCommerce product reviews are stored as comments. If you want to make reviews searchable, then you should also check the ‘Comments’ box.
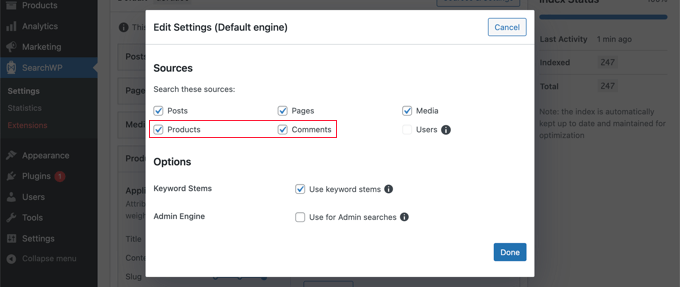
Check the Products and Comments Boxes

Once you’ve done that, click on the ‘Done’ button to close the popup.

Now you need to scroll down to the ‘Products’ section. Notice that by default, the plugin will only look at the product title, content (description), slug, and excerpt (short description).

Click the 'Add/Remove Attributes' Button in the Products Section

You can extend SearchWP’s reach by clicking on the ‘Add/Remove Attributes’ button.

This will bring up a popup where you can include specific custom fields and taxonomies in searches. For this tutorial, we’ve added the ‘color’ and ‘size’ custom fields, and the taxonomies ‘product categories’ and ‘product tags’.
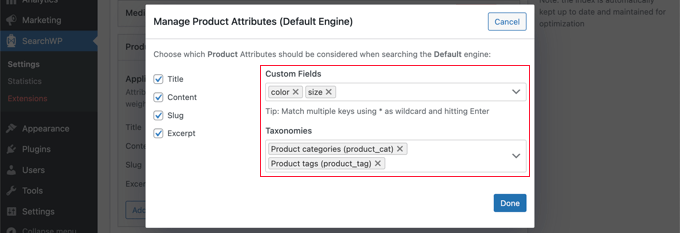
Add Custom Fields and Taxonomies to the Search Engine

You can now click the ‘Done’ button, and you should notice that those custom fields and taxonomies have been added to the products section of SearchWP.

After that, you can adjust the weight of each attribute. If you’d like to make a specific attribute more important in search results, then simply move the slider to the right.
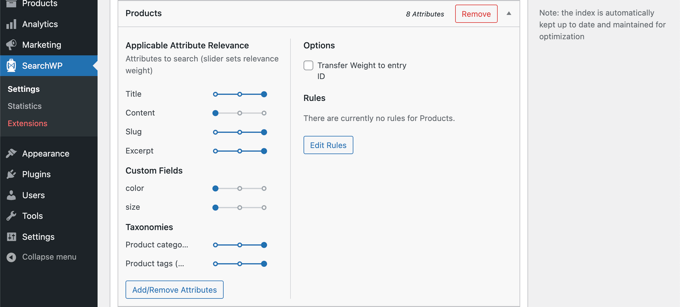
Adjust the Importance of Each Attribute

When you’re done, go ahead and click on the ‘Save Engines’ button at the top of the screen to save your settings.

SearchWP will then start rebuilding your search index in the background. After that, the plugin will be ready to start delivering more relevant search results to your WooCommerce store.
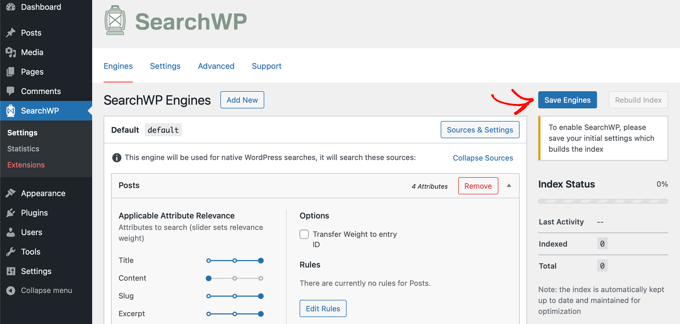
Click the 'Save Engine' Button

SearchWP will automatically use any search forms on your online store. However, if you need to add a search form, then see our step by step guide on how to create a custom WordPress search form. This will also teach you how to style the results page using custom CSS.

Now you can go to your WooCommerce store to try out the search feature. We’ll search for the product category ‘hoodies’, and all products in that category will be displayed.
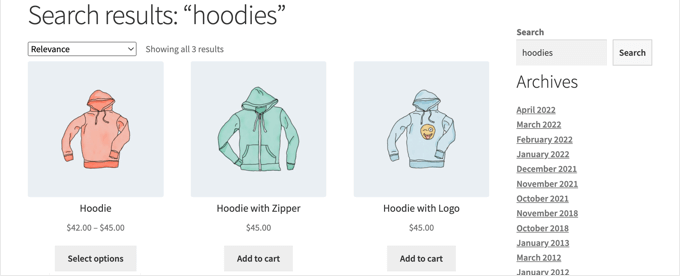
Product Search Results Page Preview

To learn more, see our guide on how to make a smart WooCommerce product search.

Customizing Which Products Will Be Shown on Search Results Pages

By default, SearchWP will include all of the products in your online store in the search results. However, you may wish to specify which products should or should not be displayed.

For example, you can automatically exclude products if they fall under certain conditions, like if they are discontinued or out of stock. Or you might only display products that are on sale or come with free shipping.

For example, the AeroPress WooCommerce store lets you search for products with free shipping. This is a great incentive for customers to make a purchase.

AeroPress Product Search Results Page

To get started, you should click the ‘Edit Rules’ button in SearchWP’s Products section.

Click the 'Edit Rules' Button

Right now there are no rules. You can create as many rules as you need.

To create your first rule, you need to click the ‘Add Rule’ button.

Click the 'Add Rule' Button

Now you can specify the conditions for which products should be shown or excluded from search results. For this tutorial, we’ll exclude all out of stock products.

First, you should select ‘Exclude entries if’ from the first drop down menu. Then select the ‘Product visibility’ taxonomy and type ‘outofstock’ in the field next to it.

Creating a Rule to Exclude Out of Stock Products

If you like, you can add additional conditions that should be excluded by clicking the ‘OR’ button. Once you’re finished adding rules, click the ‘Done’ button.

Now all you need to do is press the ‘Save Engines’ button at the top to store your changes.

Click the 'Save Engine' Button

To learn about more ways you can make use of SearchWP’s rules, see our guide on how to exclude specific pages, authors, and more from WordPress search.

Displaying Product Search Results in Live Mode

Live search will improve the search experience on your WooCommerce store by automatically showing search results as your customers type their queries.

For example, Good Dye Young offers live search results on their hair and makeup products.

Relevant products and articles are immediately displayed while the customer types their search query, providing a better user experience.

Good Dye Young Product Search Results Page

To add this to your own store, all you need to do is install and activate the free SearchWP Live Ajax Lite Search plugin. For more details, see our step by step guide on how to install a WordPress plugin.

Upon activation, your WooCommerce search forms will automatically provide live search.

Live Search Preview

For more details, see our guide on how to add live search to your WordPress site.

Finding Partial Matches and Other Advanced Features

Partial matching will help your customers to find what they are searching for, even if they don’t type the whole word or use the correct spelling.

For example, the Magna-Tiles online store has partial matching enabled. Customers only need to type part of a product name to find it in the search results.

Magna-Tiles Product Search Results Page

To enable partial matching in SearchWP, you should navigate to SearchWP » Settings and click on the Advanced tab.

On this page, you can enable some settings that will make it easier for your users to find what they are looking for.
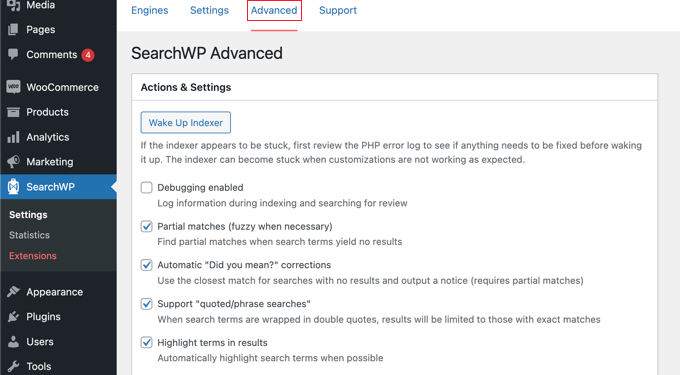
SearchWP Advanced Settings

Check any of these options that you would like:

  • Partial matches will also display results that don’t quite match the term that is being searched for.
  • Automatic “Did you mean?” corrections will suggest a slightly different search term that will match more products in your online store.
  • Supporting “quoted/phrase searches” will allow your users to use quotes when searching for exact phrases.
  • Highlighting terms in results will make it easier for your customers to find what they are looking for in the search results.

We hope this tutorial helped you learn how to customize the WooCommerce product search results page. You may also want to learn how to add wholesale pricing in WooCommerce, or check out our list of the best email marketing services.

If you liked this article, then please subscribe to our YouTube Channel for WordPress video tutorials. You can also find us on Twitter and Facebook.

The post How to Customize WooCommerce Product Search Results Page first appeared on WPBeginner.


May 02, 2022 at 04:00PM
Friday, April 29, 2022

12 Signs Your WordPress Site Is Hacked (And How to Fix It)

We are often asked, how do I check if my WordPress site has been hacked?

There are some common telltale signs that may help you figure out if your WordPress is hacked or compromised.

In this article, we’ll share some of the most common signs that your WordPress site is hacked and what you can do to clean it up.

Signs to look for when your WordPress website is hacked

1. Sudden Drop in Website Traffic

If you look at your analytics reports and see a sudden drop in traffic, even though Google Analytics is set up properly, then this could be a sign that your WordPress site is hacked.

A sudden drop in traffic can be caused by different factors.

For instance, malware on your website may be redirecting non-logged-in visitors to spam websites.

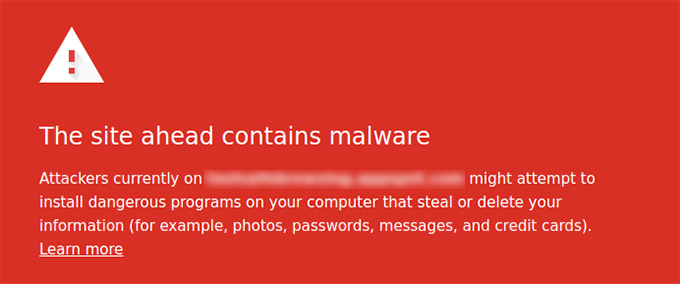
Another possible reason for the sudden drop in traffic could be that Google’s safe browsing tool is showing warnings to users regarding your website.

Google safe browsing malware warning

Each day, Google blacklists around 10,000 websites for malware and around thousands more for phishing. That’s why every website owner needs to pay serious attention to their WordPress security.

You can check your website using Google’s safe browsing tool to see your safety report.

2. Bad Links Added to Your Website

Data injection is one of the most common signs of a hacked WordPress. Hackers create a backdoor on your WordPress site which gives them access to modify your WordPress files and database.

Some of these hacks add links to spammy websites. Usually these links are added to the footer of your website, but they could be anywhere. Deleting the links doesn’t guarantee that they won’t come back.

You will need to find and fix the backdoor used to inject this data into your website. See our guide on how to find and fix a backdoor in a hacked WordPress site.

3. Your Website’s Homepage is Defaced

Defaced WordPress website

This is probably the most obvious one as it is clearly visible on the homepage of your website.

Most hacking attempts do not deface your site’s homepage because they want to remain unnoticed for as long as possible.

However, some hackers may deface your website to announce that it has been hacked. Such hackers usually replace your homepage with their own message. Some may even try to extort money from site owners.

4. You are Unable to Login into WordPress

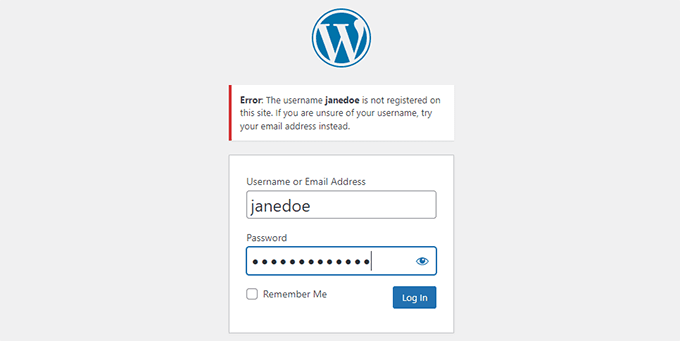
login error username not registered on site

If you are unable to login to your WordPress site, then there is a chance that hackers may have deleted your admin account from WordPress.

Since the account doesn’t exist, you would not be able to reset your password from the login page.

There are other ways to add an admin account using phpMyAdmin or via FTP. However, your site will remain unsafe until you figure out how the hackers got into your website.

5. Suspicious User Accounts in WordPress

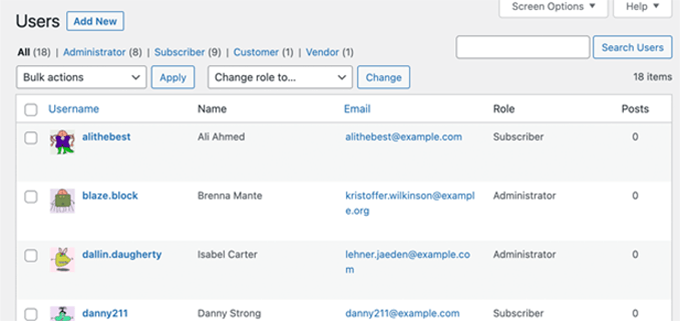
Suspicious user accounts in WordPress

If your site is open to user registration, and you are not using any spam registration protection, then spam user accounts are just common spam that you can simply delete.

However, if you don’t remember allowing user registration and still seeing new user accounts in WordPress, then your site is probably hacked.

Usually the suspicious account will have the administrator user role, and in some cases you may not be able to delete it from your WordPress admin area.

6. Unknown Files and Scripts on Your Server

Suspicious files

If you’re using a site scanner plugin like Sucuri, then it will alert you when it finds an unknown file or script on your server.

To find the files, you need to connect to your WordPress site using an FTP client. The most common place where you will find malicious files and scripts is the /wp-content/ folder.

Usually, these files are named similarly to WordPress files so that they can hide in plain sight. To recognize them yourself, you will need to audit the file and directory structure. However, deleting these files will not guarantee that they won’t return.

7. Your Website is Often Slow or Unresponsive

Slow or unresponsive website

All websites on the internet can become the target of random denial of service or DDoS attacks. These attacks use several hacked computers and servers from all over the world using fake IP addresses.

Sometimes they are just sending too many requests to your server, while other times they are actively trying to break into your website.

Any such activity will make your website slow, unresponsive, and unavailable. You can check your server logs to see which IPs are making too many requests and block them, but that may not fix the problem if there are too many or if the hackers change IP addresses.

It is also possible that your WordPress site is just slow and not hacked. In that case, you should follow our guide to boost WordPress speed and performance.

8. Unusual Activity in Server Logs

Server logs

Server logs are plain text files stored on your web server. These files keep record of all errors occurring on your server as well as all your internet traffic.

You can access them from your WordPress hosting account’s cPanel dashboard under Statistics.

These server logs can help you understand what’s going on when your WordPress site is under attack.

They also contain all the IP addresses used to access your website, so you can block suspicious IP addresses.

They will also indicate server errors that you may not see inside your WordPress dashboard and may be causing your website to crash or be unresponsive.

9. Failure to Send or Receive WordPress Emails

Email issues

Hacked servers are commonly used for sending spam. Most WordPress hosting companies offer free email accounts with your hosting. Many WordPress site owners use their host’s mail servers to send WordPress emails.

If you are unable to send or receive WordPress emails, then there is a chance that your mail server is hacked to send spam emails.

10. Suspicious Scheduled Tasks

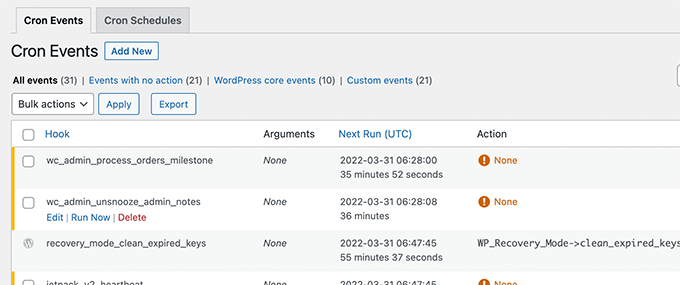
WordPress cron control

Web servers allow users to set up cron jobs. These are scheduled tasks that you can add to your server. WordPress itself uses cron to setup scheduled tasks like publishing scheduled posts, deleting old comments from trash, and so on.

A hacker can exploit cron jobs to run scheduled tasks on your server without you knowing it.

To learn more about cron jobs, see our guide on how to view and control WordPress cron jobs.

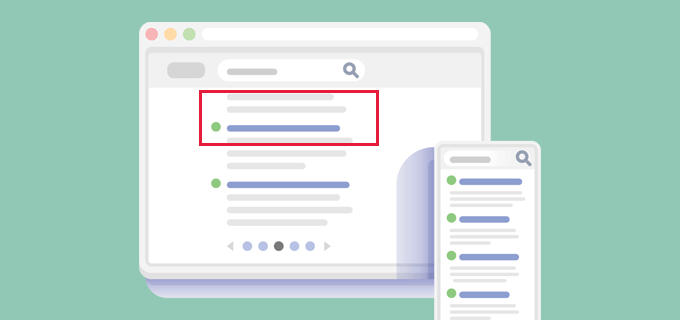
11. Hijacked Search Results

Search results hijacked

If the search results from your website show incorrect titles or meta descriptions, then this is a sign that your WordPress site is hacked.

Looking at your WordPress site, you will still see the correct title and description.

The hacker has again exploited a backdoor to inject malicious code which modifies your site data in a way that it is visible only to search engines.

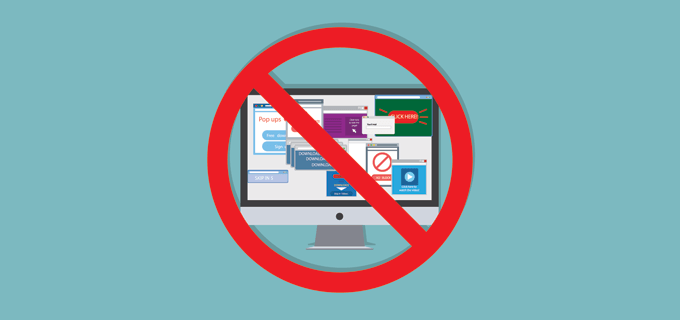
12. Popups or Pop Under Ads on Your Website

Spam popups

These types of hacks are trying to make money by hijacking your website’s traffic and showing them their own spam ads.

These popups do not appear for logged in visitors or visitors accessing a website directly.

They only appear to the users visiting from search engines. Pop-under ads open in a new window and remain unnoticeable by users.

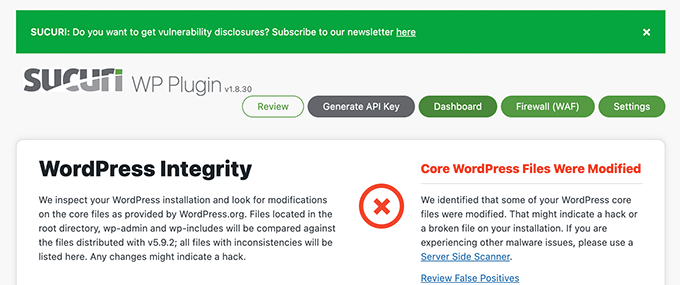
13. Core WordPress Files Are Changed

Core WordPress files changed

If your core WordPress files are changed or modified in some way, then that’s an important sign that your WordPress site is hacked.

Hackers may simply modify a core WordPress file and place their own code inside it. They may also create files with names similar to WordPress core files.

The easiest way to track those files is by installing a WordPress security plugin that monitors the health of your core WordPress files. You can also manually check your WordPress folders to look for any suspicious files or scripts.

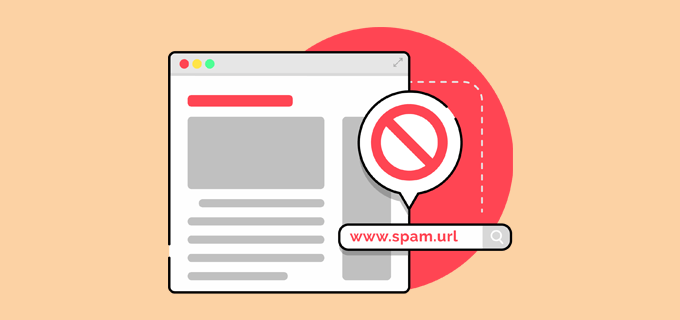
14. Users Are Randomly Redirected to Unknown Websites

Spam redirects

If your website is redirecting visitors to an unknown website, then that’s another important sign that your website may be hacked.

This hack often goes unnoticed as it does not redirect logged-in users. It may also not redirect visitors accessing the website directly by typing the address in their browser.

These types of hacks are often caused by a backdoor or malware installed on your website.

Securing and Fixing Your Hacked WordPress Site

Cleaning up a hacked WordPress site can be incredibly painful and difficult. This is why we recommend you let experts clean up your website.

We use Sucuri to protect all our websites. See how Sucuri helped us block 450,000 WordPress attacks in 3 months.

It comes with 24/7 website monitoring and a powerful website application firewall, which blocks attacks before they even reach your website. Most importantly, they clean up your website if it ever gets hacked.

If you want to clean up your site on your own, then take a look at our beginner’s guide on fixing a hacked WordPress site.

Keeping Your WordPress Website Secure from Future Attacks

Once your website is clean, you can make secure it by making it extremely difficult for hackers to gain access to your website.

Securing a WordPress website involves adding layers of protection around your website. For instance, using strong passwords with 2-step verification can protect your WordPress admin area from unauthorized logins.

Similarly, you can block access to important WordPress files to protect them or set WordPress files and folder permissions correctly.

For more details, see our ultimate WordPress security guide which will walk you through all the steps you should take to make your WordPress site secure.

We hope this article helped you learn the signs to look for in a hacked WordPress site.

You may also want to see our guide on how to get a free SSL certificate, or our expert comparison of the best business phone services for small business.

If you liked this article, then please subscribe to our YouTube Channel for WordPress video tutorials. You can also find us on Twitter and Facebook.

The post 12 Signs Your WordPress Site Is Hacked (And How to Fix It) first appeared on WPBeginner.


April 29, 2022 at 03:54PM

Thursday, April 28, 2022

How to Fix Error 521 with WordPress and Cloudflare

Are you looking for a way to fix ‘Error 521’ with WordPress and Cloudflare? 

If you’re seeing this error message, then so is everyone who tries to visit your website. This is bad news for the visitor experience and your conversion rates. It may even cost you your search engine rankings.

In this article, we will show you how to fix the 521 error with WordPress and Cloudflare.

How to fix error 521 with WordPress and Cloudflare

What Causes Error 521 with WordPress and Cloudflare?

If you see a 521 error when trying to visit your WordPress website, this means your browser is connecting to Cloudflare successfully, but Cloudflare isn’t connecting to the server that hosts your website.

Often this is because your server is offline.

There’s also a chance your WordPress hosting server may be online, but it’s blocking Cloudflare. Typically this WordPress error happens when a server mistakes Cloudflare for a security threat. This is usually due to a problem with how your server or Cloudflare is set up.

But don’t worry, we have five troubleshooting steps that you can follow to fix this error quickly.

If you’re unsure what’s causing your 521 error, then we recommend starting with step 1 and working your way through the each step. If you prefer to jump straight to a particular step, then you can use the links below.

  1. Contact Your Hosting Provider
  2. Check Whether Your Server Is Offline
  3. Whitelist All of Cloudflare’s IP Addresses 
  4. Ask Your Hosting Provider to Enable Port 443 
  5. Create and Upload a Cloudflare Origin Certificate 

1. Contact Your Hosting Provider

When you get a 521 error, there are steps you can take to fix the problem yourself. However some of them can be time-consuming and technical.

With that in mind, the easiest way to fix a 521 error is by contacting your WordPress hosting provider. A good web host should be able to tell you why you’re getting this error. They may even be able to fix the problem for you.

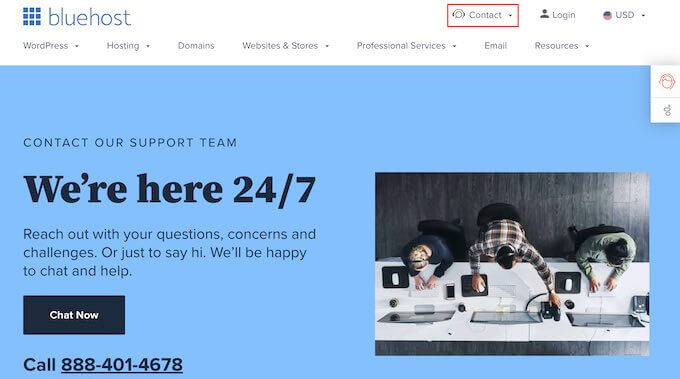
If you’re unsure how to contact support, then head over to your hosting provider’s website. You can then look for any Contact Us or Support pages. 

The Bluehost support settings

To help you fix this problem as quickly as possible, we recommend choosing live support options where available. For example, live chat or business phone support is almost always faster than ticketing portals or email. 

If you’re unable to get support from your hosting provider right away, then you can try the following steps.

2. Check Whether Your Server Is Offline

When you get a 521 error, it’s always worth checking whether your server is online. 

If it’s still online, then you can try other troubleshooting steps.

To do this, you’ll need to know your server’s IP address. This is a string of numbers that identifies a piece of hardware on a network.

You can use this IP address to ‘ping’ the physical server that hosts your WordPress website. If the server responds, you’ll know that it’s online. 

If it doesn’t respond, then your server is offline and this is what’s causing your 521 error. 

To get your IP address, you’ll need to log into your website’s control panel. This is usually supplied by your hosting provider, and is typically either cPanel or a custom panel.

Once you’re logged in you can look for any settings labeled ‘IP address.’ 

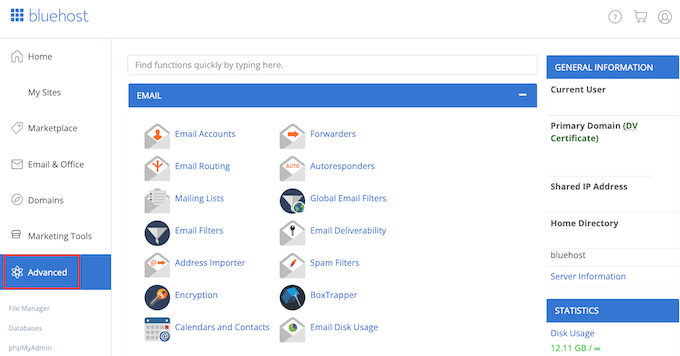
If you’re a Bluehost customer, then you just need to log into your cPanel dashboard. You can then click on Advanced in the left sidebar.

The Bluehost cPanel dashboard

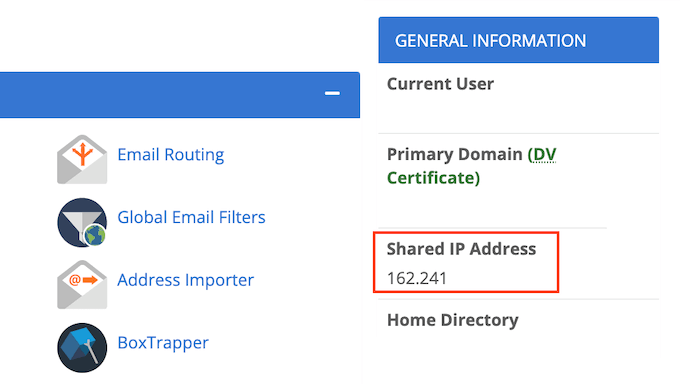
On this screen, find the General Information section.

Bluehost will show your server’s IP address under ‘Shared IP address.’

Getting your IP address in cPanel

If you’re struggling to find this IP address, it’s always worth checking your hosting provider’s website or online documentation. Many web hosts have detailed tutorials showing you how to find your IP address.

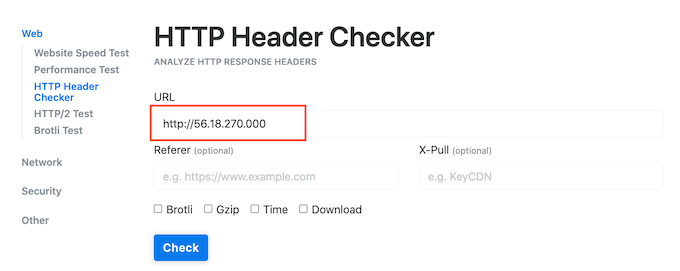
Once you have this information, head over to the HTTP Header Checker tool. You can use this tool to ‘ping’ your website’s server and see whether it responds. 

To do this test, simply paste your IP address into the ‘URL’ field. 

Then add ‘http://’ in front of your IP address. This turns this string of numbers into a web address. For example:

56.18.270.000

Becomes:

http://56.18.270.000

The HTTP Header Checker tool

Next, click on the Check button. HTTP Header Checker will now try to talk to your server.

If your server is offline, then you’ll see a message such as ‘Failed to connect’ or ‘Host Not Found.’ 

This explains why you’re getting the 521 error. In this case, you’d need to contact your hosting provider to fix it.

If your server is online, HTTP Header Checker will show a ‘2XX’ status code. You may also see a ‘3XX’ status code if your server is online but is temporarily redirecting to a new location.

If your server is online, then an outage or server downtime isn’t causing your 521 error. In that case, you can continue following this guide to fix the error.

3. Whitelist All of Cloudflare’s IP Addresses 

Your server may be online, but blocking Cloudflare’s IP addresses. This can cause the 521 error when you try to visit your WordPress website.

The solution is to whitelist all the IP addresses that Cloudflare uses. By whitelisting an IP address, you’re telling your server to allow all requests coming from that address.

You can add whitelisted IPs to your website’s .htaccess file. This is an important configuration file that tells the server how it should act.

To edit your .htaccess file, you’ll need an FTP client such as FileZilla.

If you haven’t used an FTP client before, you may want to see our guide on how to use FTP. This post shows you how to connect to your server using an FTP client. 

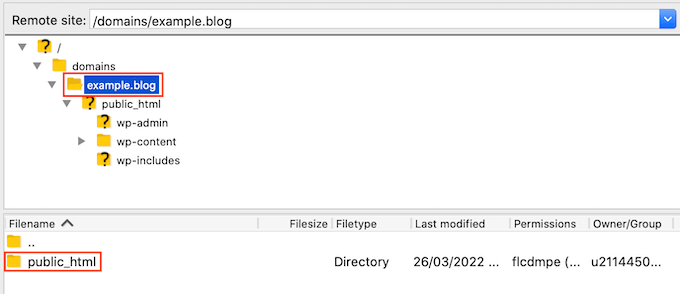
Once you’re connected to your server, you’ll need to open your website’s root folder. To reach it, simply open the folder that shows your website’s address. 

Next, open the ‘public_html’ folder. 

The FileZilla FTP client

You should now see your website’s .htaccess file.

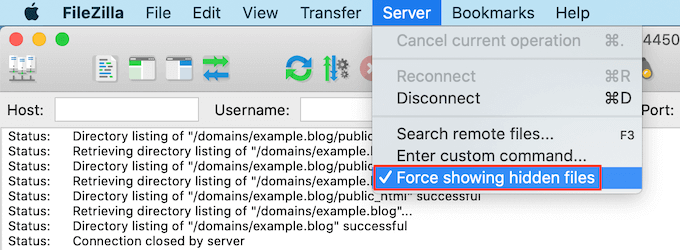
Some FTP clients hide sensitive files by default. If you don’t see an .htaccess file, then you’ll need to enable the ‘show hidden files’ option in your FTP client. 

If you’re using FileZilla, just select Server from the toolbar. Then click on ‘Force showing hidden files.’

Showing hidden files in FileZilla

If you’re still struggling to find .htaccess, then please see our guide on how to find the .htaccess file in WordPress.

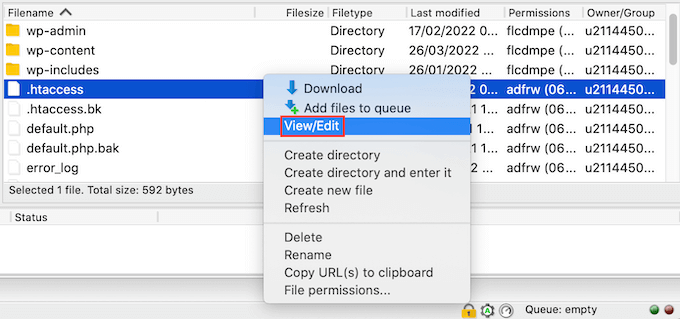
When you’re ready to edit this file, simply Control-click on the .htaccess file.

Then, select View/Edit. 

Editing the .htaccess file

This will open .htaccess in your computer’s default text editing program. 

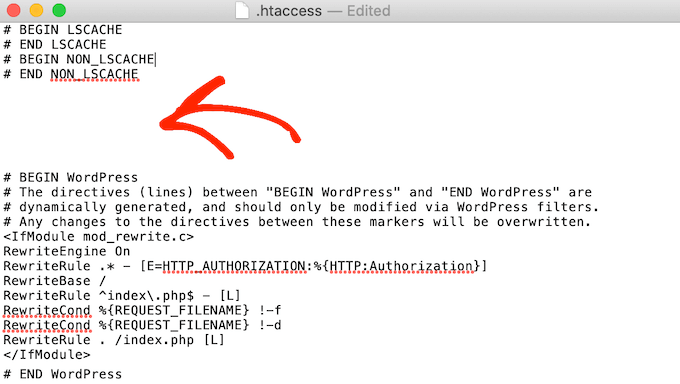
Inside this file, find the ‘​​# BEGIN’ line. You’ll need to add all the Cloudflare IP addresses above this line.

Fixing error 521 with WordPress and Cloudflare

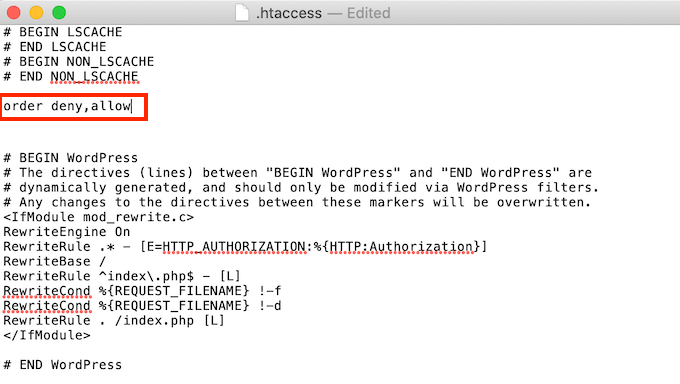
To start, type the following on a new line:

order deny,allow

How to fix error 521 using .htaccess

In a new tab, open the list of Cloudflare IP ranges

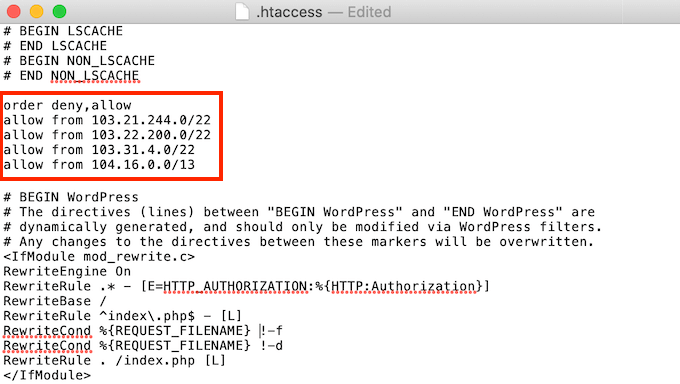
To whitelist an IP address, you’ll need to type ‘allow from’ and then either copy/paste or type the IP address. This means that:

103.21.244.0/22

Becomes:

allow from 103.21.244.0/22

You’ll also need to add each IP address on a new line.

Whitelisting the Cloudflare IP address

After adding all the Cloudflare IP addresses, save your changes. You can now close the .htaccess file.

Now you can go ahead and visit your site, to see whether this has fixed ‘Error 521.’ 

4. Ask Your Hosting Provider to Enable Port 443 

Cloudflare has a few different encryption modes.

Did you switch to Full or Full (Strict) mode, right before getting the 521 error? This may have caused the problem. 

When Cloudflare is in Full or Full (Strict) mode, it needs access to port 443. However, some servers prevent Cloudflare from accessing this port, which will trigger the ‘Error 521′ error.

The solution is to enable port 443 on your server. 

This process will vary depending on your hosting provider and your server’s settings. With that in mind, we recommend contacting your hosting provider and asking them to enable port 443 for you. 

5. Create and Upload a Cloudflare Origin Certificate 

Even with port 443 enabled, you may still get the 521 error when using Cloudflare’s Full or Full (Strict) mode. 

This is because some servers only allow connections on port 443 if you have a valid Cloudflare Origin Certificate. This certificate encrypts the traffic between Cloudflare and your web server.

If you don’t provide an Origin Certificate, you may get an ‘Error 521.’ 

The good news is that Cloudflare can walk you through the process of creating this certificate, step by step.

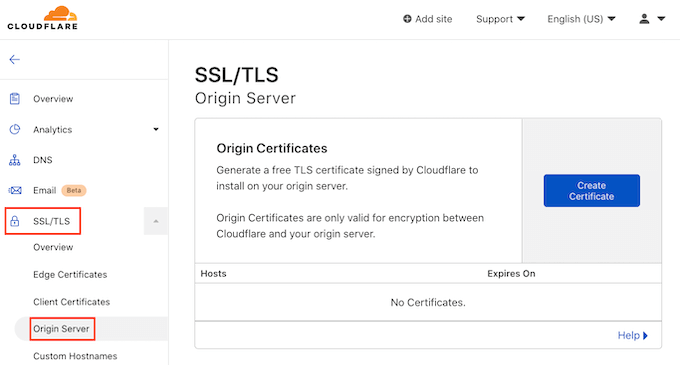
To get started, log into your Cloudflare account. Then go to SSL/TLS » Origin Server.

How to create a Cloudflare Origin Certificate

Next click on the Create Certificate button. 

Cloudflare will now ask for a private key and a Certificate Signing Request (CSR). 

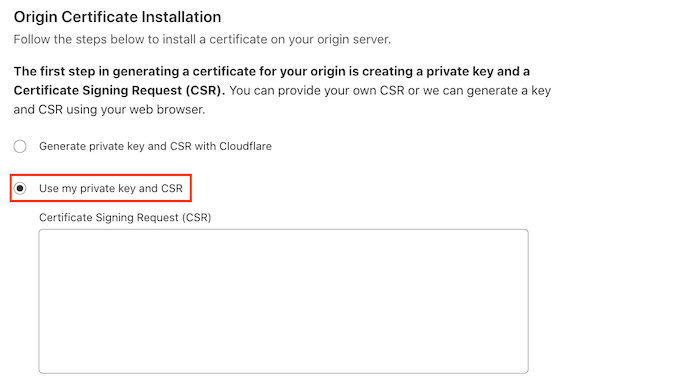
Do you already have a private key and CSR? Then simply select the ‘Use my private key and CSR’ checkbox.

Creating a private key

You can now type your CSR into the ‘Certificate Signing Request (CSR)’ box. 

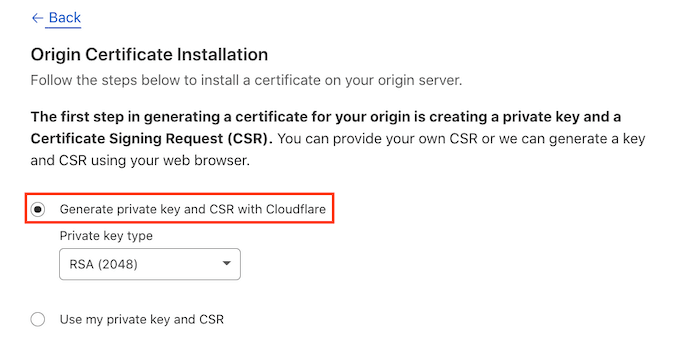
If you don’t have a CSR and key, don’t panic! Cloudflare can create these two things for you. 

To get started, select ‘Generate private key and CSR with Cloudflare.’

Fixing error 521 with WordPress and Cloudflare

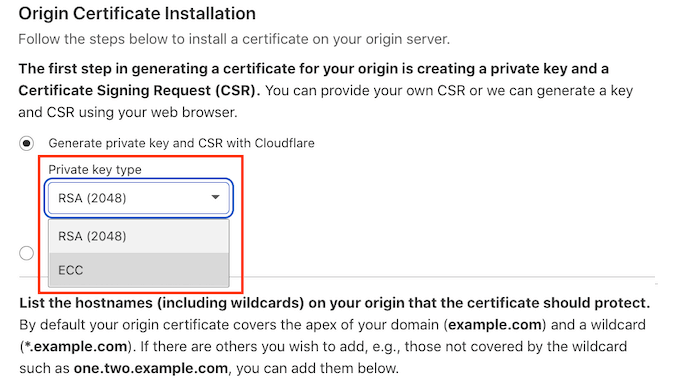
You can now choose whether to create an RSA key or an ECC key. 

Most security experts agree that ECC and RSA are equally secure. However, ECC has a shorter key length. This means that ECC keys are faster. 

For this reason, we recommend you create an ECC key.

Once you’ve made your decision, open the ‘Private key type’ dropdown. You can then select either RSA or ECC.

Creating a private key for Cloudflare

Next, scroll to the Hostnames field. Here you can add all the hostnames that you want to protect. This may sound complicated, but Cloudflare does a lot of the work for you. 

You’ll see that Cloudflare has already added your root domain name

Cloudflare also automatically adds a wildcard, which is your website’s domain plus a * symbol. This is a ‘catch-all’ that makes sure your subdomains are properly protected. For example, if your root domain is ‘www.example.com’ then this wildcard will ensure your ‘store.youurwebsite.com’ subdomain is also protected. For more details, see our complete guide to subdomains

These default values should be enough to protect most websites. However, if you need to add more hostnames then you can just type them into the ‘Hostnames’ field.

Adding hostnames to Cloudflare

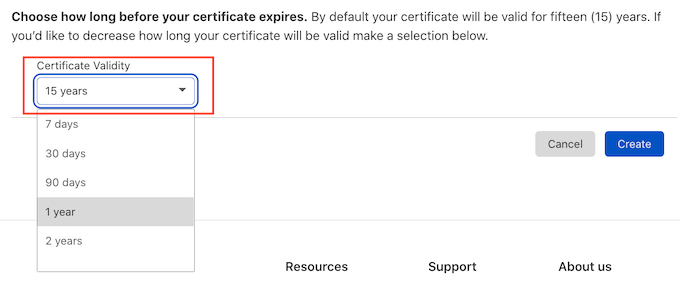
Next scroll to the ‘Certificate validity’ section.

Your certificate will be valid for 15 years by default. 

Need more time? Then just open the ‘Certificate validity’ dropdown and choose a new value. 

Changing your certificate validity

When you’re happy with all the information you’ve entered, click on the Create button.

Cloudflare will now create your certificate. 

Fixing error 521 with a Cloudflare certificate

Cloudflare will then show an Origin Certificate and Private Key. You’ll need to copy this information into separate files.

NOTE: You won’t be able to see the Private Key again after leaving this screen. With that in mind, make sure you store this key somewhere safe.

You can now upload your Origin Certificate to your web server. The steps may vary depending on your hosting provider and server.

To help you out, Cloudflare has published instructions for the different types of web servers.

Once you’ve installed the Origin Certificate on your server, the final step is updating your SSL/TLS encryption mode. 

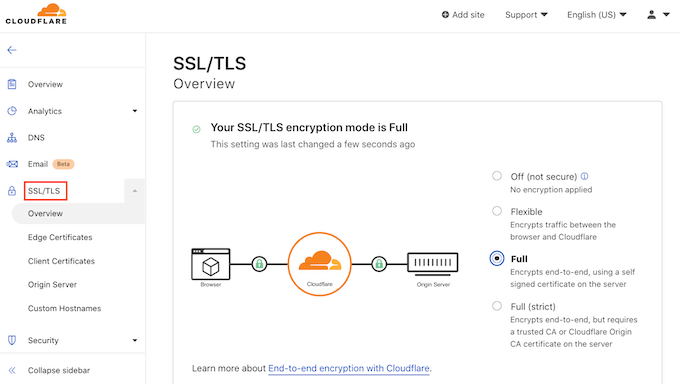
In your Cloudflare dashboard, go to SSL/TLS.

The Cloudflare dashboard

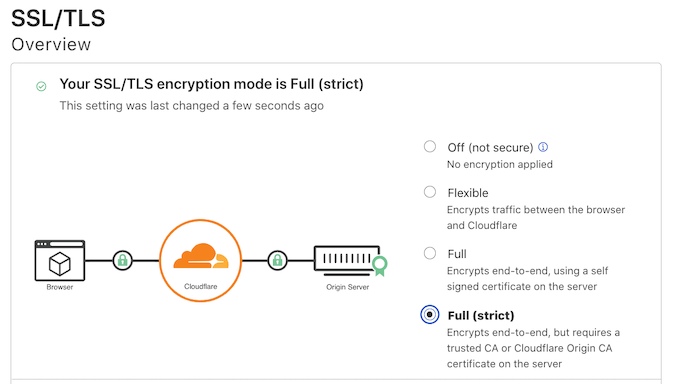
Now find the ‘SSL/TLS encryption mode’ section. 

In this section select ‘Full (strict).’ 

Changing your Cloudflare mode

Cloudflare is now using your Origin Certificate. You can now check your site to see whether this has fixed the ‘Error 521’

We hope this article helped you learn how to fix ‘Error 521’ with WordPress and Cloudflare. You may also want to see our guide on best managed WordPress hosting if you’d like your hosting company to deal with the technical details, or see our roundup of the best business VoIP providers for small businesses.

If you liked this article, then please subscribe to our YouTube Channel for WordPress video tutorials. You can also find us on Twitter and Facebook.

The post How to Fix Error 521 with WordPress and Cloudflare first appeared on WPBeginner.


April 28, 2022 at 04:00PM