Tuesday, May 10, 2022

How to Add Next / Previous Links in WordPress (Ultimate Guide)

Do you want to add next / previous links in WordPress?

Next and previous links are dynamic links that allow users to view the next or previous post.

In this article, we’ll show you how to easily add next/previous links in WordPress and how to make the most out of them.

Adding next and previous links in WordPress

What Are Next / Previous Links in WordPress?

Next / Previous links are dynamic links added by a WordPress theme that allow users to easily navigate to the next or the previous post. This can help to increase pageviews and reduce your bounce rate.

By default, WordPress blog posts are displayed in a reverse chronological order (newer posts first).

This means the next post is the one published after the current post a user is viewing, and the previous post is the one that was published before the current post.

Example of next previous links in a WordPress post

The next/previous links allow users to easily navigate individual articles and blog archive pages. It also helps you get more pageviews for your blog.

Most WordPress themes come with built-in next and previous posts links which are automatically displayed at the bottom of each post. However, some themes don’t display them, or you may want to customize where and how they appear on your WordPress website.

That being said, let’s take a look at how to easily add next and previous links in WordPress.

Following is the list of topics we’ll cover in this article.

Adding Next / Previous Links to WordPress by Using a Plugin

This method is easier and recommended for beginners who are not comfortable adding code to their websites.

First, you need to install and activate the CBX Next Previous Article plugin. For more details, see our step by step guide on how to install a WordPress plugin.

Upon activation, you need to visit the Settings » CBX Next Previous page. From here, you can choose where you want to show the next and previous links on your website.

Next and previous link plugin settings

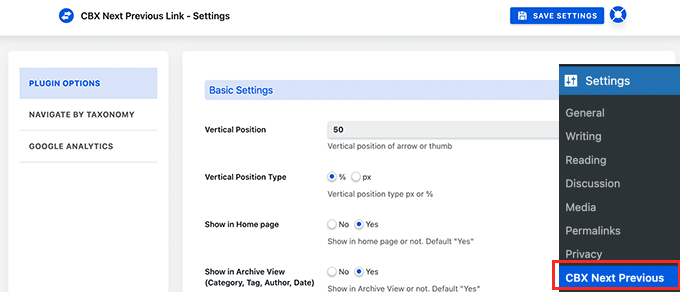
The plugin allows you to show Next and Previous link arrows on single posts, pages, archive pages, and more.

To make your next and previous links more relevant, you can also choose to display the next and previous posts from the same category or tag.

The free version of the plugin only allows you to display arrows for next and previous articles. You can upgrade to pro version to unlock other display options such as slide-in popup.

Choose arrow color

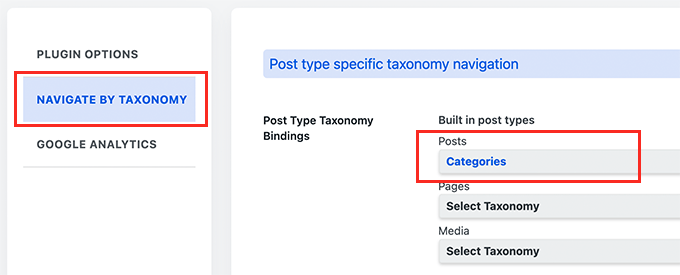
If you choose to display next / previous posts from same taxonomy, then you need to switch to the Navigate by Taxonomy tab.

From here, you need to choose which taxonomy you want to use to select next and previous links.

Taxonomy select

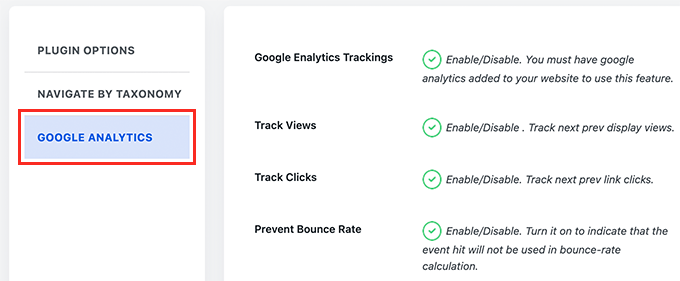
Optionally, the plugin also allows you to track clicks using Google Analytics. To use this feature, you’ll need to first install Google Analytics in WordPress.

After that, switch to the Google Analytics tab in plugin settings and enable click tracking options.

Enable Google Analytics

Once you are finished, don’t forget to click on the Save Settings button to store your changes.

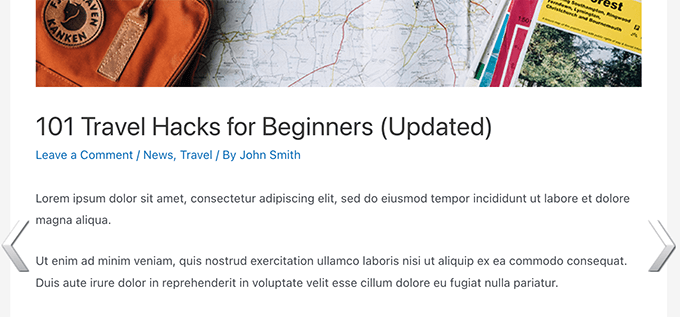
You can now visit your WordPress website to see the next/previous links in action.

Next / Previous links with arrows

This method is easier but it does not give you much flexibility. For instance, the free version doesn’t display the next or previous post title.

If you need more flexibility, then continue reading.

For this method, you’ll need to edit your WordPress theme files. If you haven’t done this before, then take a look at our guide on how to copy and paste code in WordPress.

Next, you’ll need to connect to your WordPress website using an FTP client or by using the File Manager app in your WordPress hosting control panel.

Once you are connected, you need to navigate to the /wp-content/themes/your-current-theme/ folder.

Editing single.php template

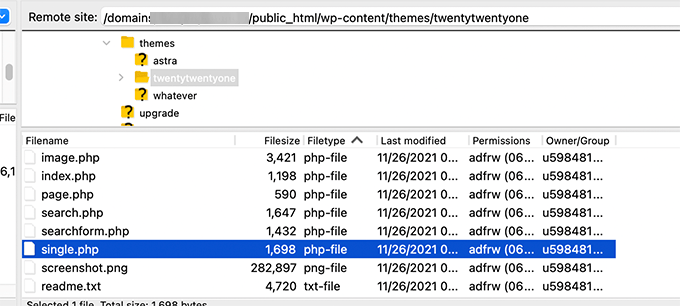
Now, you’ll need to locate the single.php file. This is the file responsible for displaying the single post items on your website.

Some WordPress themes may reference other files inside single.php file. These files are called template parts and are located inside the template-parts folder of your WordPress theme.

For more details, see our article on which files to edit in the WordPress theme.

After that, simply copy and paste the following code at the location in the template file where you want to display the next and previous links.

<?php the_post_navigation(); ?> 

You can now save your changes and visit your website to see Next / Previous links in action.

Simple next and previous links

The above template tag will simply show the link to next and previous posts with post title as the anchor text. It doesn’t say that these are the links to the next and previous articles.

Let’s change this a bit and provide users some context about these links. We’ll do this by adding the available parameters for the the_post_navigation template tag.

Simply replace the above code with the following:

<?php the_post_navigation( array(
 'prev_text'  => __( 'Previous Article: %title' ),
 'next_text'  => __( 'Next Article: %title' ),
 ) );
?>

You can now save your changes and preview your website.

Here is how it looked on our test site:

Next and previous links with context

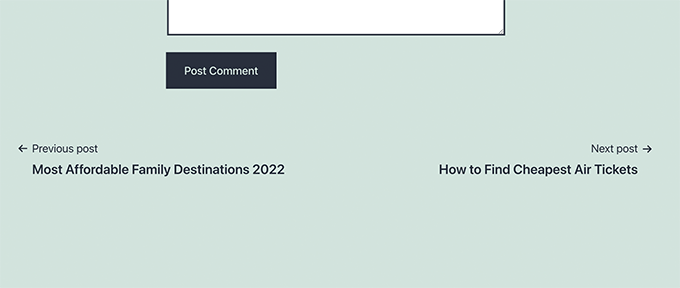
You can also use special characters and arrows along with next and previous post titles.

Simply replace the code with the following:

<?php the_post_navigation( array(
 'prev_text'  => __( '← %title' ),
 'next_text'  => __( '%title →' ),
 ) );
?>

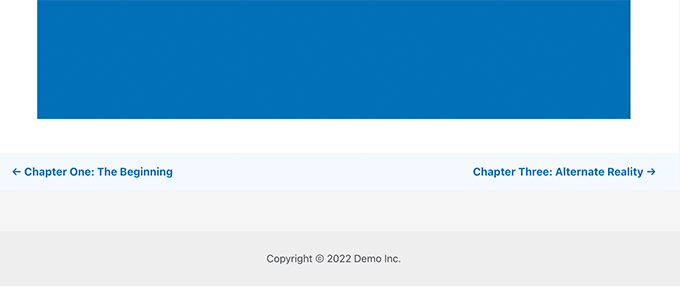
Here is how this code looked on our test website:

Next and previous links with arrow

Now let’s say you want to make the next and previous links more relevant to the article the user is currently viewing.

You can do that by showing the next and previous links from the same category or tags.

<?php the_post_navigation( array(
 'prev_text'  => __( '← %title' ),
 'next_text'  => __( '%title →' ),
 'in_same_term' => true, 
 'taxonomy'     => __( 'category' ),
 ) );
?>

This code tells WordPress to display next and previous posts in the same category. You can change taxonomy parameter to tags or any other custom taxonomy if needed.

Styling Next / Previous Links in WordPress

Now that we have learned how to add Next / Previous links in WordPress, let’s take a look at how to style them properly.

By default, WordPress automatically adds several default CSS classes to the post navigation links. You can use these CSS classes in your WordPress theme to style these links.

Here is some basic CSS that you can add to your theme.

.nav-links,
.posts-navigation .nav-links,
.post-navigation .nav-links {
        display: flex;
}

.nav-previous,
.posts-navigation .nav-previous,
.post-navigation .nav-previous {
        flex: 1 0 50%;
}

.nav-next,
.posts-navigation .nav-next,
.post-navigation .nav-next {
        text-align: end;
        flex: 1 0 50%;
}

This basic CSS simply displays next and previous links next to each other but on the different sides of the same line.

You can also make your navigation links standout by adding background color, hover effect, and more.

Here is some sample CSS code that you can use as an starting point.

.post-navigation {
background-color:#f3f9ff;
padding:0px;
}
.nav-previous, .nav-next{
padding:10px;
font-weight:bold
}
.nav-previous:hover,.nav-next:hover {
background-color:#0170b9;
}
.nav-previous:hover a:link ,.nav-next:hover a:link {
color:#fff;
}

This code styles the link text and adds some background color and hover effect to make next and previous links more prominent.

Next and previous link CSS style

Adding Next / Previous Links to WordPress Pages

Normally, the post navigation links are used for blog posts in WordPress. That’s because those items are published in reverse chronological order.

On the other hand, WordPress pages are not generally published in chronological order. For more details, see our guide on the difference between posts and pages in WordPress.

However, some users may need to display page navigation so that users can find the next page easily.

Luckily, you can use use the same code we used earlier for pages. However, you’ll need to add the code inside page.php template.

<?php the_post_navigation( array(
  'prev_text'   => __( '← %title' ),
  'next_text'   => __( '%title →' ),
   ) );
?>

Here is how it looked on our demo site:

Next and previous links for a WordPress paage

Adding Next / Previous links in WordPress with Thumbnails

Want to make your next and previous links more noticeable? Images are the easiest way to attract user attention and make these links more engaging.

Let’s add next and previous links with post thumbnail or featured image next to them.

First, you need to add the following code to theme’s functions.php file or a site-specific plugin.

function wpb_posts_nav(){
    $next_post = get_next_post();
    $prev_post = get_previous_post();
     
    if ( $next_post || $prev_post ) : ?>
     
        <div class="wpb-posts-nav">
            <div>
                <?php if ( ! empty( $prev_post ) ) : ?>
                    <a href="<?php echo get_permalink( $prev_post ); ?>">
                        <div>
                            <div class="wpb-posts-nav__thumbnail wpb-posts-nav__prev">
                                <?php echo get_the_post_thumbnail( $prev_post, [ 100, 100 ] ); ?>
                            </div>
                        </div>
                        <div>
                            <strong>
                                <svg viewBox="0 0 24 24" width="24" height="24"><path d="M13.775,18.707,8.482,13.414a2,2,0,0,1,0-2.828l5.293-5.293,1.414,1.414L9.9,12l5.293,5.293Z"/></svg>
                                <?php _e( 'Previous article', 'textdomain' ) ?>
                            </strong>
                            <h4><?php echo get_the_title( $prev_post ); ?></h4>
                        </div>
                    </a>
                <?php endif; ?>
            </div>
            <div>
                <?php if ( ! empty( $next_post ) ) : ?>
                    <a href="<?php echo get_permalink( $next_post ); ?>">
                        <div>
                            <strong>
                                <?php _e( 'Next article', 'textdomain' ) ?>
                                <svg viewBox="0 0 24 24" width="24" height="24"><path d="M10.811,18.707,9.4,17.293,14.689,12,9.4,6.707l1.415-1.414L16.1,10.586a2,2,0,0,1,0,2.828Z"/></svg>
                            </strong>
                            <h4><?php echo get_the_title( $next_post ); ?></h4>
                        </div>
                        <div>
                            <div class="wpb-posts-nav__thumbnail wpb-posts-nav__next">
                                <?php echo get_the_post_thumbnail( $next_post, [ 100, 100 ] ); ?>
                            </div>
                        </div>
                    </a>
                <?php endif; ?>
            </div>
        </div> <!-- .wpb-posts-nav -->
     
    <?php endif;
}

This code simply creates a function that displays the next and previous posts with featured images or post thumbnails.

Next, you need to add the wpb_posts_nav() function to your theme’s single.php file where you want to display the links.

If your theme already has next and previous links, then you may want to find the line that contains the_post_navigation() function and delete it.

Remove existing post navigation code

Now add the following code to display your custom next and previous links.

<?php wpb_posts_nav(); ?>

After adding the code, don’t forget to save your changes and visit your website to see the links in action.

Next and previous links without styling

Now, you may notice that these links don’t look very clean.

Let’s change that by adding some custom CSS to style them.

.wpb-posts-nav {
    display: grid;
    grid-template-columns: 1fr 1fr;
    grid-gap: 50px;
    align-items: center;
    max-width: 1200px;
    margin: 100px auto;
}
 
.wpb-posts-nav a {
    display: grid;
    grid-gap: 20px;
    align-items: center;
}
 
.wpb-posts-nav h4,
.wpb-posts-nav strong {
    margin: 0;
}
 
.wpb-posts-nav a svg {
    display: inline-block;
    margin: 0;
    vertical-align: middle;
}
 
.wpb-posts-nav > div:nth-child(1) a {
    grid-template-columns: 100px 1fr;
    text-align: left;
}
 
.wpb-posts-nav > div:nth-child(2) a {
    grid-template-columns: 1fr 100px;
    text-align: right;
}
 
.wpb-posts-nav__thumbnail {
    display: block;
    margin: 0;
}
 
.wpb-posts-nav__thumbnail img {
    border-radius: 10px;
}

You can now save your changes and visit your website to view next and previous links with thumbnails.

Here is how it looked on our test site:

Next and previous links with thumbnails

For more details, you can see our guide on how to add thumbnails to previous and next post links.

Bonus: Remove Next and Previous Links in WordPress

Some users may want to remove next and previous links in WordPress.

For instance, some users may find that these links are less helpful. Some may want to display related posts or popular posts instead.

There are two ways you can remove the next and previous links in WordPress.

Method 1. Delete The Code in Your WordPress Theme

To remove the next and previous links in WordPress, you’ll need to remove the code responsible for displaying the links in your WordPress theme.

The problem with this approach is that as soon as you update your theme, the deleted code will come back.

To avoid this, you’ll need to create a child theme.

Next, you need to find the code responsible for displaying the next and previous links in your parent theme.

Usually, it is found inside single.php or content-single.php templates.

Basically, you’ll be looking for the code that includes the following function.

<?php the_post_navigation() ?> 

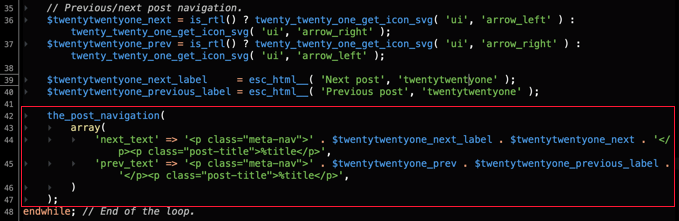
This code may have a slightly different format and parameters to it. For instance, on our test site the theme used this code to display the links:

the_post_navigation(
                                array(
                                        'prev_text' => '<span class="nav-subtitle">' . esc_html__( 'Previous:', 'mytheme' ) . '</span> <span class="nav-title">%title</span>',
                                        'next_text' => '<span class="nav-subtitle">' . esc_html__( 'Next:', 'mytheme' ) . '</span> <span class="nav-title">%title</span>',
                                )
                        );

If you are using a child theme, then you need to duplicate this particular template in your child theme and then delete the lines used to display next or previous links.

If you would rather just delete it in your parent theme, then you can do that as well.

Deleting the code will stop WordPress from displaying next and previous links.

Method 2. Hide The Next and Previous Posts Links

This method doesn’t really remove the next and previous links. Instead, it just makes them invisible to human readers.

Simply add the following Custom CSS to your WordPress theme.

nav.navigation.post-navigation {
    display: none;
}

Don’t forget to save your changes and visit your website to see the navigation links disappear.

Remove next previous links in WordPress using CSS

We hope this article helped you learn how to easily add next and previous links in WordPress. You may also want to see our guide on how to choose the best web design software, or our expert comparison of the best domain registrars.

If you liked this article, then please subscribe to our YouTube Channel for WordPress video tutorials. You can also find us on Twitter and Facebook.

The post How to Add Next / Previous Links in WordPress (Ultimate Guide) first appeared on WPBeginner.


May 10, 2022 at 04:00PM

Monday, May 9, 2022

How to Accept ACH Payments in WordPress

Do you want to accept ACH payments on your WordPress website?

ACH (Automated Clearing House) payments are a bank-to-bank payment method in the United States. ACH payments help save transaction fees for business owners since they are a lot lower than a credit card or digital wallet transaction fees.

In this article, we’ll show you how to accept ACH payments in WordPress.

How to accept ACH payments in WordPress

Why Accept ACH Payments in WordPress?

If your business is located in the United States, then you can lower your transaction fees by a lot when you accept ACH payments on your WordPress site. It’s a perfect payment method if you regularly accept large amounts of money from customers.

For example, the Stripe fee for accepting ACH payments is just 0.8% per transaction, with a maximum cap of $5.

On the other hand, a typical credit card or digital wallet payment fee is 2.9% + USD 0.30 per transaction. Even newer methods like Apple Pay charge a 1.5% fee, nearly double ACH.

Keeping these fees in mind, let’s say a customer pays $100. Through ACH payments, the transaction fee would be roughly $0.80. At the same time, the transaction fee for the same amount through a credit card or digital wallet would be $3.20.

Similarly, on an $800 payment amount, the transaction fee through ACH would be $6.40, and through cards or digital wallets would be $23.50. What this means is that the higher the transaction amount, the more you’ll save in transaction costs.

Another advantage of using ACH payments is getting higher customer retention and reducing the churn rate. Credit and debit cards expire after a certain period, which means that customers will stop doing business until their cards are renewed. With ACH payments, you can overcome this issue and reduce involuntary churn.

That said, let’s look at how you can accept ACH payments in WordPress.

Accepting ACH Payments in WordPress

The best way to allow ACH payments in WordPress is by using the WP Simple Pay plugin. It’s the best Stripe plugin for WordPress and will let you set up one-time payments or recurring payments without setting up a shopping cart.

We’ll use the WP Simple Pay Pro version for this tutorial because it includes ACH payments, on-site payment forms, and other features. There is also a free version of the plugin, but it doesn’t have an ACH payment option.

First, you’ll need to install and activate the WP Simple Pay plugin. If you need help, then please see our detailed guide on how to install a WordPress plugin.

Once the plugin is active, it will automatically launch the setup wizard. Go ahead and click the ‘Let’s Get Started’ button.

The WP Simple Pay Setup Wizard Will Start Automatically

On the next screen, you’ll need to enter the license key. You can easily find the license key in your WP Simple Pay account area.

After entering the key, you can click the ‘Activate and Continue’ button.

You’ll Be Asked to Enter Your WP Simple Pay License Key

Next, you’ll need to connect WP Simple Pay with Stripe.

Stripe is a popular payment gateway that allows you to collect ACH payments on your WordPress site.

Go ahead and click the ‘Connect with Stripe’ button.

Connecting WP Simple Pay to Stripe

After that, you can log in to your Stripe account and connect it with WP Simple Pay.

Just a note that Stripe requires websites to have HTTPS encryption. If you don’t already have an SSL certificate for your website, then please see our step-by-step guide on how to get a free SSL certificate for WordPress.

Once your Stripe account is connected, WP Simple Pay will show different email options to configure. You can enable emails for payment receipts, upcoming invoices, and payment notifications.

Configure Your WP Simple Pay Emails

Next, enter your business email address where you’d like to receive these emails, and then click the ‘Save and Continue’ button.

After that, you’ll arrive at the last step in the setup wizard, where you’ll need to create a payment form. Simply click on the ‘Create a Payment Form’ button.

WP Simple Pay Setup Is Complete

Setting Up a WP Simple Pay Payment Form

You can also create a payment form in WP Simple Pay by going to WP Simple Pay » Add New from your WordPress dashboard.

You will see a number of payment form templates. You need to hover over the ‘ACH Direct Debit Form’ template and then click the ‘Use Template’ button that appears.

Select the ACH Direct Debit Form Template

You’ll find yourself on the ‘General’ tab of the payment form editor. If you like, you can rename the form and give it a description.

We’ll leave the other settings with their default values.

If You Like, Rename Your Form and Give It a Description

Next, go to the ‘Payment’ tab in the payment form and enter the price amount and label.

You should also set up whether it is a one-time payment or a recurring subscription.

Enter payment details

After that, head down to the ‘Form Field’ tab.

Under the Payment Method section, you’ll notice that the ‘ACH Direct Debit’ and ‘Card’ payment options have already been selected for you. If you like, you can also select any other payment methods that you’d like to use.

ACH and Credit Card Payment Options Have Already Been Set Up for You

Next, you can preview your ACH payment form and then publish it.

To do that, simply click the ‘Publish’ button in WP Simple Pay.

Publish your ACH form

You can now add your ACH payment form anywhere on your WordPress website.

To start, go ahead and add a new page or edit an existing one. Once you’re in the content editor, simply add a WP Simple Pay block. After that, you should select your ACH form from the dropdown menu.

Add WP Simple Pay Block

Once that’s done, you can preview your page and publish it.

Now you can visit your website to see the ACH payment form in action. Here’s a preview of what it looks like on our demo site.

ACH Payment Form Preview

Final Thoughts on Adding ACH Payments in WordPress

The above method is the simplest way to accept ACH payment in WordPress without using a shopping cart.

However, if you’re using WordPress for your online store or to sell digital downloads, then most of those eCommerce plugins also support ACH payments.

For example, you can use Easy Digital Downloads to sell digital downloads like eBooks, software, music, etc, and it lets you accept ACH payments.

Alternatively, WooCommerce will allow you to sell physical goods and accept ACH payments.

We hope that this article helped you learn how to accept ACH payments in WordPress. You can also see our guide on how much it costs to build a website and the best WordPress plugins.

If you liked this article, then please subscribe to our YouTube Channel for WordPress video tutorials. You can also find us on Twitter and Facebook.

The post How to Accept ACH Payments in WordPress first appeared on WPBeginner.


May 09, 2022 at 02:30PM

Saturday, May 7, 2022

How to Set a Default Featured Image in WordPress (Easy Way)

Do you want to set a default featured image in WordPress?

Many themes use featured images (a.k.a post thumbnails) to make your content look more appealing and attention-grabbing. But finding the right featured image for each post can be time-consuming, and if you forget to add a featured image, then your posts might look incomplete.

In this article, we will show you how to fix that by setting a default featured image in WordPress.

How to set a default featured image in WordPress using a plugin

Why Set a Default Featured Image in WordPress?

Featured images, sometimes known as thumbnail images, are the primary image for your WordPress posts and pages.

All popular WordPress themes come with built-in support for featured images.

However, you may sometimes forget to upload a featured image to your posts. If you have other authors posting on your site, then they may not realize the importance and skip over adding a featured image.

WordPress themes typically use featured images in multiple different areas. If you forget to add a featured image, then you may end up with lots of gaps in your website’s design including in important places like your blog archive or homepage.

For example, in the following image you can see that OptinMonster shows featured images on their blog index.

The OptinMonster blog index

People also find images more engaging than plain text. Posts that don’t have a featured image may get less traffic and lower conversion rates.

With that in mind, it’s a good idea to set a default featured image in WordPress. This gives your site something to show when no featured image is available.

To make it easy for you, we have created quick jump links for the sections:

The easiest way to set a default featured image is by using the Default Featured Image plugin. This plugin adds a new setting to the WordPress Media page where you can upload a fallback featured image.

First, you’ll need to install and activate the

Default Featured Image plugin. If you need help, then please see our step by step guide on how to install a WordPress plugin.

Upon activation, head over to Settings » Media. Once you’ve done that, just click on the ‘Select default featured image’ button.

The WordPress Media Library

You can now either choose an image from the WordPress media library or upload a new file.

After choosing your fallback, scroll to the bottom of the screen and click on ‘Save Changes.’

How to set a WordPress default featured image

WordPress will now use the image that you selected as your default thumbnail for any posts or pages where you don’t provide a featured image.

You can change the default image at any point by repeating the same process above.

If you no longer want to use a default featured image, then simply go to Settings » Media. Then just click on the ‘Don’t use a default featured image’ button.

Removing the default featured image using a plugin

Don’t forget to click on ‘Save Changes’ when you’re done.

How to Set a Default Featured Image for Social Media

Social media platforms are a great place to reach new readers, build a following, and get more people to visit your site. To do this, you’ll need to post interesting and engaging content to your social media accounts.

The featured image that’s shared alongside your post can also encourage more people to visit your site.

However, social media sites don’t automatically display your featured image when you share your content. Sometimes they’ll even show the wrong thumbnail, here’s how to fix the incorrect thumbnail issue in WordPress.

With that in mind, you may also want to set a default featured image for the different social media platforms. These platforms will then use this fallback for any posts that are shared without a unique featured image.

To do this, we recommend using All in One SEO (AIOSEO) plugin.

AIOSEO

AIOSEO is the best SEO plugin for WordPress in the market used by over 3 million websites including WPBeginner. It offers the most beginner friendly and comprehensive SEO toolkit to help you fine-tune your WordPress blog or website for the search engines.

For this post, we’ll be using the free version of AIOSEO.

First, you’ll need to install and activate the AIOSEO plugin in WordPress. For more details, please see our tutorial on how to install a WordPress plugin.

Upon activation, the plugin will launch the setup wizard. To configure the plugin, simply click the ‘Let’s Get Started’ button and follow the onscreen instructions. If you need help, then please refer to our guide on how to properly set up All in One SEO in WordPress.

Once you’ve done that, go to All in One SEO » Social Networks.

The AIOSEO SEO plugin for WordPress

You will now see tabs for Facebook, Twitter, and Pinterest. You can use these tabs to set a unique default image for these different platforms.

As an example, let’s see how you can set a default featured image for Facebook. To get started, click on the ‘Facebook’ tab.

Adding a default featured image using AIOSEO

After that, open the ‘Default Post Image Source’ dropdown.

You can then choose ‘Default Image (Set Below).’

AIOSEO's social network settings

Next find the ‘Default Post Facebook Image’ section.

Here you’ll see some tips on how to make sure your image looks great when people share it on Facebook.

Optimizing your default featured image with AIOSEO

For more information, please see our complete social media cheat sheet for WordPress.

To set your default featured image, click on the ‘Upload or Select Image’ button.

Uploading a default featured image for Facebook

This opens the WordPress media library. You can now either choose an image from your media library, or upload a new file.

Finally, click on the ‘Save Changes’ button. After completing this step, Facebook will use this image whenever there’s no featured image available.

To set a default image for Twitter or Pinterest, simply click on the ‘Twitter’ or ‘Pinterest’ tab. You can then choose a fallback image following the same process described above.

AIOSEO's Twitter and Pinterest tabs

We hope this article helped you learn how to set a default featured image in WordPress using a plugin. You may also want to check out our guide on how to choose the best web design software and the best drag and drop WordPress page builders compared.

If you liked this article, then please subscribe to our YouTube Channel for WordPress video tutorials. You can also find us on Twitter and Facebook.

The post How to Set a Default Featured Image in WordPress (Easy Way) first appeared on WPBeginner.


May 07, 2022 at 12:00PM

Friday, May 6, 2022

21 Best WordPress Full Site Editing Themes of 2022 (Mostly Free)

Are you looking for the best full site editing WordPress themes?

Full Site Editing (FSE) in WordPress gives you more control over your website design. It offers custom blocks for styling your website’s header, footer, sidebar, and other sections.

In this article, we will share some of the best WordPress full site editing themes for your site.

Best WordPress Full Site Editing Themes

What is WordPress Full Site Editing (FSE)?

Full Site Editing (FSE) is a set of modern features for the default WordPress Block Editor. It was first released in WordPress 5.9.

Previously, the WordPress Block Editor allowed you to add and customize the layout of content within your pages and blog posts. The rest of your website’s layout and design was determined by your WordPress theme.

Now, WordPress full site editing lets you completely change the theme layout and add new sections to your website, without writing any code. You can also add site-wide global styles that apply to your entire website or individual styles for specific WordPress pages or posts.

The styling options include color schemes, font settings, layout spacing, image borders, and more.

However, you can only use full-site editing features if your theme supports them.

Below you’ll find our hand-picked list of the best full-site editing (FSE) themes for WordPress.

1. SeedProd

SeedProd WordPress Website Builder

SeedProd is one of the most popular WordPress theme builders. It lets you design a custom website template from scratch, without writing code.

SeedProd is different from other themes on this list because it’s actually a plugin that includes its own easy drag and drop builder, instead of relying on the built-in FSE features. This gives you more flexibility and control over your theme’s design.

You can easily create a header, footer, page templates, post layouts, and WooCommerce pages for your website. It also comes with ready-made custom blocks to add content to different sections of your WordPress site, plus a library of 2+ million free stock images.

To help you get started, SeedProd provides dozens of theme and page layouts. These built-in theme templates give you a quick start to set up your website for any business niche. You can also start with a blank template and create your own design from scratch.

For step-by-step instructions and examples, you can see our guide on how to create a custom WordPress theme from scratch.

2. Divi

Divi

Divi is an excellent WordPress theme and page builder. It works with the WordPress block editor and supports full site editing to create a website for your business or professional blog.

The Divi Builder is powerful and works with all the popular WordPress themes for easy customization.

Its visual builder functionality gives you the flexibility to make real-time changes to your website’s background, colors, font, and images. And, if you don’t like the new look, you can always also undo or redo changes to go back where you started.

Divi Theme comes with hundreds of layout packs. These website layouts are fully functional and easy to import to your site with 1 click.

The best part about the Divi layout packs is that they include complete pages and content. That means you can quickly launch your site without having to create everything from scratch yourself.

3. Astra

Astra

Astra is the most popular WordPress theme on the market. It’s super flexible and works with all popular WordPress page builder plugins, including Beaver Builder, Elementor Pro, and Visual Composer.

The theme comes with a built-in header and footer builder. It gives you full site editing options with custom blocks for your website’s header and footer.

Astra offers dozens of starter themes, so you can easily find a theme for your business website. And, these templates seamlessly work with popular WordPress theme builders like SeedProd for easy customization.

4. Ultra

Ultra

Ultra is a modern WordPress multipurpose theme built by Themify. It also offers a WordPress visual builder for a custom header, footer, and site-wide layouts.

The theme gives you complete control to show or hide any element from the header or footer. It also comes with page and post layouts, background options, custom fonts, and beautiful color schemes.

Themify Builder Pro tool included with Ultra lets you create a custom theme template with your choice of header, footer, page, post, search page, and WooCommerce pages. You can create global theme styles or design individual page templates for different categories on your site.

5. Neve

Neve

Neve is a fantastic WordPress theme for any kind of website. It’s fast and lightweight and comes with flexible full site editing options, including custom blocks and layout options.

It has a drag and drop header and footer builder to add, remove, and move elements easily. Also, the layout options allow you to choose from a full-width or sidebar layout.

The theme supports WordPress page builders out of the box. And, Neve has hundreds of starter templates that you can import to your site and customize with your favorite page builder plugin to launch a website.

6. Guten Theme

Guten Theme

Guten Theme is a modern WordPress theme built specifically for the WordPress block editor. It comes with built-in layouts for the header, footer, and blog page to easily set up a website using the WordPress customizer.

The theme also works with popular page builder plugins like Elementor Pro. You can use the page builder to fully control the complete website layout and design, including your theme’s background, colors, and fonts.  

7. Clove

Clove

Clove is a free and beautiful WordPress full site editing theme. It comes with an elegant layout that features an eye-catching homepage design, natural colors, and a minimalistic design.

The theme offers ready-made block templates and design options. It’s easy to manage these settings with global styles and the WordPress block editor.

8. Felt LT

Feltmag

Felt LT is a premium quality WordPress magazine theme. It comes with widget-ready areas on the homepage and multiple useful widgets to add content to the front page.

The theme has full site editing support with a built-in style manager. It lets you customize global styles for your WordPress site, including colors, borders, buttons, and layouts with a few clicks.

9. Hestia Pro

Hestia Pro

Hestia Pro is a stylish WordPress one-page theme. It comes with a few ready-made templates for small businesses that you can quickly import to launch your site.

With built-in support for WordPress page builders, you can fully customize your theme layout. It also lets you change the header style to add a custom background video or image slider. And, you can apply this option to your entire site or make it limited to the homepage.

10. Naledi

Naledi

Naledi is a free WordPress and WooCommerce full site editing theme. It has a beautiful homepage layout with a full-width header background image, welcome text, and a call-to-action button.

The theme lets you make changes to the global styles to control the look and design of your site. And, the style options also appear on your WooCommerce shop pages without any extra work.

11. BlockPress

Blockpress

Blockpress is a free WordPress block theme. It supports full site editing options with global styles, custom blocks, and a site manager.

The theme works with eCommerce plugins to start an online store. It’s also translation-ready and supports RTL languages to create a multilingual website.

12. Archeo

Archeo

Archeo is a free WordPress theme built specifically for archeology, history, and cultural websites. It comes with a classic vintage font style on the homepage and other landing pages.

There’s a fullscreen background image that you can change with the block editor. The Archeo theme supports full site editing with site-wide blocks and global style options.

13. Hive

Hive

Hive is a black and white WordPress magazine theme. It’s beautifully crafted with a magazine-style website layout including a custom logo, navigation menu, featured posts, and social icons.

The theme has a bold look with full-width and multi-column sections on the homepage. It supports page builders to add new landing pages and customize global elements on the theme easily.

14. Stewart

Stewart

Stewart is a free and minimalist WordPress theme for bloggers, writers, and authors. It comes with a two-column layout with a sidebar on the left and your content on the right side of the screen.

It comes with a default color scheme for the WordPress blog theme. However, you can use the full site editing features to customize global colors styles, font styles, and background options.

15. Bricksy

Bricksy

Bricksy is a premium-style but free WordPress theme. It has a modern and stylish homepage layout, including eye-catching font styles and image choices in the top section.

It fully supports the block editor and has drag and drop features for you to design your website pages with. You can use the full site editing options to manage global website styles or individual page settings.

16. Tove

Tove

Tove is a multi-color free WordPress theme with support for the modern full site editing features. It’s specifically built for cafes, restaurants, and coffee shops.

The theme comes with dozens of block patterns for the header, footer, and site-wide layout. These custom blocks are easy-to-use on your entire site globally or to customize specific pages and posts.

17. Julia

Julia

Julia is an attractive and beautiful WordPress food blog theme. It comes with a magazine-style layout for food bloggers, chefs, restaurants, and cafes.

The theme is perfect to start your food blog. It fully supports the modern WordPress block editor and full site editing options to customize the theme design in real-time.

18. Hansen

Hansen

Hansen is a simple and free WordPress blog theme. It offers a fully custom block theme template and supports full site editing out of the box.

The theme features include a full-width layout, beautiful color scheme, custom background, and more. It comes with global styles and block patterns to customize your site without editing code.

19. Aino

Aino

Aino is an advanced WordPress theme with bold colors and classic font styles. It comes with a block plugin to create custom page layouts with built-in block patterns and a site manager.

The theme is easy to customize with full site editing features. You can use a single-column, two-column, or three-column layout on the entire site or individual pages as per your requirements.

20. Kemet

Kemet

Kemet is a fast and reliable WordPress theme. It’s designed specifically for personal blogs, portfolio sites, and small online business stores.

The default theme’s color and font styles are highly attractive. Kemet provides built-in theme templates, template parts, and custom blocks to edit your website’s header, footer, and site-wide settings easily.

21. Rosa2

Rosa2

Rosa2 is a premium WordPress food blog and restaurant theme. It comes with a powerful visual editor and custom blocks ideally built for restaurants and cafes.

The theme has an eye-catching design with a fullscreen homepage header layout. It gives you the flexibility to customize colors and fonts to match your global website layout.

We hope this article has helped you find the best WordPress full site editing themes. You may also want to check out our guide on how to create a free business email address, or our expert pick of the best auto-dialer software for small business.

If you liked this article, then please subscribe to our YouTube Channel for WordPress video tutorials. You can also find us on Twitter and Facebook.

The post 21 Best WordPress Full Site Editing Themes of 2022 (Mostly Free) first appeared on WPBeginner.


May 06, 2022 at 04:00PM