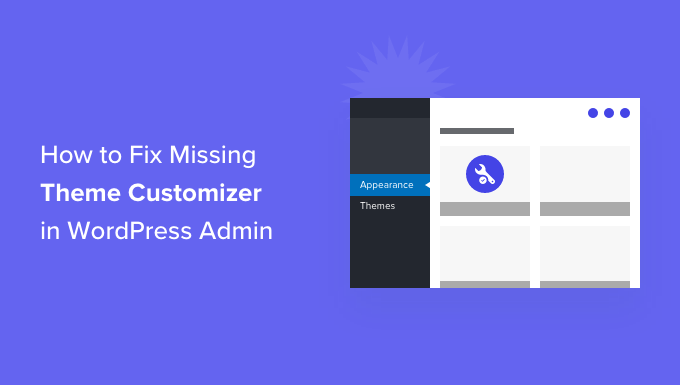
Do you want to fix the missing theme customizer in the WordPress dashboard?
WordPress themes that support full site editing (FSE) don’t include a theme customizer option in the WordPress admin panel. Instead, you’ll see a new ‘Editor (Beta)’ option under the Appearance menu.
In this article, we’ll show you how to fix the missing theme customizer in WordPress admin.
What Happened to the Theme Customizer in WordPress Admin?
With WordPress gradually releasing the new full site editor, many themes no longer show the theme customizer option in your WordPress dashboard.
Full site editing allows you to customize your website design using blocks, just like editing a blog post or page in the WordPress content editor. You can add and edit different sections of your theme template using blocks, widgets, and menus.
However, your Appearance menu will look different if you’re using a block-based theme like the default Twenty Twenty-Two theme.
You’ll notice that the ‘Customize’ option to open the theme customizer is missing from the Appearance menu. Instead, there’s an ‘Editor (Beta)’ option to launch the full site editor.
By using the full site editor, you should be able to make any changes you would have made with the Customizer tool.
However, you might prefer to use the customizer instead of learning a whole new way of customizing your theme. In that case, we’ve put together a guide on how you can still use the customizer on your WordPress site.
Let’s look at some of the ways you can fix the missing theme customizer.
Fixing Missing Theme Customizer from WordPress Admin
There are 3 simple ways you can use to fix the missing theme customizer from your WordPress admin panel.
We’ll go through each method, so you can choose the one that best suits you.
1. Manually Enter the Theme Customizer URL in Your Browser
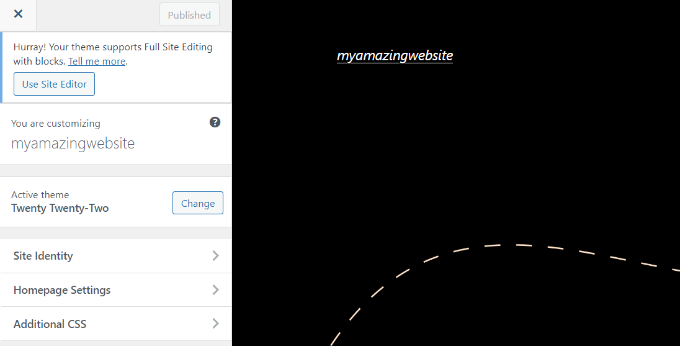
If you’re using a WordPress theme that uses the full site editor and want to access the theme customizer, then you can add ‘customize.php’ at the end of your WordPress admin URL.
Your website URL will look like this:
https://ift.tt/RwGHtym
Simply replace ‘example.com’ with your own website domain name and enter the link in your web browser. This will launch the theme customizer for your website.
However, it’s important to note that the editing options will be limited in the theme customizer for themes using full site editing. For instance, you may only see a few simple settings like site identity, homepage settings, and additional CSS.
If you want to use all the options offered by the theme customizer to edit your site’s theme, then you can use the next method.
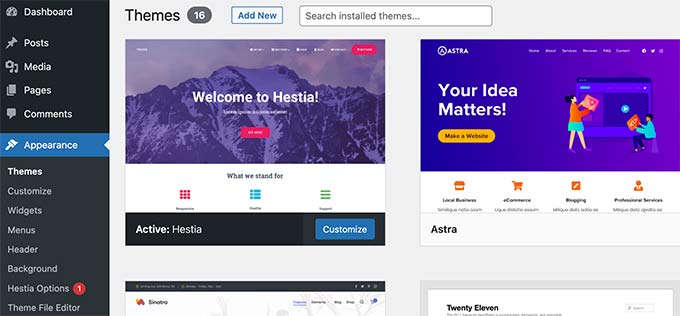
2. Switch Your WordPress Theme to Fix Missing Theme Customizer
Another way to solve the missing theme customizer issue is by changing your WordPress theme.
Full site editor is steadily rolling out, and it’s still in the early phases even in the latest WordPress 6.0 version. This means that not many themes fully support site editing at the moment, and those that do can be clunky and tricky to use.
Plus, the block-based themes have limited customization options if you access the theme customizer.
A simple way of restoring the theme customizer menu is by switching your WordPress theme to one that doesn’t include full site editing.
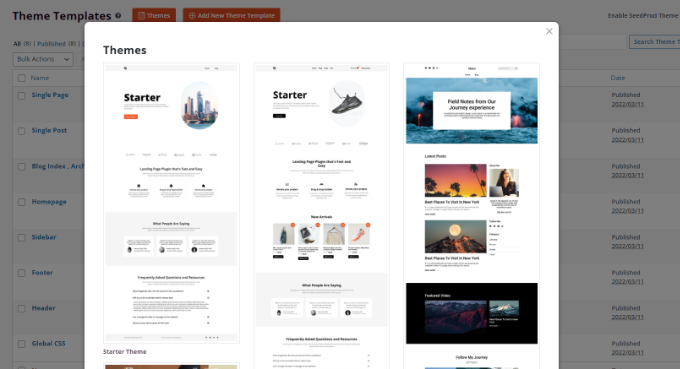
3. Use a WordPress Theme Builder to Fix Missing Theme Customizer
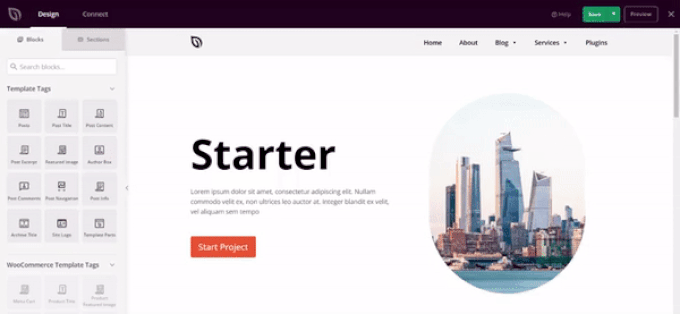
You can also use a WordPress theme builder like SeedProd to customize your WordPress website and fix the missing theme customizer from WordPress admin.
WordPress theme builders allow you to customize your site’s theme the way you want without writing any code or hiring a developer. Their drag and drop interface lets you build different theme templates and removes the need to use the WordPress theme customizer.
SeedProd is the best WordPress theme builder and page builder plugin that’s used by over 1 million professionals. It offers pre-built theme templates that you can use to create a custom WordPress theme in no time.
After selecting a template, you can use the drag and drop builder to customize your design.
Simply drag any element from the menu on your left and drop it onto the template. Plus, there are options to further customize each element on the template and change its color, size, font, and alignment.
Are you looking for the best WordPress banner plugins?
Banner plugins make it easy to add high-converting banners to your WordPress website. You can then use them to promote your products, highlight your services, sell advertising placements, and more.
In this article, we will compare the best WordPress banner plugins to help you boost your website revenue.
Why Use a WordPress Banner Plugin?
Many website owners use banners to encourage visitors to take some action on their website, like buying their products or services. For example, you might use a banner to promote your online courses.
Banners are also a great way to generate leads. You might create a banner that offers visitors a coupon code if they sign up to your email newsletter.
Whether you want to show a banner announcements on your eCommerce store, use a simple banner to generate leads, or sell banner ads in a slider, a WordPress banner plugin lets you do it without writing any code.
Some WordPress banner plugins also have advanced targeting features, so you can show personalized messages to the right people at the right time.
They may also come with professionally-designed templates for your banners, and offer other design tools to help you customize them.
That being said, let’s take a look at the best banner plugins for WordPress for various industry use-cases.
Pro Tip: There is a free version of OptinMonster that you can use to get started. They have a special free plan that can only be found from inside their WordPress plugin dashboard.
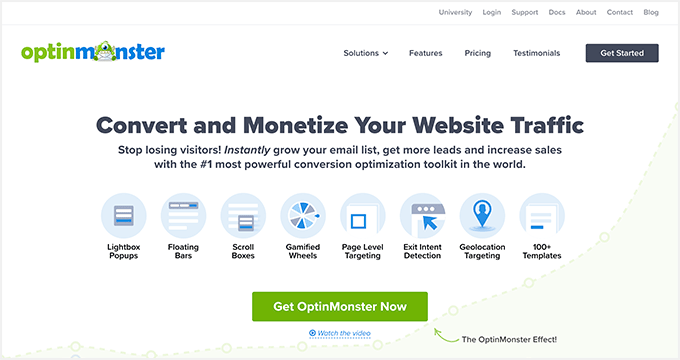
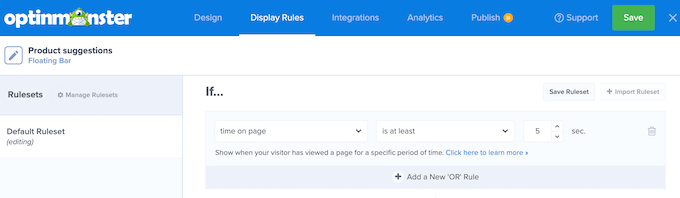
OptinMonster lets you add all kinds of banners to your website, including floating banner bars like in the image below.
This is a “sticky” floating bar that attaches to the top or bottom of the page and follows visitors as they scroll. This allows you to show a banner without annoying the visitor or interrupting what they’re doing on your WordPress website.
OptinMonster also has full support for popup banners. You can even level-up these banners with OptinMonster’s powerful exit-intent technology. This allows you to show a popup just as the user is about to leave your website.
Many website owners use these extent-intent popups to convince visitors to stay on the website by offering them exclusive discounts.
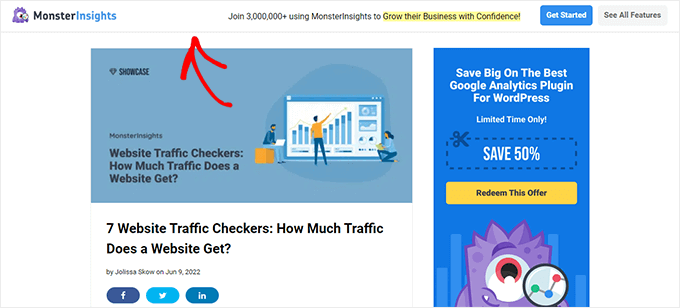
Popups are a great way to get the visitor’s attention, but they can also become intrusive. With that in mind, OptinMonster gives you the option to show your banners as slide-ins.
These are small popups that OptinMonster shows in the bottom-right corner of the screen as the visitor scrolls down. As you can see in the following image, slide-ins are a way to show content without interrupting whatever the visitor is currently doing on the website.
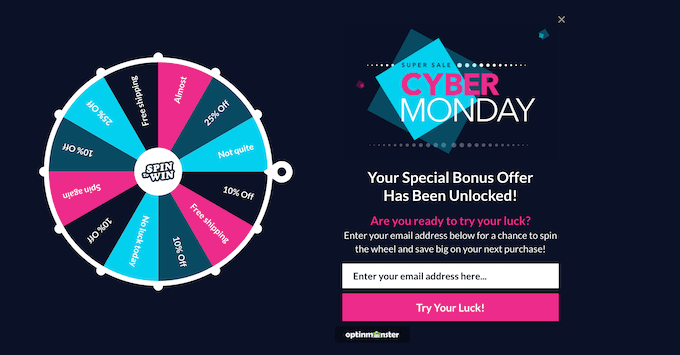
Gamified popups are a fun alternative to the traditional banner.
Many website owners have increased their conversions and overall engagement by using OptinMonster to create ‘spin to win‘ banners.
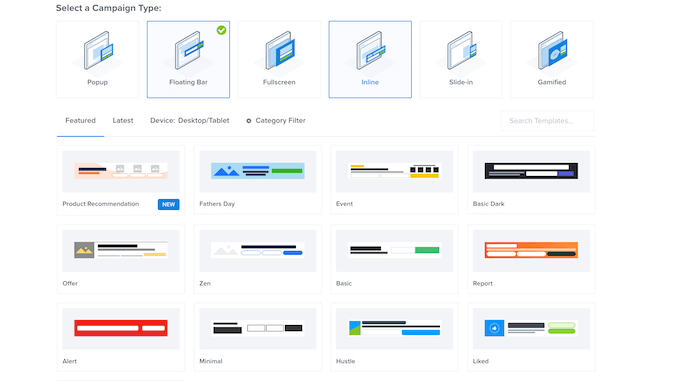
Even better, you can create all of these different banners within minutes by using OptinMonsters huge library of templates.
All of these templates are fully mobile responsive. This means your banner is guaranteed to look good on mobile devices, tablets, and full-sized desktop computers.
Simply choose a template from the OptinMonster setup wizard, and you’re ready to start creating your banner.
All of OptinMonster’s banner templates are easy to customize. Just open the built-in OptinMonster editor and start making changes using simple drag and drop. You can also remove content from the template and add new content with just a few clicks.
Let’s look at an example.
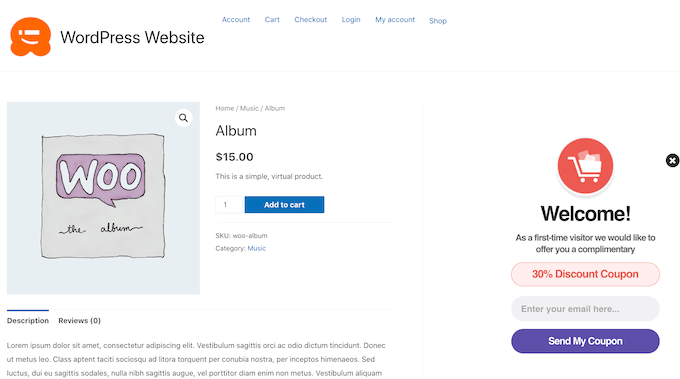
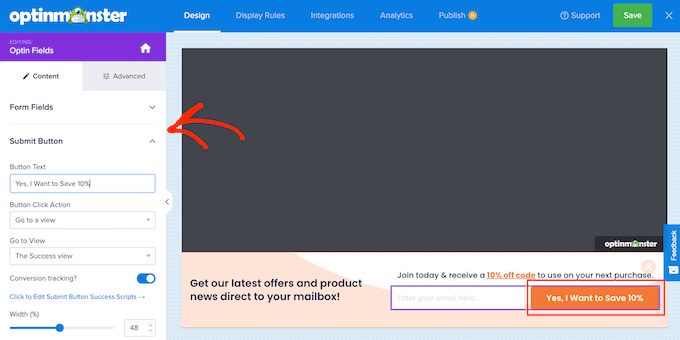
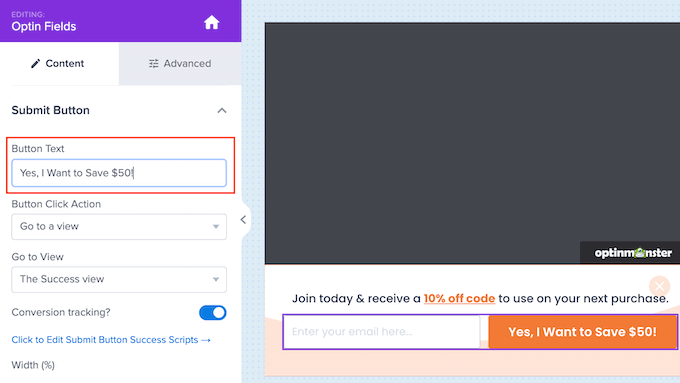
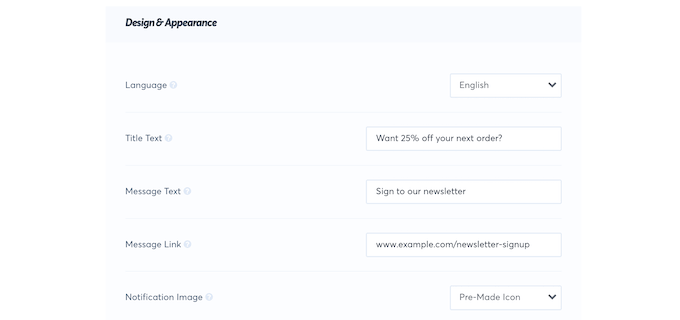
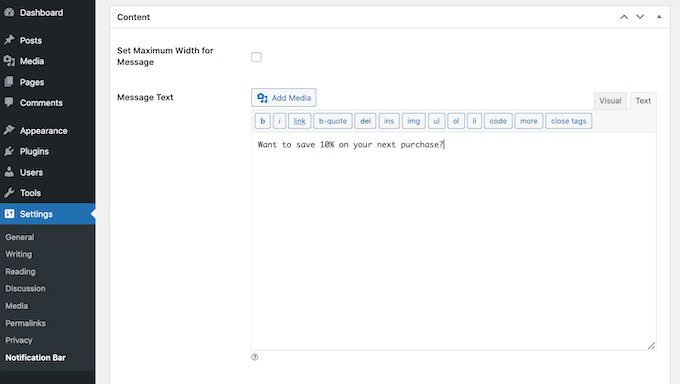
Many of OptinMonster’s banner templates have optin fields, so you can collect names, email addresses, or phone numbers, plus a call to action (CTA) button. To customize this button, you just need to give it a click.
The OptinMonster editor will then update to show all the settings you can use to customize that field or button.
You can now go ahead and make your changes in the left-hand menu.
For example, you might type a new call to action into the ‘Button Text’ field.
Once you’re happy with your banner, you’ll want to show it in the right places, to the right people, and at the right time.
OptinMonster makes it easy to create advanced targeting rules.
This allows you to show personalized banners based on things like the page the visitor is on, their location, and even the device they are using. You can even show different banners to first-time visitors and returning visitors.
OptinMonster comes with hundreds of powerful targeting rules to help you maximize your banner conversions.
Smart website owners often use OptinMonster banners to:
You can set up TrustPulse within a few minutes, and then create notification bubbles that show recent purchases, form submissions, sign ups for a free trial, and more.
TrustPulse’s notifications aren’t banners in the traditional sense. However, TrustPulse has an Action Message campaign that lets you show text in a notification bubble.
TrustPulse’s Action Messages are perfect for letting visitors know about sales, promotions, updates, and much more.
Plus, they use the power of social proof so you can get maximum conversions.
The TrustPulse editor makes it easy to create an Action Message that acts exactly the same as a banner would.
When the visitor clicks on your Action Message, you can redirect them to any WordPress page or post such as your landing pages or product pages. You can also send visitors to any third-party URL, which is perfect for promoting your affiliate links.
TrustPulse comes with built-in analytics so you can see which pages and Action Messages have the best conversion rates. You can then use this information to fine-tune your content and boost your conversions even further.
Advanced Ads is an ad management plugin that works with all the major ad types and networks. This includes Google AdSense, Google Ad Manager, and Amazon Ads.
Using this plugin, you can create and show unlimited banner ads on your WordPress website.
Large banners can be intrusive on devices with smaller screens, especially mobile devices. The good news is that with Advanced Ads, you can choose to show or hide your banners based on whether the visitor is using a smartphone, tablet, or a desktop computer.
You can also show or hide your banners depending on the visitor’s user role, or whether they’re logged into your membership site. This is a simple but effective way to show personalized banners and boost your conversion rates.
Advanced Ads supports lots of different ad placements as well.
Price:Advanced Ads starts at €49 (about $52 USD) per year. There’s also a basic free version you can use to try it out.
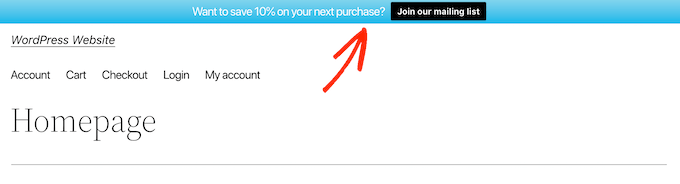
Upon activation, WPFront Notification Bar adds a new area to your WordPress dashboard under Settings » Notification Bar.
Here, you can build your banner by working through the different menus and checkboxes. You can then simply type your banner text into the standard WordPress text editor.
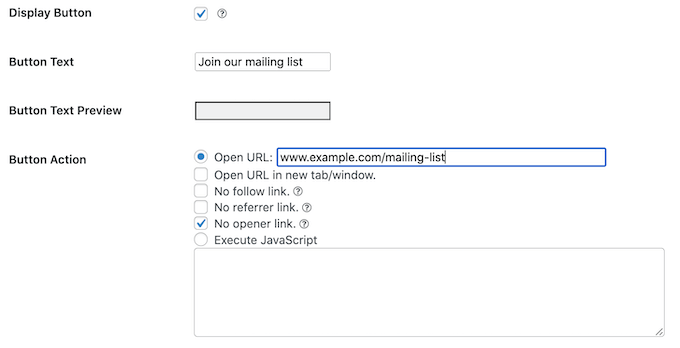
You can also encourage visitors to click on your banners by adding a button.
This button can redirect the visitor to any page, post, or third-party URL. It can also run JavaScript code.
When it comes to customization, this free plugin is much more limited than premium plugins like OptinMonster.
For example, there are no professionally-designed templates and no drag-and-drop builder. However, you can change your banner’s color and height.
If you accept user registrations on your WordPress site, then you can show or hide the banner based on the visitor’s role. After creating your banner, you can choose where this banner will show up on your website.
WPFront Notification Bar can show your banner at the top or bottom of the page. It can also hide the banner until the visitor scrolls.
If you like to schedule your banner campaigns in advance, then WPFront Notification Bar gives you the option to set a start and end date.
AdSanity can show ads from external networks like Google AdSense. However, you can also create your own banner using web design software such as Canva and then upload it to WordPress.
Once you’ve done that, you can show your banner on any page or post using a shortcode that AdSanity creates automatically.
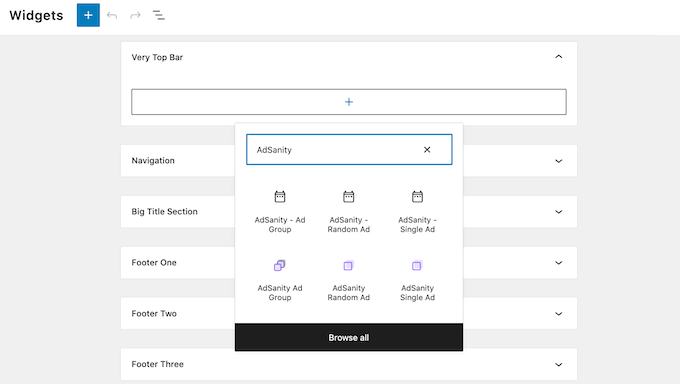
AdSanity also adds three new widgets to your WordPress dashboard: Ad Group, Random Ad, and Single Ad. You can use these widgets to add banners to any widget-ready area of your WordPress blog or website such as your sidebar.
Many WordPress website owners want to show several different ads in the same area, similar to a banner slider plugin.
With AdSanity, you can group ads together by creating ad groups. Once you’ve created some ads and assigned them to ad groups, you can place these groups on your site in exactly the same way you place single ads.
Once you’ve done that, your ad groups will rotate through their different ads on every page refresh. In this way, AdSanity can also work similar to a banner slider plugin.
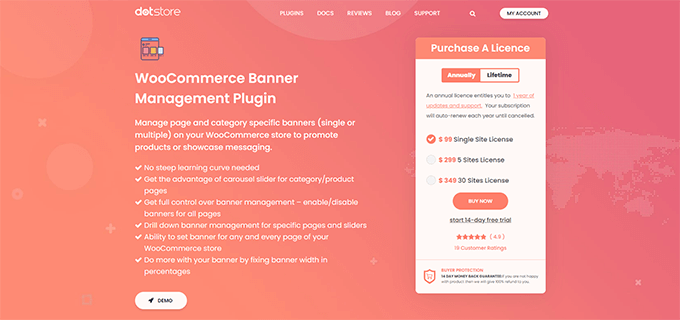
This plugin has separate sections where you can create unique banners for the different areas of your WooCommerce store. This includes WooCommerce’s cart, checkout, thank you, and product pages.
This makes it easy to run lots of different campaigns at the same time. You can even show multiple banners on the same page.
Product images are a big part of running a successful WooCommerce store. With that in mind, you can use this plugin to create image carousels showing lots of different products.
You can also set a start and end date for your banners, which is perfect for scheduling all of your different campaigns ahead of time.
Since this banner plugin is designed to be used with WooCommerce, you’ll need to install and activate the WooCommerce plugin first. If you need help, then please see our complete guide on WooCommerce.
Price:WooCommerce Banner Management costs $99 per year for a single website. There is also a limited free version that you can download from the official WordPress repository.
Once you start adding banners to your website, you’ll want to track how many people are clicking on each banner and whether those banners are bringing you conversions.
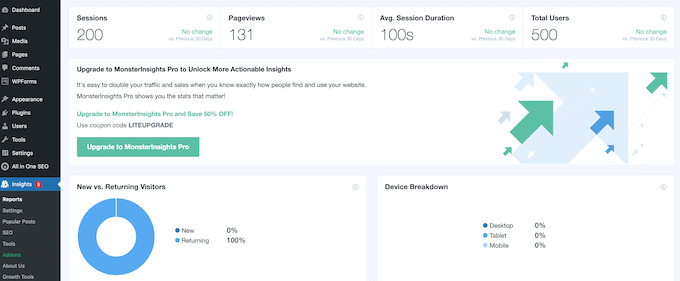
After adding MonsterInsights to your website, you can see how many people are clicking on your banners, where they come from, and whether they convert. You can then make data-driven decisions to encourage more people to interact with your banners and boost your conversion rates.
Price:MonsterInsights starts at $99.50 per year. There is also a free version version that lets you track your banners, no matter what your budget.
Expert Pick: Which is the Best Banner Plugin for WordPress?
In our opinion, OptinMonster is the best banner plugin for WordPress because of all the different types of banners you can create, including popup banners, floating banners, and full-screen banners. It also comes with a huge selection of templates, so you can create high-converting WordPress banners within minutes.
Not to mention it also comes with powerful personalization and targeting features that are helpful for publishers, eCommerce site owners, and just about every small business website.
If you are a blogger or publisher looking to sell ads, then we believe that WP Advanced Ads is the best banner ad management plugin for WordPress.
If you are an eCommerce website owner, then we believe that
TrustPulse is the best social proof banner plugin for WordPress.
Are you looking to create a vertical navigation menu in WordPress?
In WordPress, navigation menus can be displayed horizontally or vertically. Vertical menus offer a number of advantages, such as fitting your website’s sidebar better and being easier to navigate on mobile devices.
In this article, we’ll show you how to create a vertical navigation menu in WordPress.
What Is a Navigation Menu?
A navigation menu is a list of links pointing to important areas of a website. They are usually presented as a horizontal bar of links at the top of every page on a WordPress website.
Navigation menus give your site structure and help visitors find what they’re looking for. You can add links to your most important pages, categories or topics, WordPress blog posts, and even custom links such as your social media profile.
But while you often see them placed horizontally at the top of a website, vertical navigation menus have many uses and advantages.
With that being said, let’s take a look at a number of ways to create a vertical navigation menu in WordPress. Here are the topics we’ll cover in this article:
When you add a navigation menu to your website, it will be displayed either vertically or horizontally. This depends on your theme, as well as the menu location you select.
The number of menu locations that are available depends on the theme you are using. You may find that some of these locations display the menu vertically.
To test this with your theme, you need to navigate to Appearance » Menus. Here you can experiment to see which locations are available on your website and how they are displayed.
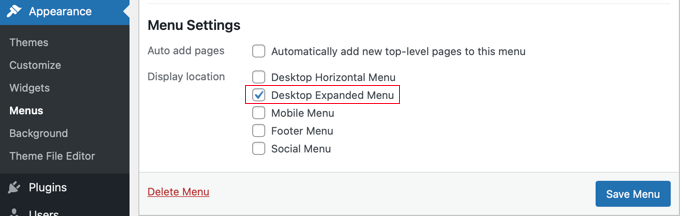
For example, the Twenty Twenty-One theme doesn’t offer any vertical locations, while the Twenty Twenty theme offers one, called ‘Desktop Expanded Menu’.
You can simply select the menu that you wish to display vertically, and then check the ‘Desktop Expanded Menu’ box at the bottom of the screen. After that, you must make sure to click the ‘Save Menu’ button to store your settings.
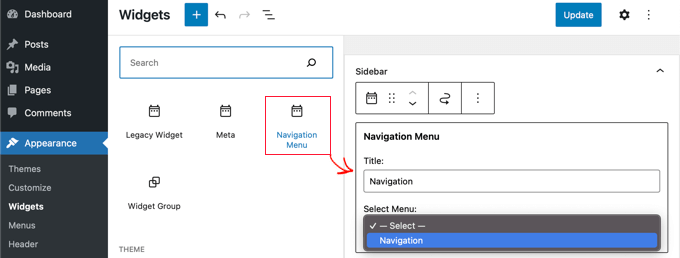
No matter what theme you’re using, it’s easy to add a vertical navigation menu to the sidebar using a widget.
First, you’ll need to create a navigation menu that you want to display, if you haven’t already.
Then you need to navigate to Appearance » Widgets. From here, simply click the blue ‘+’ block inserter button found at the top of the page, and drag the Navigation Menu block onto the sidebar.
After that, you can give the widget a name and select the menu you wish to display from the drop down menu.
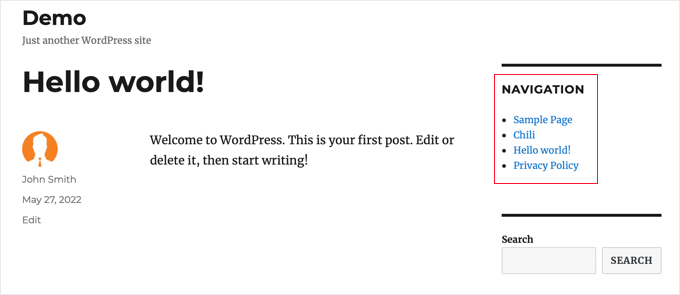
Here’s how the vertical sidebar menu looks on our demo website.
Creating a Vertical Navigation Menu on a Post or Page
You can add a vertical navigation menu to posts and pages in a similar way.
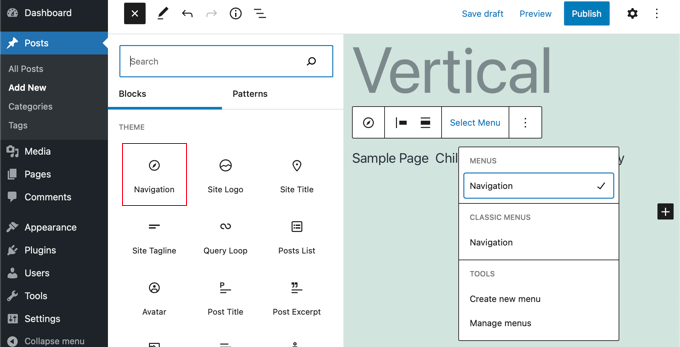
First, you need to create a new post or edit an existing one. After that, you need to click the blue ‘+’ block inserter button at the top of the page, and then drag the Navigation block onto the page.
Next, you need to choose which menu will be displayed. Simply click the ‘Select Menu’ button on the toolbar and select the desired menu.
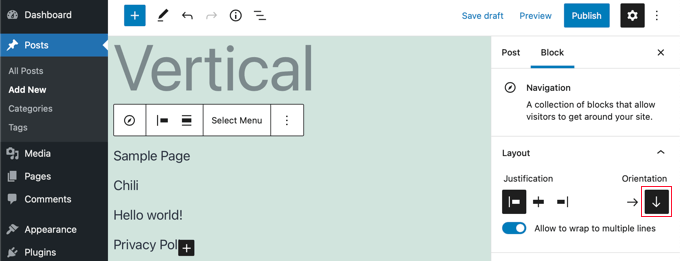
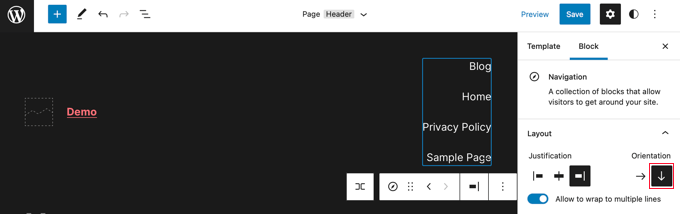
Finally, you need to look at the block’s settings in the left hand pane. There you will find two buttons for the menu’s orientation. You will need to click the down arrow button to orient the menu vertically.
Adding a Vertical Navigation Menu Using the Full Site Editor
The new full site editor allows you to customize your WordPress themes using the block editor. It was released in WordPress 5.9, and it enables you to add different blocks to your templates to create a unique design.
However, the full site editor is still in beta and limited to specific themes that support it, such as the default Twenty Twenty-Two theme. For more details, you can see our article on the best WordPress full site editing themes.
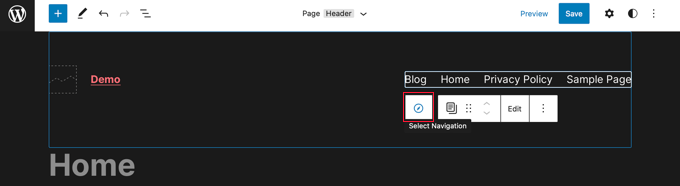
To add a navigational menu using the full site editor, you need to go to Appearance » Editor from your WordPress dashboard. Once you’re in the editor, go ahead and click on the navigational menu that appears at the top of the website header.
Next, you’ll need to click on the ‘Select Navigation’ button on the toolbar.
Now you’ll see different options to customize the navigational menu on the panel on the right. One of those options is whether to display the menu with a horizontal or vertical orientation.
Simply click the Down arrow for vertical orientation to create a vertical menu.
Creating a Vertical Navigation Menu using a Theme Builder Plugin
SeedProd is the best WordPress page builder and custom theme builder plugin on the market. It allows you to easily create vertical menus anywhere on your WordPress website.
Note: There is a free version of SeedProd that will allow you to add a vertical navigation menu to individual pages. But you will need the Pro version to access the theme builder and add a menu to your theme’s templates.
Upon activation, you need to enter your license key. You can find this information under your account on the SeedProd website.
After that, you need to use SeedProd to create a custom WordPress theme.
Creating a Custom WordPress Theme
You’ll find the SeedProd theme builder by navigating to the SeedProd » Theme Builder page. Here, you’ll use one of SeedProd’s ready-made themes as a starting point. This will replace your existing WordPress theme with a new, custom design.
You can do that by clicking the ‘Themes’ button.
You will be shown a list of professionally designed themes for different types of websites. For example, there are templates called ‘Modern Business’, ‘Marketing Agency’, and ‘Mortgage Broker Theme’.
Take a look through the options and select one that best matches your needs by clicking the checkmark icon.
Once you have chosen a theme, SeedProd will generate all the theme templates you need. You can learn how to customize these templates in our guide on how to easily create a custom WordPress theme.
Adding a Vertical Navigation Menu to Your Site’s Templates
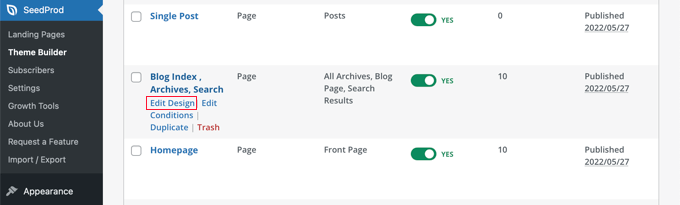
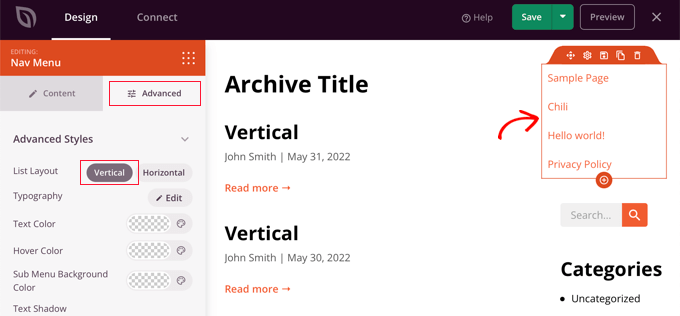
Now you can use SeedProd to add a vertical navigation menu to any of your theme templates. In this tutorial, we’ll add a menu to the blog index template.
You need to hover your mouse over that template, and then click the ‘Edit Design’ link.
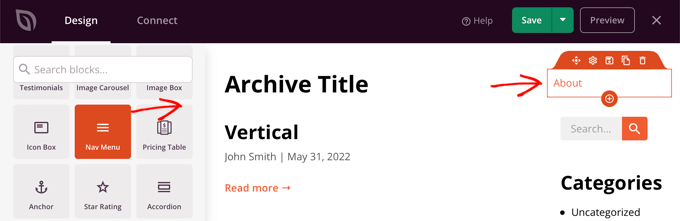
This will open SeedProd’s drag and drop page builder. You’ll see a preview of your website on the right, and a collection of blocks you can add to your site on the left.
You need to scroll down the blocks until you come to the Advanced section.
Once you locate the Nav Menu block you should drag it onto your sidebar or anywhere that you want to display the navigation menu. By default, there is only one item in the menu, ‘About’.
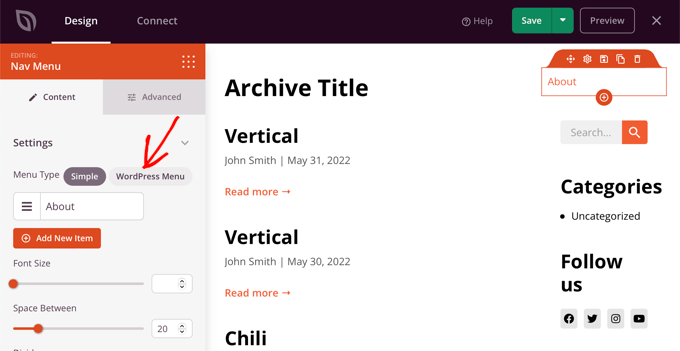
Now you will need to change the menu’s settings. To do that, you need to click on the menu and the available options will be displayed in a pane on the left of the page.
Currently, the ‘Simple’ menu type is selected. This allows you to build your own navigation menu in SeedProd.
However, for this tutorial, we’ll click the ‘WordPress Menu’ type to use the WordPress navigation menu instead.
Finally, you need to click on the ‘Advanced’ tab. Here you’ll find an option to orient the list layout vertically or horizontally.
When you click on the ‘Vertical’ button you’ll notice the preview immediately change to a vertical navigation menu.
Don’t forget to click the ‘Save’ button at the top of the screen to store your vertical menu.
Creating a Responsive Vertical Navigation Menu for Mobile Devices
It can be difficult to tap on a standard menu while using the small screen of a smartphone. That’s why we recommend that you preview the mobile version of your WordPress site to see how your website looks on mobile devices.
Vertical menus are much easier to navigate, especially when you use a fullscreen responsive menu that will automatically adjust to different screen sizes.
A dropdown menu looks like a normal horizontal navigation menu at the top of the screen, but when you hover your mouse over one of the items, a vertical submenu is displayed.
If you have a website with a lot of content, then a dropdown menu allows you to organize the menu structure by topics or hierarchy. This will show more content in a limited space.
To display a dropdown navigation menu on your website, you will need to choose a theme with dropdown menu support. After that, you need to create the navigation menu, and then add sub-items to some of the menu entries.
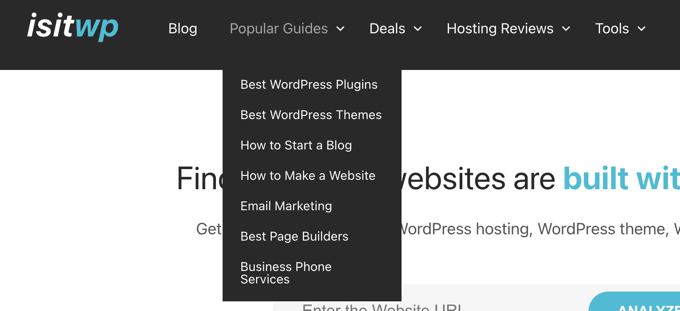
A mega menu lists multiple menus vertically across the page. They’re similar to dropdown menus, except all of the submenus are displayed at once, allowing users to quickly and easily find your very best content.
Mega menus are highly engaging and interactive because they combine the best of horizontal and vertical menus to show a helpful overview of your website’s contents on a single screen.