Is the jQuery version running on your WordPress site up to date?
Your theme and plugins, as well as WordPress itself, rely on jQuery. An out of date version may place your website at risk.
In this article, we’ll show you how to update jQuery to the latest version in WordPress.
Why Upgrade jQuery to Latest Version in WordPress?
Your WordPress website, as well as many plugins and themes you use, rely on JavaScript in combination with jQuery to create fast, interactive and engaging features.
It’s important to keep jQuery up to date to maintain the security of your website. The latest version fixes bugs and vulnerabilities in previous versions that may place your site at risk.
If you are running the latest version of WordPress, then you don’t need to manually update jQuery. It’s automatically done for you. But if you’re using an older version of WordPress such as WordPress 5.4 or earlier, then it’s recommended that you do the update.
Editor’s Note: it’s important to highlight that updating jQuery may break older plugin functionality, so after the update, you should test your website. In most cases, it’s not an issue, but in case you run into problems, then you can easily return to the older version.
With that being said, let’s take a look at how to upgrade jQuery to the latest version in WordPress. Here’s what we’ll cover in this tutorial:
How to Determine if Your Version of jQuery Is Out of Date
You can easily find the version of jQuery your website is running using the Javascript console in your web browser.
First, you will need to visit your website and then open the JavaScript console. If you are using Google Chrome, then you can do this by selecting View » Developer » JavaScript Console from the menu.
Next, you should paste the following command into the console:
jQuery.fn.jquery
This command will display the version of jQuery your website is running.
You should hopefully see version 3.5.1 or higher. If your website is running a version that starts with 1.7 or lower, then you should definitely upgrade.
Method 1: Upgrade jQuery to the Latest Stable Version
The jQuery Updater plugin updates jQuery to the latest official stable version. This is likely to be more current than the version that comes with WordPress.
First, you need to install and activate the jQuery Updater plugin. For more details, see our step by step guide on how to install a WordPress plugin.
Upon activation, your website will start running the latest version of jQuery. However, before you see the change, you may need to clear your browser cache and WordPress cache.
The plugin includes the jQuery Migrate script to help with backward compatibility. However, if you find that you have trouble with some of your plugins, then you can simply deactivate the jQuery Updater plugin to return your site to its original state.
Method 2: Control the Version of jQuery That Is Run on Your Website
The Version Control for jQuery plugin allows you to control the version of jQuery that is run on your website. This allows WordPress users to run a stable WordPress website, and WordPress developers can check if their code works with various versions of jQuery.
To get started, you need to install and activate the jQuery Updater plugin. If you need help, then see our step by step guide on how to install a WordPress plugin.
Upon activation, the plugin will default to the latest pre-release version of jQuery. It also installs the jQuery Migrate script to help with backward compatibility.
If you need to, you can select a different version of jQuery by visiting the Settings » jQuery Version Control page.
From here, you can select the jQuery and jQuery Migrate versions you wish to run on your site. Make sure you click the ‘Save Changes’ button to store your settings.
If the updated version of jQuery breaks some of your older plugins, then you can simply select an earlier version from the drop down menu. Alternatively, if you deactivate the Version Control for jQuery plugin, then your site will return to its original state.
Do you want to add social logins to your WordPress website?
Social logins allow visitors to create an account with your WordPress website by using their existing social media accounts. Instead of creating a new username or password, users can simply login with Facebook, Google, or another platform. This saves them time, reduces friction, and still get you access to their name / email address for future marketing purposes.
In this article, we will show you how you can add social login to WordPress.
Why Add Social Login To WordPress?
There are many reasons why you may want to allow user registration on your WordPress website. If you’re running an online store, then user registration allows shoppers to save their payment and delivery information. This makes it easier for them to buy again in the future.
However, most people don’t like filling out long user registration forms and remember yet another username / password.
Social logins let visitors create an account with your website just by clicking a button. They can use the username and password from their existing social media accounts, such as their Facebook login details.
Since it’s so convenient, social login can encourage more people to register with your website. With that being said, let’s see how you can add social login to WordPress.
This free plugin lets visitors log in using Facebook, Twitter, or Google.
Note: Want to add social login for a site other than Facebook, Twitter, or Google? There is also a Nextend Social Login pro version that adds social login for lots of different sites including PayPal, Slack, and TikTok.
First, you’ll need to install and activate the Nextend plugin. For more details, please see our beginner’s guide on how to install a WordPress plugin.
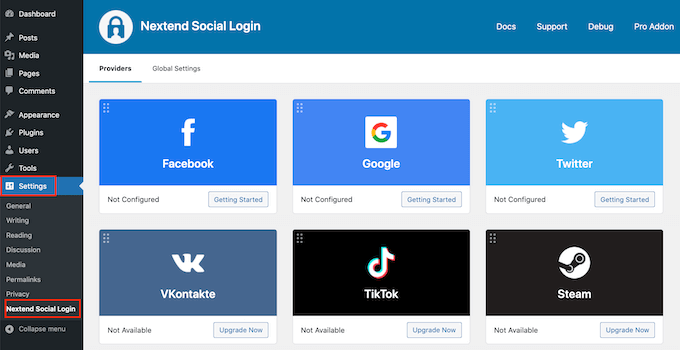
Upon activation, go to Settings » Nextend Social Login in the WordPress admin area. On this screen, you see all the different social login options that you can add to your WordPress site.
The process of adding a social login to your site will vary depending on whether you’re adding Facebook, Twitter, or Google login.
To add Facebook login to your WordPress website, click on the ‘Getting Started’ button under the Facebook logo.
At this point, you may get a warning that Facebook only allows HTTPS OAuth Redirects. This means your site must be using HTTPS before you can add Facebook login to WordPress. To set it up, see our guide on how to switch from HTTP to HTTPS in WordPress.
Once you’re using HTTPs, your next task is creating a Facebook app. This allows you to create an App Key and App Secret, which you’ll add to the Nextend plugin.
Creating a Facebook app sounds technical, but don’t worry. You don’t need to know any code, and we’ll walk you through all the steps.
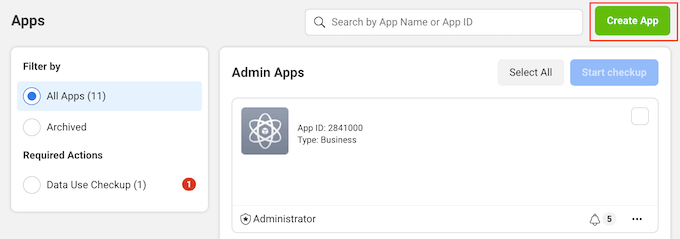
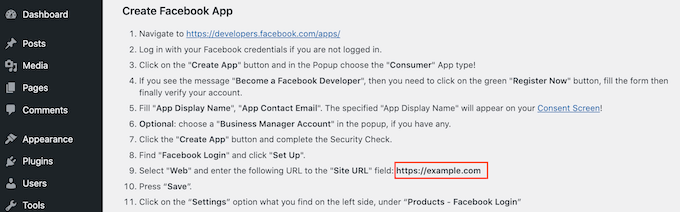
To create this app, you’ll need to switch between your WordPress dashboard and the Facebook Developers website. With that in mind, it’s a good idea to leave your WordPress dashboard open in the current tab and visit the Facebook Developers in a new tab.
In your Facebook Developers tab, simply click on the ‘Create App’ button.
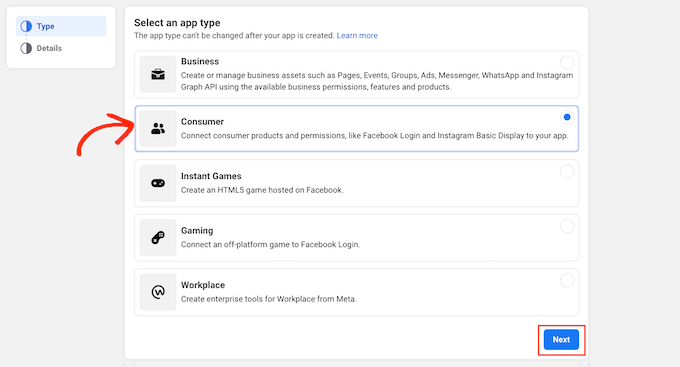
You can now choose an app type. Since we want to add social login to WordPress, go ahead and click on ‘Consumer.’
After that, scroll to the bottom of the screen and click on the ‘Next’ button.
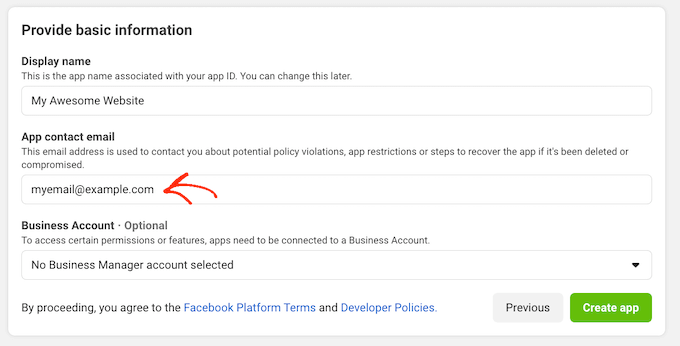
In the ‘Display name’ field, type in the name that you want to use for the Facebook app. This name will be shown to visitors, so you’ll want to use something they’ll recognize such as the name of your WordPress website.
Next, type your email address into the ‘App contact email’ field.
This is the address that Facebook will use to warn you about potential policy violations and app restrictions, or share information about how you can recover a deleted account. With that in mind, you’ll want to type in an email address that you check regularly.
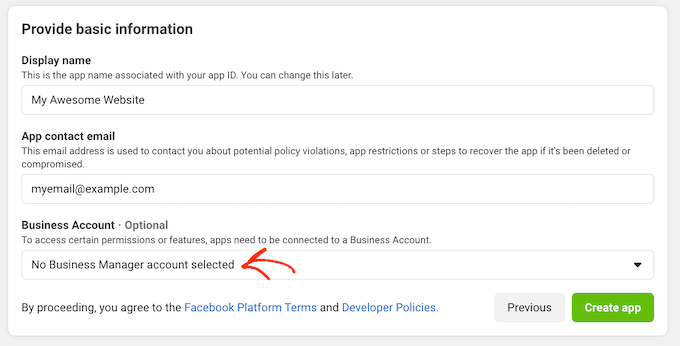
If you have multiple Facebook pages, then you may have created a Facebook Business Manager account. This lets you give team members full or partial access to your Facebook pages without sharing your login details.
If you’ve created a Facebook Business Manager account, then you can connect your new app to your manager account by opening the ‘Business Account’ dropdown. Then, simply choose an account manager from the dropdown menu.
If you don’t have a Facebook Business Manager, then you can simply leave this dropdown set to ‘No Business Manager account selected,’ which is the default setting.
After that, you’re ready to click on the ‘Create app’ button.
In the popup that appears, type in the password for your Facebook account and then click on the ‘Submit’ button.
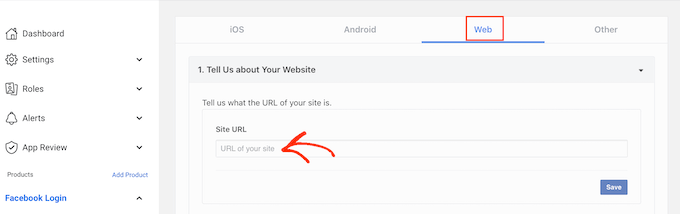
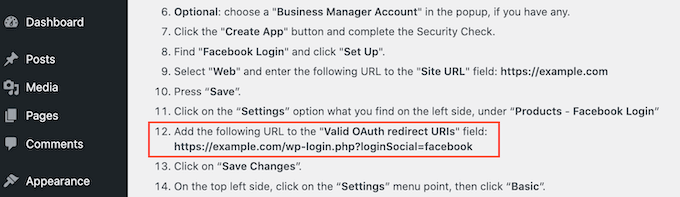
You’re now ready to add products to the Facebook app. Go ahead and find the Facebook Login section and then click on the ‘Set up’ button.
Next, simply click on ‘Web.’
In the Site URL field, type in your website’s URL.
To get the right URL, simply switch back to the tab that’s showing your WordPress dashboard.
This screen has detailed instructions on how to link Nextend to Facebook. This includes showing the exact URL that you should use.
After typing your site’s URL into the ‘Site URL’ field, make sure you click on the ‘Save’ button to save your changes.
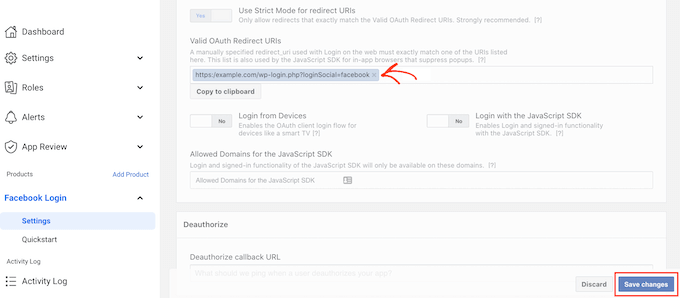
In the left-hand menu, find the ‘Facebook Login’ section and click on ‘Settings.’
On this screen, you’ll need to paste a valid oAuth redirect. To get this value, just switch back to your WordPress tab.
These instructions include a URL that’s labelled as the ‘Valid OAuth redirect URIs.’ You can go ahead and copy this URL.
Next, switch back to the Facebook Developer website and paste the URL into the ‘Valid OAuth Redirect URIs’ field.
After that, you’re ready to click on the ‘Save changes’ button at the bottom.
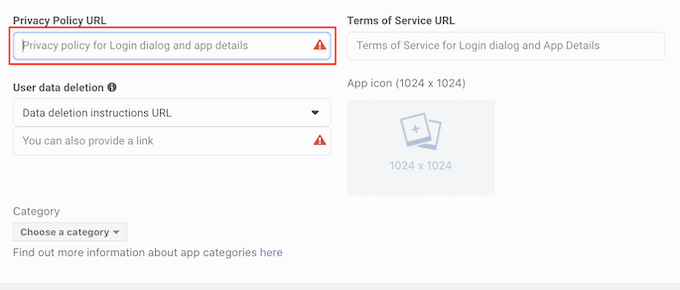
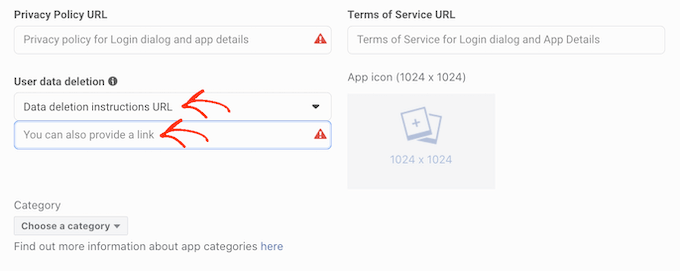
In the Privacy Policy URL field, you’ll need to type in the address of your website’s privacy policy. This privacy policy should disclose the information you collect from visitors and how you plan to use that data, including any information you get from social logins.
To help users find this information, click on the ‘User Data Deletion’ section, and then choose ‘Data Deletion Instructions URL’ from the dropdown menu.
You can then type in, or copy/paste the URL where visitors can find information on how to delete their account. For example, you might add the instructions to your privacy policy or FAQ page.
Once you’ve done that, open the ‘Category’ dropdown menu and choose the category that best represents how you plan to use social login on your WordPress website.
For example, if you’re adding Facebook login to your WooCommerce store, then you’ll typically want to click on the ‘Shopping’ category.
Once you’ve done that, the next step is choosing an App Icon. This icon will represent your app in the App Center, which is an area of Facebook where users can find new applications.
This isn’t particularly important for our app, but it’s a requirement so you’ll still need to create an app icon.
Your app icon must be between 512 x 512 and 1024 x 1024 pixels, and it must have a transparent background. When creating this icon, you can’t use any variations of Facebook’s logos, trademarks, or icons including its WhatsApp, Oculus, and Instagram brands.
You also can’t include any ‘Facebook’ or ‘FB’ text.
If you don’t already have one, then you can easily create a professional-looking Facebook app icon using a logo maker.
Once you’ve created an app icon, click on the ‘App Icon’ section and then choose the image file that you want to use.
After all that, click on the Save Changes button.
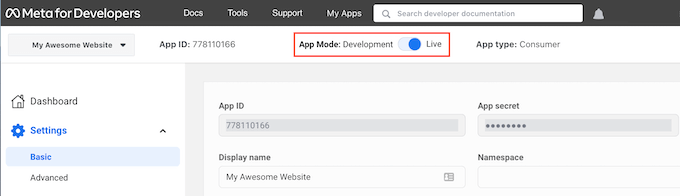
Your Facebook app is set to private by default. This means you’re the only person who can log in using Facebook.
Before your visitors can create an account using Facebook, you’ll need to make your app live. To do this, find the ‘App Mode: Development’ slider and click on it to turn the slider from white to blue.
Facebook applications can either have ‘Standard access’ or ‘Advanced access’ to the user’s information. If your app has standard access, then visitors won’t be able to log in using Facebook’s social login.
In the past Facebook has changed its default permission settings, so it’s always worth checking that your app has the right permissions to support social login.
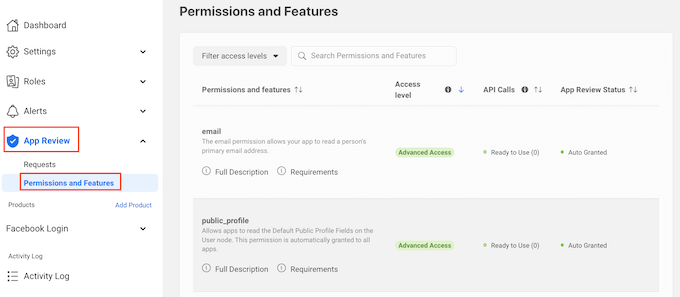
In the left-hand menu, click on App Review » Permissions and Features.
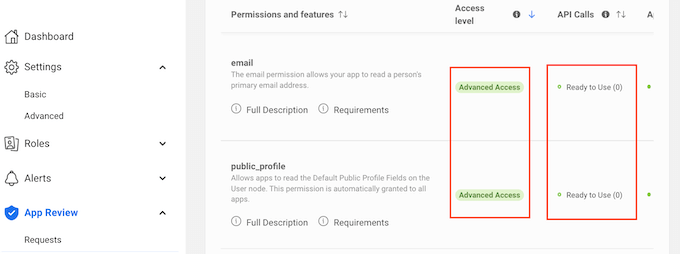
Now, find the ‘email’ and ‘public_profile’ permissions.
To support social login, both of these permissions must be marked as ‘Advanced Access’ and ‘Ready to Use’ as you can see in the following image.
Do you see ‘Get Advanced Access’ buttons instead? This means that your app currently doesn’t have the right permissions for social login.
In this case, you’ll need to go ahead and click on the ‘Get Advanced Access’ button, and then follow the onscreen instructions.
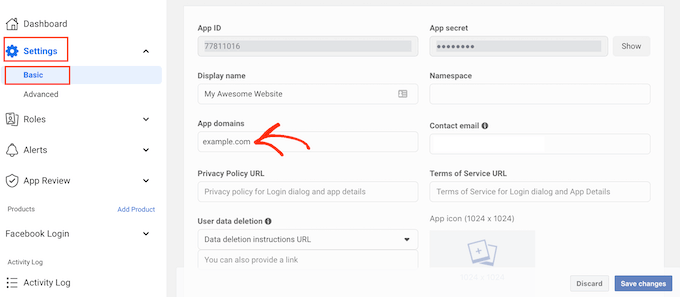
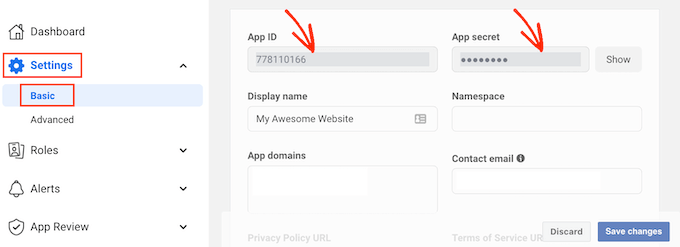
Once you have the Advanced Access permissions, go ahead and click on Settings » Basic in the left-hand menu.
At the top of the page you’ll see an ‘App ID’ and ‘App secret.’
To reveal the App secret, just click on the ‘Show’ button and then type in the password for your Facebook account.
The Facebook Developers website will now update to show your App secret.
The next step is adding the App secret and App ID to your Nextend plugin. To do this, switch back to the WordPress dashboard.
Here, click on the ‘Settings’ tab. You can now paste the ID and secret into the ‘App ID’ and ‘App secret’ fields in your WordPress dashboard.
Once you’ve done that, click on the Save Changes button.
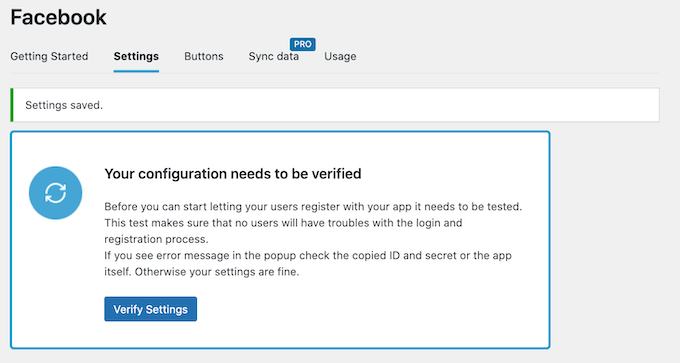
Before you go any further, it’s a good idea to test that your social login is set up correctly. To do this, simply click on the Verify Settings button.
This will open a popup where you can type in your Facebook username and password. If you’ve set up the social login correctly, then you should now be logged into your WordPress blog.
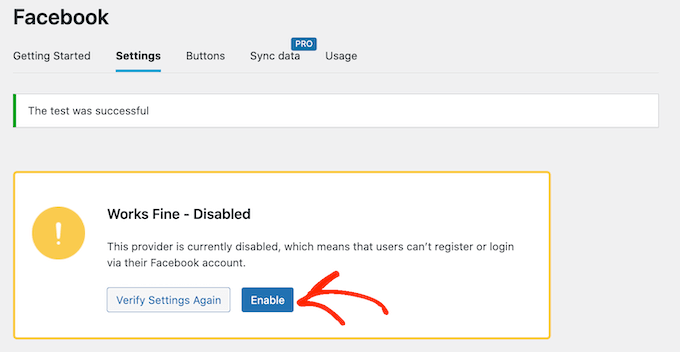
Even if your social login is working, Nextend may still warn you that the provider is currently disabled. If you do see this warning, then simply click on the Enable button.
You’ve now successfully added social login to your WordPress website. The next step is changing how the login button looks and acts on your site.
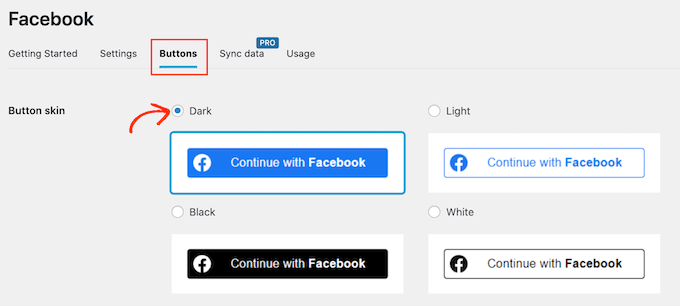
To style the social login button, simply click on the ‘Buttons’ tab. You will now see all the different styles that you can use for the social login button.
To use a different style, simply click to select its radio button.
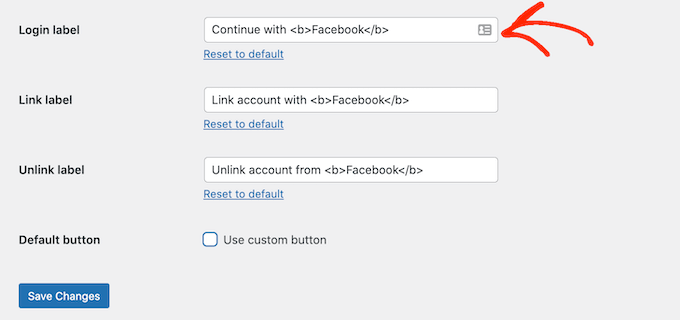
Once you’ve done that, you can change the text that Nextend shows on this button by editing the ‘Login label’ text.
You can also apply some basic formatting to the login label. For example, in the following image we’re applying a bold effect by using <b> and </b> HTML tags.
Aside from that, you also have the option to change the text that this button uses for its ‘Link label.’ This is the text that Nextend shows when the visitor has created an account on your website, but hasn’t linked that account to Facebook.
You can use the link label to encourage logged-in users to connect their account to various social media profiles.
To change this text, simply type into the ‘Link label’ field. Once again, you can use HTML to apply some basic formatting to the label text.
You should also make it easy for visitors to disconnect their social media profiles from your WordPress website.
This is where the ‘Unlink label’ field comes in.
In this field, you can type in the text that your site will show to logged-in users who have already connected their social account to your website.
By clicking on this link, users will be able to break the connection between your WordPress website and their social media account.
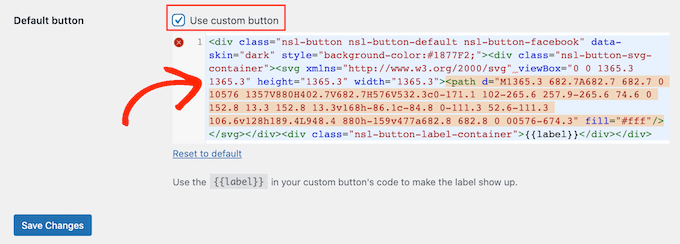
These settings should be enough for most websites. However, if you prefer to create a completely custom button, then you can always check the ‘Use custom button’ box.
This adds a new section where you can create your own social login button using code.
When you’re happy with how you’ve styled your button, click on the Save Changes button.
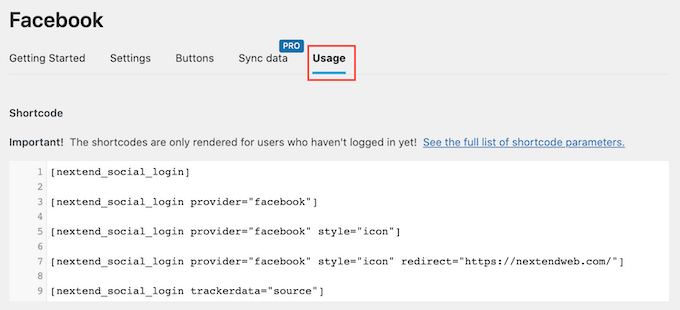
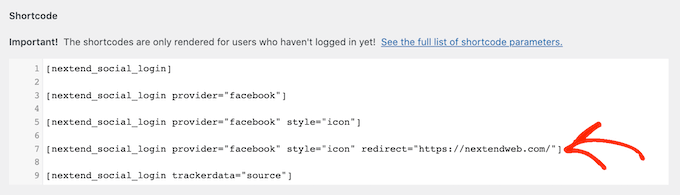
Next, click on the ‘Usage’ tab. Nextend will now show all the shortcodes that you can use to add the social login button to your WordPress website.
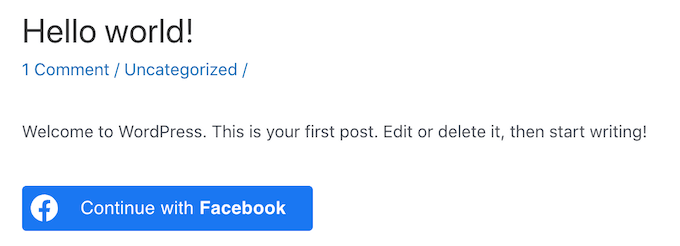
These shortcodes can create a range of login buttons. To create a basic login button for Facebook, you would use the following shortcode:
[nextend_social_login provider=”facebook”]
The following image shows an example of how this social login button will look on your site.
As you can see in the ‘Usage’ tab, there are a few extra parameters that you can add to your shortcode. This will change how the button looks or acts.
If you want to create a social login button that doesn’t have a text label, then you can add the ‘icon’ parameter, for example [nextend_social_login provider=”facebook” style=”icon”]
Here is an example of how this button will look on your WordPress website.
When a visitor logs into your site using a social account, you can redirect them to a page automatically. This screen has an example shortcode that will redirect users to the Nextend site.
You can easily customize this shortcode so that it redirects the visitor to a page on your own WordPress website.
There are a few other parameters that you can add to your shortcode, to see the full list of parameters click on the link in the plugin documentation.
Often beginners ask us about what image sizes they should use on their WordPress site, and how WordPress handles images in different areas.
In this beginner’s guide, we’ll explain common WordPress image sizes, and share best practices on how to know which sizes to use on your website.
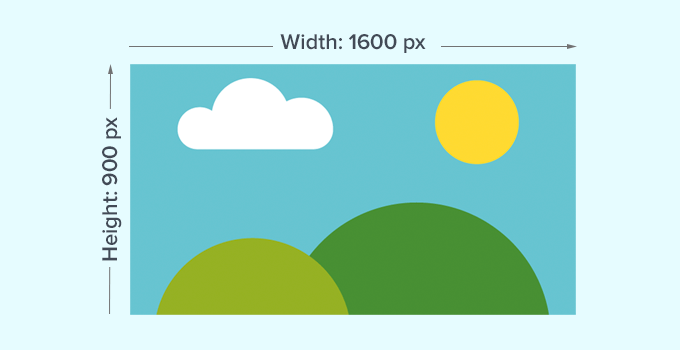
What is an Image Size?
Image size usually refers to the width and height of an image measured in pixels. For instance, 1600×900 pixels means an image that is 1600 pixels wide and 900 pixels in height.
These measurements also called image dimensions.
Basically, an image with larger dimensions has more pixels in it which will lead to an increase in image file size.
Image file size is the space an image file occupies on a computer, and it is measured in bytes. For instance, 100 KB (kilobytes).
If an image is larger in file size, then it will take longer to download for users and affect your website’s speed and performance. That’s why it’s important to keep the image file size as small as possible, while keeping the image at the right dimensions.
Which brings us to image file formats.
Image file formats are the compression technologies to save your image files. The most common ones used on the web are JPEG and PNG.
Images like photographs that contain more colors can be better compressed by using JPEG file format.
On the other hand, images like illustrations with fewer color details can use PNG for the best results.
That being said, let’s take a look at what image sizes to use in WordPress for different areas of your website.
What Size Should My Images Be for My WordPress Site?
For an average WordPress website, you’ll be using images in several areas of your website. You’ll need images for your blog posts, thumbnails, page headers, cover images, and more.
WordPress automatically handles some of the image file sizes by default. Whenever you upload an image, WordPress will automatically make several copies of it in different sizes.
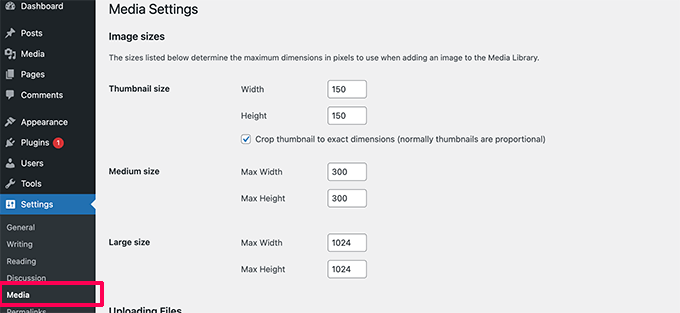
You can view and even adjust the default WordPress image sizes by visiting Settings » Media page in the WordPress admin area.
You’ll see three sizes for Medium, Thumbnail, and Large.
However, your WordPress theme may create its own additional image sizes and use those for different sections of your site.
These sizes will not be visible on the Media screen, and the only way to view those additional sizes is by going to the File Manager on your WordPress hosting account.
Then navigate to /wp-content/uploads/ folder and select any year folder there to browse. This will help you see all the various image sizes your WordPress site is generating.
With that said, let’s take a look at different areas of your website, and what image sizes you should use in those areas.
What Image Sizes to Use in Blog Posts
You need to choose image size for your blog posts based on your WordPress theme.
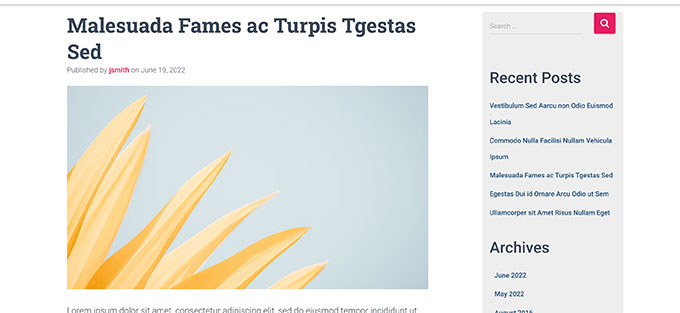
For instance, some WordPress themes come with a single column layout which allows you to use wider images.
On the other hand, some WordPress themes use multi column layouts (content + sidebar) which means you need to adjust the image width accordingly.
For most blogs you can use the following image sizes:
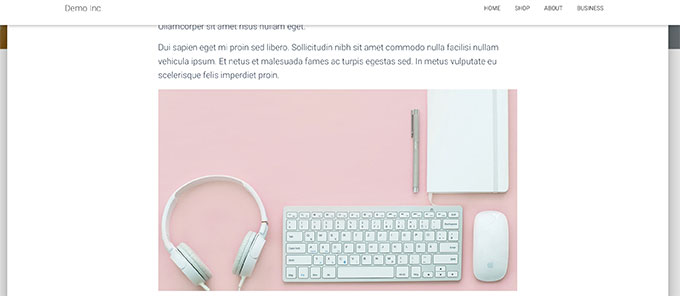
Single column layout: 1200×675
Two-column layout: 680×382
Now, you might notice that many popular WordPress websites use the same image width for all their images inside an article. However, this is not a strict rule.
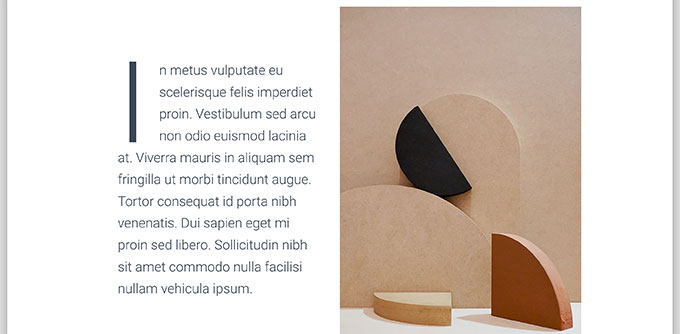
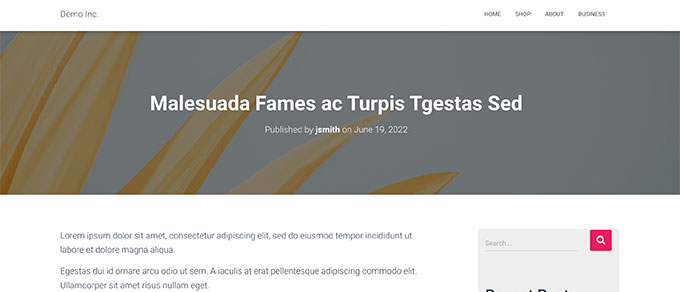
For instance, if you need to add ‘Media and Text’ block, then you can adjust the image size accordingly. In the example below, we are using an image in portrait size next to some text.
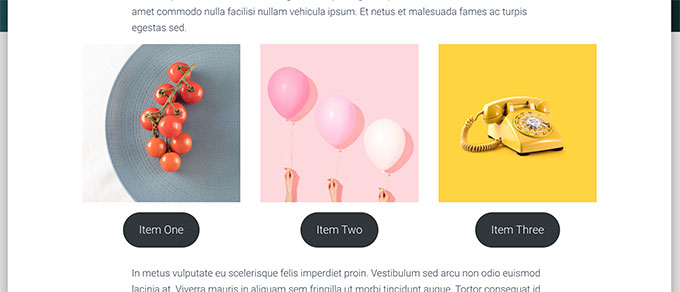
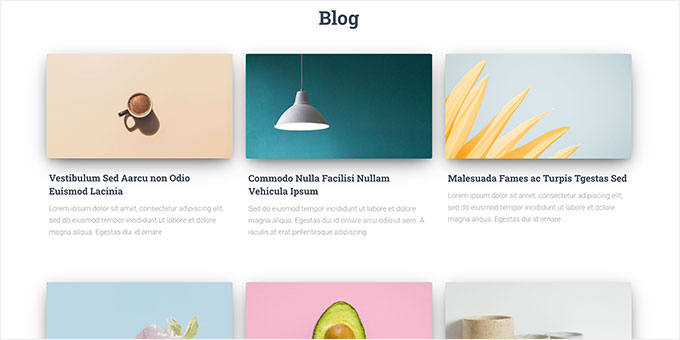
Similarly, you may want to use square images for some situations.
For instance, here is an example of square images used in a multi-column layout.
When using square images, you simply need to make sure that the image dimensions have the same width and height such as 300 x 300 pixels.
What Image Sizes to Use for Featured Images
Featured images, also called post thumbnails, are a WordPress theme feature. That means that your theme will determine what size images to display.
For instance, some WordPress themes may use standard 16:9 aspect ratio for featured image sizes (for example, 680×382 pixels).
Some WordPress themes may also use the featured image as a larger header image. To do that, they may need larger images (like 1200×675).
Featured images are important since your WordPress theme may use them in different areas of your website. They’re often the first thing your visitors see, so you’ll want to make a good first impression.
We recommend using larger images, so they still look beautiful whether they’re scaled down or used in wider modes.
Similarly, if your WordPress theme uses square images for featured image, then we would recommend using images that are at least 600×600 pixels.
For themes that use rectangular featured images: 1200×687 pixels
For themes that use square featured images: 600×600 pixels
Your WordPress theme will generate additional sizes for featured images to use in different area such as homepage, blog page, or archive pages.
What Image Sizes to Use for Social Media
Now if your WordPress theme is using featured images that are 16:9 in aspect ratio, then you can also use them as social media images for Twitter and Facebook.
However, you’ll need to explicitly tell those platforms which image you want to display when someone shares an article from your website.
To do that, you’ll need the All in One SEO plugin for WordPress. It is the best WordPress SEO plugin on the market used by over 3 million websites. It helps you optimize your website for search engines and social media platforms.
First, you need to install and activate the plugin. For more details, see our step by step guide on how to install a WordPress plugin.
Upon activation, the plugin will launch the setup wizard. Follow the on-screen instructions to complete the wizard. You can also see our guide on how to set up All in One SEO for step-by-step instructions.
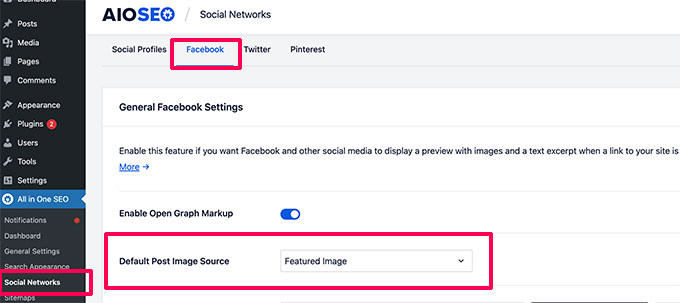
After that, you need to visit All in One SEO » Social Networks page and switch to the Facebook tab. From here you can set ‘Featured Image’ as your default Open Graph image source.
You can then switch to Twitter tab and do the same.
Don’t forget to click on the Save Changes button to store your settings.
Now, if your WordPress theme used images in a different size, then Facebook and Twitter may not be able to display those images properly.
In that case, you can provide social media platforms with a custom image.
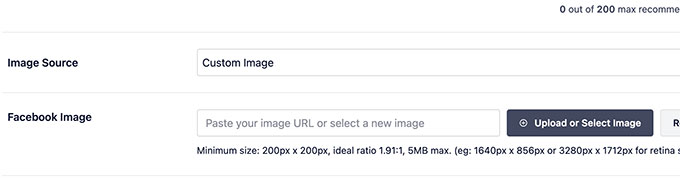
Simply create an image with 16:9 aspect ratio (1200×675 pixels or 680×382 pixels). Then edit the post or page and scroll down to AIOSEO Settings section below the editor.
From here, you need to switch to the Social tab and scroll down to Image source section. From the drop down menu, select Custom image and then upload your Facebook image.
You’ll need to repeat the process on Twitter tab as well.
You will have to do this for all the articles you publish to ensure that social media use the image you want them to use.
What Image Size to Use for Website Logo in WordPress
Many WordPress themes will let you know what image size you should use for your website logo.
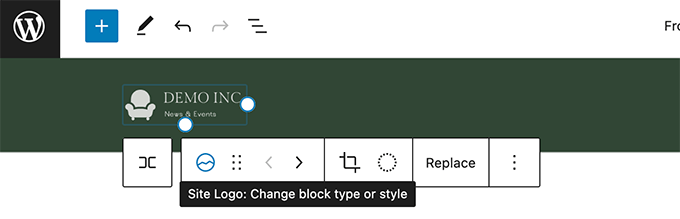
For instance, our demo theme shows this message when we tried to upload a logo.
However, if you are using a newer WordPress theme with full site editing feature, then you may not get a recommendation for logo image size.
In that case, we recommend uploading different styles and sizes to see what looks best for your brand. A logo image size of 300×200 pixels can be a good starting point.
Editing Images for Your WordPress Website
Most WordPress users are not graphic designers by profession. However, you’ll need to use image editing software to create image sizes for your WordPress website.
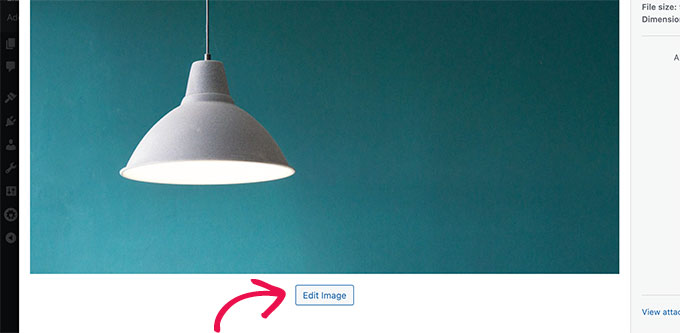
WordPress itself comes with some basic image editing tools. To use them, simply go to the Media » Library page and click on an image.
This will open the image in a popup where you’ll see a button to edit image.
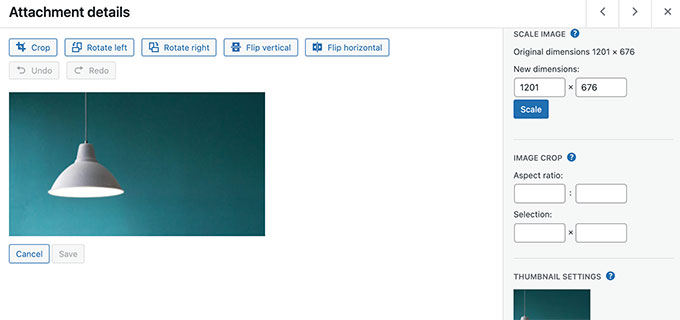
This will open the editing options.
The tools include basic image resizing, cropping, rotate, and flipping.
This basic image editing comes in handy if you quickly need to fix an image. However, it is not the best way to edit your images day to day.
Luckily, there are several free and inexpensive options that you can use.
Canva – free web based image editing software. It also includes ready made templates for website images, logos, social media images, and more.
Pixlr – A freemium web based image editing software. Can be used to easily resize images for your blog posts.
Gimp – Free and open source image editing software. It works as a native desktop app on Windows, Mac, and Linux. Can be used to resize images, add layers of text, edit photos, and more.
We hope this article helped you learn more about WordPress image sizes and what image sizes to use on your website. You may also want to see our guide on how to choose the best website builder or our expert pick of best WordPress plugins for small business sites.
If you liked this article, then please subscribe to our YouTube Channel for WordPress video tutorials. You can also find us on Twitter and Facebook.