Monday, October 24, 2022

How to Allow Users to Choose a Payment Method on WordPress Forms

Do you want to allow users to choose between different payment methods on your WordPress website or online store?

When you allow your customers to choose their preferred payment method, you’ll build trust and increase conversions on your website.

In this article, we’ll show you how to allow your users to choose a payment method in your WordPress forms.

How to Allow Users to Choose a Payment Method on WordPress Forms

Why Offer Multiple Payment Methods in WordPress?

PayPal and credit cards are two popular ways to pay for online purchases. Each has its pros and cons, and your visitors are likely to already have a preference for one or the other.

So, if you’re selling products or services on your WordPress website, or asking for donations, then it is important to allow your visitors to use their preferred payment method.

You may already have a complete online store with a shopping cart, but you don’t need to set one up to accept online payments. All you need is a simple online order form with a choice of payment options.

This makes sense if you’re selling a single product, accepting payments for services, or raising money for a cause or charity.

Before you can accept payments on your website, you’ll need to enable HTTPS/SSL on your website so that you can accept payments securely. For more details, you can follow our guide on how to get a free SSL certificate for your WordPress site.

That being said, let’s look at how you can offer multiple payment options on your website. We’ll cover three methods so you can choose the one that best suits your needs.

Method 1 is the simplest and doesn’t require a full shopping cart. You should use Method 2 if you have a WooCommerce store. And Method 3 is best if you don’t have an online store and want to use PayPal or create more flexible forms.

Method 1: Offering Multiple Payment Methods Using WP Simple Pay

WP Simple Pay is an easy way to offer multiple payment methods on your site. It’s a leading WordPress payments plugin that lets you receive payments without setting up a full-featured eCommerce store or membership site.

It uses Stripe, a popular payment gateway, to accept payments from credit cards, Apple Pay, Google Pay, ACH bank debit, SEPA direct debit, Alipay, Giropay, iDEAL, and more.

The first thing you need to do is install and activate the WP Simple Pay plugin. For more details, see our step by step guide on how to install a WordPress plugin.

While there is a free version of the plugin, you need the Pro plugin to create on-site payment forms, accept Apple Pay, and more.

Upon activation, the WP Simple Pay setup wizard will start automatically. You simply need to click the ‘Let’s Get Started’ button to continue.

The WP Simple Pay Setup Wizard Will Start Automatically

First, you’ll be asked to enter your license key. You can find this information from your account on the WP Simple Pay website.

After that, you need to click the ‘Activate and Continue’ button to move on.

You’ll Be Asked to Enter Your WP Simple Pay License Key

Next, you’ll need to connect WP Simple Pay to Stripe.

Start by clicking the ‘Connect with Stripe’ button. From there, you can log in to your Stripe account or create a new one. Anyone with a legitimate business can create a Stripe account and accept payments online.

You Need to Connect WP Simple Pay to Stripe

As we mentioned earlier, Stripe will require your site to be using SSL/HTTPS encryption. If you don’t already have an SSL certificate for your website, then please see our step by step guide on how to add SSL in WordPress.

Once you’ve connected to Stripe, you’ll be asked to configure your WP Simple Pay emails.

Configure Your WP Simple Pay Emails

The options for payment and invoice emails to your customers have already been enabled for you. So has the option for sending payment notification emails. You just need to enter the email address where the notifications should be sent.

Once you’ve done that, you need to click the ‘Save and Continue’ button. This completes your setup of WP Simple Pay.

WP Simple Pay Setup Is Complete

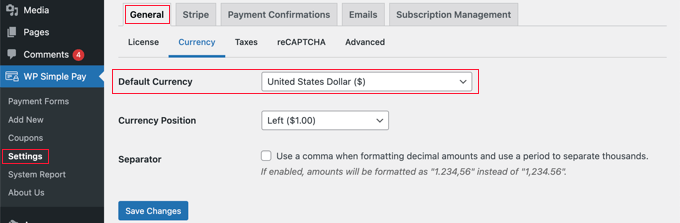
There’s one more setting you may need to configure before we move on. Some payment options will only work for specific currencies, so if you are not using USD, then you will need to change the default currency.

Simply visit WP Simple Pay » Settings then click on ‘General’ and then ‘Currency’, then select the correct currency from the drop down menu.

If Necessary, Change the Default Currency for WP Simple Pay

Creating a Payment Form in WordPress

Now it’s time to create your payment form. WP Simple Pay offers plenty of ways to customize the form, but if you need more complete control over the way your form looks, then check out WPForms in Method 3.

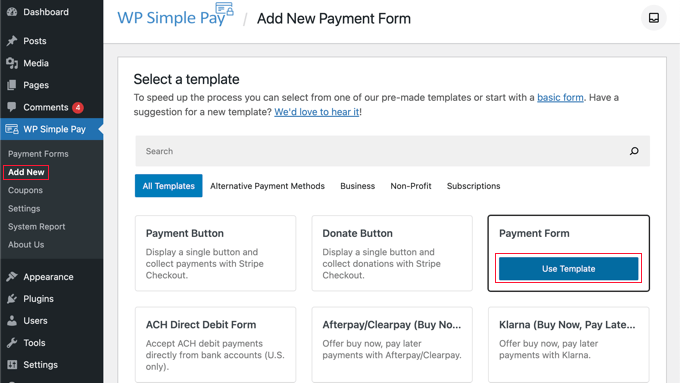
If you didn’t need to change your currency and can still see the last page of the setup wizard, simply click the ‘Create a Payment Form’ button. Otherwise, you should navigate to the WP Simple Pay » Add New page.

You’ll be shown a list of payment form templates. You could start with a generic template such as ‘Payment Form’ and then add payment methods. Alternatively, you can look for a more specific template, such as ‘Afterpay/Clearpay’ or ‘Apple Pay / Google Pay‘.

For this tutorial, we’ll choose the ‘Payment Form’ template. Simply hover over the template you wish to use and click the ‘Use Template’ button when it appears.

Select the Payment Form Template

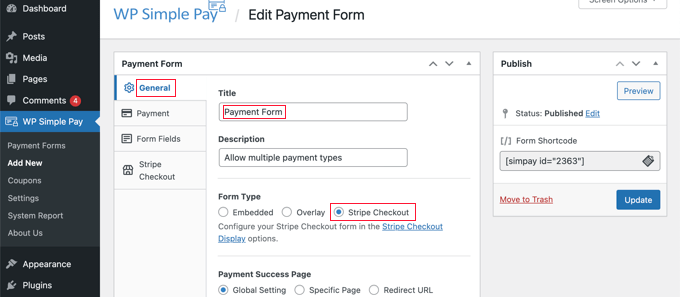
This will take you to the payment form editor.

You should start by giving the payment form a name and description. After that, you can select the ‘Stripe Checkout’ option under Form Type.

Give Your New Payment Form a Name and Description

Next, you need to click on the ‘Payment’ tab. Here you can set the payment mode to either live or testing. Test mode will let you make payments that are not actually charged so you can make sure your form is working properly and emails are being sent.

Don’t forget to change this to ‘Live’ when you’ve finished testing and are ready to start receiving payments from your customers.

Set the Payment Mode to Either Live or Testing

You can also add the products or services that you offer, along with their prices and whether they are a one-time payment or a subscription.

Simply click the ‘Add Price’ button until you have added as many prices as you need. Then for each one, you will need to add a label and price. You can also select other options, such as if the price is a subscription, or the user can determine the price, as in a donation.

Add Your Products and Services to the Payment Form

You can show or hide a price by clicking the small arrow on the right.

Next, we’ll move on to the ‘Form Fields’ tab. The essential fields have already been added to the form, and you can add more if necessary.

Using the ‘Form Fields’ drop down, you can choose additional fields and add them by clicking the ‘Add Field’ button. Options include name, phone number, address, and much more.

You Can Add Fields to Your Payment Form

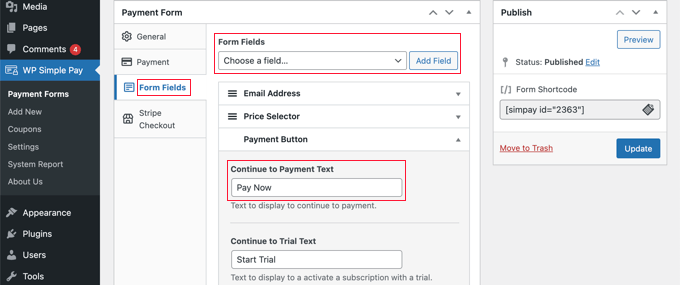
The default text on the button is ‘Pay with Card’. Since you’ll be accepting multiple payment types, you can change the text to something more generic, such as simply ‘Pay Now’. Then your customers won’t assume that credit cards are the only payment option.

Finally, you should click the ‘Stripe Checkout’ tab and select the payment methods you wish to offer. For this tutorial, we’ll just leave the default settings.

Select any Additional Payment Methods and Tweak the Checkout Form

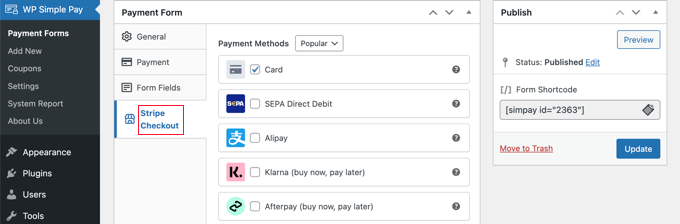
Additional payment methods, such as Apple Pay, will be automatically offered on compatible devices. To learn more, see our guide on how to accept Apple Pay in WordPress.

Klarna and Afterpay are ‘buy now, pay later’ services and offer customers flexibility as they can purchase goods and pay in installments over a specified time period. For more information, see our guide on how to add ‘buy now pay later’ payment plans to WordPress.

When you are happy with your payment form, click the ‘Publish’ button to store your settings and push the form live.

The final step is to add the form to a post or page on your website.

Adding the Payment Form to Your Website

WP Simple Pay makes it super easy to add forms anywhere on your website.

Simply create a new post or page, or edit an existing one. Then, click on the plus (+) sign at the top and add a WP Simple Pay block in the WordPress block editor.

Add the WP Simple Pay Block to a Post or Page

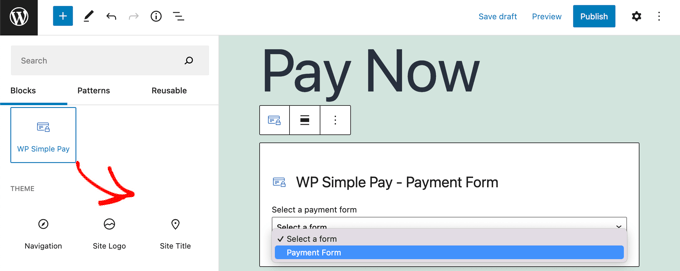
After that, select your order form from the dropdown menu in the WP Simple Pay block.

Once you’re finished, you can update or publish the post or page, and then click on the preview button to see your form in action.

Visit Your Website to See the Payment Form in Action

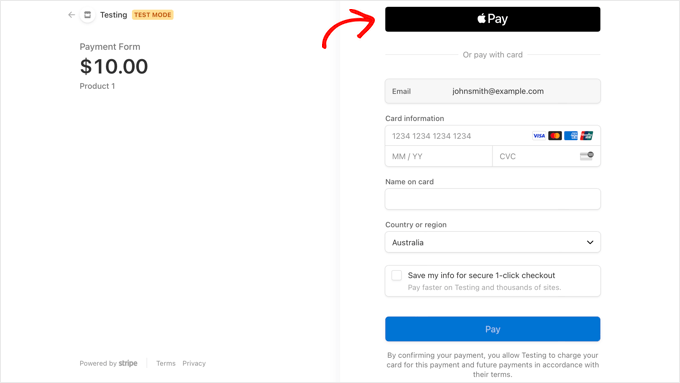
When your users click the ‘Pay Now’ button, the Stripe checkout form will be displayed. This will offer all of the payment options you checked earlier.

On supported devices and browsers, additional payment options such as Apple Pay will also be offered automatically.

Apple Pay Will Be Offered When Checking Out on Safari on a Mac or iOS Device

One additional payment method you can offer your customers using WP Simple Pay is recurring payments. For more information, see our guide on how to accept recurring payments in WordPress.

Method 2: Offering Multiple Payment Methods in WooCommerce

If you are running an online store using WooCommerce, then you can easily offer additional payment methods by using PayPal and the Stripe payment gateway.

For this tutorial, we’ll assume that you already have WooCommerce installed. If you need help setting it up, then see our step by step guide on WooCommerce.

Adding PayPal to Your WooCommerce Store

You may have already set up PayPal when following the WooCommerce setup wizard in that guide. If you have, then you can move on to the next section and set up Stripe.

If not, you need to head over to WooCommerce » Settings and then click the ‘Payments’ tab at the top of the screen.

After that, scroll down the page until you find PayPal and click the ‘Get started’ button.

Click the PayPal Getting Started Button

You need to start by typing your PayPal email address and then selecting your country from the drop down menu.

After that, you should click the ‘Next’ button to continue.

If you already have a PayPal account using that email address, then you’ll be asked to provide your password and log in. Otherwise, you’ll first be asked to provide your personal details and create a new account.

Log In to Your PayPal Account or Create a New One

Finally, you should click the ‘Agree and Consent’ button to connect your PayPal account to the online store.

Once you’ve done that, you’ll need to confirm your email address by going to your inbox and following the instructions in the email you were sent. You can then dismiss the popup window by scrolling to the bottom and clicking the button.

Agree to Connect Your Account, then Scroll Down and Click the Button

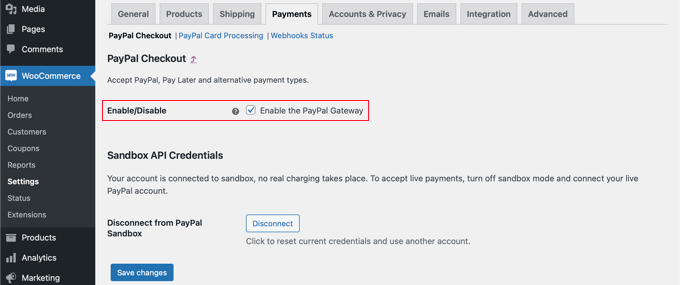
You should find yourself back on the WooCommerce payments settings page. Here you will need to check the box to enable the PayPal payment gateway on your online store.

After that, carefully scroll down the page and make sure all the settings are correct. When you’re happy, you can click the ‘Save changes’ button at the bottom of the page.

Enable the PayPal Payment Gateway on Your WooCommerce Store

When checking out, your customers can now pay using PayPal as a payment option.

Adding Stripe to Your WooCommerce Store

The first thing you need to do is install and activate WooCommerce Stripe Payment Gateway. For more details, see our step by step guide on how to install a WordPress plugin.

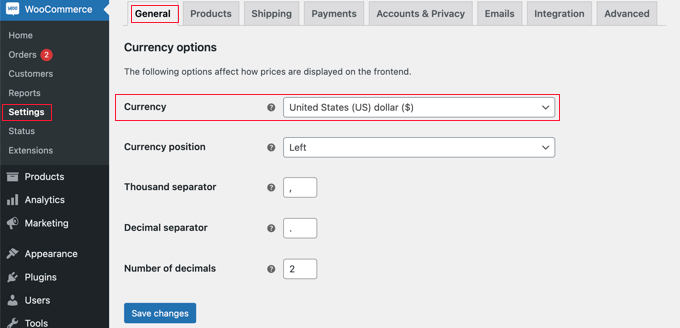
Some payment options are only available for certain currencies. If you are using a currency other than USD, then you should navigate to WooCommerce » Settings and make sure you are on the ‘General’ tab.

Here you can choose the currency for your online store. Make sure you click the ‘Save’ button to store the setting.

Choose a Currency for Your Online Store

After that, you should click the ‘Payments’ tab. Once there, you should scroll down until you find ‘Stripe’ in the ‘Method’ column. Notice that there are multiple Stripe payment methods.

Set Up Stripe Credit Card in WooCommerce

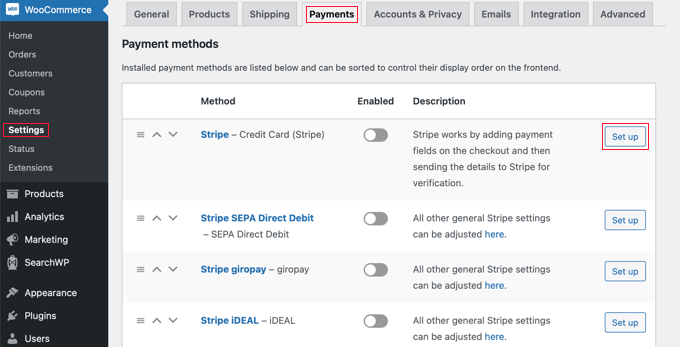
You need to start by clicking the ‘Set up’ button next to ‘Stripe – Credit Card’. This will launch a setup wizard that takes you through the steps of connecting WooCommerce to Stripe.

On the next screen, click on the ‘Enter account keys’ button.

Entering your Stripe account keys

WooCommerce will now ask for your Stripe account keys. To get this information, you need to log into your Stripe dashboard in a new tab.

Inside the Stripe dashboard, you should make sure you’re on the ‘Developers’ tab at the top of the screen, and then select ‘API keys’ from the left-hand menu.

The Stripe API keys

You can now copy the ‘Publishable key.’

Then, switch back to your WordPress dashboard and paste this key into the ‘Live publishable key’ field.

The Stripe live publishable key

Now you need to do the same thing with the secret key. Simply switch back to your Stripe dashboard and click on the ‘Reveal live key’ button.

This will show your secret key.

Getting the Stripe live key

You need to copy the key and then head back to your WordPress dashboard and paste it into the ‘Live secret key’ field.

After that, just click on the ‘Test connection’ link.

Testing your Stripe payment gateway connection

After a few moments, you will see a ‘Connection successful’ message. This means that WooCommerce is now connected to your Stripe account.

You can now go ahead and click on the ‘Save live keys’ button.

Saving the live Stripe keys

This will take you to the Stripe ‘Settings’ screen.

On this screen, you need to check the ‘Enable Stripe’ box. If you like, you can also click the ‘Enable test mode’ box.

Test mode will let you make payments that are not actually charged to an account. This is useful when testing multiple payment types in your WooCommerce store. Don’t forget to come back and uncheck the setting when you are ready to start taking payments.

WooCommerce's Stripe settings

Now you can scroll to the very bottom of the page and click the ‘Save Changes’ button to store your settings.

Now that you have enabled Stripe credit card payments, you can enable any additional Stripe payment methods you would like to offer on your online store.

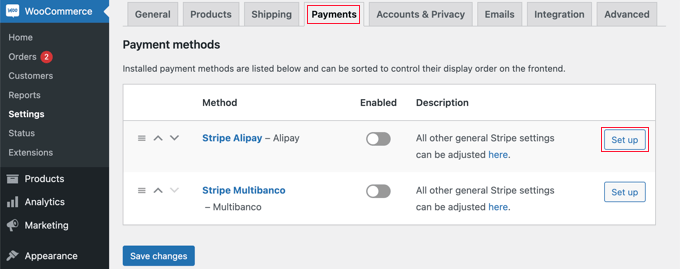
Head back to WooCommerce » Settings and click on the ‘Payments’ tab. Once there, you can explore the payment methods that work with your store’s currency.

For this tutorial, we’ll enable Alipay. You need to find ‘Stripe Alipay’ in the list of payment methods and then click its ‘Set up’ button.

Click the 'Set Up' Button Next to Alipay

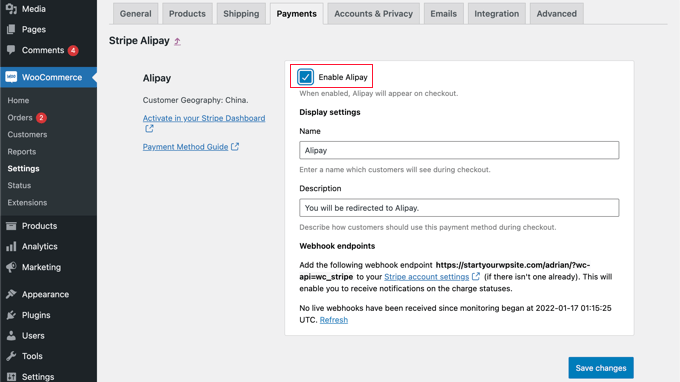
Here you can click the ‘Enable Alipay’ button. This will display Alipay as a payment option when checking out.

Next, you need to click the ‘Save changes’ button to store your settings.

Enable Alipay in WooCommerce

Adding Recurring Payments to WooCommerce

Another way to offer flexible payment arrangements to your WooCommerce customers is to add recurring payments so that your customers are automatically charged on a weekly, monthly, quarterly, or annual basis.

This automates the billing process to can save you time. You won’t have to manually send invoices and recurring payments generally lead to fewer payment delays and errors.

To learn more, see Method 4 in our guide on how to accept recurring payments in WordPress.

Now when your customers check out, they will be able to choose their preferred payment method. Here’s an example screenshot from our demo WooCommerce store.

WooCommerce Checkout Preview

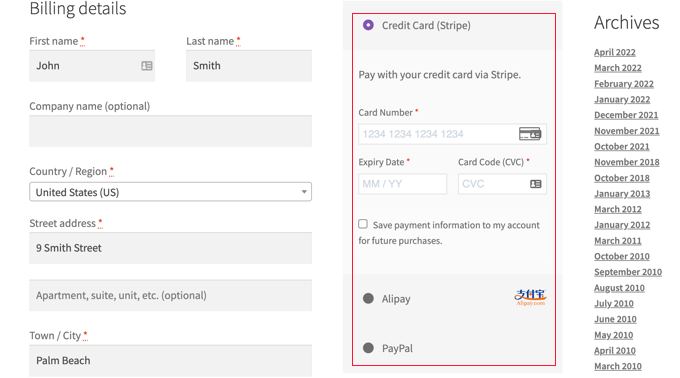
Our customers are able to make payments using credit cards, PayPal, and Alipay.

Method 3: Offering Multiple Payment Methods Using WPForms

The first thing you need to do is install and activate the WPForms plugin. For more details, see our step by step guide on how to install a WordPress plugin.

WPForms is the best drag and drop form builder plugin for WordPress. It lets you create a simple order form or donation form without the hassle of a full-fledged eCommerce platform or shopping cart plugin.

While they have a Lite version that’s free, you will need their Pro plan to access the payment addons and order form template. It supports credit cards and PayPal.

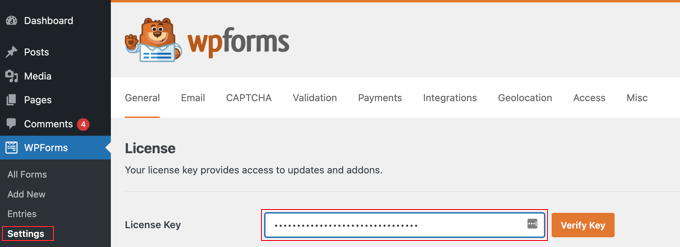
Upon activation, you need to visit the WPForms » Settings page to enter your license key. You can find this information in your WPForms account area.

Visit the WPForms » Settings Page to Enter Your License Key

Connecting Payment Platforms to WPForms

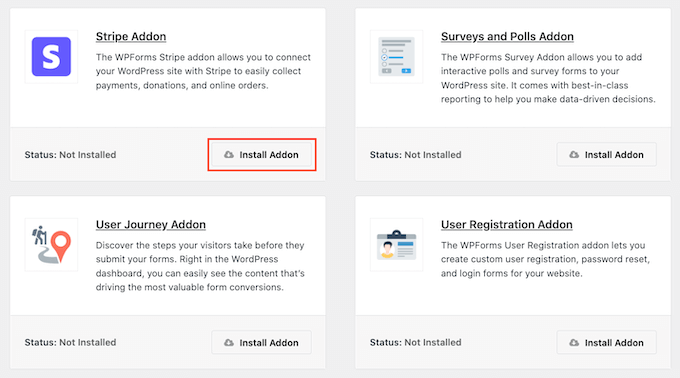
Next, we’ll connect WPForms with the payment platforms you plan to use. To do this, you need to head over to WPForms » Addons and install the payment addons.

Once there, you need to scroll down to the PayPal Standard Addon and then click on its Install Addon button.

Install the PayPal Standard Addon

You’ll see a message saying that the addon has been installed and activated, and the text on the button will change to Deactivate.

We’ll set up your PayPal account details later in the tutorial.

You’ll also need to install an addon for accepting credit card payments. WPForms supports Stripe, Square and Authorize.net. For this tutorial, we’ll set up Stripe, but the steps for setting up the other two platforms are similar.

You’ll need to scroll to the Stripe Addon and click on the Install Addon button.

Installing the Stripe addon

Once the addons have been installed and activated, you’ll need to connect WPForms to your Stripe account.

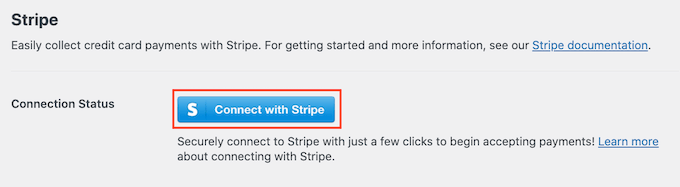
To do that, head over to WPForms » Settings page and click on the ‘Payments’ tab. After that, you will need to connect your Stripe account by clicking the ‘Connect with Stripe’ button.

Connecting WordPress to Stripe payments

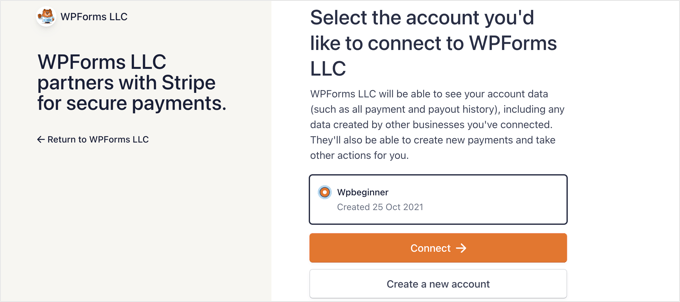
On the next screen, you can enter your Stripe email address and click the ‘Next’ button. Once that is done, Stripe will now ask for your password so that it can log in to your account.

After logging in, you can select your Stripe account and then click the ‘Connect’ button. You’ll then be redirected back to the WPForms Payments settings tab.

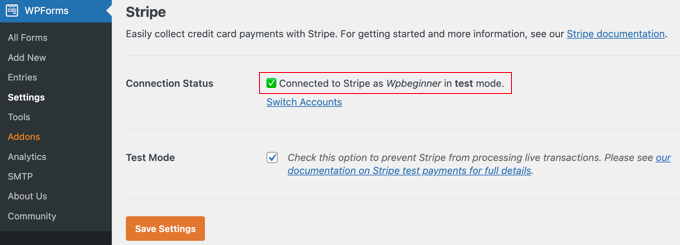
To make sure that your account is successfully connected, you can go to the Connection Status settings under Stripe settings.

When you see a green tick mark, it means your Stripe account is now live with WPForms. Go ahead and click the ‘Save Settings’ button to store your settings.

Successfully Connected Your Stripe Account

WPForms is now ready to accept credit card payments.

Creating an Order Form With Multiple Payment Methods

Now we’ll create an online order form that can accept both PayPal and credit card payments.

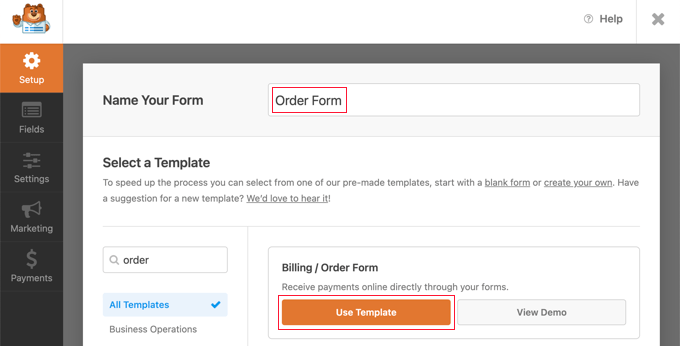
To start, head over to the WPForms » Add New page. From here, you need to provide a title for your form and then select the ‘Billing / Order Form’ template.

Select the ‘Billing / Order Form’ Template

WPForms will pre-load the form builder with a simple order form with commonly used fields.

You can edit any field by clicking it.

WPForms Will Pre-load the Form Builder with a Simple Order Form

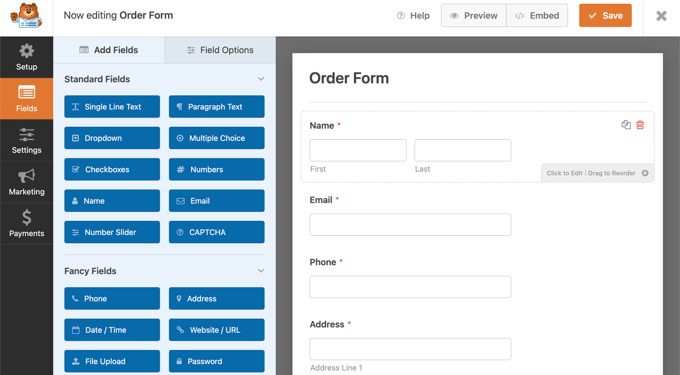
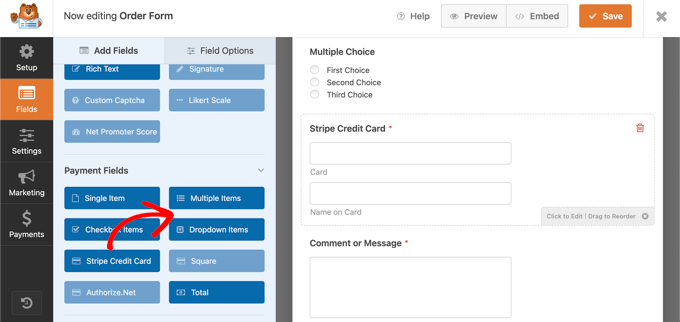
You can add new fields from the left column using drag and drop.

You’ll need to drag a Multiple Choice field onto the form to allow your customers to select from multiple payment options.

Add a Multiple Choice Field

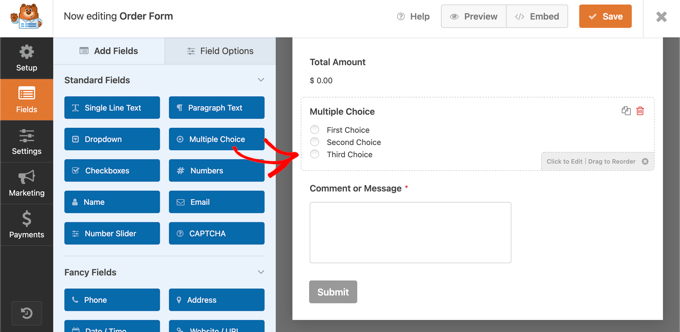
After that, you should drag the Stripe Credit Card field onto the form just underneath the Multiple Choice field.

Add a Stripe Credit Card Field

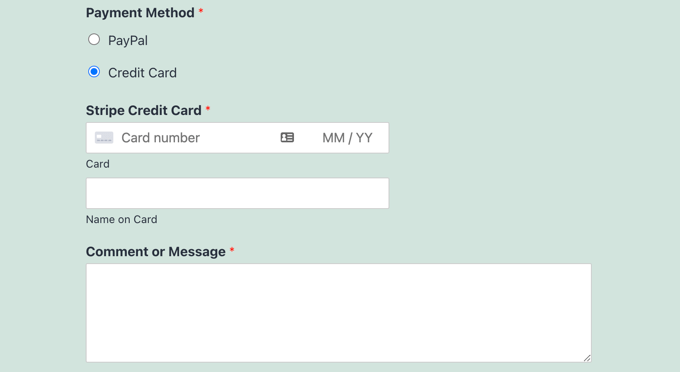
Next, you need to click on the Multiple Choice field and change the options to match the payment methods you are offering.

Start by giving the field the label Payment Method. After that, you should name the first two choices PayPal and Credit Card.

Multiple Choice Field Options

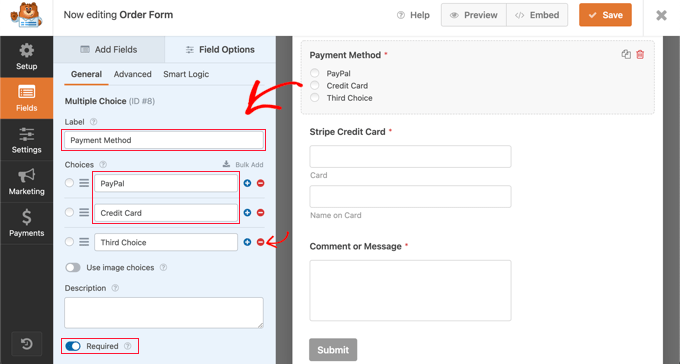
You can simply remove the third choice by clicking the red minus ‘‘ button.

After that, you need to switch the Required option on. This will make sure that users select a payment method before they submit the order form.

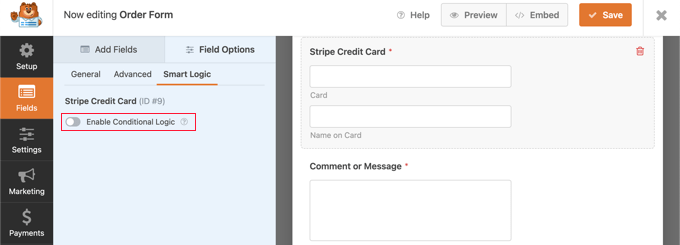
Now we need to set up the Stripe Credit Card field. We want it to be hidden until a user selects it as their payment option. We’ll need to use WPForms’ conditional logic feature.

You’ll need to click on the Stripe field so that you can edit it, and then click the ‘Smart Logic’ tab. Simply enable conditional logic by clicking the toggle switch to the on position.

Click on the Smart Logic Tab and Enable Conditional Logic

You will now see some additional options that allow you to set up rules for the field. You need to make sure that the first option is selected to ‘Show’ and then use the drop down menus so that the remaining fields say ‘Payment is Credit Card’.

Set Up Some Rules for the Field

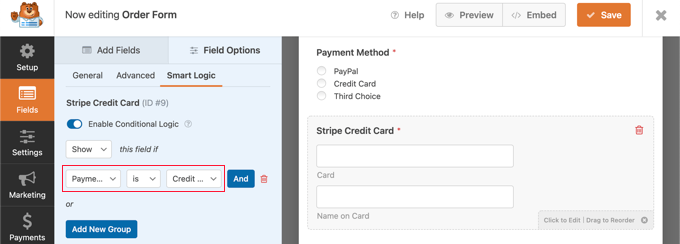
Now the Stripe Credit Card field will only be shown after a user selects Credit Card from the Payment Method field.

Enabling Payment Methods on the Order Form

Now we’ll enable PayPal and Stripe payments for the order form.

You should first navigate to Payments » PayPal Standard in the WPForms form builder. Once there, you should check the ‘Enable PayPal Standard payments’ box in the right panel.

Check the ‘Enable PayPal Standard Payments’ Box

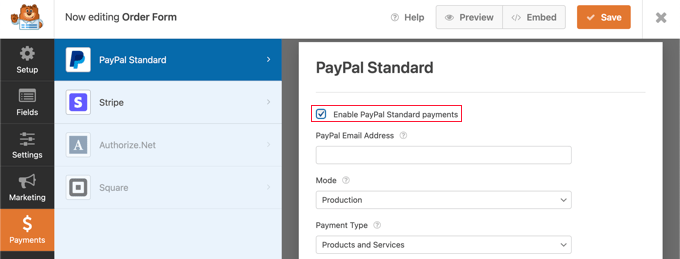
After that, you should fill in the rest of the fields. Type in your PayPal email address and place the account in Production mode. You also need to configure whether users need to supply a shipping address.

Toggle the Enable Conditional Logic Option

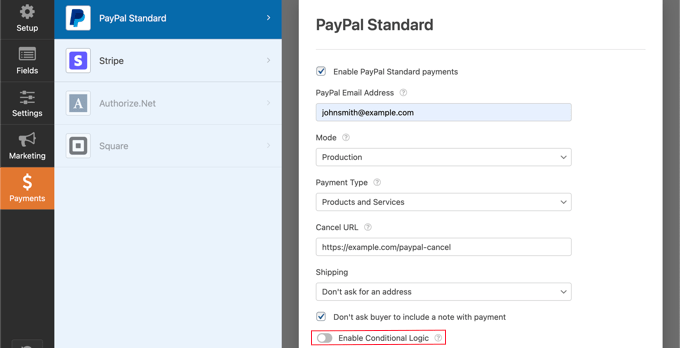
After that, you need to scroll down to the Enable Conditional Logic option and toggle it to the ON position. This will reveal more settings.

Toggle the Enable Conditional Logic Option

You should set the rule to ‘Process the charge if the Payment Method is PayPal’.

Next, you need to click on the Stripe section of the Payments tab and then check the ‘Enable Stripe payments’ box.

Check the ‘Enable Stripe Payments’ Box

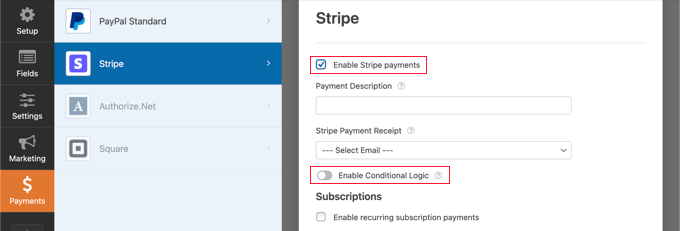
You can add a payments description and opt to email a receipt if you wish. After that, you need to switch the Enable Conditional Logic toggle to the on position so that you can create a rule for this payment option.

Toggle the Enable Condition Logic Option

You need to configure the rule so that it reads ‘Process this charge if the Payment Method is Credit Card’.

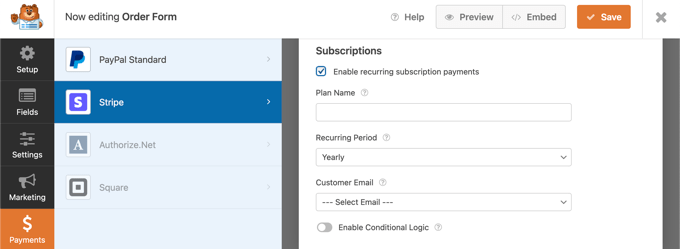
If you’d like to accept recurring subscription payments by credit card, then you can scroll down to the Subscription section and configure it.

Stripe Subscriptions

Once you are done, you need to click on the Save button at the top and exit the form builder.

Adding the Order Form to Your WordPress Site

Your online order form with multiple payment options is now ready, and you can add it to any WordPress page on your site.

To add your form, simply edit a post or page or create a new one. Then, click on the plus + sign on the right of the page and add a WPForms block in your WordPress editor.

Add a WPForms Block

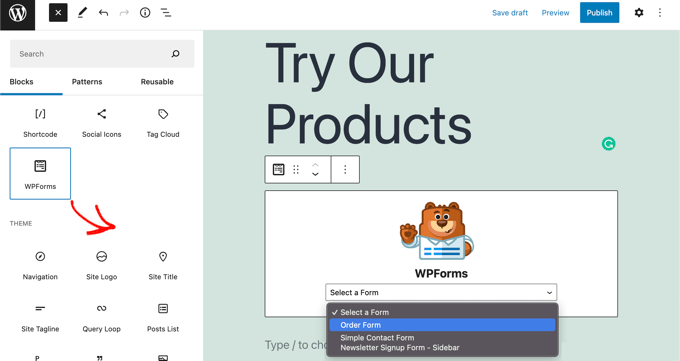
After that, you need to click on the drop down menu in the WPForms block, and then select your order form. When you’ve finished, make sure you save or publish the page.

Now you can see your form in action by clicking the ‘Preview’ button at the top of the screen.

Preview Order Form

We hope this tutorial helped you learn how to allow users to choose a payment method on your WordPress form.

You may also want to see our expert pick of the best virtual business phone number apps for small businesses, and our step by step guide on how to choose the best business VoIP provider.

If you liked this article, then please subscribe to our YouTube Channel for WordPress video tutorials. You can also find us on Twitter and Facebook.

The post How to Allow Users to Choose a Payment Method on WordPress Forms first appeared on WPBeginner.


October 25, 2022 at 12:01AM

How to Get Your WordPress Site Into Google Discover (8 Tips)

Do you want your WordPress website to appear in Google Discover?

Google Discover offers a unique way for users to uncover new content. Getting your site to appear in the Discover section can skyrocket your organic traffic. However, many website owners are not sure how to get started.

In this article, we’ll show you how to get your WordPress site into Google Discover.

How to get WordPress site into Google Discover

What is Google Discover?

Google Discover is a personalized feed of content that appears under the search bar on users’ mobile devices. It provides an entirely new way of discovering content.

Instead of showing results for a search query, Google Discover uses your past web searches, location history and settings, and your activity across different Google platforms to automatically generate a mobile feed.

It is an intelligent system that learns how your search and what you like. Using this information, you can see content based on your interests, hobbies, and topics you follow.

Google Discover preview

Getting your WordPress website listed in Google Discover can help boost your organic traffic. People can easily discover new content, and you can reach new audiences through Google Discover.

However, before getting your site into Google Discover, you’ll need to ensure that it meets the content policies. For example, your content shouldn’t be dangerous, deceptive, manipulated, misleading, or hateful. Plus, advertising and promotional material on a page shouldn’t exceed your content.

That said, let’s see how you can get your site to appear in Google Discover. Since there is no single way of getting your site into Discover, you can try the following methods:

1. Ensure Your WordPress Site is Mobile Responsive

Google Discover is a mobile-only feed, so it’s important that your WordPress site is mobile-responsive. You can start by using a responsive WordPress theme that automatically adjusts itself based on the user’s screen size.

Besides that, you should also ensure your site loads quickly. With site speed now part of the Google ranking factor, you must have a fast-loading website.

For instance, you can switch your website hosting, use a content delivery network (CDN), optimize your images, install a caching plugin, and more. You can check out our ultimate guide to boosting WordPress speed and performance.

Lastly, you can also set up Google AMP or accelerated mobile pages on your WordPress site. AMP helps your web content load faster on mobile devices and could help you get your blog posts and pages into Google Discover.

2. Uncover Your Audiences Interests

One of the ways Google shows content in the Discover feed is based on users’ interests. Finding out your audience’s interests can help you cover new content topics and increase your chances of getting into Google Discover.

With Google Analytics, you can enable demographics and interest reports and see what your visitors are interested in. This way, you can write blog posts, create videos, start a podcast, and produce other forms of content your audience likes.

If you’re using MonsterInsights, then you can easily view the report inside your WordPress dashboard. Plus, you can install Google Analytics in WordPress without editing code.

Demographics and interest reports

While your content should be based on users’ interests, Google suggests producing timely content to get into the Discover section.

This means that you should cover trending or popular topics in your industry. For example, you’ll find the latest news, recent updates about sports you follow, and other blog posts that cover trending topics in Google Discover.

Cover latest trends

A simple way to uncover new and trending topics in your niche is by using Google Trends.

It is a free tool by Google, and you can enter different search queries to find out if they’re trending or not. You can adjust the time period, location, category, and more.

Enter your topic in google trends

Not only that, but if you scroll down, you’ll see related topics and queries for your keyword.

These are additional topics and search terms that are trending right now. Covering them on your website will increase your chances of getting into Google Discover.

View related topics and queries

4. Add High-Quality Images to Your Content

Next, you should use unique high-quality images for your content. In Google Discover, pictures get a lot of attention, and using compelling photos can help you get more clicks.

Google recommends using large images that are at least 1200 px wide and enabled by max-image-preview:large robots.txt tag or using AMP.

Besides that, your images should be properly optimized for search engines. For more details, please see our guide on image SEO.

5. Embed YouTube Videos in Your WordPress Blog

Aside from images, Google Discover also shows multiple YouTube videos in the feed.

Embed videos in your blog

By embedding YouTube videos in your WordPress blogs, you can boost the chances of getting them to appear in Google Discover.

If you need help adding videos to your site, then please see our guide on how to embed videos in WordPress blog posts.

That said, you can take it one step further and create a video XML sitemap in WordPress. A video sitemap helps search engines like Google to easily find and index content with embedded videos. As a result, your videos will appear in search results, featured snippets, and eventually get picked up by Google Discover.

Using All in One SEO (AIOSEO), you can quickly create a video sitemap and adjust its settings. All you have to do is enable the video sitemap option, and the plugin will take care of the rest.

Enable video sitemap

For more details, please go through our tutorial on how to set up video SEO in WordPress.

6. Improve Your E-A-T

E-A-T or expertise, authoritativeness, and trustworthiness are guidelines used by Google to determine how valuable your content is for users and whether it should rank well. Similarly, Google uses E-A-T to decide which sites to show in the Discover section.

The Discover guidelines suggest some simple ways of showcasing your site’s E-A-T. For instance, you can provide exact publishing dates, add bylines and author information to your content.

Plus, you can improve transparency by including contact information, the company or network behind your publication, and provide other details to build trust with visitors.

Another way to boost your E-A-T is by adding a schema markup in WordPress. It helps provide more information to search engines and better understand your site.

With All in One SEO (AIOSEO), you can add a schema markup in WordPress. It is the best SEO plugin for WordPress and helps you optimize your site for search engines without hiring a professional.

Setting default schema markup for post types

For more ways to enhance your E-A-T, you can also see our ultimate WordPress SEO guide for beginners.

7. Use Open Graph Title in WordPress

Another interesting way to get your site to appear in Google Discover is using the Open Graph title. Many users have observed that Google was picking their Open Graph title for Discover instead of the main H1 headline.

Open Graph metadata helps you control how your website is displayed when shared on different social media platforms. It makes your content look more attractive on social media feeds, allows users to see what the content is about, and increases brand visibility.

If you are using All in One SEO (AIOSEO), then it is extremely easy to add an Open Graph title to your blog posts and pages.

In the WordPress content editor, you can scroll down to the AIOSEO Settings meta box. Under the ‘Social’ tab, the plugin gives an option to enter a title for Facebook and Twitter.

Add open graph title

Simply add your title and chances are that Google will use it to show your content in the Discover section.

For more details, please see our tutorial on how to add Facebook Open Graph metadata in WordPress theme.

8. Set Up Knowledge Graph Information in WordPress

When you search for a brand or keyword in Google on mobile, you’ll see a notification icon next to it. Clicking the icon will allow you to follow the topic, and you should see articles in the Discover feed.

View the follow button

However, Google shows the notification icon for websites that only appear in the featured snippets.

To increase your chances of getting featured on search results and displaying a follow icon, you can add Knowledge Graph information in WordPress.

You can easily enter the Knowledge Graph details using the All in One SEO (AIOSEO) plugin. For instance, there are options to enter your business name, phone number, specify whether it is a person or an organization, add a logo, and more.

Enter knowledge graph information

You can also check out our guide on how to get a Google featured snippet with a WordPress site for more ideas.

That said, Google Discover is still a big unknown. You can try each of these tips and enhance your chances of getting your website into the Discover section.

We hope this article helped you learn how to get your WordPress site into Google Discover. You may also want to see our guide on how to start a podcast in WordPress and the best email marketing services for small businesses.

If you liked this article, then please subscribe to our YouTube Channel for WordPress video tutorials. You can also find us on Twitter and Facebook.

The post How to Get Your WordPress Site Into Google Discover (8 Tips) first appeared on WPBeginner.


October 24, 2022 at 03:13PM

Friday, October 21, 2022

12 Best Calculator Plugins for Your WordPress Site

Are you looking for a calculator plugin for your WordPress website?

There are many types of WordPress plugins to calculate prices, measurements, dates, form fields, and more.

In this article, we have hand-picked some of the best calculator plugins for your WordPress site.

Best Calculator Plugins for WordPress Site

What to Look For in a WordPress Calculator Plugin

There are a lot of different calculator plugins out there that you could use on your WordPress site.

Some calculator plugins can be used to create any calculator of your choice. However, this can be a lot of work. When possible, you want to pick a plugin with a pre-built calculator template for the type of calculator you want to create.

Choosing a responsive calculator that looks good on mobiles and computers is also important. You may also want a plugin that lets you change the colors and styles of your calculator so it can match your website’s color scheme and brand.

1. Formidable Forms Calculators

Formidable Forms Calculator

Formidable Forms is a drag and drop form builder with a large range of pre-built calculator templates. These let you easily create different calculators on your WordPress blog or website.

With Formidable Forms calculator templates, you can create and add the following calculators on your site:

  • BMI Calculator
  • Percentage Calculator Template
  • Advanced Mortgage Calculator Template
  • Simple Mortgage Calculator Template
  • WooCommerce Product Configurator
  • Car Payment Calculator Template
  • Debt to Income Ratio Calculator Form Template
  • Life Insurance Calculator Template
  • ROI Calculator Form Template
  • Savings and Investment Calculator Form Template
  • Order/Billing Form Template
  • Age Calculator Form Template
  • Compound Interest Calculator Template
  • Final Grade Calculator Template
  • Pregnancy Due Date Calculator Form Template
  • Daily Calorie Intake Calculator Template
  • Length Conversion Calculator Form Template
  • Paycheck Calculator Form Template
  • Tip Calculator Form Template
  • Amortization Calculator Template

Some of these are simple, useful tools, like the percentage calculator, the length conversion calculator, the tip calculator, and the age calculator. Others are much more detailed and offer huge value to your users.

For instance, if you’re running a medical or health blog, you might want to offer a BMI (Body Mass Index) calculator or a Daily Calorie Intake calculator. These are easy to create using Formidable Forms.

If you sell real estate, you could use the simple mortgage calculator or the advanced mortgage calculator on your site. You could even offer tools like the debt-to-income ratio calculator to help users determine whether the mortgage is affordable.

All Formidable Forms calculators are responsive and look great on mobile devices. You can also easily customize them to match your website’s branding.

Formidable Forms is our top calculator pick due to its large range of calculators and ease of use. It’s also one of the best WordPress contact form plugins.

2. Calculated Fields Form

Calculated Field Forms

Calculated Fields Form allows you to create forms and perform mathematical calculations among form fields. It comes with a form and logic builder, which you can use to add fields, assign values to those fields, and define mathematical operators to run.

Calculated Fields Form comes with five built-in sample calculators that you can use or modify:

  • Simple Calculator Operations
  • Calculation with Dates (bookings with check-in and check-out dates)
  • Ideal Weight Calculator
  • Pregnancy Calculator
  • Lease Calculator

You can easily use Calculated Fields Form with the WordPress content editor (block editor) and the old classic editor. It also works with popular page builder plugins.

3. Responsive Mortgage Calculator

Responsive Mortgage Calculator

Responsive Mortgage Calculator is an easy-to-use mortgage calculator for real estate websites. It comes with a sidebar widget and shortcode that you can use inside your WordPress posts, pages, and below your listings.

It also comes with light and dark color schemes. However, you can disable plugin styling and use your theme’s colors or add custom CSS to style the calculator.

4. Measurement Price Calculator

Measurement Price Calculator

Measurement Price Calculator is perfect for running a WooCommerce online store where you sell items of variable sizes. It allows you to add item pricing based on measurements selected by the customer.

It has two different measurement calculation methods, so you can choose whichever suits your product best. You can offer unit pricing based on set quantities (such as a box of tiles). Or you can let the user enter dimensions and buy the correct amount for the length, area, or volume they require.

It works well with other top WooCommerce plugins and addons.

5. WooCommerce Product Options and Price Calculation Formulas

WooCommerce Product Options

WooCommerce Product Options and Price Calculation Formulas provides additional WooCommerce product options and pricing calculation formulas. It comes with a custom product layout builder that allows you to add and display more product options for each item.

It includes conditional logic and formulas to calculate pricing based on selection. You can use it to show, hide, or change product pricing based on the customer’s selection. You can also use mathematical formulas to calculate product pricing and display options.

6. WooCommerce Price Based on Country

WooCommerce Price Based on Country

The WooCommerce Price Based on Country plugin does exactly what it says. The plugin uses WooCommerce’s geolocation feature to guess the customer’s location. It then displays pricing in the local currency.

It can automatically calculate pricing by the current exchange rate, or you can manually set it for each currency. It also includes a country switcher widget that enables users to change country and currency independently. This plugin works well with multilingual WordPress sites.

7. WordPress Mortgage Calculator Estatik

Estatik Mortgage Calculator

WordPress Mortgage Calculator Estatik is a useful real estate plugin to let your users estimate their mortgage payments.

It can be a simple calculator with the purchase price, down payment, and interest rate. Or, if you prefer, you can switch to advanced options like home insurance, property taxes, and PMI (private mortgage insurance).

The shortcode lets you add your mortgage calculator to your sidebar or to any post or page. You can display the results in a popup with a graph or with a simple image and text.

8. Mortgage Calculator

Mortgage Calculator

Mortgage Calculator is another useful mortgage calculator plugin. It shows a graph for the principal, interest, and remaining balance across the mortgage term. It can also handle property tax.

You can easily place the calculator in your website’s sidebar or on any post or page using the shortcode. It’s a free plugin, but note that it’s supported by ads.

9. YITH WooCommerce Cost of Goods

Yith Cost of Goods

YITH WooCcommerce Cost of Goods is a handy plugin that helps you add the cost of goods and then calculate profit margins in your WooCommerce reports.

You can include the product cost, shipping, and payment processing costs for each product. The plugin will then calculate and show your profit margin in WooCommerce reports as a separate column.

This allows you to instantly calculate how your business is doing and what you can do to make more sales. For instance, you can offer more discounts for certain products or increase prices for products where you are not making any profit.

10. Loan Repayment Calculator and Application Form

Loan Repayment Calculator

Loan Repayment Calculator and Application Form is a great calculator plugin for running a financial website or business. You can style it to match your site.

You can use it for fixed-fee payments, regular payments, savings, comparisons, and more. The calculator can handle different types of interest: fixed, simple, compound, and amortized.

The pro version also has sliders and the option for users to select their own currency.

11. CC BMI Calculator

Bmi Calculator

CC BMI Calculator is a simple body mass index (BMI) calculator plugin used on health and fitness websites. It allows users to enter their height and weight information to see their body mass index score. This indicates whether their weight falls into a healthy range or not.

The plugin allows you to choose different styles by changing colors. However, using this feature requires you to add a link to the plugin author’s website. It is available in both imperial and metric systems, so you can choose which unit will be used as the default option.

12. Stylish Cost Calculator

Stylist Cost Calculator

Stylish Cost Calculator is a great way to provide customized, instant quotes for potential customers and clients. You can use one of the seven built-in templates to get started quickly.

The calculator can automatically convert between currencies, detecting the user’s location to show the right one. You can customize the cost calculator however you like, adding or removing options, changing colors, and more.

You can also set a bulk discount, create branded invoices, and more. If you have the Pro version, you can create coupons. You can also integrate the Pro version with PayPal to take payments.

We hope this article helped you discover the best calculator plugins for WordPress. You may also want to see our list of must have WordPress plugins for business websites and our comparison of the best email marketing services to grow your sales.

If you liked this article, then please subscribe to our YouTube Channel for WordPress video tutorials. You can also find us on Twitter and Facebook.

The post 12 Best Calculator Plugins for Your WordPress Site first appeared on WPBeginner.


October 21, 2022 at 10:55PM